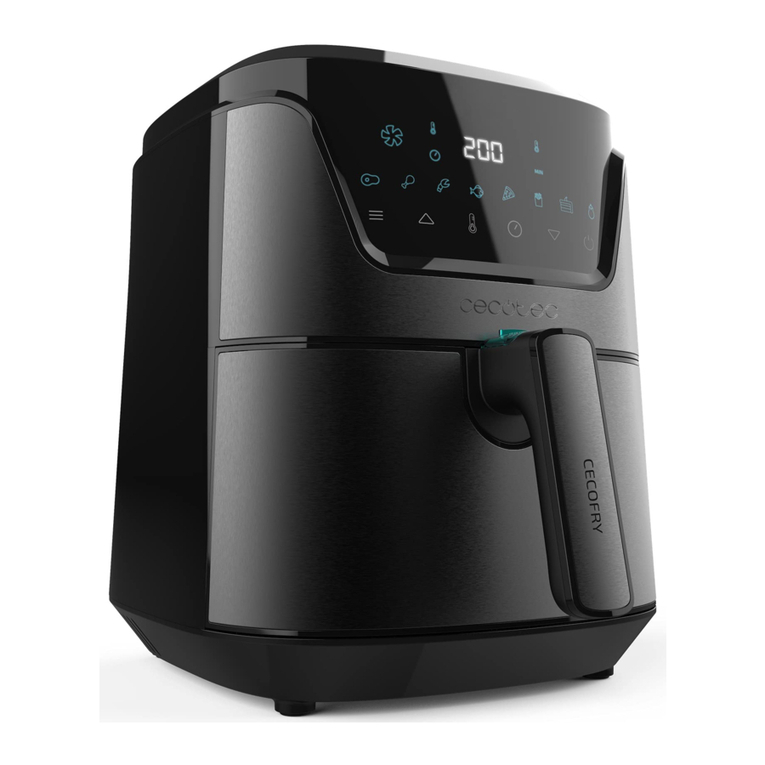
creative housewares Taurus FREDIGORA AIRE User manual

Model:
973950
1400W
complies with
INTERNATIONAL
IEC60335
SAFETY SPECIFICATIONS
PLEASE READ ALL INSTRUCTIONS BEFORE USE
FREDIGORA AIRE ENGLISH / AFRIKAANS
/SPANISH / FRENCH /
PORTUGUESE

ENGLISH MANUAL
Dear customer,
Thank you for choosing to purchase a Taurus brand
product. Thanks to its technology, design and opera-
tion and the fact that it exceeds the strictest quality
standards, a fully satisfactory use and long product
life can be assured.
1. Parts description:
1. Heat indicator light
2. Temperature
3. Time indicator
4. Main unit
5. Timer control buttons +/_
6. Fryer basket container
7. Fan indicator
8. Temperature control buttons +/_
9. On/Off button
10. Plastic cover and cooking basket release button
11. Removable cooking basket handle
2. Safety advice and warnings!
Read these instructions carefully before switching
on the appliance and keep them for future reference.
Failure to follow and observe these instructions
could lead to an accident. Clean all the parts of the
product as indicated in the cleaning section, before
use.
2.1. Use or working environment:
2.1.1. Keep the working area clean and well lit. Clut-
tered and dark areas invite accidents.
2.1.2. This appliance shall not be used by children
aged less than 8 years.
2.1.3. This appliance can be used by children aged
from 8 years and above if they are continuously
supervised.
2.1.4. This appliance can be used by people with
reduced physical, sensory or mental capabilities or
lack of experience and knowledge if they have been
given supervision or instruction concerning use
of the appliance in a safe way and understand the
hazards involved.
2.1.5. Keep the appliance and its cord out of reach
of children aged less than 8 years.
2.1.6. Cleaning and user maintenance shall not be
made by children.
2.1.7. Place the appliance on a horizontal, flat and
stable surface with the handles, if any, positioned to
avoid spillage of the hot liquids.
2.1.8. Do not use the appliance in association with a
programmer, timer or other device that automatically
switches it on.
2.1.9. The temperature of the accessible surfaces
may be high when the appliance is in use.
2.1.10. Never submerge the appliance in water or
any other liquid or place it under running water. - If
the connection to the mains has been damaged, it
must be replaced, take the appliance to an autho-
rised technical support service. Do not attempt to
disassemble or repair the appliance by yourself in
order to avoid a hazard.
2.1.11. Ensure that the voltage indicated on the rat-
ing label matches the mains voltage before plugging
in the appliance.
2.1.12. The appliance’s plug must fit into the mains
socket properly. Do not alter the plug.
2.1.13. Do not force the power cord. Never use the
power cord to lift up, carry or unplug the appliance.
2.1.14. Do not wrap the power cord around the
appliance.
2.1.15. Do not clip or crease the power cord.
2.1.16. Do not allow the power cord to come into
contact with the appliance’s hot surfaces.
2.1.17. Check the state of the power cord. Damaged
or tangled cables increase the risk of electric shock.
2.1.18. Do not touch the plug with wet hands.
2.1.19. Do not use the appliance if the cable or plug
is damaged.
2.1.20. If any of the appliance casings breaks, im-
mediately disconnect the appliance from the mains
to prevent the possibility of an electric shock.
2.1.21. Do not use the appliance if it has fallen on
the floor, if there are visible signs of damage or if it
has a leak
1
8
9
11
2
4
6
10
53
7

2.1.22. Place the appliance on a horizontal, flat,
stable surface, suitable for withstanding high
temperatures and away from other heat sources and
contact with water.
2.1.23. Keep the appliance away from flammable
material such as textiles, cardboard or paper, etc.
2.2. Personal safety:
2.2.1. CAUTION: Do not leave the appliance unat-
tended during use as there is a risk of an accident.
2.2.2. Do not touch the heated parts of the appli-
ance, as it may cause serious burns.
2.2.3. This appliance is only for domestic use, not
for industrial or professional use. It is not intended to
be used by guests in hospitality environments such
as bed and breakfast, hotels, motels, and other types
of residential environments, even in farm houses,
areas of the kitchen staff in shops, offices and other
work environments.
2.2.4. This appliance is not intended for use by
persons (including children) with reduced physical,
sensory or mental capabilities, or lack of experience
and knowledge, unless they have been given super-
vision or instruction concerning use of the appliance
by a person responsible for their safety.
2.2.5. This appliance is not a toy. Children should be
supervised to ensure that they do not play with the
appliance.
2.3. Use and care:
2.3.1. Fully unroll the appliance’s power cable before
each use.
2.3.2. Clean the parts that will be directly in contact
with food with a soft, damp cloth and dry thoroughly.
2.3.3. Place the hot air fryer housing on a stable,
heat-resistant surface, at a height that is comfortable
for the user.
2.3.4. Connect the hot air fryer to a suitable power
supply.
2.3.5. Note: When using the hot air fryer for the
first time, a slight smoke or distinctive smell may
be emitted. This is normal and will soon subside.
Ensure that there is sufficient provision of fresh air
around the hot air fryer during use. It is strongly
advised to run the hot air fryer without food for
approximately 10 minutes before first use. This will
prevent the initial smoke or funny smell from affect-
ing the taste of the food.
2.3.6. Do not use the power cord to switch off the
appliance, first switch the appliance of the On/Off
button, and then remove it from the mains.
2.3.7. Disconnect the appliance from the mains
when not in use and before undertaking any cleaning
task.
2.3.8. This appliance should be stored out of reach
of children and/or the disabled.
2.3.9. Do not store or transport the appliance if it is
still hot.
2.3.10. Never leave the appliance unattended while
in use.
2.3.11. Never leave the appliance unattended when
in use and keep out of the reach of children, as
this is an electrical appliance that heats up to high
temperatures and it can cause serious burns.
2.3.12. If, for some reason, the appliance were to
catch fire, disconnect the appliance from the mains
power supply and DO NOT USE WATER TO PUT THE
FIRE OUT.
2.4. Assemble the hot air fryer
2.4.1. Fit the non-stick coated cooking basket into
the cooking compartment until it is locked.
2.4.2. Slide the cooking compartment in towards the
hot air fryer main unit to close it.
2.4.3. The hot air fryer comes pre-assembled. Make
sure that the cooking compartment is closed tightly
before use, as not doing so will prevent the hot air
fryer from working
2.5. Service:
2.5.1. Make sure that the appliance is serviced only
by suitably qualified technician, and that only original
spare parts or accessories are used to replace exist-
ing parts/accessories.
2.5.2. If the power cord is damaged, the manu-
facturer or its service agent or a similarly qualified
person must
replace it in order to avoid a hazard.
2.5.3. Any misuse or failure to follow the instruc-
tions for use renders the guarantee and the manufac-
turer’s liability null and void.
3. Instructions for use
3.1. Before use:
3.1.1. Remove the protective film from the device (if
applicable).

3.1.2. Before using the product for the first time,
clean the parts that will come in contact with food
3.2. Use and care:
3.2.1. Using the hot air fryer
3.2.1.1. Unroll the power cord completely before
plugging it in.
3.2.1.2. Place your appliance on a flat, dry, stable
surface.
3.2.1.3. Connect the appliance to the mains power
supply.
3.2.1.4. To turn on the hot air fryer, press the ON/
OFF button, the LED display will illuminate.
3.2.1.5. Preheat the hot air fryer from roughly 3-5
minutes by using the timer control buttons. The de-
fault heat setting for the hot air fryer is 200°C; if an
alternative heat setting is required, use the tempera-
ture control buttons to adjust it then press the ON/
OFF button to start preheating(if you didn’t press the
ON/OFF button the preheat will not start)
3.2.1.6. Once the hot air fryer has reached the
required time, it will automatically switch off. It will
then beep 5 times to alert you that the cycle has
ended
3.2.1.7. Remove the cooking compartment by lifting
the plastic cover on the removable cooking basket
handle and then simultaneously press the release
button and pull the handle away from the hot air fryer
main unit.
3.2.1.8. Place your desired ingredients into the
non-stick coated cooking basket and then slide the
cooking compartment in towards the hot air fryer
main body to close it.
3.2.1.9. Turn on the hot air fryer by pressing the ON/
OFF button: the LED display will illuminate.
3.2.1.10. Use the temperature control buttons to set
the hot air fryer to the required heat setting
3.2.1.11. Determine the cooking time required for
the ingredients and use the timer control buttons to
set it accordingly.
3.2.1.12. Press the ‘On/Off’ button to set the timer,
the fan indicator will illuminate and the heat indicator
will flash to signal that the hot air fryer is cooking the
ingredients.
3.2.1.13. Some ingredients may require shaking
halfway or throughout the cooking time. Using the
cooking basket handle, carefully pull the cooking
compartment out from the hot air fryer main unit and
shake it gently. The timer will automatically pause
when the cooking compartment is pulled out from
the hot air fryer main unit and will only continue to
count down once the cooking compartment has
been replaced.
3.2.1.14. Replace the cooking compartment and
continue cooking
3.2.1.15. To check whether the ingredients are
ready carefully open the cooking compartment. If
the ingredients are not cooked, replace the cooking
compartment and use the timer control buttons to
adjust the cooking time accordingly.
3.2.1.16. Once the cooking is complete and the time
set has elapsed, the LED display will flash and hot
air fryer will automatically switch off. The fan will
remain in operation for approximately 10 seconds
and then the hot air fryer will beep 5 times to indica-
tor that it has switched off.
3.2.1.17. Carefully use the cooking basket handle to
pull the cooking compartment from the hot air fryer.
3.2.1.18. Empty the cooked ingredients into a plate
or bowl, if the food is a large quantity of fragile,
carefully use a heat-resistant tong (not included) to
remove it. Caution: Do not tip the food directly into a
bowl or onto a plate, as excess oil may collect at the
bottom of the cooking compartment and could leak
into the ingredients.
3.2.1.19. Note: Always preheat the hot air fryer
before starting to cook or alternatively add 3-5
minutes onto the cooking time. If the cooking time or
heat setting needs to be changed during use, simply
use the timer or temperature control buttons as
required and the hot air fryer will automatically adjust
the settings. During use the LED display will cycle
between the time and temperature to signal that it is
maintaining the selected temperature.
3.2.1.20. Warning: Nominal voltage is still pres-
ent even when the thermostat is turned to the off
position. To permanently switch off the hot air fryer,
ensure it is turned off at the mains power supply.
3.2.2. Using the non-stick coated cooking basket
3.2.2.1. To remove the non-stick coated cooking
basket from the cooking compartment, lift the plastic
cover on the handle to reveal the handle release
button.
3.2.2.2. Replace the non-stick coated cooking
basket by fitting it into the cooking compartment,
until it is secure.
3.2.2.3. Lower the plastic cover back into position,
so that it covers the handle release button. Warning:

Never press the handle release button if the cooking
compartment is not on a flat, steady surface, as this
could cause injury; only press it once the cooking
compartment has been placed onto a flat, stable
surface.
3.3. Once you have finished using the appliance:
3.3.1. Allow appliance to cool down.
3.3.2. Unplug the appliance from the mains power
supply.
3.3.3. Clean the appliance as described in the clean-
ing section.
4. Cleaning
4.1. Disconnect the appliance from the mains power
supply and allow it to cool completely before under-
taking any cleaning task.
4.2. Clean the hot air fryer main unit with a soft,
damp cloth and dry thoroughly.
4.3. Wash the accessories in warm, soapy water,
then rinse and dry thoroughly.
4.4. CAUTION! Do not immerse electrical parts of the
appliance in any liquid.
4.5. Do not use solvents, or products with an acid
or base pH such as bleach, or abrasive products, for
cleaning the appliance.
4.6. Never submerge the appliance in water or any
other liquid or place it under running water.
5. Anomalies and repair
5.1. Take the appliance to an authorised support
centre if product is damaged or other problems
arise.
5.2. If the connection to the mains has been dam-
aged, it must be replaced and you should proceed as
you would in the case of damage.
6. Cooking guide
Below is a guideline for cooking certain types of
food with the hot air fryer. This is a guideline only,
cooking should be monitored.

Food Amount Approximate
cooking time
Temperature Extra information
Potatoes and
chips
Thin frozen chips 300-700g 12-16 mins 180°CShake in between
(as indicated in the
use and care sec-
tion) to ensure great
results
Thick frozen
chips
300-700g 12-16 mins 180°CShake in between
(as indicated in the
use and care sec-
tion) to ensure great
results
Home-made
chips
300-700g 16-20 mins 180°CFirstly soak the chips
in water, then add 1/2
tbsp of oil and Shake
in between (as
indicated in the use
and care section) to
ensure great results
Home-made
potato wedges
300-700g 18-22 mins 180°CFirstly soak the chips
in water, then add 1/2
tbsp of oil and Shake
in between (as
indicated in the use
and care section) to
ensure great results
Meat and poultry
Steak 100-500g 8-14 mins 200°C
Pork chops 100-500g 7-14 mins 200°C
Chicken breast 100-500g 15-22 mins 200°C
Chicken drum-
sticks
100-500g 15-22 mins 200°C
Snacks and
sides
Frozen chicken
nuggets
100-500g 6-10 mins 200°C
Spring rolls 100-400g 8-10 mins 200°C
Stuffed veg-
etables
100-400g 10 mins 160°C
Bakes and cakes
Quiche 400g 20-22 mins 180°C
Cake 300g 20-25 mins 160°C
Muffins 300g 15-18 mins 200°C

7. Storage
7.1. Before storing, make sure that the hot air fryer
is cool, clean and dry. Never store the hot air fryer
while it is wet.
7.2. Never wrap the cord tightly around the hot air
fryer, wrap it loosely to avoid causing damage. Store
in a cool, dry place.
8. Specifications
Product code: 973950
Input: 220-240V~ 50/60Hz
Output: 1400W

AFRIKAANS HANDLEIDING
Geagte kliënt,
Dankie dat u ‘n Taurus-handelsmerkproduk gekoop
het. Danksy sy tegnologie, ontwerp en werking en
die feit dat dit die strengste kwaliteitsstandaarde
oorskry, kan ‘n ten volle bevredigende gebruik en
lang produklewe verseker word.
1. Parte beskrywing
1. Verhitting aanwyser
2. Temperatuur
3. Tyd aanduiding
4. Hoof eenheid
5. Tyd kontrole knoppies +/_
6. Fryer mandjie houer
7. Ventilator aanwyser
8. Temperatuur kontrole knoppies +/_
9. Aan/Af Skakelaar
10. Plastiek bedecking en kookmandjie los skakelaar
11.Verwyderbare kook mandjie handvatsel
2. Veiligheidsadvies en waarskuwings
Lees hierdie instruksies sorgvuldig deur voordat
u die toestel aanskakel en hou dit vir toekomstige
verwysing. Versuim om hierdie instruksies te volg en
op te let kan lei tot 'n ongeluk. Maak al die dele van
die produk wat met voedsel in aanraking kom, soos
aangedui in die skoonmaakafdeling, voor gebruik.
2.1. Gebruik of werk omgewing
2.1.1. Hou die werk oppervlak skoon en helder
verlig. Ongelukke gebeur in donker areas
2.1.2. Die toestel mag nie gebruik word deur kinders
jonger as 8 jaar
2.1.3. Die toestel kan deur kinders ouer as 8 jaar
gebruik word, maar moet onder toesig wees
2.1.4. Die toestel is nie geskik vir gebruik deur ver-
mindered fisiese verstandelike vermoens of gebrek
aan ervaring of kennis tensy hulle opleiding gehad
het.
2.1.5. Hou toestel buite bereik van kinders jonger as
8 jaar
2.1.6. Skoonmaak en onderhoud kan nie deur
kinders gedoen word nie
2.1.7. Plaas die apparaat op 'n horisontale, plat en
stabiele oppervlak met die handvatsels, indien enige,
om die mors van die warm vloeistowwe te vermy.
2.1.8. Moenie die toestel in kombinasie met 'n pro-
grammeerder, tydhouer of ander toestel gebruik wat
dit outomaties aanskakel nie.
2.1.9. Die temperatuur van die toeganklike opperv-
laktes kan hoog wees wanneer die toestel gebruik
word.
2.1.10. Moet nooit die apparaat in water of enige
ander vloeistof dompel of onder vloeibare water hou
nie. - As die aansluiting op die hoofstroom beskadig
is, moet dit vervang word, neem die toestel na 'n
gemagtigde tegniese diens. Moenie probeer om die
toestel self te hermonteer of te herstel om 'n gevaar
te vermy nie.
2.1.11. Maak seker dat die spanning wat op die
graderingsetiket aangedui is, ooreenstem met die
netspanning voordat u die toestel aansluit.
2.1.12. Die muurprop moet in die hoof muurprop
pas. Moenie die prop verander nie.
2.1.13. Moenie die kragkoord forsee nie nie. Moet
nooit die kragkoord gebruik om die toestel op te tel
of te dra nie.
2.1.14. Moenie die kragkoord om die toestel draai
nie.
2.1.15. Moenie die kragkoord buig of kreukel nie.
2.1.16. Moenie toelaat dat die kragkoord met die
toestel se warm oppervlaktes in aanraking kom nie.
2.1.17. Kontroleer die toestand van die kragkoord
Beskadigde of verstrengelde kabels verhoog die
risiko van elektriese skok.
2.1.18. Moenie die muurprop met nat hande hanteer
nie
2.1.19. Moenie gebruik as die muurprop of kabel
beskadig is nie
2.1.20. As enige van die toebehore breek, skakel
die toestel onmiddellik af van die kragtoevoer om te
verhoed dat daar 'n elektriese skok is.
2.1.21. Moet nie die apparaat gebruik as dit op die
vloer geval het nie, indien daar tekens van beskadig
1
8
9
11
2
4
6
10
53
7

ing of lekkasie is.
2.1.22. Plaas die apparaat op 'n horisontale, plat,
stabiele oppervlak wat geskik is vir die weerstaan
van hoë temperature en weg van ander hittebronne
en kontak met water.
2.1.23. Hou die apparaat weg van vlambare materi-
aal soos tekstiele, karton of papier, ens.
2.2. Persoonlike veiligheid
2.2.1. VERSIGTIG: Moenie die toestel onbewaak laat
tydens gebruik nie, aangesien daar 'n ongeluk gevaar
is.
2.2.2. Moenie aan die verhitte dele van die apparaat
raak nie, aangesien dit ernstige brandwonde kan
veroorsaak.
2.2.3. Hierdie toestel is slegs vir huishoudelike ge-
bruik, nie vir industriële of professionele gebruik nie
Dit is nie bedoel om gaste in gasvryheidsomgewings
soos bed en ontbyt, hotelle, motels en ander tipes
woongeboue te gebruik nie, selfs in plaashuise,
areas van kombuispersoneel in winkels, kantore en
ander werksomgewings..
2.2.4. Hierdie toestel is nie bedoel vir gebruik deur
persone (insluitend kinders) met verminderde
fisiese, sensoriese of geestelike vermoëns, of gebrek
aan ondervinding en kennis, tensy hulle toesig of
instruksies aangaande die gebruik van die toestel
deur 'n persoon wat vir hul veiligheid verantwoordelik
is, gegee is.
2.2.5. Kennisgewing. Hierdie toestel is nie 'n speeld-
ing nie. Kinders moet onder toesig gehou word om
te verseker dat hulle nie met die toestel speel nie.
2.3. Gebruik en sorg
2.3.1. Die kabel moet ten volle afgewikkel word voor
gebruik
2.3.2. Maak die dele skoon wat direk in kontak kom
met kos met 'n sagte, klam lap en droog deeglik.
2.3.3. Plaas die warm lug-braaier behuising op 'n
stabiele hittebestande oppervlak, op 'n hoogte wat
gemaklik is vir die gebruiker.
2.3.4. Verbind die warm lug-braaier aan geskikte
kragtoevoer.
2.3.5. Let wel: Wanneer die lug braaier vir die eerste
keer gebruik word, kan 'n effense rook of kenmerk-
ende reuk uitgestraal word. Dit is normaal en sal
binnekort afneem. Maak seker dat daar voldoende
lug om die warm lug-braaier beskikbaar is tydens
gebruik. Dit word sterk aanbeveel om die warm lug-
braaier sonder kos vir ongeveer 10 minute voor dit
die eerste keer gebruik word. Die aanvanklike rook of
snaaks reuk kan die smaak van die kos beïnvloed.
2.3.6. Moenie die kragkoord gebruik om die toestel
uit te skakel nie, skakel eers die toestel van die aan /
af-knoppie en verwyder dit dan uit die kragtoevoer.
2.3.7. Ontkoppel van kragtoevoer voor enige skoon-
maak begin
2.3.8. Hierdie toestel moet buite bereik van kinders
en / of gestremdes persone gestoor word.
2.3.9. Moet nie die apparaat stoor of vervoer as dit
nog warm is nie.
2.3.10. Moenie sonder toesig laat terwyl in gebruik
2.3.11. Die toestel moet nooit sonder toesig wanneer
dit gebruik word nie en hou buite bereik van kinders,
aangesien dit 'n elektriese toestel is wat verhit tot
hoë temperature en dit kan ernstige brandwonde
veroorsaak.
2.3.12. Indien die toestel om een of ander rede brand
,skakel die toestel af van die kragtoevoer en moenie
water gebruik om die vuur te blus nie.
2.4. Installeer parte van lug braaier
2.4.1. Sit die kleefvrye kook mandjie in die kook
kompartement tot dit in plek sluit
2.4.2. Skuif die kook houer in die rigting van die
warm lug-braai hoof eenheid om dit toe te maak.
2.4.3. Die warm lug-braaier kom klaar aanmekaar
gesit. Maak seker dat die kook kompartement styf
toegemaak is voor gebruik, aangesien dit nie sal
voorkom dat die warm lug-braaier nie werk nie
2.5. Diens
2.5.1. Die toestel moet deur `n gekwalifiseerde
tegnikus gediens word.
2.5.2. As die koord beskadig word moet dit deur die
diensagent of `n gekwalifiseerde person vervang
word om brandgevaar te verhoed.
2.5.3. Enige misbruik en mislukking om instruksies
te volg lewer die waarborg nul en van gener waarde
3. Instruksies vir gebruik
3.1. Voor gebruik
3.1.1. Verwyder alle verpakkings materiaal
3.1.2. Maak seker die toestel word skoongemaak
soos beskryf in die skoonmaak seksie

3.2. Gebruik en sorg
3.2.1. Using the hot air fryer
3.2.1.1. Die kabel moet ten volle afgewikkel word
voor gebruik
3.2.1.2. Plaas die toestel op `n droe stabiele opperv-
lakte
3.2.1.3. Konnekteer aan die hoof kragtoevoer
3.2.1.4. Om die warm lug-braaier aan te skakel, druk
die AAN / AF-knoppie, die LED-vertoning sal verlig.
3.2.1.5. Voorverhit die warm lug-braaier vir ongeveer
3-5 minute met die tydhouer-knoppies. Die ingestel-
de hitte instelling vir die warm lug braaier is 200°C;
as 'n alternatiewe hitte instelling vereis word, gebruik
die temperatuur beheer knoppies om dit aan te pas
en druk dan die AAN / AF-knoppie om voorverhitting
te begin (as u nie die AAN / AF-knoppie druk nie, sal
die voorverhitting nie begin nie)
3.2.1.6. Sodra die warm lug braaier die verlangde
tyd bereik het, sal dit outomaties afgeskakel . Dit sal
dan 5 keer biep om jou te laat weet dat die siklus
verby is
3.2.1.7. Verwyder die kook kompartement deur die
plastiekdeksel op die verwyderbare kook mandjie
handvatsel te lig en druk dan die vrylatingsknop
gelyktydig en trek die handvatsel weg van die warm
lug-braaier hoof eenheid.
3.2.1.8. Plaas die verlangde bestanddele in die
kleefvrye kookmandjie wat nie en skuif dan die kook
kompartement in die rigting van die warm lug- braai-
er se hoofliggaam om dit toe te maak kompartement
in die rigting van die warm lug- braaier se hooflig-
gaam om dit toe te maak.
3.2.1.9. Skakel die warm lug-braaier aan deur op
die AAN / AF-knoppie te druk Die LED-vertoning sal
verlig.
3.2.1.10. Gebruik die temperatuurbeheerknoppies
om die warm lug-braaier op die verlangde hitte-
instelling te stel.
3.2.1.11. Bepaal die kooktyd benodig vir die bes-
tanddele en gebruik die tydhouer-knoppies om in te
stel.
3.2.1.12. Druk die 'Aan / Af' -knoppie om die tydin
te stel, die waaierindikator sal verlig en die hitte-aan-
wyser sal flikker om te wys dat die warm lug-braaier
die bestanddele kook.
3.2.1.13. Sommige bestanddele moet halfpad of
deur die kooktyd geskud word. Gebruik die hand-
vatselhandgreep versigtig, trek die kookkamertjie
sorgvuldig uit die warm lug-braaier hoof eenheid en
skud dit liggies. Die tyd sal outomaties onderbreek
wanneer die kook kompartement uit die hoof eenheid
getrek word en sal net tel totdat die kook komparte-
ment terug geplaas word
3.2.1.14. sit die kook kompartement terug en gaan
voort om te kook
3.2.1.15. Om te kyk of die bestanddele gereed is,
maak die kookkas versigtig oop. As die bestanddele
nie gekook word nie, plaas die kook kompartement
terug en gebruik die tyd-knoppies om die kooktyd
daarvolgens aan te pas.
3.2.1.16. Sodra die kook proses klaar is en die
ingestelde tyd verloop het, sal die LED-vertoning flits
en die braaier sal outomaties afskakel. Die waaier sal
vir ongeveer 10 sekondes in werking wees en dan
sal die warm lug braaier 5 keer biep om aan te dui
dat dit afgeskakel is.
3.2.1.17. Gebruik die kook kompartement handvat-
sel om die kook houer uit die warm lug-braaier te
trek.
3.2.1.18. Maak die gaar bestanddele leeg in 'n bord
of bak, as die kos 'n groot hoeveelheid broos is,
gebruik versigtig 'n hittebestande tong (nie ingesluit)
om dit te verwyder . Let op: Moenie die kos direk in
'n bak of op 'n bord gooi nie, aangesien oortollige
olie onderaan die kookkas kan versamel en in die
bestanddele kan lek.
3.2.1.19. Neem kennis: Voorverhit altyd die warm
lug braaier voordat jy begin kook of voeg 3-5 minute
by die kooktyd. As die kooktyd of hitte-instelling
tydens gebruik verander moet word, gebruik die tyd-
houer knoppie of temperatuur knoppie soos benodig
en die warm lug-braaier sal die instellings outoma-
ties aanpas. Tydens gebruik sal die LED-skerm
tussen die tyd en temperatuur wissel om aan te dui
dat dit die gekose temperatuur behou.
3.2.1.20. Waarskuwing: Nominale spanning is nog
steeds teenwoordig, selfs wanneer die termostaat
na die af posisie gedraai word. Om die braaier
permanent af te skakel, maak seker dat dit by die
kragtoevoer afgeskakel is.
3.2.2. Gebruik van kleefvrye kookmandjie
3.2.3.1. Om die koekmandjie uit die kookkomparte-
ment te verwyder, lig die plastiek bedekking op die
handvatsel om die handvatsleutelknoppie te wys.
3.2.3.2. Plaas die kleefvrye kookmandjie in die kook
kompartement
3.2.3.3. Laat sak die plastiekbedekking terug in die
posisie sodat dit die handvatsel-uitlaatknoppie

bedek. Waarskuwing: Moet nooit die handvat-
sleutelknoppie druk as die kookkompartement nie
op 'n plat, bestendige oppervlak is nie, aangesien dit
besering kan veroorsaak; Druk dit net sodra die kook
kompartement op 'n plat, stabiele oppervlak geplaas
is.
3.3.Na gebruik:
3.3.1. Laat die toestel afkoel.
3.3.2. Ontkoppel van die hoof krag toevoer.
3.3.3. Maak skoon soos beskryf in die skoonmaak
seksie.
4. Skoonmaak
4.1. Maak seker dat die temperatuurbeheerskakelaar
in "AF" posisie is. Ontkoppel die apparaat van die
kragtoevoer en laat dit heeltemal afkoel voordat u
enige skoonmaakwerk onderneem.
4.2. Vee skoon met `n sagte klam lap en Moenie te
veel water gebruik nie.
4.3. Was die toebehore in warm seepwater, spoel
dan deeglik en maak droog.
4.4. WAARSKUWING! Moet nie elektriese dele van
die apparaat in enige vloeistof dompel nie.
4.5. Moet nie oplosmiddels of produkte met 'n suur
of basis pH soos bleikmiddel of skuurprodukte
gebruik vir die skoonmaak van die apparaat nie.
4.6. Moenie onder lopende water hou of in water
druk nie.
5. Anomalies and herstel
5.1. Neem die toestel na gemagtigde tegniese sen-
trum as toestel beskadig is of probleme ontstaan.
5.2 As koneksie na die muurprop beskadig is moet
die toestel vervang word volgens waarborg
6. Kookgids
Hieronder is 'n riglyne vir die kook van sekere soorte
kos met die warm lug-Braaier. Hierdie is slegs 'n
riglyn. Kook moet gemonitor word.

Voedsel Hoeveelheid kooktyd Temperatuur Addisionele infor-
masie
Aartapples en
skyfies
Dun gevriesde
skyfies
300-700g 12-16 mins 180°CSkud tussen (soos
aangedui in die
gebruiks- en vers-
orgingsafdeling) om
goeie resultate te
verseker
Dik gevriesde
skyfies
300-700g 12-16 mins 180°CSkud tussen (soos
aangedui in die
gebruiks- en vers-
orgingsafdeling) om
goeie resultate te
verseker
Tuisgemaakte
skyfies
300-700g 16-20 mins 180°CFSit eerstens die
skyfies in water, voeg
dan 1/2 eetlepels olie
by en skud tussen
(soos aangedui in
die gebruiks- en
versorgingsafdeling)
om goeie resultate te
verseker
Tuisgemaakte
skywe
300-700g 18-22 mins 180°CSit eerstens die sky-
fies in water, voeg
dan 1/2 eetlepels olie
by en skud tussen
(soos aangedui in
die gebruiks- en
versorgingsafdeling)
om goeie resultate te
verseker
Vleis en hoender
Steak 100-500g 8-14 mins 200°C
Vark tjops 100-500g 7-14 mins 200°C
Hoender bors 100-500g 15-22 mins 200°C
Hoender drum-
sticks
100-500g 15-22 mins 200°C
Peuselhappies
Bevrorehoender
nuggets
100-500g 6-10 mins 200°C
Spring rolls 100-400g 8-10 mins 200°C
Gevulde groente 100-400g 10 mins 160°C
Bak en koeke
Quiche 400g 20-22 mins 180°C
Koek 300g 20-25 mins 160°C
Muffins 300g 15-18 mins 200°C

7. Stoor
7.1. Maak seker dat die braaier koel, skoon en droog
is voordat jy dit stoor. Moet nooit die warm lug
braaier stoor terwyl dit nat is nie.
7.2. Moet nooit die kragkoord styf om die warm lug
braaier draai nie, draai dit los om skade te voorkom.
Berg in 'n koel, droë plek.
8. Spesifikasies
Produk kode: 973950
Input: 220-240V~ 50/60Hz
Output: 1400W

ESPAÑOL MANUAL
Estimado cliente,
Gracias por elegir comprar un producto de la marca
Taurus. Gracias a su tecnología, diseño y operación,
y al hecho de que supera los estándares de calidad
más estrictos, se puede asegurar un uso totalmente
satisfactorio y una larga vida del producto.
1. Descripción de las piezas
1. Luz indicadora de calor
2. Temperatura
3. Indicador de tiempo
4. Unidad principal
5. Botones de control del temporizador + / _
6. Recipiente de cacerola de freidora
7. Indicador del ventilador
8. Botones de control de temperatura + / _
9. Botón de encendido / apagado
10. Cubierta de plástico y botón de liberación de la
cesta de cocinar
11. Mango extraíble de la cesta de cocinar
2. Consejos y advertencias de seguridad!
Lea atentamente estas instrucciones antes de en-
cender el aparato y guárdelas para futuras consultas.
El incumplimiento de estas instrucciones podría
conducir a un accidente. Limpie todas las partes del
producto que estén en contacto con los alimentos,
como se indica en la sección de limpieza, antes de
usarlas.
2.1. Uso o ambiente de trabajo:
2.1.1. Mantenga el área de trabajo limpia y bien
iluminada. Las áreas desordenadas y oscuras invitan
a accidentes.
2.1.2. Este aparato no debe ser utilizado por niños
menores de 8 años.
2.1.3. Este aparato puede ser utilizado por niños de
8 años o más si son supervisados continuamente.
2.1.4. Este aparato puede ser utilizado por personas
con capacidades físicas, sensoriales o mentales re-
ducidas o por la falta de experiencia y conocimientos
si se les ha dado supervisión o instrucciones sobre
el uso del aparato de una manera segura y entiende
los peligros involucrados.
2.1.5. Mantenga el aparato y su cable fuera del
alcance de los niños menores de 8 años.
2.1.6. La limpieza y el mantenimiento del usuario no
deben ser realizados por niños.
2.1.7. Coloque el aparato sobre una superficie hori-
zontal, plana y estable, con las manijas, si las hay,
colocadas para evitar derrames de líquidos calientes.
2.1.8. No utilice el aparato en combinación con un
programador, temporizador u otro dispositivo que lo
encienda automáticamente.
2.1.9. La temperatura de las superficies accesibles
puede ser elevada cuando el aparato está en uso.
2.1.10. Nunca sumerja el aparato en agua o cual-
quier otro líquido o colóquelo bajo agua corriente.
Si se ha dañado la conexión a la red eléctrica, debe
sustituirse, llevar el aparato a un servicio técnico
autorizado. No intente desarmar ni reparar el aparato
por sí mismo para evitar riesgos.
2.1.11. Asegúrese de que la tensión indicada en la
etiqueta de características coincide con la tensión de
red antes de enchufar el aparato.
2.1.12. El enchufe del aparato debe encajar cor-
rectamente en la toma de corriente. No altere el
enchufe.
2.1.13. No fuerce el cable de alimentación. Nunca
utilice el cable de alimentación para levantar, trans-
portar o desenchufar el aparato.
2.1.14. No envuelva el cable de alimentación alred-
edor del aparato.
2.1.15. No corte ni pliegue el cable de alimentación.
2.1.16. No permita que el cable de alimentación
entre en contacto con las superficies calientes del
aparato.
2.1.17. Compruebe el estado del cable de aliment-
ación. Los cables dañados o enredados aumentan el
riesgo de descarga eléctrica.
2.1.18. No toque el enchufe con las manos mojadas.
2.1.19. No utilice el aparato si el cable o el enchufe
están dañados.
2.1.20. Si se rompe alguna de las cubiertas del
1
8
9
11
2
4
6
10
53
7

aparato, desconecte inmediatamente el aparato
de la red eléctrica para evitar la posibilidad de una
descarga eléctrica.
2.1.21. No utilice el aparato si se ha caído al suelo,
si hay señales visibles de daños o si tiene una fuga.
2.1.22. Coloque el aparato sobre una superficie
horizontal, plana y estable, adecuada para soportar
altas temperaturas y lejos de otras fuentes de calor y
en contacto con el agua.
2.1.23. Mantenga el aparato alejado de materiales
inflamables como textiles, cartón o papel, etc.
the floor, if there are visible signs of damage or if it
has a leak
2.2. Seguridad personal:
2.2.1. PRECAUCIÓN: No deje el aparato desaten-
dido durante el uso ya que existe el riesgo de un
accidente.
2.2.2. No toque las partes calientes del aparato, ya
que puede causar quemaduras graves.
2.2.3. Este aparato es sólo para uso doméstico, no
para uso industrial o profesional. No está destinada
a ser utilizada por huéspedes en ambientes de hos-
pitalidad como bed and breakfast, hoteles, moteles
y otros tipos de ambientes residenciales, incluso en
casas de granja, áreas del personal de cocina en
tiendas, oficinas y otros ambientes de trabajo.
2.2.4. Este aparato no está diseñado para ser
utilizado por personas (incluyendo niños) con capa-
cidades físicas, sensoriales o mentales reducidas,
o por falta de experiencia y conocimiento, a menos
que hayan recibido supervisión o instrucciones
sobre el uso del aparato por parte de una persona
responsable de su seguridad.
2.2.5. Este aparato no es un juguete. Los niños
deben ser supervisados para asegurarse de que no
juegan con el aparato.
2.3. Uso y cuidado
2.3.1. Desenrolle completamente el cable de alimen-
tación del aparato antes de cada uso.
2.3.2. Limpie las piezas que estarán directamente
en contacto con los alimentos con un paño suave y
húmedo y seque completamente.
2.3.3. Coloque la carcasa de la freidora en una
superficie estable y resistente al calor, a una altura
que sea cómoda para el usuario.
2.3.4. Conecte la freidora de aire caliente a una
fuente de alimentación adecuada.
2.3.5. Nota: Cuando use la freidora por primera vez,
puede emitir un ligero humo o un olor distintivo.
Esto es normal y pronto desaparecerá. Asegúrese
de que haya suficiente aire fresco alrededor de la
freidora durante el uso. Se recomienda enfriar la
freidora de aire caliente sin alimentos por aproxi-
madamente 10 minutos antes del primer uso. Esto
evitará que el humo inicial o el olor gracioso afecten
el sabor de los alimentos.
2.3.6. No utilice el cable de alimentación para
apagar el aparato, primero encienda el aparato del
botón ON/OFF y, a continuación, extráigalo de la red
eléctrica.
2.3.7. Desconecte el aparato de la red eléctrica
cuando no esté en uso y antes de realizar cualquier
tarea de limpieza.
2.3.8. Este aparato debe ser guardado fuera del
alcance de los niños y / o discapacitados.
2.3.9. No almacene ni transporte el aparato si
todavía está caliente.
2.3.10. Nunca deje el aparato desatendido mientras
esté en uso.
2.3.11. Nunca deje el aparato desatendido cuando
esté en uso y manténgalo fuera del alcance de los
niños, ya que se trata de un aparato eléctrico que
se calienta a altas temperaturas y puede causar
quemaduras graves.
2.3.12. Si, por alguna razón, el aparato se incendia,
desconecte el aparato de la red y NO USE AGUA
PARA DESCONECTAR EL FUEGO.
2.4. Ensamble la freidora de aire caliente
2.4.1. Coloque la cesta de cocinar revestida antiad-
herente en el compartimento de cocción hasta que
quede bloqueada.
2.4.2. Deslice el compartimiento de cocción hacia
la unidad principal de la freidora de aire caliente para
cerrarla.
2.4.3. La freidora de aire caliente viene pre-ens-
amblada. Asegúrese de que el compartimiento de
cocción esté bien cerrado antes de usarlo, ya que
no hacerlo evitará que funcione la freidora de aire
caliente.
2.5. Servicio:
2.5.1. Asegúrese de que el aparato sea reparado
únicamente por un técnico debidamente cualificado
y de que sólo se utilicen piezas de repuesto o
accesorios originales para reemplazar las piezas /
accesorios existentes.

2.5.2. Si el cable de alimentación está dañado, el
fabricante o su agente de servicio o una persona
cualificada debe reemplazarlo para evitar un peligro.
2.5.3. Cualquier uso indebido o incumplimiento de
las instrucciones de uso invalida la garantía y la
responsabilidad del fabricante.
3. Instrucciones de uso
3.1. Antes de usar
3.1.1. Retire la película protectora del aparato (si
corresponde).
3.1.2. Antes de utilizar el producto por primera vez,
limpie las piezas que entrarán en contacto con los
alimentos de la manera descrita en la sección de
limpieza.
3.2. Uso y cuidado
3.2.1. Uso de la freidora de aire caliente
3.2.1.1. Desenrolle completamente el cable de
alimentación antes de enchufarlo.
3.2.1.2. Coloque el aparato sobre una superficie
plana, seca y estable.
3.2.1.3. Conecte el aparato a la red eléctrica.
3.2.1.4. Para encender la freidora de aire caliente,
presione el botón ON / OFF, la pantalla LED se
iluminará.
3.2.1.5. Precaliente la freidora de aire caliente de
aproximadamente 3-5 minutos utilizando los botones
de control del temporizador. El ajuste de calor por
defecto para la freidora de aire caliente es de 200°C;
si se requiere un ajuste de calor alternativo, utilice
los botones de control de temperatura para ajustarlo
y luego presione el botón ON / OFF para iniciar el
precalentamiento (si no presionó el botón ON / OFF,
el precalentamiento no se iniciará)
3.2.1.6. Una vez que la freidora de aire caliente haya
alcanzado el tiempo requerido, se apagará automáti-
camente. Entonces emitirá un pitido 5 veces para
avisarle que el ciclo ha terminado
3.2.1.7. Retire el compartimento de cocción
levantando la tapa de plástico del mango extraíble
de la cesta de cocción y luego presione simultánea-
mente el botón de liberación y tire del mango de la
unidad principal de la freidora de aire caliente.
3.2.1.8. Coloque los ingredientes deseados en la ca-
nasta de recubrimiento antiadherente y luego deslice
el compartimento de cocina hacia el cuerpo principal
de la freidora de aire caliente para cerrarlo.
3.2.1.9. Encienda la freidora de aire caliente pulsan-
do el botón ON / OFF: la pantalla LED se iluminará.
3.2.1.10. Utilice los botones de control de tempera-
tura para ajustar la freidora de aire caliente al ajuste
de calor requerido
3.2.1.11. Determine el tiempo de cocción requerido
para los ingredientes y utilice los botones de control
del temporizador para ajustarlo en consecuencia.
3.2.1.12. Pulse el botón 'On / Off' para ajustar el
temporizador, el indicador del ventilador se iluminará
y el indicador de calor parpadeará para indicar
que la freidora de aire caliente está cocinando los
ingredientes.
3.2.1.13. Algunos ingredientes pueden requerir
agitación a mitad de camino o durante el tiempo de
cocción. Con el mango de la cesta de cocinar, tire
con cuidado del compartimento de cocción de la
unidad principal de la freidora y agítelo suavemente.
El temporizador se detendrá automáticamente
cuando se retire el compartimiento de cocción de la
unidad principal de la freidora de aire caliente y sólo
continuará la cuenta regresiva una vez que se haya
reemplazado el compartimento de cocción.
3.2.1.14. Vuelva a colocar el compartimento de
cocción y continúe
3.2.1.15. Para comprobar si los ingredientes están
listos, abra cuidadosamente el compartimento
de cocción. Si los ingredientes no están cocidos,
cambie el compartimento de cocción y utilice los
botones de control del temporizador para ajustar el
tiempo de cocción de acuerdo a ello.
3.2.1.16. Una vez finalizada la cocción y transcur-
rido el tiempo establecido, la pantalla LED par-
padeará y la freidora se apagará automáticamente. El
ventilador permanecerá en funcionamiento durante
aproximadamente 10 segundos y luego la freidora
de aire caliente emitirá un pitido 5 veces para indicar
que se ha apagado.
3.2.1.17. Utilice cuidadosamente la manija de la
cesta de cocinar para tirar del compartimento de
cocción de la freidora de aire caliente.
3.2.1.18. Vacíe los ingredientes cocidos en un
plato o tazón, si la comida es una gran cantidad de
frágiles, utilice cuidadosamente una pinza resistente
al calor (no incluida) para quitarla.
Precaución: No incline los alimentos directamente
en un recipiente o en un plato, ya que el exceso
de aceite puede acumularse en la parte inferior del
compartimento de cocción y podría derramarse en
los ingredientes.

3.2.1.19. Nota: Siempre precaliente la freidora
antes de comenzar a cocinar o, alternativamente,
añadir 3-5 minutos en el tiempo de cocción. Si
es necesario cambiar el tiempo de cocción o el
ajuste de temperatura durante el uso, simplemente
utilice los botones de control del temporizador o de
temperatura según sea necesario y la freidora de aire
caliente ajustará automáticamente los ajustes. Du-
rante el uso, la pantalla LED cambiará entre la hora y
la temperatura para indicar que está manteniendo la
temperatura seleccionada.
3.2.1.20. Advertencia: La tensión nominal sigue
estando presente incluso cuando el termostato está
en la posición de apagado.
Para apagar permanentemente la freidora de aire
caliente, asegúrese de que esté apagada en la fuente
de alimentación principal.
3.2.2. Uso de la canasta de cocina recubierta
antiadherente
3.2.2.1. Para quitar la cesta de cocinar revestida an-
tiadherente del compartimiento de cocción, levante
la cubierta de plástico en el mango para revelar el
botón de liberación del mango.
3.2.2.2. Vuelva a colocar la cesta de cocinar reves-
tida antiadherente colocándola en el compartimento
de cocción, hasta que quede segura.
3.2.2.3. Vuelva a colocar la cubierta de plástico en
su posición, de modo que cubra el botón de liber-
ación del mango. Advertencia: Nunca presione el
botón de liberación de la manija si el compartimento
de cocción no está sobre una superficie plana y
estable, ya que podría causar lesiones; sólo presione
una vez que el compartimento de cocción haya sido
colocado sobre una superficie plana y estable.
3.3. Una vez que haya terminado de utilizar el
aparato:
3.3.1. Permita que el aparato se enfríe.
3.3.2. Desconecte el aparato de la red eléctrica.
3.3.3. Limpie el aparato como se describe en la
sección de limpieza
4. Limpieza
4.1.
Desconecte el aparato de la red eléctrica y deje que
se enfríe completamente antes de realizar cualquier
tarea de limpieza.
4.2. Limpie la unidad principal de la freidora con un
paño suave y húmedo y seque completamente.
4.3. Lave los accesorios con agua tibia y jabón,
luego enjuague y seque completamente.
4.4. ¡PRECAUCIÓN! No sumerja las partes eléctricas
del aparato en ningún líquido.
4.5. No utilice disolventes, ni productos con un pH
ácido o básico, tales como lejía, o productos abrasi-
vos, para limpiar el aparato.
4.6. Nunca sumerja el aparato en agua o cualquier
otro líquido o colóquelo bajo agua corriente
5. Anomalías y reparación
5.1. Lleve el aparato a un centro de asistencia y el
producto está dañado u otros problemas.
5.2. Si la conexión a la red eléctrica se ha dañado,
debe ser sustituido y debe proceder como lo haría
en caso de daños.
6. Guía de cocina
A continuación se presenta una guía para cocinar
ciertos tipos de alimentos con la freidora de aire
caliente. Esto es una pauta solamente, la cocina
debe ser monitoreada.

Comida cantidad Tiempo aproxi-
mado de coc-
ción
Temperatura Información extra
Patatas y papas
fritas
Virutas finas con-
geladas
300-700g 12-16 mins 180°CAgite en el medio
(como se indica en
la sección de uso
y cuidado) para
garantizar excelentes
resultados
Chips congela-
dos gruesos
300-700g 12-16 mins 180°CAgite en el medio
(como se indica en
la sección de uso
y cuidado) para
garantizar excelentes
resultados
chips hechos en
casa
300-700g 16-20 mins 180°CEn primer lugar
remojar las virutas en
agua, luego agregar
1/2 cucharadas de
aceite y Agitar en el
medio (como se in-
dica en la sección de
uso y cuidado) para
asegurar grandes
resultados
Cuñas caseras
de papa
300-700g 18-22 mins 180°CEn primer lugar
remojar las virutas en
agua, luego agregar
1/2 cucharadas de
aceite y Agitar en el
medio (como se in-
dica en la sección de
uso y cuidado) para
asegurar grandes
resultados
Carne y aves de
corral
Filete 100-500g 8-14 mins 200°C
Chuletas de
cerdo
100-500g 7-14 mins 200°C
Pechuga de
pollo
100-500g 15-22 mins 200°C
Muslos de pollo 100-500g 15-22 mins 200°C
Bocadillos y
costados
Pepitas de pollo
congeladas
100-500g 6-10 mins 200°C
Rollitos de pri-
mavera
100-400g 8-10 mins 200°C

7. Almacenamiento
7.1. Antes de almacenar, asegúrese de que la
freidora esté fría, limpia y seca. Nunca almacene la
freidora de aire caliente mientras esté húmeda.
7.2. Nunca enrolle el cordón firmemente alrededor
de la freidora de aire caliente, envuélvalo suelto para
evitar causar daños. Guardar en un lugar fresco y
seco.
8. Especificaciones
Código de Producto: 973950
Entrada: 220-240V ~ 50 / 60Hz
Salida: 1400W
Verduras rel-
lenas
100-400g 10 mins 160°C
Cuisson au four
et gâteaux
Quiche 400g 20-22 mins 180°C
Pastel 300g 20-25 mins 160°C
Magdalenas 300g 15-18 mins 200°C

MANUEL EN FRANÇAIS
Cher client,
Nous vous remercions d'avoir choisi d'acheter un
produit de marque Taurus. Grâce à sa technologie,
sa conception et son fonctionnement et le fait qu'elle
dépasse les normes de qualité les plus strictes, une
utilisation parfaitement satisfaisante et une longue
durée de vie du produit peuvent être assurées.
1. Description des pièces
1. Voyant lumineux de chauffage
2. Température
3. Indicateur de temps
4. Unité principale
5. Touches de commande de la minuterie + / _
6. Conteneur de panier à frire
7. Indicateur de ventilateur
8. Touches de contrôle de la température + / _
9. Bouton Marche / Arrêt
10. Couvercle en plastique et bouton de déblocage
du panier de cuisine
11. Poignée de panier amovible
2. Conseils et avertissements de sécurité!
Lisez attentivement ces instructions avant d'allumer
l'appareil et conservez-les pour référence ultérieure.
Le non-respect et observation de ces instructions
peuvent entraîner un accident. Nettoyez toutes les
parties du produit qui seront en contact avec les ali-
ments, comme indiqué dans la section de nettoyage,
avant utilisation.
2.1. Conseils et avertissements de sécurité
2.1.1. Gardez la zone de travail propre et bien
éclairée. Les zones obsolètes et obscures invitent les
accidents.
2.1.2. Cet appareil ne doit pas être utilisé par des
enfants âgés de moins de 8 ans.
2.1.3. Cet appareil peut être utilisé par des enfants
âgés de 8 ans et plus s'ils sont surveillés en perma-
nence.
2.1.4. Cet appareil peut être utilisé par des per-
sonnes ayant des capacités physiques, sensorielles
ou mentales réduites ou un manque d'expérience
et de connaissances si elles ont reçu une supervi-
sion ou des instructions concernant l'utilisation de
l'appareil de manière sécuritaire et comprennent les
dangers inhérents.
2.1.5. Gardez l'appareil et son cordon hors de portée
des enfants âgés de moins de 8 ans.
2.1.6. Le nettoyage et l'entretien des utilisateurs ne
doivent pas être effectués par des enfants.
2.1.7. Placez l'appareil sur une surface horizon-
tale, plane et stable, les poignées éventuellement
positionnées pour éviter le déversement des liquides
chauds.
2.1.8. N'utilisez pas l'appareil en association avec un
programmeur, une minuterie ou un autre appareil qui
l'allume automatiquement.
2.1.9. La température des surfaces accessibles peut
être élevée lorsque l'appareil est utilisé.
2.1.10. Ne jamais immerger l'appareil dans de l'eau
ou tout autre liquide ou le placer sous l'eau courante.
Si la connexion au secteur a été endommagée, elle
doit être remplacée, emmener l'appareil à un service
de support technique agréé. N'essayez pas de
démonter ou de réparer l'appareil vous-même afin
d'éviter tout danger.
2.1.11. Assurez-vous que la tension indiquée sur
l'étiquette d'évaluation correspond à la tension
secteur avant de brancher l'appareil.
2.1.12. La fiche de l'appareil doit s'adapter correcte-
ment à la prise secteur. Ne modifiez pas la fiche.
2.1.13. Ne forcez pas le cordon d'alimentation.
N'utilisez jamais le cordon d'alimentation pour sou-
lever, transporter ou débrancher l'appareil.
2.1.14. Ne placez pas le cordon d'alimentation
autour de l'appareil.
2.1.15. Ne coupez ni ne pliez le cordon
d'alimentation.
2.1.16. Ne laissez pas le cordon d'alimentation entrer
en contact avec les surfaces chaudes de l'appareil.
2.1.17. Vérifiez l'état du cordon d'alimentation. Les
câbles endommagés ou enchevous augmentent le
risque de choc électrique.
1
8
9
11
2
4
6
10
53
7
This manual suits for next models
1
Table of contents
Languages:
Other creative housewares Fryer manuals
Popular Fryer manuals by other brands
T-Fal
T-Fal Uno instructions
Frymaster
Frymaster Pro H50-Series 819-5463 24-Std. Service-Hotline 1-800-551-8633 AUG 2002 Installations- und Gebrauchsanleitung
eta
eta Virtuoso 0172 user manual
Tower Hobbies
Tower Hobbies T17138 user manual
Russell Hobbs
Russell Hobbs Brooklyn 5L Instructions & warranty
Frymaster
Frymaster Enodis E4 Specification sheet

