crelando CHES 9 A1 User manual

IAN 275317
EMBOSSING-SET CHES 9 A1
EMBOSSING SET
Translation of the original instructions
EMBOSSING-SET
Originalbetriebsanleitung

GB/IE/NI Translation of the original instructions Page 1
DE/AT/CH Originalbetriebsanleitung Seite 11
Before reading, unfold the page containing the illustrations and familiarise yourself with all functions of
the device.
Klappen Sie vor dem Lesen die Seite mit den Abbildungen aus und machen Sie sich anschließend mit allen
Funktionen des Gerätes vertraut.

CHES 9 A1 GB│IE│NI│ 1 ■
Contents
Introduction......................................................2
Proper use of the hot air blower CHES 9 A1-1 ..................................... 2
Features ................................................................... 2
Package contents ............................................................ 2
Technical details............................................................. 2
General safety instructions .........................................3
Safety instructions for the hot air blower .......................................... 4
Additional safety instructions ................................................... 4
Use .............................................................5
Operation.................................................................. 5
Maintenance and cleaning..........................................8
Disposal.........................................................8
Disposal of the device ........................................................ 8
Kompernass Handels GmbH warranty ...............................8
Service .................................................................... 9
Importer................................................................... 9
Translation of the original Conformity Declaration .....................10

CHES 9 A1
■ 2 │ GB│IE│NI
EMBOSSING SET CHES 9 A1
Introduction
Congratulations on the purchase of your new ap-
pliance. You have selected a high-quality product.
The operating instructions are part of this product.
They contain important information about safety,
usage and disposal. Before using the product, please
familiarise yourself with all operating and safety
instructions. Use the product only as described and
for the range of applications specified. Please also
pass these operating instructions on to any future
owner.
Proper use of the hot air blower
CHES 9 A1-1
The appliance is intended for heating embossing
powder for leisure purposes. Any other usage of
or modification to the appliance is deemed to be
improper and carries a significant risk of accidents.
The manufacturer accepts no responsibility for
damage(s) attributable to misuse. The appliance
is not intended for commercial use.
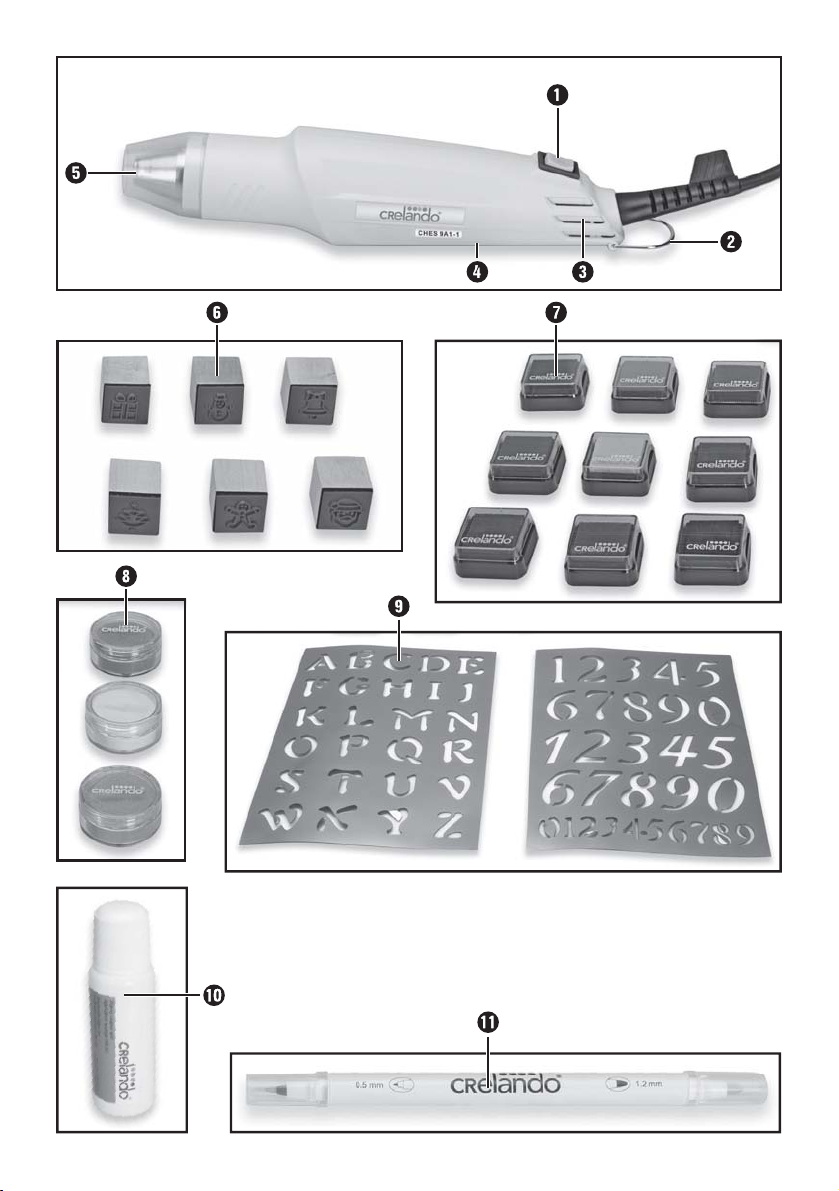
Features
ON/OFF switch
Hanger
Air inlet
Flattened side
Nozzle
Wooden Christmas motif stamp
Stamp pad
Embossing powder
Embossing stencil
Stamp cleaner
Embossing pen (with 2 tips for writing, painting
or drawing)
Package contents
1 heat gun CHES 9 A1-1
1 embossing pen (transparent)
9 stamp pads in various colours (red, orange,
yellow, dark green, black, dark blue, light blue,
purple, copper)
6 wooden Christmas motif stamps
1 embossing powder (gold)
1 embossing powder (silver)
1 embossing powder (transparent)
1 embossing stencil (ABC)
1 embossing stencil (numbers)
1 stamp cleaner
1 set of operating instructions
Technical details
Rated voltage: 230 V ~50 Hz
(alternating current)
Rated power
consumption: 350 W
Air flow: Level I: approx. 70 l/min.
Level II: approx. 120 l/min.
Temperature
(nozzle outlet): Level I: approx. 220°C
Level II: approx. 330°C
Protection class: II/ (double insulation)
The A-rated sound pressure level of the appliance
is typically less than 70 dBA.

CHES 9 A1 GB│IE│NI│ 3 ■
General safety
instructions
WARNING!
► Read all safety warnings and all
instructions. Failure to follow the
warnings and instructions may
result in electric shock, fire and/or
serious injury.
■ This appliance may be used by
children aged 8 years and above
and by persons with limited physi-
cal, sensory or mental capabilities
or lack of experience and knowl-
edge, provided that they are under
supervision or have been told how
to use the appliance safely and are
aware of the potential risks. Do not
allow children to use the appliance
as a plaything. Cleaning and user
maintenance tasks may not be car-
ried out by children unless they are
supervised.
■ To avoid potential risks, damaged
mains cables should be replaced
by the manufacturer, their customer
service department or a similarly
qualified person.
Save all warnings and instructions
for future reference.
The term "power tool" in the warnings
refers to your mains-operated (corded)
power tool or battery-operated (cord-
less) power tool.
■Do not expose power tools to rain
or wet conditions. Water entering
a power tool will increase the risk of
electric shock.
■Do not abuse the cord. Never use
the cord for carrying, pulling or
unplugging the power tool. Keep
cord away from heat, oil, sharp
edges or moving parts. Damaged
or entangled cords increase the risk
of electric shock.
■If operating a power tool in a
damp location is unavoidable, use
a residual current device (RCD)
protected supply. Use of an RCD
reduces the risk of electric shock.
■Do not use the power tool if the
switch does not turn it on and off.
Any power tool that cannot be con-
trolled with the switch is dangerous
and must be repaired.
CHES 9 A1
■ 4 │ GB│IE│NI
Safety instructions for the hot
air blower
■ Careless use of the appliance can
cause a fire.
■ Take care when using the appliance
in the vicinity of inflammable materi-
als.
■ Do not aim at the same place for
a prolonged period of time.
■ Do not use in the presence of an
explosive atmosphere.
■ Heat can be transferred to combus-
tible materials which are hidden
from view.
■ Allow the appliance to cool down
after use before packing it away.
■ Do not leave the appliance unat-
tended while it is in operation.
Additional safety instructions
CAUTION!
►Avoid the risk of injury or fire as
well as health risks.
■ In case of danger, remove the plug
from the socket immediately.
CAUTION! RISK OF INJURY!
► Never use the appliance as a
hairdryer.
■ Never aim the hot air stream at
people or animals.
■ Never look directly into the nozzle .
CAUTION! RISK OF BURNS!
► Do not touch the hot nozzle .
CAUTION! RISK OF FIRE
AND EXPLOSION!
► The appliance generates a lot of
heat. Careless use can lead to an
increased risk of fire and explo-
sions.
■ Do not work in the presence of
flammable gases or materials, or
in an explosive environment. When
working on plastics, paints, lacquers,
etc., hazardous gasses can be re-
leased. Always ensure sufficient
ventilation.
■ Always remove the plug from the
power socket during work breaks,
when adjusting the appliance and
when it is no longer in use.
■ Keep the nozzle at a distance from
the workpiece or the area being
processed. A build-up of hot air can
result in damage to the appliance.
■ Pay close attention to the area being
worked and also the surrounding
area. The heat can reach com-
bustible parts outside your field of
vision.
CHES 9 A1 GB│IE│NI│ 5 ■
■ The appliance must always be kept
clean, dry and free from oil or
grease.
■ Never use the appliance for pur-
poses other than the ones for which
it was designed.
Use
Operation
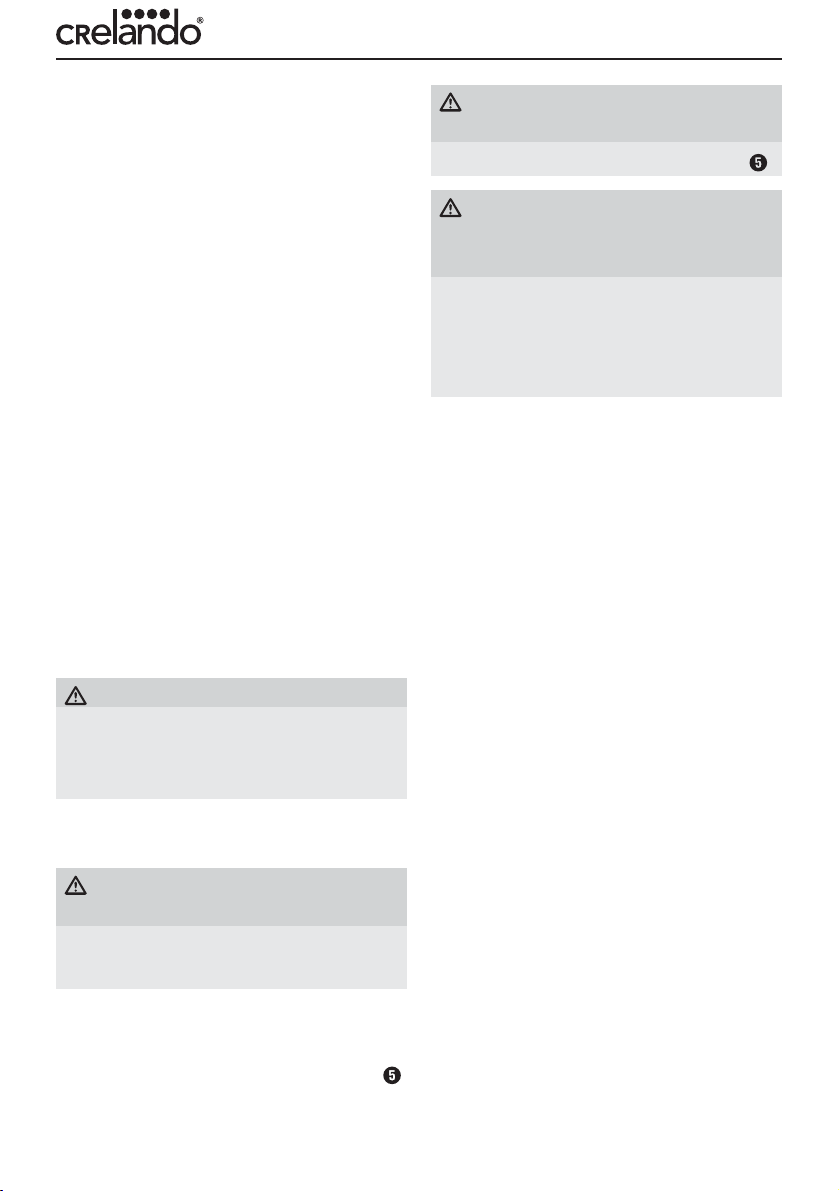
CAUTION!
► Do not cover the air inlet during use.
CAUTION! RISK OF BURNS!
► Do not touch the hot nozzle .
Switching the appliance on:
■ Move the ON/OFF switch into the position
level "I" or "II".
Switching the appliance off:
■ Move the ON/OFF switch to position "0".
Setting airflow and temperature:
You can use the ON/OFF switch to select
between two airflow levels. Depending on the ap-
plication, you can select the most suitable airflow
and temperature:
Level I: * approx. 70 l/
min.
approx.
220°C
Level II: ** approx. 120
l/min.
approx.
330°C
* For smaller applications, such as stamp motifs.
** For large-area applications, such as lettering.
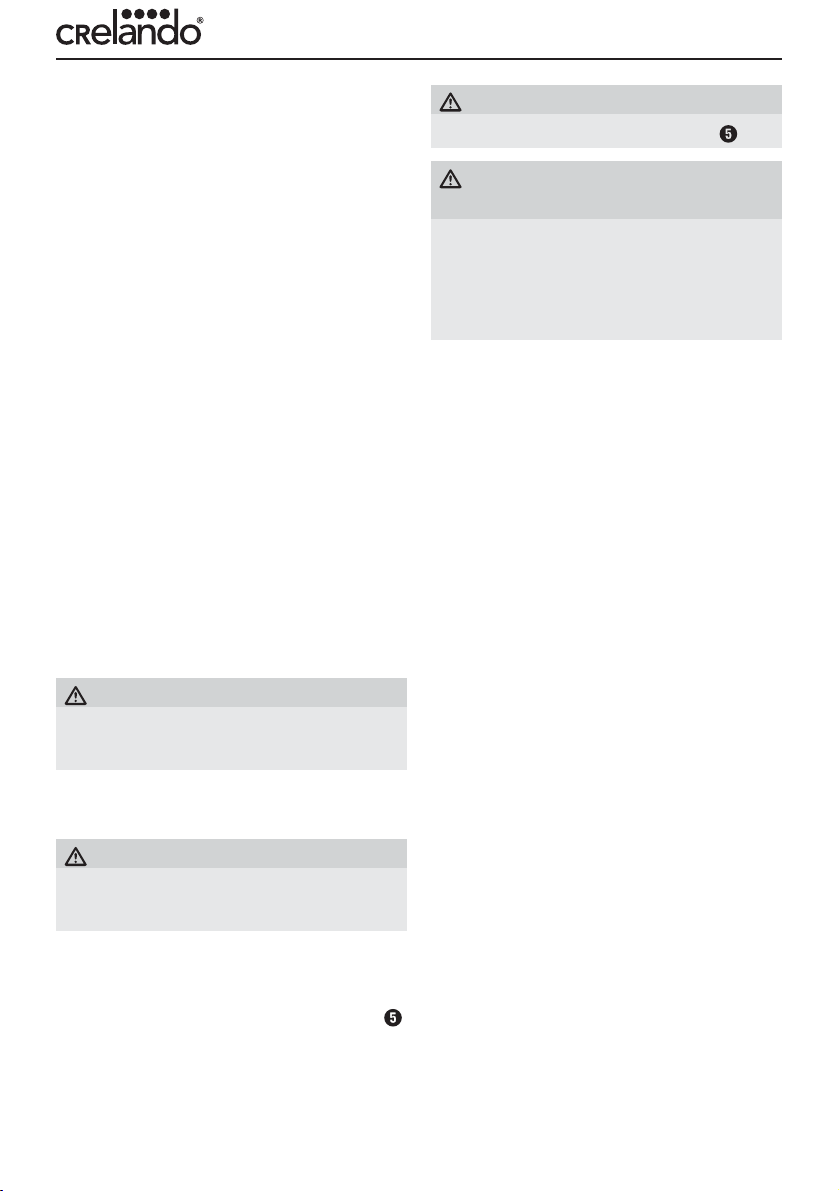
For freehand and stencil work
♦ 1.) Lay the embossing stencil on the paper
(see fig. A).
♦ 2.) Guide the embossing pen along the
contours (see fig. A).
Fig. A
NOTE
► Please note that the pen color is quick drying.
For example, after painting of two symbols,
the powder should be sprinkled.
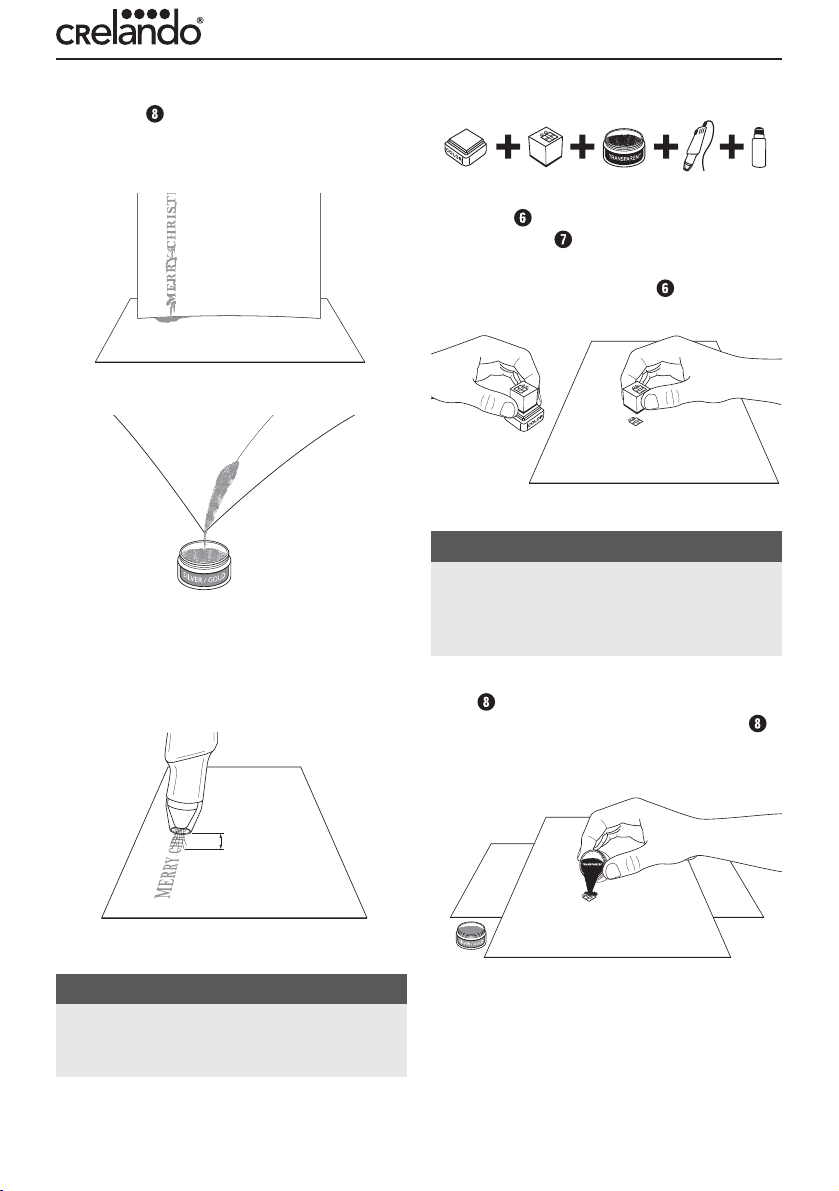
♦ 3.) Add a generous amount of embossing
powder (gold or silver) to the still wet
pen ink. (the embossing powder only
sticks to where you have previously drawn
with the pen) (see fig. B).
Fig. B

CHES 9 A1
■ 6 │ GB│IE│NI
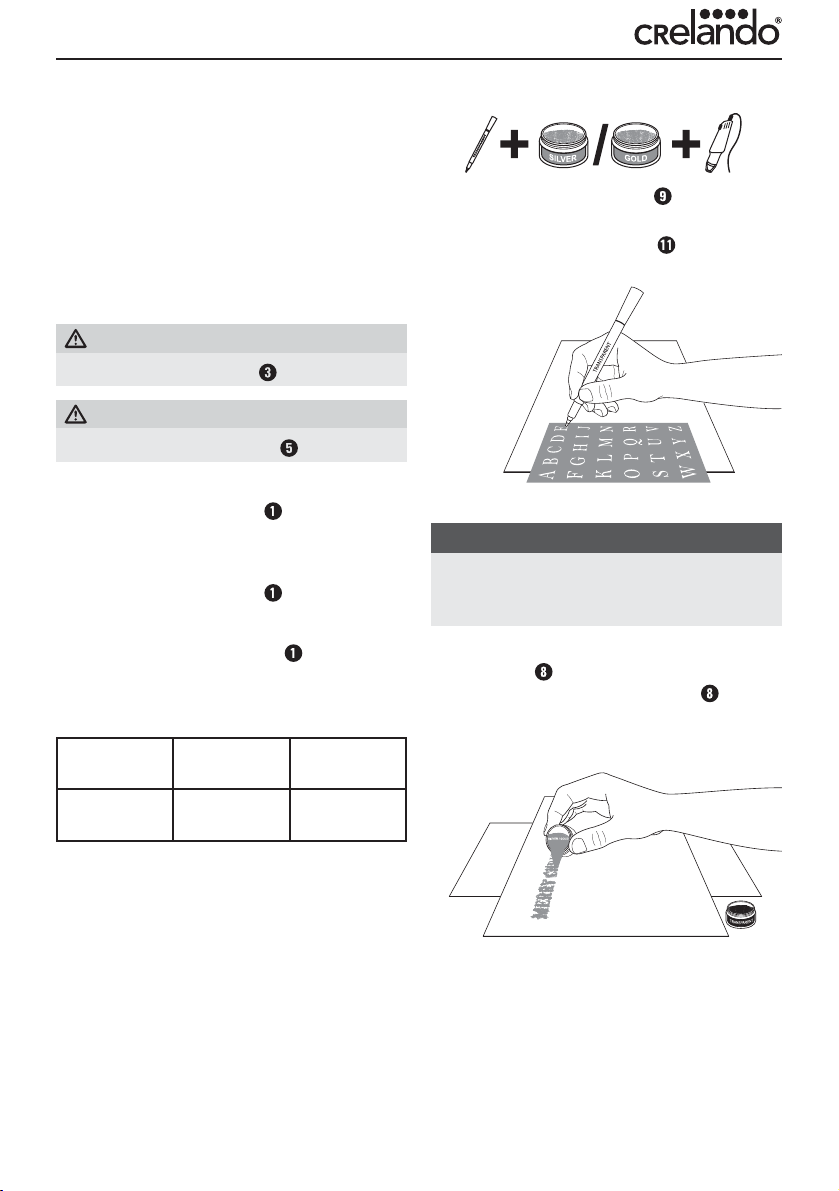
♦ 4.) Shake off the surplus embossing powder
onto a piece of paper (preferably already
folded down the middle). Now pour the
powder back into the container (see figs.
C+D).
Fig. C
Fig. D
♦ 5.) Now heat up the powder-covered drawing.
Aim the hot air blower at the drawing from
a distance of 3 to 5 cm (see fig. E).
3-5 cm
Fig. E
NOTE
► Heat the powder only until it has completely
melted. The powder is then smooth and shiny.
Working with stamp pads
1.) Moisten the wooden Christmas motif stamp
on the stamp pad with the colour you want
to use (see fig. F).
♦ 2.) Press the moistened wooden Christmas
motif stamp onto the paper (see fig. F).
Fig. F
NOTE
► Please note that the stamp ink is quick-drying.
For example, after the impression of two mo-
tives, the powder should be sprinkled.
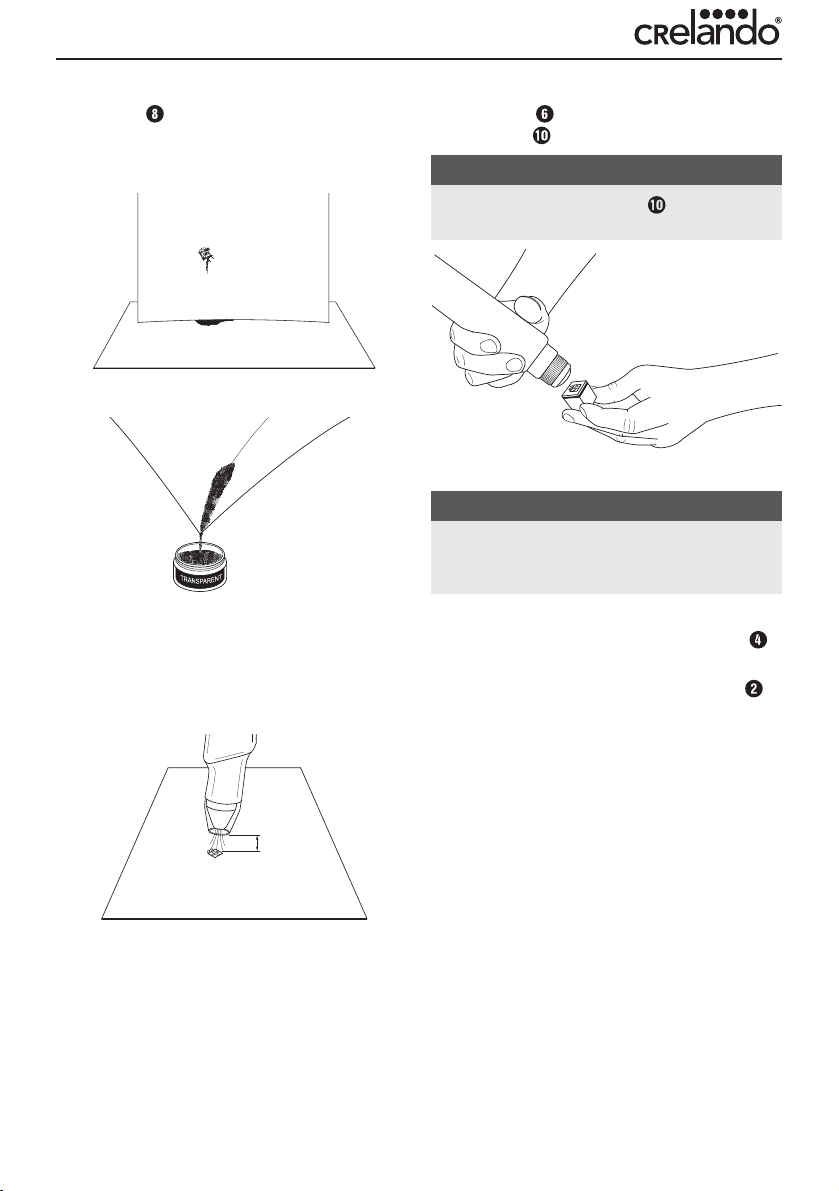
♦ 3.) Add a generous amount of embossing
powder (transparent) to the still-wet
stamp (the embossing powder only
sticks to where you have stamped)
(see fig. G).
Fig. G
CHES 9 A1 GB│IE│NI│ 7 ■
♦ 4.) Shake off the surplus embossing powder
onto a piece of paper (preferably already
folded down the middle). Now pour the
powder back into the container (see figs.
H+I).
Fig. H
Fig. I
♦ 5.) Now heat up the powder-covered stamp.
Aim the hot air blower at the stamp from
a distance of 3 to 5 cm (see fig. J).
3-5 cm
Fig. J
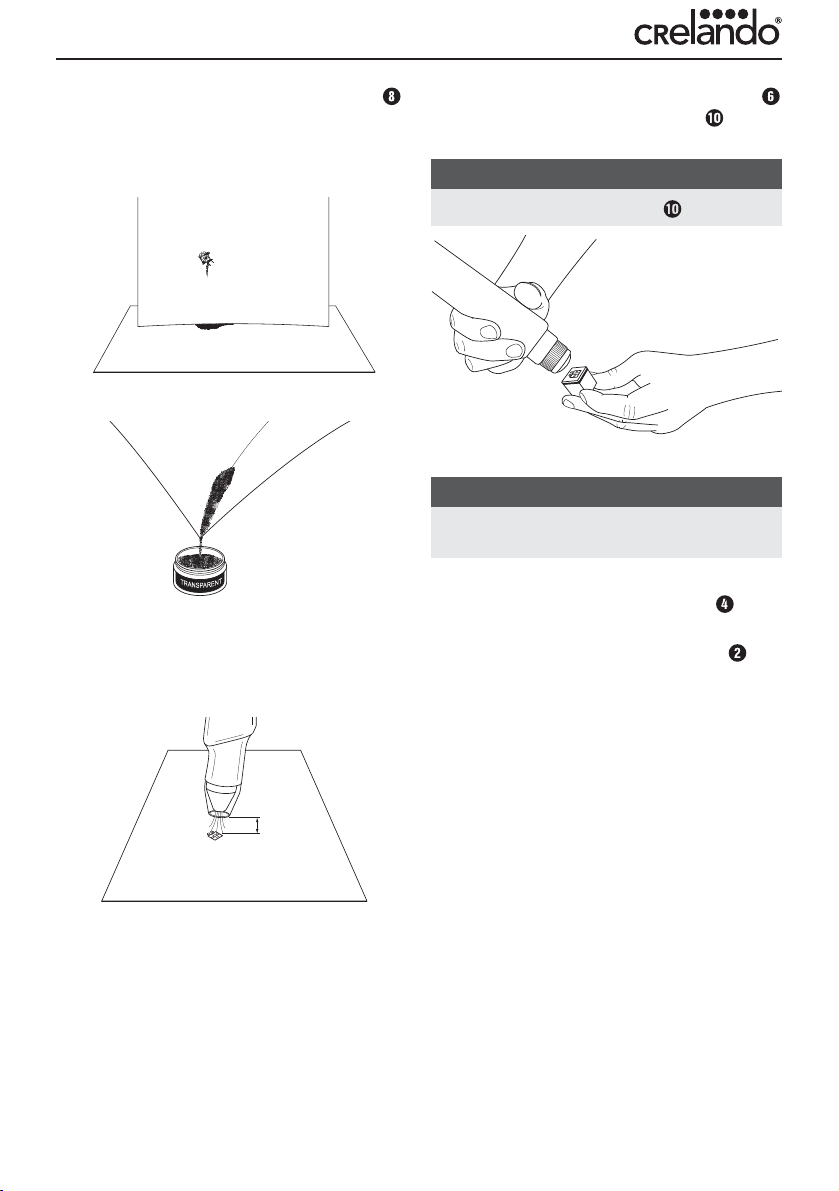
♦ 6.) Clean the wooden Christmas motif stamp
using the supplied stamp cleaner
(see fig. K).
NOTE
► Pull cap of the stamp cleaner , do not turn!
Fig. K
NOTE
► Heat the powder only until it has completely
melted. The powder is then smooth and shiny.
Cooling down
■ Lay the appliance on its flattened side on
a flat surface,
■ or hang the appliance using the hanger
–to have both hands free to work.
–or to allow the appliance to cool down.

■ 8 │ GB│IE│NI CHES 9 A1
Maintenance and cleaning
WARNING! RISK OF INJURY! Always
pull the plug out of the socket and let
the appliance cool down before you
carry out any work on the appliance.
■ Always clean the appliance after completion
of work.
■ Keep the air inlet and the nozzle clean.
■ To clean the housing, use a cloth and a mild
detergent if necessary.
■ Never use sharp objects, petrol, solvents or
cleaning agents that can damage plastic.
■ Do not allow any liquids to get into the interior
of the appliance.
NOTE
► Replacement parts not listed (such as switch-
es) can be ordered via our service hotline.
Disposal
Disposal of the device
The packaging is made from environmen-
tally friendly material and can be disposed
of at your local recycling plant.
Do not dispose of power tools in your
normal household waste!
European Directive 2012/19/EU requires that
worn-out power tools be collected separately and
recycled in an environmentally compatible manner.
Your local community or municipal authorities can
provide information on how to dispose of the worn-
out appliance.
Kompernass Handels GmbH
warranty
Dear Customer,
This appliance has a 3-year warranty valid from
the date of purchase. If this product has any faults,
you, the buyer, have certain statutory rights. Your
statutory rights are not restricted in any way by the
warranty described below.
Warranty conditions
The validity period of the warranty starts from the
date of purchase. Please keep your original receipt
in a safe place. This document will be required as
proof of purchase.
If any material or production fault occurs within
three years of the date of purchase of the product,
we will either repair or replace the product for you
at our discretion. This warranty service is depend-
ent on you presenting the defective appliance and
the proof of purchase (receipt) and a short written
description of the fault and its time of occurrence.
If the defect is covered by the warranty, your product
will either be repaired or replaced by us. The repair
or replacement of a product does not signify the
beginning of a new warranty period.
Warranty period and statutory
claims for defects
The warranty period is not prolonged by repairs
effected under the warranty. This also applies to
replaced and repaired components. Any damage
and defects present at the time of purchase must
be reported immediately after unpacking. Repairs
carried out after expiry of the warranty period shall
be subject to a fee.

CHES 9 A1 GB│IE│NI│ 9 ■
Scope of the warranty
This appliance has been manufactured in accord-
ance with strict quality guidelines and inspected
meticulously prior to delivery.
The warranty covers material faults or production
faults. The warranty does not extend to product
parts subject to normal wear and tear or fragile
parts such as switches, batteries, baking moulds or
parts made of glass.
The warranty does not apply if the product has
been damaged, improperly used or improperly
maintained. The directions in the operating instruc-
tions for the product regarding proper use of
the product are to be strictly followed. Uses and
actions that are discouraged in the operating
instructions or which are warned against must be
avoided.
This product is intended solely for private use and
not for commercial purposes. The warranty shall be
deemed void in cases of misuse or improper handling,
use of force and modifications/repairs which have
not been carried out by one of our authorised
Service centres.
Warranty claim procedure
To ensure quick processing of your case, please
observe the following instructions:
▯ Please have the till receipt and the item number
(e.g. IAN 12345) available as proof of purchase.
▯ You will find the item number on the type plate,
an engraving on the front page of the instructions
(bottom left), or as a sticker on the rear or bottom
of the appliance.
▯ If functional or other defects occur, please
contact the service department listed either by
telephone or by e-mail.
▯ You can return a defective product to us free of
charge to the service address that will be provided
to you. Ensure that you enclose the proof of
purchase (till receipt) and information about
what the defect is and when it occurred.
You can download these instructions
along with many other manuals,
product videos and software on
www.lidl-service.com.
Service
Service Great Britain
Tel.: 0871 5000 720 (£ 0.10/Min.)
E-Mail: [email protected]
Service Ireland
Tel.: 1890 930 034
(0,08 EUR/Min., (peak))
(0,06 EUR/Min., (off peak))
E-Mail: [email protected]
IAN 275317
Importer
Please note that the following address is not the
service address. Please use the service address
provided in the operating instructions.
KOMPERNASS HANDELS GMBH
BURGSTRASSE 21
44867 BOCHUM
GERMANY
www.kompernass.com
CHES 9 A1
■ 10 │ GB│IE│NI
Translation of the original
Conformity Declaration
We, KOMPERNASS HANDELS GMBH, docu-
ments officer: Mr. Semi Uguzlu, BURGSTR. 21,
44867 BOCHUM, GERMANY, hereby declare that
this product complies with the following standards,
normative documents and EC directives:
EC Low Voltage Directive
(2014/35/EU)
EMC (Electromagnetic Compatibility)
(2014/30/EU)
RoHS Directive
(2011/65/EU)
Applied harmonised standards:
EN 60335-1: 2012 / A11: 2014
EN 60335-2-45: 2002 / A2: 2012
EN 62233: 2008
EN 55014-1: 2006 / A2: 2011
EN 55014-2: 1997 / A2: 2008
EN 61000-3-2: 2014
EN 61000-3-3: 2013
Type/appliance designation:
Heat gun CHES 9 A1-1
Year of manufacture: 06-2016
Serial number: IAN 275317
Bochum, 11/05/2016
Semi Uguzlu
- Quality Manager -
The right to effect technical changes in the context
of further development is reserved.

CHES 9 A1 DE│AT│CH │ 11 ■
Inhaltsverzeichnis
Einleitung.......................................................12
Bestimmungsgemäßer Gebrauch des Heißluftgebläses CHES 9 A1-1 .................. 12
Ausstattung................................................................ 12
Lieferumfang............................................................... 12
Technische Daten ........................................................... 12
Allgemeine Sicherheitshinweise...................................... 13
Sicherheitshinweise für Heißluftgebläse ..........................................14
Ergänzende Sicherheitshinweise ...............................................14
Bedienung ......................................................15
Inbetriebnahme ............................................................15
Wartung und Reinigung...........................................18
Entsorgung .....................................................18
Gerät entsorgen ............................................................18
Garantie der Kompernaß Handels GmbH ............................18
Service ...................................................................19
Importeur ................................................................. 19
Original-Konformitätserklärung ....................................20

CHES 9 A1
■ 12 │ DE│AT│CH
EMBOSSING-SET
CHES 9 A1
Einleitung
Wir beglückwünschen Sie zum Kauf Ihres neuen
Gerätes. Sie haben sich damit für ein hochwertiges
Produkt entschieden. Die Bedienungsanleitung ist
Teil dieses Produkts. Sie enthält wichtige Hinweise
für Sicherheit, Gebrauch und Entsorgung. Machen
Sie sich vor der Benutzung des Produkts mit allen
Bedien- und Sicherheitshinweisen vertraut. Benutzen
Sie das Produkt nur wie beschrieben und für die
angegebenen Einsatzbereiche. Händigen Sie alle
Unterlagen bei Weitergabe des Produkts an Dritte
mit aus.
Bestimmungsgemäßer Gebrauch des
Heißluftgebläses CHES 9 A1-1
Das Gerät ist zum Erwärmen von Embossing-
Pulver im Freizeitbereich vorgesehen. Jede andere
Verwendung oder Veränderung des Gerätes gilt
als nicht bestimmungsgemäß und birgt erhebliche
Unfallgefahren. Für aus bestimmungswidriger
Verwendung entstandene Schäden übernimmt der
Hersteller keine Haftung. Das Gerät ist nicht für
den gewerblichen Einsatz bestimmt.
Ausstattung
EIN- / AUS-Schalter
Bügel
Lufteinlass
Auflagefläche
Düse
Holz-Weihnachtsmotiv-Stempel
Stempelkissen
Embossing-Puder
Embossing-Schablone
Stempelreiniger
Embossing-Stift (mit 2 Spitzen zum schreiben,
malen oder zeichnen)
Lieferumfang
1 Heißluftgebläse CHES 9 A1-1
1 Embossing-Stift (transparent)
9 Stempelkissen in den Farben (rot, orange, gelb,
dunkelgrün, schwarz, dunkelblau, hellblau, lila,
„kupfer“)
6 Holz-Weihnachtsmotiv-Stempel
1 Embossing-Puder (Gold)
1 Embossing-Puder (Silber)
1 Embossing-Puder (Transparent)
1 Embossing-Schablone (ABC)
1 Embossing-Schablone (Zahlen)
1 Stempelreiniger
1 Bedienungsanleitung
Technische Daten
Bemessungsspannung: 230 V ~50 Hz
(Wechselstrom)
Bemessungsaufnahme: 350 W
Luftmenge: Stufe I: ca. 70 l/min.
Stufe II: ca. 120 l/min.
Temperatur
(Düsenausgang): Stufe I: ca. 220 °C
Stufe II: ca. 330 °C
Schutzklasse: II/ (Doppelisolierung)
Der mit A- bewertete Schalldruckpegel des Gerätes
ist typischerweise kleiner als 70 dB (A).

CHES 9 A1 DE│AT│CH │ 13 ■
Allgemeine
Sicherheitshinweise
WARNUNG!
► Lesen Sie alle Sicherheitshinweise
und Anweisungen. Versäumnisse
bei der Einhaltung der Sicher-
heitshinweise und Anweisungen
können elektrischen Schlag, Brand
und/oder schwere Verletzungen
verursachen.
■ Dieses Gerät kann von Kindern ab
8 Jahren und darüber sowie von
Personen mit verringerten physi-
schen, sensorischen oder mentalen
Fähigkeiten oder Mangel an Erfah-
rung und Wissen benutzt werden,
wenn sie beaufsichtigt oder bezüg-
lich des sicheren Gebrauchs des
Gerätes unterwiesen wurden und
die daraus resultierenden Gefah-
ren verstehen. Kinder dürfen nicht
mit dem Gerät spielen. Reinigung
und Benutzer-Wartung dürfen nicht
von Kindern ohne Beaufsichtigung
durchgeführt werden.
■ Wenn die Netzanschlussleitung die-
ses Gerätes beschädigt wird, muss
sie durch den Hersteller oder seinen
Kundendienst oder eine ähnlich
qualifizierte Person ersetzt werden,
um Gefährdungen zu vermeiden.
Bewahren Sie alle Sicherheitshin-
weise und Anweisungen für die
Zukunft auf.
Der in den Sicherheitshinweisen
verwendete Begriff „Elektrowerk-
zeug“ bezieht sich auf netzbetriebene
Elektrowerkzeuge (mit Netzkabel /
Netzadapter) und auf akkubetriebene
Elektrowerkzeuge (ohne Netzkabel).
■Halten Sie Elektrowerkzeuge
von Regen oder Nässe fern.
Das Eindringen von Wasser in ein
Elektrogerät erhöht das Risiko eines
elektrischen Schlages.
■Zweckentfremden Sie das Kabel
nicht, um das Elektrowerkzeug zu
tragen, aufzuhängen oder um den
Stecker aus der Steckdose zu zie-
hen. Halten Sie das Kabel fern von
Hitze, Öl, scharfen Kanten oder sich
bewegenden Geräteteilen. Beschä-
digte oder verwickelte Kabel erhöhen
das Risiko eines elektrischen Schlages.
■Wenn der Betrieb des Elektrowerk-
zeuges in feuchter Umgebung
nicht vermeidbar ist, verwenden
Sie einen Fehlerstromschutzschal-
ter. Der Einsatz eines Fehlerstrom-
schutzschalters vermindert das Risiko
eines elektrischen Schlages.
■Benutzen Sie kein Elektrowerkzeug,
dessen Schalter defekt ist. Ein Elekt-
rowerkzeug, das sich nicht mehr ein-
oder ausschalten lässt, ist gefährlich
und muss repariert werden.
CHES 9 A1
■ 14 │ DE│AT│CH
Sicherheitshinweise für
Heißluftgebläse
■ Ein Brand kann entstehen, wenn mit
dem Gerät nicht sorgsam umgegan-
gen wird.
■ Vorsicht bei Gebrauch des Gerätes
in der Nähe brennbarer Materialien.
■ Nicht für längere Zeit auf ein und
dieselbe Stelle richten.
■ Nicht bei Vorhandensein einer
explosionsfähigen Atmosphäre
verwenden.
■ Wärme kann zu brennbaren Materiali-
en geleitet werden, die verdeckt sind.
■ Nach Gebrauch abkühlen lassen,
bevor es weggepackt wird.
■ Das Gerät nicht unbeaufsichtigt
lassen, solange es in Betrieb ist.
Ergänzende Sicherheitshinweise
VORSICHT!
►Vermeiden Sie Verletzungs-,
Brandgefahr und Gesundheitsge-
fährdungen.
■ Ziehen Sie bei Gefahr sofort den
Netzstecker aus der Steckdose.
VORSICHT!
VERLETZUNGSGEFAHR!
► Verwenden Sie das Gerät niemals
als Haartrockner.
■ Richten Sie den heißen Luftstrom
niemals auf Personen oder Tiere.
■ Schauen Sie nicht direkt in die Düse .
VORSICHT!
VERBRENNUNGSGEFAHR!
► Berühren Sie nicht die heiße Düse .
VORSICHT!
BRAND- UND EXPLOSIONS-
GEFAHR !
► Das Gerät entwickelt eine starke
Hitze. Unsorgsamer Umgang
bewirkt eine erhöhte Brand- und
Explosionsgefahr.
■ Arbeiten Sie nicht in der Nähe von
leicht entzündbaren Gasen oder Ma-
terialien, oder in einer explosionsfähi-
gen Umgebung. Bei der Bearbeitung
von Kunststoffen, Farben, Lacken etc.
können zudem gesundheitsgefähr-
dende Gase entstehen. Sorgen Sie
stets für ausreichende Belüftung.
■ Ziehen Sie bei Arbeitspausen, vor
allen Arbeiten am Gerät und bei
Nichtgebrauch immer den Netzste-
cker aus der Steckdose.
■ Halten Sie mit dem Düsenausgang
einen Abstand zum Werkstück oder
der zu bearbeitenden Fläche. Ein
Luftstau kann zur Überhitzung des
Gerätes führen.
■ Achten Sie auf den direkten Arbeits-
bereich und auch auf den Umge-
bungsbereich. Die Wärme kann zu
brennbaren Teilen gelangen, die sich
außerhalb der Sichtweite befinden.

CHES 9 A1 DE│AT│CH │ 15 ■
■ Das Gerät muss stets sauber, trocken
und frei von Öl oder Schmierfetten sein.
■ Verwenden Sie das Gerät niemals
zweckentfremdet.
Bedienung
Inbetriebnahme
VORSICHT!
► Verdecken Sie beim Gebrauch nicht den
Lufteinlass .
VORSICHT!
VERBRENNUNGSGEFAHR!
► Berühren Sie nicht die heiße Düse .
Gerät einschalten:
■ Drücken Sie den EIN- / AUS-Schalter in die
Position Stufe „I“ oder „II“.
Gerät ausschalten:
■ Drücken Sie den EIN- / AUS-Schalter in die
Position „0“.
Luftmenge und Temperatur einstellen:
Sie können mit dem EIN- / AUS-Schalter zwei
verschiedene Gebläsestufen einschalten. Je nach
Anwendung können Sie so die passende Luftmen-
ge und Temperatur auswählen:
Stufe I * ca. 70 l/min. ca. 220 °C
Stufe II ** ca. 120 l/min. ca. 330 °C
* Bei kleinen Anwendungen, wie z. B. Stempelmotive.
** Bei großflächigen Anwendungen, wie z. B.
Schriftzüge.
Zum Freihand- und Schablonenarbeiten
♦ 1.) Legen Sie die Embossing-Schablone auf
das Papier (siehe Abb. A).
♦ 2.) Fahren Sie mit dem Embossing-Stift die
Konturen nach (siehe Abb. A).
Abb. A
HINWEIS
► Bitte beachten Sie, dass die Stiftfarbe schnell-
trocknend ist. Beispielsweise nach dem Malen
zweier Symbole, sollte das Puder aufgestreut
werden.
♦ 3.) Streuen Sie großzügig das Embossing-Puder
(gold oder silber) auf die noch feuchte
Stiftfarbe auf. (Das Embossing-Puder
bleibt nur dort hängen, wo zuvor gezeichnet
wurde) (siehe Abb. B).
Abb. B
CHES 9 A1
■ 16 │ DE│AT│CH
♦ 4.) Schütten Sie das überflüssige Embossing-
Puder auf einem Stück Papier ab (am
besten eines, das in der Mitte gefaltet ist).
Schütten Sie jetzt das Puder in den Behälter
wieder ein. (siehe Abb. C+D).
Abb. C
Abb. D
♦ 5.) Erwärmen Sie die mit Puder bedeckte Zeich-
nung. Richten Sie dazu das Heißluftgebläse
mit einem Abstand von 3 bis 5 cm auf die
Zeichnung (siehe Abb. E).
3-5 cm
Abb. E
HINWEIS
► Erhitzen Sie nur so lange das Puder, bis es
vollständig geschmolzen ist. Das Puder ist dann
glatt und glänzend.
Mit Stempelkissen arbeiten
1.) Feuchten Sie den Holz-Weihnachtsmotiv-
Stempel auf dem mit der gewünschte Farbe
Stempelkissen auf (siehe Abb. F).
♦ 2.) Drücken Sie den angefeuchteten Holz-
Weihnachtsmotiv-Stempel auf das Papier
(siehe Abb. F).
Abb. F
HINWEIS
► Bitte beachten Sie, dass die Stempelfarbe
schnelltrocknend ist. Beispielsweise nach dem
Aufdrücken zweier Motive, sollte das Puder
aufgestreut werden.
♦ 3.) Streuen Sie großzügig das Embossing-Puder
(Transparent) auf den noch feuchten
Stempelabdruck (Das Embossing-Puder
bleibt nur dort hängen, wo zuvor gestempelt
wurde) (siehe ABB. G).
Abb. G
CHES 9 A1 DE│AT│CH │ 17 ■
♦ 4.) Schütteln Sie das überflüssige Embossing-
Puder auf einem Stück Papier ab (am
besten eines, das in der Mitte gefaltet ist).
Schütten Sie jetzt das Puder in den Behälter
wieder ein (siehe Abb. H+I).
Abb. H
Abb. I
♦ 5.) Erwärmen Sie den mit Puder bedeckten Stem-
pelabdruck. Richten Sie dazu das Heißluftge-
bläse mit einem Abstand von 3 bis 5 cm auf
den Stempelabdruck (siehe Abb. J).
3-5 cm
Abb. J
♦ 6.) Reinigen Sie den Holz-Weihnachtsmotiv-
Stempel mit den mitgelieferten Stempel-
reiniger (siehe Abb.K).
HINWEIS
► Kappe des Stempelreinigers abziehen, nicht
drehen!
Abb. K
HINWEIS
► Erhitzen Sie nur so lange das Puder, bis es
vollständig geschmolzen ist. Das Puder ist dann
glatt und glänzend.
Zum Abkühlen
■ Legen Sie das Gerät mit der Auflagefläche
auf eine ebene Fläche ab,
■ oder hängen Sie das Gerät an dem Bügel
auf,
–um beide Hände zum Arbeiten frei zu
haben.
–oder zum Abkühlen des Gerätes.
Other manuals for CHES 9 A1
1
Table of contents
Languages:
Popular Power Tools manuals by other brands


Coitech
Coitech KPMD0120-UK Original instructions

DeWalt
DeWalt DW621 instruction manual

Parkside
Parkside PAR 12 A1 Translation of the original instructions

PortaCo
PortaCo WS-10-64-3 Operation, maintenance, and repair manual

Buffalo Tools
Buffalo Tools PC3000 instruction manual

EINHELL
EINHELL TE-BJ 18 Li Original operating instructions


