Crest Audio CS1F User manual

TV Safety
Strap
Warranty and
Installation Guide
CS1F
CS1F This model will suit most flat panel TV's as long as they weigh 60kg Maximum
Thank you for purchasing this Crest TV Wall Mount.
Crest prides itself on supplying quality audio visual accessories to consumers and businesses throughout Australia.
If you follow this guide carefully, we are confident this product will help maximise the enjoyment you obtain from your
audio visual equipment for many years. Please keep this guide for future reference.
SAFETY FIRST
1. Some images in this guide may vary slightly from the actual
components supplied.
2. Ensure this Installation Guide is completely read and
understood before attempting installation.
3. Strap MUST NOT be installed solely in plasterboard, fibre
cement and similar surfaces.
4. Strap MUST be installed in sound supporting structures such
as those made of timber, steel or masonry using appropriate
fasteners.
5. The supporting structure must be capable of sustaining the
combined weight of the TV mount and the strap otherwise
the structure must be reinforced.
6. The fasteners supplied in this hardware pack allow for fixing
into timber and masonry only. If installing into a supporting
structure made of steel, appropriate fasteners must be used
and sourced from an appropriate supplier.
7. Use appropriate tools and safety equipment and ensure
adequate ventilation during installation.
8. If uncertain about any aspect of installation, contact Crest or
an installation professional.
9. Crest holds no responsibility for incorrecty installed products.
TOOLS REQUIRED
Drywall (Timber Frame) Installation
• Stud finder
• Spirit level
• Pencil
• Drill
• Long neck Philips head screwdriver
• 2mm Diameter high speed drill bit
• Adjustable spanner
In addition, for Masonry Installation
• Drill with hammer function
• 6mm Masonry drill bit
• Hammer
If installing on to glass, you will require
• Long neck Philips head screwdriver

8. M6*30 Bolt x 2
9. M8*16 Bolt x 2
10. M8*20 Bolt x 2
11. M8*40 Bolt x 2
12. Large Washer x 4
13. Small Washer x 4
1. Adjustable Strap
2. M4*25mm Screw x 4pcs
3. M4*38mm Screw x 4pcs
4. Concrete Anchor x 4
5. M4*12 Bolt x 2
6. M5*12 Bolt x 2
7. M6*12 Bolt x 2
HARDWARE KIT CONTENTS
ITEM DESCRIPTION ITEM DESCRIPTION
with Steel
Connecting Plates

Attach to the TOP holes of your flat panel
STEP 1 – SELECT THE CORRECT SCREW SIZE FOR ATTACHING THE STRAP TO THE BACK OF
YOUR TV
1. The Hardware Pack contains 4 different sized bolts (#5 to 11) for attaching the strap to your TV.
2. Hand thread these bolts into the HIGHER threaded holes in the back of your TV so you can determine the correct
size.
3. If none of these bolts fit you will need to purchase correct ones from your local hardware, Crest only supply’s the
most popular sized bolts.
STEP 2 – POSITIONING YOUR FLAT PANEL TO THE DESIRED POSITION
1. Before attaching the strap to your TV and Furniture please ensure that your TV is sitting in the correct position.
2. If you have decided to attach the strap to your wooden shelf, mark and drill two 2mm (wide), holes in the appropriate
position then attach using wood screws #2…DO NOT over tighten screws.
3. For attaching to a wall, mark desired position. When attaching to a cavity wall ensure that the connector is screwed into
the STUD (use stud finder to find location) then pre-drill holes using a 2mm bit followed by screw #3. If going into a
Masonry wall pre-drill holes with a 6mm Masonry Drill Bit then lightly tap Concrete Anchor #4 into these holes. Once
this is done you can then use screws #3 to attach connector. DO NOT over tighten screws.
M6 or M8
M4, M5
Screws
WOOD

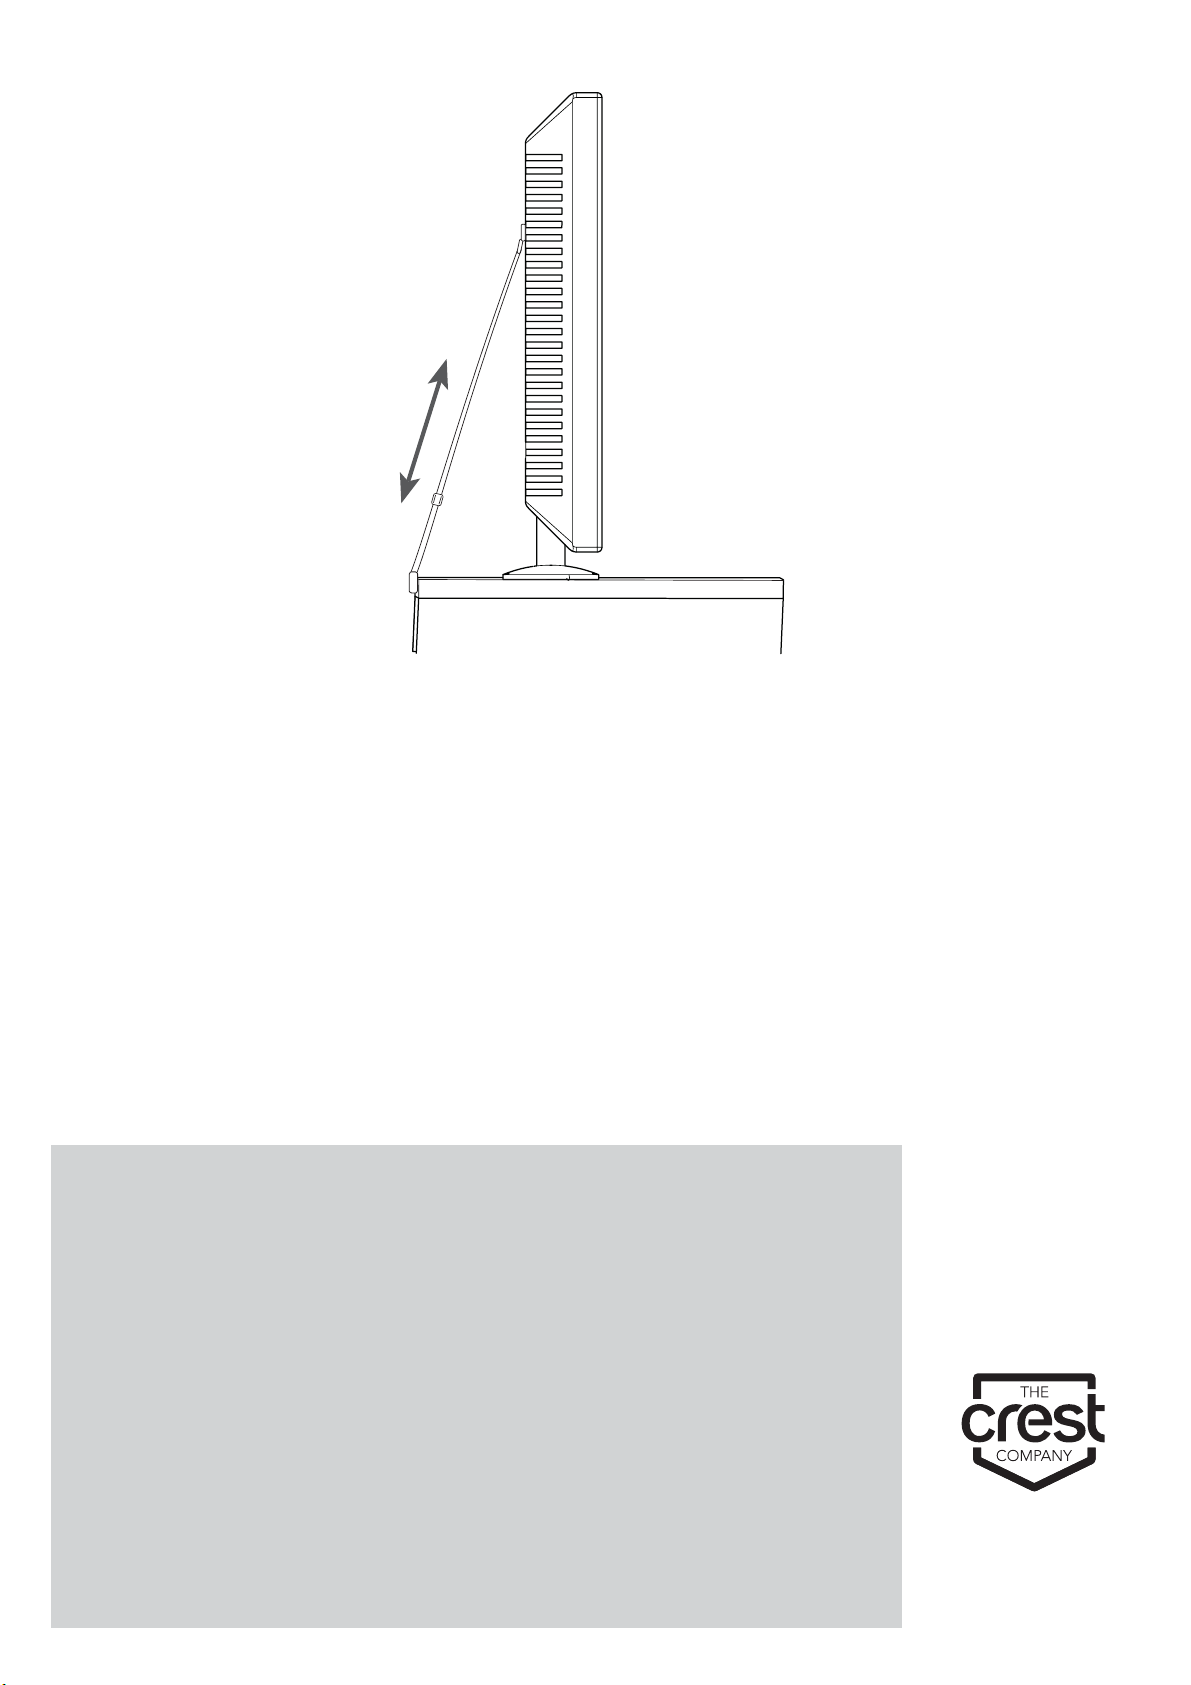
Tighten the tether strap.
PO Box 5658 Brendale
QLD Australia 4500
Customer Support
1800 812 261
www.crest.com.au
AUSTRALIAN OWNED
Proudly brought to you by:
1 YEAR WARRANTY
Olbertz Holdings Pty Ltd ACN 010 003 933 trading as Crest Electronics (Crest Electronics) of 165 South Pine Road, Brendale,
Queensland, 4500, Ph: 1800 812261, Email www.crest.com.au, warrants that if this Crest product purchased by you from Crest or a
retail outlet is found by Crest to be defective in workmanship or materials within 1 year of the date of purchase, Crest Electronics will
(at its election) either repair that product, replace the product, supply an equivalent product or pay the costs of repairing or replacing
the product or acquiring an equivalent product.
This limited warranty will not extend to or cover any expenses associated with removing, demounting the original product or installing
the repaired, replaced or equivalent product or all or any of its components, you must bear these expenses. It also does not cover
damage or loss resulting from intentional or unintentional misuse of, tampering with, alterations to or incorrect installation of this
product or use of this product for purposes other than that for which it is designed or in a manner inconsistent with the product’s
instructions. This limited warranty also does not apply to damage or loss resulting from fair wear and tear or events beyond Crest
Electronics’ control including but not limited to natural disasters.
In order to claim under this warranty, you must contact Crest Electronics and return to Crest Electronics (via our nominated reply paid
address) the product and its components and proof of purchase (including the date and location of purchase) so that Crest can verify
the defect and your purchase. Our goods come with guarantees that cannot be excluded under the Australian Consumer Law. You
are entitled to a replacement or refund for a major failure and compensation for any other reasonably foreseeable loss or damage. You
are also entitled to have the goods repaired or replaced if the goods fail to be of acceptable quality and the failure does not amount to
a major failure. The benefits given by this warranty are in addition to other rights and remedies which you may have under a law in
relation to the goods or services to which the warranty relates.
TECHNICAL SUPPORT
If you have any questions regarding the warranty, installation or use of this product, please contact our Technical Support
Centre on 1800 812 261.
STEP 3 – SECURE STRAP TO FLAT PANEL TV
1. It is now time to secure your strap to the TV using the bolts you previously selected; a washer either #12 or 13 can be
used if required. It is important here to NOT over tighten these bolts but make sure they are securely attached.
2. Tighten the Strap between your TV and Furniture by adjusting the buckle on the strap. It is important here to make sure
that the strap is tight and that your TV base is held flat to the furniture top.
3. After this is completed it is important to test your TV against accidental knock to ensure that your TV is in the correct
position and that it is held stable.
1638/3
Table of contents
Popular TV Accessories manuals by other brands

Sony
Sony WEGA KLV-S19A10 manual

Panasonic
Panasonic LA1000 - TY - Projection TV Replacement Lamp Replacement instructions

Philips
Philips SWV2005 Specifications

Diamond Multimedia
Diamond Multimedia HD 600 Specification sheet

Blaupunkt
Blaupunkt BTV3TB instruction manual

Philips
Philips SWV2259W Specifications