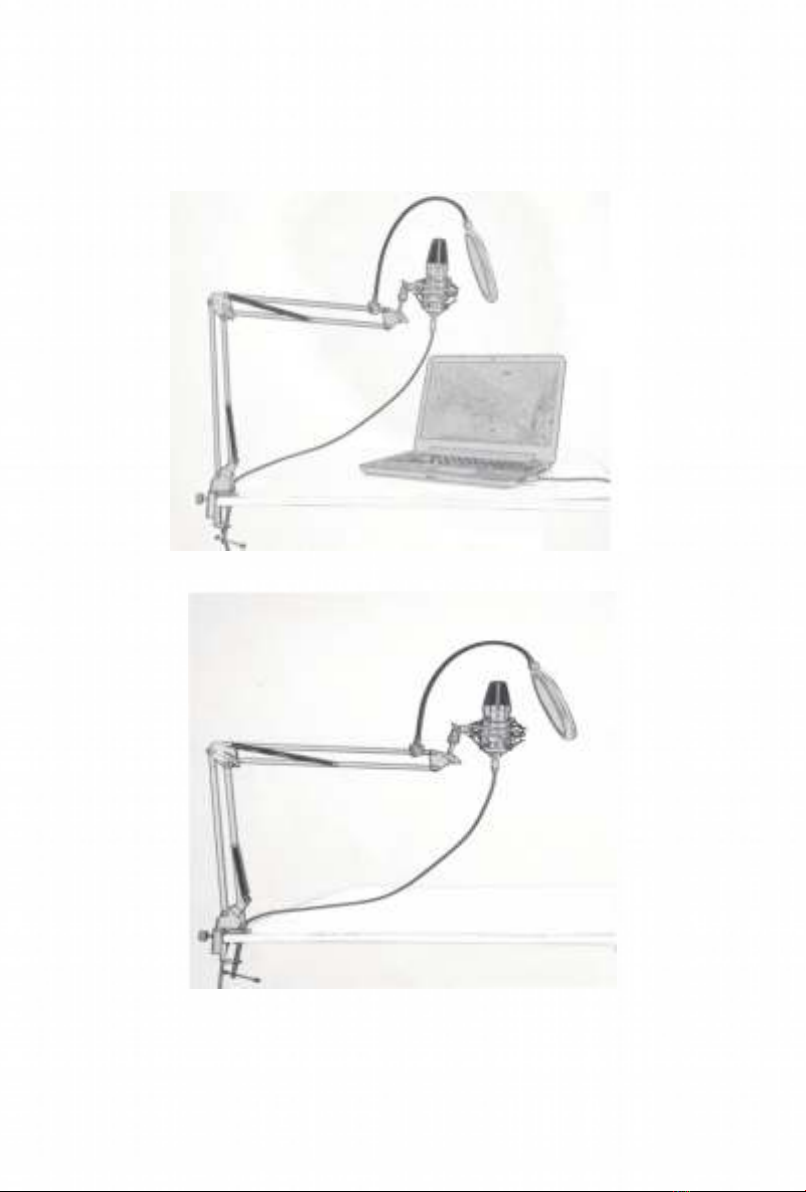
Cresta C-SMART CSM100 User manual


1
Wij feliciteren u met de aankoop van onze C SMART Microfoonset CSM100 en
bedanken u voor het in ons merk en onze producten estelde vertrouwen.
Wij zijn er van overtui d dat u met deze aankoop een hoo waardi kwaliteitsproduct
heeft aan eschaft waarvan u van het ebruik edurende vele jaren plezier zult
hebben. Leest u deze ebruiksaanwijzin eerst zor vuldi door voor u het product in
ebruik neemt, ook wanneer u met het soort product vertrouwd bent. Het eeft u
bruikbare tips om uw product optimaal te ebruiken.
Indien u na het lezen van deze ebruiksaanwijzin toch no vra en heeft over dit
product en het ebruik er van stuurt u dan een e-mailbericht naar onderstaand adres;
wij zullen uw vraa direct beantwoorden.
Nous vous félicitons pour l'achat de notre Kit Microphone Complet CSM100 et vous
remercions de la confiance que vous avez accordée à notre marque et à nos
produits. Nous sommes convaincus qu'avec cet achat, vous avez acheté un produit
de haute qualité que vous aurez plaisir à utiliser pendant de nombreuses années.
Veuillez lire attentivement ce mode d'emploi avant d'utiliser le produit, même si vous
connaissez bien le type de produit. Il vous donnera des conseils utiles sur la manière
d'utiliser votre produit de manière optimale. Si, après avoir lu ce manuel, vous avez
encore des questions sur ce produit et son utilisation, veuillez envoyer un e-mail à
l'adresse ci-dessous ; nous répondrons immédiatement à votre question.
We thank you for buyin our C-SMART Microphonset CSM100 and thank you for the
confidence you have placed in our brand and products. We are convinced that with
this purchase you have acquired a hi h quality product that you will enjoy usin for
many years. Please read these operatin instructions carefully before usin the
product, even if you are familiar with the type of product. It ives you useful tips for
ettin the most out of your product. If, after readin this manual, you still have
questions about this product and how to use it, please send an e-mail to the address
below; we will answer your question immediately.
Herzlichen Glückwunsch zum Kauf unseres C-SMART Mikrofonset CSM100 und
vielen Dank für das Vertrauen, das Sie in unsere Marke und Produkte esetzt haben.
Wir sind davon überzeu t, dass Sie mit diesem Kauf ein qualitativ hochwerti es
Produkt erworben haben, das Sie viele Jahre lan erne verwenden werden. Bitte
lesen Sie diese Bedienun sanleitun sor fälti durch, bevor Sie das Produkt
verwenden, auch wenn Sie mit dem Produkttyp vertraut sind. Hier finden Sie
nützliche Tipps, wie Sie Ihr Produkt optimal nutzen können.
Wenn Sie nach dem Lesen dieses Handbuchs noch Fra en zu diesem Produkt und
seiner Verwendun haben, senden Sie bitte eine E-Mail an die unten an e ebene
Adresse. Wir werden Ihre Fra e um ehend beantworten.
CRESTA INTERNATIONAL B.V.
ROLBRUGWEG 4 | NL-1332 AS ALMERE | NEDERLAND
info@cresta-international.com
www.cresta-international.com
Tel: + 31 20 6932932

2

3
NL: Accessoires overzicht EN: Overview of accessories
FR: Apercu des accessoires DE: Zubehör Übersicht
NL
Microfoon standaard*1
Tafelklem*2
Pop filter*3
USB microfoon*4
USB Kabel*5
Shock mount*6
Shock mount adapter*7
Windkap*8
FR
Support pour microphone*1
Pince de table*2
Filtre pop*3
Microphone USB*4
Câble USB*5
Support de choc*6
Adaptateur pour
monta e sur amortisseur*7
Capuchon en mousse anti-vent*8
DE
Microfon Standard*1
Tischklemme*2
Pop Filter*3
USB Microfon*4
USB Kabel*5
Stossdämpfer*6
Stossdämpfer Adapter*7
Windkappe*8
EN
Microphone stand*1
Table clamp*2
Pop filter*3
USB Microphone*4
USB cable*5
Shock mount*6
Shock mount adaptor*7
Anti-wind foam cap*8
3
2
4
1
5
6
7
8

4
NL: Bureau - tafel monta e EN: Desk mountin
FR: Monta e sur bureau DE: Tischmonta e
NL: Schroef de tafelklem op de rand van een tafel of bureau
Limiet hoo te klem 35 mm
EN: Screw the table clamp on the ed e of a table.
clamp hei ht limit 35mm
FR: Visser le serre-joint de la table sur le bord d'une table.
clamp limite de hauteur 35mm
DE: Schrauben Sie die Tischklemme an die Kante eines Tisches
oder SchreibtischesGrenzhöhenklemme 35 mm

5
NL: Bureau - tafel monta e EN: Desk mountin
FR: Monta e sur bureau DE: Tischmonta e
NL: Steek de verstelbare arm in de openin
EN: Insert the adjustable arm into the hole
FR: Insérez le bras ré lable dans le trou
DE: Führen Sie den verstellbaren Arm in die Öffnun ein

6
NL: Bureau - tafel monta e EN: Desk mountin
FR: Monta e sur bureau DE: Tischmonta e
NL: Zet de schroef vast
EN: Fasten the screw.
FR: Fixez la vis.
DE: Ziehen Sie die Schraube fest

7
NL: Bureau - tafel monta e EN: Desk mountin
FR: Monta e sur bureau DE: Tischmonta e
NL: Draai de knop los om de hoek aan te passen
EN: Loosen the knob to adjust the an le
FR: Desserrer le bouton pour ré ler l'an le
DE: Lösen Sie den Knopf, um den Winkel einzustellen

8
NL: Microfoon Installatie EN: Microphone Installation
FR: Installation du microphone DE: Mikrofon Installation
NL: Schroef de adapter in de openin van de shockmount
EN: Screw the adapter into the hole of the shock mount
FR: Visser l'adaptateur dans le trou du support de l'amortisseur
DE: Schrauben Sie den Adapter in die Öffnun der
Stoßdämpferhalterun

9
NL: Microfoon Installatie EN: Microphone Installation
FR: Installation du microphone DE: Mikrofon Installation
NL: Draai de standaard en de shockmount vast
EN: Ti hten the stand and the shock mount
FR: Resserrez le support et le support de choc
DE: Ziehen Sie den Ständer und die Stoßdämpferhalterun fest

10
NL: Microfoon Installatie EN: Microphone Installation
FR: Installation du microphone DE: Mikrofon Installation
NL: Houd beide zijden van de shockmount vast en spreid deze uit
EN: Hold both sides of the shock mount and spread it out
FR: Tenir les deux côtés du support de l'amortisseur et l'écarter
DE: Halten Sie beide Seiten der Stoßdämpferhalterun fest
und spreizen Sie sie

11
NL: Microfoon Installatie EN: Microphone Installation
FR: Installation du microphone DE: Mikrofon Installation
NL: Plaats de microfoon in de shockmount
EN: Put the microphone into the shouck mount
FR: Placer le microphone dans le support de l'écran
DE: Setzen Sie das Mikrofon in die Stoßdämpferhalterun ein

12
NL: Microfoon Installatie EN: Microphone Installation
FR: Installation du microphone DE: Mikrofon Installation
NL: Maak de USB kabel vast aan de microfoon
EN: USB cable connect to the microphone
FR: Câble USB à brancher sur le microphone
DE: Schließen Sie das USB-Kabel an das Mikrofon an

13
NL: Microfoon Installatie EN: Microphone Installation
FR: Installation du microphone DE: Mikrofon Installation
NL: Normale positie
EN: Normal Position
FR: Voie normale
DE: Normal Position

14
NL: Microfoon Installatie EN: Microphone Installation
FR: Installation du microphone DE: Mikrofon Installation
NL: Ondersteboven positie
EN: Upside down way
FR: La voie à l'envers
DE: Um edrehte Position

15
NL: Microfoon Installatie EN: Microphone Installation
FR: Installation du microphone DE: Mikrofon Installation
NL: 1. Plaats de schuimrubberen windkap
2. Monteer het popfilter vast en pas de hoek aan
EN: 1 . Put the Anti-wind Foam Cap on
2 . Mount the pop filter ti ht it up and adjust the an le
FR: 1 . Mettez le bouchon de mousse anti-vent
2. Monter le filtre anti-pop, le serrer et ajuster l'an le.
DE: 1. Installieren Sie die Schaumstoff-Windschutzscheibe
2. Installieren Sie den Pop-Filter und stellen Sie den Winkel ein

16
NL: Verbind met de computer
voor Type A
EN: Connect to the computer
for Type A
FR: Se connecter à l'ordinateur
pour le type A
DE: Stellen Sie eine Verbindun
zum Computer her
für Typ A.
NL: Computer met USB Type-A, sluit deze rechtstreeks aan
EN: Computer with USB Type-A, connect it directly
FR: Ordinateur avec USB de type A, le connecter directement
DE: Computer mit USB Typ A, direkt anschließen
USB-Type A vrouwelijk
USB-Type A femelle
USB-Type A female
USB-Typ A-Buchse

17
NL: Verbind met de computer
voor Type C
EN: Connect to the computer
for Type C
FR: Se connecter à l'ordinateur
pour le type C.
DE: Stellen Sie eine Verbindun
zum Computer her
für Typ C.
NL: Computer met USB Type-C, OTG-adapter
is nodi (niet inbe repen)
EN: Computer with USB Type-C , OTG adaptor
is needed (not included)
FR: Ordinateur avec adaptateur USB Type-C , OTG
est nécessaire (non inclus).
DE: Computer mit USB-Typ-C-OTG-Adapter
wird benöti t (nicht enthalten)

18
NL: Verbind met de computer
voor Type C
EN: Connect to the computer
for Type C
FR: Se connecter à l'ordinateur
pour le type C.
DE: Stellen Sie eine Verbindun
zum Computer her
für Typ C.
NL: Verbind de OTG adapter met de USB kabel
EN: OTG connect with the USB cable
FR: OTG se connecter avec le câble USB
DE: Verbinden Sie den OTG-Adapter mit dem USB-Kabel

19
NL: Verbind met de computer
voor Type C
EN: Connect to the computer
for Type C
FR: Se connecter à l'ordinateur
pour le type C.
DE: Stellen Sie eine Verbindun
zum Computer her
für Typ C.
NL: Verbind vervol ens met de computer
EN: Then connect to the computer
FR: Se connecter ensuite à l'ordinateur
DE: Stellen Sie dann eine Verbindun zum Computer her
Table of contents