Crewsaver CREWFIT 18OPRO User manual

Owners Manual
IMPORTANT: PLEASE READ THIS MANUAL
BEFORE USING YOUR CREWFIT LIFEJACKET
CREWFIT 18O
PRO

2
XXXXXXXXXXXX
150N LIFEJACKETS
This level 150N lifejacket will give a reasonable assurance of safety from
drowning to a person who, for whatever reason, is no longer capable of
helping themselves fully. This level is intended for general application or
for use with foul weather clothing. It will turn an unconscious person into
a safe position and requires no subsequent action by the user to maintain
this position. This jacket is suitable for oshore use.
IMPORTANT INFORMATION
Train yourself in the use of this device

CREWFIT 18O
PRO
Introduction To Lifejackets
Crewt 180N Pro Lifejacket Features ....................................Page 4
Crewt Lifejacket Donning
Donning the Crewt 180N Pro ..............................................Page 5
Lifejacket Ination Methods
Know Your Ination Mechanism Type....................................Page 6
Re-Arming Pro-Sensor Operating Mechanisms.....................Page 7
Lifejacket Features & Packing
Unpacking the Crewt 180N Pro ..........................................Page 8
Repacking the Crewt 180N Pro...........................................Page 9
Attaching & Using Spray Hoods............................................Page 11
Care & Maintenance
General Care & Maintenance ................................................Page 12
Cleaning, Storing & Other Important Information...................Page 13
Testing Your Lifejacket
Testing Your Lifejacket ..........................................................Page 14
Using the Ination Tube on Inatable Lifejackets....................Page 16
Other Information
Using Safety Lines with a Harness Lifejacket ........................Page 17
Correct Use of Lifting Beckets ..............................................Page 18
Warranty & Servicing.............................................................Page 19
CONTENTS
3

4
THE CREWFIT 180N PRO LIFEJACKET
CREWFIT 18O
PRO
ISO12402-3 approved
High performance 180N Ination chamber
Exceptional turning speeds
Durable Indicator window
Hard wearing outer cover
Soft loop deck safety harness on harness version
ISO 12401:2009 on harness version only
Twin burst cover zip
Rapid adjusting buckles for perfect t
AIS S20 compatible
Single lifting becket
Single crotch strap*
Whistle
Optional SOLAS approved light and spray hood
*Not included on lifejackets sold into Australia

1
2
3
BUCKLE
THREADING
CREWFIT 18O
PRO
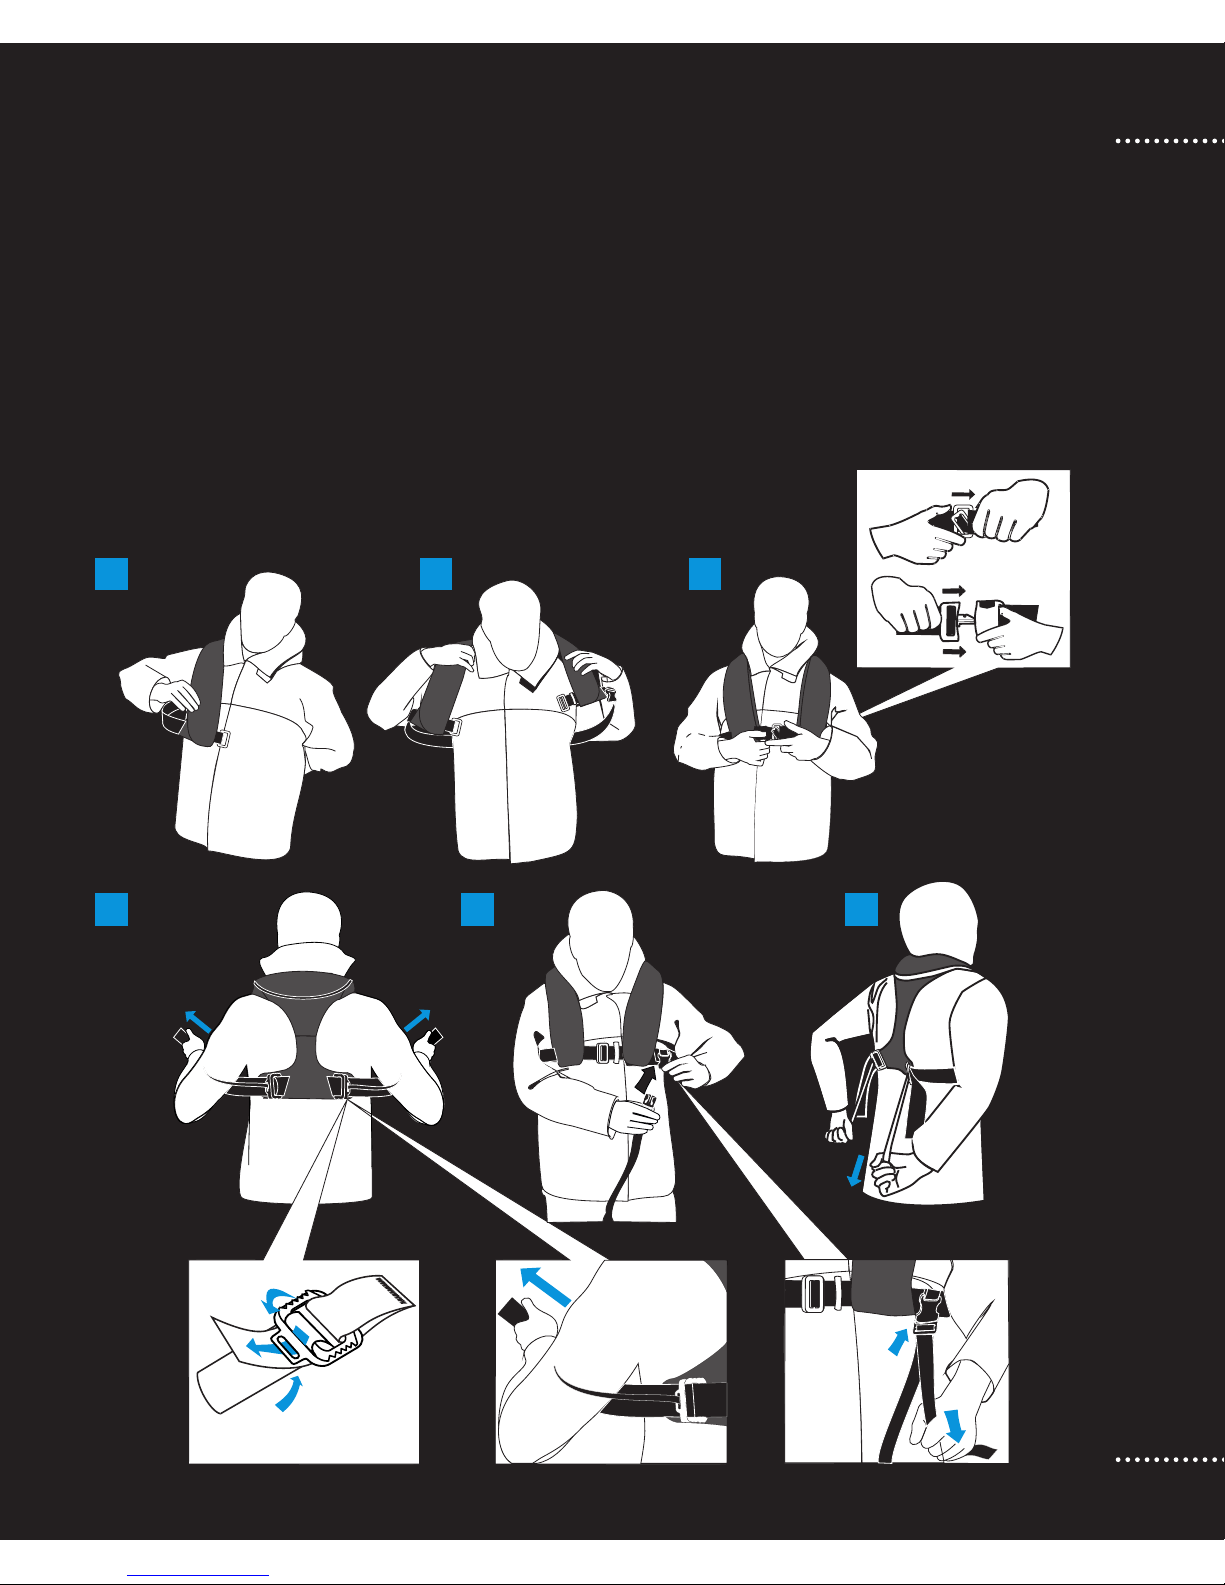
DONNING THE CREWFIT 180N PRO LIFEJACKET
1 & 2 Don like a normal jacket
3Fasten front buckle
4Adjust waist belt by pulling webbing forward for a close secure t
5Fasten crotch strap* buckle and adjust straps by pulling webbing downwards for
a close secure t
6 To release straps, pull the release tabs attached to the adjustment buckles
1
4 5 6
2 3
5
DONNING YOUR LIFEJACKET
*Not included on lifejackets sold into Australia

6
KMOW YOUR INFLATION TYPE
KNOW YOUR INFLATION MECHANISM TYPE
PRO-SENSOR MK3: AUTOMATIC OR MANUAL
1(AUTOMATIC ONLY) Check that the automatic ring capsule (C) is screwed fully onto the
operating mechanism (B). Ensure that the capsule (C) has not been red inadvertently by
checking that the bottom indicator shows green (D). Also check the expiry date on the side of
the capsule. Do not use a capsule that is out of date.
2Check the CO2 cylinder (A) is securely screwed into the operating mechanism. Check that the
top indicator (D) shows green.
3 Ensure toggle (E) is easily accessible.
A AB BD DC
E E
AUTOMATIC
On an automatic model, unscrew and remove the
automatic capsule rst
MANUAL

7
RE-ARMING
UML
Pro-Sensor
AUTOMATIC
On an automatic model, unscrew and remove the
automatic capsule rst
MANUAL
UML
Pro-Sensor
UML
Pro-Sensor
AUTOMATIC MANUAL
UML
Pro-Sensor
UML
Pro-Sensor
AUTOMATIC MANUAL
WARNING: If you are unsure or have any doubt how to re-arm
and repack your lifejacket return the product to Crewsaver or
your nearest Crewsaver service agent.
RE-ARMING PRO-SENSOR OPERATING MECHANISMS
Always re-arm your lifejacket ready for use before you stow it away. The operating mechanism
must be thoroughly dried before re-arming. When re-arming your lifejacket it is important
you use only Crewsaver supplied components. For your nearest supplier contact
Crewsaver or see www.crewsaver.com
AUTOMATIC ONLY Take the new automatic ring capsule and screw onto the operating
mechanism in a clockwise direction. Screw tightly ensuring there is no gap between the
capsule and the base of the operating mechanism. Do up hand tight. The bottom indicator will
turn green when the capsule is tightened correctly.
Check that the cylinder-sealing gasket in the end of the operating mechanism has been
correctly tted, or replaced if necessary. Check the new CO2 cylinder has not been used and
screw into the main body in a clockwise direction. Ensure the cylinder is screwed right down
and do up hand tight. The top indicator will turn green when the cylinder is tightened correctly.
The operating mechanism is now rearmed. Both Indicators should show green. Do not use if
either indicator is red.
See www.uml.co.uk for more details on the UML Pro-Sensor Mk3 mechanism.

UNPACKING YOUR LIFEJACKET
OPENING THE LIFEJACKET COVER
1Open the velcro tab.
2To avoid damaging your lifejacket zip, pull apart the zip, open the zip via the quick burst
elements, holding the cover either side.
3Once the zip has opened, insert your nger and slide it around the lifejacket. Undo the zip
all the way around the outside of the lifejacket. The lifejacket cover should now be open
and the ination chamber visible. Fully separate the zip. Both sides of the zip should be
apart, with the zip slider free to move back around the lifejacket to the start.
PREPARING ZIP FOR RE-PACKING
1Ensure that the zip slider is separated on one side.
2Slide the zip around to the right side of the jacket as worn.
3Feed the zip teeth into the slider ready to re-pack.
YKKYKK
YKK
YKK
YKK
YKK
YKK
YKK
YKK
YKK
To Open
To Close
21 3
8

9
REPACKING YOUR LIFEJACKET
REPACKING THE CREWFIT 180N PRO LIFEJACKET
Ensure that your lifejacket is completely dry before packing.
(Refer to page 12 - Care and Maintenance for details on storing and cleaning your lifejacket)
1Start with folding the bottom left of the chamber up.
2Fold bottom right corner in then fold the whole of the right side over.
3Fold left side over twice. The operating head should lie on top.
4Bring the two sides of the cover together and secure with the velcro tab.
5Zip up the left hand side to secure folds. Now fold the bottom right of the chamber up.
6Fold bottom left corner in then fold the whole of the left side over. Check window panel is
showing ring mechanism.
a
b
a
b
HR
H
R
a
b
H
R
1
3
5
2
4
6

10
REPACKING YOUR LIFEJACKET
a
b
a
c
b
b
ba
7
9
11
8
10
12
7Fold over the right side and fold again so that the chamber is tucked neatly within the
cover.
8Bring the two sides of the cover together and secure with the velcro tab.
9Concertina the chamber collar with two folds underneath the black fabric neck retainer.
10 Fold in the last corners of the chamber and tuck in the black fabric neck retainer. Bring the
zip round ensuring the velcro tabs are secure.
11 Finally tuck zips out of the way into the cover.
12 Ensure toggle is accessible and lifejacket is neat with the ring mechanism still clear in the
window.

11
SPRAY HOODS
REPACKING YOUR CREWFIT 180N PRO LIFEJACKET
WITH HOOD (SOLD SEPERATELY)
After these three steps please refer to the start of repacking the Crewt 180N Pro lifejacket
and follow steps 1–12 (Page 9)
1 32
2
2
11
2
2
1 2 3
ATTACHING YOUR SPRAY HOOD TO YOUR CREWFIT
1Locate the toggle at the top of the hood and put through the fabric loop at the top of the bladder.
2Locate the velcro tabs on the side of the hood and secure through the holes in the ination bladder.
3Your hood is now tted securely to your lifejacket and ready for use.
USING SPRAY HOODS WITH YOUR CREWFIT LIFEJACKET
Familiarise yourself with how the spray hood works if needed in an emergency.
1Hood webbing is located at shoulder height on Ination chamber.
2 Pull webbing up and overhead.
3 Secure webbing over the front lobes of the ination chamber

CARE & MAINTENANCE OF YOUR LIFEJACKET
Your lifejacket is an important item of technical safety equipment. The working life of the
lifejacket will be prolonged if the following instructions are adhered to:
Check that both status indicators are displaying green
Check the expiry date, if any items have expired they MUST be replaced
before use
(Refer to page 7 – Re-arming your lifejacket) for details on how to t
a new capsule
Ensure a fully charged cylinder is tightly tted
Ensure that the manual pull toggle is accessible
IF A RED INDICATOR SHOWS, CHECK THE FOLLOWING ITEMS:
Ensure a fully charged cylinder is tightly tted.
Ensure an automatic capsule is tightly tted (on Pro-Sensor Automatic)
Check that the expiry date has not passed and check that there is a
plate in the base of the capsule. If there is no plate and a red dot is
visible the capsule has been red and must not be used. See re-arming
your lifejacket for how to t a new capsule onto your operating mechanism.
Ensure that the manual pull toggle is accessible.
AFTER USE (if Inated)
Rinse your lifejacket after use. (Refer to page 13 - Cleaning & Storing
Your Lifejacket)
Re-arming your lifejacket. (Refer to page 7 - Re-arming pro-sensor
operating mechanisms)
PERIODICAL CHECKS
A complete inspection of your lifejacket is to be carried out every
three months.
Check the fabric for cuts, tears, abrasion and signs of damage caused
by heat.
Leak testing is an important part of the periodical checks. Inate your
lifejacket orally until rm. Leave overnight or for a minimum of 12
hours. A lifejacket that is leaking will not hold its rmness and must be
replaced. (Refer to page 9 - Repacking the Crewt 180N Pro)
NOTE: Avoid wide variations in temperature when performing this test.
Temperature variation can cause the inatable chamber to lose rmness.
Examine the lifejacket for signs of damage, wear and tear or contamination.
Pay particular attention to the webbings and the stitching on your lifejacket.
Perform the oral ination valve test as follows:
1 Fully inate the lifejacket
2 Place the oral tube into water and check for bubbles
3If bubbles appear a replacement valve is required.
Check the expiry date on the automatic ring capsule. If it has expired it should be replaced.
EXPDATE2010
WARNING: If you are not condent in self-inspection of your
lifejacket using these instructions, refer to your closest Crewsaver
approved service station for details. Crewsaver approved service
stations can be found via our website: www.crewsaver.com
12.00
00.00
12
CARE & MAINTENANCE
EXPDATE2010

13
CLEANING AND STORING
WARNING: Inating your lifejacket using CO2 ination
could over pressurise and damage your lifejacket if it has
already been orally inated fully. Do not use as a cushion or
in any other way likely to cause damage.
WARNING: This lifejacket is inated by a CO2 gas cylinder.
Gas cylinders are dangerous goods, and they must be kept
away from children and not misused.
CLEANING & STORING YOUR LIFEJACKET
It is important that the lifejacket is stored in a dry, well-ventilated space. If the lifejacket is wet
or damp, and it is tted with an automatic ring capsule, it is advisable to remove the capsule
until the lifejacket is completely dry. Any dampness in the lifejacket may penetrate the capsule
and eventually cause it to operate the lifejacket. It is advisable to hang the lifejacket to dry on
a coat hanger until it is completely dry before stowing. To avoid ination, do not submerge
the lifejacket in water unless the lifejacket has been used or the capsule has been removed.
Periodically rinse the lifejacket in fresh water, particularly if it has been in contact with salt
water. Oil and similar marks should be removed by washing with warm soapy water.
Never put your lifejacket in a washing machine, spin or tumble dryer.
After washing always allow your lifejacket to dry naturally before stowing in a dry place.
OTHER IMPORTANT INFORMATION
Your new Crewt has been tested to meet a temperature range between
-10ºC and 40ºC as required by BS EN ISO 12402.
When the temperature is well below freezing, your lifejacket may operate
much slower than normal and at very low temperatures a fully discharged
cylinder may not adequately inate your lifejacket. In these temperatures
the oral tube should be used for additional topping up if necessary.
This lifejacket is not a PFD until fully inated. Full performance may not
be achieved using certain clothing or other circumstances. Certain
circumstances will alter performance, such as waves or the wearing of
garments which provide additional buoyancy. The buoyancy provided by
the jacket can be aected if heavy objects are carried in the pockets.
A whistle is located on the inside left ination chamber. Six long blasts
repeated at intervals is the international distress signal.
FOR USE WITH CREWFIT
180N PRO LIFEJACKETS

14
TESTING YOUR LIFEJACKET
Practice and training are required before use.
In an emergency, there is no time to learn how equipment works. Crewsaver recommend that
you try your lifejacket to ascertain its performance before use in an emergency. This will also
help familiarise yourself with the product.
When trying out your lifejacket, remember that you may need replacement parts or re-arming
kits to get your lifejacket ready for use again.
If you are a weak swimmer it is strongly recommended that you use an automatically operated
lifejacket or an inherently buoyant device.
Step 1: Put on your lifejacket by following the donning Instructions. (Refer to page 5 - Donning
the Crewt 180N Pro)
Step 2: Stand in shallow water or in a swimming pool, ensuring that the water is just deep
enough for your head to be above the water’s surface.
Step 3: Inate your lifejacket. This can be done the following ways:
Automatically: If your lifejacket is an automatic it should fully inate within ve seconds of
water contacting the automatic ring capsule. This activates the operating mechanism and
releases the CO2 cylinder into the lifejacket.
Manually: The lifejacket can be activated manually by a sharp downward pull on the toggle.
The lifejacket should fully inate within 5 seconds.
Oral Ination: If you are using a pro-sensor automatic lifejacket ensure that the automatic
ring capsule has been removed before entering the water. Open the lifejacket cover and
locate the oral ination tube, remove the cap and blow into the tube.
Once inated see how the lifejacket holds you in the water, noting the position that it holds you
in with your mouth well clear of the water’s surface and your body at an angle.
WARNING: Re-arm and re-pack your lifejacket following testing

15
TESTING YOUR LIFEJACKET
While in the water it is also recommended that you try out your lifejacket’s spray hood.
1Reach above your head and locate the grab loops on the spray hood. (Refer to page 11 -
Spray hoods)
Your lifejacket should be tested whilst wearing any oshore clothing. Check that the lifejacket
will turn you from a face down position to a face up position.
NOTE: Some oshore clothing in particular drysuits and immersion suits can trap air - this may
aect the performance of the lifejacket.
After testing your lifejacket completely deate the lifejacket using the oral ination tube. Let
the lifejacket dry thoroughly. Do not expose to direct sunlight or heat. Re-arm your lifejacket
following the relevant re-arm & re-pack instructions. (Refer to page 7 for rearming and page
9 for repacking instructions)

16
USING INFLATION TUBES
USING INFLATION TUBE ON INFLATABLE LIFEJACKETS
If required all inatable lifejackets can be inated orally without ring the CO2 cylinder.
INFLATING YOUR LIFEJACKET
1Remove the valve cap (a) at the top of the ination tube (b).
2Blow into the ination tube. The protective cover on the lifejacket will
unfold as the ination chamber takes shape. To make this easier open up
the cover by hand and continue to blow into the tube until it is dicult to
inate further.
3 Ensure once inated that you replace the valve cap (a). It is important to
keep this in place, except when the deation valve is being used.
DEFLATING YOUR LIFEJACKET AFTER USE
1 Reverse the valve cap (a) at the top of the ination tube and hold it in the valve.
2Squeeze the lifejacket to expel the air inside.
3 When as much gas as possible has been expelled, re-inate the lifejacket orally. This will reduce
the concentration of any remaining CO2.
4Squeeze the lifejacket a second time expelling as much air as possible.
5The lifejacket should now be completely deated, and can be folded into the cover as before.
6Replace the valve cap (b) back into the normal position on top of the Ination tube.
WARNING: Inating your lifejacket using CO2 ination could
over pressurize and damage your lifejacket if it has already
been orally inated fully.
WARNING: Do NOT use anything other than the valve cap to deate
your lifejacket. Any other item used may cause damage to the valve.
WARNING: If the lifejacket has been inated using a gas
cylinder take care not to inhale the expelled CO2 gas.
WARNING: Over ination can damage your lifejacket.
12
A
A
B
B

USING SAFETY LINES WITH A HARNESS LIFEJACKET
The Crewt range of lifejackets can be used with all approved safety lines, on lifejackets
with a harness.
Available within the Crewsaver range and suitable for use on the Crewt 180N Pro are both
2 hook and 3 hook safety lines.
A 2 Hook Safety Line should be used when connected to a strong point on the boat; this will
help to ensure you are attached securely in adverse conditions.
The 3 Hook Safety Line enables the transfer from one secure point on the boat to another,
ensuring you remain safely attached at all times during the transfer.
ISO 12401
Deck safety Harness Class 1 0514
WARNING: The deck safety harness and safety line are intended to
prevent the user falling overboard. They do not provide protection
against falls from a height.
The deck safety harness and safety line may transmit very large forces.
Only attach to strong hooking points or jack lines.
Minimum strength of 1 tonne.
It is unsafe to wear this harness loose. The harness shall be worn tightly
in order to be eective.
If your harness and/or safety line are subjected to an exceptional
load while worn, it is vital that these are returned to Crewsaver for
inspection, even if no external damage is visible.
17
USING SAFETY LINES WITH A HARNESS LIFEJACKET
Non harness version can be worn over a separate harness.

18
LIFTING BECKETS
1 2
CORRECT USE OF LIFTING BECKETS
1 Lifting becket is located below the left lobe of the ination chamber on harness version
lifejackets and on the right lobe of non-harness versions.
2Use lifting becket to haul casualties from the water.

19
YOUR 3 YEAR GUARANTEE
Crewsaver has over 50 years’ experience in manufacturing safety equipment and our total
commitment to quality enables us to oer you a FULL 3 YEAR GUARANTEE on your lifejacket.
This 3 year guarantee includes all parts and labour to repair defective equipment and the
return postage.
The guarantee covers all Crewsaver lifejackets and combined lifejackets/harnesses worn for
normal leisure purposes. This excludes commercial and industrial use and other applications
where equipment is either worn for prolonged periods or in severe conditions.
The guarantee does not cover the eects of accidental damage, normal wear and tear, or
mistreatment, or where repairs have been carried out other than by a Crewsaver approved
serviced centre.
The guarantee covers all lifejackets registered via the Crewsaver website, any products
returned that are not registered with Crewsaver will not be considered for warranty.
Remember your lifejacket is an important piece of safety equipment and should be serviced
annually. Servicing should be completed with genuine Crewsaver parts at a Crewsaver
approved service station. Crewsaver will not accept any lifejackets for warranty that have not
been serviced annually at a Crewsaver approved service station.
Please copy the Product Serial Number and Date Purchased below for your own reference:
For more information or to register your product please visit our website
www.crewsaver.com
SERVICE ANNUALLY
Your lifejacket must be serviced on an annual basis.
Never try to repair a lifejacket yourself. You could cause more damage and render the
lifejacket irreparable or aect the warranty.
Always return the lifejacket to a Crewsaver approved service station for repairs and servicing.
To nd your nearest Crewsaver approved service station visit:
crewsaver.com/ndastockist
SERIAL NO: DATE PURCHASED:

ART0196i2
www.crewsaver.com
Crewsaver, Survitec House
Lederle Lane, Gosport
Hampshire
PO13 0FZ
UNITED KINGDOM
Tel: +44 (0) 1329 8200 00
Fax: +44 (0) 1329 2362 18
Crewsaver, Units A, F & G
75 St Hilliers Road
Auburn NSW 2144, PO Box 6091
Silverwater BC 1811
AUSTRALIA
Tel: +61 2 9330 7000
Fax: +61 2 9330 7098
Table of contents
Popular Boating Equipment manuals by other brands

Quick
Quick MC2X 56k Installation and use manual

Floe
Floe 510-20000-00 Assembly instructions

SLEIPNER MOTOR AS
SLEIPNER MOTOR AS Side-Power Series installation manual

MINN KOTA
MINN KOTA RIPTIDE ST user manual

Floe
Floe VSD 6000 Assembly instruction

OCEANSOUTH
OCEANSOUTH MA080-5 Assembly and installation instructions