Crorzar Outdoor 360 Owner's manual


The following are included in the box with your purchaseMain Device: Camera x 1Accessory 1: Power adapter x 1Accessory 2: Waterproof cap x1 Screws bag×1Included in the Box2

Please check the interface and buttons of the camera before using.Product Details3remove the screw toopen the hatch to install SD Card insideSpeakerDual AntennaLens4pcs white LEDIR LEDIR sensorMicrophone

4Available on theApp Store
Get it onGoogle play
Method 1:Scan the QR Code to download the App.Method 2:Search for "Crorzar Cameras" in the App Store or "Crorzar Pro" in Google Play Store and download directly.How to Download APPScan this QR code to download App for iOS devicesScan this QR code to download App for Android devices
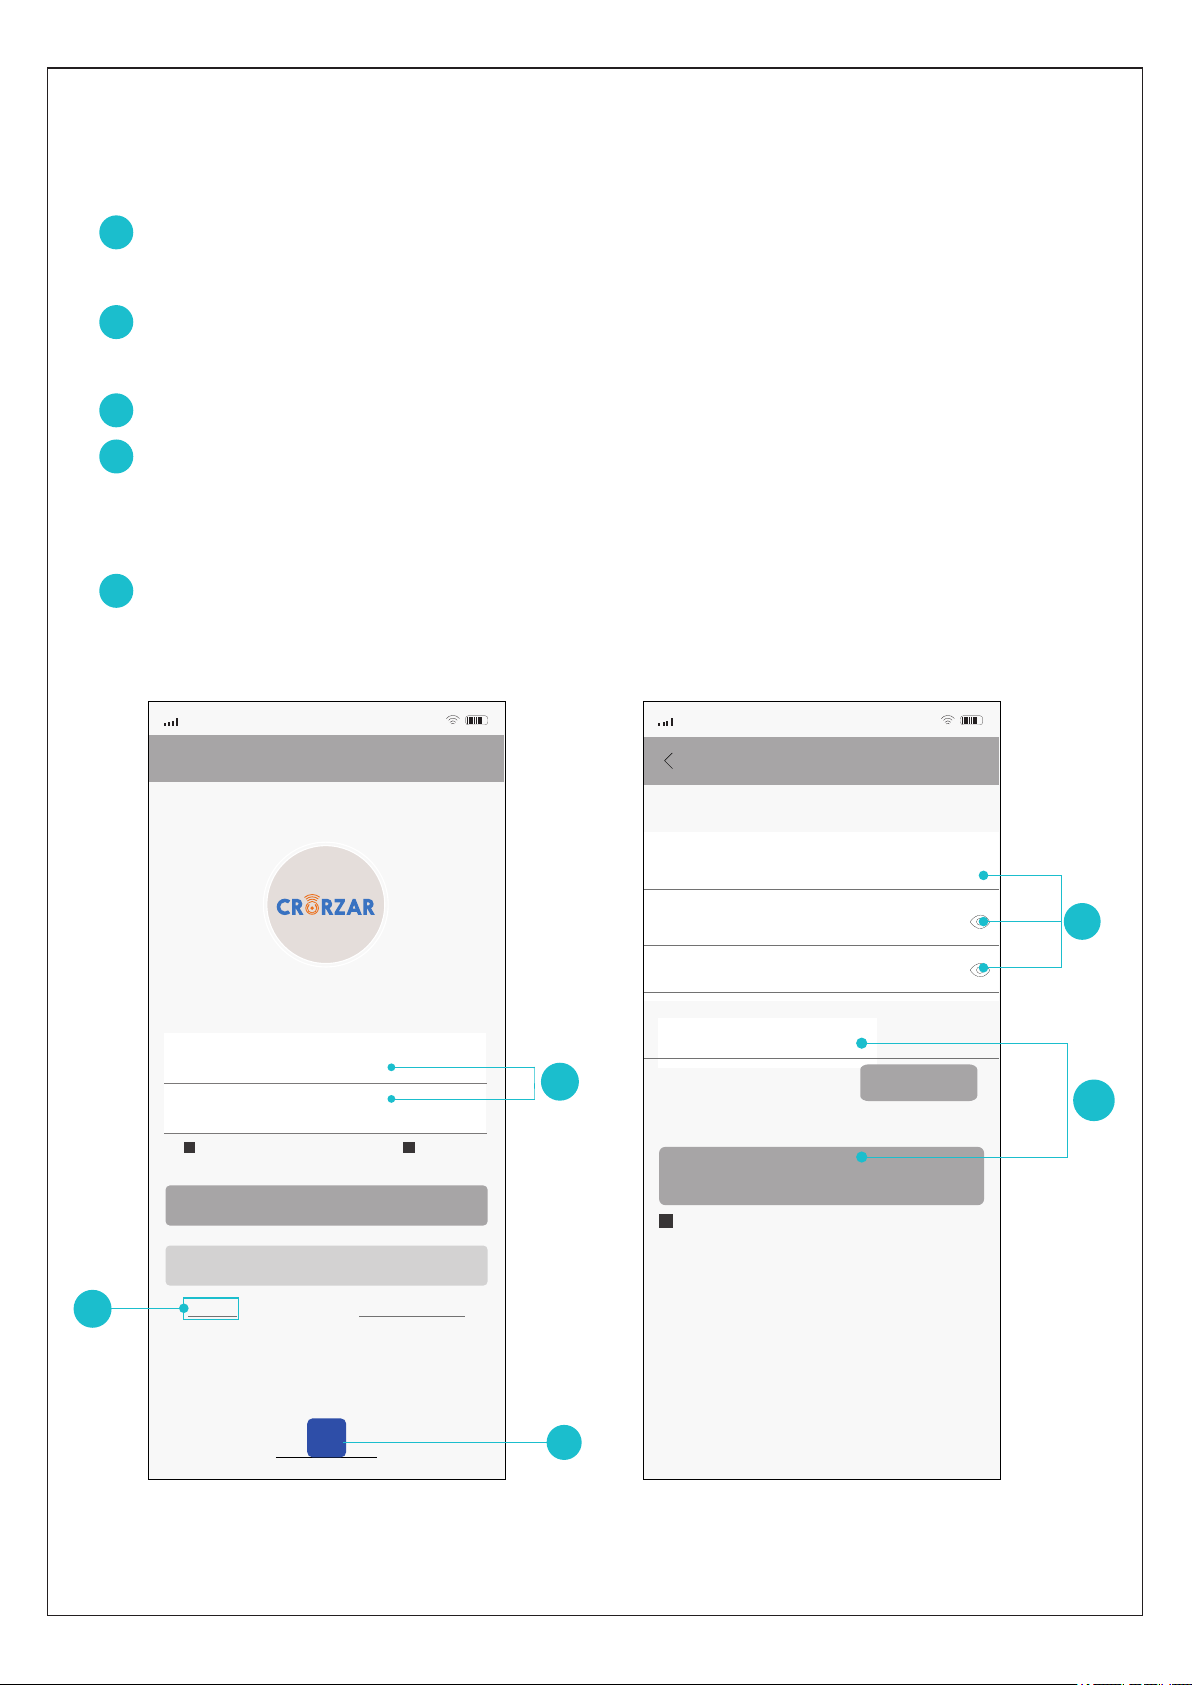
User registration & loginIf you have a Facebook ID, you can tap the Facebook icon onthe APP interface directly to log in.You can also create a new account and log in: Click "Sign Up" to register anew account.Enter new username and password.Enter a email address and tap “Get Code”(a verification email with a code will be sent to this address so please find the email to get the code and then input this code in where you just entered the email address and tap Sign Up).Then log in using the username and password you just registered.123455Registration4G10:07…Sign UpUsed for resrt password if you forget itUsernameConfirm passwordPassword4-32 characters,numbers8-32 digit with the combination of charater anEnter password again√I Agree Privacy Statement134PasswordLog in4G10:07Account LoginUsernameGuest Loginusername..........√Remember Password√Auto LoginSign UpForgot Password
f
2Enter Email to Verify AccountGet Code5

When Device says “wait to be configured”,click “Next Step”.Set Up Device Using Wi-fi4G10:07…Next stepClick here for troubleshooting stepsRouter Setting4G10:07…Confirmhyws2014*Select Wi-fi network, enter password, and push “confirm”Wi-FiEnter WiFi passwordConnection Issues?Enter the WIFI password andclick “Confirm”Configure network connection for camera Method 1: through WIFI (recommended)6Click " " to check whetherthe WIFI password isvisible or not3Make sure the WIFI network is okay,click Next stepSmart Devices4G10:07+Add DeviceDevicesManual EventsMy Account1After logining in successfully,click"+" in the upper right corner.Add Device4G10:07MoreSet Up Device Using Wi-fiAdd Guest DeviceHold “RESET” button on the bottom/back of the device to begin setup2Click "Set Up Device Using Wi-fi”4Make sure your device isconnected to the sameWIFI network that you wishthe camera to connect toMake sure WIFI passwordis correctPlease note, 2.4GHz Wi-fi network required

Smart Devices4G10:07DevicesManual EventsMy Account99f4b5b94d298110OnlineLong press the device in list to delete+
Wifi Network4G10:07CancelPush the QR code button in theupper right hand corner to displaythe wifi configuration QR code178'connecting,Please WaitSet PasswordSN:53effc385dd8966aConfirm New RasswordSet Password4G10:07※Password setting failed,long press reset button to restoer factory settings.Afterwards,add the device again,reset password.ConfirmSet New Password7This password is for sharingthe device and is requiredwhen sharing the camerawith another userClick "save" to finish the operation to view thereal-time screenPush the QR code button in the upper right hand corner to generate a configuration code on your device. Hold this code a few inches from the cameralens for a few seconds to initiate camera setup. Holdthe QR code in place until you hear 2 prompts. Thefirst will say “Connecting, please wait”, and the second will say “Connect to router successfully”. HOLD THE QR CODE IN FRONT OF THE LENS UNTIL YOU HEAR BOTH PROMPTS.If you do not hear both prompts after 1 minute, pressand hold the reset button on the back of your camerafor 5-10 seconds until you hear a prompt indicatingthat the camera is restoring to factory settings. Restartthe learn in process. 56Enter the new password of the device and please save itDo not close the interface when configuring
Setup a name for the devicePick a name4G10:07SaveCamera
7Input the name of the device
AlertsSettingsMotion Settings

Note: About wired connection, you need to connect the camera to the router using the LAN cable.8Method 2: via LAN port1. After logging in successfully, click “+” in the upper right hand cornerand then click “”and from the popup select the fourth methodMore (Fig1).“Add device in the same WLAN”The mobile phone must be connected to the same WIFI network. (if no device found, please check if it is the same network)2. Go to the "Search Device" interface and click on (Fig 2)."robot_****" Click "Add Device" to complete it.3. The device will appear in the device list of the APP (as shown in Fig 3), and display the camera "online", indicating that the camera configuration is complete.4. Click play button on the screen to enter real-time monitoring, enter the settings to set the wireless network and other relevant operations.
Search Device4G10:07camera_c6a91580d7be9dcd010b192.168.0.107
(Fig 1)(Fig 2)(Fig 3)
Smart Devices4G10:07+DevicesManual EventsMy Account99f4b5b94d298110OnlineLong press the device in list to delete
Alerts
SettingsMotion Settings
Add Device4G10:07hideSet Up Device Using Wi-fiAdd Guest DeviceHold “RESET” button on the bottom/back of the deviceto begin setupAdd My device(AP mode)Add device in the same WLANAP mode

Method 3: via AP Mode1. Press the button 2-5 times shortly on the device, the device “RESET”will prompt “Entering AP direct connection mode”.2. Click the "+" at upper right corner of the APP , then click "More" at the upper right. Select the fifth mode "AP mode" (Fig 4).3. IOS device: click “to set the WIFI” (Fig 5)Android: Search device name (Figure 6)4. Find the device and click Add or display the name "robot_****" and adding.Input the AP password 1234567890 and add the device to view it (Figure 7).(AP mode is limited to remote access within 10 meters when without network) 9Note: Direct connection is limited to remote viewing within 10 meters when without networkSearch Device4G10:07…camera_c6a91580d7be9dcd010b192.168.0.107(Fig 4)(Fig 5)(Fig 6)(Fig 7)Smart Devices4G10:07…DevicesManual EventsMy Account99f4b5b94d298110Long press the device in list to deleteAdd Device4G10:07hideSet Up Device Using Wi-fiAdd Shared DeviceHold”RESET” but ton on the bottom/back of the de vice tobegin setupAdd My device(AP mode)Add device in the same WLANAP modeAdd Device4G10:07hideSet Up Device Using Wi-fiAdd Shared DeviceAdd My device(AP mode)Add device in the same WLANAP mode<SettingsWi-FiWi-Firobot_****robot_****robot_****
!!!
To set the WiFiSelect device hotsportGo to phone Settings-WLAN, and then select the devicethat you want to connect with,Wifi password:1234567890The current WiFi:MERCURY_1306Hold ”RESET” button on the bottom/ back of the device tob egin se tup
AlertsSettingsMotion Settings

Smart DevicesSmart Devices4G4G10:0710:07DevicesManual EventsMy AccountLong press the device in list to deleteLong press the device in list to delete++
10Multiple cameras can be added on the App and all of them will show up on the main screen of the App, long press on an camera can lead to menu that usercan share, set or delete the camera. DoorbellDoorbellIPCIPCOutdoor 360Outdoor 360PTZPTZSleepSleepOnlineOnlineOnlineOnlineOnlineOnlineAccess manuallyrecorded eventsfrom all of yourcamerasCancelDeleteSettingsAlertsMotion SettingsShareDevice Management: Outdoor 360Manage cameras
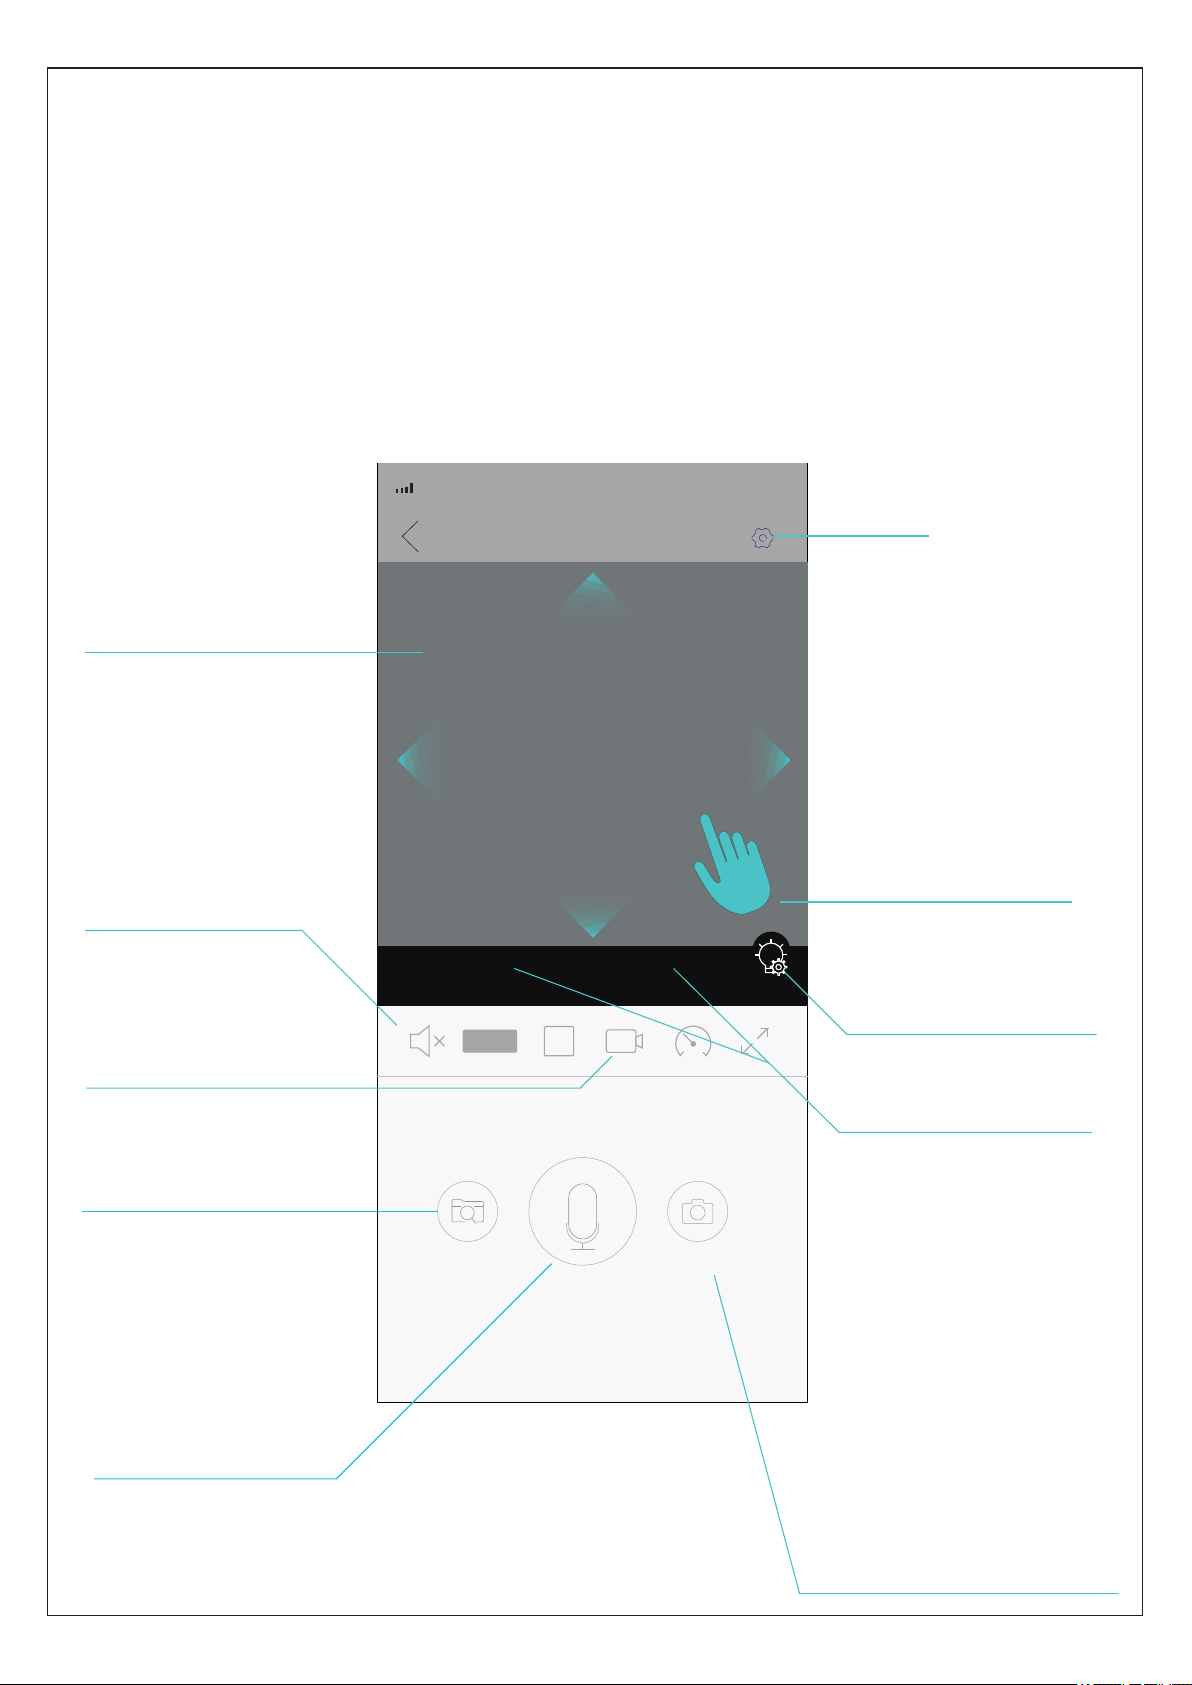
11(Fig 8)Smart Devices4G10:07…SDAUTOHold to SpeakView EventsSnapshotView the camera through AppUser can achieve the real time monitoring through the camera once it is added successfully on App by pressing the “Play” icon like Fig 7, thereare also some functions available user can use on the page below. SettingsEnable or disable audio(this device only)To start recording the camera manuallyView saved picturesand videos(check history recordingin SD card)To take a snapshotof the camera viewmanuallyReal time viewingHold it to speak throughcamera to talk to people in front of camera Move your finger onthe viewing imageto rotate camera- Zoom +- Focus +To zoom in orzoom out lensTo setup the modeof LED lights

12Setup the LED lightsSmart Devices4G10:07…SDAUTOHold to SpeakView EventsSnapshot- Zoom +- Focus +User can tap the icon in Fig 11 to go to the settings of LED lights. Light Mode can be White Light, Normal, or Double Light.White Light: the 4pcs white LED will light up when it’s dark outside.Normal: the IR LED will light up when it’s dark outside but white LED willnot light up.Double Light: the IR LED will light up when it’s dark outside, and the whiteLED will light up if the camera detect human.User will be able to setup Sensitivity and Lighting Duration when choosingDouble Light option shown as Fig 13.. Smart Devices4G10:07…SDAUTO- Zoom +- Focus +Smart Devices4G10:07…SDAUTO- Zoom +- Focus +(Fig 11)(Fig 12)(Fig 13)Light ModeLight ModeSensitivityLighting Dur..Intelligent VigilanceWhite Lig.. Normal Double Lig..White Lig.. Normal Double Lig.. Low Middle High 5s 10s 30s 60s 90s 120s
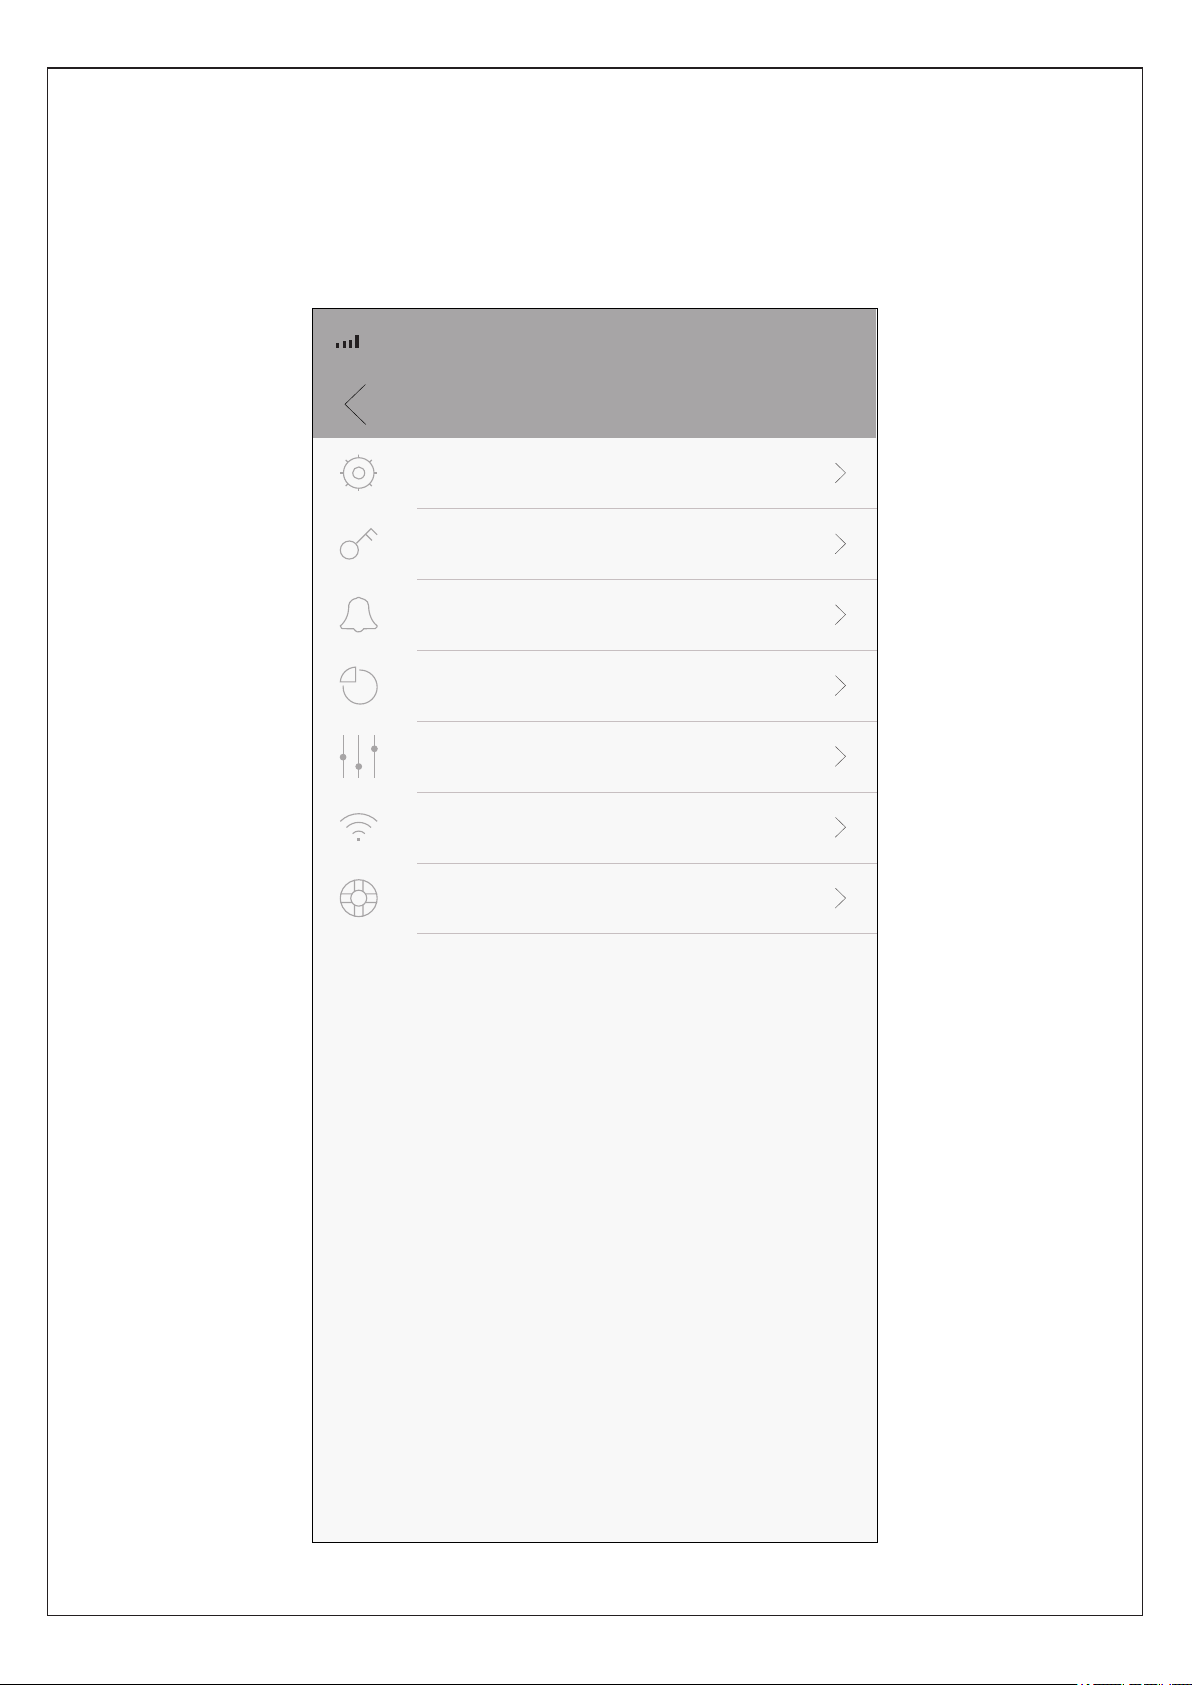
13Camera SettingsUser can setup the camera when necessary, press the “setting” icon in the upper right hand corner on Fig 8.Settings4G10:07…Basic SettingsManage PasswordAlert SettingsManage StorageAdvanced SettingsNetwork SettingsDevice Info
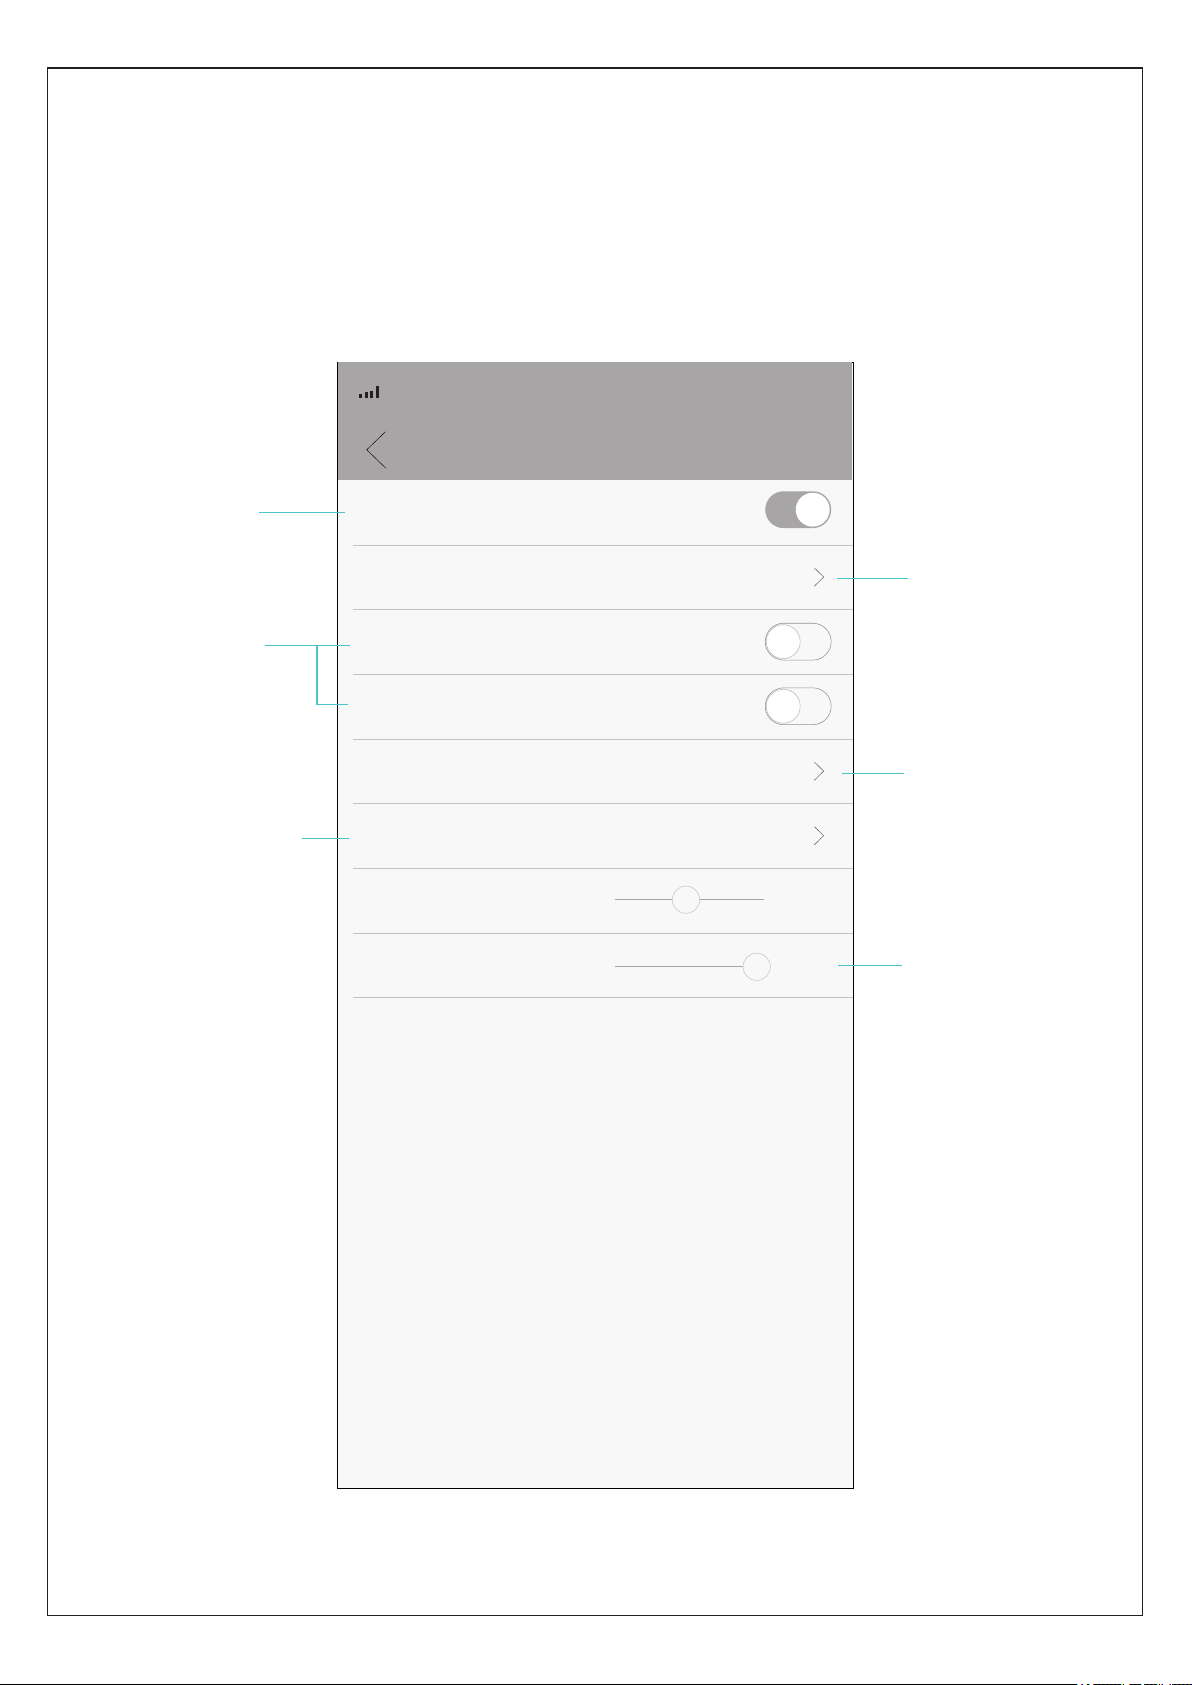
14Basic SettingsBasic Settings4G10:07…ToneDevice Name Flip Upside-DownFlip Left-RightDevice LanguageRotation SpeedSpeaker VolumeSaveIndoorEnglishNormal1005Enable or disablevoice promptsChange devicenameEnable or disableflip of orientationof image on screenChange devicelanguageChange rotationspeed of pan/tiltChange volumeof speaker withcameraDay/NightSensitivity

15Set Password4G10:07…
Manage PasswordCurrent PasswordNew PasswordConfirm PasswordSaveInput current passwordInput a newpasswordInput the newpassword againPress “Save”to finish operation

16Alert SettingsMotion Settings4G10:07…Motion Activated AlertsVideo Duration(S) Actionson AlertsAlarm SchedulesSensitivityAlert Push00:30MiddleTrigger alarm when there is a motionPhotos and VideosAll day alarmEnable or disablemotion activatedalertsSet the time ofvideo durationfor recordingupon alertsChange the actionson alertsChange theschedules foralarmChange thesensitivity ofmotion detectionEnable or disablepush notificationfor alerts sentfrom cameraIgnore MessagesDon't send alert messagesApp on mobilephone will notreceive alertmessages if this isenabledIntelligent VigilanceSetup Intelligenthuman detection

17Alert Settings-Intelligent Vigilance Intelligent Vigilance Save4G10:07…Smart DetectionShow TracesCordonCamera will only detect human for triggering alarm ifit's enabledEnable it to setupthe perimeter thathuman movementcan trigger alarmEnable it toshow tracesof human detectedPerimeter AlertCustom Areas To setup thealerting line and direction of humanmovement thatcan trigger alarmTap Save after asetting is doneTo draw the alerting area wherehuman movement can trigger alarm

18Storage CapacityCapacity for VideoCapacity for SnapshotAvailable StorageAt FullStorageManage Storage4G10:07…
Manage StorageStop RecordOverwriteFormat SD CardCheck entirecapacity of SD cardCheck the storagecapacity for videoson SD cardCheck the storagecapacity for snapshots on SD cardCheck the availablestorage on SD cardSet the actionwhen SD cardis fullFormat SD card
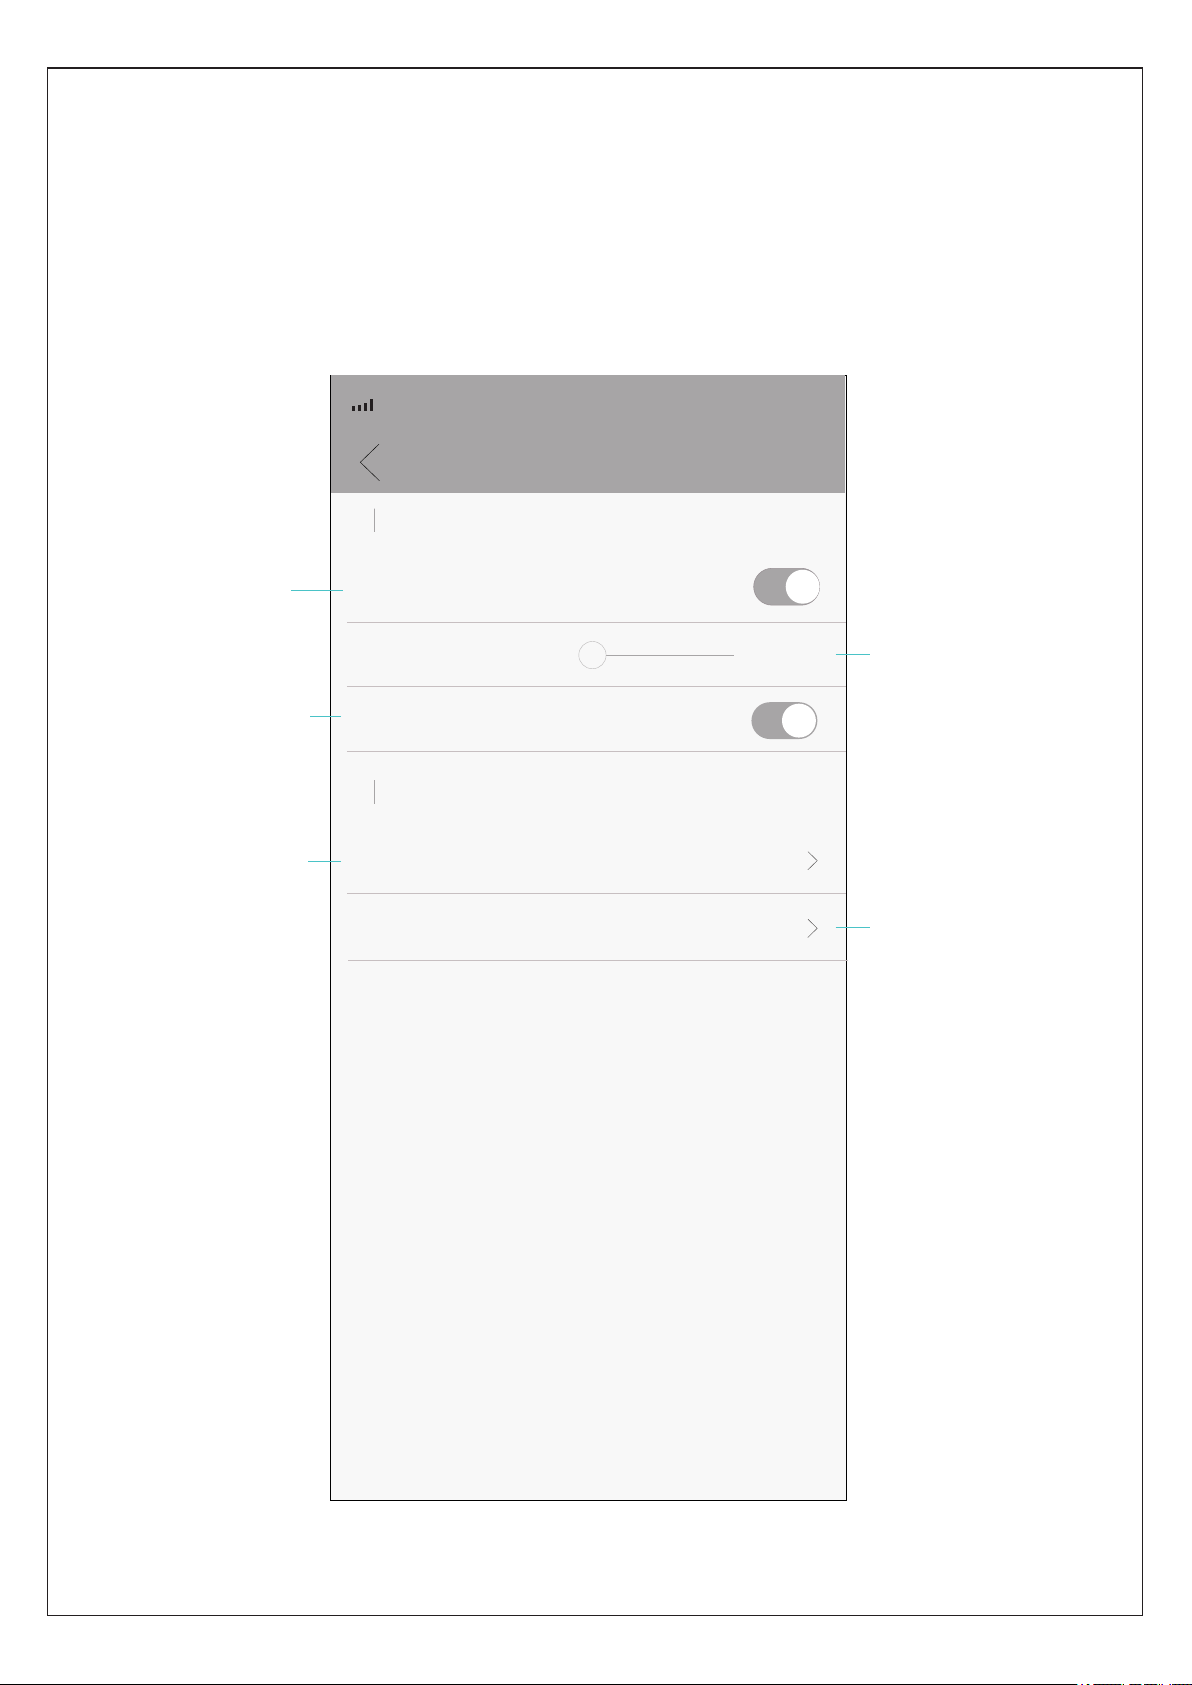
19Advanced SettingsAdvanced Settings4G10:07…Record SettingsRecord Switch DurationRecord Audio Other SettingsVideo QualityH265XNormalH265XSave5MinsTurn on/off videorecording on SDcardSet the duration of video clips on SD cardEnable or disableaudio recordingChange video qualityChange video format

20Network Settings4G10:07…AP ModeRouting ModeMySpectrumWIFIZans_2.4ORBI13-GuestORBI13ORBI13-GuestNetwork SettingsORBI13SaveSelect the networkconnection modefor cameraSelect an availableWIFI network forcamera
Other manuals for Outdoor 360
1
Table of contents


