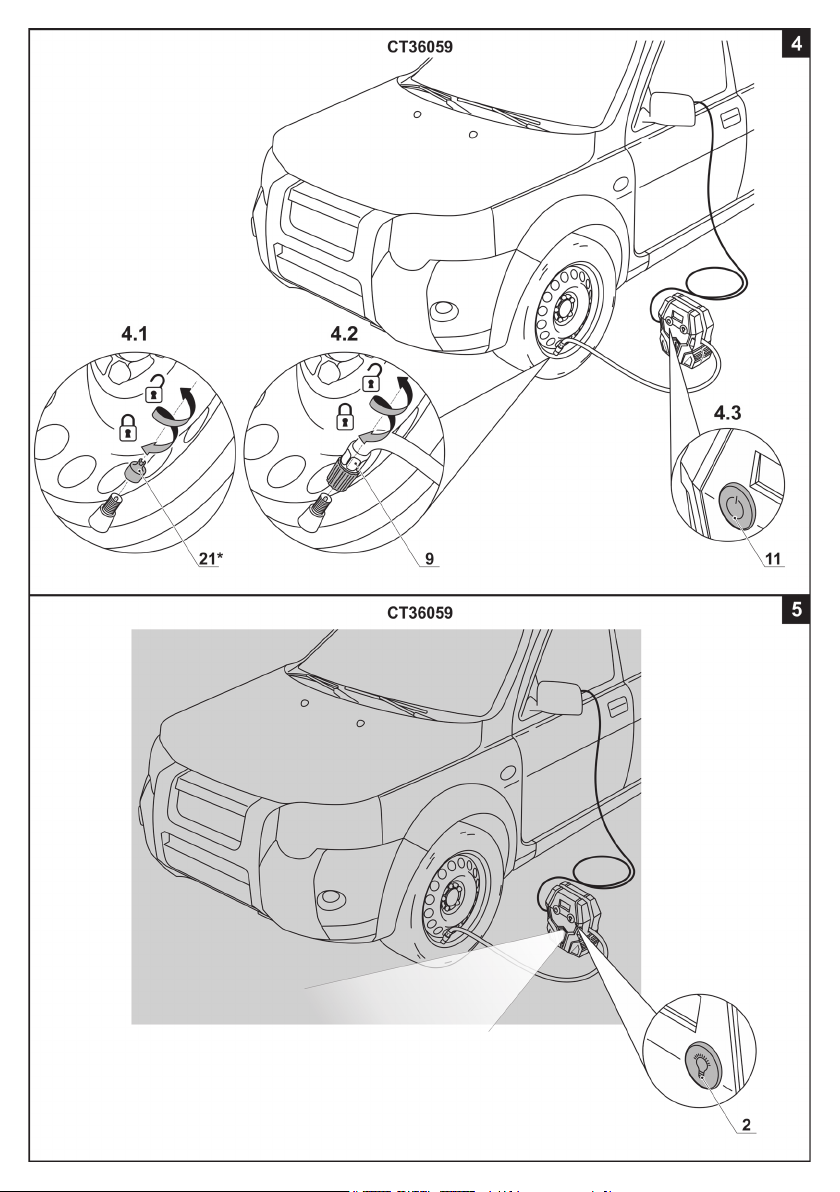
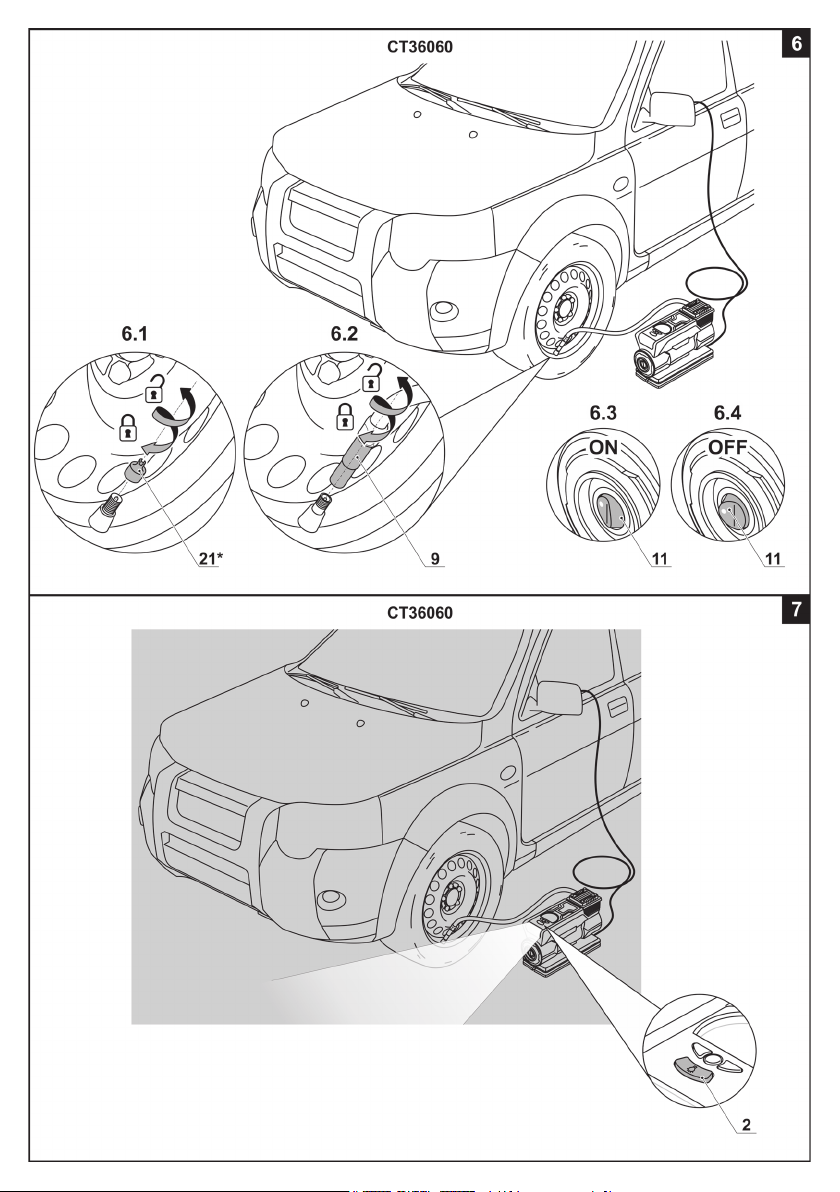
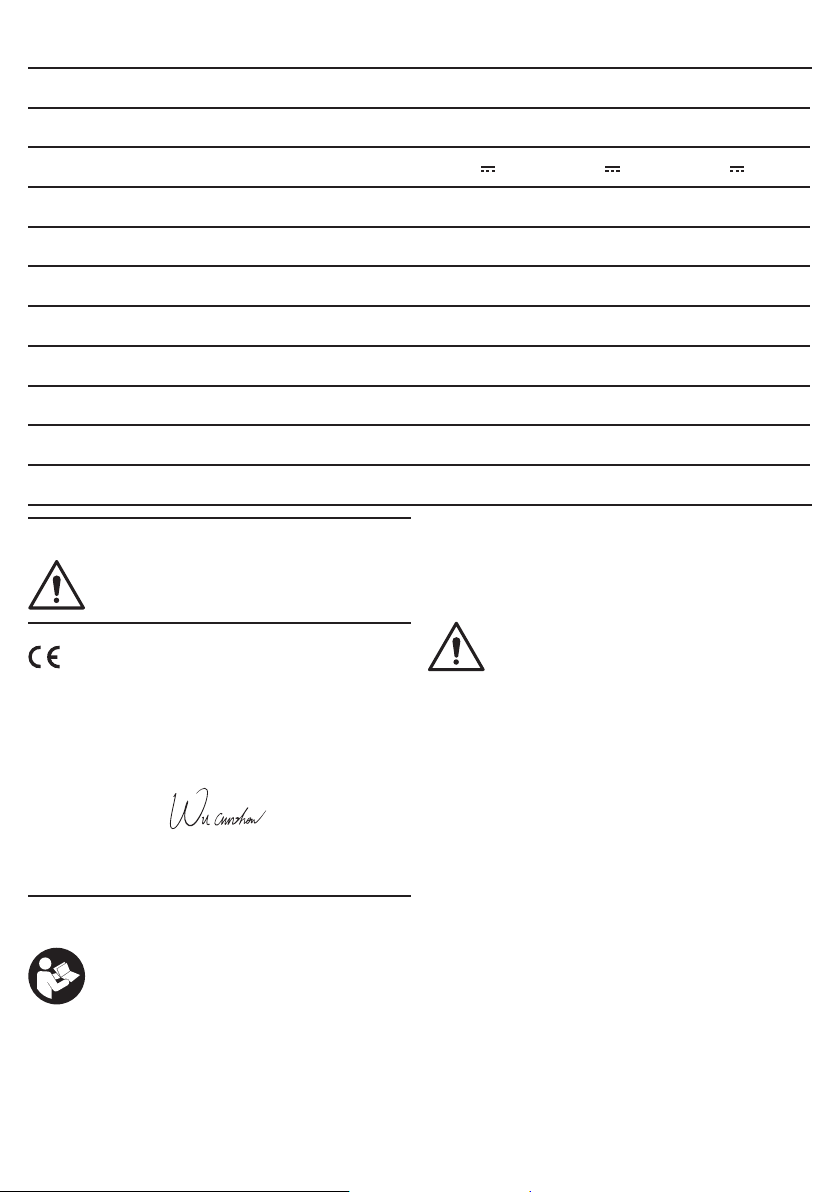
Crown CT36059 User manual


2
Content / Contenido / Содержание / Зміст / Мазмұны /
English
Explanatory drawings ������������������������������������������������������������������������������������������������������������ pages
General safety rules, instructions manual ����������������������������������������������������������������������������� pages
3 - 8
9 - 12
Español
Dibujos explicativos ������������������������������������������������������������������������������������������������������������ páginas
Recomendaciones generales de seguridad, manual de instrucciones ������������������������������ páginas
3 - 8
13 - 16
Русский
Пояснительные рисунки ������������������������������������������������������������������������������������������������ страницы
Общие указания по ТБ, инструкция по эксплуатации ������������������������������������������������� страницы
3 - 8
17 - 20
Украïнська
Пояснювальні малюнки ��������������������������������������������������������������������������������������������������� сторінки
Загальні вказівки по ТБ, iнструкція з експлуатації ��������������������������������������������������������� сторінки
3 - 8
21 - 24
Қазақ тілі
Түсіндіргіш әлеміштер �������������������������������������������������������������������������������������������������������� беттер
Жалпы қауіпсіздік жөніндегі ұсыныстар, пайдалану нұсқаулығы ���������������������������������������� беттер
3 - 8
25 - 28
����������������������������������������������������������������������������������������������������������������������������
����������������������������������������������������������������������������������������������������
3 - 8
29 - 32
�������������������������������������������������������������������������������������������������������������������������
��������������������������������������������������������������������������������������������
3 - 8
33 - 36

3

4

5

6

7

8

9
English
Noise information
Always wear ear protection if the sound
pressure exceed 85 dB(A).
Declaration of conformity
We declare under our sole responsibility that the
product described under "Appliance specications"
is in conformity with all relevant provisions of the di-
rectives 2006/42/EC their amendments and complies
with the following standards: EN ISO 12100:2010,
EN 1012-1:2010, EN60204-1:2006/AC:2010�
Certication Wu Cunzhen
manager
Merit Link International AG
Stabio, Switzerland, 30�11�2018
General safety instructions
ATTENTION! Read these instructions
carefully before using the appliance
for the rst time and follow all rules
and recommendation specied herein.
Keep the original instructions for future reference
or for a future owner.
Besides safety precautions contained herein, ob-
serve general legal safety regulations and accident
prevention guidelines.
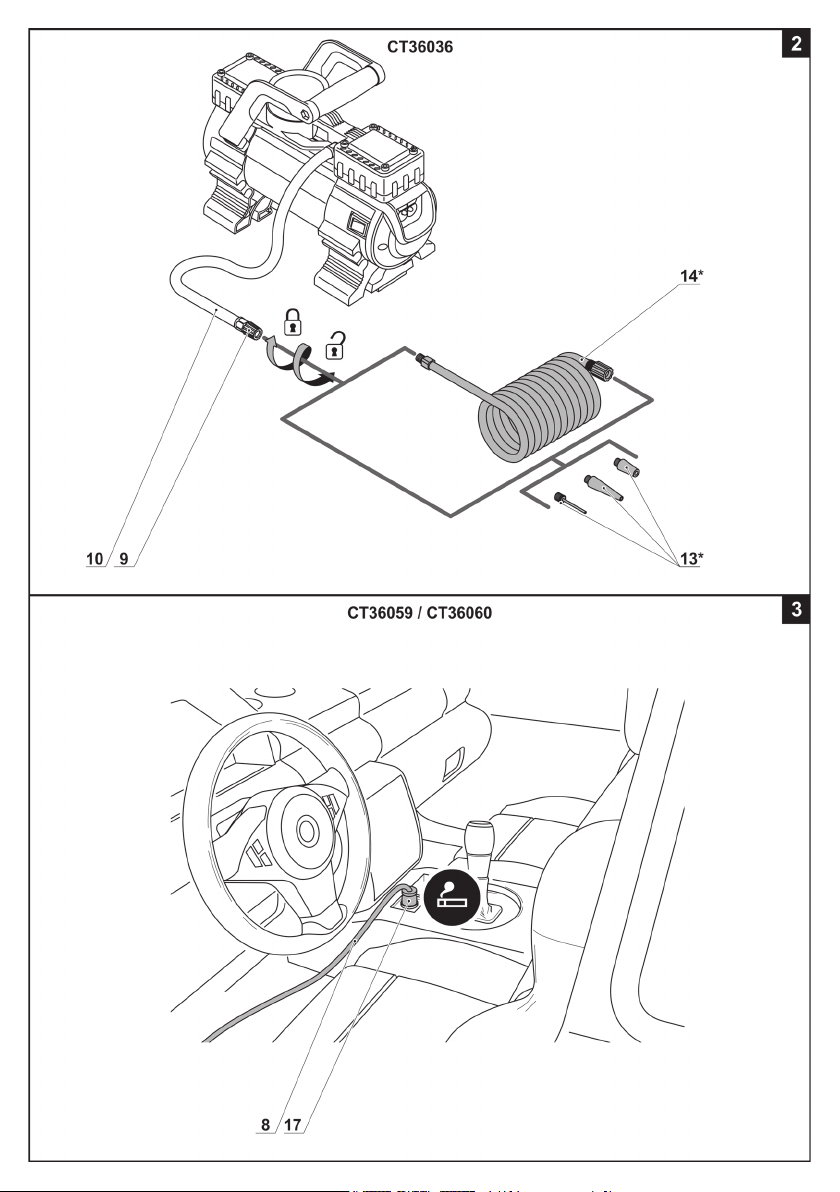
•This appliance is designed to be powered only from
a 12V DC power supply� Do not use any other power
supply and do not change the appliance design� If the
charge of your vehicle accumulator is too low, voltage
of the vehicle network may be insufcient for effective
function of the appliance� In such case it is recommend-
ed to use the appliance when the vehicle engine is on�
Attention! It is strictly prohibited to start
the vehicle engine in rooms with insuf-
cient ventilation; it may cause exhaust
gas poisoning and death.
•Check the fuse installed in the cigarette lighter cir-
cuit� It should be designed for a current of at least 10A
(15A recommended)�
•Do not allow dirt, ash or foreign objects to enter the
cigarette lighter socket� Foreign objects can cause a vi-
olation of a reliable electrical contact, cause overheating
of the cigarette lighter socket, and cause a re and tram.
•Make sure that the power cable and the extension
cords are not damaged by tripping-over, crushing,
stretching, etc� Protect power cables from heat, oil
products, and damages from sharp edges�
•It is forbidden to use the appliance in places with
a dusty atmosphere, as well as with an atmosphere
containing explosive gases and vapors of aggressive
substances�
•Before you start working, ensure that the appliance
is far from ammables and is not prevented from nor-
mal cooling by external factors�
•Use the appliance only according to its intended pur-
pose� Consider local conditions and pay attention to
other persons around when using the appliance�
•Use the appliance only with accessories supplied
with the appliance�
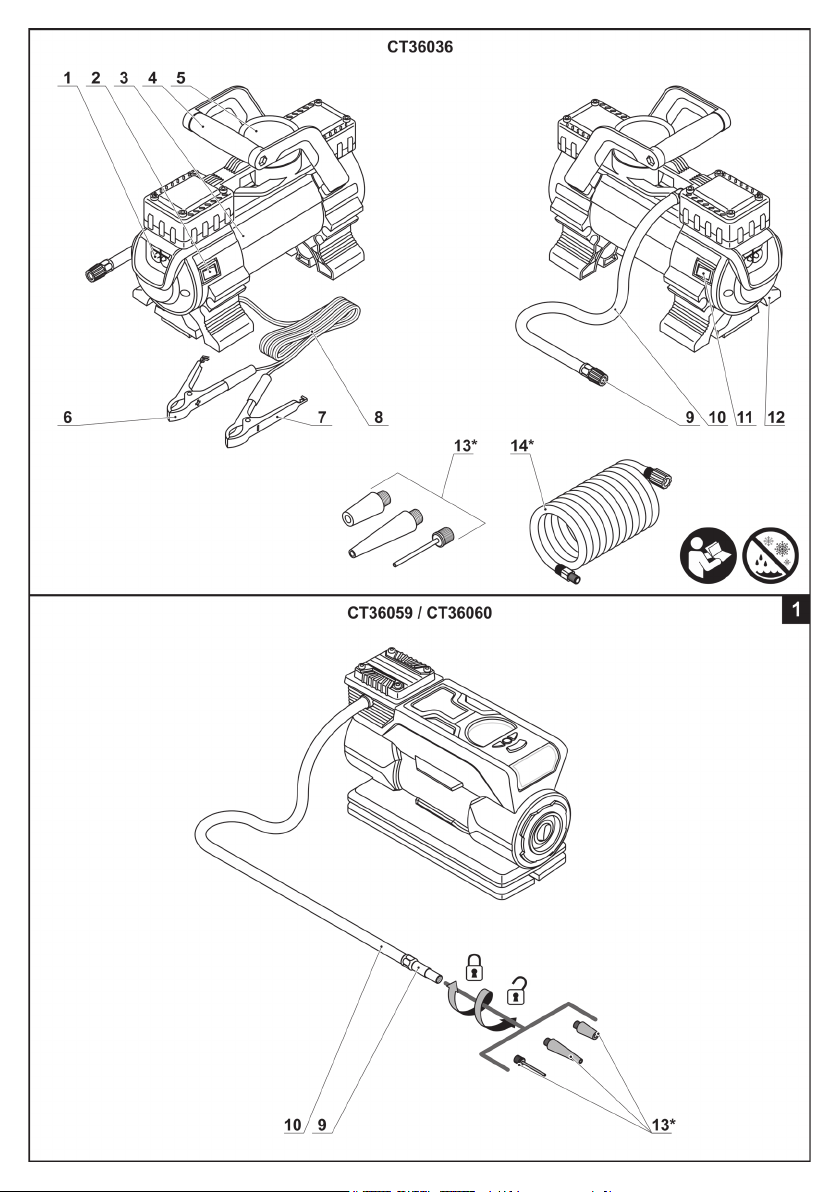
•The appliance is intended only for ination of differ-
ent articles (vehicle tires, sports equipment) - do not
connect pneumatic tools to the appliance�
Appliance specication
Vehicle compressor CT36059 CT36060 CT36036
Appliance code 422552 422569 421470
Rated voltage [V] 12 12 12
Max. power [W] 60 120 200
Max. current [A] <6�5 <12 <18
Productivity [l/min] 13 30 45
Max. pressure [bar]
[psi] 10,34
150
6,89
100
7
101�52
Continuous operation time [min] <20 <20 <20
Ambient temperature [°C] -6°C ��� +49°C -20°C ��� +50°C -20°C ��� +50°C
Weight [kg]
[lb] 0,5
1�1
1,75
3�86
3,3
7�28
Sound pressure [dB(A)] 85 80 85

10
English
•The appliance is not intended for ination of big in-
atable articles such as blow-up beds, boats, etc.
•Do not use the compressed air produced by the ap-
pliance for medical or pharmaceutical purposes�
•The appliance is not intended for lling air cylinders,
air supply into air receivers, tanks and shock absorb-
ers�
•Do not leave the appliance unattended when in
function�
•Use by children is strictly prohibited� Do not let chil-
dren play with the appliance�
•Prevent animals from being in the area of the appli-
ance use�
•Appliance operation by persons (including children)
with limited physical, sensitive, or mental capacities
is strictly prohibited, unless they are supervised or in-
structed on appliance operation by the person(s) re-
sponsible for their safety�
•Stay focused and deliberate over each action when
operating the appliance� Do not use the appliance if
you feel tired or when being under the effect of drugs,
alcohol, or medicines� Loss of attention during the op-
eration may cause serious injuries�
•Do not use the appliance during thunderstorms,
heavy rain or snow�
•Do not touch the operating appliance with wet
hands�
•Do not dip the appliance or its parts into water or
other liquids�
•When working, ensure stability of the appliance to
prevent accidents or injuries resulting from turning-
over� It is strictly prohibited to use the appliance at
height, e�g� if on the vehicle splasher or if hung up�
•Maximum tire pressure or ination pressure of
other inated articles should not be exceeded (maxi-
mum pressure is usually indicated on the tire or sports
equipment)�
•Do not continuously use the appliance for over 20
minutes as this may cause appliance overheating and
failure� In such case you will not be entitled for war-
ranty repair� Let the appliance cool down for no less
than 20 minutes before using it again�
•Move the appliance using only transport handles�
Never use an air hose or power cable to move the ap-
pliance�
•Be careful when operating the appliance, since
some of its parts can get very hot�
•Do not use ammables or corrosive agents to clean
the appliance�
•After nishing work, wait till the appliance cools
down, only after that it may be covered or put into a
protective case�
Appliance maintenance
Maintenance of your appliance must be performed
by qualied personnel using the recommended spare
parts� This ensures that the safety of your appliance
will be preserved�
Symbols used in the manual
Following symbols are used in the operation manual,
please remember their meanings� Correct interpreta-
tion of the symbols will allow correct and safe use of
the appliance�
Symbol Meaning
Serial number sticker:
CT ��� - model;
XX - date of manufacture;
XXXXXXX - serial number�
Read all safety regulations
and instructions�
Do not work in rain or snow�
Movement direction�
Rotation direction�
Locked�
Unlocked�
Socket of the cigarette lighter�
A sign certifying that the
product complies with es-
sential requirements of the
EU directives and harmo-
nized EU standards�
Attention� Important�
Useful information�
Do not dispose of the appli-
ance in a domestic waste
container�
Appliance designation
The vehicle compressor is intended for inating ve-
hicle, motorcycle and bicycle tires, and various sports
equipment�

11
English
Appliance components
1 LED light
2 LED light on / off switch
3 Body
4 Carrying handle
5 Manometer
6 "+" clamp
7 "-" clamp
8 Power cable
9 Nozzle
10 Air hose
11 On / off switch
12 Support
13 Replaceable tips *
14 Extension hose *
15 Ventilation slot
16 LCD display
17 Plug
18 Button "-"
19 Button "Set"
20 Button "+"
21 Nipple cap *
* Optional extra
Not all of the accessories illustrated or described
are included as standard delivery.
Installation and regulation of appliance
elements
Disconnect the appliance from the socket of the
cigarette lighter or vehicle accumulator before car-
rying out any procedures.
Do not draw up the fastening elements
too tight to avoid damaging the thread.
Accessories installation / replacement (see
g. 1-2)
[CT36059, CT36060]
Connect / disconnect one of the replaceable tips 13 to
nozzle 9, as shown in g. 1.
[CT36036]
Connect / disconnect hose 14 or one of the replace-
able tips 13 to nozzle 9, as shown in g. 2.
Initial operating of the appliance
•Ensure that the voltage in the vehicle network cor-
responds with the data indicated on the appliance en-
closure�
•Check power cable 8� Replace it in case of dam-
ages�
•Check air hose 10 or extension hose 14� Replace
them in case of damages�
Switching the appliance on / off
[CT36059]
Switching on:
Press and release on / off switch 11 (see g. 4.3).
Switching off:
Press and release on / off switch 11 (see g. 4.3).
[CT36060, CT36036]
Switching on:
Set on / off switch 11 in the "ON" position (see
g. 6.3, 8.3).
Switching off:
Set on / off switch 11 in the "OFF" position (see
g. 6.4, 8.4).
Design features of the appliance
Temperature protection
Temperature protection prevents from damage to the
appliance, switching it off during excessive loads and
overheating� When temperature protection is activat-
ed, unplug the appliance from the mains, eliminate the
cause that triggered the protection, allow the appliance
to cool down, and then continue working�
Selection of measurement units
[CT36060]
Press button 19� The selected measurement units are
displayed on LCD display 16 (psi, kPa, bar)�
Pressure setting
[CT36060]
Press buttons 18 or 20 to set the desired pressure,
and then press button 19 to x this value. The appli-
ance will automatically stop once the desired pressure
is reached�
LED light (see g. 5, 7, 9)
LED light 1makes it possible to work in case in low
light condition�
[CT36059, CT36060]
•Press and release LED light on / off switch 2to
switch on the LED light (see g. 5, 7).
•Press and release LED light on / off switch 2to
switch off the LED light (see g. 5, 7).
[CT36036]
•Set on / off switch 2in the "ON" position to switch on
the LED light (see g. 9.1).
•Set on / off switch 2in the "OFF" position to switch
off the LED light (see g. 9.2).

12
English
Recommendations on the appliance op-
eration
Before starting work
•If necessary connect extension hose 14 to the appli-
ance (CT36036)�
•If you are going to inate sports equipment, put the
appropriate replaceable tip 13�
•Power cable 8should be fully unwound as it im-
proves efciency of the appliance function.
General recommendations (see g. 3-9)
•CT36059, CT36060 - extract cigarette lighter and
insert plug 17 into cigarette lighter socket as shown
in g. 3.
•CT36036 - connect the appliance to the vehicle ac-
cumulator as shown in g. 8. Observe polarity when
connecting the appliance to the vehicle accumula-
tor: clamp 6 ("+" with red handles) should be con-
nected to "+" output of the accumulator; clamp 7
("-" with black handles) should be connected to -
output of the accumulator.
•Screw nipple cap 21 off the tire nipple (see
g. 4.1, 6.1, 8.1).
•Screw nozzle 9onto the tire nipple (see
g. 4.2, 6.2, 8.2).
•Turn on the appliance�
•Inate the tire, while observing indications of the
LCD display 16 (CT36059, CT36060) or manometer 5
(CT36036)� Having reached the necessary pressure
turn off the appliance�
•Screw nozzle 9off the tire nipple�
•Screw nipple cap 21 onto the tire nipple�
•Disconnect the appliance from the socket of the
cigarette lighter or vehicle accumulator�
Appliance maintenance / preventive
measures
Disconnect the appliance from the
socket of the cigarette lighter or vehi-
cle accumulator before carrying out any
procedures.
Cleaning the appliance
It is required to periodically clean the outer surface of
the appliance with a soft brush and a cloth, and blow
the parts of the appliance with compressed air� Do not
use caustic substances or solvents to clean the appli-
ance�
After-sales service and application service
Our after-sales service responds to your questions
concerning maintenance and repair of your product as
well as spare parts� Information about service centers,
parts diagrams and information about spare parts can
also be found under: www.crown-tools.com.
Transportation of the appliances
•CT36036 - only move the аppliance by handle 4or
by picking it up and supporting from the bottom� Do
not move the аppliance by other parts (by pulling the
hoses or power cable, etc�)�
•Categorically not to drop any mechanical impact on
the packaging during transport�
•When unloading / loading is not allowed to use any
kind of technology that works on the principle of clamp-
ing packaging�
Environmental protection
Recycle raw materials instead of dispos-
ing as waste.
Appliance, accessories and packaging
should be sorted for environment-friendly
recycling�
The plastic components are labelled for categorized
recycling�
These instructions are printed on recycled paper man-
ufactured without chlorine�
The manufacturer reserves the possibility to introduce changes.

13
Español
Información sobre ruidos
Tome medidas adecuadas para proteger
sus oídos cuando la presión acústica ex-
ceda el valor de 85 dB(A).
Declaración de conformidad
Declaramos bajo nuestra exclusiva responsabilidad
que el producto descrito en "Especicaciones del
artefacto" está en conformidad con todas las dispo-
siciones relevantes de las directivas 2006/42/EC, in-
cluyendo sus enmiendas, y cumple con las siguien-
tes normas: EN ISO 12100:2010, EN 1012-1:2010,
EN60204-1:2006/AC:2010�
Gerente de Wu Cunzhen
certicación
Merit Link International AG
Stabio, Suiza, 30�11�2018
Instrucciones generales de seguridad
¡ATENCIÓN! Lea atentamente estas
instrucciones antes de usar el artefac-
to por primera vez y siga todas las re-
glas y recomendaciones especicadas
en dichas instrucciones.
Conserve las instrucciones originales para futura
referencia o para un futuro propietario.
Además de las precauciones de seguridad del
presente documento, cumpla con las reglamenta-
ciones legales de seguridad y las pautas para la
prevención de accidentes.
•Este aparato fue designado para recibir energía
sólo a partir del suministro de energía de 12V CC. No
use ningún otro suministro de energía y no cambie el
diseño del aparato� Si la carga del acumulador de su
vehículo es demasiado baja, la tensión de la red del
vehículo puede ser insuciente para la función efectiva
del aparato� En tal caso se recomienda usar el aparato
cuando el motor del vehículo está encendido�
¡Atención! Está estrictamente prohibi-
do arrancar el motor del vehículo en
ambientes con ventilación insuciente;
puede causar la intoxicación por gases
de combustión y la muerte.
•Verique el fusible instalado en el circuito del
encendedor de cigarrillos� Debe estar diseñado para
una corriente de al menos 10A (15A recomendable)�
•No deje que ingrese suciedad, cenizas u objetos
extraños en el tomacorriente del encendedor de
cigarrillos� Los objetos extraños pueden causar
una violación del contacto eléctrico conable,
sobrecalentamiento del tomacorriente de encendedor
de cigarrillo y lesiones y e incendios�
•Asegúrese de que el cable de alimentación de
energía y los cables de extensión no estén dañados
al arrancarlos, golpearlos, estirarlos, etc� Proteja los
cables de alimentación de energía del calor, productos
del petróleo y roturas con bordes losos.
•Está prohibido usar el aparato en lugares en una
atmósfera con polvo, como así también en una atmós-
fera con gases explosivos y vapores de sustancias
agresivas�
•Antes de empezar a trabajar, asegúrese de que el
aparato esté lejos de productos inamables y que no
se evite el enfriamiento normal por factores externos�
•Use el aparato sólo de acuerdo con su n propuesto.
Considere las condiciones locales y preste atención a
otras personas alrededor cuando use el aparato�
Especicaciones del artefacto
Compresor de automoción CT36059 CT36060 CT36036
Código del artefacto 422552 422569 421470
Tensión nominal [V] 12 12 12
Potencia máx. [W] 60 120 200
Corriente máx. [A] <6�5 <12 <18
Productividad [l/min] 13 30 45
Presión máx. [MPa]
[bar] 10,34
150
6,89
100
7
101�52
Tiempo de operación continua [min] <20 <20 <20
Temperatura ambiente [°C] -6°C ��� +49°C -20°C ��� +50°C -20°C ��� +50°C
Peso [kg]
[lb] 0,5
1�1
1,75
3�86
3,3
7�28
Presión acústica [dB(A)] 85 80 85

14
Español
•Use el aparato sólo con los accesorios suministra-
dos con el aparato�
•El aparato es sólo para inar diferentes artículos
(neumáticos del vehículo, equipo de deportes) - no co-
necte herramientas neumáticas al aparato�
•El aparato no tiene por objetivo inar artículos in-
ables grandes como colchones inables, botes ina-
bles, etc�
•No use el aire comprimido producido por el aparato
para nes médicos o farmacéuticos.
•El aparato no es para rellenar cilindros de aire, su-
ministro de aire en receptores de aire, tanques y amor-
tiguadores�
•No deje el aparato sin atención cuando esté en fun-
cionamiento�
•Está totalmente prohibido el uso por parte de los
niños� No deje que los niños jueguen con el apa-
rato�
•Evite que haya animales cerca del área de funciona-
miento del aparato�
•Está totalmente prohibido que operen este apara-
to las personas (incluidos niños) con capacidades fí-
sicas, mentales o de sensibilidad limitadas, a menos
que sean supervisados o instruidos sobre el funcio-
namiento del aparato por la persona responsable de
su seguridad�
•Permanezca enfocado y consciente con cada ac-
ción cuando opere el aparato. No use el aparato si se
siente cansado o cuando está bajo el efecto de las
drogas, alcohol, o medicamentos. La pérdida de aten-
ción durante la operación puede causar serias lesio-
nes�
•No use el aparato durante las tormentas, lluvia fuer-
te o nieve�
•No toque el aparato operante con sus manos�
•No sumerja el aparato o sus partes en agua u otros
líquidos�
•Cuando trabaje, asegure la estabilidad del aparato
para prevenir accidentes o lesiones que resulten de su
caída� Está estrictamente prohibido usar el aparato en
altura, por ejemplo, en la hidronave o colgado�
•No se debe exceder la presión máxima del neumáti-
co o la presión de inado de otros artículos inados (se
indica la presión máxima usualmente en el neumático
o equipo de deportes)�
•No use el aparato continuamente durante más
de 20 minutos ya que esto puede causar el sobreca-
lentamiento del aparato y fallas� En tal caso, usted no
tendrá derecho a la reparación de garantía. Deje que
se enfríe el aparato durante no menos de 20 minutos
antes de usarlo nuevamente�
•Mueva el aparato usando sólo las asas de trans-
porte� No use nunca una manguera de aire o cable
eléctrico para mover el aparato.
•Tenga cuidado cuando opere el aparato, ya que al-
gunas partes pueden calentarse muchísimo�
•No use agentes inamables o corrosivos para lim-
piar el aparato�
•Después de nalizar el trabajo, espere hasta que
se enfrie el aparato y sólo después de eso, cúbralo o
guárdelo en su caja protectora�
Mantenimiento del artefacto
El mantenimiento de su artefacto debe ser realizado
por personal calicado que utilice los repuestos reco-
mendados� Esto garantiza que se preserve la seguri-
dad de su artefacto�
Símbolos utilizados en este manual
Los siguientes símbolos se utilizan en este manual de
funcionamiento, por favor, recuerde sus signicados.
La correcta interpretación de los símbolos permitirá un
uso correcto y seguro del artefacto�
Símbolo Signicado
Etiqueta con número de
serie:
CT ��� - modelo;
XX - fecha de fabricación;
XXXXXXX - número de serie�
Lea todas las reglas e ins-
trucciones de seguridad�
No trabaje en la lluvia o en
la nieve�
Dirección del movimiento.
Dirección de la rotación.
Bloqueado�
Desbloqueado�
Tomacorrientes del encen-
dedor de cigarrillos�
Un signo que certica que
el producto cumple con los
requisitos esenciales de las
directivas de la UE y las nor-
mas armonizadas de la UE�
Atención. Importante.
Información útil.
No deseche el artefacto en
un recipiente de basura do-
méstico.

15
Español
Designación del artefacto
El compresor del vehículo tiene el propósito de inar
los neumáticos del vehículo, motocicleta y bicicleta, y
de varios equipos deportivos�
Componentes del artefacto
1 Luz LED
2 Interruptor de encendido y apagado LED
3 Cuerpo
4 Asa de transporte
5 Manómetro
6 Abrazadera "+"
7 Abrazadera "-"
8 Cable eléctrico
9 Pico
10 Manguera de inado
11 Interruptor de encendido / apagado
12 Apoyo
13 Puntas de sustitución *
14 Manguera de extensión *
15 Ranuras de ventilación
16 Pantalla LCD
17 Enchufe
18 Botón "-"
19 Botón "Set"
20 Botón "+"
21 Tapa de la boquilla *
* Accesorios
No todos los accesorios fotograados o descritos
están incluidos en el envío estándar.
Instalación y regulación de los elemen-
tos del artefacto
Desconecte el aparato del tomacorriente del en-
cendedor de cigarrillos o acumulador del vehículo
antes de llevar a cabo los procedimientos.
No apriete demasiado los elementos de
ajuste para evitar dañar el hilo.
Instalación de los accesorios / sustitución (ver
g. 1-2)
[CT36059, CT36060]
Conecte-desconecte una de las puntas reemplaza-
bles 13 con la boquilla 9, como lo muestra la g. 1.
[CT36036]
Conecte / desconecte la manguera 14 o una de las
puntas de sustitución 13 en el pico 9, como se observa
en la g. 2.
Funcionamiento inicial del artefacto
•Asegure que la tensión en la red del vehículo co-
rresponda a los datos indicados en la caja del aparato�
•Revise el cable eléctrico 8� Sustitúyalo en caso de
daño�
•Revise la manguera de inado 10 o la manguera de
extensión 14� Sustitúyalas en caso de daño�
Encendido y apagado del artefacto
[CT36059]
Encendido:
Oprima y suelte el interruptor de encendido / apaga-
do 11 (ver g. 4.3)
Apagado:
Oprima y suelte el interruptor de encendido / apaga-
do 11 (ver g. 4.3)
[CT36060, CT36036]
Encendido:
Fije el interruptor de encendido / apagado 11 en la po-
sición "ON" (ver g. 6.3, 8.3).
Apagado:
Fije el interruptor de encendido / apagado 11 en la po-
sición "OFF" (ver g. 6.4, 8.4).
Características de diseño del artefacto
Protección de temperatura
La protección de temperatura evita daño al artefacto
y lo apaga en caso de cargas excesivas y sobreca-
lentamiento. Cuando la protección de temperatura
esté activada, desenchufe el artefacto de la red de
alimentación principal, elimine la causa que activó la
protección, permita que el artefacto se enfríe y luego
continúe trabajando�
Selección de unidades de medición
[CT36060]
Oprima y suelte el botón 19. Las unidades de medición
seleccionadas se muestran en la pantalla LCD 16 (psi,
kPa, bar)�
Conguración de la presión
[CT36060]
Oprima y suelte los botones 18 o 20 para congurar
la presión deseada, luego oprima el botón 19 para
arreglar este valor� El aparato se detendrá automática-
mente cuando se llegue a la presión deseada.
Luz LED (ver g. 5, 7, 9)
La luz LED 1hace posible trabajar en caso de una
condición con luz baja.
[CT36059, CT36060]
•Oprima y suelte el interruptor 2de encendido-
apagado de luz LED para encender la luz LED (ver
g. 5, 7).
•Oprima y suelte el interruptor 2de encendido-
apagado de luz LED para apagar la luz LED (ver
g. 5, 7).

16
Español
[CT36036]
•Fije el interruptor de encendido / apagado 2en
la posición "ON" para encender la luz LED (ver
g. 9.1).
•Fije el interruptor de encendido / apagado 2
en la posición "OFF" para apagar la luz LED (ver
g. 9.2).
Recomendaciones sobre el funciona-
miento del artefacto
Antes de comenzar a trabajar
•Si fuera necesario conectar la manguera de exten-
sión 14 al aparato (CT36036)�
•Si va a inar el equipo de deportes, ponga la punta
de sustitución apropiada 13�
•Se debe desenrollar completamente el cable eléc-
trico 8 ya que mejora la eciencia de la función del
aparato�
Recomendaciones generales (ver g. 3-9)
•CT36059, CT36060 - extraiga el encendedor de
cigarrillo e inserte el enchufe 17 en el tomacorriente
de encendedor de cigarrillo como se muestra en la
g. 3.
•CT36036 - conecte el aparato al acumulador del
vehículo como se observa en la g. 8. Observe la
polaridad cuando conecte el aparato al acumula-
dor del vehículo: la abrazadera 6 ("+" con las asas
rojas) debería conectarse a la producción "+" del
acumulador; la abrazadera 7 ("-" con asas negras)
debería conectarse a la producción - del acumu-
lador.
•Desatornille la tapa de la boquilla 21 de la boquilla
del neumático (ver la g. 4.1, 6.1, 8.1).
•Atornille el pico 9en la boquilla del neumático (ver
la g. 4.2, 6.2, 8.2).
•Encienda el aparato�
•Ine el neumático, mientras cumple con las indica-
ciones de la pantalla LCD 16 (CT36059, CT36060) o el
manómetro 5(CT36036). Al llegar a la presión necesa-
ria, apague el aparato�
•Desatornille el pico 9de la boquilla del neumático�
•Atornille la tapa de la boquilla 21 en la boquilla�
•Desconecte el aparato del tomacorriente del encen-
dedor de cigarrillo o acumulador del vehículo�
Mantenimiento del artefacto / medidas
preventivas
Desconecte el aparato del tomacorriente del en-
cendedor de cigarrillos o acumulador del vehículo
antes de llevar a cabo los procedimientos.
Limpieza del artefacto
Es necesario limpiar periódicamente la supercie exter-
na del artefacto con un cepillo blando y un paño y soplar
las piezas del artefacto con aire comprimido� No use sus-
tancias cáusticas o solventes para limpiar el artefacto�
Servicio de post-venta y servicio de aplicaciones
Nuestro serivicio de post-venta responde a sus pre-
guntas sobre el mantenimiento y la reparación de su
producto, así como también sobre los repuestos. La
información sobre los centros de servicio, los diagra-
mas de las piezas y sobre los repuestos también se
puede encontrar en: www.crown-tools.com�
Transporte del artefacto
•CT36036 - mueva el artefacto sólo por el asa 4o
levantándolo y sosteniéndolo de la parte inferior. No
mueva el artefacto por otras partes del mismo (tirando
de las mangueras o del cable de alimentación, etc.).
•Está terminantemente prohibido dejarlas caer para
que no se produzca ningún impacto mecánico en el
embalaje durante el transporte�
•Cuando se descarguen / carguen, no se permite
usar ningún tipo de tecnología que funcione bajo el
principio de sujeción de embalajes.
Protección del medio ambiente
Recicle las materias primas en lugar de
eliminarlas como basura.
El artefacto, los accesorios y el embalaje
deben clasicarse para el reciclado que res-
pete el medio ambiente�
Las piezas de material plástico están marcadas para
un reciclado selectivo�
Estas instrucciones están impresas sobre papel reci-
clado sin la utilización de cloro.
El fabricante se reserva la posibilidad de incluir cambios.

17
Русский
Информация о шуме
Носить приспособление для защиты
органов слуха при уровне звукового
давления свыше 85 дБ(A).
Соответствия требуемым нор-
мам
Мы заявляем под нашу единоличную ответ-
ственность, что описанный в разделе "Техни-
ческие характеристики устройства" продукт от-
вечает всем соответствующим положениям
Директив 2006/42/EC, включая их изменения, а
также следующим нормам: EN ISO 12100:2010,
EN 1012-1:2010, EN60204-1:2006/AC:2010�
Менеджер по Wu Cunzhen
сертификации
Merit Link International AG
Stabio, Швейцария, 30�11�2018
Общие указания по технике безопас-
ности
ВНИМАНИЕ! Перед первым примене-
нием вашего устройства внимательно
прочтите данную инструкцию и соблю-
дайте все рекомендации и правила,
изложенные в ней.
Сохраните инструкцию для дальнейшего поль-
зования или для следующего владельца.
Наряду с указаниями по технике безопасности,
содержащимися в данной инструкции, соблю-
дайте общие положения законодательства по
технике безопасности и предотвращению не-
счастных случаев.
•Устройство предназначено для работы только от
источника постоянного тока 12В. Не используйте
никаких других источников электропитания, не изме-
няйте конструкцию устройства. Если аккумуляторная
батарея вашего автомобиля недостаточно заряжена,
то напряжение в бортовой сети может быть недоста-
точным для эффективной работы устройства. В этом
случае рекомендуется использовать устройство при
включенном двигателе автомобиля.
Внимание! Категорически запре-
щается заводить двигатель авто-
мобиля в помещении с недоста-
точной вентиляцией, это может
привести к отравлению выхлопными газами и
стать причиной смерти.
•Проверьте предохранитель, установленный в
цепи автомобильного прикуривателя. Он должен
быть рассчитан на ток не менее 10А (рекоменду-
ется 15А).
•Не допускайте попадания грязи, пепла или по-
сторонних предметов в разъем прикуривателя. По-
сторонние предметы могут вызвать нарушение на-
дежного электрического контакта, стать причиной
перегрева гнезда прикуривателя, вызвать пожар и
травмы.
•Следите за тем, чтобы токоведущие кабели не
были повреждены путем переезда через них, сдав-
ливания, растяжения и т.п. Защищайте токоведу-
щие кабели от воздействия жары, нефтепродуктов,
а также от повреждения острыми краями.
•Запрещается использовать устройство в местах
с запыленной атмосферой, а также с атмосферой,
Технические характеристики устройства
Автомобильный компрессор CT36059 CT36060 CT36036
Код устройства 422552 422569 421470
Напряжение [В]12 12 12
Макс. мощность [Вт]60 120 200
Макс. сила тока [A] <6�5 <12 <18
Производительность [л/мин] 13 30 45
Макс. давление [МПа]
[бар]
10,34
150
6,89
100
7
101�52
Время непрерывной работы [мин] <20 <20 <20
Температура окружающей среды [°C] -6°C ��� +49°C -20°C ��� +50°C -20°C ��� +50°C
Вес [кг]
[фунты]
0,5
1�1
1,75
3�86
3,3
7�28
Звуковое давление [дБ(A)] 85 80 85

18
Русский
содержащей взрывоопасные газы и испарения
агрессивных веществ.
•Перед началом работы необходимо убедиться,
что устройство установлено вдали от легковоспла-
меняющихся веществ, и никакие внешние факторы
не препятствуют его нормальному охлаждению.
•Используйте устройство только в соответствии
с его назначением. При работе с устройством учи-
тывайте местные особенности и обращайте внима-
ние на других лиц, находящихся поблизости.
•Используйте устройство только с принадлежно-
стями, входящими в комплект поставки.
•Устройство предназначено только для накачи-
вания различных изделий (шин транспорта, спор-
тивного инвентаря) - не подключайте к устройству
пневмоинструменты.
•Устройство не предназначено для накачивания
больших надувных изделий - надувных кроватей,
лодок и т.п.
•Не используйте сжатый воздух, производимый
устройством, для медицинских или фармацевтиче-
ских нужд.
•Данное устройство не пригодно для наполнения
баллонов аквалангов, нагнетания воздуха в воз-
душные ресиверы, баллоны и амортизаторы.
•Не оставляйте устройство без присмотра во вре-
мя работы.
•Категорически запрещена эксплуатация устрой-
ства детьми. Не разрешайте детям играть с устрой-
ством.
•Не допускайте нахождения животных зоне, где
используется устройство.
•Запрещается использовать устройство лицам
(включая детей) с пониженным физическими, чув-
ственными или умственными способностями, если
они не находятся под контролем или не проин-
структированы об использовании устройства ли-
цом, ответственным за их безопасность.
•При работе устройством будьте внимательны и
хорошо обдумывайте свои действия. Не пользуй-
тесь устройством в случае если вы устали, или на-
ходитесь под воздействием наркотиков, алкоголя
или медикаментов. Потеря внимания во время ра-
боты может стать причиной серьезных травм.
•Не работайте устройством во время грозы, силь-
ного дождя или снега.
•Не касайтесь работающего устройства мокрыми
руками.
•Не погружайте устройство или его части в воду
или другие жидкости.
•При работе обеспечьте устойчивость устройства,
чтобы предотвратить несчастные случаи или по-
вреждения в результате опрокидывания. Катего-
рически запрещается использовать устройство на
высоте, например, установив его на крыло автомо-
биля, либо подвесив его.
•Не превышайте максимальное давление в шинах
или других накачиваемых изделиях (максимальное
давление обычно указывается на покрышке или на
спортивном инвентаре).
•Не пользуйтесь устройством непрерывно бо-
лее 20 минут, это может привести к перегреву
устройства и стать причиной его поломки. В этом
случае вы утратите право на гарантийный ремонт.
Перед повторным использование дайте устройству
остыть в течение не менее 20 минут.
•Перемещайте устройство только за транспор-
тировочную рукоятку. Никогда не используйте воз-
душный шланг или токоведущие кабели для пере-
мещения устройства.
•Соблюдайте осторожность, во время работы
устройства некоторые его части сильно нагреваются.
•Не используйте легковоспламеняющиеся или
едкие вещества для чистки устройства.
•После окончания работы выждите, пока устрой-
ство охладится, только после этого его можно на-
крывать или надевать на него защитный чехол.
Обслуживание устройства
Обслуживание Вашего устройства должно произ-
водиться квалифицированными специалистами с
использованием рекомендованных запасных ча-
стей. Это дает гарантию того, что безопасность Ва-
шего устройства будет сохранена.
Символы, используемые в инструкции
В руководстве по эксплуатации используются ни-
жеприведенные символы, запомните их значение.
Правильная интерпретация символов поможет ис-
пользовать устройство правильно и безопасно.
Символ Значение
Наклейка с серийным но-
мером:
CT ... - модель;
XX - дата производства;
XXXXXXX - серийный но-
мер.
Ознакомьтесь со всеми
указаниями по технике
безопасности и инструкци-
ями.
Не работайте в дождь или
в снег.
Направление движения.
Направление вращения.
Заблокировано.
Разблокировано.
Разъем автомобильного
прикуривателя.
Знак, удостоверяющий,
что изделие соответству-
ет основным требованиям
директив ЕС и гармонизи-
рованным стандартам Ев-
ропейского Союза.

19
Русский
Символ Значение
Внимание. Важная инфор-
мация.
Полезная информация.
Не выбрасывайте устрой-
ство в бытовой мусор.
Назначение устройства
Автомобильный компрессор предназначен для на-
качивания автомобильных, мотоциклетных и ве-
лосипедных шин, а также различного спортивного
инвентаря.
Элементы устройства
1 LED фонарь
2 Включатель / выключатель LED фонаря
3 Корпус
4 Рукоятка для транспортировки
5 Манометр
6 Зажим "+"
7 Зажим "-"
8 Токоведущий кабель
9 Наконечник
10 Воздушный шланг
11 Включатель / выключатель
12 Опора
13 Сменные насадки *
14 Удлинительный шланг *
15 Вентиляционные отверстия
16 LCD дисплей
17 Штекер
18 Кнопка "-"
19 Кнопка "Set"
20 Кнопка "+"
21 Защитный колпачок *
* Принадлежности
Перечисленные, а также изображенные принад-
лежности, частично не входят в комплект по-
ставки.
Монтаж и регулировка элементов
устройства
Перед проведением всех процедур обязатель-
но отключите устройство от аккумуляторной
батареи автомобиля или извлеките штекер из
разъема прикуривателя.
Не затягивайте слишком сильно кре-
пежные элементы, чтобы не повре-
дить их резьбу.
Установка / замена принадлежностей (см.
рис. 1-2)
[CT36059, CT36060]
Присоедините / отсоедините одну из сменных на-
садок 13 к наконечнику 9, как показано на рис. 1.
[CT36036]
Присоедините / отсоедините шланг 14 или одну из
сменных насадок 13 к наконечнику 9, как показано
на рис. 2.
Ввод в эксплуатацию устройства
•Убедитесь в том, что имеющееся напряжение в
бортовой сети автомобиля соответствует данным,
указанным на корпусе устройства.
•Проверьте состояние токоведущего кабеля 8. В
случае обнаружения повреждений, необходимо за-
менить его.
•Проверьте состояние воздушного шланга 10 или
удлинительного шланга 14, в случае обнаружения
повреждений, необходимо заменить их.
Включение / выключение устройства
[CT36059]
Включение:
Нажмите и отпустите включатель / выключатель 11
(см. рис. 4.3).
Выключение:
Нажмите и отпустите включатель / выключатель 11
(см. рис. 4.3).
[CT36060, CT36036]
Включение:
Включатель / выключатель 11 установите в положе-
ние "ON" (см. рис. 6.3, 8.3).
Выключение:
Включатель / выключатель 11 установите в положе-
ние "OFF" (см. рис. 6.4, 8.4).
Конструктивные особенности устрой-
ства
Температурная защита
Температурная защита предотвращает повреж-
дение устройства, отключая его при чрезмерных
нагрузках и перегреве. При срабатывании темпе-
ратурной защиты, отключите устройство от сети,
устраните причину, вызвавшую срабатывание за-
щиты, дайте устройству охладиться и только тогда
продолжайте работу.
Выбор единиц измерения
[CT36060]
Нажмите и отпустите кнопку 19. Выбранные едини-
цы измерения отобразятся на LCD дисплее 16 (psi,
kPa, bar)�

20
Русский
Установка давления
[CT36060]
Нажмите и отпустите кнопку 18 или 20, чтобы уста-
новить желаемое давление, затем нажмите кноп-
ку 19, чтобы зафиксировать это значение. При
достижении установленного давления устройство
автоматически выключится.
LED фонарь (см. рис. 5, 7, 9)
LED фонарь 1 позволяет вести работы в условиях
недостаточной освещенности.
[CT36059, CT36060]
•Для включения LED фонаря нажмите и отпустите
кнопку включения / выключения 2 (см. рис. 5, 7).
•Для выключения LED фонаря нажмите и отпусти-
те кнопку включения / выключения 2 (см. рис. 5, 7).
[CT36036]
•Для включения LED фонаря включатель / вы-
ключатель 2 установите в положение "ON" (см.
рис. 9.1).
•Для выключения LED фонаря включатель / вы-
ключатель 2 установите в положение "OFF" (см.
рис. 9.2).
Рекомендации при работе устрой-
ством
Перед началом работы
•Если необходимо, подключите к устройству удли-
нительный шланг 14 (CT36036)�
•Если вы собираетесь накачивать спортивный ин-
вентарь, установите одну из подходящих сменных
насадок 13�
•Необходимо полностью разматывать токоведу-
щий кабель 8, это повышает эффективность рабо-
ты устройства.
Общие рекомендации (см. рис. 3-9)
•CT36059, CT36060 - извлеките прикуриватель
и вставьте в разъем штекер 17, как показано на
рис. 3.
•CT36036 - подключите устройство к аккумулятор-
ной батарее автомобиля, как показано на рис. 8.
При подключении устройства к аккумуляторной
батарее автомобиля соблюдайте полярность:
зажим 6 ("+", с рукоятками красного цвета) под-
ключайте к выводу "+" аккумуляторной бата-
реи; зажим 7 ("-", с рукоятками черного цвета)
подключайте к выводу "-" аккумуляторной ба-
тареи.
•Скрутите защитный колпачок 21 с ниппеля шины
(см. рис. 4.1, 6.1, 8.1).
•Накрутите наконечник 9 на ниппель шины (см.
рис. 4.2, 6.2, 8.2).
•Включите устройство.
•Накачивайте шину, следя при этом за показани-
ями LCD дисплея 16 (CT36059, CT36060) или ма-
нометра 5(CT36036). При достижении желаемого
давления выключите устройство.
•Скрутите наконечник 9 с ниппеля шины.
•Накрутите защитный колпачок 21 на ниппель
шины.
•Отключите устройство от аккумуляторной бата-
реи автомобиля или извлеките штекер 17 из разъ-
ема прикуривателя.
Обслуживание / профилактика устрой-
ства
Перед проведением всех процедур обязатель-
но отключите устройство от аккумуляторной
батареи автомобиля или извлеките штекер из
разъема прикуривателя.
Чистка устройства
Необходимо периодически очищать наружную по-
верхность устройства мягкой щеткой и тряпкой, а
также обдувать детали устройства сжатым возду-
хом. Не используйте для очистки устройства едкие
вещества и растворители.
Послепродажное обслуживание
Ответы на вопросы по ремонту и обслуживанию
вашего продукта вы можете получить в сервисных
центрах. Информацию о сервисных центрах, схе-
мы запчастей и информацию по запчастям Вы мо-
жете найти по адресу: www.crown-tools.com.
Транспортировка устройства
•CT36036 - перемещайте устройство только за ру-
коятку 4, либо переносите устройство поддерживая
его снизу. Запрещается перемещать устройство за
другие части (подтягивать его за шланги или токо-
ведущий кабель и т.п.).
•Не допускайте падения упаковки, а также любые
механические воздействия на нее при транспорти-
ровке.
•При погрузке / разгрузке не используйте погру-
зочную технику, работающую по принципу зажима
упаковки.
Защита окружающей среды
Вторичное использование сырья вме-
сто устранения мусора!
Устройство, дополнительные принадлеж-
ности и упаковку следует экологически
чисто утилизировать.
В интересах чистосортной рециркуляции отходов
детали из синтетических материалов соответ-
ственно обозначены.
Настоящее руководство по эксплуатации напеча-
тано на бумаге‚ изготовленной из вторсырья без
применения хлора.
Оговаривается возможность внесения изменений.
This manual suits for next models
2
Table of contents
Languages:
Other Crown Air Compressor manuals
Popular Air Compressor manuals by other brands

Iwata
Iwata IS 850 SMART JET instruction manual

Atlas Copco
Atlas Copco GA 110 VSD+ Instruction book

Vixen Air
Vixen Air VXO4841DCF installation guide

VIAIR
VIAIR 150C-IG user manual

Campbell Hausfeld
Campbell Hausfeld FP2098 Series Operating instructions and parts list

Campbell Hausfeld
Campbell Hausfeld DC02003 Operating instructions and parts manual