Crown CT36046 User manual


2
Content / Sommaire / Contenido / Índice / İçindekiler / Содержание / Зміст /
Мазмұны /
English
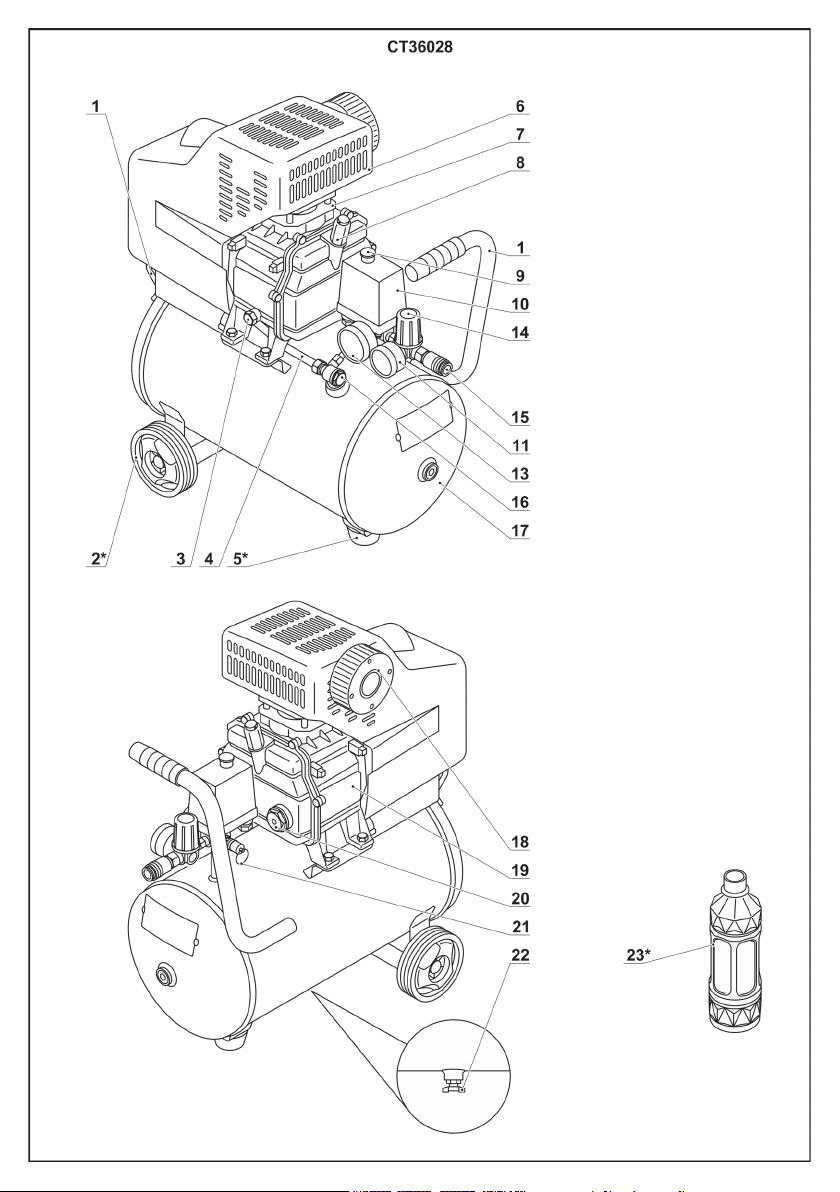
Explanatory drawings �������������������������������������������������������������������������������������������������������������pages
General safety rules, instructions manual ����������������������������������������������������������������������������� pages
3 - 10
11 - 16
Français
Dessins explicatifs ������������������������������������������������������������������������������������������������������������������pages
Recommandations générales de sécurité, mode d'emploi ���������������������������������������������������� pages
3 - 10
17 - 23
Español
Dibujos explicativos ������������������������������������������������������������������������������������������������������������ páginas
Recomendaciones generales de seguridad, manual de instrucciones ������������������������������ páginas
3 - 10
24 - 30
Português
Esboços explicativos ���������������������������������������������������������������������������������������������������������� páginas
Recomendações gerais de segurança, manual de instruções ������������������������������������������� páginas
3 - 10
31 - 37
Türkçe
Açıklayıcı resimler �������������������������������������������������������������������������������������������������������������� sayfalar
Genel güvenlik tavsiyeleri, kullanım kılavuzu ��������������������������������������������������������������������� sayfalar
3 - 10
38 - 43
Русский
Пояснительные рисунки �������������������������������������������������������������������������������������������������страницы
Общие указания по ТБ, инструкция по эксплуатации ������������������������������������������������� страницы
3 - 10
44 - 50
Украïнська
Пояснювальні малюнки ���������������������������������������������������������������������������������������������������� сторінки
Загальні вказівки по ТБ, iнструкція з експлуатації ��������������������������������������������������������� сторінки
3 - 10
51 - 57
Қазақ тілі
Түсіндіргіш әлеміштер ���������������������������������������������������������������������������������������������������������беттер
Жалпы қауіпсіздік жөніндегі ұсыныстар, пайдалану нұсқаулығы ���������������������������������������� беттер
3 - 10
58 - 64
����������������������������������������������������������������������������������������������������������������������������
���������������������������������������������������������������������������������������������������� 3 - 10
65 - 70
�������������������������������������������������������������������������������������������������������������������������
���������������������������������������������������������������������������������������������
3 - 10
71 - 76

3

4

5

6

7

8

9

10

11
English
Noise information
Always wear ear protection if the sound
pressure exceed 85 dB(A).
Declaration of conformity
We declare under our sole responsibility that the
product described under "Appliance specications"
is in conformity with all relevant provisions of the
directives 2006/42/EC including their amendments
and complies with the following standards:
EN1012-1:2010�
Certication Wu Cunzhen
manager
Merit Link International AG
Stabio, Switzerland, 20�01�2018
General safety instructions
ATTENTION! Read these instructions
carefully before using the appliance
for the rst time and follow all rules
and recommendation specied herein.
Keep the original instructions for future reference
or for a future owner.
Besides safety precautions contained herein, observe
general legal safety regulations and accident preven-
tion guidelines�
Caution plates and type plates on the appliance con-
tain important information, which is necessary for safe
operation�
Electrical safety recommendations
•Electrical connections shall only be performed by a
qualied electrician according to the requirements of
IEC 60364-1.
•If the power cable plug does not match the socket
used, the service technician shall cut such plug off and
replace it with an appropriate one. If the original plug has
a built-in protection device, the replacement plug shall
have a protection device with the same characteristics�
The cut off plug shall be disposed to avoid electric shock
and shall not be connected to any sockets.
•It is recommended to only connect the appliance to
a socket equipped with a 30 mA circuit breaker.
•The device shall only be connected to AC mains�
The voltage shall match the data on the type plate�
•Do not touch the plug or the socket with wet hands.
•Check the power cable and the plug for damage
before operation� Do not operate the appliance in
case of a damaged plug or a power cable� Contact our
customer service or a skilled electrician.
•If an extension cord is used, its power plug, socket,
and power cable shall be totally enclosed, splash-
proof, and suitable for outdoor use�
•Make sure that the power cable and the extension
cords are not damaged by tripping-over, crushing,
Appliance specication
Air compressor CT36046 CT36028 CT36029 CT36047
Appliance code [220-230 V ~50/60 Hz] 421463 421449 421456 421470
Rated power [W]
[HP] 750
11500
21500
21500
2
Amperage at voltage 220-230 V [A] 6 8 8 8
Rated speed [min-1]2800 2800 2800 2800
Air receiver capacity [l] 9 25 50 50
Productivity [l/min] 80 135 135 110
Operating pressure [MPa]
[bar] 0,8
80,8
80,8
80,8
8
Weight [kg]
[lb] 13,8
30�42 22
48�5 28
61�73 27,9
61�51
Safety class I I I I
Sound pressure [dB(A)] — — — —
Acoustic power [dB(A)] — — — —
Weighted vibration [m/s2]— — — —

12
English
stretching, etc� Protect power cables from heat, oil
products, and damages from sharp edges�
•When performing any service or maintenance,
switch the appliance off and disconnect the power plug
from the socket.
•Always switch off the mains disconnecting switch
when leaving the appliance unattended�
•Unsuitable extension cords may be dangerous� Only
approved for use and appropriately marked extension
cords with a sufcient wire cross-section may be used
outdoors:
•cable length: 1-10 m, cross-section: 1,5 mm2;
•cable length: 10-30 m, cross-section: 2,5 mm2;
•cable length: 30-50 m, cross-section: 4 mm2�
•Always reel out the cable completely to avoid a re
outbreak resulting from cable overheating.
Safe operation instructions
•Only use the appliance as intended� When operating
the appliance, follow local regulations with due account
for other people nearby�
•Appliance operation by children is strictly prohibited�
Do not allow children to play with the appliance�
•The appliance can only be used by persons who
underwent relevant operation training�
•Appliance operation by persons (including children)
with limited physical, sensitive, or mental capacities
is strictly prohibited, unless they are supervised or
instructed on appliance operation by the person(s)
responsible for their safety�
•Stay focused and deliberate over each action when
operating the appliance� Do not use the appliance if
you feel tired or when being under the effect of drugs,
alcohol, or medicines� Loss of attention during the
operation may cause serious injuries�
•Do not operate the appliance during thunderstorm or
heavy rain, especially in case of lightning strikes.
•Only use the appliance in vertical position, do
not cover it during the operation to ensure sufcient
ventilation and avoid overheating�
•Ensure stability of the appliance before performing
any operations in order to prevent accidents or
damage from tipping over. It is strictly forbidden to use
the appliance at height, for example, by installing it on
a scaffold or a stepladder, or by hanging it�
•Be careful when using the appliance� Never point
a jet of compressed air at people or animals� Use
personal protective equipment (goggles, respirator,
gloves, etc�)�
•Do not use compressed air to clean clothes� Do not
inhale compressed air�
•Do not modify the design in a way in which the
maximum permissible pressure may be exceeded� Do
not exceed the maximum operating pressure�
•Never exceed the maximum permissible pressure for
the equipment that will be connected to the appliance�
•Do not use the appliance at temperatures below 5°C
•Move the appliance using only transport handles�
Never use an air hose to move the appliance�
•Do not transport or move the appliance without
relieving pressure from the receiver�
•Be careful when operating the appliance, since
some of its parts can get very hot�
•Do not use ammable or corrosive substances to
clean the appliance�
•Keep an eye on the receiver status; if the receiver
becomes damaged or any air leak is detected,
immediately turn off the appliance and relieve air
pressure in the receiver�
•It is strictly forbidden to use the appliance with
a damaged receiver� Repair and further use of the
receiver are not allowed - a damaged receiver must
be replaced�
•Prior to maintenance or repair, make sure that the
appliance is disconnected from the power source�
•After each use, it is necessary to relieve air pressure
in the receiver and drain the condensate from it�
•Do not operate the appliance with damaged or
dismantled protective devices� Never use the appliance
that is not properly equipped or was subjected to
unauthorized modications.
•The appliance operation assumes its continuous
work without being attended by the user, so make sure
that the appliance is installed away from ammable
substances and no external factors prevent its normal
cooling (the minimum distance from any objects or
walls to the appliance is 50 cm)�
•It is forbidden to use the appliance in places with
a dusty atmosphere, as well as with an atmosphere
containing explosive gases and vapors of aggressive
substances�
•The appliance is designed only for air compression,
do not use it for other purposes�
•Do not use the compressed air produced by the
appliance for medical or pharmaceutical purposes�
•These appliances are not suitable for lling diving
cylinders�
•Do not touch the operating appliance with wet
hands�
•The use of the appliance for various purposes
(ination, powering pneumatic tools and appliances
using compressed air energy, coloring, washing, etc�)
assumes that the user is aware of safety rules for each
specic case.
•After the operation is nished, wait until the appliance
cools down, and only after that it can be covered or a
protective cover can be put on it�
Other hazards
•Do not use the appliance in an explosive atmosphere,
for example, in the presence of vapors of ammable
liquids or gases, particles of combustible substances
in the form of dust�
•Do not point the jet of compressed air at the surfaces
containing substances that are harmful to health (for
example, asbestos)�
•Consider the appliance weight when choosing location
for its storage and transportation (see the "Appliance
specication" table) to avoid accidents or injuries.
Appliance maintenance
•Maintenance of your appliance must be performed
by qualied personnel using the recommended spare
parts� This ensures that the safety of your appliance
will be preserved�
•Follow the lubrication instructions and recommenda-
tions for replacing accessories�
Residual risks
•Even if you use the appliance in accordance with
all safety requirements, potential risks of injury and
damage still remain. Due to specic features of the
appliance design, the following hazards may occur:

13
English
•the risk of injury and material damage from
objects thrown out by compressed air;
•injuries or physical damage due to faulty
accessories or a sudden impact against hidden
objects during operation�
Symbols used in the manual
Following symbols are used in the operation manual,
please remember their meanings� Correct interpreta-
tion of the symbols will allow correct and safe use of
the appliance�
Symbol Meaning
Serial number sticker:
CT ��� - model;
XX - date of manufacture;
XXXXXXX - serial number�
Read all safety regulations
and instructions�
Wear safety goggles�
Wear ear protectors�
Wear a dust mask.
Disconnect the appliance
from the mains before instal-
lation or adjustment�
Do not work in rain or snow.
Movement direction�
Rotation direction�
Locked.
Symbol Meaning
Unlocked.
IProtection class�
A sign certifying that the
product complies with es-
sential requirements of the
EU directives and harmo-
nized EU standards.
Attention. Important.
Useful information�
Do not dispose of the appli-
ance in a domestic waste
container�
Appliance designation
The compressor isdesigned to providevarious pneumatic
tools, devices and appliances with compressed air�
Using the compressor allows you to save electrical
power, mechanize work, and increase the speed of
work performance.
Various pneumatic tools signicantly expand the scope
of the compressor application, which makes it possible
to perform such works as drilling, chiselling, pumping,
painting, and washing which involves spraying
detergents, etc�
Appliance components
1 Transportation handle
2 Wheel *
3 Oil drain plug
4 Piping
5 Rubber mount *
6 Case
7 Cylinder
8 Valve plug
9 On / off switch
10 Pressure relay (pressostat)
11 Receiver manometer
12 Outlet tting (unregulated pressure)
13 Manometer of regulated pressure
14 Pressure regulator
15 Outlet tting (regulated pressure)
16 Check valve
17 Receiver
18 Air lter (assembly)
19 Crankcase
20 Viewport for oil level monitoring

14
English
21 Safety valve
22 Drain valve
23 Oil bottle *
24 Fitting *
25 Nut for installing rubber mount *
26 Bolt for installing rubber mount *
27 Washer for installing rubber mount *
28 Wheel installing stud *
29 Wheel installing washer *
30 Wheel installing nut *
31 Hose *
32 Hose clamp *
33 Quick-change tting *
34 Plug *
35 Air lter housing
36 Filter element *
37 Air lter cover
* Optional extra
Not all of the accessories illustrated or described
are included as standard delivery.
Installation and regulation of appliance
elements
Before any procedures, be sure to switch off the
appliance, remove the current-carrying cable from
the socket and discharge pressure in receiver 17
(pulling by the ring of safety valve 21).
Do not draw up the fastening elements
too tight to avoid damaging the thread.
Mounting / dismounting / setting-up of
some elements is the same for all appli-
ance models, in this case specic mod-
els are not indicated in the illustration.
Rubber mounts assembly / disassembly (see g. 1-2)
•Install the rubber mounts 5 as shown in g. 1-2.
•Disassemble in the reverse sequence�
Wheels assembly / disassembly (see g. 3)
[CT36028, CT36029, CT36047]
•Install wheels 2 as shown in g. 3.
•Disassemble in the reverse sequence�
Connecting / disconnecting the air hose (see g. 4-5)
[CT36046, CT36047]
•Attach hose clamp 32 to the end of hose 31 (see
g. 4.1).
•Install tting 24�
•Tighten the screw of hose clamp 32�
•When connecting, screw tting 24 on outlet tting 12
or 15 (see g. 4.2).
•When disconnecting unscrew tting 24�
[CT36028, CT36029]
•When connecting, insert (until it clicks) quick-change
tting 33 into outlet tting 12 or 15 (see g. 5.1).
•When disconnecting, move the bush of the quick-
change connection, as shown in g. 5.2, and remove
quick-change tting 33�
Initial operating of the appliance
Oil lling (see g. 6-7)
Attention: The manufacturer of the
appliance does not ll crankcase 19
with oil in order to comply with the
technical conditions for transportation.
Therefore, before using it is required to ll
the appliance with oil of the recommended
brand. Operation of the appliance without oil in
crankcase 19 or at the oil level less than minimum
will result in the appliance damage; in this case you
will lose the right to the warranty repair service.
•Place the appliance on a at horizontal surface.
•Clean an area around the oil hole with a cloth and
remove the plug 34 (see g. 6.1).
•Carefully pour oil into crankcase 19 (it is
recommended to use a funnel)� The oil level is the
upper limit of the red point on viewport 20 (see
g. 6.2). Wait for 5 minutes and then check the oil
level again, top up to the maximum level mark, if
necessary� Attention: do not exceed the maximum
level mark.
•Install plug 8 as shown in gure 7.1. Attention:
plug 8 has a special valve that prevents from
pressure increase inside crankcase 19. It is
strictly forbidden to replace plug 8 with plug 34
or other objects.
•To ensure even distribution of oil in crankcase 19
at the rst start-up and after a long idle time, it is
recommended to let the appliance run without a load
for 5 minutes� To do this, unscrew drain valve 22 (as
when draining condensate, see the description below),
also pull by the ring of safety valve 21 and hold it, then
switch on the appliance�
For relling use the oil supplied with the
appliance� You can also use engine oil -
SAE30 (if the appliance is used at the
temperature above 10°C) or SAE10 (if the
appliance is used at temperatures below 10°C)� Do not
mix oils of different grades�
Before operating the appliance
•Make sure the voltage matches technical
specications printed on the appliance.
•Check power cable and extension cord condition; if
any damage is detected, the cable shall be replaced�
•Check the condition of the air hose; if damaged,
replace it�
Switching the appliance on / off
Before connecting the appliance to the mains,
make sure that on / off switch 9 is in the down
position (Off).
Switching on:
Move on / off switch 9 upwards (see g. 8.1).

15
English
Switching off:
Move on / off switch 9 downwards (see g. 8.2).
Design features of the appliance
Automatic switching on / off
After switching on, the appliance operates in a cyclic
mode: pressure relay 10 maintains the constant
pressure value in receiver 17, switching on / off
the appliance depending on the consumption of
compressed air by connected pneumatic tools�
When the appliance is being switched on, the air
is sucked through air lter 18 and injected into
receiver 17 through piping 4� When the maximum
pressure value (the value of this parameter is set
at the factory) is reached, pressure relay 10 is
activated and the electric motor is switched off�
Excess air from piping 4and cylinder 7is discharged
through the valve� Thus, there is no excess pressure
in cylinder 7and piping 4- this reduces the load on
the electric motor the next time when the appliance
is started. If pressure inside receiver 17 drops to
the minimum value, the electric motor starts up and
the appliance starts pumping air into receiver 17
until it reaches the maximum value� The appliance
operates in this mode as long as on / off switch 9is
in the up position ("On")�
If the appliance does not switch off automatically when
the maximum pressure is reached, then the excess
pressure is discharged through safety valve 21. In this
case it is necessary to immediately contact a dedicated
CROWN repair workshop.
Temperature protection
Temperature protection prevents from damage to the
appliance, switching it off during excessive loads and
overheating� For example, when using pneumatic
tools whose air consumption exceeds the appliance
capacity, or when lter element 36 is clogged, etc�
This protects the electric motor against overload�
When temperature protection is activated, unplug the
appliance from the mains, eliminate the cause that
triggered the protection, allow the appliance to cool
down, and then continue working.
Pressure adjustment (see g. 8)
Pressure regulator 14 allows you to adjust pressure
of compressed air in outlet tting 15, as may be
required�
•Manometer 13 shows the set pressure value�
•To increase the pressure, rotate the handle of
pressure regulator 14 counterclockwise (see g. 8).
•To reduce pressure, rotate the handle of pressure
regulator 14 clockwise.
Attention: the appliance design allows
for adjustment of the compressed
air pressure only at outlet tting 15.
The pressure at outlet tting 12 is
equal to the pressure inside receiver 17 (the
pressure value inside receiver 17 is shown by
manometer 11).
Recommendations on the appliance op-
eration
Before starting work
•Place the appliance on a at horizontal surface
(permissible slope is less than 15°); this will ensure
proper lubrication of the parts�
•Connect pneumatic tools to the appliance�
•Connect the appliance to the mains�
•For models CT36046 and CT36047 - open the valve
on outlet tting 12 or 15 (depending on which of them
the pneumatic tool is connected)�
•When carrying out works related to spraying liquids,
make sure that no drops of liquid get on the appliance.
•If you need to move the appliance during operation,
disconnect it from the mains and depressurize
receiver 17, and then transport�
•If case of any side sounds or strong vibrations on
the part of the appliance, immediately switch it off and
contact the CROWN service center�
General recommendations
•Switch on the appliance�
•Using pressure regulator 14 set the pressure
required for operation�
•Do not overload the appliance� The operating mode
of the appliance is intermittent with the cyclic duration
factor of up to 55%, while the duration of a cycle
is 6-10 minutes. It is allowed to operate the device
continuously for 15 minutes, but not more often than
once within 1�5 hours�
•When using the appliance, monitor the oil level in
crankcase 19; add oil if necessary�
After completing the operation
•Switch off the appliance�
•Disconnect the appliance from the mains�
•Pulling by the ring of safety valve 21, depressurize
receiver 17�
•Drain the condensate from receiver 17, as described
below�
Appliance maintenance / preventive
measures
Before any procedures, be sure to switch off the
appliance, remove the current-carrying cable from
the socket and discharge pressure in receiver 17
(pulling by the ring of safety valve 21).
Cleaning the appliance
It is required to periodically clean the outer surface of
the appliance with a soft brush and a cloth, and blow the
parts of the appliance with compressed air� Do not use
caustic substances or solvents to clean the appliance�
Changing the oil (see g. 6-7)
After the rst 30 hours of the appliance operation (and
then after every 150 hours of operation), it is required
to change the oil. If the compressor is not used for more

16
English
than 12 months, it is also recommended to change the
oil before operation�
Attention: If the oil changed its color (it
became light - water entered it, or it be-
came dark - it got overheated) or there
are foreign impurities in it, you must im-
mediately change it.
•Place the appliance on a at horizontal surface.
•Under the drain hole, place a container, into which
the used oil will drain (see g. 7.2).
•Using a cloth, clean the area around plug 8and un-
screw it (see g. 7.1).
•Using a cloth, clean the area around plug 3and un-
screw it, and wait until the used oil stops owing out of
the drain hole� Screw in plug 3 (see g. 7.2).
•Carefully pour the oil into crankcase 19 (it is recom-
mended to use a funnel)� The oil level is the upper limit
of the red point on viewport 20 (see g. 6.2). Atten-
tion: do not exceed the maximum level mark.
•Screw in plug 8 (see g. 7.1).
Draining condensate (see g. 9-10)
After each using or after working day, always drain the
condensate from receiver 17� This prevents from cor-
rosion inside receiver 17�
•Place the appliance on a at horizontal surface.
•Place a container under drain valve 22, where the
condensate will drain�
•Unscrew drain valve 22 and wait until the conden-
sate has drained completely (water will stop dripping
from valve 22) (see g. 9-10).
•Screw in drain valve 22�
Cleaning air lter (see g. 11-12)
Regularly inspect lter element 36 of air lter 18 (its
contamination depends on the state of the environ-
ment). Clean (or replace) the lter element as it gets
dirty, but at least after 100 hours of using the ap-
pliance. A polluted air lter reduces efciency factor
and contributes to a greater depreciation of the ap-
pliance�
•Place the appliance on a at horizontal surface.
•Unscrew air lter 18 (see g. 11-12).
•Remove cover 37 from housing 35�
•Remove lter element 36�
•For models CT36028, CT36029: wash lter ele-
ment 36 with water and soap, and dry it thoroughly� At-
tention: Do not use gasoline, solvents or corrosive
substances to ush the lter element.
•For models CT36046, CT36047: blow lter ele-
ment 36 with compressed air�
•If the impurities of lter element 36 are too heavy
and cannot be cleaned, replace it. It is strictly forbidden
to use the appliance without an air lter.
•Assemble air lter 18 and install it back.
Checking the receiver status
Regularly inspect receiver 17 for signs of damage or
corrosion. If receiver 17 is damaged, it is forbidden
to perform independent repairs (mechanical, or by
welding)� Damaged receiver 17 must be completely
replaced at the dedicated CROWN repair workshop.
After-sales service and application service
Our after-sales service responds to your questions
concerning maintenance and repair of your product as
well as spare parts. Information about service centers,
parts diagrams and information about spare parts can
also be found under: www.crown-tools.com.
Transportation of the appliances
•Only move the аppliance by handle 1 or by picking
it up and supporting from the bottom� Do not move the
аppliance by other parts (by pulling the hoses or power
cable, etc�)�
•Do not transport or move the appliance without re-
lieving pressure from the receiver 17�
•Categorically not to drop any mechanical impact on
the packaging during transport.
•When unloading / loading is not allowed to use any
kind of technology that works on the principle of clamp-
ing packaging.
Environmental protection
Attention: Do not dispose of the used oil,
as well as condensate from receiver 17,
on the soil, into the ground, water bod-
ies or wastewater sewerage. The used oil
must be collected in a sealed container and trans-
ferred to a process waste collection point for fur-
ther disposal.
Recycle raw materials instead of dispos-
ing as waste.
Appliance, accessories and packaging
should be sorted for environment-friendly
recycling�
The plastic components are labelled for categorized
recycling�
These instructions are printed on recycled paper man-
ufactured without chlorine�
The manufacturer reserves the possibility to introduce changes.

17
Français
Caractéristiques de la machine
Compresseur d’air CT36046 CT36028 CT36029 CT36047
Code machine [220-230 V ~50/60 Hz] 421463 421449 421456 421470
Puissance absorbée [W]
[HP] 750
11500
21500
21500
2
Ampérage tension 220-230 V [A] 6 8 8 8
Vitesse nominale [min-1]2800 2800 2800 2800
Capacité du récepteur d’air [l] 9 25 50 50
Productivité [l/min] 80 135 135 110
Pression de travail [MPa]
[bar] 0,8
80,8
80,8
80,8
8
Poids [kg]
[lb] 13,8
30�42 22
48�5 28
61�73 27,9
61�51
Classe de protection I I I I
Pression acoustique [dB(A)] — — — —
Puissance acoustique [dB(A)] — — — —
Vibration [m/s2]— — — —
Bruit d'information
Portez toujours des protections pour
les oreilles (casque) lorsque le niveau
de pression acoustique est supérieur
à 85 dB(A).
Déclaration de conformité
Nous déclarons sous notre seule responsabilité que
le produit décrit sous " Caractéristiques de l’appareil "
est conforme à toutes les dispositions pertinentes des
directives 2006/42/EC, y compris leurs amendements
et respecte les normes suivantes : EN1012-1:2010�
Gestionnaire de Wu Cunzhen
certication
Merit Link International AG
Stabio, Suisse, 20�01�2018
Instructions de sécurité générales
ATTENTION ! Veuillez lire attentivement
les présentes instructions avant d’utili-
ser la machine pour la première fois et
suivre les règles et recommandations
spéciées ci-dessous. Veuillez conserver les ins-
tructions originales pour une consultation ulté-
rieure ou un propriétaire futur.
Outre les précautions de sécurité contenues dans ce
manuel, respecter les règles générales de sécurité et
les directives de prévention des accidents�
Les plaques de mise en garde et les plaques signa-
létiques sur l’appareil contiennent des informations
importantes nécessaires pour un fonctionnement sûr�
Recommandations relatives à la sécurité élec-
trique
•Les branchements électriques ne doivent être effec-
tués que par un électricien qualié conformément aux
exigences de la norme IEC 60364-1.
•Si la che du cordon d’alimentation ne correspond
pas à la prise utilisée, le technicien d’entretien doit
couper cette che et la remplacer par une che ap-
propriée. Si la che d’origine comporte un dispositif
de protection intégré, la che de remplacement doit
comporter un dispositif de protection présentant les
mêmes caractéristiques. La che coupée doit être dis-
posée de manière à éviter tout choc électrique et ne
doit pas être raccordée à des prises�
•Il est conseillé de ne brancher l’appareil qu’à une
prise équipée d’un disjoncteur de 30 mA�
•L’appareil doit uniquement être branché au secteur�
La tension doit correspondre aux données gurant sur
la plaque signalétique�
•Ne pas toucher la che ou la prise avec des mains
mouillées�
•Vérier tout dommage sur le câble d’alimentation et
la che avant la mise en marche. Ne pas utiliser la
machine en cas de che ou de câble d’alimentation
endommagé� Contacter notre service clientèle ou un
électricien compétent�

18
Français
•En cas d’utilisation d’une rallonge, la che secteur,
la prise et le câble d’alimentation doivent être entière-
ment fermés, étanches aux projections d’eau et adap-
tés à une utilisation à l’extérieur�
•S’assurer que le câble d’alimentation et les ral-
longes ne sont pas endommagés par le déclen-
chement, le broyage, l’étirement, etc� Protéger les
câbles d’alimentation de la chaleur, des produits
pétroliers et des dommages causés par des bords
tranchants�
•Lors d’un entretien ou d’une maintenance, mettre
l’appareil hors tension et débrancher la che secteur
de la prise�
•Lorsque l’appareil est laissé sans surveillance, tou-
jours mettre hors tension le sectionneur de secteur�
•Des rallonges inadéquates peuvent être dange-
reuses� Seules les rallonges approuvées et avec une
section transversale de câble sufsante peuvent être
utilisées à l’extérieur :
•longueur de câble : 1-10 m, section transver-
sale : 1,5 mm2;
•longueur de câble : 10-30 m, section transver-
sale : 2,5 mm2;
•longueur de câble : 30-50 m, section transver-
sale : 4 mm2�
•Toujours entièrement dévider le câble pour empê-
cher un début d’incendie provoqué par la surchauffe
du câble.
Consignes de sécurité
•Utiliser uniquement l’appareil comme prévu� Lors
de l’utilisation de l’appareil, suivre les réglementations
locales en tenant compte des autres personnes à
proximité�
•L’utilisation de l’appareil par les enfants est stricte-
ment interdite� Ne pas laisser les enfants jouer avec
l’appareil�
•L’appareil ne peut être utilisé que par des personnes
ayant suivi une formation appropriée sur le fonction-
nement�
•L’utilisation de l’appareil par des personnes (y com-
pris des enfants) ayant des capacités physiques, sen-
sorielles ou mentales limitées est strictement interdite,
à moins d’une surveillance ou d’une instruction sur
l’utilisation de l’appareil par la ou les personnes res-
ponsables de leur sécurité�
•Rester concentré et penser chaque action lors de
l’utilisation de l’appareil� Ne pas utiliser l’appareil en
cas de fatigue ou sous l’emprise de drogues, alcool ou
médicaments� Une perte d’attention pendant le fonc-
tionnement peut causer des blessures graves�
•Ne pas faire fonctionner l’appareil pendant les
orages ou les fortes pluies, particulièrement en cas de
foudre�
•Utiliser uniquement l’appareil en position verticale,
ne pas le recouvrir pendant le fonctionnement pour as-
surer une ventilation sufsante et éviter la surchauffe.
•Assurer la stabilité de l’appareil avant de procé-
der à une opération an de prévenir les accidents ou
les dommages consécutifs à un basculement. Il est
strictement interdit d’utiliser l’appareil en hauteur, par
exemple, en l’installant sur un échafaudage ou une
échelle ou en le suspendant�
•Lors de l’utilisation de l’appareil, veillez à. Ne jamais
diriger le jet d’air comprimé sur des personnes ou des
animaux� Utiliser un équipement de protection person-
nelle (lunettes, respirateur, gants, etc�)�
•Ne pas utiliser l’air comprimé pour nettoyer les vête-
ments� Ne pas inhaler l’air comprimé�
•Ne pas modier sa fonction de façon à pouvoir excé-
der la pression maximale permise� Ne pas excéder la
pression de travail maximale�
•Ne jamais excéder la pression maximale permise
pour l’équipement devant être raccordé à l’appareil�
•Ne pas utiliser l’appareil à une température infé-
rieure à 5°C
•Déplacer l’appareil uniquement à l’aide des poi-
gnées de transport� Ne jamais utiliser le tuyau à air
pour déplacer l’appareil�
•Ne pas transporter ou déplacer l’appareil sans libé-
rer la pression du récepteur�
•Faire attention en faisant fonctionner l’appareil,
puisque certaines de ses pièces peuvent être très
chaudes�
•Ne pas utiliser de substances inammables ou cor-
rosives pour nettoyer l’appareil�
•Surveillez toujours le statut du récepteur ; si le ré-
cepteur est endommagé ou si une fuite d’air est dé-
tectée, éteindre immédiatement l’appareil et libérer la
pression d’air dans le récepteur�
•Il est strictement interdit d’utiliser l’appareil avec un
récepteur endommagé� La réparation du récepteur et
son utilisation ultérieure ne sont pas autorisées - un
récepteur endommagé doit être remplacé�
•Avant de procéder à la maintenance ou à la répa-
ration, assurez-vous que l’appareil est débranché de
l’alimentation électrique�
•Après chaque utilisation, il est nécessaire de libérer
la pression d’air dans le récepteur et d’en évacuer le
condensat�
•Ne pas faire fonctionner l’appareil avec des disposi-
tifs endommagés ou désassemblés� Ne jamais utiliser
un appareil qui n’est pas correctement équipé ou qui a
fait l’objet de modications non autorisées.
•Le fonctionnement de l’appareil présume un travail
ininterrompu sans la présence de l’utilisateur, assu-
rez-vous donc que l’appareil est installé à l’écart de
substances inammables et qu’aucun facteur exté-
rieur n’empêche son refroidissement normal (la dis-
tance minimale entre l’appareil et tout objet ou mur est
de 50 cm)�
•Il est interdit d’utiliser l’appareil dans des endroits
où l’atmosphère est poussiéreuse, et où l’atmosphère
contient des gaz explosifs et des vapeurs de subs-
tances agressives�
•L’appareil est conçu uniquement pour l’air compri-
mé, ne pas l’utiliser à d’autres ns.
•Ne pas utiliser l’air comprimé produit par l’appareil à
des ns médicales ou pharmaceutiques.
•Ces appareils ne sont pas adaptés pour remplir les
bouteilles de plongée�
•Ne pas toucher l’appareil en marche avec des mains
humides�
•L’utilisation de cet appareil pour des objectifs variés
(gonage, alimentation des outils pneumatiques et des
appareils utilisant l’énergie de l’air comprimé, peinture,
lavage, etc�) présume que l’utilisateur est conscient
des consignes de sécurité pour chaque cas spécique.
•Une fois le travail terminé, attendez que l’appareil
refroidisse, et ensuite seulement, il peut être recouvert
ou un couvercle de protection peut être mis dessus�
Autres dangers
•Ne pas utiliser l’appareil dans une atmosphère
explosive, par exemple, en présence de vapeurs de

19
Français
liquides ou gaz inammables, de particules de subs-
tances combustibles sous forme de poussière�
•Ne pas diriger le jet d’air comprimé sur des surfaces
contenant des substances dangereuses pour la santé
(par exemple, de l’amiante)�
•Prenez en compte le poids de l’appareil en choisis-
sant le lieu de stockage et de transport (voir le tableau
des " spécications de l’appareil ") an d’éviter les
accidents ou les blessures�
Maintenance de l’appareil
•La maintenance de l’appareil doit être faite par un
personnel qualié en utilisant les pièces détachées
recommandées� Cela assure que la sécurité de l’appa-
reil est préservée�
•Suivez les instructions de lubrication et les recom-
mandations pour remplacer les accessoires�
Risques résiduels
•Même si vous utilisez l’appareil conformément à
toutes les exigences de sécurité, les risques potentiels
de blessure ou de dommage demeurent� En raison
des caractéristiques spéciques de la conception de
l’appareil, les dangers suivants peuvent se présenter :
•risque de blessure ou de dommage matériel par
des objets projetés par l’air comprimé ;
•blessures ou lésions physiques causées par des
accessoires défaillants ou par un choc soudain
contre des objets cachés pendant le fonctionne-
ment�
Symboles utilisés dans le manuel
Les symboles suivants sont utilisés dans le manuel
d’utilisation, ne pas oublier leur signication. Une inter-
prétation correcte des symboles permettra une utilisa-
tion appropriée et sûre de l’appareil�
Symbole Légende
Etiquette avec le numéro
d’usine:
CT ��� - modèle;
XX - date de fabrication;
XXXXXXX - numéro d’usine�
Lisez attentivement toutes
les consignes de sécurité et
les instructions�
Portez les lunettes de pro-
tections�
Portez le casque de protec-
tion�
Symbole Légende
Portez le masque antipous-
sière�
Avant les travaux de mon-
tage et de réglage, débran-
chez l’instrument du réseau
électrique�
Ne pas travailler en cas de
pluie ou de neige�
Sens du mouvement�
Sens de la rotation�
Bloqué�
Débloqué�
IClasse de protection�
Signe certiant que l’article
correspond aux directives
CE et aux standards har-
monisés de l’Union Euro-
péenne�
Attention. Information impor-
tante�
Information utile.
Ne pas jeter la machine
dans un conteneur à dé-
chets domestiques�
Appellation de la machine
Le compresseur est conçu pour alimenter différents
outils en air comprimé, dispositifs et appareils pneu-
matiques�

20
Français
L’utilisation du compresseur vous permet d’économi-
ser l’électricité, de mécaniser le travail et d’augmenter
la vitesse de la performance de travail�
Les différents outils pneumatiques élargissent le
champ d’application du compresseur, ce qui lui permet
de faire des opérations comme le forage, le burinage,
la peinture et le lavage ce qui comprend la pulvérisa-
tion de détergents, etc�
Composants de la machine
1 Poignée de transport
2 Roue *
3 Bouchon de vidange d’huile
4 Durite
5 Support en caoutchouc *
6 Boitier
7 Cylindre
8 Clapet de soupape
9 Interrupteur marche / arrêt
10 Relais de pression (pressostat)
11 Manomètre du récepteur
12 Raccord de sortie (pression non régulée)
13 Manomètre de pression régulée
14 Régulateur de pression
15 Raccord de sortie (pression régulée)
16 Clapet de retenue
17 Récepteur
18 Filtre à air (assemblage)
19 Carter
20 Fenêtre d’afchage pour surveiller le niveau d’huile
21 Soupape de sûreté
22 Vanne de vidange
23 Bouteille d’huile *
24 Raccord *
25 Écrou pour installer le support en caoutchouc *
26 Boulon pour installer le support en caoutchouc *
27 Rondelle pour installer le support en caoutchouc *
28 Ergot de montage de roue *
29 Rondelle de montage de roue *
30 Écrou de montage de roue *
31 Tuyau *
32 Collier de serrage pour tuyau *
33 Raccord pour remplacement rapide *
34 Bouchon *
35 Boite du ltre à air
36 Élément de ltre *
37 Couvercle du ltre à air
* Accessoires
Une partie des accessoires représentés et décrits
ne gurent pas dans la livraison.
Installation et réglage des éléments de
la machine
Avant d’entamer toute procédure, assurez-vous
d’éteindre l’appareil, de débrancher le câble d’ali-
mentation de la prise et de libérer la pression dans
le récepteur 17 (en tirant sur la soupape de sûre-
té 21).
Ne pas trop serrer les xations an d'évi-
ter tout endommagement du letage.
Le montage / démontage / réglage de
certains éléments est le même pour l’en-
semble des modèles de machines. Les
modèles spéciques ne sont pas présen-
tés dans l’illustration.
Assemblage / désassemblage des supports en
caoutchouc (voir les g. 1-2)
•Installez les supports en caoutchouc 5comme re-
présenté g. 1-2.
•Désassemblez dans l’ordre inverse.
Assemblage / désassemblage des roues (voir
g. 3)
[CT36028, CT36029, CT36047]
•Montez les roues 2 comme représenté g. 3.
•Désassemblez dans l’ordre inverse.
Branchement / débranchement du tuyau à air (voir
les g. 4-5)
[CT36046, CT36047]
•Attachez le collier de serrage du tuyau 32 à l’extré-
mité du tuyau 31 (voir la g. 4.1).
•Posez le raccord 24�
•Serrez la vis du collier de serrage du tuyau 32�
•Pour brancher, vissez le raccord 24 sur le raccord
de sortie 12 ou 15 (voir la g. 4.2).
•Pour débrancher, dévissez le raccord 24�
[CT36028, CT36029]
•Pour brancher, insérez (jusqu’au clic) le raccord de
remplacement rapide 33 sur le raccord de sortie 12
ou 15 (voir la g. 5.1).
•Pour débrancher, déplacez la douille du branche-
ment de remplacement rapide, comme représenté
g. 5.2 et enlevez le raccord de remplacement ra-
pide 33�
Première opération de la machine
Remplissage d’huile (voir les g. 6-7)
Attention : Le fabricant de l’appareil ne
remplit pas le carter 19 d’huile an de se
conformer aux conditions techniques de
transport. Par conséquent, avant l’utili-
sation, il est exigé de remplir l’appareil avec l’huile
de la marque recommandée. Le fonctionnement
de l’appareil sans huile dans le carter 19 ou avec
un niveau d’huile inférieur à la quantité minimale
endommagera l’appareil ; dans quel cas, vous per-
drez la garantie réparation.
•Placez l’appareil sur une surface horizontale plane.
•Nettoyez la zone autour de l’ouverture à huile avec
un chiffon et enlevez le bouchon 34 (voir la g. 6.1).
•Versez délicatement l’huile dans le carter 19 (il est
recommandé d’utiliser un entonnoir)� Le niveau d’huile
est la limite supérieure du point rouge dans la fenêtre
d’afchage 20 (voir la g. 6.2). Attendez 5 minutes
puis vériez de nouveau le niveau d’huile, si besoin
This manual suits for next models
3
Table of contents
Languages:
Other Crown Air Compressor manuals