Crye Precision AVS 1000 PACK User manual

AVS™1000 PACK OPERATOR’S MANUAL


EQUIPMENT INFORMATION
01 INTRODUCTION
02 CONFIGURATION OVERVIEW
03 COMPONENT DESCRIPTIONS
MISSION SPECIFIC CONFIGURATIONS
07 AVS™ SELF-ACCESS CONFIGURATION
11 AVS™SEMI-FIXED CONFIGURATION
13 FIXED (PLATE BAG) CONFIGURATION
17 MOLLE-ATTACH CONFIGURATION
19 SHOULDER PAD CONFIGURATION
COMMON INSTALLATIONS
23 SHOULDER COMPONENT INSTALLATION
25 FRAME SHEET REMOVAL
26 FRONT ADJUSTMENT STRAP INSTALLATION
27 ADJUSTMENT STRAP INSTALLATION
CONTENTS

1AVS™1000 PACK
INTRODUCTION
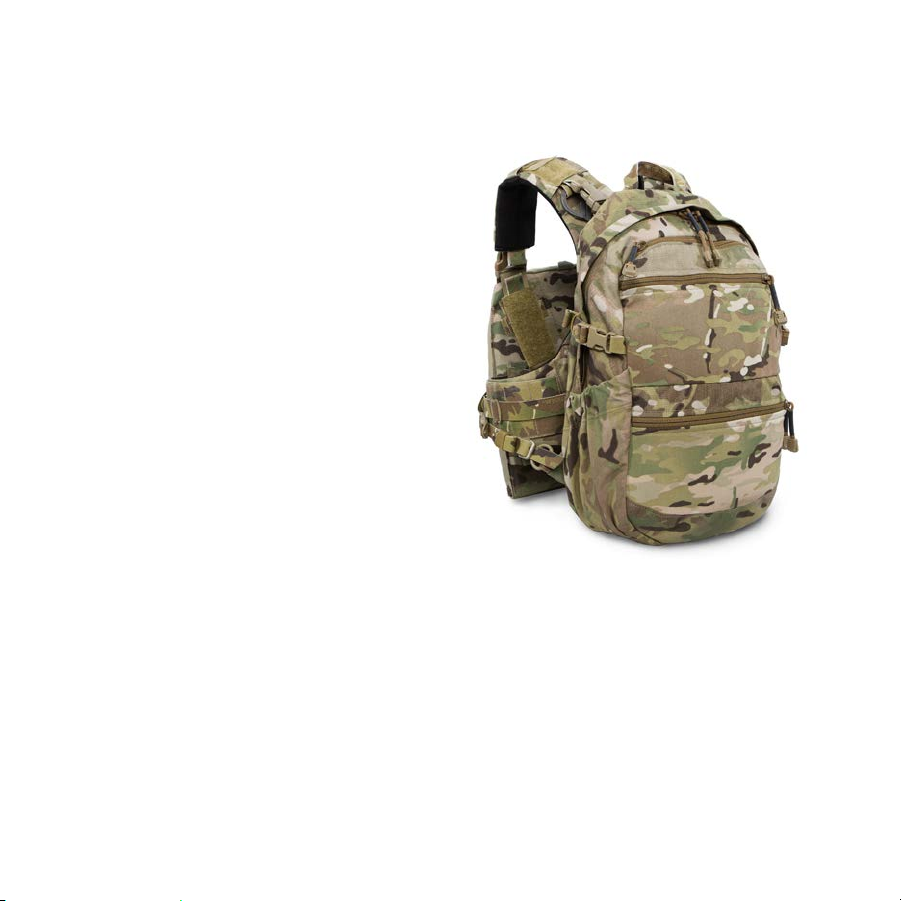
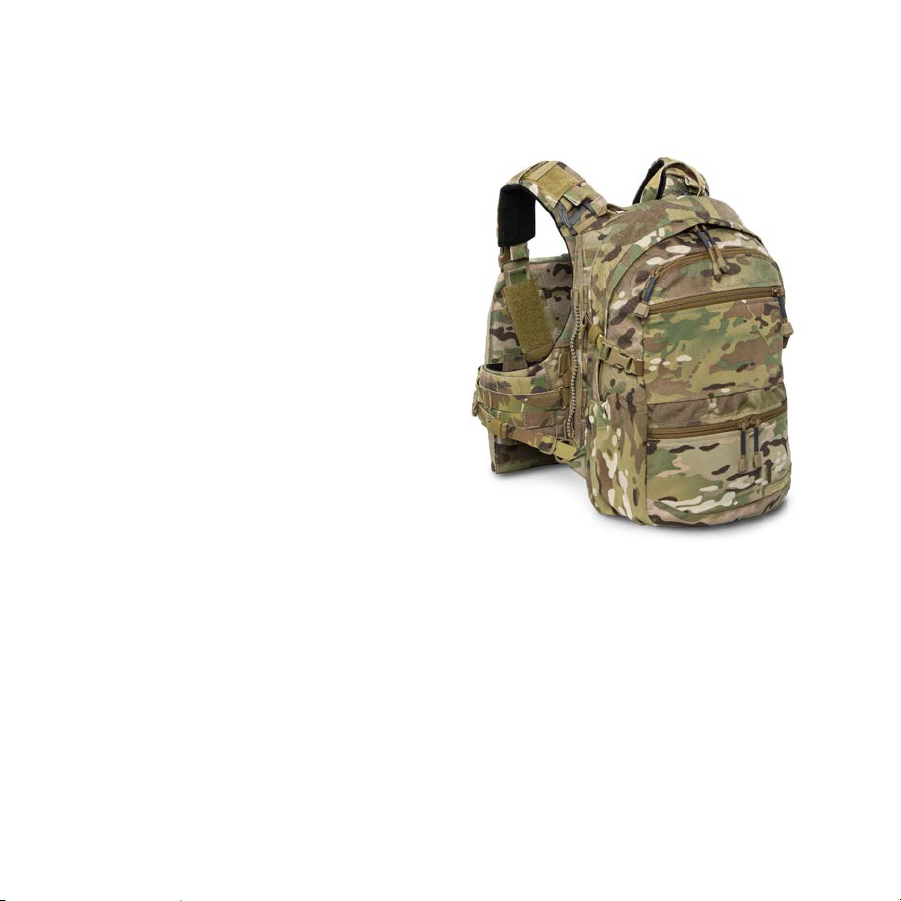
The AVS™1000 Pack is a small, lightweight assault pack designed to provide the user
with a variety of access and attachment options. The AVS™SELF-ACCESS conguration allows
users to secure the pack to the AVS™without bulky shoulder pads while still allowing the
user to easily access the pack. The FIXED conguration replaces the rear plate bag of the
AVS™or JPC™ with the AVS™ 1000 Pack. The FIXED conguration also accommodates all
sizes of ESAPI or swimmer-cut plates. Additional attachment options include broad-based
carriage capabilities like MOLLE-ATTACH and SHOULDER PAD congurations, which are ideal
for carrying radios, medical equipment, or everyday use. Made in the US from US materials.
FEATURES
Five unique carry congurations:
AVS™ Self-Access
Fixed (Plate Bag)
AVS™ (when combined with AVS™ components)
JPC™ (when combined with JPC™ components)
AVS™ Semi-Fixed
Shoulder Pad
MOLLE-Attach
Removable frame sheet
3 row by 3 column external MOLLE panel
Bottle holder designed for .75 L bottle and smaller
Hydration bladder sleeve
Two ports for tube and cable routing
Three medium-sized pockets with exterior access
One inward-expanding medium-sized pocket
Can hold ballistic plate (up to XL) with use of frame sheet
Adjustable and removable sternum strap
Externally sewn compressions straps
Main zipper pulls are designed to hitch together to secure around UHF antenna
Stow bars for attaching 1, 2, or 3 band cummerbunds

2EQUIPMENT INFORMATION
CONFIGURATION OVERVIEW
AVS™SELF-ACCESS (PG 7)
MOLLE-ATTACH (PG 17)FIXED (PLATE BAG) (PG 13) SHOULDER PAD (PG 19)
AVS™SEMI-FIXED (PG 11)

3AVS™1000 PACK
COMPONENT DESCRIPTIONS
321
12
109
11
8
7
6
5
4

4EQUIPMENT INFORMATION
COMPONENT DESCRIPTIONS
FRAME SHEET3
BACK PAD
2
AVS™PACK
1
STERNUM STRAP, FEMALE
12
ADJUSTMENT STRAP (x3)
11
FRONT ADJUSTMENT STRAP10
9SHOULDER PADS
7LEFT HINGE
8SEMI-FIXED HARDWARE (x2)
6RIGHT HINGE
SELF-ACCESS SHOULDER STRAP ANCHOR (x2)5
SELF-ACCESS SHOULDER STRAP (x2)4


MISSION SPECIFIC CONFIGURATIONS

7AVS™1000 PACK
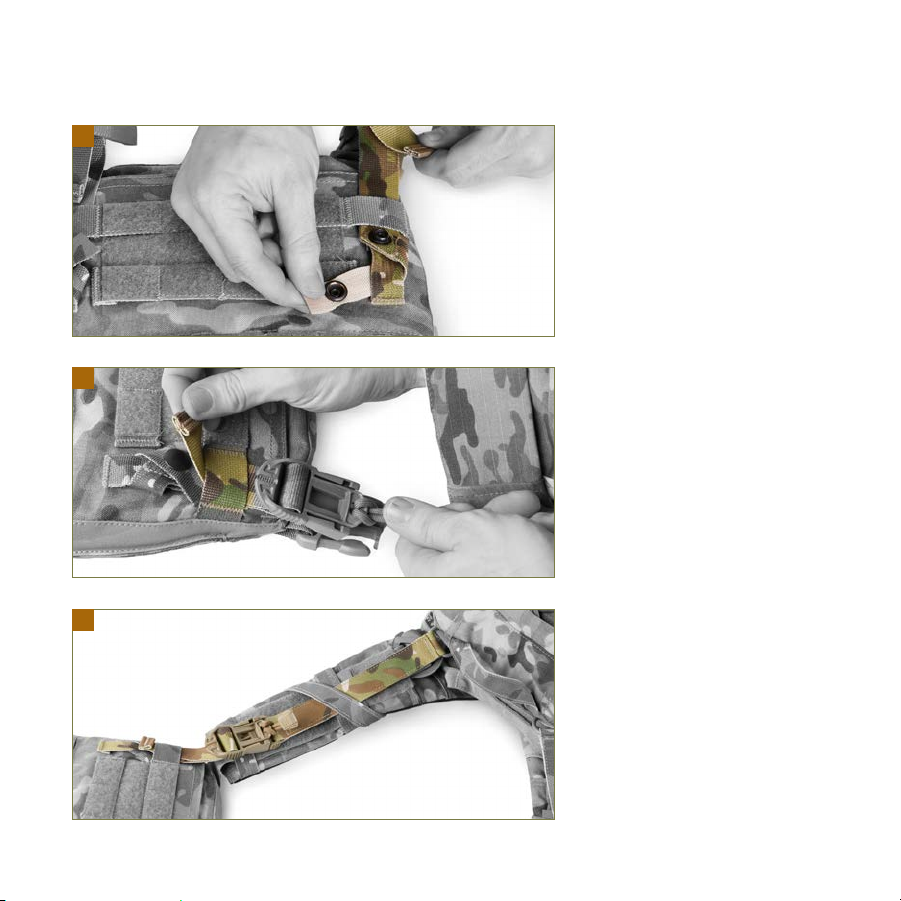
The AVS™SELF-ACCESS conguration is for AVS™users who
are looking for a low-prole option for carrying their pack.
Without excessive layers and added bulk of shoulder pads, this
conguration is well-suited for maintaining the ability to quickly
don and doff (partially or fully) without teammate assistance.
AVS™SELF-ACCESS CONFIGURATION
Complete SHOULDER COMPONENT (PG 23), FRONT ADJUSTMENT STRAP
(PG 26),and ADJUSTMENT STRAP (PG 27) installations for this section.
REQUIRED COMPONENTS
SELF-ACCESS SHOULDER STRAPS
SELF-ACCESS SHOULDER STRAP ANCHORS
LEFT & RIGHT HINGES
FRONT ADJUSTMENT STRAP
ADJUSTMENT STRAP (x2)

8MISSION SPECIFIC CONFIGURATIONS
Remove the shoulder strap covers from the
AVS™and disconnect the components.
Ensure the HINGE is positioned correctly on
the reverse side of the strap.
Pass the AVS™strap through the HINGE
and adjust the location of the pivot point.
The webbing should be higher inboard and
lower outboard.
1
2
3
9AVS™1000 PACK
Pull the adjustment end of the anchor
down through the PALS webbing.
Connect the shoulder straps and adjust to
preferred height.
Locate the SELF-ACCESS SHOULDER STRAP
ANCHOR. Pass the snap end through the
PALS stow on front of the AVS™then pass
the strap behind the vertical webbing and
snap it back onto itself.
4
5
6

10MISSION SPECIFIC CONFIGURATIONS
To deploy, disconnect the FRONT
ADJUSTMENT STRAP and the SELF-ACCESS
SHOULDER STRAP ANCHOR on the same side.
This will release the pack, allowing it to
swing around to the front.
To redeploy, swing the pack around or
the pass the buckle around your neck.
Ensure the buckle is passed through the
HINGE webbing.
7
8
11 AVS™1000 PACK
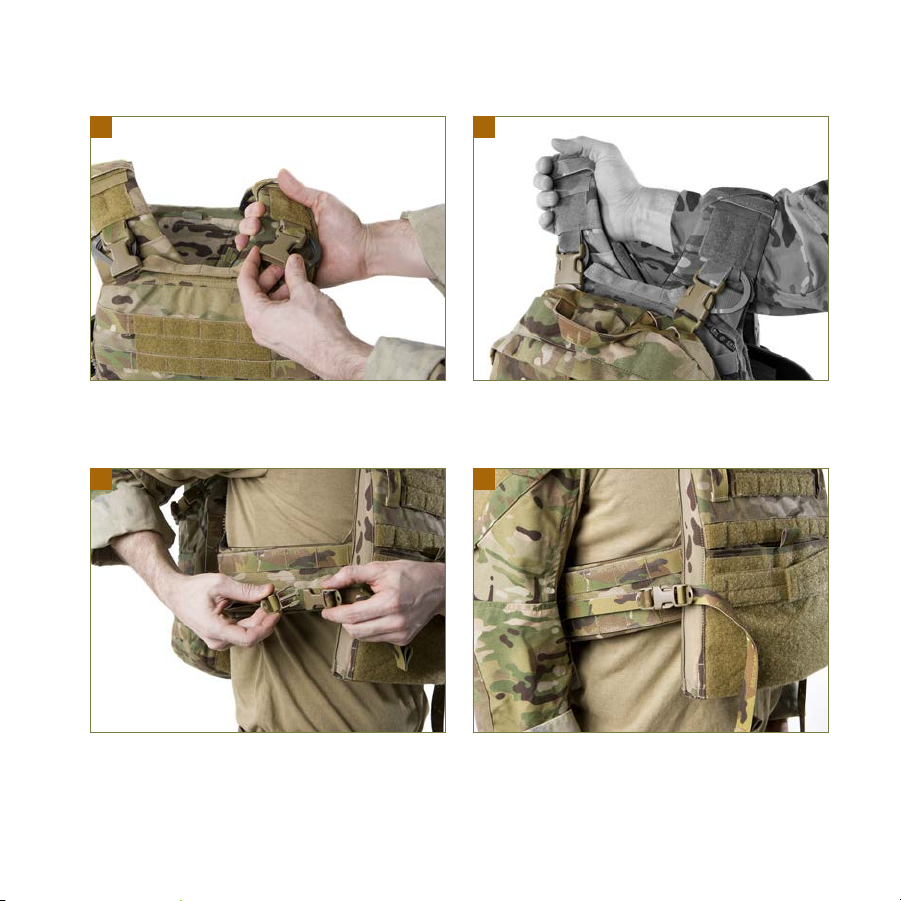
AVS™SEMI-FIXED CONFIGURATION
Complete SHOULDER COMPONENT (PG 23),FRONT ADJUSTMENT STRAP
(PG 26),ADJUSTMENT STRAP (PG 27) installations before beginning
this section.
The AVS™SEMI-FIXED conguration is for AVS™users who are
looking for a low-prole option for carrying heavier items in their
pack that don’t require personal access. Quickly clipped on, this
conguration adds no additional straps to the shoulder area, but
still allows the ability to quickly add and remove the pack.
REQUIRED COMPONENTS
SEMI-FIXED HARDWARE
FRONT ADJUSTMENT STRAP
ADJUSTMENT STRAP (x2)
12MISSION SPECIFIC CONFIGURATIONS
Locate the webbing loop on the back of the AVS™. Install the
female SEMI-FIXED HARDWARE by rotating the split bar onto the loop.
Connect the ADJUSTMENT STRAPS to the FRONT ADJUSTMENT STRAP.
Attach the pack via the installed SEMI-FIXED HARDWARE at the top
of the pack.
Cinch the pack by pulling forward on the FRONT ADJUSTMENT STRAP.
1 2
34

13 AVS™1000 PACK
FIXED (PLATE BAG) CONFIGURATION
Complete FRONT ADJUSTMENT STRAP (PG 24) and ADJUSTMENT STRAP
(PG 25) installations before beginning this section.
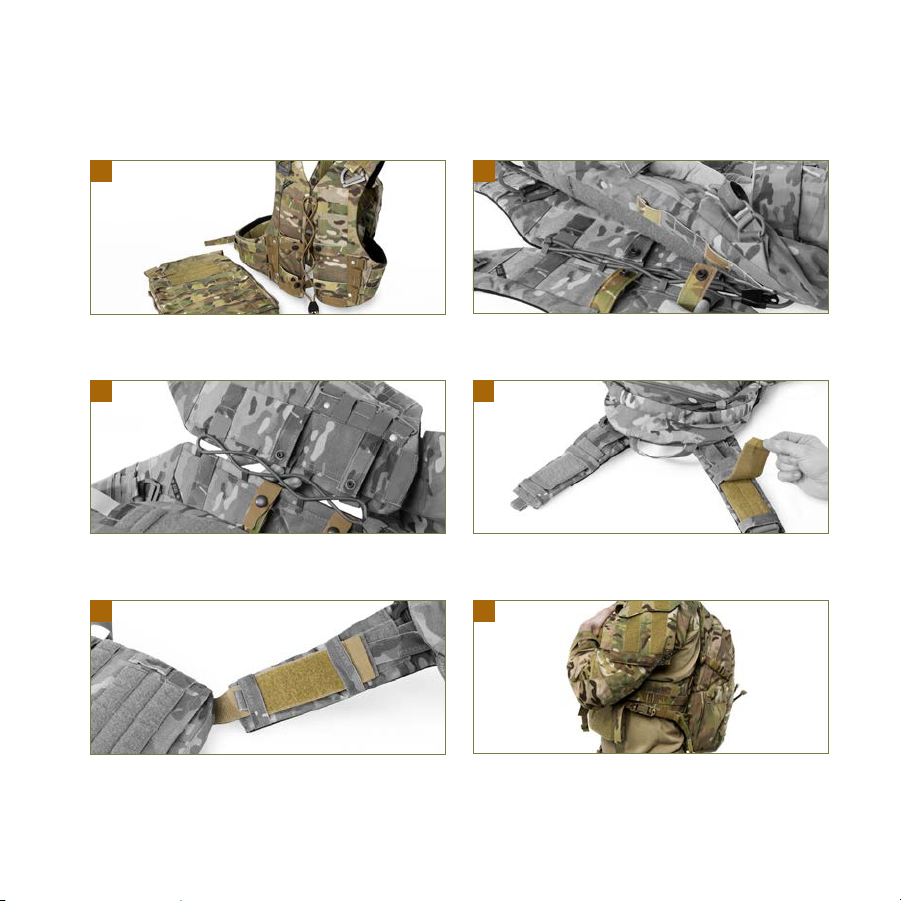
The FIXED conguration replaces the rear plate bag of either
the AVS™ or JPC™ with the AVS™ 1000 Pack. The FIXED
conguration accommodates all ESAPI and swimmer-cut plate
sizes. Utilizing the pack as a rear plate bag reduces excess
material by removing the need for a separate rear plate bag.
REQUIRED COMPONENTS
FRAME SHEET
FRONT ADJUSTMENT STRAP
ADJUSTMENT STRAP (x2)
BACK PAD (OPTIONAL FOR JPC™)
14MISSION SPECIFIC CONFIGURATIONS
AVS™FIXED CONFIGURATION
Snap the AVS™tabs closed and repeat on the opposite side. Extend the pack shoulder straps and secure on the AVS™Harness
shoulder straps.
Remove the rear plate bag from the AVS™Harness. Pass the AVS™tabs through the respective slots located on the
back of the pack.
Secure the AVS™front straps to the pack shoulder strap loop. Completed AVS™FIXED set-up.
1
4
2
56
3

15 AVS™1000 PACK
Remove the rear portion of the JPC™. Push the shoulder strap
covers below the shoulder strap loop.
Reinstall the JPC™shoulder strap covers.
Extend the pack shoulder straps and secure to the shoulder straps
of the JPC™front.
JPC™FIXED CONFIGURATION
1 2
3
On the reverse side of the pack, pass the 3-band cummerbund
webbing ends through the stows.
4

16MISSION SPECIFIC CONFIGURATIONS
Install the bungee cord and secure it with an overhand knot.
Secure the foam pad on the corresponding loop channels. Completed JPC™FIXED set-up.
Drop the plate into the hydration sleeve and secure the adjustable
plate strap. Adjust the plate to desired height.
5 6
7 8
17 AVS™1000 PACK
MOLLE-ATTACH CONFIGURATION
Complete FRONT ADJUSTMENT STRAP (PG 24) and ADJUSTMENT STRAP
(PG 25) installations before beginning this section.
The MOLLE-ATTACH conguration allows the user to secure the pack
to any PALS platform with a 4-stow by 6-row area available. For
additional stability, the user can utilize FRONT ADJUSTMENT STRAPS
and/or ADJUSTMENT STRAPS to interface with most hook-and-loop-
style front aps.
OPTIONAL COMPONENTS
FRONT ADJUSTMENT STRAP
ADJUSTMENT STRAP (x2)
Table of contents


