Crystal DBH50R User manual
DBH50R
Version 7

Technical Assistance
If
you need assistance setting up or using your CRYSTAL product now or in the future, call CRYSTAL Support.
Australia
TEL: 03 – 8587 8898
FAX: 03 – 8587 8866
Mon-Fri 9am – 5pm AEST
Please retain this user guide for future reference.
Safety Information and Warnings
For updates on CRYSTALM products go to our website
http://tdj.com.au/firmware/Crystal/
Information on Safe Operation
Read This Information Before Using Your CRYSTAL Radio. The operation of your UHF radio in
Australia is subject to conditions in the following license:
In Australia the ACMA Radio communications (Citizen Band Radio Stations) and in New Zealand by
MED the General User Radio License for Citizen Band Radio.
Safety and general use whilst in a vehicle
Check the State and Federal laws and regulations regarding the use of two way radios in the area
where you drive, and always obey them.
Radio Antenna
Do not use any radio that has a damaged antenna. If a damaged antenna comes in contact with the
skin, a minor burn may result.
Do NOT change or modify the antenna.
Do NOT hold the antenna when the radio is “IN USE.” Holding the antenna reduces range and may
cause bodily harm.

Do not place your radio in the area over an air bag or in the air bag deployment area. Air bags
the radio may be propelled with great force and cause serious injury to the occupants of the
vehicle.
All batteries can cause property damage and/or bodily injury such as burns if conductive material
such as jewellery, keys, or beaded chains touches exposed terminals. The material may complete
an electrical circuit (short circuit) and become quite hot. Exercise care in handling any charged b
attery, particularly when placing it inside a pocket, purse, or other container with metal objects.
Do not replace or charge batteries in a potentially explosive atmosphere. Contact sparking may
occur while installing or removing batteries and cause an explosion.
Potentially Explosive Atmospheres
Turn your radio OFF when in any area with a potentially explosive atmosphere. Sparks in such areas
atmospheres are often, but not always clearly marked. They include fueling areas such as below deck
on boats; fuel or chemical transfer or storage facilities; areas where the air contains chemicals or
particles, such as grain, dust, or metal powders; and any other area where you would normally be
advised to turn off your vehicle engine.

To avoid possible interference with blasting operations, turn your radio OFF near electrical blasting caps
or in a “blasting area” or in areas posted: “Turn off the two way radio.” Obey all signs and instructions.
Exposure to Radio Frequency Energy
Your CRYSTAL two-way radio complies with Australian Communications Authority Radio communications
(Electromagnetic Radiation-Human Exposure) Standard, 2003. To assure optimal radio performance and
make sure human exposure to radio frequency electromagnetic energy is within the guidelines set out in
the above standards always adhere to the following procedures.
Transmit and Receive Procedure
Your two-way radio contains a transmitter and a receiver. To control your exposure and ensure
compliance with the general population/uncontrolled environment exposure limits, always adhere to the
exposure only when transmitting (in terms of measuring standards compliance). Always hold the radio
approximately 5cm in front of your mouth with the antenna pointing away from your head.
Nearly every electronic device is susceptible to electromagnetic interference (EMI). To avoid the possibility of
instruct you to do so such as health care facilities.
Radio Operation and EME Exposure
the antenna when the radio is “IN USE.” Holding the antenna reduces the effective range. Do not use the radio if the
antenna is damaged. If a damaged antenna makes contact with your skin, a minor burn can result. If you wear a radio on
least 5cm from your body when transmitting.
Aircraft
When instructed to do so, turn off your radio when onboard an aircraft. Any use of a radio must be in accordance with
applicable regulations per airline crew instructions.
Medical Devices – Pacemakers
The Advanced Medical Technology Association recommends that a minimum separation of 6 inches (15cm) be
maintained between a handheld wireless radio and a pacemaker. These recommendations are consistent with the
independent research by and recommendations of the U.S. Food and Drug Administration.
People with pacemakers should:
ALWAYS keep the radio more than 15cm from their pacemaker when the radio is turned ON.
Turn the radio OFF immediately if there is any reason to suspect that interference is taking place.
Medical Devices - Hearing Aids
Some radios may interfere with some hearing aids. In the event of such interference, you may want to consult your
hearing aid manufacturer to discuss alternatives.
Other Medical Devices
If you use any other personal medical device, consult the manufacturer of your device to determine if it is adequately
shielded from RF energy. Your physician may be able to assist you in obtaining this information.

15
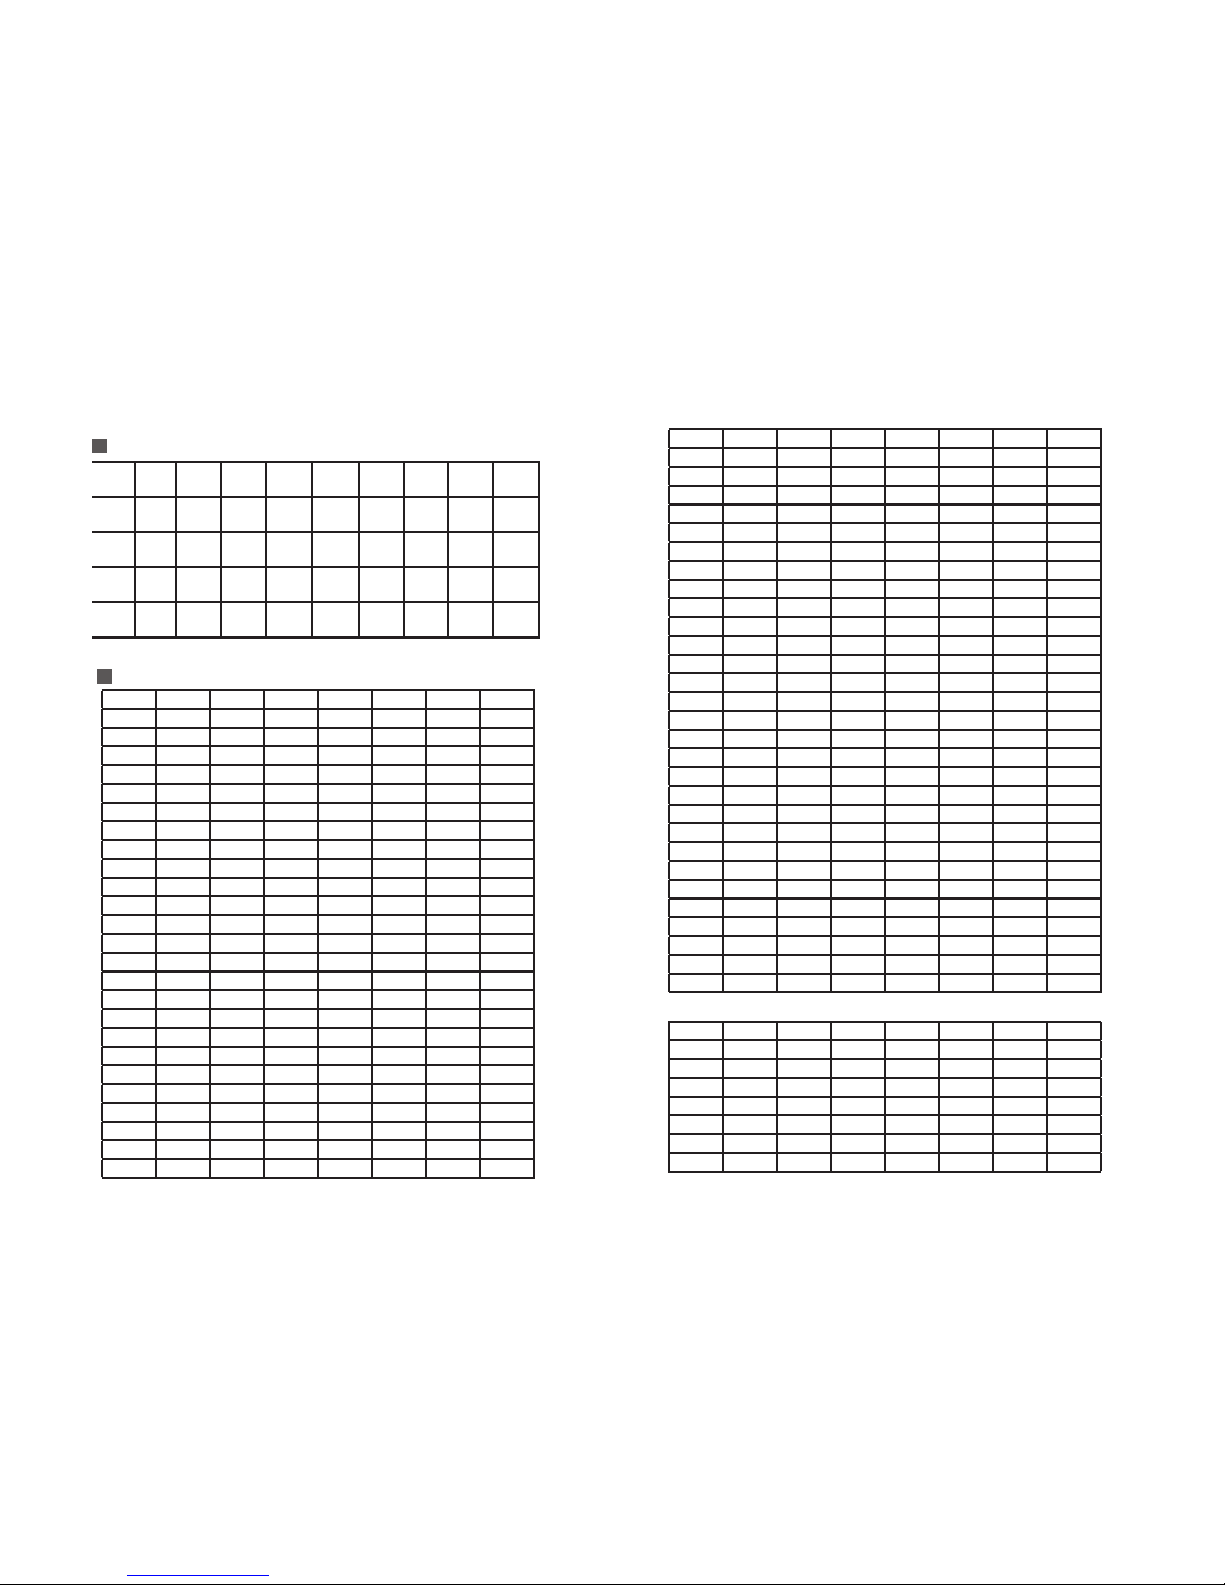
67.0 79.7 94.8 110.9 131.8 156.7 171.3 186.2 203.5 229.1
69.3 82.5 97.4 114.8 136.5 159.8 173.8 189.9 206.5 233.6
71.9 85.4 100.0 118.8 141.3 162.2 177.3 192.8 210.7 241.8
74.4 88.5 103.5 123.0 146.2 165.5 179.9 196.6 218.1 250.3
77.0 91.5 107.2 127.3 151.4 167.9 183.5 199.5 225.7 254.1
50 groups CTCSS Tone Frequency(Hz)
1024 groups DCS Code.
000 001 002 003 004 005 006 007
010 011 012 013 014 015 016 017
020 021 022 023 024 025 026 027
030 031 032 033 034 035 036 037
040 041 042 043 044 045 046 047
050 051 052 053 054 055 056 057
060 061 062 063 064 065 066 067
070 071 072 073 074 075 076 077
100 101 102 103 104 105 106 107
110 111 112 113 114 115 116 117
120 121 122 123 124 125 126 127
130 131 132 133 134 135 136 137
140 141 142 143 144 145 146 147
150 151 152 153 154 155 156 157
160 161 162 163 164 165 166 167
170 171 172 173 174 175 176 177
200 201 202 203 204 205 206 207
210 211 212 213 214 215 216 217
220 221 222 223 224 225 226 227
230 231 232 233 234 235 236 237
240 241 242 243 244 245 246 247
250 251 252 253 254 255 256 257
260 261 262 263 264 265 266 267
270 271 272 273 274 275 276 277
300 301 302 303 304 305 306 307
310 311 312 313 314 315 316 317
320 321 322 323 324 325 326 327
330 331 332 333 334 335 336 337
340 341 342 343 344 345 346 347
350 351 352 353 354 355 356 357
360 361 362 363 364 365 366 367
370 371 372 373 374 375 376 377
400 401 402 403 404 405 406 407
410 411 412 413 414 415 416 417
420 421 422 423 424 425 426 427
430 431 432 433 434 435 436 437
440 441 442 443 444 445 446 447
450 451 452 453 454 455 456 457
460 461 462 463 464 465 466 467
470 471 472 473 474 475 476 477
500 501 502 503 504 505 506 507
510 511 512 513 514 515 516 517
520 521 522 523 524 525 526 527
530 531 532 533 534 535 536 537
540 541 542 543 544 545 546 547
550 551 552 553 554 555 556 557
560 561 562 563 564 565 566 567
570 571 572 573 574 575 576 577
600 601 602 603 604 605 606 607
610 611 612 613 614 615 616 617
620 621 622 623 624 625 626 627
630 631 632 633 634 635 636 637
640 641 642 643 644 645 646 647
650 651 652 653 654 655 656 657
660 661 662 663 664 665 666 667
670 671 672 673 674 675 676 677
700 701 702 703 704 705 706 707
710 711 712 713 714 715 716 717
720 721 722 723 724 725 726 727
730 731 732 733 734 735 736 737
740 741 742 743 744 745 746 747
750 751 752 753 754 755 756 757
760 761 762 763 764 765 766 767
770 771 772 773 774 775 776 777

Professional
FM Transceiver
04
Transmitting Range
The talk range will depend on your surroundings and environment it will be affected by obstructions such as hills or
buildings.
Don’t try to use two radio units which are less than 1.5m (5 feet) apart. Otherwise, you may experience interference.
Talk range depends on the terrain. It will be affected by concrete structures, heavy foliage and by operating radios indoors
or in vehicles.
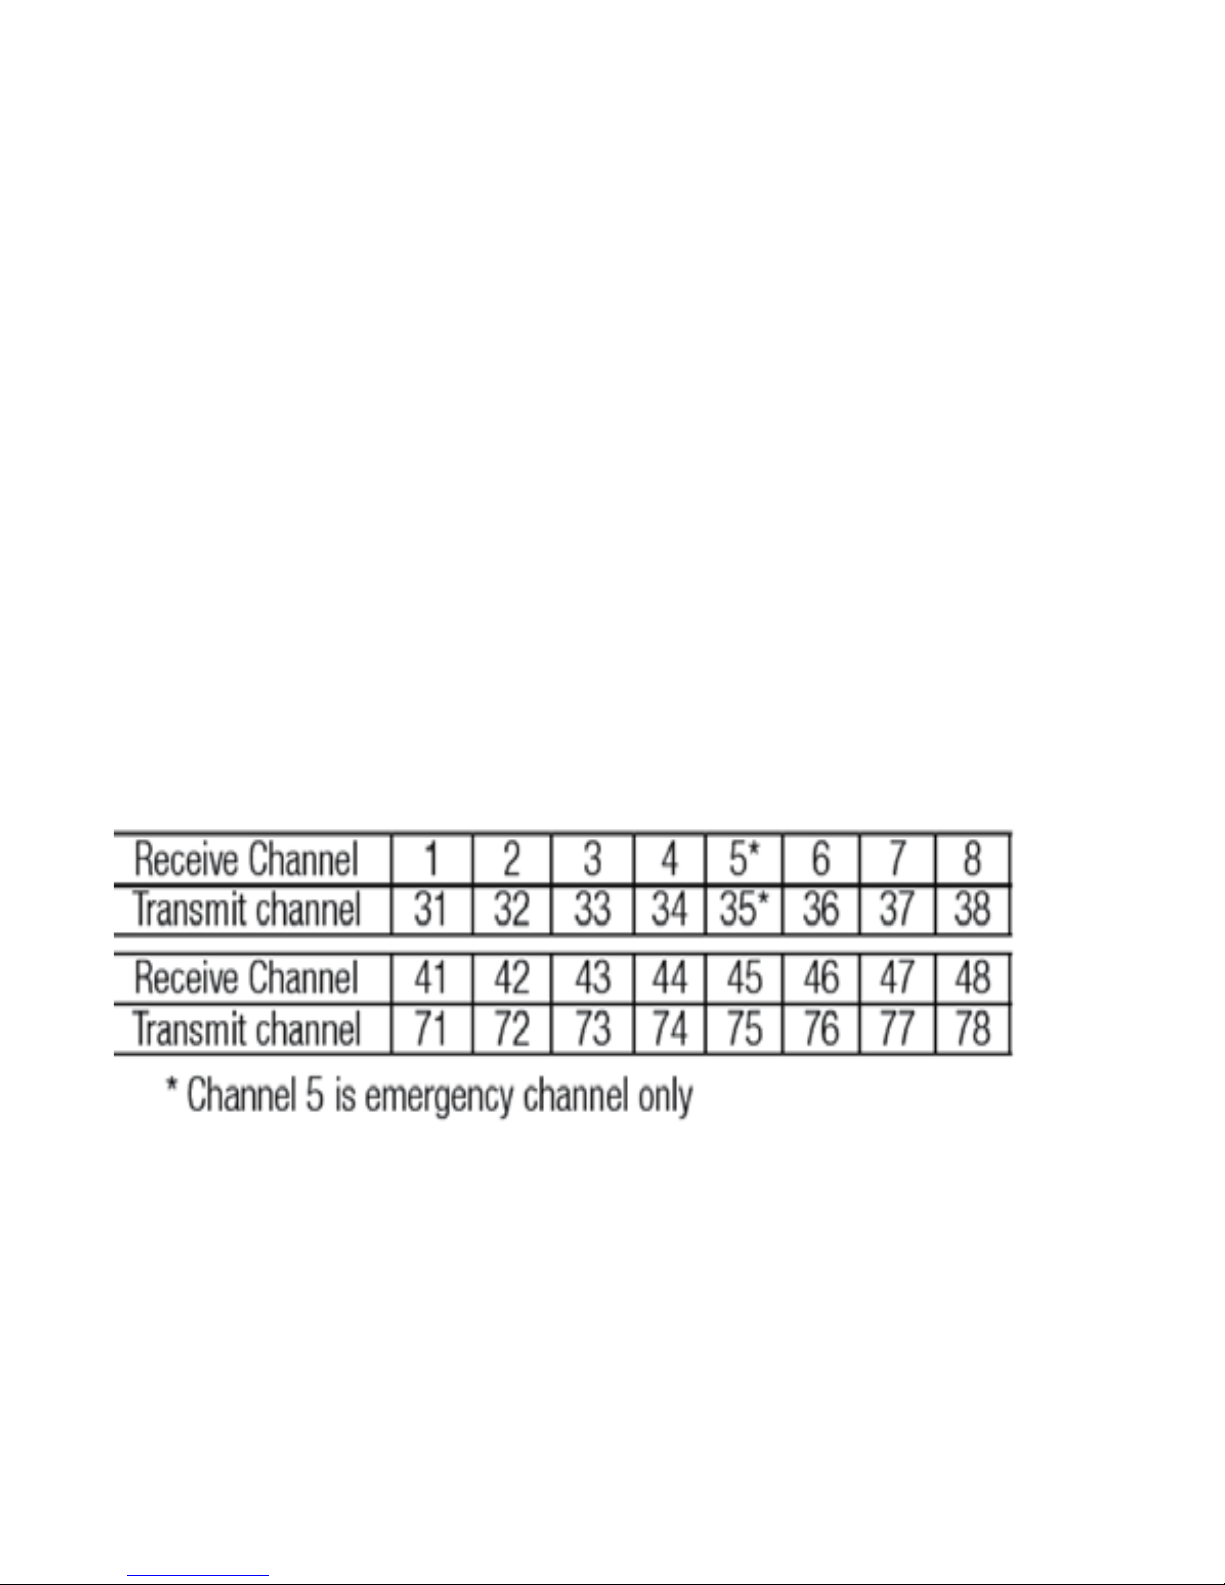
Channel 5 and 35 (paired for Duplex repeaters) are reserved as emergency channels and should be used only in an
emergency. CTCSS and DCS will not operate on channels 5 and 35.
A list of currently authorised channels can be obtained from the ACMA website in Australia and the MED website in
New Zealand. Channel 11 is a calling channel generally used to call others and channel 40 is the customary road vehicle
channel.
Once contact is established on the calling channel, both stations should move to another unused “SIMPLEX” channel
to allow others to use the calling channel.
Channels 22 and 23 are for Telemetry and Telecommand use, voice communications are not allowed on these channels
by law. Channel 9 and above are the best choices for general use in Simplex mode.
No licence is required to own or operate this radio in Australia and New Zealand. The Radiocommunications (Citizen
Band Radio Stations) Class Licence 2002 contains the technical parameters, operating requirements, conditions of licence
and relevant standards for Citizen Band (CB) radios. CB radios must comply with the class licence for their use to be
authorised under the class licence.
UHF channels and frequencies
IMPORTANT NOTE: The operation of your UHF radio in Australia and New Zealand is subject to conditions in the
following licenses: In Australia the ACMA Radio communications (Citizen Band Radio Stations) and in New Zealand by
MED the General User Radio License for Citizen Band Radio.
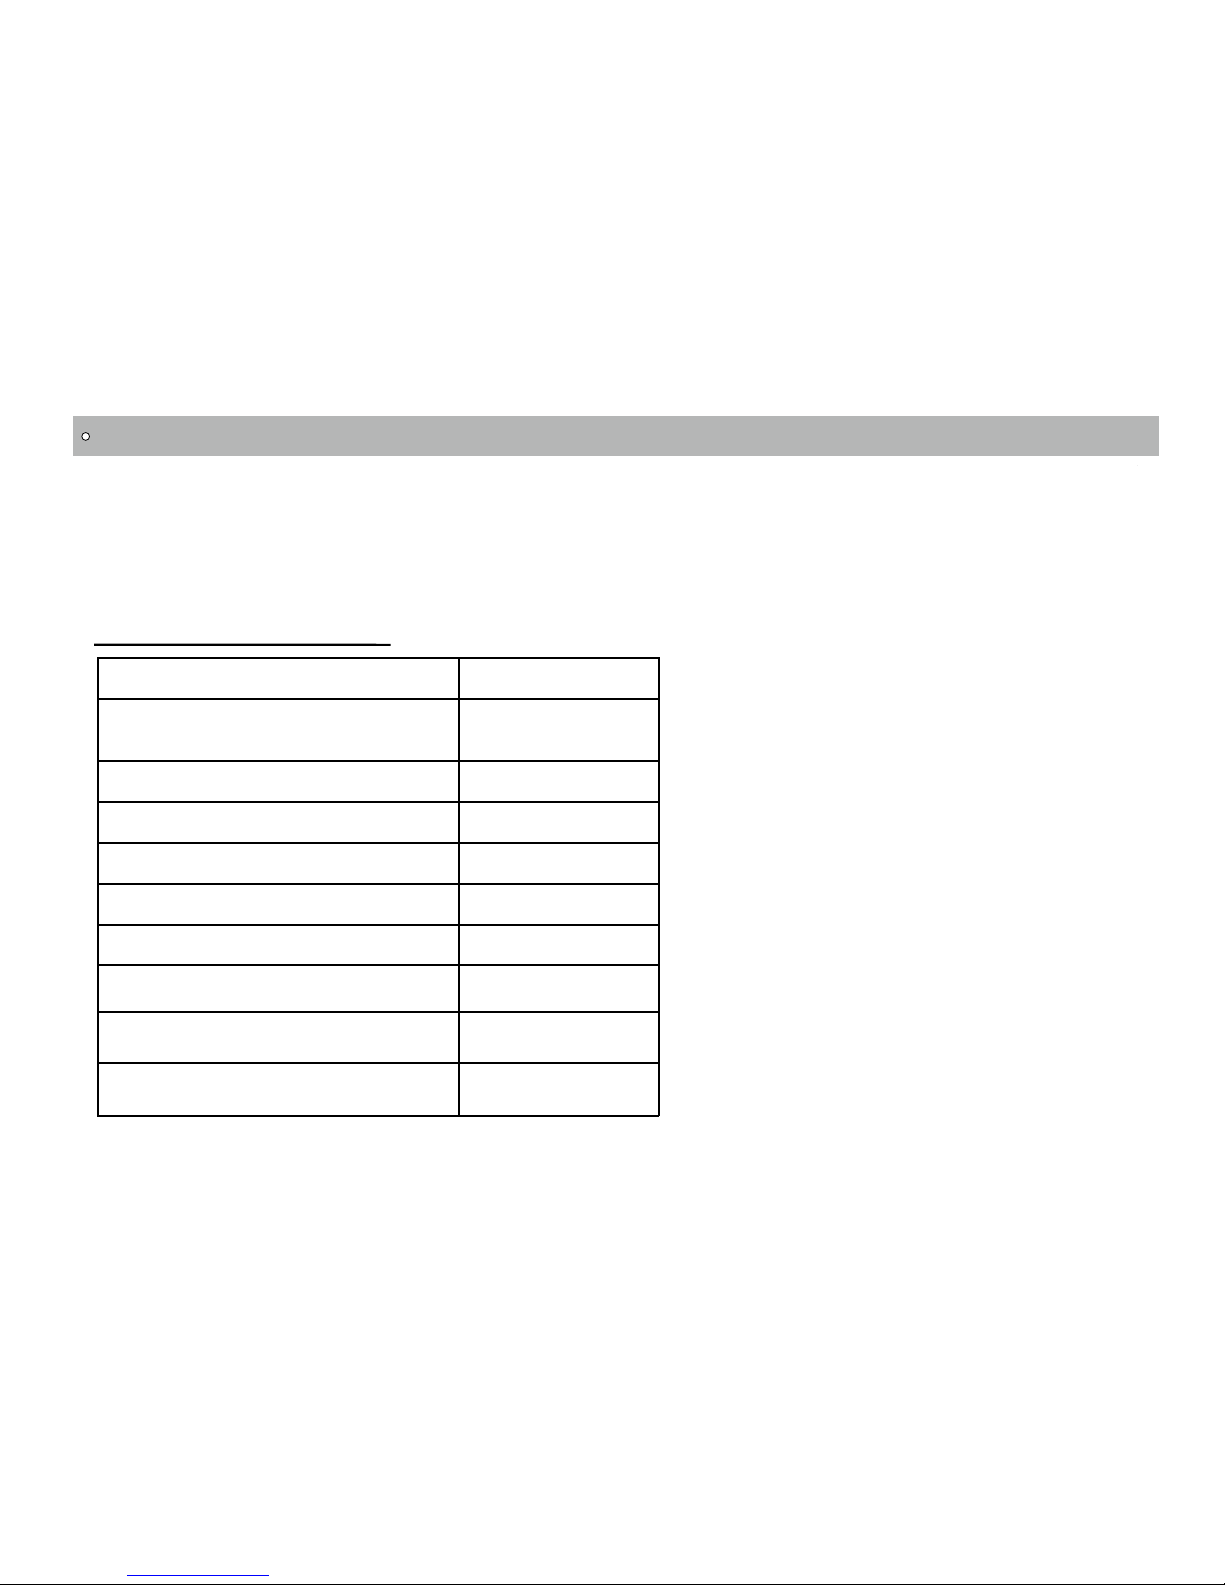
Item Quantity
Antenna 1 477MHz
Li-ion Battery (1200 mAh) 1
Battery Charger 1
AC Adaptor 1
Belt Clip 1
Instruction Manual
Car Charger
Earphone
Hand Strap
1
1
1
1
UNPACKING
Carefully unpack the transceiver. We recommend you identify the items listed in the table
before discarding the packing material. If any items are missing or have been damaged during
shipment, please contact your local dealer immediately.
Supplied Accessories
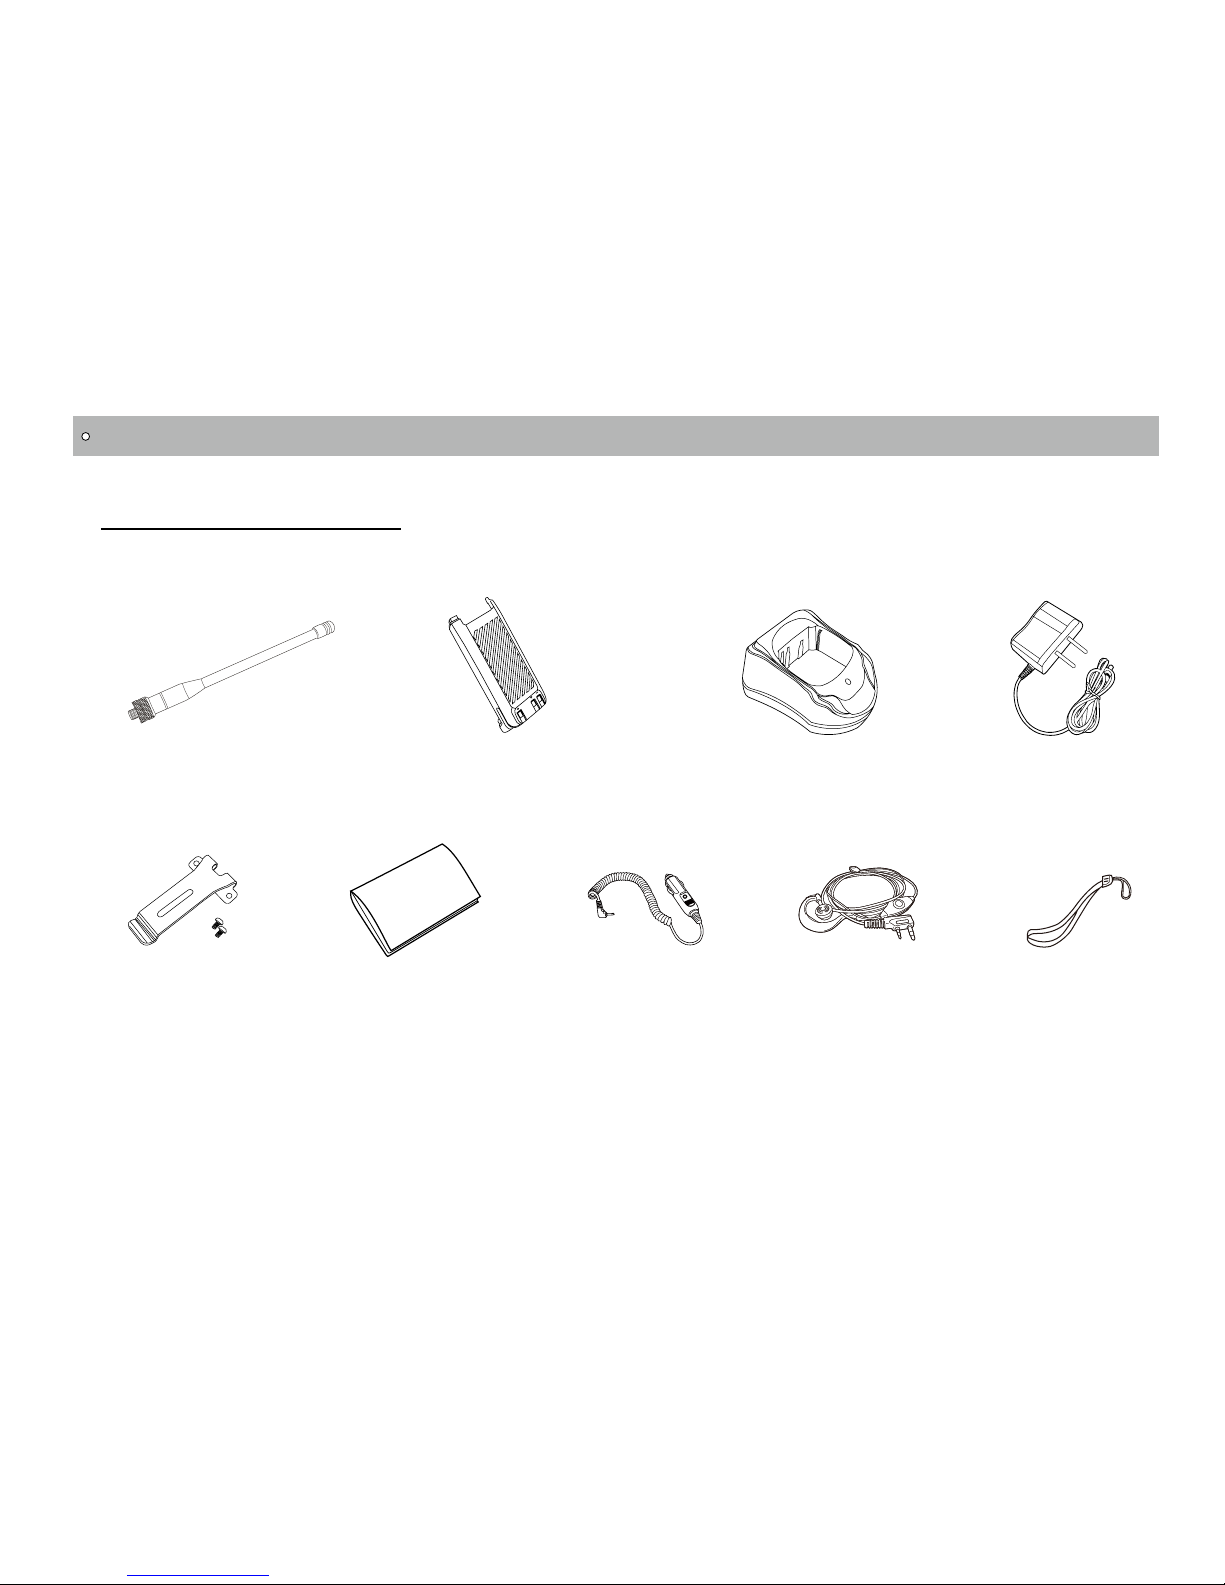
Instruction
Manual
Antenna Li-ion Battery Charger AC Adaptor
Belt Clip
(including screws)
STANDARD ACCESSORIES/OPTIONAL ACCESSORIES
Standard Accessories
Car Charger Earphone Hand Strap

OPERATION MODE
TRANSCEIVER
FIRST LEVEL MENU:SHORTCUT OPERATIONS
SECOND LEVEL MENU: CHANNEL OPERATIONS
THIRD LEVEL MENU:BACKGROUND OPERATIONS
BATTERY INFORMATION
Charging the Battery Pack
The battery pack is not charged at the factory; please charge it before use. Charging the battery pack
for the first time after purchase or extended storage (more than 2 months) may not bring the battery
pack to its normal operating capacity. After fully charging/ discharging cycle for two or three times, the
operating capacity will reach its best performance. The battery pack life is over when its operating time
decreases even though it is fully and correctly charged. Change to a new battery pack.
Charger Applied
Please use the specific charger appointed by our company. Other models may cause explosion and
personal injury. After installing the battery pack, if the radio displays low battery with red flashing
lamp or voice prompt, please charge the battery.
NOTES
▲
Do not short the battery terminals or throw the battery into fire. Never attempt to remove the

BATTERY INFORMATION
casing from the battery pack. We bear no responsibility on any results caused by modifying the
battery.
▲
The ambient temperature should be between 5℃ and 40℃ while charging is in progress. Charging
outside this range may not fully charge the battery.
▲
Always switch OFF the transceiver equipped with a battery pack before charging. Otherwise, it will
interfere with correct charging.
▲
To avoid interference with charging, please do not cut off the power or take out the battery during
charging.
▲
Do not recharge the battery pack if it is already fully charged. This may shorten the life of the battery
pack or damage the battery pack.
▲
Do not charge the battery or transceiver if it is damp. Dry it before charging to avoid danger.
When keys, ornamental chain or other electric metals contact with the battery terminal, the battery
may cause damage or injury. If the battery terminal short circuits it will generate a lot of heat,
please be careful when you carry or use the battery, please put battery or radio into insulated
container. Do not put it into metal container.
WARNING:

BATTERY INFORMATION
You can charge the battery or transceiver separately.
1. Plug the AC adaptor into the AC outlet, and then plug the cable of the AC adaptor into the DC jack
located on the back of the Charger.
Charging indicator---Green
B. Charging indicator---Red
3. Fully charged. Charging indicator--Green
Note:
It takes approximately 4 hours to fully charge the battery. But, the actual
2. Plug the battery or transceiver into the charger.
A. Make sure that the battery is well connected with charging connectors.
charging time depends on the dump battery. After fully charged, please remember
to remove the battery or transceiver out of charger. Over charging will shorten the
battery life and reduce its performance.

Emergent Charging
Connect the transceiver directly with adaptor or car charger to charge.
Note:Please power off the transceiver before charging the transceiver in this way. Also, it takes
longer time (totally 12hours) to fully charge the transceiver in this way.
How to Store the Battery
1. If the battery needs to be stored, keep it in status of 50% discharged.
2. It should be kept in low temperature and dry environment.
3. Keep it away from hot places and direct sunlight.
WARNING:
▲
Do not short circuit battery terminals.
▲
Never attempt to remove the casing from the battery pack.
▲
Never assemble the battery in dangerous surroundings, spark may cause explosion.
▲
Do not put the battery in hot environment or throw it into fire, it may cause explosion.
PREPARATION
Installing / Removing the Battery
■ Installing the battery:
Match the battery pack with the corresponding guides on the back of the transceiver, and push it
upwards till it is fully locked by the battery latch.

PREPARATION
■ Removing the battery pack
Slide up the battery latch and remove the pack away from the
transceiver.
Installing / Removing the Antenna
■ Installing the Antenna:
Screw the antenna into the connector on the top of the
transceiver by holding the antenna at its base and turning it
clockwise
■ Removing the Antenna:
Turn the antenna anticlockwise to remove it.
■ Installing the Belt Clip
Installing the Belt Clip: Place the belt clip to the
corresponding grooves on the back of the
transceiver, and then screw it. clockwise
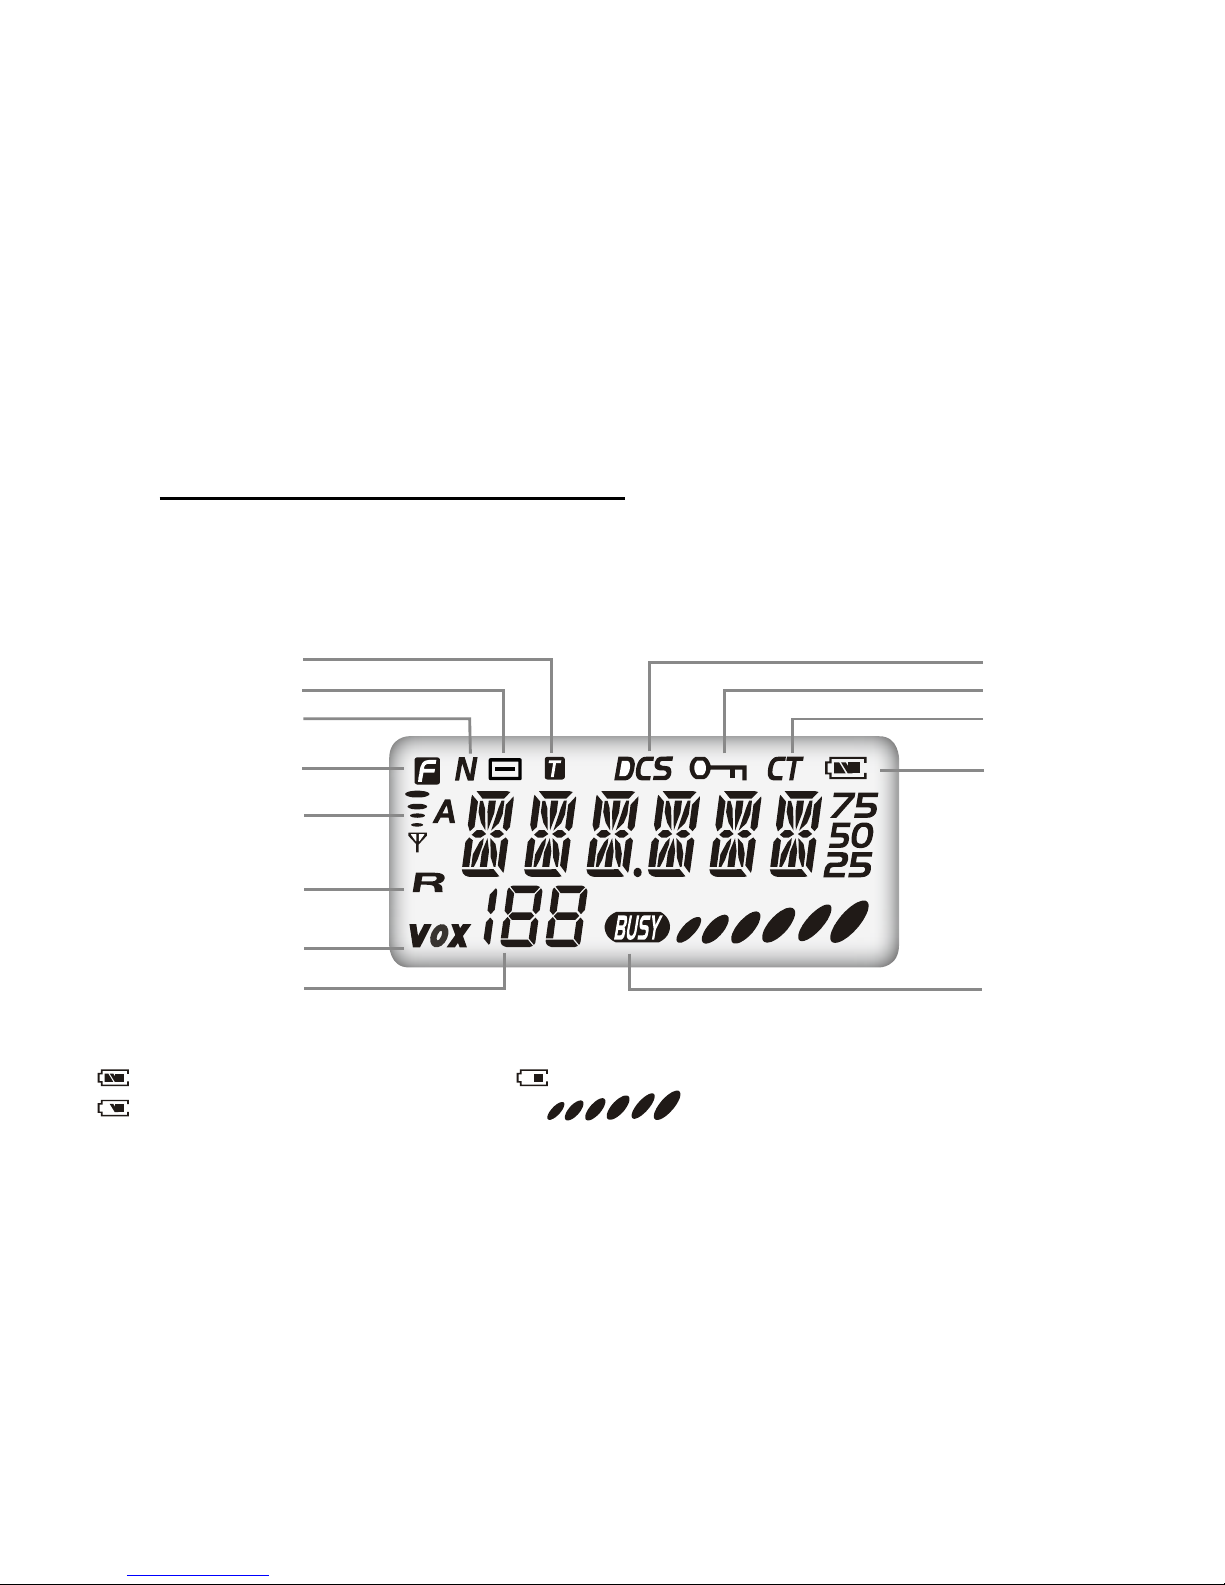
Talk around
Negative offset frequency
Narrow band
Func
Signal
Frequency Reverse
VOX Function
CTCSS
Keypad Lockout
DCS
Battery indicator
Busy Channel
NOTE:
Battery capacity indicator(full) No power,replace battery pack or charge battery
Battery capacity remnant Real time display receiving signal
strength/Power Indicator
Channel serial number/
FUNC menu s/no
Getting Acquainted
On LCD display screen, you will see various icons which stand for the
selected functions and sometimes you may forget the meaning of them.
Here you will find the following table extremely useful.
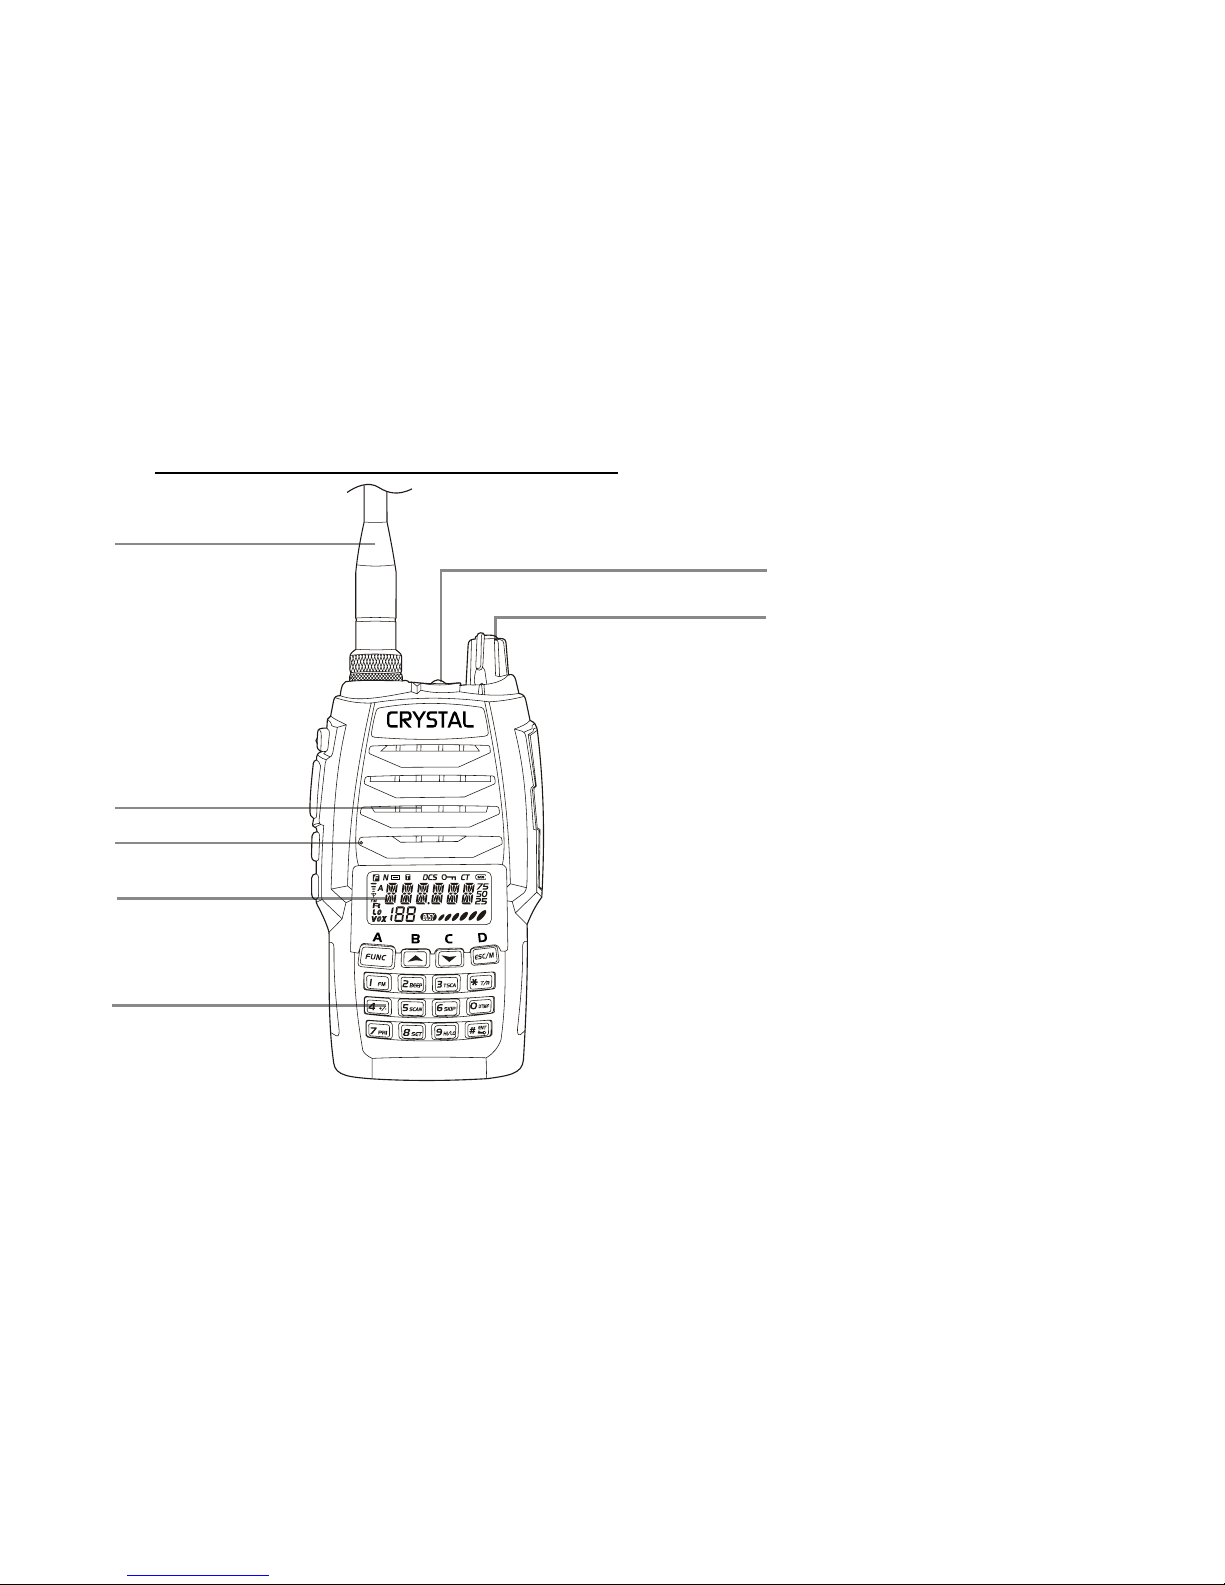
.
LED light
Power / Volume
Switch
Antenna
Speaker
Microphone
LCD
Numeric keys
Getting Acquainted
Under power-ostate, please turn
[POWER]/ [VOLUME] clockwise to turn on
the transceiver.
Under power-on state, please turn
[POWER]/ [VOLUME] anticlockwise to
turn othe transceiver.
Adjusting Volume
Under power-on state, turn
[POWER] / [VOLUME] to adjust volume.
press and hold side key PF2 to monitor current
volume. (Refer to the function setup of side PF2 key)
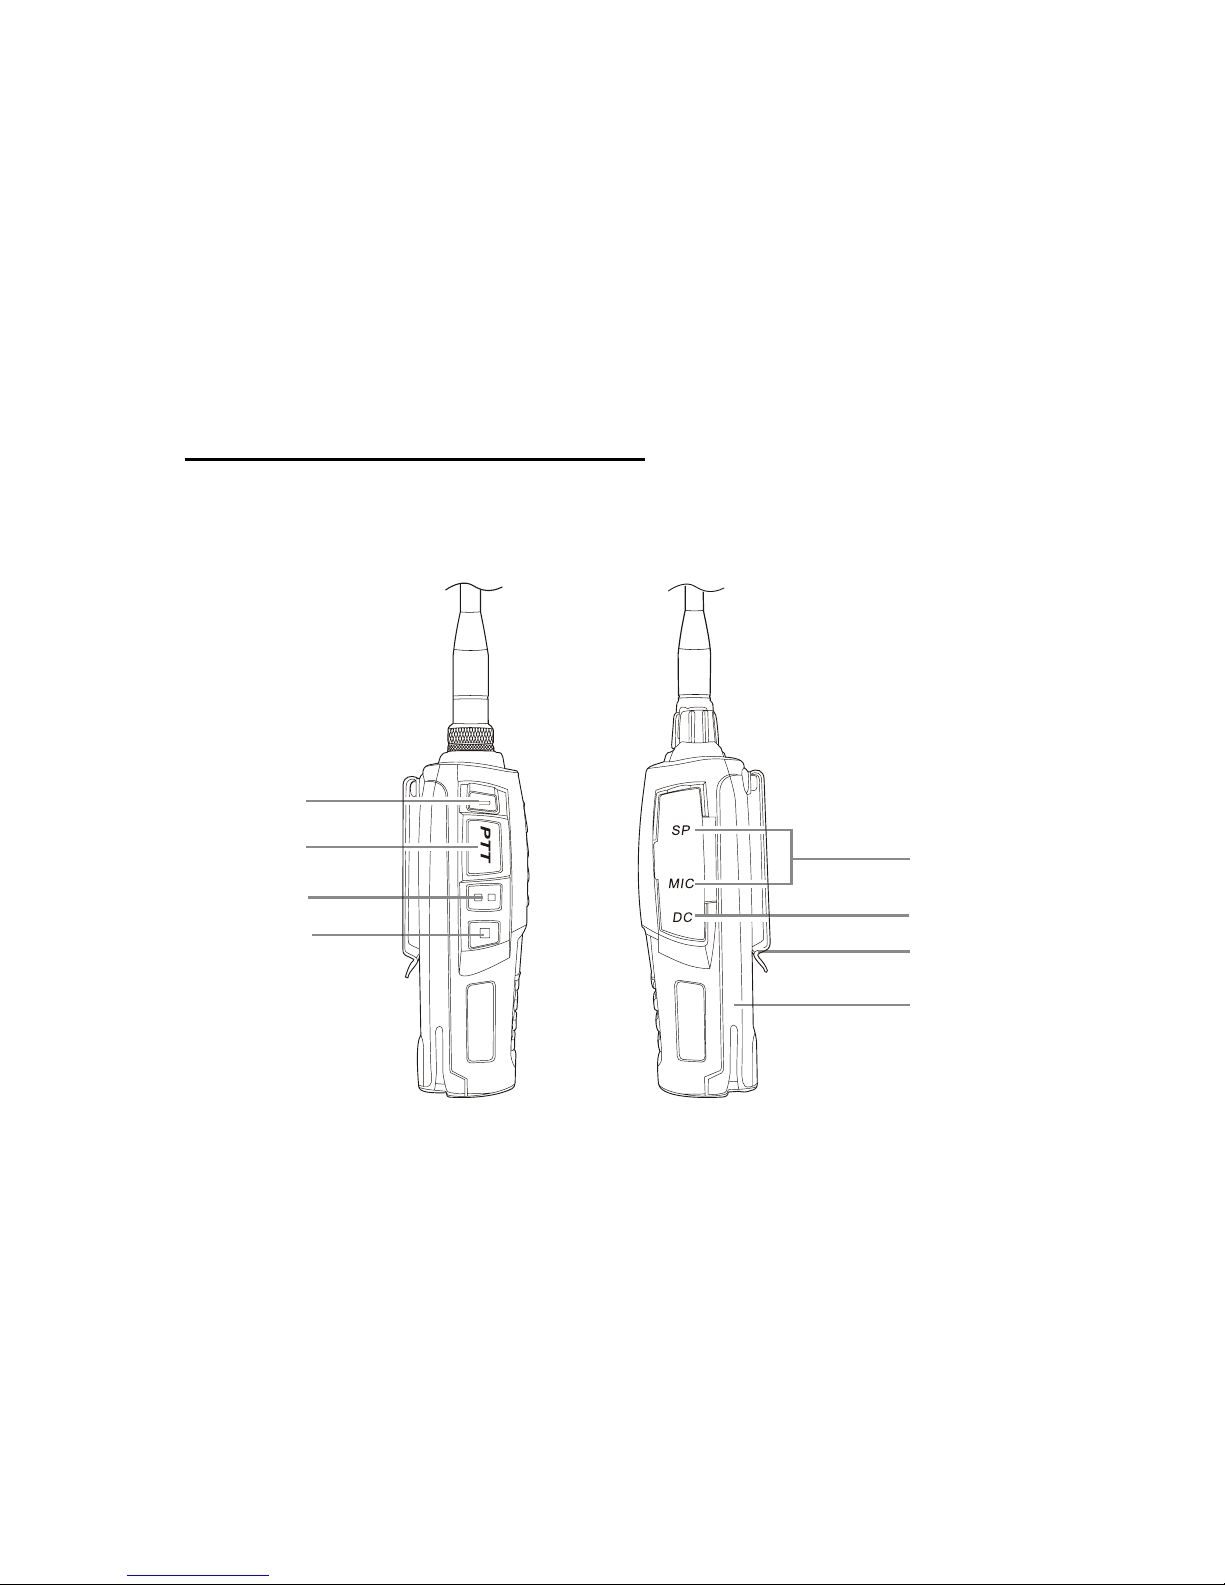
Left Panel Right Panel
PTT key
PF2
PF1
LED light
Speaker / Microphone Jacks
Belt Clip
Emergent Charging Jack
Battery
Getting Acquainted

Channel Selection
When the radio is under Channel mode or FM channel, press key to select desired channel.
Press to go up through the channels and to go down through the channels.
Note:If there is blank channel between two channels, the radio will skip it and get to next channel.
Table of contents
Other Crystal Two-way Radio manuals


