CST CemTest User manual

CemTest
User Manual
Cement Strength Tester

CST Instruments Limited. www.cstinstruments.com 2
Contents
Chapter 1: Declaration of conformity
Chapter 2: Safety information
Chapter 3: Instrument overview
The CemTest Instrument
Testing Kit Contents
Chapter 4: Getting started
Turning on the instrument
Operating the main menu
Setting the date and time
Chapter 5: Performing the test
Chapter 6: Preparing the sample
Testing cement strength
Entering the cement type
Entering the density (Rho) p
Entering the neness of cement (P)
Entering the consistency of normal paste (H)
Entering additive size (D)
Entering additive type (v) - Nu
Table of additive types
Entering water / cement ratio (Z)
Entering curing temperature (t)
Entering curing time (T)
Summary screen review
Cement test results
Saving results
Chapter 7: Multiple tests
Chapter 8: View log
4
5
6
6
7
8
8
9
10
11
12
13
14
15
16
17
18
19
20
21
22
23
24
25
26
27
29

CST Instruments Limited. www.cstinstruments.com 3
Contents
Chapter 9: Downloading test results
Chapter 10: Erase log
Chapter 11: Charging
Chapter 12: Reset the instrument
31
33
35
36
The images may not perfectly or accurately depict the instrument. The illustration is purposely designed to
demonstrate a principle or sequence of steps so that the viewer better understands what is going on.
Details may be simplied or omitted, scale may be exaggerated, etc.

CST Instruments Limited. www.cstinstruments.com 4
Declaration of conformity
The CemTest, manufactured by CST Instruments Limited, complies with the
requirements of the following industry standards:
Manufacturer CST Instruments Limited.
Address 5 Leys Avenue, Letchworth Garden City, Hertfordshire, SG6 3EA
Country United Kingdom
Product name CemTest
EN 61326-1:2013 - Electromagnetic compatibility (EMC)
EN 61010-1:2010 - Basic safety assessment
ISO 9001
ISO 14001

CST Instruments Limited. www.cstinstruments.com 5
Safety information
• The CemTest Instrument must be operated and maintained in strict accordance
with the instructions, warnings and label information included in this manual.
The Cemtest Instrument must be operated within the limitations stated.
• Please read and understand all instructions in this user manual prior to using
the CemTest Instrument.
• Before use ensure that the instrument is in good condition and the enclosure is
intact and has not been damaged in any way.
• If there is any damage to the instrument please do not use, contact
CST Instruments Limited (here in after referred as “CST”) main ofce or local
agent for repair/replacement.
• Do not disassemble or substitute components as this may impair safety and
invalidate safety certication.
• Only genuine CST replacement parts must be used; substitute
components may invalidate certication and warranty of the CemTest
Instrument and accessories.
• Observe all warnings and instructions marked on the unit and within this
manual.
• Understand the screen display and alarm warnings prior to use.
• If this product is not working properly, read page 37 and/or contact CST ofce
or agent, for details refer to the contact section of the manual.
• Ensure maintenance is carried out on the instrument.
• The CemTest Instrument re-chargeable battery must only be charged in
non-hazardous (safe) areas.
• The CemTest Instrument must not be charged or connected at ambient tem-
peratures greater than +40°C.

CST Instruments Limited. www.cstinstruments.com 6
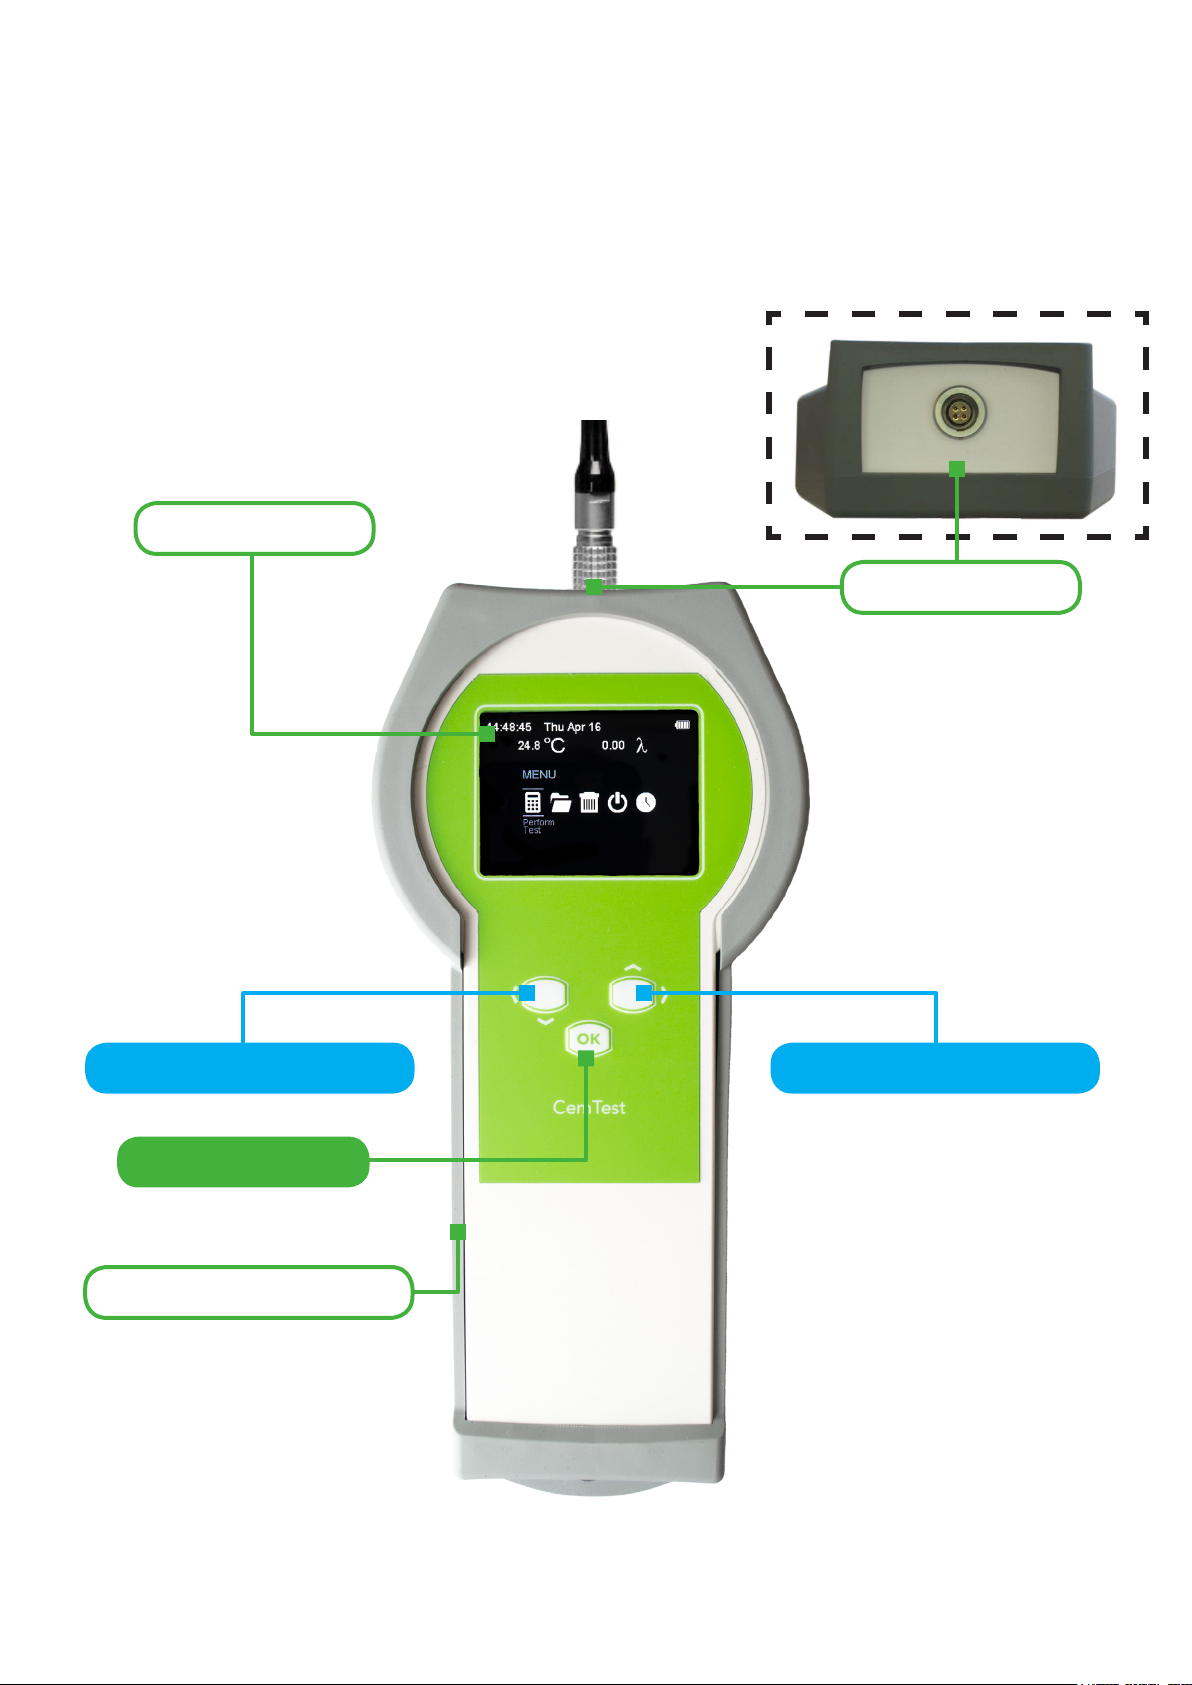
Instrument overview
The CemTest Instrument
2.5” LCD colour display
Protective rubber sleeve
BACK / DOWN navigation button FORWARD / UP navigation button
CONFIRM / OK button
LEMO connector

CST Instruments Limited. www.cstinstruments.com 7
Testing Kit Contents
Air release
Probe
Probe connector
USB charging
cable
Digital scale
USB Memory
stick
Charger
Please ensure that the air release hole is
not blocked by debris or submerged
during testing.
Carry case
500ml beaker
Spoon

CST Instruments Limited. www.cstinstruments.com 8
Getting started
Turning on the instrument
Press and hold the OK button for 3 seconds to power up. The startup screen will
appear. Do not connect probe until the time and date are set.
Press OK button to access main menu
13:11:05 Tue Jul 16
PROBE DISCONECTED
PLEASE CONNECT THE
MEASUREMENT PROBE

CST Instruments Limited. www.cstinstruments.com 9
Press OK to display the Main Menu. Navigate using the navigation keys to select the
required option. To conrm press OK.
Press OK button to display MAIN MENU
Available MAIN MENU options are:
Set date & timePerform test
Power offView log
Delete log

CST Instruments Limited. www.cstinstruments.com 10
Setting date and time
Setting the date and time is important for saving the results and future result retrieval.
From Main Menu select Set Date & Time option. To change date/time settings see
instructions below.
Currently selected value/option is highlighted
Use NAVIGATION BUTTONS
to make changes
Press OK to conrm each
change and move to another
value / option
Rapid Slow
Set Date & Time
10 / 01 / 2017
10 : 37 : 06
CancelOK
0.00
C 0.00
14:48:45 Thu Apr 16
o

CST Instruments Limited. www.cstinstruments.com 11
Performing the test
Note: The CemTest instrument has been designed for the
accelerated testing of ordinary portland cement groups:
CEM I, CEM II with a single mineral additive.
It is able to test cement types: Normal, Rapid, Sulphate
resistant, cements which achieve high strengths with
strength enhancement additives (with no more than 1%).
Connect the probe at the top of the instrument
(please ensure red dots are lined up when connecting)
When “dip probe in Cement / Water” appears on the screen prepare the test.
Select Cement Type
Rapid Slow
Dip the probe into Cement / Water
Temperature and Conductivity
HELD VALUES SHOWN
Temperature:
00.0 oC
13:11:30 Tue Jul 16
Once the probe is connected press left or right to switch to measure conductivity
Press OK to continue

CST Instruments Limited. www.cstinstruments.com 12
Preparing the sample
Pour 500ml
of deionised
water
Measure and
pour 15g of
cement into the
deionised water
Stir solution for
50 seconds
Dip the probe into
the cement and
water solution
Dip the probe and check conductivity, should be 0.00 λ
make sure that the air release hole is not submerged
Wait 10 seconds for the conductivity readings to stabilise, and press OK.
This will store the conductivity reading on the instruments memory.
Remove probe from the water / cement solution and clean and dry with a cloth.
Dip the probe into
the deionised water
Allow temperature reading
to stabilise and conductivity
reading should be 0.00 λ
Select Cement Type
Rapid Slow
Dip the probe into Cement / Water
Temperature and Conductivity
Measurement in Progress
Temperature:
20.0 oC
13:11:30 Tue Jul 16

CST Instruments Limited. www.cstinstruments.com 13
Testing cement strength
Scroll to the perform test icon on the display and press OK
Perform test
Press OK to continue
20.0 35.41

CST Instruments Limited. www.cstinstruments.com 14
Select Cement Type
21.2
o
Rapid
14:48:45 Thu Apr 16
Normal Slow
Press OK to continue
Use NAVIGATION BUTTONS
to select cement type
Entering the cement type

CST Instruments Limited. www.cstinstruments.com 15
OK
14:48:45 Thu Apr 16
Density of Cement:
2.8 - 3.3(g/cm3)
p = 2.8
20.0 C 35.41
Entering density (Rho) ρ
p (Rho) - density of cement powder: determined according to BS EN 196-6:2010 using Pycnometer
(CEM I : 3.2), (CEM II : 3.0), (CEM III : 2.9 - 2.8).
Press OK to conrm
Use NAVIGATION BUTTONS
to increase or decrease value of p
°

CST Instruments Limited. www.cstinstruments.com 16
OK
14:48:45 Thu Apr 16
Fineness of Cement:
2800-5800 cm2/gr
S= 3750
20.0 C 35.41
o
Press OK to conrm
Use NAVIGATION BUTTONS
to increase or decrease value of P
Entering the fineness of cement (S)
S -fineness grinding of cement powder: determined according to Blain method
(Air Permeability)

CST Instruments Limited. www.cstinstruments.com 17
OK
14:48:45 Thu Apr 16
Consistency of Paste:
22 - 35 (%)
H = 22.0
20.0 C 35.41
0
Press OK to conrm
Use NAVIGATION BUTTONS
to increase or decrease value of H
Entering consistency of normal paste (H)
H - consistency of normal paste: determined according to BS EN 196-1:2005
(Average used : 26%)

CST Instruments Limited. www.cstinstruments.com 18
OK
14:48:45 Thu Apr 16
Additive Size:
0 - 35(%)
D = 15.0
20.0 C 35.41
o
Press OK to conrm
Use NAVIGATION BUTTONS
to increase or decrease value of D
Entering additive size (D)
D - additive size: regulated by BS EN 197 -1 cement composition
CEM - I: 0 - 5 %
CEM - II: 6 - 35 %

CST Instruments Limited. www.cstinstruments.com 19
OK
14:48:45 Thu Apr 16
Additive type:
0.5 - 2.0 (%)
v = 1.0
20.0 C 35.41
o
Press OK to conrm
Use NAVIGATION BUTTONS
to increase or decrease value of v (Nu)
Entering additive type v - (Nu)
v - (Nu) - additive type: Please refer to the table on page 20 which
presents the calculated values of the impact for the particular additive used.
Please note that if the additive size is entered as 0 then the
additive type screen (below) will not appear.

CST Instruments Limited. www.cstinstruments.com 20
Additive type
Additive size % (D)
6>9 10>12 13>15 16>20 21>25 26>30 31>35 <35
Slag Cement GGBS (S) 2.0 1.8 1.8 1.6 1.4 1.3 1.2 1.2
Silica Fume Cement (D) 2.0 1.9 1.8 N/A N/A N/A N/A N/A
Puzzolana Natural (P) 1.8 1.6 1.6 1.5 1.4 1.3 1.2 1.1
Puzzolana Industrial (Q) 2.0 1.9 1.7 1.6 1.5 1.4 1.3 1.2
Fly Ash Siliceous (V) 2.0 1.9 1.8 1.6 1.4 1.3 1.2 1.2
Fly Ash Calcareou (W) 1.8 1.7 1.5 1.4 1.3 1.3 1.2 1.2
Barnt Shale (T) 2.0 1.9 1.8 1.7 1.6 1.5 1.3 1.3
Limestone Ground (L) 1.7 1.5 1.4 1.3 1.3 1.2 1.2 1.1
Limesone Killn (LL) 1.8 1.6 1.6 1.4 1.3 1.2 1.2 1.1
Composite Cement (M) 1.6 1.5 1.5 1.4 1.4 1.3 1.3 1.2
Sulfatresistant Cement (S-R) 0.7 N/A N/A N/A N/A N/A N/A N/A
If the additive type has an inuence on the cement and v (Nu) is unknown, this can be
determined by performing the test using the Rcom result by the crushing method as
the target.
Perform multiple tests by changing the additive type inuence v (Nu) from 0.5 to 2.0
(recommended start point is 1.2) until you have achieved original target Rcom. Once
the additive inuence v(Nu) has been established, it can be used in the future to de-
termine strength of cements with the same additive.
Table of contents