Curb Roller Manufacturing Hydra-Pack User manual

Owner’s Manual
Curb Roller Manufacturing
112 S. Main Street
Fairview, KS 66425
www.curbroller.com
785-467-3132

2July 2017

July 2017 3
...................................................................................... 4
........................................................................................... 4
................................................................. 6
................................................................................... 7
................................................................................................. 8
5.1 Hazards..........................................................................................................8
5.1 Decal Kit Part Number..................................................................................9
......................................................................................... 10
.................................................................................... 11
7.1 Change Hydraulic Oil Filter - Every 300 Hours ........................................ 11
7.2 Change Hydraulic Oil - Every 600 Hours/ Annually ................................. 11
................................................................................................. 12
Table Of Contents

4July 2017
1.
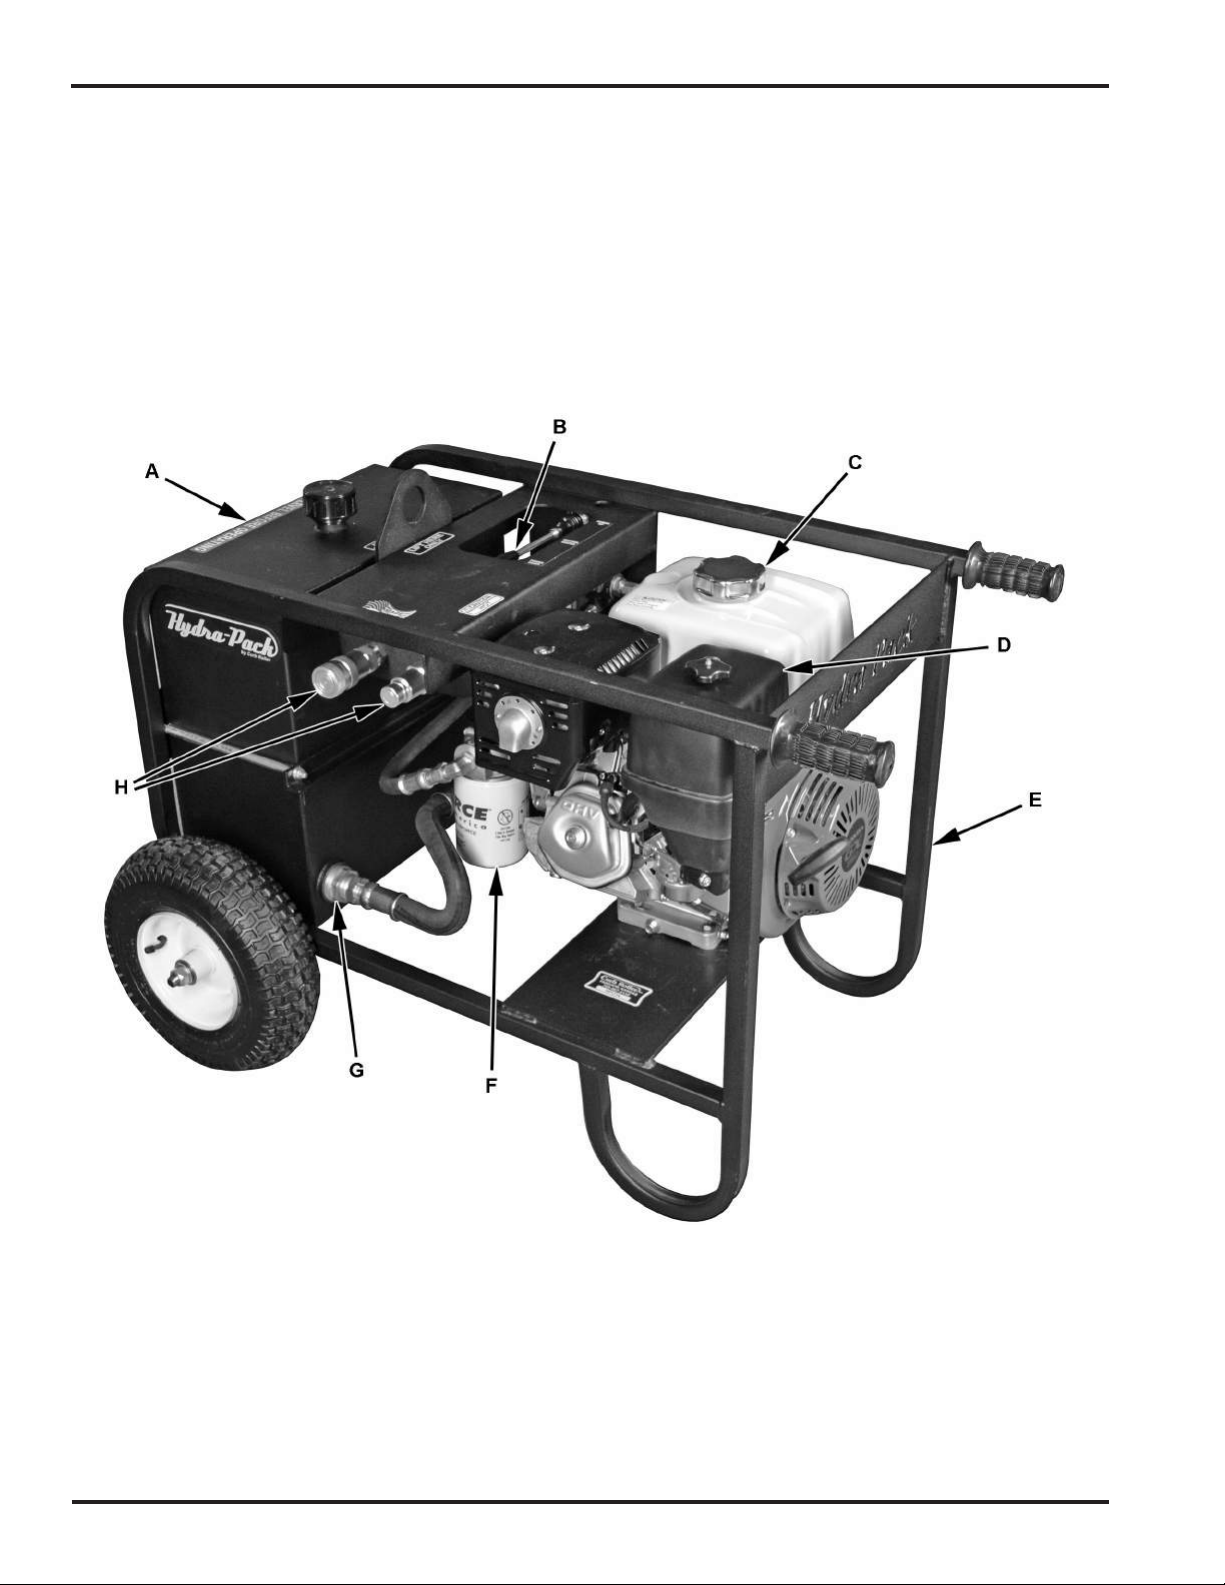
Congratulations on your purchase of a Hydra-Pack by
Curb Roller.
The Hydra-Pack has been designed and manufactured to
provide years of service.
Carefully examine your equipment upon receipt. Report
any damage immediately to the freight carrier and register
any claim. If any material or manufacturing defects be
discovered, contact Curb Roller Manufacturing.
Read and understand this manual before setting up,
operating and maintaining this equipment. Follow all
safety instructions.
Information provided in this manual was current as of the
issue date. Curb Roller Manufacturing reserves the right
to make design changes without further notice or liability.
Information furnished in this manual does not include
all of the details of design, production, or variations
of the equipment. It does not cover all the possible
contingencies, which may arise during operation. If
special problems arise or further information be desired,
please contact Curb Roller Manufacturing.
Equipment modications from original design and
specications are strictly prohibited. Modications may
compromise safe operation subjecting users to serious
injury or death, and may void any remaining warranty.
Curb Roller Manufacturing reserves the right to change,
improve, modify or expand features of this equipment
at any time. Specications, models, or equipment are
subject to change without notice, and without incurring
any obligations to change, improve or expand features
of previously delivered equipment. Because of the
variations in optional equipment and continued design
improvement, certain information contained within this
manual may not apply.
This operators manual does not replace, nor does its
use release the owner/operator from observing all safety
codes or operating limitations as well as any applicable
federal, state, provincial or local regulations.
Introduction & Warranty
Curb Roller Manufacturing warrants to the original
purchaser that this product will be free from defects in
material and workmanship.
Curb Roller Manufacturing agrees to repair or replace, at
manufacturer’s discretion, any defective product free of
charge within three years from the date of purchase.
If any of the warranted goods are found by Curb Roller
Manufacturing to be defective in material or workmanship,
such goods will at Curb Roller’s option be replaced or
repaired. All warranty claims will be addressed upon
inspection of goods returned, prepaid, and/or review of
the claim (photos with notication of alleged defects) by a
direct Curb Roller Manufacturing representative.
Curb Roller Manufacturing must authorize all work and
returns prior to any work being performed or returns
made. If the customer does perform work and makes a
return without authorization, the customer does so with
the understanding that Curb Roller Manufacturing or any
of its agents shall not be obligated for the cost of any
such unauthorized expenses or actions.
The purchaser of any goods covered by this warranty
understands and agrees that the sole and exclusive
remedy against Curb Roller Manufacturing shall be for
the replacement or repair of defective goods as provided
herein.
All allowances will be credited at factory cost, with no
provisions for overtime, travel time, mileage, freight
charges or special services, i.e. down time.
Proof of purchase in the form of your dated sales receipt
showing serial number and the model of the product will
be required before our dealers can perform warranty
service on the product.
Curb Roller Manufacturing Products Warranty Period
1. Warranted for a period of three (3) years after date of
original purchase to original purchaser.
2. Replacement parts provided under the terms of
warranty applicable to and/or the product on which
installed as if such parts were original components
of that product.
Curb Roller Manufacturing Products Warranty Shall
Not Extend Or Apply To:
1. Defects which in our judgment are the result of
misuse, negligence, accident, or failure to perform
regular maintenance or service, and any parts that
may wear and need to be replaced.

July 2017 5
Introduction & Warranty
2. Products and component parts not manufactured
by Curb Roller Manufacturing beyond the warranty
period provided by the original manufacturer or
supplier.
3. Products improperly installed, maintained, or used
not in accordance with all applicable Curb Roller
Manufacturing instructions.
4. Goods or component parts that are modied or
changed in any way other than by, or authorized by,
Curb Roller Manufacturing.
Warranty questions or service information can be obtained
from your dealer or contact Curb Roller Manufacturing at
785-467-3132
www.curbroller.com

6July 2017
A. Hydraulic Oil Reservoir
B. Directional Valve
C. Engine Fuel Tank
D. Engine Air Filter
E. Cart
F. Hydraulic Oil Filter
G. Hydraulic Oil Suction Strainer
H. Hydraulic Couplers

July 2017 7
Hydraulic Reservoir Capacity .................. 11 gal. (41.6 l)
Hydraulic Flow*....................................7 gpm (26.5 lpm)
Maximum Hydraulic Pressure.........2300 psi (158.6 bar)
Oil Filtration ................................................... 10 Micron
* Dependant On Engine RPM

8July 2017
Before assembling and operating this equipment, you
must read, understand and follow the instructions and
safety warnings in this manual. Your Hydra-Pack may not
be equipped with some of the optional equipment shown
in the illustrations in this manual.
If you have any safety concerns or questions that are
not covered by this manual, please contact Curb Roller
Manufacturing at 785-467-3132.
The safety information in this manual is denoted by the
safety alert symbol: ^This symbol means ATTENTION!
BECOME ALERT! YOUR SAFETY IS INVOLVED!
The level of risk is indicated by the following signal words:
^DANGER
Indicates a hazardous situation, which, if
not avoided, will result in death or serious
injury.
^WARNING
Indicates a hazardous situation, which,
if not avoided, could result in death or
serious injury.
^CAUTION
Indicates a hazardous situation, which,
if not avoided, could result in minor or
moderate injury.
NOTICE
Indicates a situation that could result in
damage to the machine or other property.
^WARNING
Do not operate, work on or around this
machine while under the influence of
alcohol, drugs or if feeling ill.
^WARNING
Entanglement hazard.
Keep away from moving parts.
Do not wear loose fitting clothing. Loose
fitting clothing and long hair can become
entangled in moving or rotating parts.
Long hair must be tied back or netted.
Never operate machine with open or
missing guards or shields.
^WARNING
Observe federal, state/provincial and local
safety codes and regulations that apply to
the job site.
^WARNING
Pressurized fluids can penetrate the skin.
Hydraulic hoses can fail from age, damage
and exposure.
Do not search for hydraulic leaks without
body and face protection. A tiny, almost
invisible leak can penetrate the skin,
thereby requiring immediate medical
attention.
Use wood or cardboard to detect hydraulic
leaks, never use your hands.
^WARNING
The engine exhaust from this product
contains chemicals known to the State of
California to cause cancer, birth defects or
other reproductive harm.
Safety

July 2017 9
Safety
^WARNING
Engine exhaust contains poisonous
carbon monoxide.
Do not operate the Hydra-Pack in an
enclosed or confined area.
Avoid areas and actions that expose you
and others to carbon monoxide.
1. HP137

10 July 2017
Operation
^WARNING
Prevent injury.
Verify directional valve is in neutral
position before connecting hydraulics.
^WARNING
Pressurized fluids and grease can
penetrate the skin.
Hydraulic hoses can fail from age, damage
and exposure.
Do not search for hydraulic leaks without
body and face protection. A tiny, almost
invisible leak can penetrate the skin,
thereby requiring immediate medical
attention.
Use wood or cardboard to detect hydraulic
leaks, never use your hands.
1. Read and understand the engine manufacturers
operators manual before using the Hydra-Pack.
2. Check hydraulic oil level in reservoir. Add hydraulic
oil if necessary.
3. Verify directional valve (A) is in center neutral position.
4. Connect hydraulic hoses to hydraulic couplers (B)
and (C).
^WARNING
Engine exhaust contains poisonous
carbon monoxide hazard.
Do not operate the Hydra-Pack in an
enclosed or confined area.
Avoid areas and actions that expose you
and others to carbon monoxide.
5. Start and operate engine per guidelines in engine
operators manual.
6. Set engine throttle to max position.
7. Move directional valve (A) down to send pressure oil
through female coupler (B). Move directional valve
up to send pressure oil through male coupler (C).
8. Move directional valve (A) to center neutral position
to stop pressurized oil ow.

July 2017 11
Maintenance
1. Stop engine.
2. Place a drain pan under lter.
3. Remove and replace lter.
4. Rell hydraulic oil reservoir to proper level.
5. Dispose of oil in an environmentally safe manner.
1. Stop engine.
2. Place a drain pan under suction strainer.
3. Remove hose (A) to drain oil.
4. Remove, inspect and clean suction strainer (B).
Replace suction strainer if damaged.
5. Install suction strainer (B) and connect hose (A).
6. Rell hydraulic oil reservoir to proper level.
7. Dispose of oil in an environmentally safe manner.

12 July 2017
Parts
1
3
5
2
4
67
89
10
11
12
13
14
15
16
17
18
19
20
23
24
21
22
25
26
27
28
30
29
31
8
9
9
12
30
30
32
33
34
36
35
37
38
39
40
41
42
43 44
45
46
47
21
48
49
36
29
32
44
21

July 2017 13
Parts
Number Qty. Description Part Number
1 1 Breather Cap With Dipstick HP100
2 1 Hydraulic Reservoir HP101
3 1 Tank Brace HP102
4 1 Fitting, 8 M JIC x 3/4 M NPT Connector, 37 Degree Flare, Male HP103
5 1 Hydraulic Hose, 08U-608-608, 18 Inch HP104
6 2 Hex Bolt, 3/8 x 3/4 Inch HP105
7 1 Lift Bracket HP106
8 6 Flange Nut, 3/8 Inch CR165
9 3 Fitting, 90 Degree Elbow Male JIC-8 Male SAE-8 HP108
10 2 Hex Bolt, 1/4 x 3/4 Inch CR117
11 2 Lock Washer, 1/4 Inch HP109
12 3 Fitting, 08M JIC To 08M SAE HP110
13 1 Hydraulic Oil Filter Housing HP111
14 1 Hydraulic Oil Filter HP112
15 2 Grip CR106
16 1 Hydraulic Hose, 08U-608-608, 21 Inch HP113
17 1 Valve, Single Spool With 3 Position Detent HP114
18 2 Flat Washer, 1/4 Inch CR111
19 2 Hex Bolt, 5/16 x 2-1/2 Inch HP115
20 1 Hydraulic Hose, 08U-608-608, 23 Inch HP116
21 6 Flange Lock Nut, 1/4 Inch CR110
22 1 Engine HP117
23 2 Hydraulic Hose, 08U-608-608, 13 Inch HP118
24 2 Bulkhead Lock Nut , 3/4-16 Female JIC 37 Degree HP119
25 2 Fitting, 1/2 Male Pipe x 1/2 Bulkhead Male JIC HP120
26 1 Hydraulic Coupler, Female CR174
27 1 Hydraulic Coupler, Male CR175
28 4 Engine Mount HP121
29 6 Flat Washer, 5/16 Inch CR102
30 10 Lock Washer, 3/8 Inch CR138
31 4 Hex Bolt, 3/8 x 1-1/2 Inch HP122
32 6 Hex Bolt, 3/8 x 1-1/4 Inch CR137
33 1 Pump Mount HP123
34 1 Key, 1/4 x 1-1/2 Inch HP124
35 1 Coupling, 1 Inch Shaft HP125
36 2 Set Screw HP126
37 1 Spider, Rubber HP127
38 1 Coupling, 5/8 Inch Shaft HP128
39 1 Round Nose Key CR151
40 1 Hydraulic Pump HP129
41 1 Fitting, SAE 12m To JIC 12m HP130
42 1 Fitting, 90 Degree Elbow 3/4-16m JIC x 7/8-14m O-Ring HP131
43 2 Nylock Nut, 5/8 Inch CR122
44 4 Flat Washer, 5/8 Inch CR121
45 2 Tire, 13-5.00-6, Includes Rim And Tube HP132
46 1 Hydraulic Hose, 2014-12-12U-612-116, 21 Inch HP133

14 July 2017
Parts
1
3
5
2
4
67
89
10
11
12
13
14
15
16
17
18
19
20
23
24
21
22
25
26
27
28
30
29
31
8
9
9
12
30
30
32
33
34
36
35
37
38
39
40
41
42
43 44
45
46
47
21
48
49
36
29
32
44
21

July 2017 15
Number Qty. Description Part Number
47 1 Suction Strainer, 1-1/2 x 1 Inch HP134
48 2 Protector Sleeve For #49 HP135
49 2 All Thread Bolt, 5/16 x 10 Inch HP136
NS 1 Decal Kit HP137
Parts

16 July 2017
Table of contents
Other Curb Roller Manufacturing Portable Generator manuals
Popular Portable Generator manuals by other brands

Champion Power Equipment
Champion Power Equipment CSA40015 Owner's Manual and Operating Instructions

Altrad
Altrad BELLE BULLDOG Operator's manual

AIDA
AIDA TGEN-6P Operation guide

ELECTRIFIED EXPERIENCES
ELECTRIFIED EXPERIENCES MK-312BT user guide

SDMO
SDMO R 340 U User and maintenance manual

Kohler
Kohler 10REODB installation manual

GENMAX
GENMAX GM12000E user manual

Champion
Champion 100423 Operator's manual

Profoto
Profoto Pro-8a 1200 Air user guide

National Instruments
National Instruments NI PCI-6542 Getting started guide

Craftsman
Craftsman CMXGGAS030729 Operator's manual

Agilent Technologies
Agilent Technologies 33120A Service guide