Currys Essentials CDWTT11 Service manual

TA B L E TO P D I S H WA S H E R
INSTALLATION/INSTRUCTION MANUAL
CDWTT11
CDWTT11_IB_110331.indd 1 3/31/11 5:13 PM

Contents
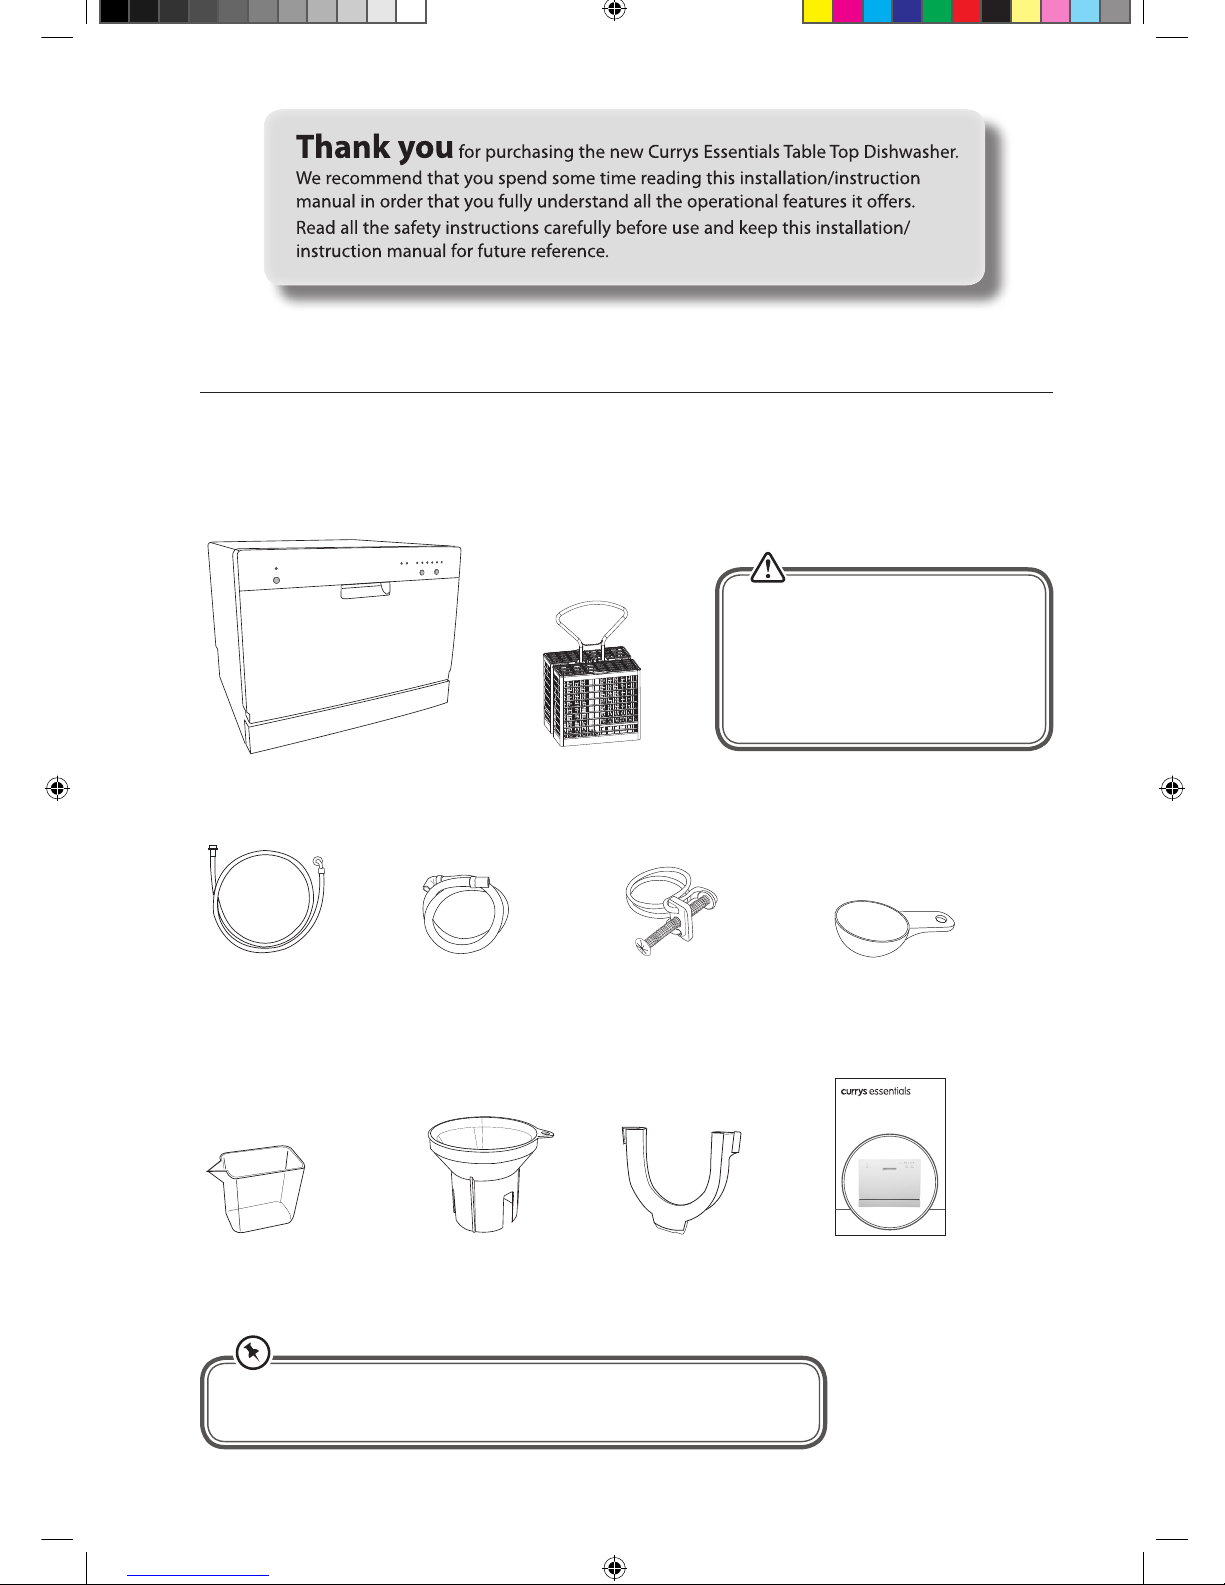
Unpacking.................................................................................................................................... 4
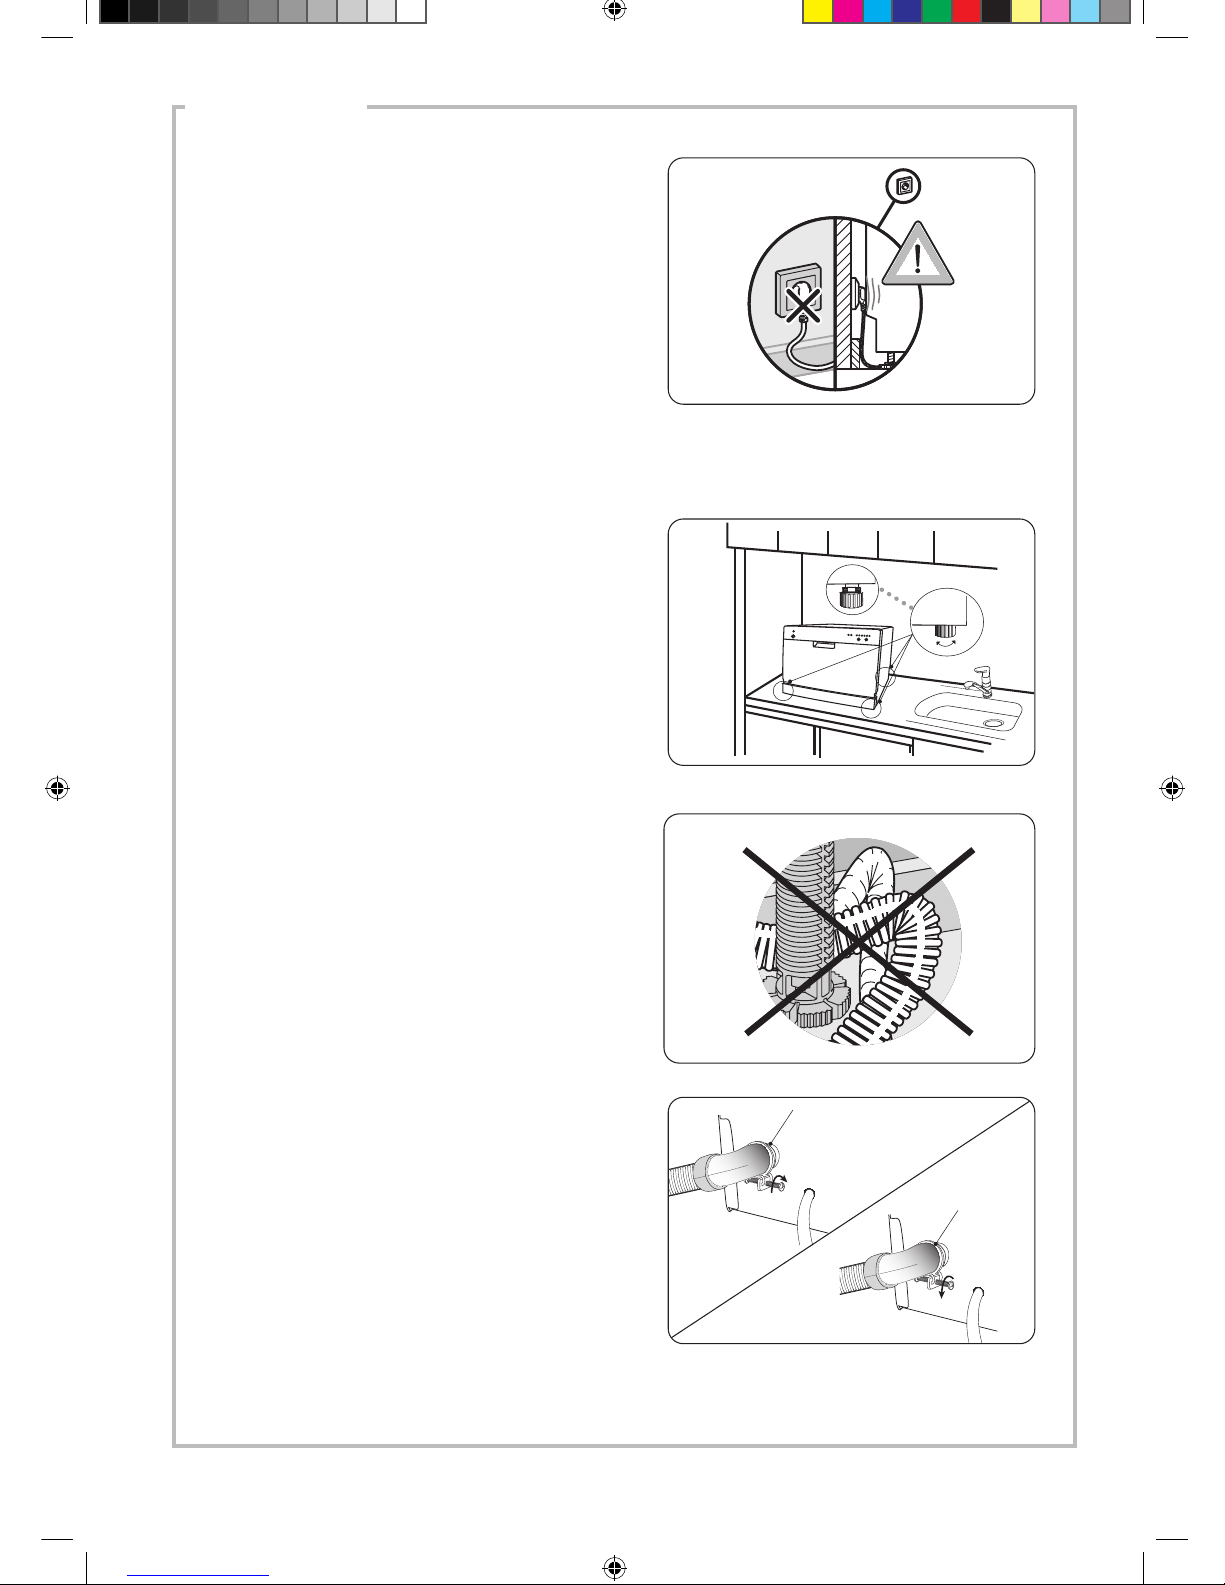
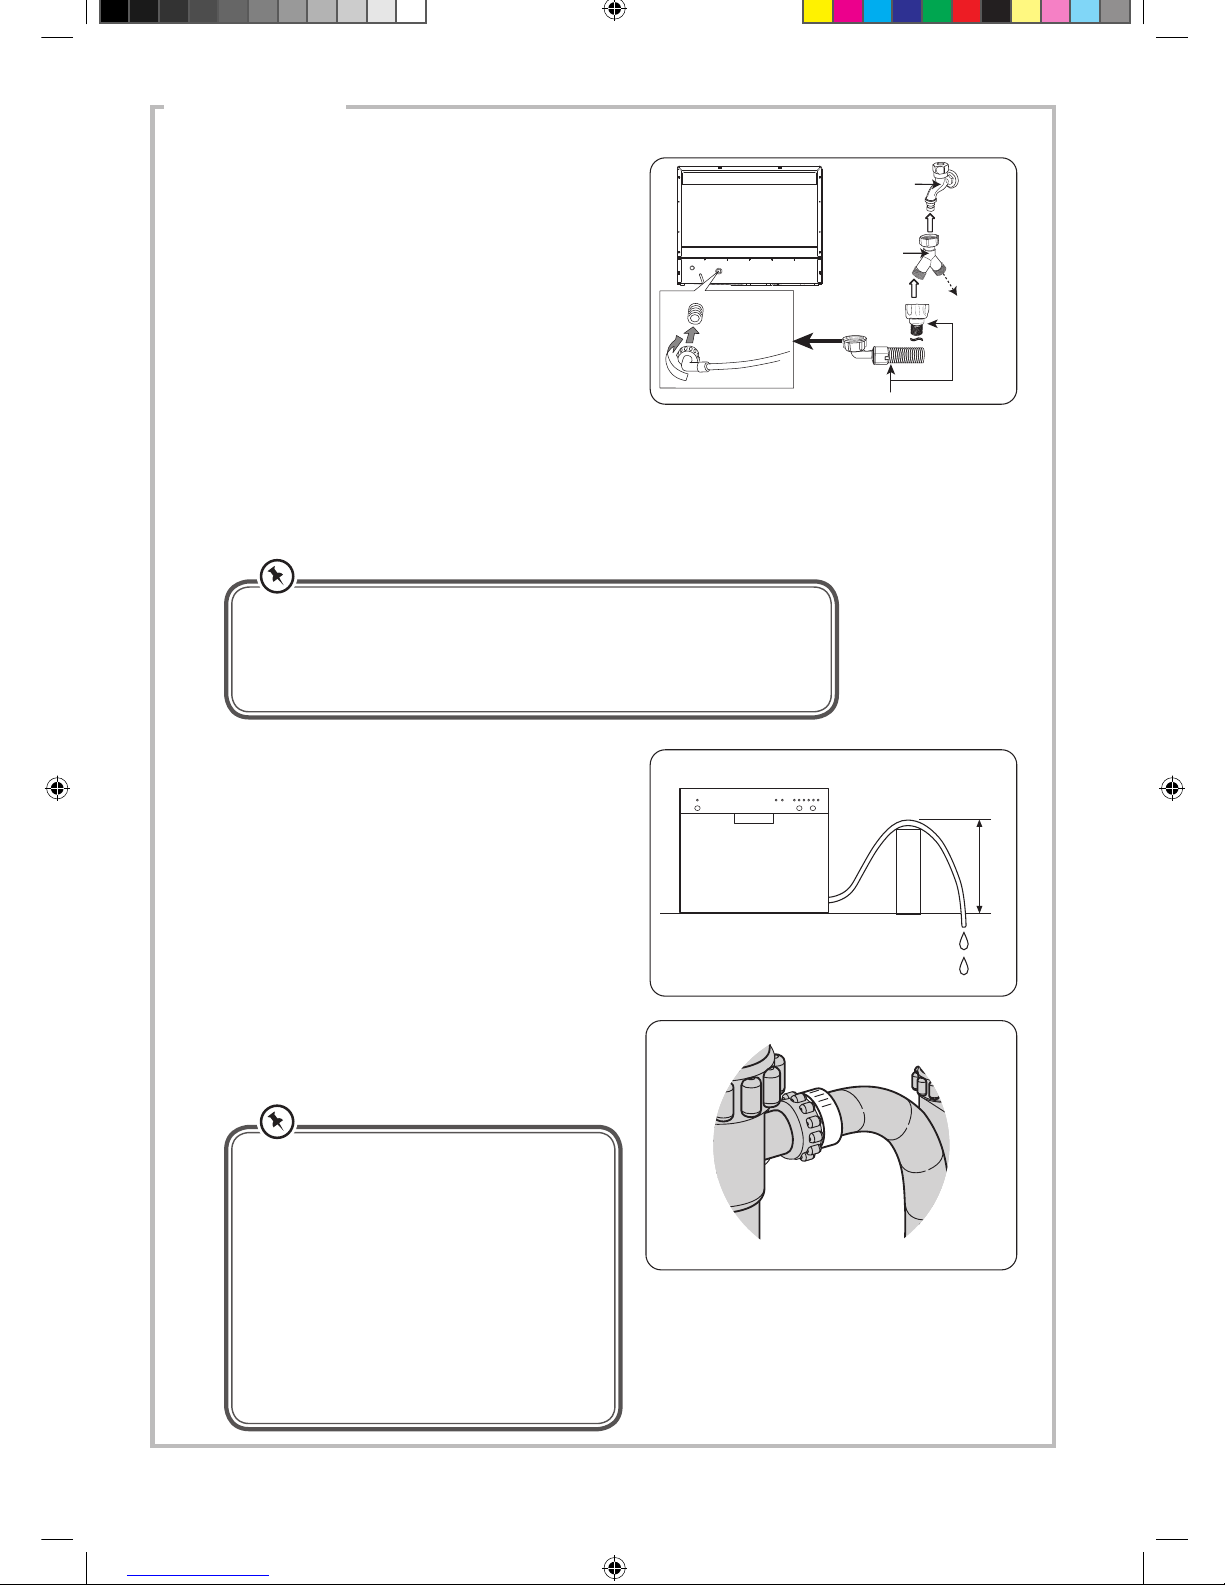
Installation ................................................................................................................................... 5
Location ..................................................................................................................................................................... 5
Product Overview........................................................................................................................ 8
Front View ................................................................................................................................................................. 8
Rear View ................................................................................................................................................................... 8
Dishwasher Basket and Cutlery Basket........................................................................................................... 9
Internal View............................................................................................................................................................. 9
Control Panel..........................................................................................................................................................10
Wash Cycle Table........................................................................................................................ 11
Before Operating....................................................................................................................... 12
To Open the Door.................................................................................................................................................12
To Close the Door .................................................................................................................................................12
Items Not Suitable for Use in the Dishwasher............................................................................................12
Adding Detergent or Detergent Tablet.................................................................................... 13
Adding Rinse Aid .......................................................................................................................14
Adjusting the Rinse Aid Reservoir..................................................................................................................14
Adding Salt .............................................................................................................................................................15
Loading the Dishwasher ........................................................................................................... 16
Before Loading the Dishwasher......................................................................................................................16
Dishwasher Basket ...............................................................................................................................................17
Hinged Cup Rack ...........................................................................................................................................17
Hinged Spikes .................................................................................................................................................17
Loading the Dishwasher Basket for 6 Place Settings........................................................................18
Cutlery Basket........................................................................................................................................................18
Loading the Cutlery Basket........................................................................................................................18
Starting a Wash Cycle ................................................................................................................ 19
Changing a Programme ............................................................................................................19
At the End of a Programme....................................................................................................... 19
Switching O the Unit............................................................................................................... 20
Unloading the Dishwasher .......................................................................................................20
Cleaning After Use..................................................................................................................... 21
External Care ..........................................................................................................................................................21
The Door and the Door Seal ......................................................................................................................21
The Control Panel ..........................................................................................................................................21
Internal Care...........................................................................................................................................................21
Filtering System..............................................................................................................................................21
Spray Arms.......................................................................................................................................................22
CDWTT11_IB_110331.indd 2 3/31/11 5:13 PM

Frost Precaution ........................................................................................................................ 22
Moving the Dishwasher ............................................................................................................ 22
Maintenance After a Prolonged Period of Non-Operation ....................................................22
Hints and Tips ............................................................................................................................ 23
Fault Code ...............................................................................................................................................................23
Technical Problems..............................................................................................................................................23
Disposal of the Dishwasher ......................................................................................................25
Disposal of Packing Material ....................................................................................................25
Specications............................................................................................................................. 26
Safety Warnings......................................................................................................................... 27
CDWTT11_IB_110331.indd 3 3/31/11 5:13 PM

GB-4
Unpacking
Remove all packaging from the unit. Retain the packaging. If you dispose of it please do so according to
local regulations.
The following items are included:
The Main Unit
Drain Hose Mounting
Clamp X 1
P.N.: 672005400002
Detergent Measuring Spoon X 1
1 full spoon = 20g (approx.)
P.N.: 673002200079
Instruction Manual X 1
P.N.: CDWTT11-001
U-Shape Hose Holder X 1
P.N.: 673006200003
Salt Funnel X 1
P.N.: 673002200001
Drain Hose X 1
P.N.: 673005400041
Measuring Cup X 1
60ml (approx.)
P.N.: 673006200004
Water Supply Hose X 1
P.N.: 673000900060
Cutlery Basket
P.N.: 673006200014
If items are missing, or damaged please contact Partmaster (UK only).
Tel: 0844 800 3456 for assistance.
TA B L E TO P D I S H W A S H E R
INSTALLATION/INSTRUCTION MANUAL
CDWTT11
This product has been wet tested
to ensure correct operation. As
a result some water may remain
inside the unit. This is normal and
safe. Remove any water droplets
from the exterior if necessary.
CDWTT11_IB_110331.indd 4 3/31/11 5:14 PM

GB-5
INSTALLATION
1. Please ensure the dishwasher is installed by a
qualified technician. Refer to the tools required.
Location
When selecting a position for your freestanding
dishwasher you should make sure the installation
surface is flat and firm, and the room is well
ventilated. Avoid locating your dishwasher near a
heat source, eg. cooker, boiler or radiator. Extreme
cold ambient temperatures may also cause the
appliance not to perform properly. This dishwasher
is not designed for use in a garage or outdoor
installation.
Do not drape the dishwasher with any covering.
When installing, ensure that free space is left at the
sides.
2. Ensure there is clearance each side of the unit
to allow slight sideways movement for servicing
when required. Good levelling is essential for
correct closure and sealing of the door. When
the unit is correctly levelled, the door should
not catch the inner liner on either side of the
cabinet.
The dimension of the dishwasher is 550(W) x
500(D) X 438(H) in mm. The figure outlines the
minimum dimensions required to accommodate
the table top dishwasher. Protect plastic parts
and cables from high temperatures.
unit in mm
550mm
438mm
500mm
150mm or more
50mm or more
150mm or more
50mm
or
more
All parts removed must be saved to do
the reinstallation in the future. Ensure
the dishwasher is unplugged and empty.
We recommend that 2 people handle the
dishwasher during installation.
CDWTT11_IB_110331.indd 5 3/31/11 5:14 PM

GB-6
INSTALLATION
4. The electrical connection conditions must
correspond with the specifications on the rating
plate of the dishwasher. Do not use extension
cables.
5. Position the unit next to a water tap and a drain.
Level the unit if needed.
3. Do not connect the unit to the mains socket
before installation. Ensure you are not installing
the unit right in front of the mains socket. This
is to avoid potential damage to the back of the
unit.
After installing the appliance, ensure that the
mains plug is easily accessible.
6. Ensure the water inlet and drain hoses are not
kinked or squashed. The unit must not stand on
the electrical supply cable.
7. Loosen the rings of the drain hose clamp by
turning the screw in anti-clockwise direction.
Then, insert the drain hose through the rings
of the Drain Hose Clamp to the drain outlet
firmly. Tighten the drain hose clamp by turning
the screw in clockwise direction to secure the
connection between the drain hose and the
drain outlet.
level
up down
Clockwise to
tighten
Rings of Drain
Hose Clamp
Rings of Drain
Hose Clamp
Anti-clockwise
to loosen
CDWTT11_IB_110331.indd 6 3/31/11 5:14 PM

GB-7
INSTALLATION
• Secure the water drain hose to the waste pipe
to avoid it coming off during the washing
process.
8. Make sure your plumbing is suitable for use with
the dishwasher. If in doubt contact a qualified
plumber. This unit MUST BE connected to COLD
WATER MAINS using the new water inlet hose.
OLD HOSE SETS MUST NOT BE RE-USED. The
water pressure from the water mains needs to
be at a minimum of 0.04 MPa and a maximum of
1.00MPa.
• Connect one end of the safety water supply
hose to your dishwasher, and then connect
the other end of the hose to your water
mains. Please ensure the black rubber seal is
in place.
• After connecting the hose, turn on your water
mains and check for leaks.
• Connect the dishwasher to the mains socket.
water mains
water supply hose
Y-Adaptor
(not included)
Connect to
another
appliance
if required.
You may use a Y-adaptor (not included)
for an additional water feed for another appliance, for example a
washing machine. This is only applicable for cold water mains. A
Y-adaptor is available from most DIY stores.
• The waste pipe must only be connected
to the foul drains and not the surface
water drainage system.
• The water drain hose should be placed
lower than 10cm from the table top
and must not be extended, otherwise
the unit may not be able to expel the
waste water properly.
• You may use the u-shaped drain hose
holder to secure your drain hose and to
avoid bending it.
• Do not bend your drain hose.
• Do not lift the drain hose higher than 10 cm
from the table top, otherwise the unit may
not be able to expel the waste water properly.
max.
10cm
CDWTT11_IB_110331.indd 7 3/31/11 5:14 PM

GB-8
Product Overview
Front View
Rear View
1. Power Button and Indicator Light
2. Control Panel
3. Door Handle
4. Drain hose
5. Mains Cable (Connect To Electrical Mains Socket)
6. Water Inlet (Connect To Supply Hose)
4
2
5
6
1
3
CDWTT11_IB_110331.indd 8 3/31/11 5:14 PM

GB-9
Dishwasher Basket and Cutlery Basket
Internal View
9. Salt Reservoir
10. Spray Arms
11. Filtering System
12. Cutlery Basket
13. Detergent Dispenser (Dual Compartment)
14. Rinse Aid Dispenser
7
12
9
10
8
11
13 14
7. Spikes
8. Cup Racks
CDWTT11_IB_110331.indd 9 3/31/11 5:14 PM

GB-10
1. Power Indicator
• The LED light will illuminate when the
dishwasher is on.
2. On / Off Button
• To turn the dishwasher on and off.
3. Salt Refill Warning Light
• Illuminates when the salt reservoir needs
refilling.
4. Rinse Aid Refill Warning Light
• Illuminates when the rinse aid dispenser
needs refilling.
Start/PauseProgram
Control Panel
3 4 721 5 6
5. Programme Button
• To select your required washing programme.
• Each press of this button switches from one
washing programme to another.
6. Start/Pause button
• To confirm and start the selected washing
programme.
• To reset the washing programme.
7. Programme Indicators
• Illuminate when the washing programme
has been selected.
• Flashes when the selected washing
programme is running.
CDWTT11_IB_110331.indd 10 3/31/11 5:14 PM

GB-11
Wash Cycle Table
Programme Cycle
Cycle
Selection
Information
Process
Detergent
Amount
(Pre-wash/
Main wash)
Running
Time
(min.)
Energy
Consumption
(Kwh)
Water
Consumption
(I)
Rinse
Aid
Intensive • Pots,
utensils and
cutlery.
• Highly
soiled.
• Pre-wash
(50°C)
• Wash (70°C)
• Rinse (70°C)
• Drying
• Prre-wash
(3g)
• Main Wash
(15g)
145 0.94 11
Normal • Pots,
utensils and
cutlery.
• Normally
soiled.
• Pre-wash
• Wash (60°C)
• Rinse (70°C)
• Drying
• Prre-wash
(3g)
• Main Wash
(15g)
125 0.7 8.4
Economy*
(EN50242)
• A shorter
wash for
lightly
soiled
items.
• Pre-wash
• Wash (55°C)
• Rinse (70°C)
• Drying
• Prre-wash
(3g)
• Main Wash
(15g)
170 0.63 8.4
Glass • Glasses,
crystal and
fine china.
• Lightly
soiled.
• Pre-wash
• Wash (45°C)
• Rinse (60°C)
• Drying
• Main Wash
(15g)
75 0.48 6.8
Rapid • Glasses and
cups.
• Lightly
soiled.
• Wash (40°C)
• Rinse (45°C)
• Main Wash
(15g)
30 0.3 6
3-in-1 • Utensils and
cutlery.
• Normally
soiled.
• Pre-wash
• Wash (60°C)
• Rinse (70°C)
• Drying
• Use 3 in 1
detergent
tablet only.
140 0.7 8.4
* To comply with Standards of Performance, i.e. EN50242, please ensure to use economy washing cycle for
the test.
Condensing dry technology
• Energy is saved by drying the dishes using the remaining heat after the last rinse cycle.
• Wash cycle times are extended due to this drying method.
• Some wash programmes do not have a drying function, please refer to the Wash Cycle Table for
more details.
CDWTT11_IB_110331.indd 11 3/31/11 5:14 PM

GB-12
●●
Small plastic items
(Milk bottle nipple)
Plastic items that
are not dishwasher safe
Crystal glasses
Silverware
Valuable vases
Copper pots and pans
Cast iron pans
Cracked / Chipped china
Scratched non-stick cookware
Towels and sponges
The Following Items Are Not Suitable
Before Operating
To Open the Door
• Pull the door handle.
• If the door is opened during operation all functions are automatically interrupted.
To Close the Door
• After loading the dishes, push the baskets fully into the dishwasher.
• Lift the door upwards and push until it clicks into position.
• Do not slam the dishwasher door.
Items Not Suitable for Use in the Dishwasher
When purchasing new crockery and cutlery, please make sure they are dishwasher-proof. Some items are
not suitable for dishwashers.
• Wooden cutlery and crockery or items with wooden parts may discolour and fade. The glue used in
these items is not dishwasher-proof and wooden handles may come loose after being washed in a
dishwasher.
• Craft items, antiques, valuable vases and decorative glassware are also not suitable for dishwashers.
• Plastic items (e.g. tupperware) which are not heat resistant may melt or loose shape due to the high
temperature in the dishwasher.
• Copper, brass, tin and aluminium items may discolour or become matt.
• Clouding may occur on glasses and delicate glassware after frequent washing. Do not wash delicate
glassware, or glassware containing lead crystal in a dishwasher. Wash delicate glassware by hand
instead.
• Silver and aluminium parts have a tendency to discolour during washing. Residues like egg white, egg
yolk and mustard often cause discolouring and staining on silver. Therefore, please clean the residues
from silver immediately after use.
CDWTT11_IB_110331.indd 12 3/31/11 5:14 PM

GB-13
• Keep out of the reach of children
• Irritating to eyes.
• Avoid contact with eyes. In case of contact with eyes, rinse immediately
with plenty of water and seek medical advice.
• If swallowed, seek medical advice immediately.
Adding Detergent or Detergent Tablet
Only use detergents specifically designed for use in dishwashers. To be more environmentally friendly,
please use no more than the correct amount of detergent.
Please follow the steps below to fill the detergent dispenser.
1. Push the button on the lid of the detergent
dispenser in the direction of the arrow until the
flap springs open.
2. Fill the detergent dispenser with detergent
powder or insert the detergent tablet. The
marking indicates the filling level.
Bleach and
Countertop detergent Irritant
pre-wash detergent chamber
main wash detergent chamber
or
3. All programmes with pre-wash need an additional
detergent dosage that must be placed in the pre-
wash detergent chamber (please refer to the wash
cycle table). This detergent will take effect during
the pre-wash phase.
4. Close the lid firmly so that it clicks into place.
You can choose to add a detergent tablet
alone or to add detergent powder to both
the main wash detergent chamber and the
pre-wash detergent chamber for your selected
wash cycle.
push up from the right side
CDWTT11_IB_110331.indd 13 3/31/11 5:14 PM

GB-14
Alternatively, you can judge the amount of rinse aid by checking the rinse aid indicator right next to the
reservoir’s cap. When the indicator is black, it means it is full. When it is clear, it means it is almost empty.
Adjusting the Rinse Aid Reservoir
The rinse aid reservoir has six settings. Both the recommended
setting and the factory setting is “4”. If the dishes are not drying
properly or are spotted, adjust the dial to the next higher number
until your dishes are spot-free.
Adding Rinse Aid
Rinse aid helps to ensure water does not cling and leave marks on crockery during the drying phase and
helps crockery dry faster after it has been washed. Only pour rinse aid that is for domestic dishwashers into
the reservoir. This model is designed to use liquid rinse aids only.
Please follow the steps below to pour the rinse aid into the storage reservoir, and the amount will dispense
automatically.
1. Turn the cap and open as indicated.
2. When the cap open marking is aligned, you
may lift the cap up.
3. Pour the rinse aid in until the level indicator
turns completely black in colour and close the
cap.
4. Be careful not to overfill the reservoir. Wipe
up any spills. The approximate volume of the
rinse aid reservoir is 110ml.
open
rinse aid indicator
Rinse aid warning light will illuminate when the reservoir is
running out of rinse aid and requires refilling.
rinse aid
warning light
If the water hardness in your area is soft, you may
not need rinse aid as it may cause white film to
develop on your dishes.
CDWTT11_IB_110331.indd 14 3/31/11 5:14 PM

GB-15
Adding Salt
If the water in your area is hard, deposits will form on your dishes and
utensils. This appliance contains a salt reservoir for you to reduce the
hardness of the water.
Please follow the steps below to pour the salt into the salt reservoir and
it must be set to correspond to the water hardness level in your area.
1. Remove the lower basket and unscrew the reservoir cap.
2. Fill the reservoir with approximately 500ml of water (first use only).
3. Place the funnel provided over the salt reservoir.
4. Pour in approximately 1.2kg of dishwasher salt depending on the
brand used.
5. Clean any excess salt from around the reservoir opening and then
screw the cap on again firmly.
6. Run the “eco” wash programme immediately (without any crockery in
the dishwasher) to remove any traces of salt from the compartment.
The salt warning light will illuminate when the reservoir is
running out of salt and requires re-filling.
The salt warning light will cease to illuminate within a few
days depending on how quickly the salt dissolves.
OPEN
open
open
open
salt warning
light
CDWTT11_IB_110331.indd 15 3/31/11 5:14 PM

GB-16
Loading the Dishwasher
Before Loading the Dishwasher
Please observe the following notes before loading your cutlery and crockery into the basket.
• Remove lipstick stains and any food residues from crockery and dishes. Rinse if necessary.
• Dishes and cutlery must not lay inside one another, or cover each other.
• Load your cutlery and crockery so that water can access all surfaces.
• Ensure all items are securely positioned.
• Hollow items such as cups, glasses, pans, etc. must be placed upside down in the basket.
• Wide based items should be placed at an angle so that water can run off them freely.
• The spray arms must not be blocked by items which are too tall or hang through the baskets. If in
doubt, test for free movement by manually rotating the spray arms.
• Ensure that small items cannot fall through the holders in the baskets.
Do not wash items soiled with ash, sand, wax, lubricating grease or paint in the dishwasher. Ash
does not dissolve and can distribute in the dishwasher. Wax, sand, lubricating grease and paint can
cause damage to the dishwasher.
CDWTT11_IB_110331.indd 16 3/31/11 5:14 PM

GB-17
Dishwasher Basket
Please use the dishwasher basket for small and lightweight
items such as cups, saucers, glasses, dessert bowls, etc.
Shallow pans or casserole dishes can also be placed in the
upper basket.
Long items such as soup ladles, mixing spoons and long
knives should be placed lying down across the front of the
upper basket.
Hinged Cup Rack
To make room for taller items in the dishwasher basket, raise
the cup rack upwards. You can then lean the tall glasses
against it. You can also remove it when it is not required for
use.
Raise upwards
Fold backwards Push and snap
Hinged Spikes
The spikes are used for holding plates and a platter. They can be lowered to make more room for large
items. Please refer below for the steps to open up the spikes.
For safety reasons, do not operate the dishwasher without the upper and lower baskets in place.
To prevent water dripping from the upper basket
onto the dishes in the lower basket, we recommend
that you empty the lower basket first and then the
upper basket.
CDWTT11_IB_110331.indd 17 3/31/11 5:14 PM

GB-18
Cutlery Basket
Loading the Cutlery Basket
To make unloading much easier, cutlery should be grouped
in zones and placed in the cutlery basket. Please refer to the
table below for placement method.
Number Item
1 Forks
2 Soup spoons
3 Dessert spoons
4 Teaspoons
5 Knives
6 Serving spoons
7 Gravy ladle
8 Serving fork
IN 6 1 6
2
1
1
1
2
5
55
1
2
5
5
1
4
3
3
3
3
4
4
4
7
35
4
4 8
3
2
2 2
Loading the Dishwasher Basket for 6 Place Settings
For loading the dishwasher basket, please refer to the table below.
Number Item
1 Cups
2 Medium serving bowl
3 Glasses
4 Saucers
5 Dish
6 Oval platter
7 Dinner plates
8 Soup plates
9 Dessert dishes
10 Cultery basket
IN
1
6
987
3
5
1
2
4
3
10
3
• Do not let any items extend through the
bottom of baskets.
• To avoid the risk of injury, please load your
knives and forks with handles upwards. Do
not hold them by their sharp edges.
• The cutlery basket comes with covers, and
they are designed for you to load the cutlery
into the appropriate slots. If you use the
basket without the cover, it may reduce the
washing results of your cutlery.
• Please ensure the cover is securely locked to
the basket before operation.
• To comply with Standards of Performance, i.e.
EN50242, all cutlery must be loaded according
to the instructions in this manual.
CDWTT11_IB_110331.indd 18 3/31/11 5:14 PM

GB-19
Starting a Wash Cycle
Please follow the steps below to start a wash cycle.
1. Ensure the unit is connected to the mains power and the water supply is on (water pressure between
0.04MPa and 1.00MPa).
2. Open the door. Pull out the dishwasher baskets, load the dishes and push the baskets back.
3. Pour in the detergent or place the detergent tablet in the detergent compartment and close firmly
afterwards.
4. Close the dishwasher door. A click sound should be heard when the door is closed correctly. Do not
slam the door.
5. Press the On/Off button.
6. Select the wash cycle programme based on the loading and soil requirements. Please refer to the
“Wash Cycle Table” (page 11).
7. The power indicator light of the selected programme indicator light will illuminate.
8. Press the Start/Pause button, the washing cycle will begin shortly.
Changing a Programme
To change the programme if the washing cycle has already started, follow the steps below.
1. Open the door slightly to check if the unit has dispensed the detergent or detergent tablet. This will
depend on how long the washing cycle was running for.
2. If the detergent dispenser lid is opened, we suggest you to allow the wash cycle to complete.
3. If the detergent dispenser lid is still closed, press the On/Off button to cancel the programme. You
may then close the dishwasher door and press the On/Off button again. Then, press the required new
programme button and confirm the selection by pressing the Start/Pause button. The unit will start
the new washing cycle shortly.
At the End of a Programme
At the end of a programme, the dishwasher will make an audible sound.
If you open the dishwasher door during the washing cycle and then close it, the dishwasher will
continue the current washing programme after 10 seconds. However, if the door is not closed
correctly after 1 minute, the dishwasher will make an audible sound at 1 minute intervals.
CDWTT11_IB_110331.indd 19 3/31/11 5:14 PM

GB-20
Switching O the Unit
To save energy, remember to switch the dishwasher off using the ON/OFF button. The dishwasher will
continue to use electricity until it is switched off with the ON/OFF button.
If the dishwasher is not going to be used for a long period of time, e.g. whilst on holiday, disconnect the
unit from the mains supply.
Unloading the Dishwasher
Allowing dishes to cool down before unloading is important as dishes tend to break and chip more easily
when they are hot. Therefore, if you open the dishwasher door fully after switching off, it will allow the
dishes to cool down much faster.
CDWTT11_IB_110331.indd 20 3/31/11 5:14 PM
Other manuals for CDWTT11
1
Table of contents
Other Currys Essentials Dishwasher manuals

Currys Essentials
Currys Essentials CID60W12 User manual

Currys Essentials
Currys Essentials CID60W12 User manual

Currys Essentials
Currys Essentials CDWTT10 User manual

Currys Essentials
Currys Essentials CDWTT11 Service manual

Currys Essentials
Currys Essentials CID45B13 User manual

Currys Essentials
Currys Essentials CDW45W10 Service manual

Currys Essentials
Currys Essentials CDWTT10 User manual

Currys Essentials
Currys Essentials CDW60W13 User manual

Currys Essentials
Currys Essentials CDW60W10 User manual

Currys Essentials
Currys Essentials CID45B10 Service manual