Currys Essentials CDWTT13 User manual

INSTRUCTION MANUAL
TABLETOP DISHWASHER
CDWTT13


Contents
Safety Warnings............................................................................................................................ 5
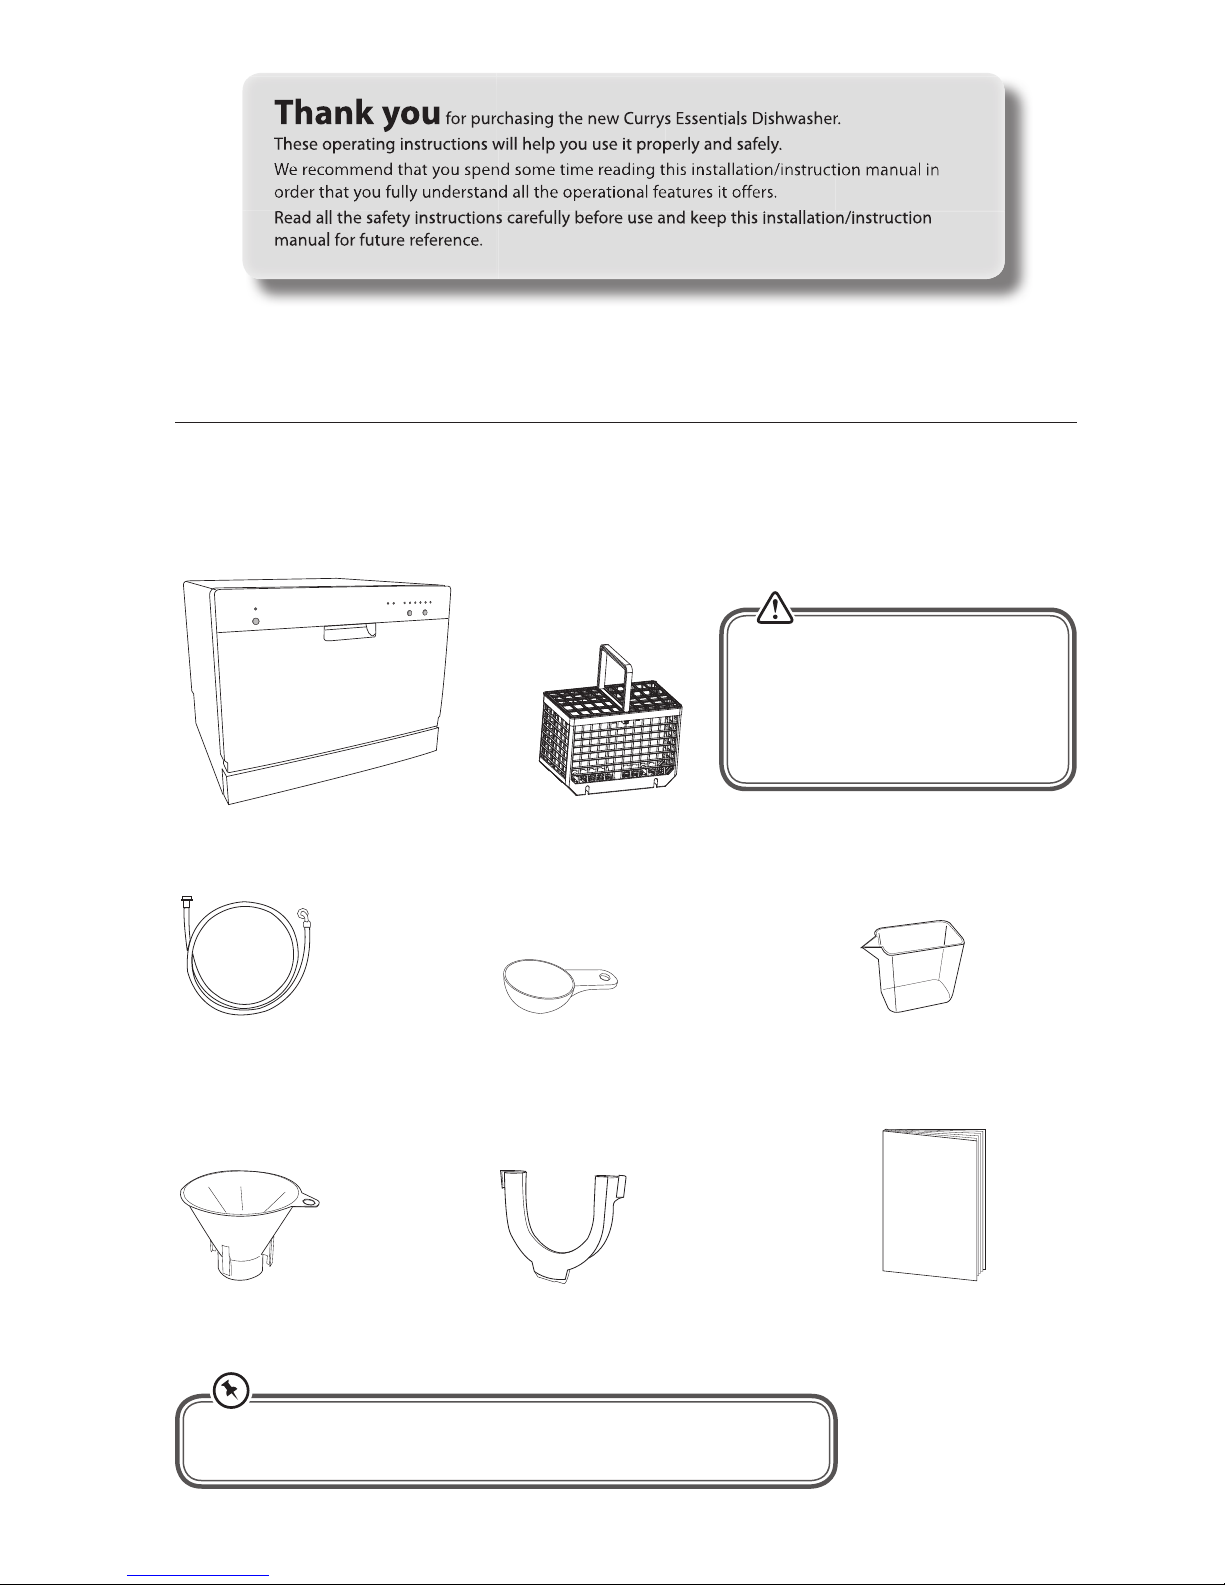
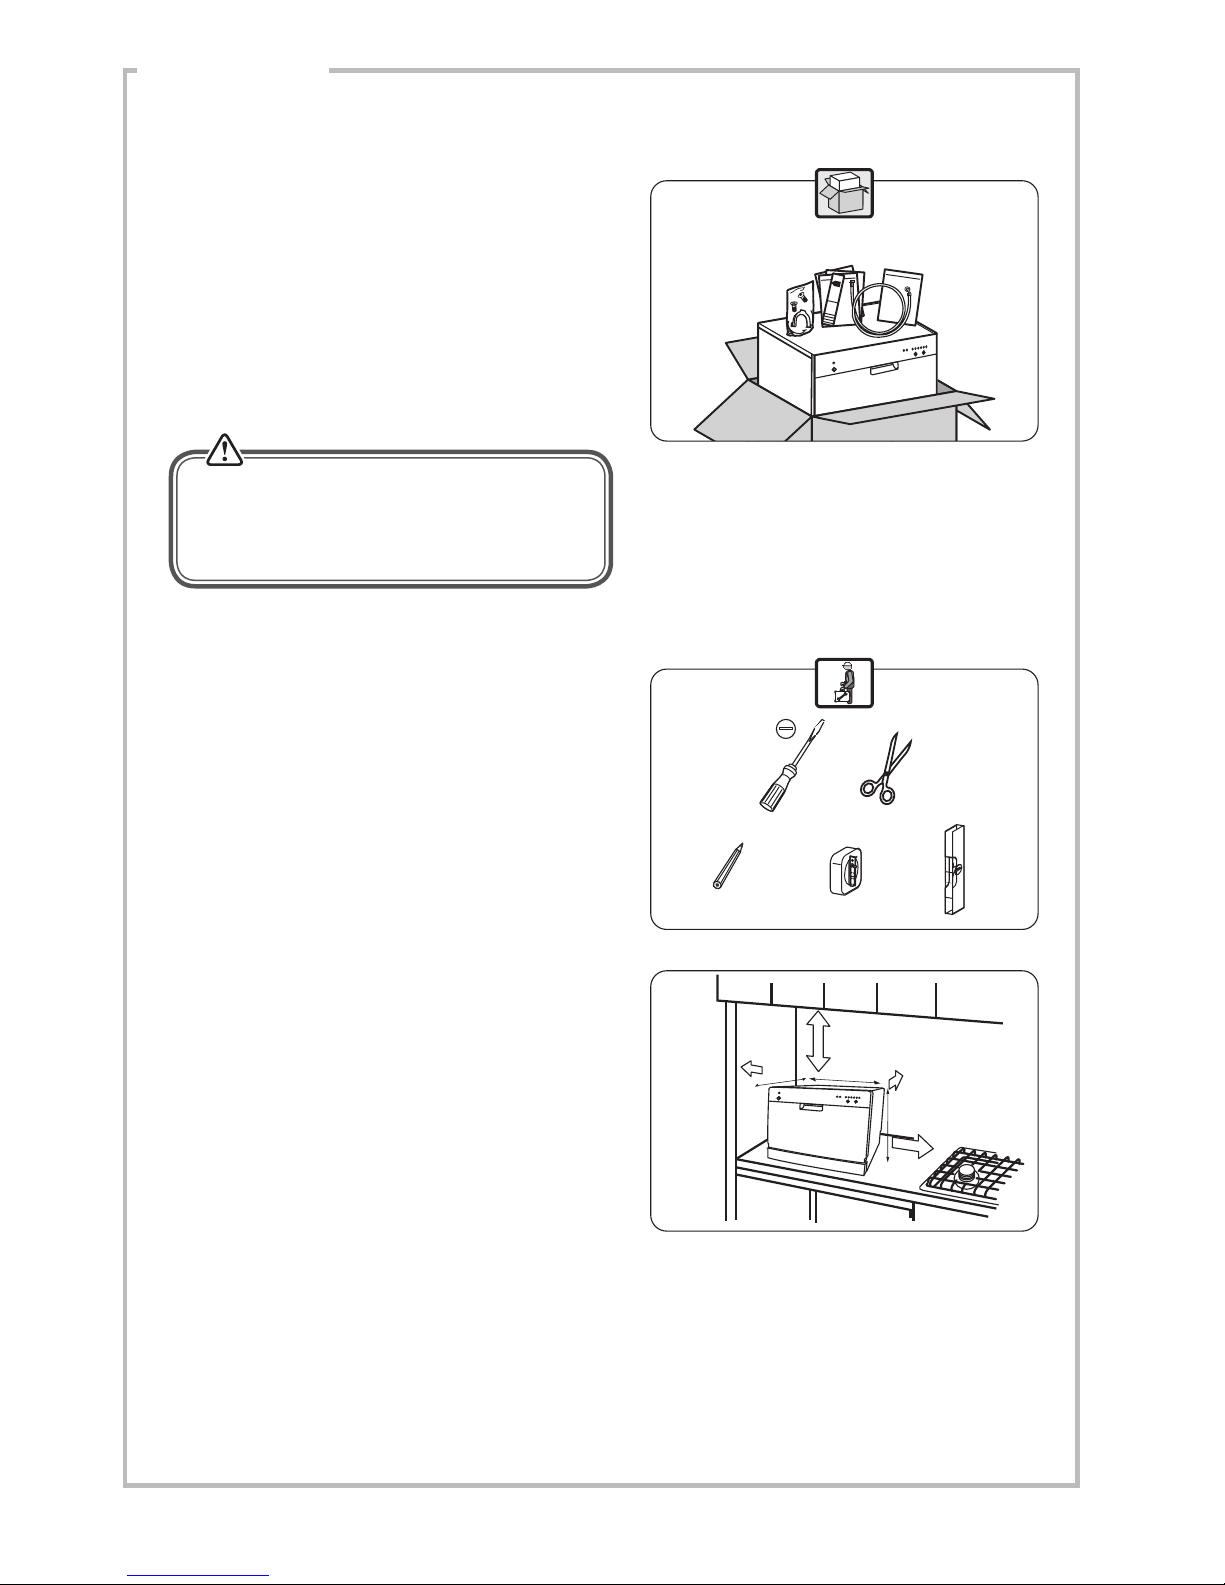
Unpacking..................................................................................................................................... 8
Installation .................................................................................................................................... 9
Location .......................................................................................................................................................................9
Product Overview....................................................................................................................... 12
Front View ................................................................................................................................................................ 12
Rear View ..................................................................................................................................................................12
Dishwasher Basket and Cutlery Basket..........................................................................................................13
Internal View............................................................................................................................................................13
Control Panel...........................................................................................................................................................14
Before Operating........................................................................................................................ 15
To Open the Door.................................................................................................................................................. 15
To Close the Door ..................................................................................................................................................15
Items Not Suitable for Use in the Dishwasher.............................................................................................15
Adding Detergent or Detergent Tablet..................................................................................... 16
Adding Rinse Aid ........................................................................................................................ 17
Adjusting the Rinse Aid Reservoir................................................................................................................... 17
Adding Salt.................................................................................................................................. 18
Loading the Dishwasher ............................................................................................................ 19
Before Loading the Dishwasher....................................................................................................................... 19
Dishwasher Basket ................................................................................................................................................ 20
– Hinged Cup Rack ............................................................................................................................................... 20
– Hinged Spikes.....................................................................................................................................................20
– Loading the Dishwasher Basket for 6 Place Settings............................................................................21
Cutlery Basket......................................................................................................................................................... 21
Operation .................................................................................................................................... 22
Starting a Wash Cycle...........................................................................................................................................22
Changing a Programme......................................................................................................................................22
At the End of a Programme ...............................................................................................................................22
Switching O the Unit .........................................................................................................................................22
Unloading the Dishwasher ................................................................................................................................22
Wash Cycle Table......................................................................................................................... 23

Cleaning After Use...................................................................................................................... 24
External Care ...........................................................................................................................................................24
– The Door and the Door Seal.......................................................................................................................... 24
– The Control Panel..............................................................................................................................................24
Internal Care............................................................................................................................................................24
– Filtering System .................................................................................................................................................24
– Spray Arms........................................................................................................................................................... 25
Frost Precaution ......................................................................................................................... 25
Moving the Dishwasher ............................................................................................................. 25
Maintenance After a Prolonged Period of Non-Operation ..................................................... 25
Hints and Tips ............................................................................................................................. 26
Technical Problems...............................................................................................................................................26
General Problems..................................................................................................................................................27
Disposal of the Dishwasher ....................................................................................................... 28
Disposal of Packing Material ..................................................................................................... 28
Specications.............................................................................................................................. 29

5
Safety Warnings
For your continued safety and to reduce the risk of injury or electric shock,
please follow all the safety precautions listed below.
• Read all instructions carefully before using the dishwasher and keep them
for future reference.
• Retain the manual. If you pass the dishwasher onto a third party, make sure
to include this manual.
• Keep ventilation openings in the dishwasher enclosure clear of obstructions.
• Choose a location for your dishwasher away from heat sources such as
radiators or fires.
• Young children should be supervised to ensure that they do not play with
the dishwasher.
• Keep mains cable out of reach of children.
• This appliance can be used by children aged from 8 years and above
and persons with reduced physical, sensory or mental capabilities or
lack of experience and knowledge if they have been given supervision or
instruction concerning use of the appliance in a safe way and understand
the hazards involved. Children shall not play with the appliance. Cleaning
and user maintenance shall not be made by children without supervision.
• Keep the appliance and its cord out of reach of children less than 8 years
old.
• Keep children away from detergents and rinse aids. These may cause
chemical burns in the mouth, throat and eyes or asphyxiation.
• Keep children away from the dishwasher when the door is open.
• Switch off water and power and unplug before fitting or removing tools/
attachments, after use and before cleaning.
• Keep your fingers away from moving parts and fitted attachments.
• Never use a damaged machine.
• If the mains cable is damaged, it must be replaced by the manufacturer, its
service agent or a qualified technician in order to avoid a hazard.
• Keep the power unit, mains cable and plug away from water.
• Never exceed the maximum capacities.
• 2 people are required to lift this dishwasher.
• Only use the dishwasher for its intended domestic use.

6
• This appliance is intended for indoor household use and similar applications
such as:
- farm houses and by clients in hotels, motels and other residential type
environment;
- bed and breakfast type environment;
- catering and similar non-retail applications.
WARNING
IT IS HAZARDOUS FOR ANYONE OTHER THAN AUTHORISED
SERVICE PERSONNEL TO CARRY OUT SERVICING OF REPAIRS
WHICH INVOLVE THE REMOVAL OF COVERS.
TO AVOID THE RISK OF AN ELECTRICAL SHOCK DO NOT
ATTEMPT REPAIRS YOURSELF.
• Do not sit or stand on the door or dish rack.
• Do not move your dishwasher by holding the door or its edges. Hold the
dishwasher around its sides or base when moving it.
• Do not touch the heating element during or immediately after use.
• Do not operate your dishwasher unless all enclosure panels are properly in
place. Open the door very carefully when there is a programme running, as
there is a risk of hot water spraying out of the appliance.
• Do not place any heavy objects on the open door. The appliance could tip.
• When loading items to be washed:
• Locate sharp items so that they will not damage the door seal;
• Warning: Knives and other utensils with sharp points must be loaded in the
basket with the points downwards or placed horizontally.
• Do not allow plastic items to come into contact with heating element.
• Check that the detergent receptacle is empty after completion of the wash
cycle.
• Do not wash plastic items unless they are marked dishwasher safe or
equivalent.
• Use only detergent and rinse aids designed for an automatic dishwasher.
• Other means for disconnection from the supply must be incorporated in the
fixed wiring with at least 3mm contact separation in all poles.
• The door should not be left in the open position since this could present a
tripping hazard.

7
• For energy saving, always remember to switch the dishwasher off when you
have finished using it. The dishwasher should not be left unattended when
in use.
• Remove the door to the washing compartment when removing an old
dishwasher from service or discarding it.
• During installation, the power supply cord must not be excessively or
dangerously bent or flattened.
• Do not tamper with controls.
• The appliance is to be connected to the water mains using new hose sets.
• The maximum number of place settings to be washed is 6.
• The maximum permissible inlet water pressure is 1Mpa, and the minimum
permissible inlet water pressure is 0.04Mpa.
earthing instructions
WARNING: THIS APPLIANCE MUST BE EARTHED.
• This appliance is equipped with a mains cable having an equipment-
earthing conductor and an earthing plug.
• The plug must be plugged into an appropriate mains socket that
is installed and earthed in accordance with local standards and
requirements.
Improper connection of the equipment-earthing conductor could result in a
risk of electric shock.
• The wires in the cord are coloured as follows:
Green and Yellow = Earth,
Blue = Neutral,
Brown = Live.
• Check with a qualified electrician or service representative if you are in
doubt whether the appliance is properly earthed or the plug does not fit
correctly.
• Never modify the plug provided with the appliance.

8
Unpacking
Remove all items from the packaging. Retain the packaging. If you dispose of it please do so according to
local regulations.
The following items are included:
The Main Unit
Detergent Measuring Spoon X 1
1 full spoon = 20g (approx.)
Instruction Manual X 1U-Shape Hose Holder X 1Salt Funnel X 1
Measuring Cup X 1
60ml (approx.)
Water Supply Hose X 1
Cutlery Basket
If items are missing, or damaged please contact Partmaster (UK only).
Tel: 0844 800 3456 for assistance.
This product has been wet tested to
ensure correct operation. As a result
some water may remain inside the
unit. This is normal and safe. Remove
any water droplets from the exterior if
necessary.
Instruction
Manual

INSTALLATION
9
1. Please ensure the dishwasher is installed by a
qualified technician. Refer to the tools required.
Location
When selecting a position for your freestanding
dishwasher you should make sure the installation
surface is flat and firm, and the room is well
ventilated. Avoid locating your dishwasher near a
heat source, eg. cooker, boiler or radiator. Extreme
cold ambient temperatures may also cause the
appliance not to perform properly. This dishwasher
is not designed for use in a garage or outdoors.
Do not cover the dishwasher. When installing,
ensure that free space is left at the sides.
2. Ensure there is sufficient clearance on each side
of the unit to allow slight sideways movement
for servicing when required. Good levelling is
essential for correct closure and sealing of the
door. When the unit is correctly levelled, the
door should not catch the inner liner on either
side of the cabinet.
The dimensions of the dishwasher are 550(W) x
500(D) X 438(H) in mm. The figure outlines the
minimum dimensions required to accommodate
the table top dishwasher. Protect plastic parts
and cables from high temperatures.
unit in mm
550mm
438mm
500mm
150mm or more
50mm or more
150mm or more
50mm
or
more
All parts removed must be saved to do the
reinstallation in the future. Ensure the dishwasher
is unplugged and empty. We recommend that 2
people handle the dishwasher during installation.
Installation

INSTALLATION
10
4. The electrical connection conditions must
correspond with the specifications on the rating
plate of the dishwasher. Do not use extension
cables.
5. Position the unit next to a water tap and a drain.
Level the unit if needed.
3. Do not connect the unit to the mains socket
before installation. Ensure you are not installing
the unit right in front of the mains socket. This
is to avoid potential damage to the back of the
unit.
After installing the appliance, ensure that the
mains plug is easily accessible.
6. Ensure the water inlet and drain hoses are not
kinked or squashed. The unit must not stand on
the electrical supply cable.
level
up down

INSTALLATION
11
• Secure the water drain hose to the waste pipe
to avoid it coming off during the washing
process.
7. Make sure your plumbing is suitable for use with
the dishwasher. If in doubt contact a qualified
plumber. This unit MUST BE connected to COLD
WATER MAINS using the new water inlet hose.
OLD HOSE SETS MUST NOT BE RE-USED. The
water pressure from the water mains needs to
be at a minimum of 0.04 MPa and a maximum of
1.00MPa.
• Connect one end of the safety water supply
hose to your dishwasher, and then connect
the other end of the hose to your water
mains. Please ensure the black rubber seal is
in place.
• After connecting the hose, turn on your water
mains and check for leaks.
• Connect the dishwasher to the mains socket.
water mains
water supply hose
Y-Adaptor
(not included)
Connect to
another
appliance
if required.
You may use a Y-adaptor (not included) for an additional water feed for
another appliance, for example a washing machine. This is only applicable for
cold water mains. A Y-adaptor is available from most DIY stores.
• The waste pipe must only be connected to
the foul drains and not the surface water
drainage system.
• The water drain hose should be placed lower
than 10cm from the table top and must not
be extended, otherwise the unit may not be
able to expel the waste water properly.
• You may use the u-shaped drain hose holder
to secure your drain hose and to avoid
bending it.
• Please close the hydrant after use.
• Do not bend your drain hose.
• Do not lift the drain hose higher than 10 cm
from the table top, otherwise the unit may
not be able to expel the waste water properly.
max.
10cm

12
Product Overview
Front View
Rear View
1. Power Button and Indicator Light
2. Control Panel
3. Door Handle
4. Drain hose
5. Mains Cable (Connect To Electrical Mains Socket)
6. Water Inlet (Connect To Supply Hose)
4
2
5
6
1
3

13
Dishwasher Basket and Cutlery Basket
Internal View
10. Salt Reservoir
11. Spray Arms
12. Filtering System
13. Cutlery Basket
14. Detergent Dispenser (Dual Compartment)
15. Rinse Aid Dispenser
7
13
10
11
8
9
12
14 15
7. Spikes
8. Cup Racks
9. Cutlery Basket

14
1. Power Indicator
• The LED light will illuminate when the
dishwasher is on.
2. On / Off Button
• Turn the dishwasher on and off.
3. Salt Refill Warning Light
• Illuminates when the salt reservoir needs
refilling.
4. Rinse Aid Refill Warning Light
• Illuminates when the rinse aid dispenser
needs refilling.
Start/PauseProgram
ECO
Control Panel
3 4 721 5 6
5. Programme Button
• Select your required washing programme.
• Each press of this button switches from one
washing programme to another.
6. Start/Pause button
• Confirm and start the selected washing
programme.
• Reset the washing programme.
7. Programme Indicators
• Illuminates when the washing programme
has been selected.
• Flashes when the selected washing
programme is running.

15
Before Operating
To Open the Door
• Pull the door handle.
• If the door is opened during operation, first open the door slightly to avoid water spillage.
• Wooden cutlery and crockery or items with wooden parts may discolour and fade. The glue used in
these items is not dishwasher-proof and wooden handles may come loose after being washed in a
dishwasher.
• Craft items, antiques, valuable vases and decorative glassware are also not suitable for dishwashers.
• Plastic items (e.g. tupperware) which are not heat resistant may melt or loose shape due to the high
temperature in the dishwasher.
• Copper, brass, tin and aluminium items may discolour or become matt.
• Clouding may occur on glasses and delicate glassware after frequent washing. Do not wash delicate
glassware or glassware containing lead crystal, in a dishwasher. Wash delicate glassware by hand
instead.
• Silver and aluminium parts have a tendency to discolour during washing. Residues like egg white, egg
yolk and mustard often cause discolouring and staining on silver. Therefore, please clean the residues
from silver immediately after use.
If the door is opened during operation, all functions are automatically interrupted.
To Close the Door
• After loading the dishes, push the baskets fully into the dishwasher.
• Lift the door upwards and push until it clicks into position.
• Do not slam the dishwasher door.
Items Not Suitable for Use in the Dishwasher
When purchasing new crockery and cutlery, please make sure they are dishwasher-proof. Some items are
not suitable for dishwashers.
The following items are not suitable
Towels and
sponges
Small plastic
items
(Milk bottle
nipple)
Plastic items
that are not
dishwasher safe
Cast iron
pans
Scratched non-stick cookware
Copper pots and pans
Crystal
glasses
Silverware
Valuable
vases
Cracked / chipped china

16
All programmes with pre-wash need an additional
detergent dosage that must be placed in the pre-
wash detergent chamber. If using tablets please
check the detergent manufacturers instructions.
Please refer to the wash cycle table. This detergent
will take effect during the pre-wash phase.
2. Fill the detergent dispenser with detergent
powder to both main wash detergent chamber
and pre-wash detergent chamber, or insert the
detergent tablet to the main detergent chamber.
The marking indicates the filling level.
3. Close the lid firmly so that it clicks into place.
• Keep detergents and bleaches out of the reach of children.
• Irritating to eyes.
• Avoid contact with eyes. In case of contact with eyes, rinse immediately
with plenty of water and seek medical advice.
• If swallowed, seek medical advice immediately.
Adding Detergent or Detergent Tablet
Only use detergents specifically designed for use in dishwashers. To be more environmentally friendly,
please use no more than the correct amount of detergent. Fill the detergent dispenser with detergent
power or tablet. See the detergent manufacturers instructions for the correct amount to use. If using
tablets read the manufacturers recommendations on the tablet packaging in order to determine where the
table should be placed (e.g. cutlery basket, detergent compartment etc).
Please follow the steps below to fill the detergent dispenser.
1. Push the button on the lid of the detergent
dispenser in the direction of the arrow until the
flap springs open.
Irritant
Bleach and
Countertop
detergent
main wash detergent chamber
or
pre-wash detergent chamber

17
Adding Rinse Aid
Rinse aid helps to ensure water does not cling and leave marks on crockery during the drying phase and
helps crockery dry faster after it has been washed. Only pour rinse aid that is for domestic dishwashers into
the reservoir. This model is designed to use liquid rinse aids only.
Please follow the steps below to pour the rinse aid into the storage reservoir, and the amount will dispense
automatically.
1. Turn the cap and open as indicated.
2. When the cap open marking is aligned, you
may lift the cap up.
3. Pour the rinse aid in until the level indicator
turns completely black in colour and close the
cap.
4. Be careful not to overfill the reservoir. Wipe up
any spills.
Adjusting the Rinse Aid Reservoir
The rinse aid reservoir has six settings. Both the recommended
setting and the factory setting is “4”. If the dishes are not drying
properly or are spotted, adjust the dial to the next higher number
until your dishes are spot-free.
• If the water hardness in your area is soft, you may not need rinse aid as it may cause white film to
develop on your dishes.
• If you decide to use a detergent tablet, you do not need to add rinse aid into the rinse aid reservoir.
• Rinse aid refill warning indicator will show on the LED display window when the reservoir is running out
of rinse aid and requires refilling.
• Alternatively, you can judge the amount of rinse aid by checking the rinse aid indicator next to the
reservoirs cap when the indicator is black, it means it is full. When it is clear, it means it is almost empty.
If there is some rinse aid residue left in the washing compartment
or your dishes, turn the rinse aid dispenser dial to 1.

18
Adding Salt
If the water in your area is hard, deposits will form on your dishes and
utensils. This appliance contains a salt reservoir for you to reduce the
hardness of the water.
Please follow the steps below to pour the salt into the salt reservoir and
it must be set to correspond to the water hardness level in your area.
1. Remove the lower basket and unscrew the reservoir cap.
2. Fill the reservoir with approximately 500ml of water (first use only).
3. Place the funnel provided over the salt reservoir.
4. Pour in approximately 1.2kg of dishwasher salt depending on the
brand used.
5. Clean any excess salt from around the reservoir opening and then
screw the cap on again firmly.
6. Run the “eco” wash programme immediately (without any crockery in
the dishwasher) to remove any traces of salt from the compartment.
• The salt refill warning indicator will illuminate when the reservoir is running out of salt and requires refilling.
• The salt refill warning indicator will cease to illuminate within a few days, depending on how quickly the salt
dissolves.
• If you decide to use a detergent tablet, you may not need to add salt, this depends upon the water hardness
in your area and the type of tablet being used. Check with your water supplier and the detergent tablet
manufacturer’s instructions.
OPEN
open
open
open

19
Loading the Dishwasher
Before Loading the Dishwasher
In general, please observe the following notes before loading your cutlery and crockery into the basket.
• Remove lipstick stains and any food residues from crockery and dishes. Rinse if necessary.
• Dishes and cutlery must not lie inside one another, or cover each other.
• Load your cutlery and crockery so that water can access all surfaces.
• Ensure all items are securely positioned.
• Hollow items such as cups, glasses, pans, etc. must be placed upside down in the basket.
• Wide based items should be placed at an angle so that water can run off them freely.
• The spray arms must not be blocked by items which are too tall or hang through the baskets. If in
doubt, test for free movement by manually rotating the spray arms.
• Ensure that small items cannot fall through the holders in the baskets.
• For safety reasons, do not operate the dishwasher without the dishwasher basket in place.
• Do not wash items soiled with ash, sand, wax, lubricating grease or paint in the dishwasher. These items can
damage the dishwasher. Ash does not dissolve and will be distributed in the dishwasher.

20
Dishwasher Basket
Please use the dishwasher basket for small and lightweight
items such as cups, saucers, glasses, dessert bowls, etc.
Long items such as soup ladles, mixing spoons and long
knives should be placed lying down across the front of the
upper basket.
Hinged Cup Rack
To make room for taller items in the dishwasher basket, raise
the cup rack upwards. You can then lean the tall glasses
against it. You can also remove it when it is not required for
use.
Raise upwards
Hinged Spikes
The spikes are used for holding plates and a platter. They can be lowered to make more room for large
items. Please refer below for the steps to open up the spikes.
Table of contents
Other Currys Essentials Dishwasher manuals

Currys Essentials
Currys Essentials CID45B13 User manual

Currys Essentials
Currys Essentials CDWTT10 User manual

Currys Essentials
Currys Essentials CDW60W10 User manual

Currys Essentials
Currys Essentials CDW60W13 User manual

Currys Essentials
Currys Essentials CID60W12 User manual

Currys Essentials
Currys Essentials CDW45W10 Service manual

Currys Essentials
Currys Essentials CDWTT11 Service manual

Currys Essentials
Currys Essentials ESSENTIALS CDW60W16 User manual

Currys Essentials
Currys Essentials CID45B10 Service manual

Currys Essentials
Currys Essentials CDWTT10 User manual