d.gen Artrix H8 User manual

OPERATOR MANUAL

TITLE
OPERATOR MANUAL
PAGE
PRINTERS
ARTRIX H8
2
VERSION
2017SEP01/1
OUT OF
REVISED BY
MUNOZ, ANTONIO
77
FOR THE USER
d·gen, Inc. - COMPANY PRIVATE (LEVEL 1)
NOT TO BE DISCLOSED TO UNAUTHORIZED PERSONS – PROHIBIDA SU DIVULGACIÓN A PERSONAS NO AUTORIZADAS
DO NOT REPRODUCE WITHOUT AUTHORIZATION – NO REPRODUCIR SIN AUTORIZACIÓN
INDEX.
1. Important Safety Instructions ……………………………………………………………………………….
2. Notes on Usage and Storage ……………………………………………...………………………………..
3. Presenting the printer ………………………………………………………………………………………..
4. Turning ON and OFF the printer ……………………………………………………………..…………......
5. Loading ink ……………………………………………………………………………………………………
6. Loading the media for non-knitted fabrics ………………………………………………………………….
7. Loading the media for knitted fabrics ……………………………………………………………………….
8. Using the take-up unit ………………………………………………………………………………………..
9. Using the dryer …..………………………..………………………………………….……..……………….
10. Using the washing unit ……………………………………………………………………………………..
11. Nozzle check test print …………..…………………………………………………………………………
12. Purge and Auto-cleaning …..……………..……………………………………………………..…………
13. Global bidirectional adjustment ………………………………………………………………….………..
14. Feed Adjustment ………………………………………………………….………………………………..
15. Problem solver ……………………………………………………………………………………………...
16. Appendix …………………………………………………………………………………………………….
3
3
5
18
20
22
36
46
52
58
61
66
69
72
73
76
THANK YOU FOR CHOOSING d·gen
✓Be sure to read this document carefully for a correct use of this printer.
✓The contents of this document are subject to change without notice.
✓Please inform us if any misprint or error is found in this document.
✓No part of this publication may be reproduced, stored in a retrieval system, or transmitted in any form
or by any means, electronic, mechanical, photocopying, recording, or otherwise, without the prior
written permission of d∙gen Inc. International.
✓The information contained herein is designed only for use with this d∙gen printer. d∙gen is not
responsible for any use of this information as applied to other printers.
✓Neither d∙gen Inc. International nor its affiliates assumes no responsibility to the purchaser of this
product or third parties for damages, losses, costs, or expenses incurred by the purchaser or third
parties as a result of accident, misuse, or abuse of this product or unauthorized modifications, repairs,
or alterations to this product, or failure to strictly comply with d∙gen Inc. International’s operating and
maintenance instructions.
✓d∙gen Inc. International shall not be liable for any damages or problems arising from the use of any
options or any consumable products other than those designated as original d∙gen products or d∙gen
approved products.
✓d∙gen Inc. International shall not be held liable for any damage resulting from electromagnetic
interference that occurs from the use of any interface cables other than those designated as original
d∙gen products or d∙gen approved products.
d∙gen Inc. International
73, Bupyeong-daero 297 beon-gil
Bupyeong-gu, Incheon 21315
Republic of Korea
Phone: (+82) 32 510 3503
Web page: www.dgen.com
TITLE
OPERATOR MANUAL
PAGE
PRINTERS
ARTRIX H8
3
VERSION
2017SEP01/1
OUT OF
REVISED BY
MUNOZ, ANTONIO
77
FOR THE USER
d·gen, Inc. - COMPANY PRIVATE (LEVEL 1)
NOT TO BE DISCLOSED TO UNAUTHORIZED PERSONS – PROHIBIDA SU DIVULGACIÓN A PERSONAS NO AUTORIZADAS
DO NOT REPRODUCE WITHOUT AUTHORIZATION – NO REPRODUCIR SIN AUTORIZACIÓN
1. IMPORTANT SAFETY INSTRUCTIONS.
When using this product.
✓Take care not to spill liquid on this product.
✓Do not attempt to service this product yourself.
✓Do not block or cover the openings in the printer.
✓Unplug this product and refer servicing to qualified service personnel under the following conditions:
The power cord or plug is damaged; liquid has entered the product; the product has been dropped or
the cabinet damaged; the product does not operate normally or exhibits a distinct change in
performance.
✓Do not move the print head by hand; otherwise you may damage this product.
When handling the ink bottles.
✓Wear protective eyewear and gloves when refilling ink tanks or replacing the waste ink bottle.
✓Keep ink packs out of the reach of children and do not drink the ink.
✓If fluid adheres to your skin, immediately wash it off using large volumes of soapy water. Consult a
physician if the skin appears irritated or is discolored.
✓If fluid enters your eyes, rinse immediately with water. Failure to observe this precaution could result in
bloodshot eyes or mild inflammation.
✓If fluid enters your mouth, consult a physician immediately.
✓If fluid is swallowed, do not force the person to vomit, and consult with a physician immediately. If the
person is forced to vomit, fluid may get caught in the trachea, which can be dangerous.
2. NOTES ON USAGE AND STORAGE.
When using the printer.
✓Keep the printer running in a stable and controlled environment under these temperature and humidity
values: 20°C ~ 25°C (68°F ~ 41°F) and 45% ~ 65% of relative humidity.
✓Be sure the operating conditions suit the media. For more information, see the documentation supplied
with the media.
✓Also, when operating in dry areas, air-conditioned environment, or under direct sunlight, maintain the
appropriate humidity.
✓Do not bend or tug the waste ink tube. Ink could spill inside or around the printer.
✓Avoid using the printer in locations with heat sources or locations that are exposed to direct drafts from
ventilators or air conditioners. The print head nozzles could dry out and clog.
✓When the power is on, do not remove the power plug or cut the power at the breaker. The carriage may
not be capped properly. In this case, turn on the power and wait until capping is performed
automatically.
✓Be sure that the waste ink bottle is installed whenever the printer is on.

TITLE
OPERATOR MANUAL
PAGE
PRINTERS
ARTRIX H8
4
VERSION
2017SEP01/1
OUT OF
REVISED BY
MUNOZ, ANTONIO
77
FOR THE USER
d·gen, Inc. - COMPANY PRIVATE (LEVEL 1)
NOT TO BE DISCLOSED TO UNAUTHORIZED PERSONS – PROHIBIDA SU DIVULGACIÓN A PERSONAS NO AUTORIZADAS
DO NOT REPRODUCE WITHOUT AUTHORIZATION – NO REPRODUCIR SIN AUTORIZACIÓN
When not using the printer.
✓If you do not print for a long time, the print head nozzles may become clogged. Turn the printer on at
least once a week to prevent the print head clogging.
✓Leaving the printer for too long without turning it on may result in a malfunction. Repair work for such
malfunction will be charged.
✓If you will not be using the printer for more than 2 weeks, maintenance must be performed by a service
engineer before and after this period. This maintenance work will be charged.
✓Note that even if proper maintenance has been done before a long period of non-use, repair may be
necessary when doing maintenance for reusing the printer, depending on the period and conditions of
storage. In such a case, the repair work will also be charged. Contact your local dealer or
[email protected] for more information.
✓The media may also become wavy or curled, causing jams or resulting in the media coming into contact
with the print head. Remove the media before storing the printer.
✓Store the printer after confirming that the print head has been capped. If the print head is left uncapped
for a long time, the print quality may decline.
✓Close all covers before placing the printer in storage. If you are not using the printer for a long time, put
the gray anti-static cover (provided with the printer) on the printer to prevent dust build-up. The print
head nozzles are very small, and they can become clogged easily if fine dust gets on the print head,
and you may not be able to print properly.
✓If you have not used the printer for a long time, check the print head for clogging before you start
printing. Perform head cleaning if the print head is clogged.
✓When storing the printer, be sure that it is level: do not store it on an angle, on end, or upside down.
When handling the ink bottles.
✓Store the ink bottles at room temperature out of direct sunlight.
✓To ensure print quality, use all the ink in the ink bottle before the expiry date. (One year after the
manufacture date).
✓If the ink bottle has been stored in a cold location for a long period of time, keep at room temperature
for at least 24 hours before using.
✓Be sure not to leave any ink in the ink bottle after refilling the Big Ink System.
✓Refill the Big Ink System as soon as possible after opening the ink bottle.
When handling the media before printing.
✓Do not fold the media or damage the printable surface.
✓Do not touch the printable surface. Moisture and oils from your hands can affect print quality.
✓When handling media, hold it by both edges. We recommend wearing cotton gloves.
✓Keep the media dry.
✓Packaging materials can be used to store media and should not be thrown away.
✓Avoid locations that are subject to direct sunlight, excessive heat, or humidity.
✓When not in use, media should be removed from the printer, rewound, and inserted in its original
packaging for storage. Leaving media in the printer for extended periods may cause it to deteriorate.
When handling the media just after being printed.
✓Do not rub or scratch the printed surface. If it is rubbed or scratched, the ink may peel off.
✓Do not touch the printed surface, as this may remove the ink.
✓Make sure printouts are completely dry before folding or stacking, as otherwise discoloration or other
marks may appear where the prints touch. These marks will disappear if the prints are immediately
separated and dried but will become permanent if the surfaces are not separated.
✓Avoid direct sunlight.
✓To prevent discoloration, display and store prints as instructed in the documentation supplied with the
media.

TITLE
OPERATOR MANUAL
PAGE
PRINTERS
ARTRIX H8
5
VERSION
2017SEP01/1
OUT OF
REVISED BY
MUNOZ, ANTONIO
77
FOR THE USER
d·gen, Inc. - COMPANY PRIVATE (LEVEL 1)
NOT TO BE DISCLOSED TO UNAUTHORIZED PERSONS – PROHIBIDA SU DIVULGACIÓN A PERSONAS NO AUTORIZADAS
DO NOT REPRODUCE WITHOUT AUTHORIZATION – NO REPRODUCIR SIN AUTORIZACIÓN
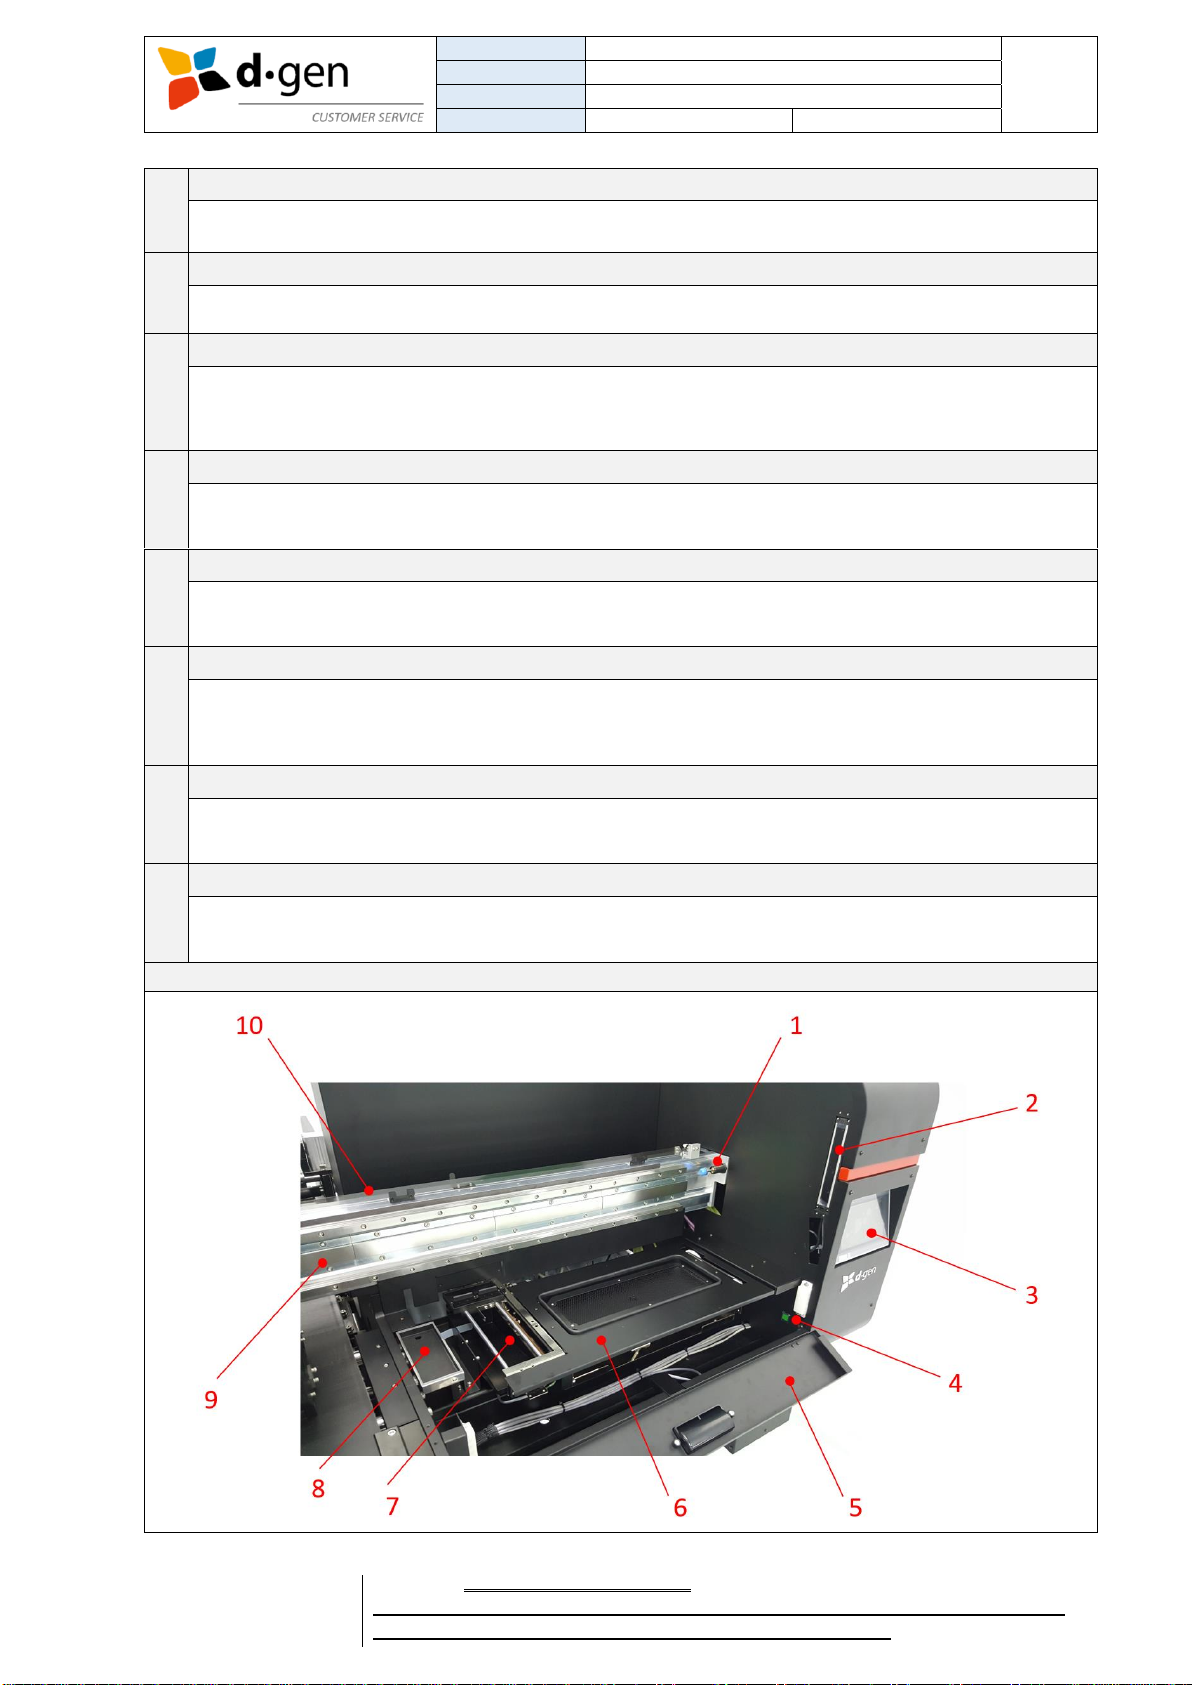
3. PRESENTING THE PRINTER.
FRONT (RIGHT VIEW)
1
Front free roller.
The printed fabric goes over it towards the drying unit. Its function is to detach the fabric from the
sticky belt.
2
Magnetic LM block and 720dpi encoder strip.
Do not use metal elements near this device. Clean the magnetic rail only with alcohol. The encoder
strip with warm distilled water.
3
Carriage.
Equipped with 8 Ricoh Gen 5 print heads staggered in 2 lines. (2 colors per print head).
4
Touch Operating Panel.
Running on version 8. The manual comes separately.
5
Ink supply system.
Equipped with 8 PALL® ink filters and 8 ink solenoid valves. Make sure the ink filters are always free
of air.
6
Emergency push switch button.
This printer has a total of 4 emergency buttons. 2 more at the back side.
7
Printer’s water outlet.
To be linked with the drain pump. Used when cleaning the washing unit.

TITLE
OPERATOR MANUAL
PAGE
PRINTERS
ARTRIX H8
6
VERSION
2017SEP01/1
OUT OF
REVISED BY
MUNOZ, ANTONIO
77
FOR THE USER
d·gen, Inc. - COMPANY PRIVATE (LEVEL 1)
NOT TO BE DISCLOSED TO UNAUTHORIZED PERSONS – PROHIBIDA SU DIVULGACIÓN A PERSONAS NO AUTORIZADAS
DO NOT REPRODUCE WITHOUT AUTHORIZATION – NO REPRODUCIR SIN AUTORIZACIÓN
8
Water inlet.
Connected to the site’s water supply. Used for providing the washing unit with clean water.
9
Conveyor washing unit.
Equipped with one brush roller. Can be raised or lowered through the touch panel or by hand.
10
Washing unit’s water outlet.
To drain all the residues when maintaining the washing unit.
11
Conveyor (sticky belt).
Sticky belt designed for transporting knitted and elastic fabrics under the carriage for printing without
feeding banding issues.
12
Emergency laser sensor.
Designed to bring the machine into an emergency stop when intercepting the beam between the 2
sensors.
FRONT (LEFT VIEW)
1
Feeding servo motor.
To move the conveyor forward or backwards. To be serviced only by a d∙gen qualified technician.
2
Emergency laser sensor.
Designed to bring the machine into an emergency stop when intercepting the beam between the 2
sensors.
3
Pneumatic cylinder.
To move up/down the washing unit’s tank, brush and wipers. To be serviced only by a d∙gen
qualified technician.
4
Washing unit’s water outlet.
To drain all the residues when maintaining the washing unit.

TITLE
OPERATOR MANUAL
PAGE
PRINTERS
ARTRIX H8
7
VERSION
2017SEP01/1
OUT OF
REVISED BY
MUNOZ, ANTONIO
77
FOR THE USER
d·gen, Inc. - COMPANY PRIVATE (LEVEL 1)
NOT TO BE DISCLOSED TO UNAUTHORIZED PERSONS – PROHIBIDA SU DIVULGACIÓN A PERSONAS NO AUTORIZADAS
DO NOT REPRODUCE WITHOUT AUTHORIZATION – NO REPRODUCIR SIN AUTORIZACIÓN
5
Inductive motor and reducer.
To turn the brush roller when cleaning the conveyor. To be serviced only by a d∙gen qualified
technician.
6
Electric cabinet.
Equipped with high voltage electric components such us breakers, servo driver units and inverters.
To be serviced only by a d∙gen qualified technician.
7
Emergency push switch button.
This printer has a total of 4 emergency buttons. 2 more at the back side.
CARRIAGE
1
Solenoid valves.
The solenoid valve is opened if the LED is turned on. Having the solenoid valve opened allows free
circulation of negative air pressure between the vacuum pump and the head. Making the heads to
bleed for long purging is possible by closing the solenoid valve (LED switched off) right after the purge
button is pressed in the touch panel.
2
Emergency laser sensor.
Designed to bring the machine into an emergency stop when intercepting the beam between the 2
sensors.
3
Touch Operating Panel.
Running on version 8. The manual comes separately.
4
Print head service hoses.
Use the provided syringe to suck out the air in the print heads. Never use the syringe to flush the
print heads. Risk of voiding the warranty.
TITLE
OPERATOR MANUAL
PAGE
PRINTERS
ARTRIX H8
8
VERSION
2017SEP01/1
OUT OF
REVISED BY
MUNOZ, ANTONIO
77
FOR THE USER
d·gen, Inc. - COMPANY PRIVATE (LEVEL 1)
NOT TO BE DISCLOSED TO UNAUTHORIZED PERSONS – PROHIBIDA SU DIVULGACIÓN A PERSONAS NO AUTORIZADAS
DO NOT REPRODUCE WITHOUT AUTHORIZATION – NO REPRODUCIR SIN AUTORIZACIÓN
5
Maintenance cover.
Used when cleaning the printer and switching on the PC control box.
6
Emergency push switch button.
This printer has a total of 4 emergency buttons. 2 more at the back side.
7
Automated capping station.
Moved up/down by a stepping motor. Use this capping station to cap the print heads always when not
printing. Bring down the capping station by pushing the left arrow in the touch panel. Raise the capping
station by pushing the home button in the touch panel.
8
Media width sensor.
Push the media width button in the touch panel to measure the media’s width every time after setting
a different media.
9
Automated wiper unit.
If user executes Auto cleaning, this wiper will work automatically. To increase the wiper’s performance,
remove ink residue on wiper periodically.
10
Flushing stage.
The flushing unit is used to keep the print heads unclogged. Every time the carriage leaves the home
position for printing right to left, the heads flush a very small quantity of ink in order to keep the nozzles
always unclogged.
11
Carriage height adjustment lever.
This lever regulates the carriage height in 3 positions. Low, medium and high. Depending the
thickness of the media. There is a difference of 1 mm between positions.
12
Magnetic LM block and 720dpi encoder strip.
Do not use metal elements near this device. Clean the magnetic rail only with alcohol. The encoder
strip with warm distilled water.
CARRIAGE
TITLE
OPERATOR MANUAL
PAGE
PRINTERS
ARTRIX H8
9
VERSION
2017SEP01/1
OUT OF
REVISED BY
MUNOZ, ANTONIO
77
FOR THE USER
d·gen, Inc. - COMPANY PRIVATE (LEVEL 1)
NOT TO BE DISCLOSED TO UNAUTHORIZED PERSONS – PROHIBIDA SU DIVULGACIÓN A PERSONAS NO AUTORIZADAS
DO NOT REPRODUCE WITHOUT AUTHORIZATION – NO REPRODUCIR SIN AUTORIZACIÓN
1
Right stopper.
This machine is equipped with 2 side stoppers to prevent the carriage damaging the side limit
sensors.
2
Emergency laser sensor.
Designed to bring the machine into an emergency stop when intercepting the beam between the 2
sensors.
3
Touch Operating Panel.
Running on version 8. The manual comes separately.
4
PC control box’s main switch.
To turn ON/OFF the software side of the printer.
5
Maintenance cover.
Used when cleaning the printer and switching on the PC control box.
6
Automated capping station.
Moved up/down by a stepping motor. Use this capping station to cap the print heads always when not
printing. Bring down the capping station by pushing the left arrow in the touch panel. Raise the capping
station by pushing the home button in the touch panel.
7
Automated wiper unit.
If user executes Auto cleaning, this wiper will work automatically. To increase the wiper’s performance,
remove ink residue on wiper periodically.
8
Flushing stage.
The flushing unit is used to keep the print heads unclogged. Every time the carriage leaves the home
position for printing right to left, the heads flush a very small quantity of ink in order to keep the nozzles
always unclogged.
9
Magnetic LM block.
Do not use metal elements near this device. Clean the magnetic rail only with alcohol.
10
720dpi encoder strip.
Clean periodically the encoder strip with warm distilled water.
TITLE
OPERATOR MANUAL
PAGE
PRINTERS
ARTRIX H8
10
VERSION
2017SEP01/1
OUT OF
REVISED BY
MUNOZ, ANTONIO
77
FOR THE USER
d·gen, Inc. - COMPANY PRIVATE (LEVEL 1)
NOT TO BE DISCLOSED TO UNAUTHORIZED PERSONS – PROHIBIDA SU DIVULGACIÓN A PERSONAS NO AUTORIZADAS
DO NOT REPRODUCE WITHOUT AUTHORIZATION – NO REPRODUCIR SIN AUTORIZACIÓN
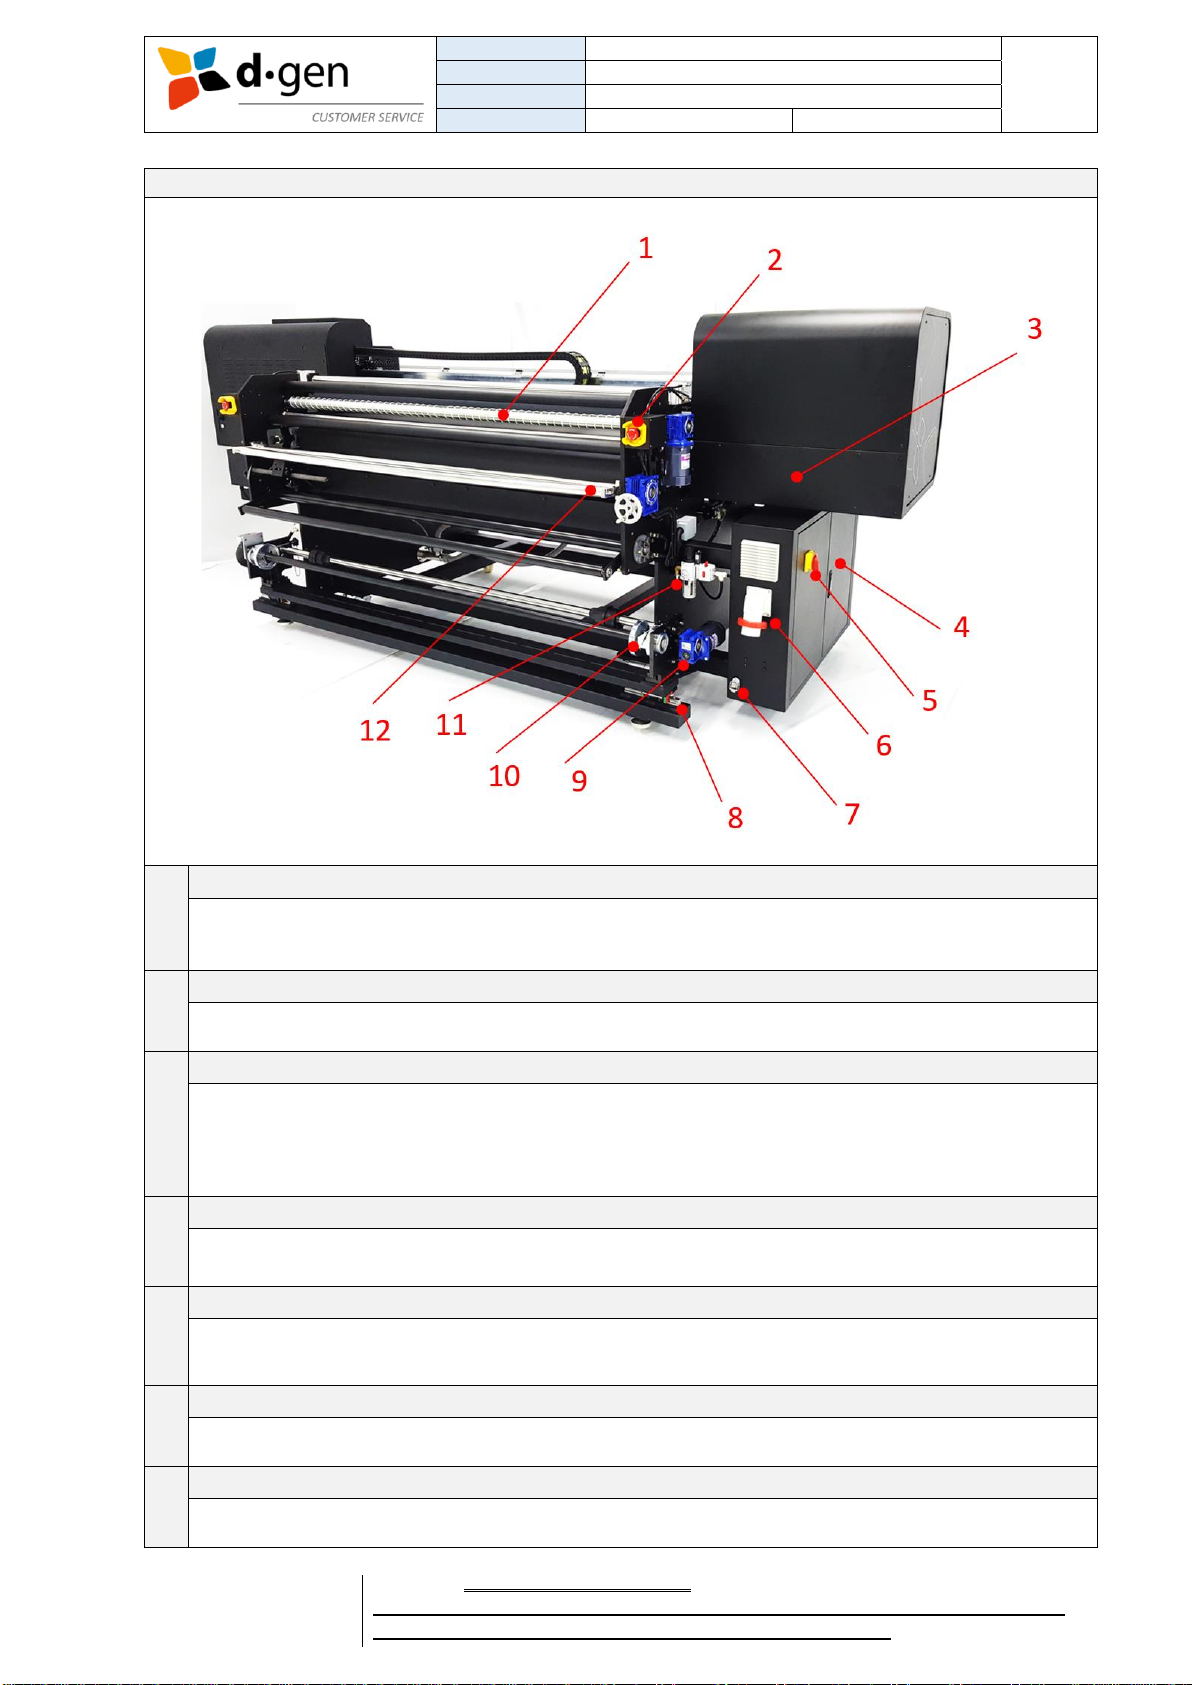
REAR (RIGHT VIEW)
1
Extender roller.
Used when printing on knitted/elastic fabrics to extended the fabric toward the edges and eliminate
wrinkles. Turn on/off the roller in the touch panel.
2
Emergency push switch button.
This printer has a total of 4 emergency buttons. 2 more at the front.
3
Negative/Positive pressure system.
Behind this cover there are a series of pumps and valves to create enough negative pressure in the
heads for stable printing or enough positive pressure to purge the heads for cleaning its nozzles.
When printing, is normal to hear the pump functioning. Cover normally closed when using the printer.
To be serviced only by a d∙gen qualified technician.
4
Electric cabinet.
Equipped with high voltage electric components such us breakers, servo driver units and inverters.
To be serviced only by a d∙gen qualified technician.
5
Electric cabinet’s main ON/OFF switch.
Equipped with a 3-phase interrupter. Used when servicing the printer or when leaving it stopped for
a long period of time.
6
32A 3-phase power supply inlet.
To be connected to the site’s power supply socket. 3Ø+N+PE AC 380 V (32A).
7
4-pin connector.
To be linked with the drain motor. The drain motor can be operated from the touch panel.

TITLE
OPERATOR MANUAL
PAGE
PRINTERS
ARTRIX H8
11
VERSION
2017SEP01/1
OUT OF
REVISED BY
MUNOZ, ANTONIO
77
FOR THE USER
d·gen, Inc. - COMPANY PRIVATE (LEVEL 1)
NOT TO BE DISCLOSED TO UNAUTHORIZED PERSONS – PROHIBIDA SU DIVULGACIÓN A PERSONAS NO AUTORIZADAS
DO NOT REPRODUCE WITHOUT AUTHORIZATION – NO REPRODUCIR SIN AUTORIZACIÓN
8
Feeder rail.
The feeder unit moves sideways on this rail to align the fabric with the conveyor.
9
Inductive motor with reducer.
To turn the motor-type feeder when using non-knitted/non-elastic fabrics.
10
Clutch-type feeder.
To be used when printing on knitted/elastic fabrics.
11
Pneumatic system.
To be linked with the site’s compressed air supply outlet. The pneumatic system moves up/down the
washing unit, press roller and conveyor wipers. Activates as well the pneumatic clutch in the feeder.
12
Banana bar.
The purpose of this bar is to homogenize the tension in the fabric. Specially used when printing on
knitted/elastic medias. Also on fabrics with a lower tension in the edges. Possible to regulate the angle
of the bar by turning the wheel. If the tension in the edges are very uneven, it is possible to adjust the
bending angle of the bar manually.
REAR (LEFT VIEW)
1
Electric panel.
This electrical panel contains hazardous components. Risk of Electrical Shock. It is used for
maintenance purposes. Only qualified technicians can access this electric panel. Normally closed
when using the printer.
2
Emergency push switch button.
This printer has a total of 4 emergency buttons. 2 more at the front.

TITLE
OPERATOR MANUAL
PAGE
PRINTERS
ARTRIX H8
12
VERSION
2017SEP01/1
OUT OF
REVISED BY
MUNOZ, ANTONIO
77
FOR THE USER
d·gen, Inc. - COMPANY PRIVATE (LEVEL 1)
NOT TO BE DISCLOSED TO UNAUTHORIZED PERSONS – PROHIBIDA SU DIVULGACIÓN A PERSONAS NO AUTORIZADAS
DO NOT REPRODUCE WITHOUT AUTHORIZATION – NO REPRODUCIR SIN AUTORIZACIÓN
3
Banana bar.
The purpose of this bar is to homogenize the tension in the fabric. Specially used when printing on
knitted/elastic medias. Also on fabrics with a lower tension in the edges. Possible to regulate the angle
of the bar by turning the wheel. If the tension in the edges are very uneven, it is possible to adjust the
bending angle of the bar manually.
4
Dancing bar.
For applying tension on the fabric. Used only in combination with the motor type feeder when
printing on non-knitted/non-elastic fabrics.
5
FABRIC EPC (Edge Position Control) sensor
Senses the media’s edge to move the feeding unit sideways to align it with the conveyer.
6
Pneumatic clutch.
It is basically a brake system that keeps the fabric always in a proper tension. Possible to regulate the
brake depending on the media’s characteristics. The conveyor drags the media towards the front while
unwinding the media. Increase the brake power if the media is too loose.
7
Pneumatic clutch regulator.
Use this valve to regulate the brake. Increase the brake power if the media is too loose.
8
Ink supply system.
Equipped with 8 PALL® ink filters and 8 ink solenoid valves. Make sure the ink filters are always free
of air. It is connected to the bulk ink system.
9
Printer’s main ON/OFF power button and Ethernet socket.
This main switch turns OFF/ON the printer’s hardware. The Lan port is linked with the RIP station
using a Cat5 (or higher) Ethernet cable.
SIDE VIEW (LEFT)

TITLE
OPERATOR MANUAL
PAGE
PRINTERS
ARTRIX H8
13
VERSION
2017SEP01/1
OUT OF
REVISED BY
MUNOZ, ANTONIO
77
FOR THE USER
d·gen, Inc. - COMPANY PRIVATE (LEVEL 1)
NOT TO BE DISCLOSED TO UNAUTHORIZED PERSONS – PROHIBIDA SU DIVULGACIÓN A PERSONAS NO AUTORIZADAS
DO NOT REPRODUCE WITHOUT AUTHORIZATION – NO REPRODUCIR SIN AUTORIZACIÓN
1
Left side cover.
Used only for servicing the printer. Only d∙gen qualified technicians can have access to this part of
the printer.
2
Feeding servo motor.
Moves the conveyor forward or backwards. To be serviced only by a d∙gen qualified technician.
3
Inductive motor and reducer.
To turn the brush roller when cleaning the conveyor. To be serviced only by a d∙gen qualified
technician.
4
Electric cabinet.
Equipped with high voltage electric components such us breakers, servo driver units and inverters.
To be serviced only by a d∙gen qualified technician.
5
Electric cabinet’s main ON/OFF switch.
Equipped with a 3-phase interrupter. Used when servicing the printer or when leaving it stopped for
a long period of time.
6
32A 3-phase power supply inlet.
To be connected to the site’s power supply socket. 3Ø+N+PE AC 380 V (32A).
7
Feeding unit.
This unit moves sideways depending on the signal received by the EPC sensor to always keep the
media well aligned with the conveyor.
8
Dancing bar.
For applying tension on the fabric. Used only in combination with the motor type feeder when
printing on non-knitted/non-elastic fabrics.
9
Banana bar.
The purpose of this bar is to homogenize the tension in the fabric. Specially used when printing on
knitted/elastic medias. Also on fabrics with a lower tension in the edges. Possible to regulate the angle
of the bar by turning the wheel. If the tension in the edges are very uneven, it is possible to adjust the
bending angle of the bar manually.
10
Emergency push switch button.
This printer has a total of 4 emergency buttons. 2 more at the front.
11
Extender roller.
Rotated by an inductive motor with reducer. Can be switched ON/OFF in the touch panel. Normally
used when printing on knitted/elastic fabrics.

TITLE
OPERATOR MANUAL
PAGE
PRINTERS
ARTRIX H8
14
VERSION
2017SEP01/1
OUT OF
REVISED BY
MUNOZ, ANTONIO
77
FOR THE USER
d·gen, Inc. - COMPANY PRIVATE (LEVEL 1)
NOT TO BE DISCLOSED TO UNAUTHORIZED PERSONS – PROHIBIDA SU DIVULGACIÓN A PERSONAS NO AUTORIZADAS
DO NOT REPRODUCE WITHOUT AUTHORIZATION – NO REPRODUCIR SIN AUTORIZACIÓN
SIDE VIEW (RIGHT)
1
Right side cover.
Used only for servicing the printer. Only d∙gen qualified technicians can have access to this part of
the printer.
2
EPC (edge position control) sensor.
Possible to regulate the angle of the sensor to correctly sense the media’s edge at all times.
3
Pneumatic clutch.
It is basically a brake system that keeps the fabric always in a proper tension. Possible to regulate the
brake depending on the media’s characteristics. The conveyor drags the media towards the front while
unwinding the media. Increase the brake power if the media is too loose.
4
Ink solenoid valves (behind the cover).
To avoid the ink flowing backwards to the bulk ink system.
5
Printer’s water outlet.
To be linked with the drain pump. Used when cleaning the washing unit.
6
Ink filter.
Ink supply system provided with eight PALL® ink filters. Each filter has a service tube to suck out all
the undesired air in the filter. Keep always this filter free of air as part of the maintenance program.

TITLE
OPERATOR MANUAL
PAGE
PRINTERS
ARTRIX H8
15
VERSION
2017SEP01/1
OUT OF
REVISED BY
MUNOZ, ANTONIO
77
FOR THE USER
d·gen, Inc. - COMPANY PRIVATE (LEVEL 1)
NOT TO BE DISCLOSED TO UNAUTHORIZED PERSONS – PROHIBIDA SU DIVULGACIÓN A PERSONAS NO AUTORIZADAS
DO NOT REPRODUCE WITHOUT AUTHORIZATION – NO REPRODUCIR SIN AUTORIZACIÓN
BIG INK SYSTEM
1
Cover.
Buzzer can be heard if this cover is opened. Cover normally closed when using the printer.
2
Lid and ink filter.
We suggest pouring the ink on the filter. Also, is suggested not to close the lid totally to let the air
flow in while the cylinder is getting empty.
3
Cover switch.
This device activated the buzzer when the cover is opened for refilling the inks.
4
Ink level photo sensor.
This photo sensor measures the ink level with a laser beam. Keep this area always free of ink.

TITLE
OPERATOR MANUAL
PAGE
PRINTERS
ARTRIX H8
16
VERSION
2017SEP01/1
OUT OF
REVISED BY
MUNOZ, ANTONIO
77
FOR THE USER
d·gen, Inc. - COMPANY PRIVATE (LEVEL 1)
NOT TO BE DISCLOSED TO UNAUTHORIZED PERSONS – PROHIBIDA SU DIVULGACIÓN A PERSONAS NO AUTORIZADAS
DO NOT REPRODUCE WITHOUT AUTHORIZATION – NO REPRODUCIR SIN AUTORIZACIÓN
BIG INK SYSTEM (BACK SIDE)
5
White LED bar’s power and open cover buzzer connector.
One cable powers up the white LED light bar in the Big Ink System. The other cable activates a
buzzer in the ink supply system when opening the bulk’s cover.
6
Ink outlets.
By pushing down the silver fastening is possible to release or insert the ink line without spilling ink.
7
Sensor level connector (K C M Y inks).
This connector sends the signal from the photo-sensors located in the Big Ink System (to measure
the ink level in the cylinder) to the LED ink level indicators.
8
Sensor level connector (spot colors 1, 2, 3 and 4 inks).
This connector sends the signal from the photo-sensors located in the Big Ink System (to measure
the ink level in the cylinder) to the LED ink level indicators.
Important
Keep always the ink level’s photo sensor emitter and reflector free of ink and dust.

TITLE
OPERATOR MANUAL
PAGE
PRINTERS
ARTRIX H8
17
VERSION
2017SEP01/1
OUT OF
REVISED BY
MUNOZ, ANTONIO
77
FOR THE USER
d·gen, Inc. - COMPANY PRIVATE (LEVEL 1)
NOT TO BE DISCLOSED TO UNAUTHORIZED PERSONS – PROHIBIDA SU DIVULGACIÓN A PERSONAS NO AUTORIZADAS
DO NOT REPRODUCE WITHOUT AUTHORIZATION – NO REPRODUCIR SIN AUTORIZACIÓN
SAFETY DEVICES
1
Emergency push type switch for the printer.
Two at the front on each side. Pushing one of the switches will bring a total stop the carriage and other
moving elements.
2
Emergency laser sensor.
Designed to bring the machine into an emergency stop when intercepting the beam between the 2
sensors.
Note
In case the printer exceeds its operation limits such as over-speed, operational temperature, etc., the
operator may use the emergency switches to bring the printer into an emergency stop.
Note
In case one of the safety devices is broken we strongly recommend the user to replace it with the help of
a qualified technician.
TITLE
OPERATOR MANUAL
PAGE
PRINTERS
ARTRIX H8
18
VERSION
2017SEP01/1
OUT OF
REVISED BY
MUNOZ, ANTONIO
77
FOR THE USER
d·gen, Inc. - COMPANY PRIVATE (LEVEL 1)
NOT TO BE DISCLOSED TO UNAUTHORIZED PERSONS – PROHIBIDA SU DIVULGACIÓN A PERSONAS NO AUTORIZADAS
DO NOT REPRODUCE WITHOUT AUTHORIZATION – NO REPRODUCIR SIN AUTORIZACIÓN
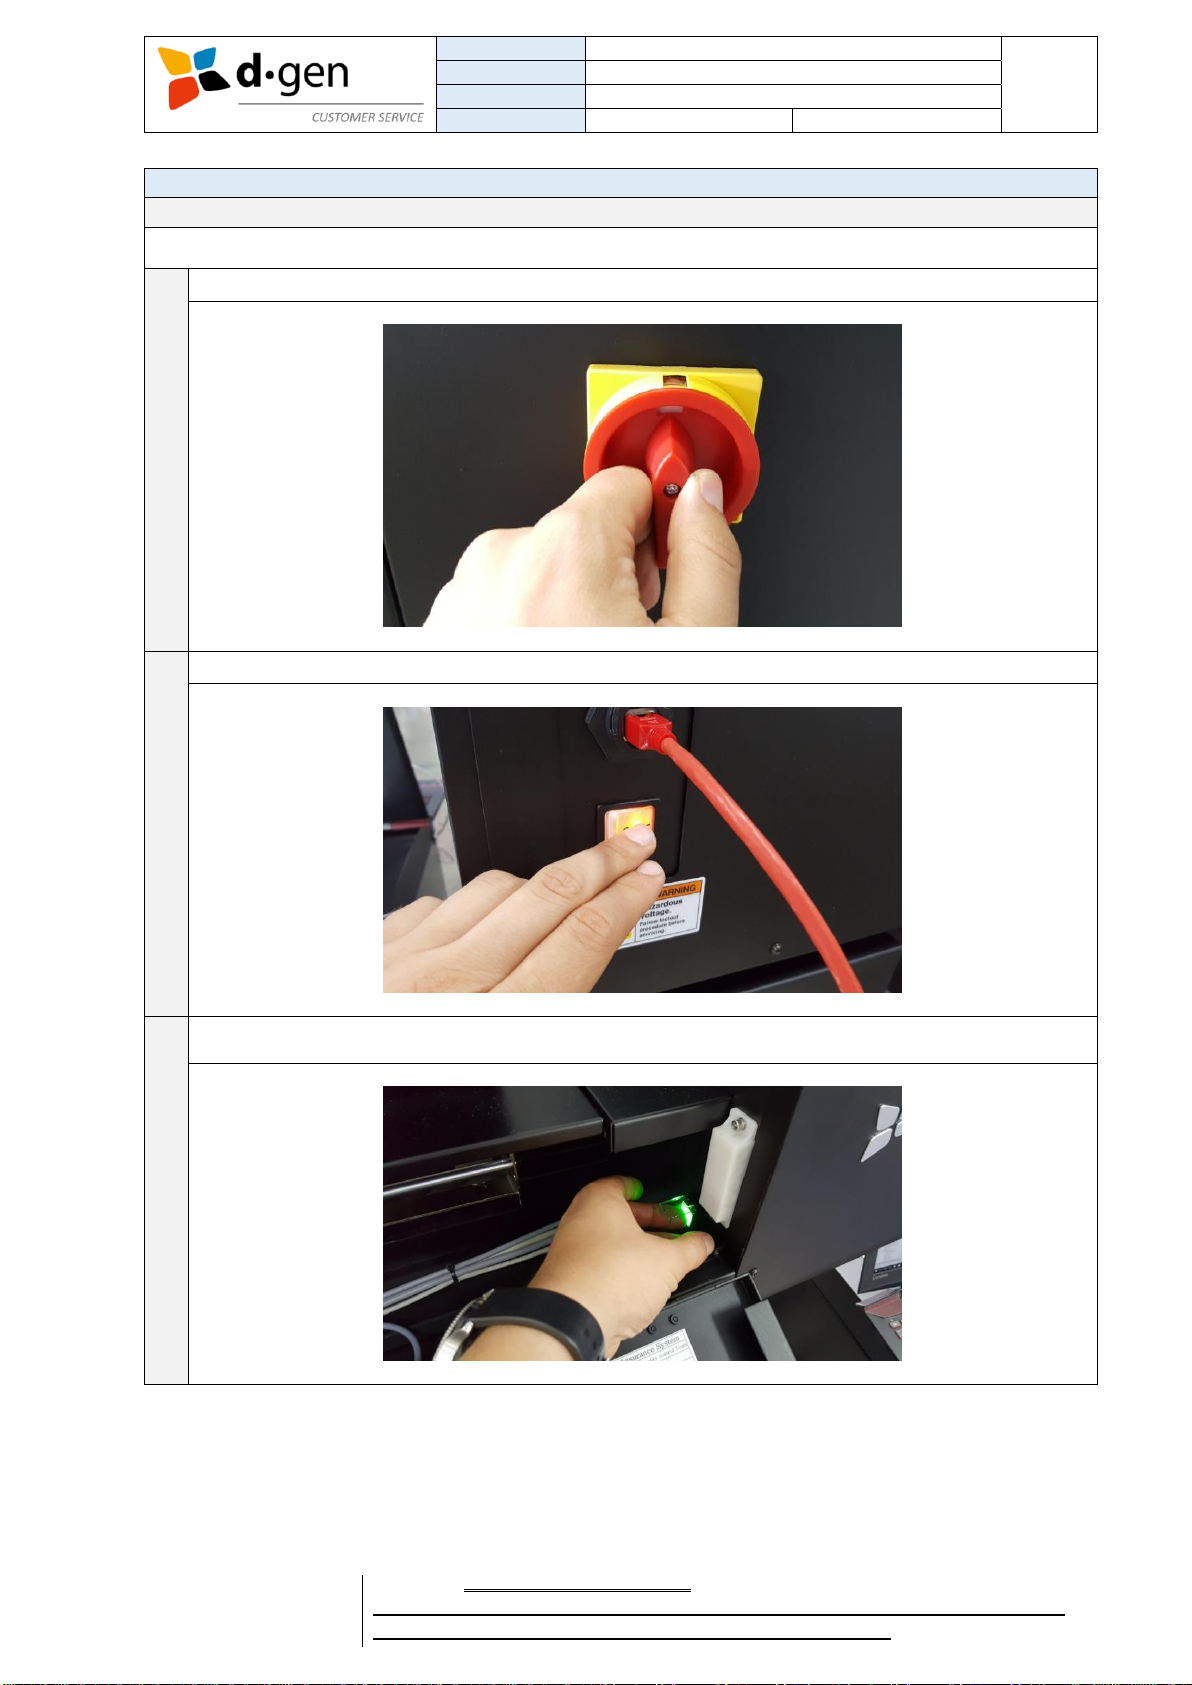
4. TURNING ON AND OFF THE PRINTER.
Turning ON the printer.
The operator must follow the following steps to correctly turn ON the printer.
1
Turn on the printer by turning the main ON/OFF switch located at the side electric cabinet.
2
Turn on the printer’s hardware by pressing the ON/OFF switch located at the back of the printer.
3
Turn on the printer’s software by pressing the ON/OFF switch located right behind the maintenance
cover.

TITLE
OPERATOR MANUAL
PAGE
PRINTERS
ARTRIX H8
19
VERSION
2017SEP01/1
OUT OF
REVISED BY
MUNOZ, ANTONIO
77
FOR THE USER
d·gen, Inc. - COMPANY PRIVATE (LEVEL 1)
NOT TO BE DISCLOSED TO UNAUTHORIZED PERSONS – PROHIBIDA SU DIVULGACIÓN A PERSONAS NO AUTORIZADAS
DO NOT REPRODUCE WITHOUT AUTHORIZATION – NO REPRODUCIR SIN AUTORIZACIÓN
4
Wait for the touch panel to display “Jetting”.
Turning OFF the printer.
The operator must follow the following steps to correctly turn OFF the printer.
1. Turn off the printer’s software by pressing the green switch located at the back of the maintenance
cover.
2. After hearing a beep, turn off the printer’s hardware by pressing the ON/OFF switch located at the
back of the printer.
3. Turn off the printer by turning the main ON/OFF switch located at the side electric cabinet.
TITLE
OPERATOR MANUAL
PAGE
PRINTERS
ARTRIX H8
20
VERSION
2017SEP01/1
OUT OF
REVISED BY
MUNOZ, ANTONIO
77
FOR THE USER
d·gen, Inc. - COMPANY PRIVATE (LEVEL 1)
NOT TO BE DISCLOSED TO UNAUTHORIZED PERSONS – PROHIBIDA SU DIVULGACIÓN A PERSONAS NO AUTORIZADAS
DO NOT REPRODUCE WITHOUT AUTHORIZATION – NO REPRODUCIR SIN AUTORIZACIÓN
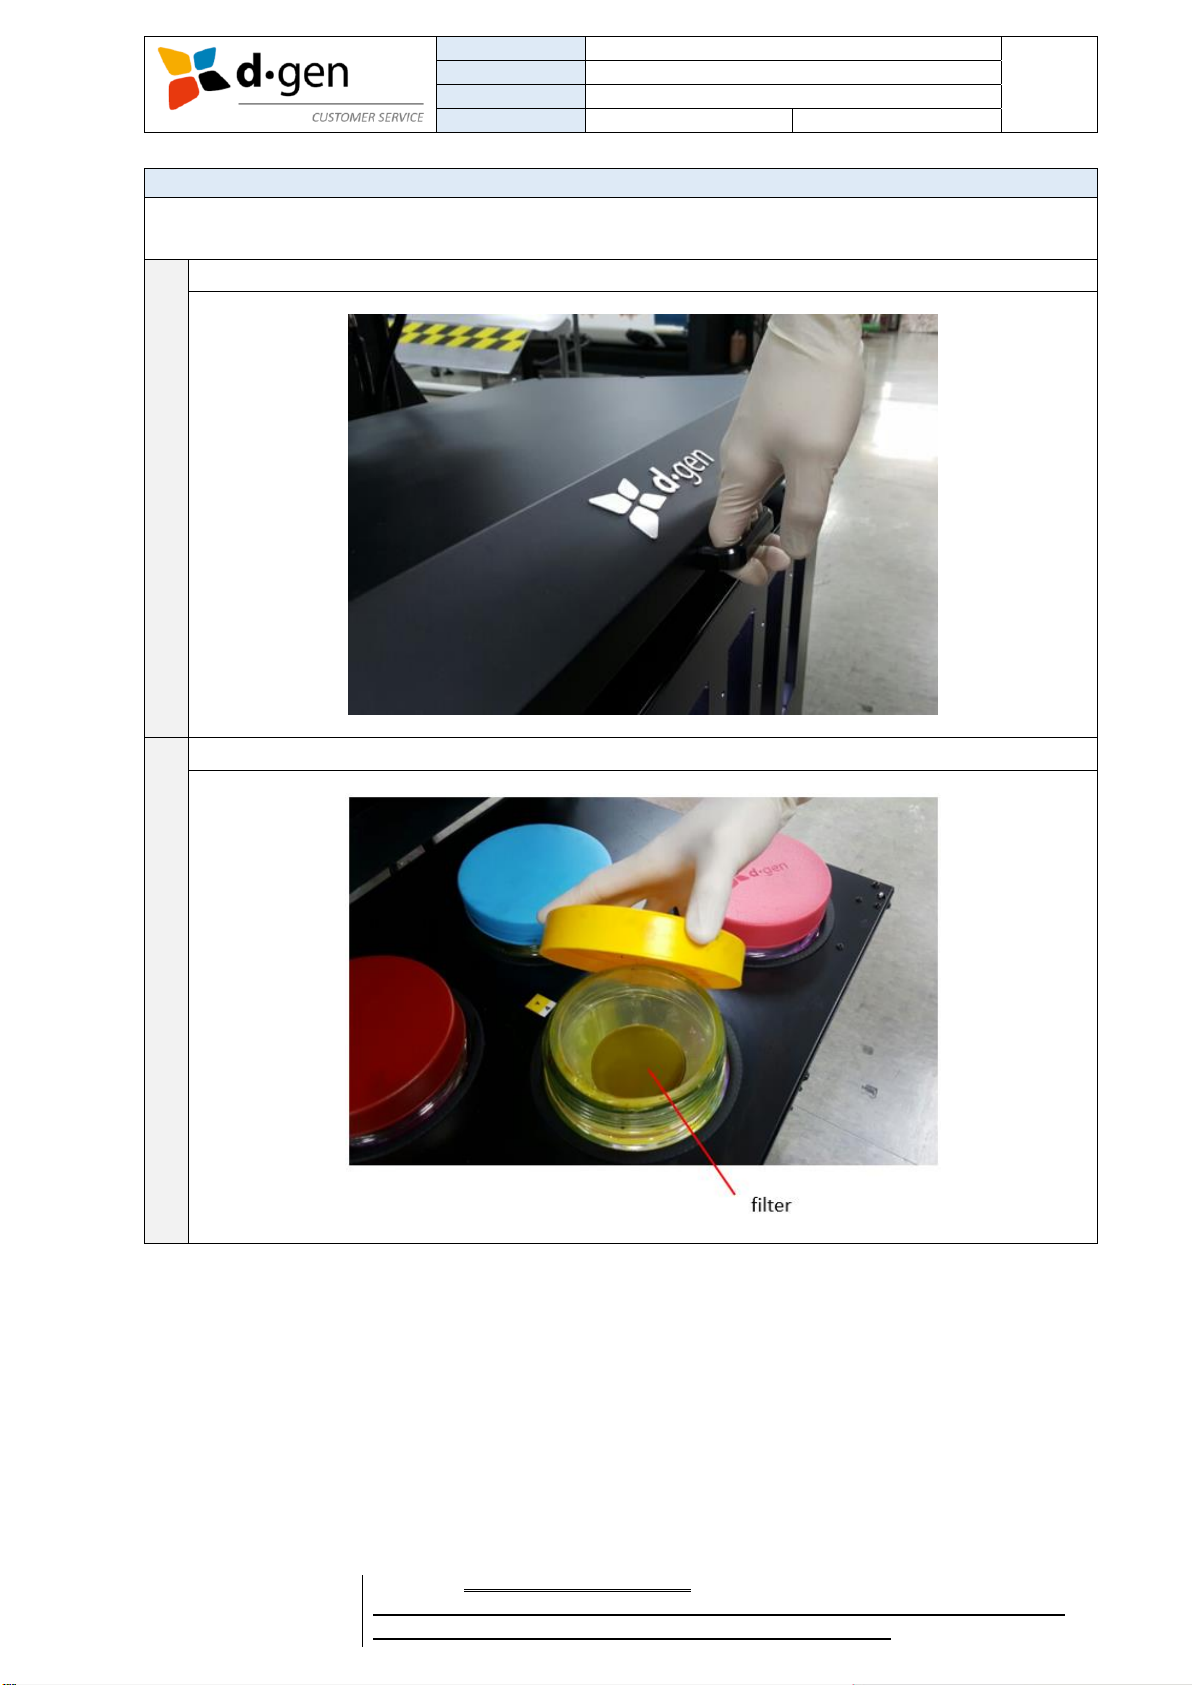
5. LOADING INK.
The operator must follow the following steps to correctly load with ink the Big Ink System.
1
Open the Big Ink System’s cover. Buzzer will be activated.
2
Open the lid. Make sure the filter is present and correctly positioned.
Table of contents
Other d.gen Printer manuals


