D-Link DSB-C320 User manual

1
D-Link VisualStream™
330K Pixel PC Camera
Manual
Ver. 3.00
Building Networks for People
RECYCLABLE

2
C
Co
on
nt
te
en
nt
ts
s
Package Contents…………………………………………………………………...3
Introduction………………………………………………………………………......3
Getting to Know Your VisualStream™ PC Camera…………………………….…...4
Features and Benefits…………………………………………………………..……..4
How to Use Your D-Link VisualStream™ Camera………….…………..…….…4
How to Install MSN Messenger…………………………………………….……..…5
Using Your PC Camera with MSN Messenger……………………………………....5
How to Install and Use CrazyTalk Cam Suite Software…………………………6
Using the Avatar……………………………………………………………………...7
How to Use Snapshot………………………………………………………………...9
How to Use Record…………………………………………………………………..9
Gallery………………………………………………………………………………10
Setting an Avatar…………………………………………………………………….10
Importing an Avatar…………………………………………………………………12
Selecting an Emotion..................................................................................................13
Importing an Emotion.................................................................................................14
Getting More Expressions……………………………………………………....…...16
Selecting a Comic Effect…………………………………………………………….17
Getting More Comic Effects………………………………………………………....17
Monitor.........................................................................................................................18
Audio Control…………………………………………………………………………20
Performance…………………………………………………………………………..21
Camera Settings………………………………………………………………………22
Setting Devices……………………………………………………………………….22

3
P
Pa
ac
ck
ka
ag
ge
e
C
Co
on
nt
te
en
nt
ts
s
Contents of Package
zD-Link DSB-C320 330K Pixel PC Camera
zUSB 1.1 Cable
zCD-ROM (containing Drivers, Installation Guide, Manual, Application Software and
Warranty)
zD-Link Quick Installation Guide
If any of the above items are missing, please contact your reseller.
System Requirements
zPentium III 500 MHz, Celeron, AMD Athlon processor, or higher
z64MB RAM (or minimum OS requirement whichever is higher)
zMicrosoft Windows Vista/XP/2000/98/ME
zMicrosoft DirectX 9.0 or higher
zUpdate Service Pack
z200MB free hard drive space
zCD-ROM drive
zUSB Port (USB specification version 1.1)
z24Bit color display adapter
zWindows compatible sound card and speakers (full duplex sound card recommended)
Introduction
The DSB-C320 PC Camera is a complete audiovisual solution for all of your e-communications.
Talk to your family, friends, and colleagues face-to-face over the Internet, create videos, digital
photo albums, and more, all the software needed to start creating digital content and enabling video
communication is included. This manual will guide you through the features of your new PC
Camera and provides step by step instructions for getting you started with the bundled CrazyTalk
Cam Suite Software.

4
Getting To Know Your VisualStream™ PC Camera
Features and Benefits
zResolution 648x480 Pixels
zSnapshot Button For Easy Still Image Capture
zVersatile Clip Base Design For Notebook and Desktop PC
zCrazyTalk Cam Suite Software Included
How to Use Your D-Link VisualStream™ Camera
zAfter installing the DSB-C320 driver into your computer, open up the AMCap.exe program in
your startup menu.

5
zScroll on the Options button located in the startup toolbar and click Video Capture Filter.
Once opened, click on the Stream Property tab.
zChoose the mode of “50Hz” or “60Hz” according to your power source environment or video
output signal system to avoid the blurry image.
zManually turn the focus ring to adjust the image.
zPress the snapshot button to capture a single frame.
How to Install MSN Messenger
Note: The DSB-C120 is compatible with most instant messenger applications, however,
these segments are an example for your reference.
Please log on to http://messenger.msn.com to download.
Using Your PC Camera with MSN Messenger
For Windows 98Second Edition/Me/2000 Users
zPlug the PC camera into your PC using the USB cord.
zClick Messenger to go to the main screen. You are now ready to have a video conversation
with MSN Messenger.
For Windows XP Users
zPlug the PC camera into your PC using the USB cord.
zClick Messenger to go to the main screen, click Actions, click Start a Video Conversation
and you are ready to have a Video Conversation with Messenger.
zIf you need more information or instructions on how to use a specific feature or tool, click the
“Help” button in the upper right-hand corner of the screen.
Click OK
AMCap > Options > Video Capture Filter

6
How to Install CrazyTalk Cam Suite Software
zInsert the provided D-Link CD-ROM into your CD drive. Setup will automatically begin,
prompting you through the steps to install your video and photo software.
zYou may enter the selection for the destination folder, the Start menu, Programs group and
other setup options. The setup process will copy the applications to the destination folder.
Note: If Windows auto-run feature has been turned off on your computer, you will need
to start the Setup.exe application on the software CD.
How to use CrazyTalk Cam Suite Software
CrazyTalk Cam Suite is an animated messaging tool that features customizable emotive facial
animations to provide a fun alternative for conventional video chatting on instant-messaging
applications.
Click Install Craz
y
Talk Cam Suite

7
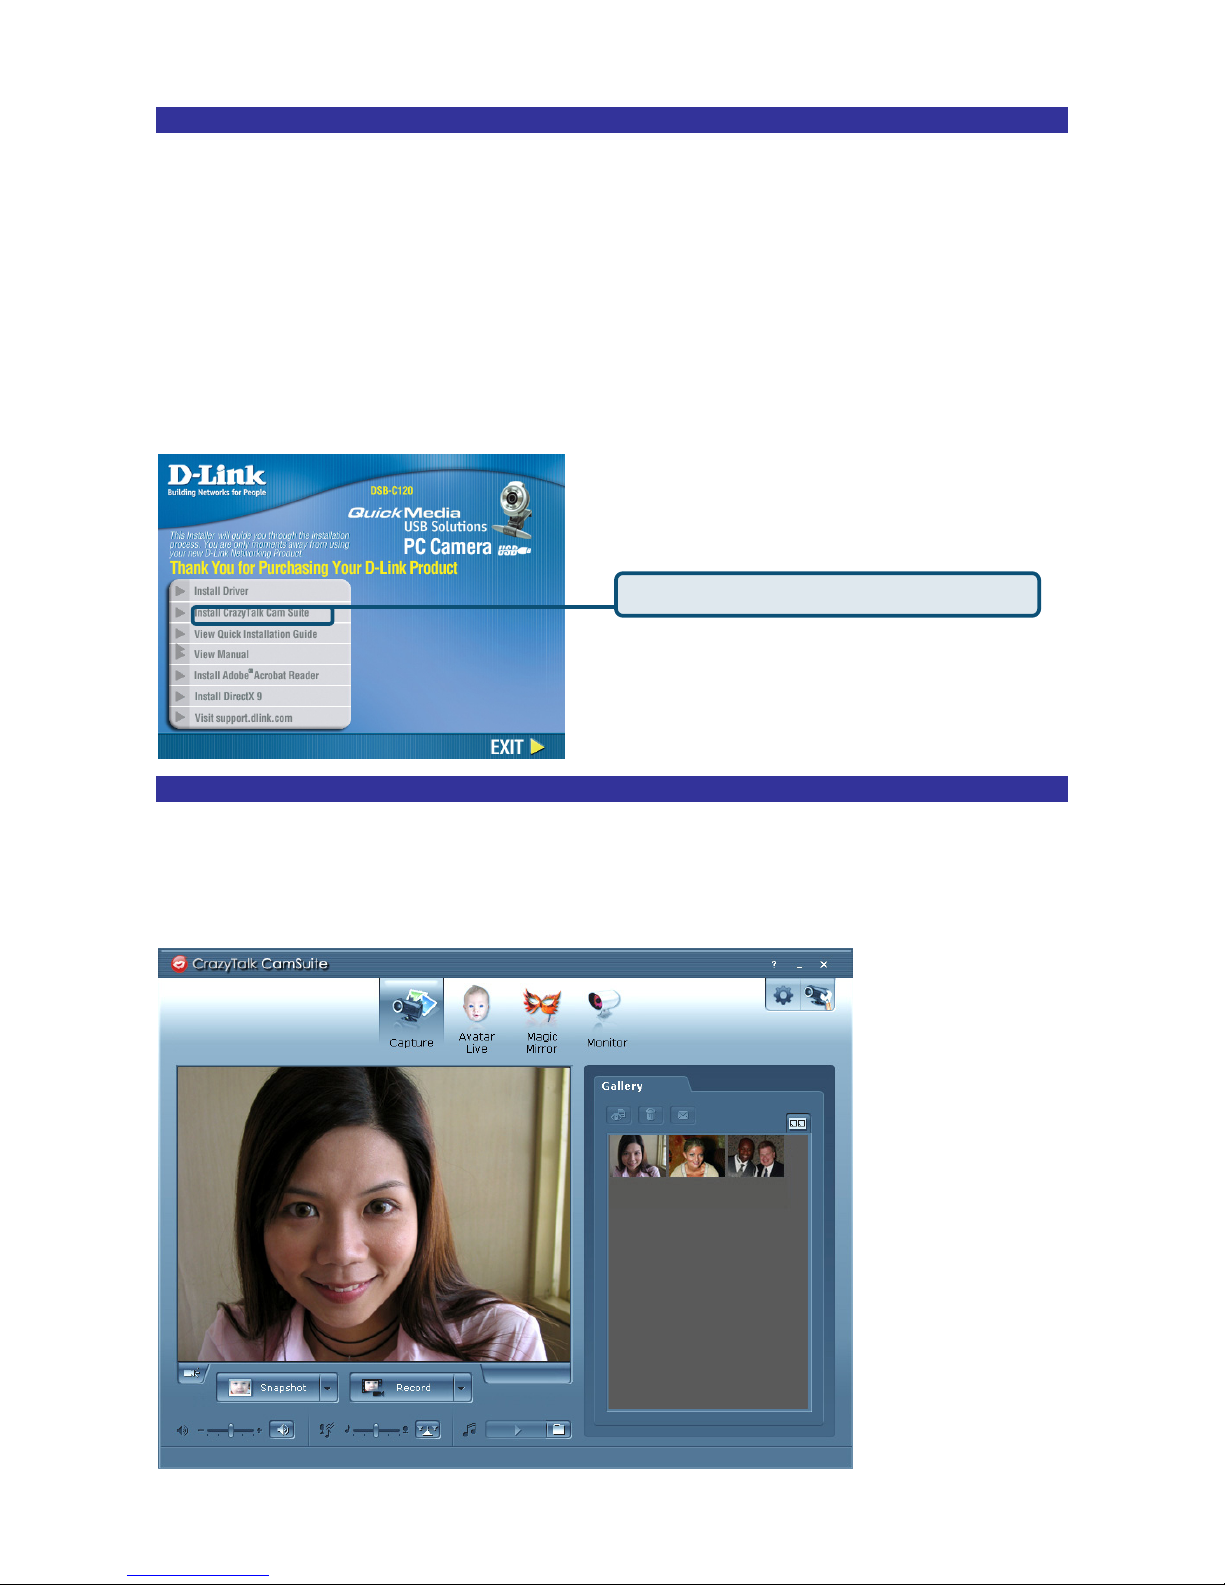
Refer to the following steps to quickly start using Cam Suite in your instant-messaging video
conference. For more details on how to use each feature of Cam Suite, refer to the latter segments
of this manual or our online help.
zIf you have an instant-messaging application installed on your OS, please manually change the
audio/video devices.
zIn the program’s Capture mode, you may click the Snapshot or Record button to capture and
share images or record videos of yourself from your webcam.
Using the Avatar
zYou may apply the features in the Avatar Live tab.
zCheck the Avatar checkbox to switch from Real Camera mode to Avatar mode. It also
enables any Avatar or Emotion to be applied. Check the Avatar window and select an avatar
icon. You will see your selected icon appear in the preview window.
Avatar shows the default avatar icons provided by Cam Suite as well as any that are imported.
Click to select an icon, which will be displayed in the preview window. If you are in a video
session, your partner will be able to see the icon and the animation – even if your partner does
not have Cam Suite installed on their messenger service.
zClick an emotion icon to preview the avatar video. You can also initiate a video call, and see
the avatar video display in your messenger video window.
zClick to select an emotion from the Emotion tab.
Emotions offer a wide range of emotive expressions such as happy, sad, surprised, scared,
angry, crying faces and many more. Click on an emotion icon to apply one to your avatar

8
along with a sound effect. If you are using video conference, the lip sync and emotive
animations are both visible to your conferencing partner.
zAlternatively, you can utilize your own face by applying different effects in the Magic Mirror
tab.
zClick on one of the expressions to apply to your face. The expression can then be previewed in
both the Magic Mirror window and your messenger conference window.
zThe expression library provides a number of expressions such as alien, bull, young, thin, sad
and more. You may switch your expression anytime according to the subject of your
conversation.
zDrag the Strength slider to increase or decrease the strength of your expression. A single
expression can generate different aspects.
zYou may optionally click on the Effect templates to give a sudden impact to your partner
during the video session. The comic library contains fire, thunder rain, sweat, and other effects.
Click one of the comic effects to instantly display the item on your face in the preview
window.
1. Plug in a microphone and your avatar can lip-sync whatever you say instantly.
2. Click the Monitor tab and you will be able to record movements that's visible to the
webcam.

9
3. You are now ready to use a wide range of animated expressions along with your video
avatar on your instant-messaging applications. Refer to the other parts of this Online
Help for more information about Cam Suite.
How to use Snapshot
zClick the Snapshot Settings button.
zYou may adjust the image resolution in the Resolution drop down list.
zClick the Snapshot button to shoot your image. A preview window pops automatically for you
to view the result. For timed snapshots, check the Delay Shooting (3 seconds) box to have a
3-second countdown before capture.
zThe image will then be stored to the Cam Suite Gallery Path.
zYou can click the button to switch your camera on or off for your convenience.
zThe auto zoom function will be unavailable when taking a snapshot.
How to Use Record
zClick the Record Settings button.
zYou may adjust the video resolution in the Resolution drop down list.
zSet the recording duration in the Record Time Limit drop down list.
zCheck the Record Audio box to record audio into your video.
zClick the Record button to start recording video. When clicking the Stop button a preview
window will automatically pop up to view your recording.
zThe video will be stored into the Cam Suite Gallery Path.
zThe auto zoom function will be unavailable when recording.

10
Gallery
zThe Gallery window displays all the images and video files in the Cam Suite Gallery Path.
zThe Gallery also provides tools to view, delete, and email the files.
zView mode: Toggles between Thumbnail and List mode.
Setting an Avatar
Cam Suite enables you to select a customized image created by CrazyTalk and use it as your
avatar during instant messaging and video conferences.
zCheck the box located in the Avatar tab to use a selected avatar when having a video
conference with your partners, un-checking the box will allow you to use your own image
captured by your PC cam.

11
zWhen selecting an avatar your selected avatar will appear in the preview window. If you are in
a video conference, you will see the selected avatar displayed on your messenger application.
zYou can click to find more avatars:
Default Avatars: Displays the default avatars provided by Cam Suite.
My Avatars: Displays imported avatars created with CrazyTalk as well as any avatars purchased
from the Reallusion Content Store.
zDouble-click an avatar from the More Avatars dialog.
zThe avatar will be displayed in the preview window. If you are in a video conference, your
partner will see this avatar and the animation, even if your partner does not have Cam Suite
installed.

12
zThe Online button will lead you to Reallusion Content Store on the web. You can view and
purchase new, hot and featured avatar content.
zIf you have installed CrazyTalk, click Add Avatars to show the CrazyTalk content
data. Please refer to the Importing an Avatar section for details.
zTo delete an avatar, select the avatar and click the Delete button.
zWhen you select an avatar and click the To Favorite button, the avatar will
be added to the Favorite Content box; the avatars in Favorite Content will be directly
displayed on the Cam Suite’s main interface, which is convenient for you to select afterwards.
zWhen you select an avatar in Favorite Content and click Clear, the avatar will be removed
from Favorite Content.
Note: The avatar will not be deleted in Cam Suite, but removed from the Favorite Content
section.
Importing an Avatar
Cam Suite allows you to import customized images or photos from CrazyTalk and use them as
your avatars. This function expands your avatar library, as you can choose any photo of yourself or
even your favorite movie star as your avatar.
In addition to creating your own avatars, you can download new avatars from the Reallusion
website.
zClick to display the import options.

13
zClick the Template tab and browse through the folders to select a model from the CrazyTalk
default template images. Alternatively, click the Custom tab to browse through the
custom-created models. Refer to CrazyTalk Online Help to learn how to create custom
models.
zSelect a template or customized model and click OK to use it as your messenger avatar. The
avatar is now displayed in My Avatars.
zTo create new avatars using CrazyTalk, click Launch Editor to start the program. The new
avatars are saved under the Custom tab.
Selecting an Emotion
You can add emotive animations to your avatar to convey any expression you want during an
instant messenger video conference. With the advanced facial morphing technique, you can
control your avatar's lips and expressions to show a wide range of emotions such as happy, sad,
and angry, as well as facial movement such as winking, blinking, opening and closing of the
mouth, and nose or cheek movement. All the emotions are accompanied with sound effects to
enhance the expressions.

14
zSelect an emotion that will be displayed on your avatar will immediately.
zYou can click to use more emotions.
zIn Default Emotions, you can see the default emotion content provided by Cam Suite. My
Emotions shows the content which you have purchased from the Reallusion website or created
with CrazyTalk.
zDouble-click any emotion in the More Emotions dialog and your avatar will show the
emotion.
zClick Online and it will lead you to the content store on the website. You can view and
purchase the new, hot and featured content.
zIf you have installed CrazyTalk, click Add Emotions to show the CrazyTalk content
data. Please refer to the Importing an Emotion section for details.
zTo delete an emotion, select the emotion and click Delete .

15
zSelect an emotion and click To Favorite , the emotion will be added to
Favorite Content; the Favorite Content will be displayed on the Cam Suite main interface,
which is convenient for you to select afterwards.
zSelect an emotion in Favorite Content and click Clear to remove the emotion from the
Favorite Content.
Note: Content will not be deleted, but removed from the Favorite Content section.
Importing an Emotion
Cam Suite allows you to import customized scripts (.cts) from CrazyTalk and use them as your
emotions. This function expands your emotion library, as you can choose audio files or record
your own voice to create your emotions.
In addition to creating your own emotions, you can download new emotions from the Reallusion
website.
zClick to display import options.
zClick the Template tab and browse through the folders to select a script (.cts) from the
CrazyTalk default template scripts. Alternatively, click the Custom tab to browse through the
custom-created scripts. Refer to CrazyTalk Online Help to learn how to create custom scripts.
zClick OK to use it as your Cam Suite emotion. The emotion is now displayed in My
Emotions in More Emotions dialog.

16
zTo create new emotions using CrazyTalk, click Launch Editor to start CrazyTalk. The new
emotions are saved under the Custom tab.
Importing an Emotion
You can add different expressions to enhance your face by using Face Morph technology.
zCheck the Morph box to apply an expression to your face. Uncheck the box to discard the
expression.
zClick on an expression of your choice.
zDrag the Strength slider right to enhance the expression, and left to minimize it.
zThe Magic Mirror panel shows its morphing effects simultaneously in the screen.
Getting More Expressions
Magic Mirror enables you to adjust the amount of expression in the templates.
zPlease Click to get more expressions.

17
zIn Default Morphs, you can see the default expressions provided by Cam Suite.
zMy Morphs displays the contents which you have purchased from the Reallusion website.
zDouble-click any expression in the More Morphs dialog and your face will show the
expression instantly.
zClick the Online button and it will lead you to the content store on the website. You can view
and purchase the new, hot and featured contents.
zTo delete an expression, select the expression and click the Delete button.
zSelect an expression and click the To Favorite button, the expression will
be added to Favorite Content; which will display on the Cam Suite main interface.
zSelect an expression in Favorite Content and click the Clear button to remove an expression.
Note: Content will not be deleted, but removed from the Favorite Content section.
Selecting a Comic Effect
You can select comic effects to entertain you and your messenger partners.

18
zCheck the Effect box to apply a comic effect to your face. Uncheck the box to disable the
effect.
zClick on one of the comic templates you desire.
zThe Magic Mirror panel displays Morph and Effect simultaneously.
Getting More Comic Effects
Magic Mirror enables you to adjust the amount of the Comic templates.
•Please click to get more comic effects.
zIn Default Comics, you can see the Default Effects contents provided by Cam Suite. My
Effects shows the contents which you have purchased from the Reallusion website.
zDouble-click any comic in the More Effects dialogue and your face will display the action.

19
zClick Online to lead you to the content store on the website. You can view and purchase the
new, hot and featured contents.
zTo delete a comic effect, select the comic effect and click the Delete button.
zSelect a comic and click To Favorite, the comic effect will be added to Favorite Content;
which will be displayed on the Cam Suite main interface.
zSelect a comic effect in Favorite Content and click Clear to remove the comic effect from the
Favorite Content.
Note: you will not delete the content; instead you remove the content from the Favorite
Content section.
Monitor
The Monitor function records movement that's visible to the webcam. An e-mail containing
snapshots will be sent to you if an event has occurred. The recorded video will be saved in the
Gallery folder.

20
zDrag the Motion sensitivity level slider to adjust the camera’s
sensitivity. The lower the sensitivity level, the less motion will be recorded. That means minor
movements will not be recorded.
zSince the recorded videos will occupy hard drive space, you can stop recording when HD
space remaining reaches a certain level. You can adjust when you want to stop recording by
dragging the slider.
zCheck the Email notification with snapshot box if you want the snapshot to be sent to you by
e-mail. Click the E-mail setting button to set your E-mail address.
zFill in the columns in the E-mail setting dialog. Click the Test button to confirm that the
e-mail can be received successfully. Click the OK button to finish the setting.
•Click the Start Monitor button to enable monitoring. Click it again to stop
monitoring.
Audio Control
Audio Control allows you adjust audio settings that are being captured through video or call in
real-time.
Other manuals for DSB-C320
4
Table of contents
Other D-Link Camcorder manuals