D-Link DPH-300 User manual

6
DPH-300
IP/DECT Dual-Mode
Cordless Phone

DPH-300 User’
s Manual
T
able of Contents
T
able o
f
Contents
1
D-LinkCorporation
Package Contents ............................................................................................3
Minimum System Requirements.....................................................................3
Important Battery Information.........................................................................4
Introduction.......................................................................................................5
Features and Benefits......................................................................................6
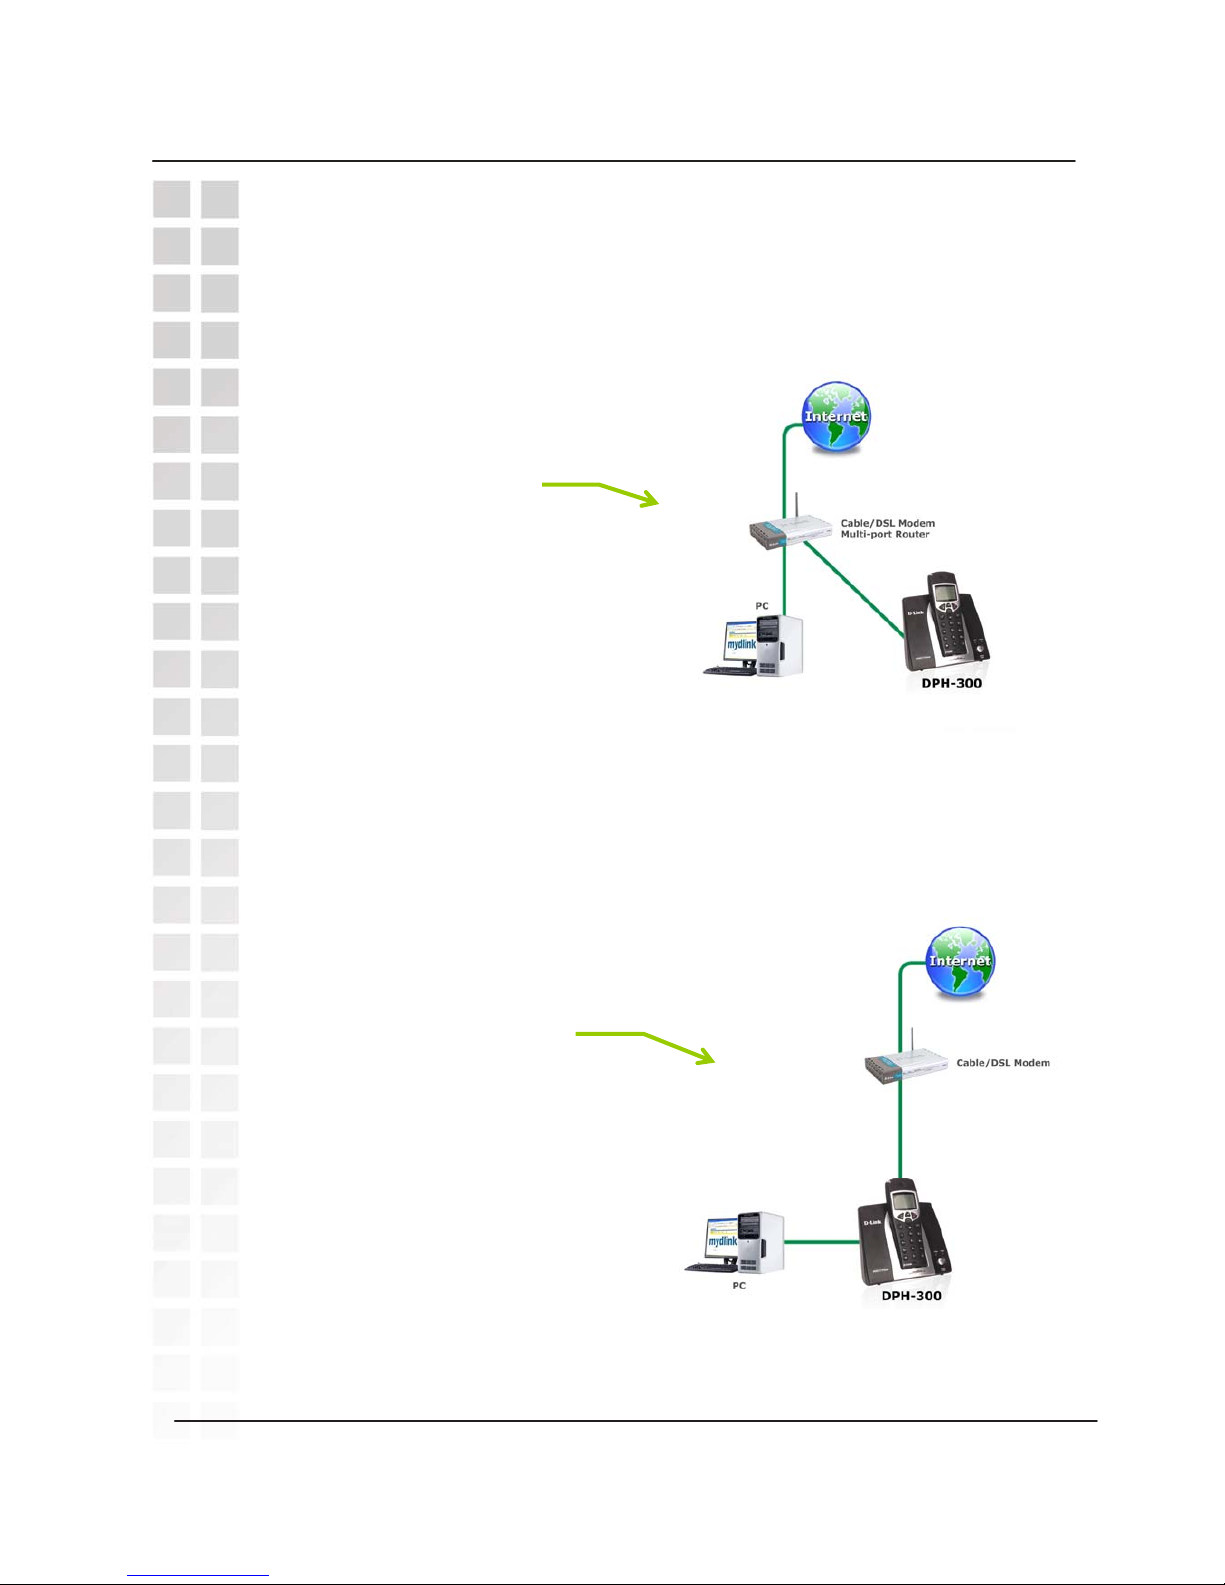
Hardware Overview..........................................................................................7
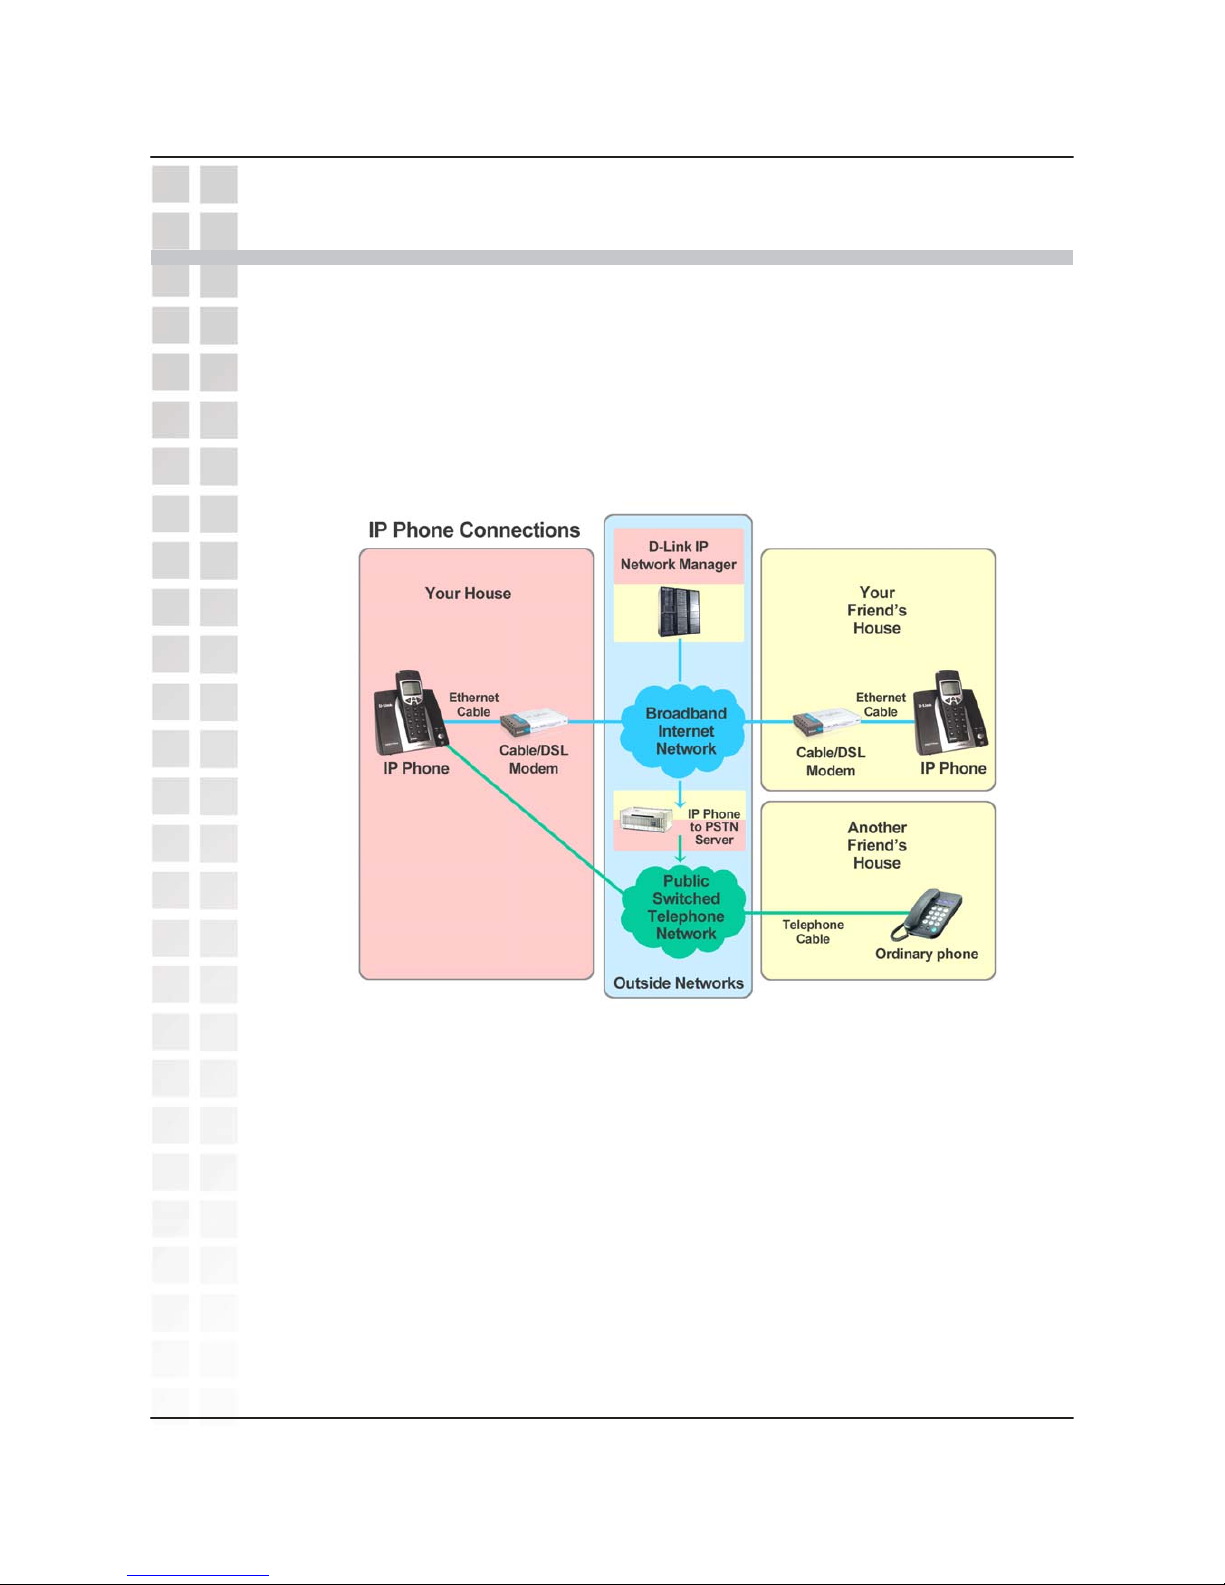
Connections...........................................................................................7
Physical Connection Methods...............................................................8
LEDs......................................................................................................9
Factory Reset......................................................................................10
Keypad ................................................................................................11
Basic Handset Instructions..................................................................14
Getting Started................................................................................................20
Connecting to the Configuration Web Page................................................21
Using the Setup Wizard .................................................................................22
Configuring the WAN (Internet) Connection........................................22
Selecting the Type of LAN Connection...............................................23
Set Dynamic IP Address .....................................................................24
Set Static IP Address...........................................................................25
PPPoE.................................................................................................26
Restart the DPH-300...........................................................................27
Auto-provisioning...........................................................................................28
Verification...........................................................................................29
mydlink............................................................................................................32
Sign in to the www.mydlink.com website............................................32
My Account > Summary......................................................................33
My Account > Summary > My Device Group......................................34
My Account > Product Profile..............................................................35
My Account > Call History...................................................................36
My Account > Order History................................................................37
My Account > Change PIN Code........................................................38
My Account > Contact Email...............................................................39
My Services > Call Forwarding ...........................................................40
My Services > Contact Management..................................................41
Redeem...............................................................................................43
My Store > mydlink Store....................................................................44
My Store > TelTel Store ......................................................................45
Support > Sites....................................................................................46
Support > FAQ ....................................................................................47
Support > Download ..........................................................................47
Support > Tutorial................................................................................48
Using the Configuration Page.......................................................................49
Home > Wizard....................................................................................49
Home > LAN > Dynamic IP Address...................................................50

D-LinkCorporation
2
DPH-300 User’
s Manual
T
able of Contents
Using the Configuration Page (continued)
Home > LAN > Static IP Address........................................................51
Home > LAN > PPPoE........................................................................52
Advanced > VoIP > User Agent [Read Only]....................................53
Firmware Upgrades.............................................................................54
Making Phone Calls........................................................................................55
Making a Call to the PSTN (regular telephone network).....................55
Making a Call to the PSTN in Standby Mode......................................56
Making a VoIP Call to another DPH-300 or mydlink number..............57
Making a VoIP Call to a Member of your Contact List ........................58
Making a TelTel Out Call to a PSTN Phone........................................59
Receiving a Call – PSTN or VoIP........................................................60
Last Ten VoIP Numbers Dialed – Redial.............................................61
Using the Speakerphone.....................................................................62
Adjusting the Volume Level.................................................................63
Calling Notes........................................................................................64
Router Port Configuration .............................................................................65
Using the DPH-300 with D-Link Routers.............................................65
Opening Ports on Routers and Gateways...........................................66
How to Open Ports on a Router ..........................................................67
Network Configuration...................................................................................69
Network with Multiple Public IP Addresses.........................................69
Broadband Modem and One PC.........................................................69
Broadband Modem, Multiple PCs, and a Hub.....................................70
Broadband Modem, Multiple PCs, and a Router.................................70
Broadband Modem Only......................................................................70
Troubleshooting..............................................................................................71
Glossary...........................................................................................................72
Technical Specifications................................................................................75
Country Codes................................................................................................77
Contacting D-Link...........................................................................................79
Notices.............................................................................................................80

DPH-300 User’
s Manual
Packa
g
e Contents
Packa
g
eContents
D-LinkCorporation
3
Minimum S
y
stem Requirements
•D-Link DPH-300 Cordless IP Telephone
•D-Link DPH-300 Cordless IP Telephone Connector Base
•Power Adapter-AC 9V AC, 1000 mA
•Manual and Warranty on CD
•Quick Installation Guide
•Ethernet Cable (the DPH-300’s Ethernet port is Auto-MDIX)
•
Broadband Internet connection
•Ethernet-Based Cable or DSL Modem
•A multi-port Ethernet router (possibly integrated as
part of the Cable or DSL Modem listed above).
•100Mbps of available Internet bandwidth
•Computer with Windows, Macintosh, or Linux-based
operating system and an installed Ethernet adapter
•Internet Explorer Version 6.0 or Netscape Navigator
Version 6.0 and Above
Note: Using a power supply with a different voltage rating than the one
included with the DPH-300 will cause damage and void the warranty for this
product.
If any of the above items are missing, please contact your reseller.

** BATTERY CHARGING NOTE **
Before you connect your DPH-300 to the Internet, your network, or your PC, you should install
the batteries in the handset and place it on the base station for charging. The batteries need
to be charged for at least 12 hours before the first time you use the DPH-300.
1. Install the batteries.
2. Plug in the A/C adapter.
3. Put the handset on the base station
4. Wait 12 hours.
IMPORTANT BATTERY SAFETY INSTRUCTIONS
CAUTION: TO REDUCE THE RISK OF FIRE OR INJURY CAUSED BY THE
BATTERIES, READ AND FOLLOW THESE INSTRUCTIONS.
1. Use Only AAA, 1.2V 600mAh Ni-MH (Nickel Metal Hydride) batteries
supplied by D-Link or D-Link Authorized Distributors.
2. Contact D-Link to purchase replacement batteries if needed.
3. Do not mix old and new batteries in this product.
4. Do not mix different battery types or batteries from different manufacturers in
this product.
5. Batteries are intended to be charged while in the handset. Charging with other
chargers or in any other manner may cause the batteries to explode.
6. Do not dispose of the batteries in a fire. The batteries may explode. Check
with local codes for possible special disposal instructions.
7. Do not open or mutilate the batteries. Released electrolyte is corrosive and may
cause damage to the eyes or skin. It may be toxic if swallowed.
8. Exercise care in handling the batteries in order not to short them with conducting
materials such as rings, bracelets, keys, or tools. The battery or conductor may
overheat and cause burns.
9. Observe proper polarity orientation between the batteries and the battery
receptacle of the handset.
10. Be aware that NiMH batteries, regardless of their apparent charge state, may be
capable of producing electrical current sufficient to cause injury and property
damage.
11. Never expose NiMH batteries to temperatures above 50 °C.
Statement of Liability
D-Link Corporation / D-Link Systems, Inc. does NOT assume any liability for death,
injury or damage to equipment or property resulting from the use of this phone in a
manner inconsistent with the use for which it was intended. D-Link Corporation / D-
Link Systems, Inc, will not be liable for consequences that may result from tampering
with the batteries or charger-base or consequences resulting from their use thereafter.
4

Introduction
Introduction
DPH-300 User
’
s Manual
5
D-LinkCorporation
Before you start, your new DPH-300 Dual-mode Cordless Phone will require a
connection to the Internet to function. The connection may be directly through a
Cable or DSL modem, or it may be through a broadband router. Your DPH-300
phone will enable you to make VoIP (Voice over Internet Protocol) telephone
calls −at zero or a very much reduced cost when compared to regular
telephone service −to nearly anywhere, over the Internet.
The DPH-300 phone allows you to make and receive calls from both ordinary
phone service and from IP telephony over the Internet. The basic diagram
shown above outlines how your new dual-mode IP phone works.

DPH-300 User’
s Manual
Features and Benefits
FeaturesandBenefits
D-LinkCorporation6
•User-friendly configuration and diagnostic utilities
•1 Foreign Exchange Subscriber (FXS) POTS port (RJ-11 Jack)
•2 NWay 10/100BASE-TX Fast Ethernet ports for network connections
•Voice Activity Detection (VAD)/Comfort Noise Generation (CNG)
•Silence suppression to reduce bandwidth consumption
•Adaptive jitter buffer for smooth voice reception
•Lost packet recovery ability for improved voice quality
•IP address assignment using DHCP or static configuration
•Support Caller ID function
•Remote configuration and management over the Internet using web browsers
•FSK and DTMF dual mode CLIP (Calling Line Identification Presentation)
•Stores up to 30 calling numbers, in three types
•Stores up to 10 last dialed IP numbers, up to 12 digits for each number
•Stores up to 50 phonebook numbers, up to 12 characters for each name and 12
digits for each number
•LCD displays calling and dialing number
•Barring numbers setting (up to 5 numbers)
•Ringer tone selection −9 different melodies
•IP and PSTN ringer tone independently configurable
•Ringer volume adjustment −9 levels
•Handset earpiece volume setting −9 levels
•Delete single or all records in phonebook
•Redialing and preparation dialing functions
•Page on base unit to look for the handset easily
•Clicking key tone on or off
•Supports GAP function
•Speakerphone

Hardware Overview
Hardware Over
view
Connections
DPH-300 User
’
s Manual
7D-LinkCorporation
LAN1 Port
Connect the
Ethernet
cable from
your
Cable/DSL
modem to
this port.
LAN2 Port
Connect the
Ethernet
cable from a
computer on
your LAN to
this port.
Phone
Connection
Connect to your
phones using
standard phone
cabling.
Power Adapter
Connect your 9V AC 1000 mA
power adapter here.
Factory Reset
Button
Pressing this
button will
restore the
DPH-300 to its
factory default
settings.

DPH-300 User’
s Manual
Hardware Overview
D-LinkCorporation8
Physical Connection Methods
The DPH-300 can either be connected to an available port on a Cable/DSL
modem multi-port router, with other devices connected to their own ports (as
below).
Or it can be connected to the WAN port of a Cable/DSL modem with a PC
connected to the DPH-300 for Internet access as in the figure below.
Multi-port Router
Connection
Single-port Cable/DSL
Modem Connection

DPH-300 User’
s Manual
Hardware Overview
LEDs
D-LinkCorporation
9
Power/Status
A blinking LED indicates the DPH-300 is
functioning properly, but has not yet registered
with a VoIP server.
A solid LED indicates the DPH-300 has registered
with a VoIP server and is ready for a call.
VoIP
An active LED indicates a
VoIP session has been
established.
LAN2
A solid LED indicates an Ethernet link
has been established. The LED will
blink when there is activity on this link
LAN1
A solid LED indicates an Ethernet
link has been established. The
LED will blink when there is activity
on this link

In order to accomplish a Factory Reset of the DPH-300, it is necessary to do the
following:
1) Remove the handset from the base station.
2) Place the base station face-down on a flat surface (such as a table or
desk top).
3) Insert a bent paperclip or a toothpick in the hole for the Factory Reset
Button (see the photo on page 7 for the button’s location), and hold the
button down.
4) While still holding the button down, unplug the power adapter.
5) Wait 10 seconds, then reconnect the power adapter without letting go of
the Factory Reset Button.
6) Once you have restored power, continue holding the Factory Reset
Button down for another 10 seconds.
7) Complete! The DPH-300 should have had the following factory default
settings restored: IP Address; Call Logs (all).
8) Note that if your DPH-300 is still connected to the Internet, the auto-
provisioning process should repeat itself after the factory reset, and the
phone should return to a ready-state showing “D-Link” in the handset
display and allowing IP calling.
If you need to reset the handset to its original factory default settings, see page
19, HS Setting > Set Default.
Factor
y
Reset
Hardware Overview
DPH-300 User
’
s Manual
10
D-LinkCor
p
oration

Hardware Overview
DPH-300 User
’
s Manual
Ke
y
pad
11D-LinkCorporation
On Hook
Use this button to
hang up the
Handset after you
have finished a
telephone call.
Clear
Use this button to
switch the Handset
off by holding the
button until Good
Bye appears in the
display. Also, this
button is used to
clear an input.
IP
Use this button to
initiate a VoIP
telephone call. It is
also used to switch
the Handset to
speakerphone mode
by holding the button
down for several
seconds until the
speaker icon appears
in the display
PSTN Dial Tone
Use this button to
initiate a PSTN
telephone call (over
your existing phone
line). It is also used
to switch the
Handset to
speakerphone
mode by holding the
button down for
several seconds
until the speaker
icon appears in the
display

Hardware Overview
DPH-300 User
’
s Manual
12
D-LinkCorporation
Up
Use this button
to open the
Contact List
when the
Handset is idle.
Pressing this
button during a
telephone call
will increase the
volume
Down
Use the button
to open the
Phone Book
telephone
numbers stored
for your use.
Pressing this
button during a
telephone call
will decrease the
volume.
Menu/OK
Use this button
to open the
Handset’s
setup and
information
menus.
Star
Pressing the
following, then press
the IP button:
**1 [IP] −will play your
DPH-300’s IP address
**2 [IP] −will play your
DPH-300’s phone number
**3 [IP] −to set the Internet
connection type.
Press1 for DHCP
mode
Press2 for Static IP
mode, followed by the
IP address separated by
*’s and then the # key (for
example, 192*168*1*110#)
Pound Key
Use this button
for various input
functions such as
to enter a static
IP address, as
described to the
left (under Star).

1X 2X 3X 4X 5X
1 (space) < > -
Aa Bb Cc 2 @
Dd Ee Ff 3 :
Gg Hh Ii 4 +
Jj Kk Ll 5 *
Mm Nn Oo 6 #
Pp Qq Rr Ss 7
Tt Uu Vv 8 .
Ww Xx Yy Zz 9
0 Ææ Ää Öö Üü
13
Hardware Overview
DPH-300 User
’
s Manual
D-LinkCor
p
oration
Keypad Table
The keys on the handset can be used to enter all of the numbers, letters, and
symbols in the table below for features like the Phone Book or Handset User
Name.

IP vs PSTN
The primary difference between IP dialing and PSTN dialing is that with IP
dialing you enter the number you want to call then push the IP button. The IP
button functions like the Enter (Return) key on a computer keyboard. For more
detailed information about making different types of calls, see page 55, Making
Phone Calls.
PSTN calls follow the standard ordinary phone service way of dialing, which is
to say that to make a PSTN call, you first press the PSTN button, listen for a dial
tone, then dial the number. PSTN dialing in “standby mode” is also supported,
see page 56 for details.
A second important difference between IP and PSTN dialing is that all IP calls to
non-IP numbers (also called, “TelTel Out” calls) require that you first enter a “+”
sign and then the number before pressing the IP button.
Handset Display
Once your DPH-300 has been successfully installed, auto-provisioned, account
verified, and you have begun using it to make and receive calls, you will notice
various displays in the handset, including settings menus. The displays provide
information about the current status of the DPH-300 and its related services.
The three most basic displays are: D-Link / Searching. . . / VoIP Offline.
When the unit is working normally and has an Internet connection, the handset
display will show “D-Link.”
While the unit is auto-provisioning – the first time or anytime thereafter such as
following a power outage or network failure of some kind, the handset LCD will
display “Searching. . .” and both the power and WAN LEDs on the base unit will
flash until either a successful Internet connection is achieved or fails completely.
If the DPH-300 is unable to complete the auto-provisioning process, the handset
LCD will display “VoIP Offline.”
Also note that when you press the Handset Locator button on the base station,
the handset display will show “---Paging---” until you press the Handset Locator
button again.
Basic Handset Instructions
Note:press and hold the “0” key to enter a “+” sign.
14
Hardware Overview
DPH-300 User
’
s Manual
D-LinkCorporation

Handset Display (continued)
The handset has a maximum range rated at 50 meters (indoor) and up to 300
meters (outdoor) for clear line-of-sight operation. Local environment conditions
will reduce the functional operating range, particularly when there are
obstructions between the handset and base station. The indicator in the upper
right corner of the LCD will indicate when signal strength is reduced due to
obstructions or distance. When the signal is lost, the handset will display
“Searching. . .” until it is back in range. While the handset is out of range, none
of the handset menus or settings are available for either display or modification.
Note, however, that handset menus and settings are available when the handset
is in range of the base station but is “VoIP Offline” due to some difficulty with the
network.
Handset Symbols
The handset LCD includes symbols indicating various things about the current
status and operation of the DPH-300 phone. Please see the table below for
information about the handset symbols.
15
Hardware Overview
DPH-300 User
’
s Manual
D-LinkCorporation

Phone Book and ContactList
Each handset has two lists independent list of phone contacts: Phone Book and
ContactList. Phone Book entries are numbers you have entered in the handset
directly using the Handset Menus (described in the next section). The Phone
Book can store up to 50 entries. Note that entries must be entered exactly as
necessary for dialing purposes. To dial a number entered in your handset
Phone Book, press the down arrow key, scroll through the entries to select the
number, then press either the IP key or PSTN key as appropriate for the call you
wish to make. See the Handset Settings / Menus sub-section below for
information on adding entries to the Phone Book.
ContactList entries are displayed in the handset but can not be added or
modified using the handset. To create new ContactList entries or edit existing
entries, you must access your account on the mydlink.com website. See page
41 for information about the My Services > Contact Management section of
mydlink.com.
Handset Settings / Menus
Handset menus described in this section are listed in the order they are
displayed by the handset. To see the top level of menus, press the Menu/OK
key. Also press the Menu/OK key to open the next menu level or to confirm an
entry or setting (much like the Enter key on a computer keyboard).
System Info > My IP
ÆDisplays the IP address currently assigned to the DPH-300.
System Info > mydlink No.
ÆDisplays the mydlink number assigned to the DPH-300 after initial
auto-provisioning.
Call LOG > Missed
ÆDisplays recent calls that have gone unanswered.
Call LOG > Received
ÆDisplays a list of recent calls received.
Call LOG > Dialed
ÆDisplays a list of recently dialed numbers.
ContactList
ÆDisplays the current list of contacts entered in the mydlink.com
Contact Management webpage. See the sub-section above and page
41 for more information about the ContactList and how to use it.
16
Hardware Overview
DPH-300 User
’
s Manual
D-LinkCorporation

Handset Settings / Menus (continued)
Phone Book > Add
ÆAllows you to create a new Phone Book entry by creating a name
(enter a maximum of 12 characters and press Menu/OK), entering the
number exactly as it needs to be dialed (maximum of 24 digits), and
finally pressing Menu/OK again. If you have successfully created a new
entry, the handset will display “Stored” and return to the usual D-Link
ready screen. You may create up to 50 entries.
Phone Book > Edit
ÆAllows you to edit existing Phone Book entries. Press Menu/OK,
select the entry to edit from the list, and press Menu/OK again. Edit the
name and press Menu/OK. Edit the number and press Menu/OK again.
If you have successfully edited the entry, the handset will display “Stored”
and return to the usual D-Link ready screen.
Phone Book > View
ÆDisplays the current Phone Book entries. Press Menu/OK to access
the list and then use the up and down arrow keys to display the entries.
Phone Book > Delete
ÆAllows you to delete Phone Book entries one at a time. Press
Menu/OK to access the list, use the up and down arrow keys to scroll
through the entries, select the one you want to delete, and press the
Menu/OK key again. You will be prompted with “Sure ?” before the
entry will be deleted. Press the Menu/OK key again to delete the entry
you chose or press the Clear key to cancel.
Phone Book > Erase all
ÆAllows you to delete all Phone Book entries. Press Menu/OK to
erase the entire list. You will be prompted with “Sure ?” before the
entries will be deleted. Press the Menu/OK key again to delete all
entries or press the Clear key to cancel.
Caller List > PSTN Calls
ÆDisplays a list of up to the last 50 PSTN calls received, including the
name and number of the caller using standard Caller ID data.
Caller List > Erase all
ÆAllows you to delete all Caller List entries. Press Menu/OK to erase
the entire list. You will be prompted with “Sure ?” before the entries will
be deleted. Press the Menu/OK key again to delete all entries or press
the Clear key to cancel.
17
Hardware Overview
DPH-300 User
’
s Manual
D-LinkCorporation

Handset Settings / Menus (continued)
HS Setting > PSTN Ring
ÆAllows you to select a different ring tone for incoming PSTN calls.
There are nine tones to choose from (Ering 1 ~ Ering 9). Scroll through
the list using the up and down arrow keys and press Menu/OK to select
the one you want. After you select a tone, it will be followed by a
volume setting indicated by a number. To raise or lower the volume, use
the up and down arrow keys.
HS Setting > VoIP Ring
ÆAllows you to select a different ring tone for incoming VoIP calls.
There are nine tones to choose from (Iring 1 ~ Iring 9). Scroll through
the list using the up and down arrow keys and press Menu/OK to select
the one you want. After you select a tone, it will be followed by a
volume setting indicated by a number. To raise or lower the volume, use
the up and down arrow keys.
HS Setting > Set keytone
ÆAllows you to turn on and off the sound which accompanies any press
of a handset button. Select On and press Menu/OK if you want to hear
the tone when you press handset buttons. Select Off and press
Menu/OK if you do not want to hear the tone.
HS Setting > User name
ÆAllows you to assign a user name to the handset.
HS Setting > Set PIN
ÆAllows you to assign a PIN code to the handset. The factory default
PIN code is: 1590. You must enter it first in order to change the PIN.
HS Setting > Auto answer
ÆAllows you to turn the auto answer feature on and off. Enabling auto
answer allows you to answer incoming calls by simply picking-up the
handset from the base station. Choose On and press Menu/OK to
enable auto answer. Select Off and press Menu/OK if you do not want to
enable auto answer.
HS Setting > Anykey talk
ÆAllows you to turn the anykey talk feature on and off. Enabling
anykey talk allows you to answer incoming calls by pressing any key on
the handset. Choose On and press Menu/OK to enable anykey talk.
Select Off and press Menu/OK if you do not want to enable anykey talk.
18
Hardware Overview
DPH-300 User
’
s Manual
D-LinkCor
p
oration

Handset Settings / Menus (continued)
HS Setting > Language
ÆAllows you to change the display language of the handset. Choose
English, Deutsch, Italiano, Francais, or Espanol and press Menu/OK.
HS Setting > Set default
ÆAllows you to return all handset settings to their factory default values.
BS Setting > [future feature]
ÆBS (base station) settings relate to technical aspects of handset
management for mult-handset environments. Multi-handset
environments are a future supported feature. It is not recommended for
users to try and change these settings at this time.
Select Base > Base 1 ~ 4, Auto [future feature]
ÆSelect Base settings relate to technical aspects of handset ÅÆ base
station management relative to multiple base stations. Multiple base
station environments are a future feature. It is not
recommended for users to try and change these settings at this time.
HS Register > Base 1 ~ 4 [future feature]
ÆHS (handset) Register settings relate to technical aspects of handset
management relative to multiple base stations and multi-handset
enviroments. Multi-handset and multiple base station environments are
a future feature. It is not recommended for users to try and
change these settings at this time.
Intercom Function [future feature]
The Intercom function allows one handset to call another, in a manner similar to
walkie-talkies, and is activated when you press the clear button without being in
the middle of a call. You will see “Intercom” and the INT symbol in the LCD.
Transfer Function [future feature]
The Transfer function allows one handset to send an outside call to another
handset. Transfer is activated when you press the clear button during a call.
You will see “Transfer” in the display.
Multi-Handset Use [future feature]
If you would like more information about acquiring and using multiple handsets,
contact your nearest D-Link distributor or local D-Link office, or choose a
website from the list at the end of this user manual to contact us for help.
19
Hardware Overview
DPH-300 User
’
s Manual
D-LinkCorporation
Table of contents
Other D-Link Cordless Telephone manuals