D-Link DIB-360 User manual


iD-Link DIB-360 User Manual
Table of Contents
D-Link reserves the right to revise this publication and to make changes in the content hereof without obligation to notify any
person or organization of such revisions or changes. Information in this document may become obsolete as our services and
websites develop and change. Please refer to the www.mydlink.com website for the most current information.
Trademarks
D-Link and the D-Link logo are trademarks or registered trademarks of D-Link Corporation or its subsidiaries in the United
States or other countries. All other company or product names mentioned herein are trademarks or registered trademarks of
their respective companies.
Copyright © 2012 by D-Link Corporation.
All rights reserved. This publication may not be reproduced, in whole or in part, without prior expressed written permission
from D-Link Corporation.
Manual Overview

iiD-Link DIB-360 User Manual
Table of Contents
Manual Overview ................................................................................................................................... i
Trademarks .......................................................................................................................................................................................................................i
Package Contents ..........................................................................................................................................................................................................1
System Requirements ..................................................................................................................................................................................................2
Introduction ....................................................................................................................................................................................................................3
Features .............................................................................................................................................................................................................................4
Getting Started ...............................................................................................................................................................................................................5
Getting to know your DIB-360 and remote control ..........................................................................................................................................5
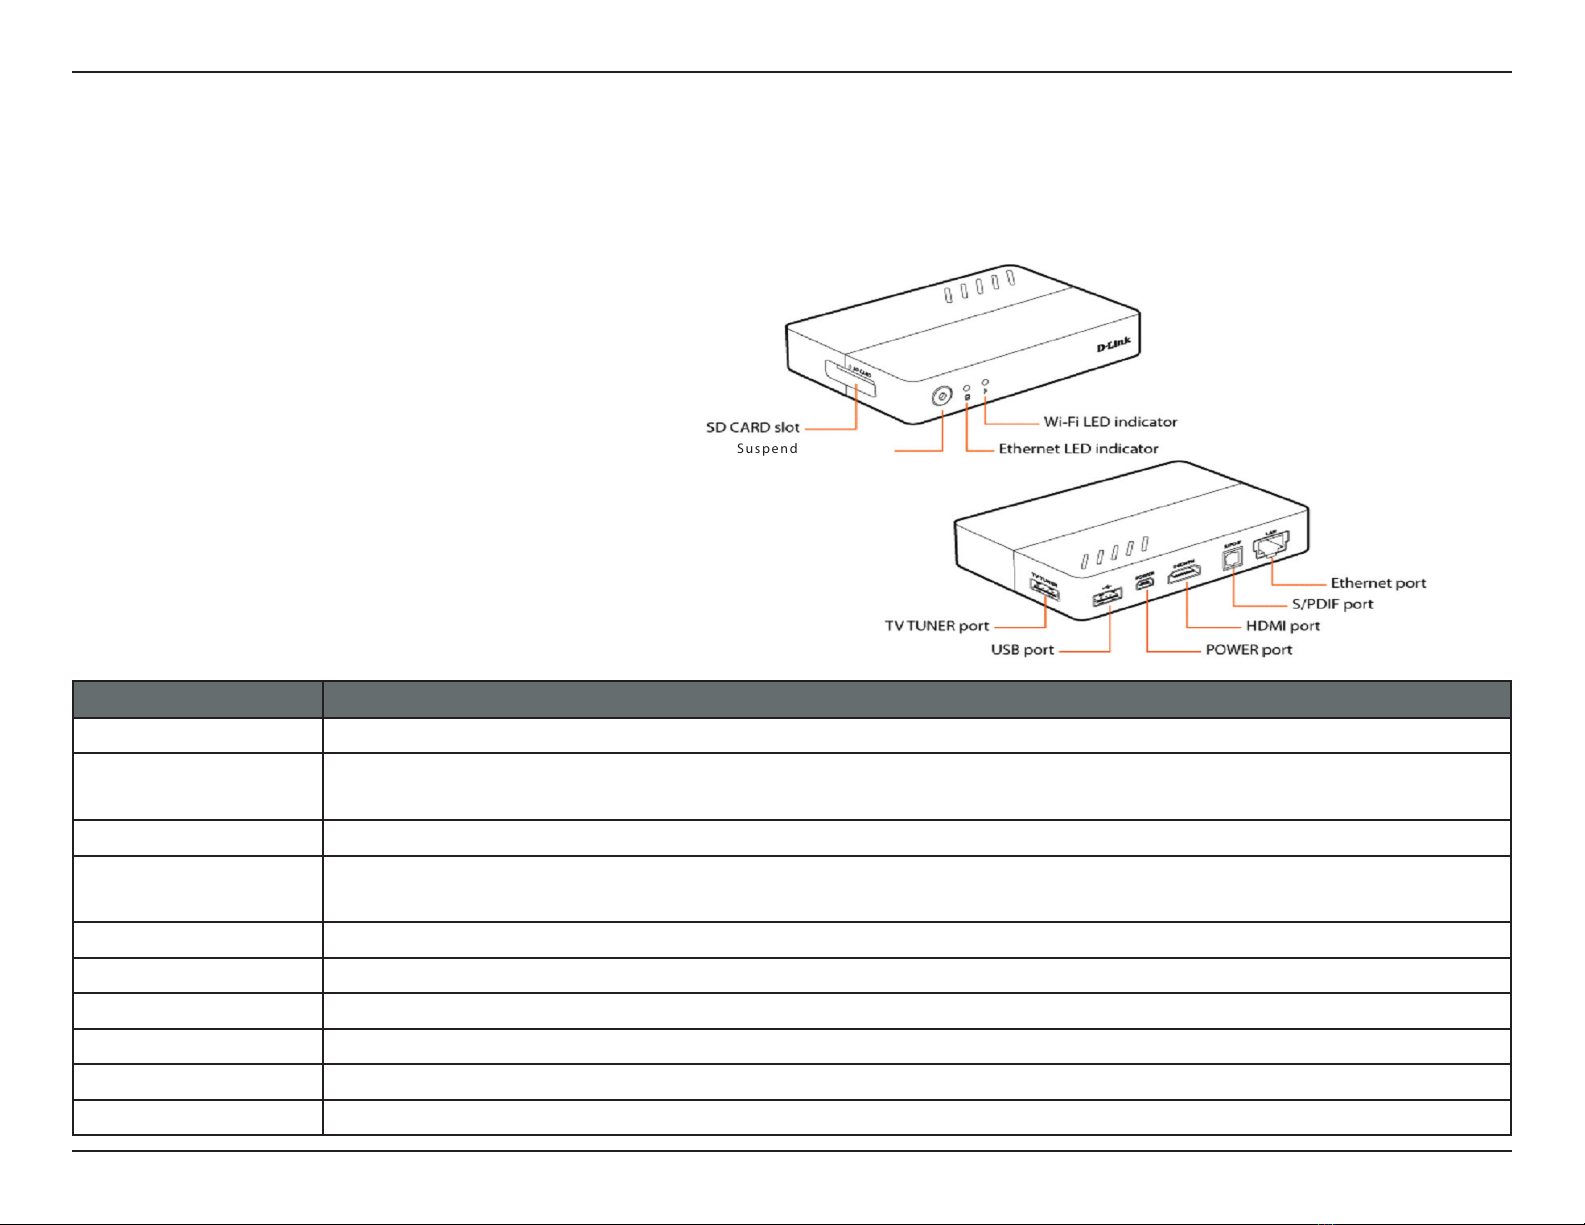
DIB-360 ......................................................................................................................................................................................................................5
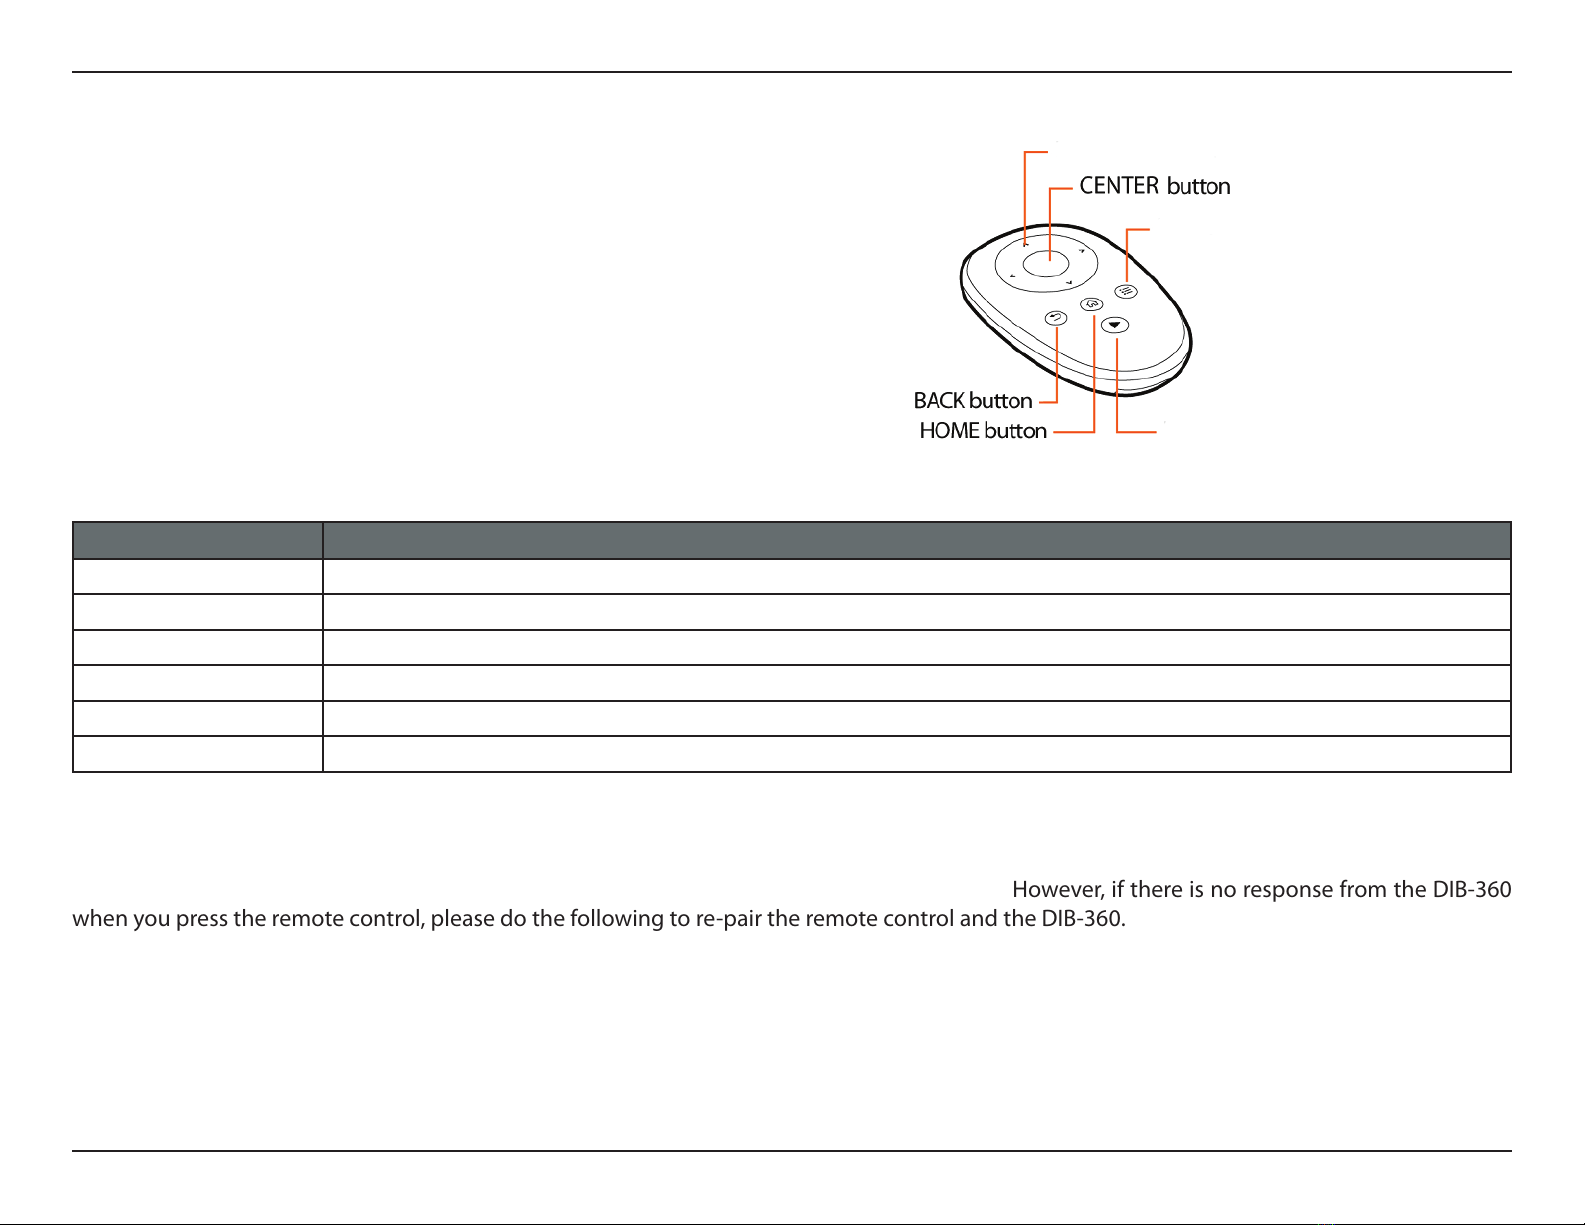
Remote Control ......................................................................................................................................................................................................6
Setting up the Network .......................................................................................................................................................................................9
Setup Wizard ...........................................................................................................................................................................................................9
Network Conguration .....................................................................................................................................................................................11
Home .......................................................................................................................................................................................................................11
How to Navigate Main Options .....................................................................................................................................................................12
Firmware Update ................................................................................................................................................................................................12
TV Apps ..................................................................................................................................................................................................................16
Settings ..................................................................................................................................................................................................................19
Technical Specifications ......................................................................................................................... 23
Firmware Specifications ......................................................................................................................... 23
Hardware Specifications ......................................................................................................................... 23
Table of Contents

1D-Link DIB-360 User Manual
Section 1 - Product Overview
• D-Link DIB-360 Android OTT Set-Top Box
• Remote Control with Battery
• QIG
• 5 V/2 A Power Adapter
• Warranty Card
If any of the above items are missing, please contact your reseller.
Package Contents

2D-Link DIB-360 User Manual
Section 1 - Product Overview
Requirements
• Broadband Internet connection
• HDMI Cable
• RJ-45
• TV
System Requirements

3D-Link DIB-360 User Manual
Section 1 - Product Overview
Introduction
Congratulations on your purchase of the DIB-360 Android OTT Set-Top Box.
The DIB-360 Android OTT Set-Top Box is a media player set-top box that connects to your TV to give you big-screen playback of
digital media stored on your SD Card or USB storage drive. With a user-friendly remote and interface, and customized Android
media apps provided by service providers as well as built-in apps, the Android OTT Set-Top Box makes it easy to enjoy the
shows and music you love. The apps allow you to use your Android OTT Set-Top Box to play videos, music, and photos from a
shared folder or drive on your network, or simply plug in a USB storage drive to view content stored on it.

4D-Link DIB-360 User Manual
Section 1 - Product Overview
Features
Total Media Experience
• Total Solution: Customized Android apps enable your D-Link DIB-360 Android OTT Set-Top Box to play videos, music,
and photos on your TV from your SD card or a USB storage drive plugged into the device. The DIB-360 supports
customized Android apps as well as includes preinstalled apps. Android apps can also be installed from SD Cards that
are placed in the included SD Card slot.
• Easy to Use: A user-friendly remote and TV interface simplies usage and setup, allowing users to easily access and
play apps for viewing, recording, playback, and conguration. Wireless N connectivity is supported along with HDMI,
so setting up the media player is simple.
• High-denition Playback: The DIB-360 supports Full High-Denition (1080p) playback for vivid video with high clarity.

5D-Link DIB-360 User Manual
Section 2 - Getting Started
DIB-360
Getting Started
Getting to know your DIB-360 and remote control
COMPONENT DESCRIPTION
SD CARD slot Micro SD Card reader
Suspend button &
POWER LED Indicator
Puts your device into sleep mode when it’s already on. Indicates device is powered on when LED is solid white,
indicates WPS is active when ashing orange, and indicates device is on standby when solid orange.
Wi-Fi LED Indicator Indicates device is connected to Wi-Fi network
Ethernet LED
Indicator
Indicates Ethernet connection is active
TV TUNER port Connects to TV Tuner Dongle
USB port Connects to external devices, such as devices that are compatible with USB Mass Storage Class
Ethernet port Connects to Ethernet cable for Internet
S/PDIF port Connects to optical audio cable
HDMI port Connects device to TV that has a HDMI port using a HDMI cable
POWER port Connects USB power adapter from your device or AC adapter to a standard power outlet to charge device
S u s pe n d b u t to n a nd
POWER LED indicator

6D-Link DIB-360 User Manual
Section 2 - Getting Started
Remote Control
You can use the remote control to control your DIB-360 and navigate
through your content. The basic functions of the remote control are
described below.
COMPONENT DESCRIPTION
DIRECTIONAL pad Press to navigate up/down/left/right on screen menus
CENTER button Press to conrm your selection and play media les
OPTION button Press to display additional functions
BACK button Press to return to the previous screen and Home Menu
HOME button Press to return to the Home Menu
QUICK button Reserved for content provider
DIRECTIONAL pad
OPTION button
QUICK button
Pairing the remote to the DIB-360
The DIB-360 and the remote control should be pre-paired during the manufacturing process. However, if there is no response from the DIB-360
when you press the remote control, please do the following to re-pair the remote control and the DIB-360.
Re-pair via the proximity method:
a. Make sure the remote is at a distance of about 5 cm from the DIB-360.
b. To trigger re-pairing, press and hold down the CENTER button for 15 seconds to start pairing.

7D-Link DIB-360 User Manual
Section 2 - Installation
Insert and Remove the Micro SD Card
Make sure your device is turned o before inserting or removing a Micro SD Card. While the device is o, lightly push the Micro SD card into the
slot until it clicks into place. To remove the Micro SD Card, gently push the Micro SD Card in until you hear a click and then release it. Please note
that the Micro SD Card must never be removed while it is in use. This may cause data on the Micro SD Card to be deleted and damaged.
Connect your DIB-360 to a TV
You can use a HDMI cable to connect your DIB-360 and your TV. The HDMI cable enables both video and audio output and enables you to enjoy
digital-quality video and audio.
Turning your DIB-360 on/off
Plug the AC adapter into an electrical outlet and connect the USB connector of the AC adapter to the POWER port on the product.
Text Input
You can use the onscreen keyboard by controlling it via the remote control to enter text.

8D-Link DIB-360 User Manual
Section 2 - Installation
COMPONENT DESCRIPTION
Type uppercase Click on Uppercase, then type the letter you require in uppercase
Type a space Click on Space
Delete character
before cursor
Click on Backspace
Clear all texts Click on Clear
Exit the keyboard Click on Done or the BACK button on the remote

9D-Link DIB-360 User Manual
Section 3 - Setup
Setting up the Network
Your DIB-360 allows you to access the Internet through one of the following connections:
Ethernet Connection
To use the network feature, please connect an Ethernet cable from the Ethernet port on your DIB-360 to a network jack or hub on your network. Go
to Settings -> Network -> Wired, and your device will obtain an IP address automatically. After obtaining an IP address successfully, your DIB-360
can be connected to an Ethernet-based network.
If you want to set the IP address manually, you can select Static to enter the IP Address, Subnet Mask, Router Address, and DNS Address. After
you’ve completed your settings, you can go to Settings -> Network -> Test Network, and then you can check the status of the network connection.
Wi-Fi Connection
Before trying to activate the Wi-Fi, please make sure your DIB-360 is within antenna range of the network’s access point and the wireless access
point is running. You can see the Wi-Fi instructions in the Settings chapter for more information.
Setup Wizard
When you turn on your device for the rst time, the Setup Wizard will be launched on the screen. The Setup Wizard will guide you to set up your
device by following a series of simple instructions.

10D-Link DIB-360 User Manual
Section 3 - Setup
Screen Ratio
If your TV screen display isn’t showing correctly, you can change the screen ratio. Press
the DIRECTIONAL pad so you can scale the overscan up or down. When you are satised
with the screen ratio, press CENTER on the remote to go to the next step.
Screen Position
You can adjust the screen position to calibrate your TV screen. Press the DIRECTIONAL
pad to adjust the vertical position of your screen. Press the DIRECTIONAL pad so you can
then netune the horizontal position. Press CENTER to go to the next step.

11D-Link DIB-360 User Manual
Section 3 - Setup
Network Configuration
If you have connected an Ethernet cable to your device, the device will detect the status
of the network connection. If you don’t connect your device with the Ethernet cable,
it will activate Wi-Fi and start to scan the available wireless networks. After connecting
to the network successfully, press OK to go to the Home Screen and then you can start
using your device.
Home
The Home Screen appears after you turn the product on. You can access the main options
from here.

12D-Link DIB-360 User Manual
Section 3 - Setup
How to Navigate Main Options
On the Home Screen, press the DIRECTIONAL pad on the remote control to select a main
option. When you move the focus on the main option bar, the shortcut icon will appear
on the top of the screen and the submenu will be expanded on the bottom half of the
screen. You can then use the DIRECTIONAL pad to move the focus to the shortcut icon
or submenu.
Firmware Update
You should perform a rmware update before you start using your DIB-360. There are two ways to update your device’s rmware:
a) OTA Download and Update
b) Update Using SD Card
OTA Download and Update
You can manually check the available rmware and update the rmware directly on your DIB-360 via a network connection. Before you start, please
insert an SD Card with at least 200 MB of free space into the device’s SD Card slot and make sure the network connection using a Wi-Fi network or
Ethernet is active.

13D-Link DIB-360 User Manual
Section 3 - Setup
Set up FTP Server
1. Go to Settings, then navigate to Software Update and press CENTER on your remote.
2. Go to Firmware update and press and hold down CENTER for at least three seconds.
3. In the FTP dialog, use the onscreen keyboard to enter either of the two sets of conguration values shown below. The characters are case sensitive.
Please note the IP address may be changed:
IP: 61.219.107.80 OR 212.46.14.134
Account: dlink001 dlink001
Password: 516872 516872
Path: /OTA/ /ota/
Port: 21 21

14D-Link DIB-360 User Manual
Section 3 - Setup
4. When you nish, click on OK to save the conguration.
How to check for available rmware and update
1. Focus on Firmware update again and press CENTER on the remote control to start checking for the latest rmware on the FTP server.
Note: If your rmware is currently up to date, it will display a message to notify you that there is currently no new rmware for your device.
2. If “New software is available for your device. Do you want to update now?” appears on the screen, click OK to start downloading the available
rmware. Click Cancel to quit the dialog.
3. While the rmware update is running, please note that:
• DO NOT power o your device or disconnect it from the AC power outlet
• DO NOT remove the SD card from the SD card slot
• Please make sure the network connection is active
Otherwise, the rmware update may not succeed and may cause your device to be unresponsive or require repair.
4. After downloading is successful, click OK to restart your device and start updating the rmware.
5. When “updating... please don’t turn o” appears on the startup screen, installation of the update has begun.
6. After the rmware update is nished and the DIB-360 powers on successfully, the upgrade is completed. You can check the rmware version in
the Firmware update screen.

15D-Link DIB-360 User Manual
Section 3 - Setup
Update using SD Card
You can also update your DIB-360 rmware using the update data saved on a SD card. Before you start, please copy the update data (OTA.img and
info.txt) to the “update” folder in your SD card. You can download OTA.img, and info.txt by FTP with the above login information.
You will need to carry out the following steps to perform the rmware update using the SD card method:
1. Insert the SD card into the SD card slot on the DIB-360.
2. Power on your TV and plug in the HDMI cable into the HDMI Output Connector on your DIB-360.
3. Press the power button on the DIB-360 and then plug in the AC adapter to an electrical outlet.
4. Press and hold the Power button on the DIB-360, meanwhile, connect the USB connector of the AC adapter to the USB Charging Connector on
the DIB-360. Please press and hold down the Power button for more than 15 seconds after you power on the device by USB adapter.
5. When “updating... please don’t turn o” appears on the startup screen, it starts installing the update and Power LED will be blinking until the
update process is complete.
6. While the rmware update is running, please note that:
• DO NOT power o your device or disconnect it from the AC power outlet
• DO NOT remove SD card from SD card slot
Otherwise, the rmware update may not succeed and may cause your device to be unresponsive, and needs to be send back to repair.
7. After the rmware update was nished, it will restart your device automatically. You can go to the Firmware Update screen to check the current
version of the rmware.

16D-Link DIB-360 User Manual
Section 3 - Setup
TV Apps
All applications that you have downloaded and installed will appear in Apps Screen.
Install
To install applications you’ve downloaded for DIB-360, please undertake the following
steps to perform the APK installation:
1. Copy the APK le you want to install from the SD Card.
2. Insert the SD Card into the SD Card slot on your DIB-360.
3. Go to TV Apps and navigate to App Manager and enter it.
4. In App Manager, press OPTION on the remote control. Navigate to Install APK and
press CENTER. You will be able to see the APK les that are saved on the SD Card.

17D-Link DIB-360 User Manual
Section 3 - Setup
Note: When you want to install non-Market applications for the rst time, the system will
display the Install blocked dialog as shown in the image. Please click on Settings on the
Install blocked dialog, and then click on Unknown sources so that a green tick shows on
the checkbox on the right. After clicking OK, and going back to the App Manager screen,
please select your APK le again and install it.
5. After the installation is complete, you can check that the APK that you’ve installed is in
the App Manager screen and launch it. The installed APK is also added to the top icons
of TV Apps in the Home screen, so you can launch it by clicking the icon.
Table of contents
Other D-Link Set-top Box manuals
Popular Set-top Box manuals by other brands

Motorola
Motorola VIP 1910 Installation instructions and manual

Zhongnantong Electronics
Zhongnantong Electronics MK809IV user manual

Motorola
Motorola DCT700 Specifications

Triax
Triax C-HD 415 CX manual

Ocilion IPTV Technologies
Ocilion IPTV Technologies P510E IP Instructions for use

Scientific Atlanta
Scientific Atlanta 8600 Series user guide