Daewoo DW-6510 User manual

PARTS IDENTIFICATION
ACCESSORY
R
O
T
A
T
I
O
N
L
I
M
I
T
R
O
T
A
T
I
O
N
L
I
M
I
T
•TUB
•OVERFLOW FILTER
•LINT FILTER
•WASHER LID
•DRAIN STRAINER
•PULSATOR
•BASE
•SPINDRYER LID
•INNER LID
•SPINDRYER DRUM
•GROUND WIRE
(OPTION)
•POWER CORD
Controlpanel
SPIN TIMER
0MIN
1
2
3
WASH SPIN
4
5
WASH TIMER
VALVE SELECTOR
0MIN
3
6
9
12
15
(
O
F
F
)
(
W
A
S
H
•
R
I
N
S
E
)
1Wash Timer
Usetoselectthedesired time for washing or rinsing.
2Valve Selector
Select“WASH·RINSE”forwashingandrinsing,and“DRAIN”todrainthetub.
“OFF”toturnoffthethedrainpump.(PUMP)
Selectwashaction(“STRONG”or“NORMAL”),and“DRAIN”todrainthetub.(NON-PUMP)
3Water Inlet & Water Guide Knob
Connectthehosefrom the water faucet to feed water to the tub.
Duringwashing,waterguideknobshouldbeselectedto“WASH”.
Duringspinrinsing,waterguideknobshouldbeselectedto“SPIN”.
4Spin Timer
Usetoselectthedesired time for spinning.
3412
N
O
R
M
A
L
S
T
R
O
N
G
D
R
A
I
N
DRAINHOSE LEG(4EA) SAFETYCOVER
NONPUMP PUMP
1
DW-6510(¿ )-Dema 01.3.269:21PM ˘`1

Caution (OnlyforDualVoltageModel)
•Makesurethattheelectricconnectorissetforyouravailablevoltagebefore operating the washing
machine.Thisunitissetfor220V. If you want to change the voltage, remove the back cover and reset
theconnectorasfigures.
INSTALLATION
Caution: Ifthepowercord is damaged, it should be replaced by a repair shop appointed by the
manufacturer,becausespecialpurposetoolsare required.
Caution:Donot connect the groundingwireto the gas pipe,lightningarrester, telephoneconnector.
etc.
•Connectthegroundingwire(option)toawaterfaucetifthepipeismadeofmetal,before plugging the
powercordintothesocket.
Ifthewatersupplypipeismadeofasyntheticmateriallikevinyl,itisnotpossibletogroundthemachine
tothewatersupplypipe,anotherground source must be found.
■Electrical Connection
•
Thisunitisdesigned to operate from an adequate supply mentioned at the rating label sticked to the rear of it.
■Location & Environment
•Donotplacethewasherinsteamyrooms or where the washer is directly exposed to rain.
Moisturemaydestroytheelectricalinsulationandcauseanelectricshockhazard.
•Placewasheronasturdy flat surface. If the washer is placed on an uneven or weaksurface, noise or
vibrationmaybeoccurred. (allowable inclination is max. 2degrees)
•Avoiddirect sunlight or heating device. As plastic and electrical components are affected by direct
heat,neverplacethewashernearheater, boilers etc...
•Donotplaceorstore the washer bellows 0°C(32°F)toavoidanydamagefromfreezing.
•Formaximumsecurity,attach the grounding wire to a copper plate or groundingrodandburyitatleast
20cmintheground.
Grounding Wire
Gas Pipe
Grounding Wire
Grounding Rod
More than
20cm
How to Fix Legs
•Whenyouinstallthisunit,besure to assemble legs(4EA) to BASE.
•Placethisunitonitsrear side on a carton to prevent damage to body.
•Insertthelegs(4EA)intotheBASEunderrectangle hole as it was
Byfirstinsertingitshook.
•Pushandscrewonlegs.(4EA)
HOOK
2
DW-6510(¿ )-Dema 01.3.269:21PM ˘`2

■Connection of Hoses
•Attachthewaterintakehosetothewaterinletlocatedat
thecontrolpanel.Pressfittheotherendofthehoseto
eitherahotorcoldwatertapasrequired.
•Attachthedrainhosetothedrainoutletattherear of the base.
•Thedrainhoseshouldbelaidflatontheground. Waterflowwillberestrictedifanyportion of the drain
hoseisraisedfrom the ground. (NON PUMP)
•Hangupthedrainhoseontheedgeofasink.(PUMP)
Caution: Thisunitismadeofpolypropylene, use water
below50°C
Caution: Theopeningmustnotbeobstructed by carpeting when the washing machine is installed on a
carpetedfloor.
WASHTIMER
R
O
T
A
T
I
O
N
L
I
M
I
T
VALVESELECTOR
SPINTIMER
R
O
T
A
T
I
O
N
L
I
M
I
T
Less than 10cm
Drain Outlet
Drain hose
A
HOW TO WASH
Preparation
HowtoWash
(NONPUMP) (PUMP)
•Sorttheclothesintogroups-whites, colorfast, non-colorfast, delicates, lint free, lint producer, etc., and
wash according tothe LAUNDRY GUIDE.
•Clotheswithworn patches or tears should first be mended. Empty out all pockets and close all side
fasteners.Treatbadstainspriortowashing.
•Ensure thedrain hose isin its correctposition.(See INSTALLATION)
•Inletpowercord plug into the power point and switch on.
1
Setthewashtimer knob to position “0”.
SettheValveselectortothe“WASH ·RINSE”or “OFF”position. (PUMP)
SettheValve selectortothe“STRONG”or“NORMAL”position.(NON-PUMP)
2Setthewaterguideknobto“WASH”.
3Openthewaterfaucetandfeedwatertothewaterlevelindicatedinsidewashtub.
4Put detergent and launday into the wash tub.
5Setwashtimewiththewashtimer.
6Whenwashingisfinished,settheValveselector to the “DRAIN”position and drain the wash tub.
3
DW-6510(¿ )-Dema 01.3.269:21PM ˘`3

1SettheValveselectortothe“WASH ·RINSE”(“STRONG”or“NORMAL”)position.
2Turnthewatertapon.
3Whentherinsingwaterbecomesclear, turn off the water tap.
4SettheValveselectortothe“DRAIN”positiontodischargethewater.
1SettheValveselectortothe“WASH •RINSE”or “OFF”position.
Incaseofnon-pumpmodel,set“STRONG”or“NORMAL”position.
2Turnthewatertaponandsupplyproper amount of water to the wash tub.
3Adjustthewashtimerinaccordance with the clothes to be rinsed.
4SettheValveselectortothe“DRAIN”positiontodischargethewater.
Beforefinalrinsingyoucanselectthiscourseformore effective rinse.
1Loadthelaundry evenly into the spindryer drum.
2Coverthelaundry with safety cover and close the inner lid.
3Closethespindryer lid.
4Setthewaterguideknobto“SPIN”andValve selector to “DRAIN”.
5Supplywaterforabout1minute.
6Afterwatersupply,set the spin timer 1~2minutes.
7Repeat 5~6,ifyouwant.
HOW TO RINSE
OverflowRinse
WaterSavingRinse
SpinRinse
Note: Beforerinsing,thewashloadmaybetransferred to the spindryer drum for spinning for 2~3
minutes(approx.)toremovesuds(SeeHOWTOSPINDRYING).
Oncompletion,transferthewashloadtothewashtubforrinsing.
Note: When you spin rinsing,
1.Donotsupplywatertospindryerdrumwhilerotatingwithhighspeed,watermaysplashandrinsing
efficiencywillbedecreased.
2.Forbestefficiencyloadthelaundry from 60% to 80% of the full capacity.
3.Donotdrainthewashingsidesimultaneously,the spindryer drum may be disturbed by remained
waterinthespinningside.
4.Ifsuppliedwateristoomuch,waterwouldbewasted.Adjustwatertapproperly not to overflow to
thewashingside.
4
DW-6510(¿ )-Dema 01.3.269:21PM ˘`4

1Putthewetclothesintothespindryer drum, being sure that they are well balanced as shown below.
2Placethesafetycoverhorizontallyonthetop.
3Closetheinnerlidandspindryer lid. (The machine will not spin if the spindryer lid is open.)
4Turnthespintimertotheclockwisedirection until you reach the desired spin time position.
•If thereisanyabnormalvibrationduringspinning,openthespindryer lid to stop the spindryer drum and
rearrangetheclothestobeingoodbalance.
•Shouldspinningfailtostopwithin15secondsafterspindryer lid is open, the brake is out of
order.Immediatelystopusingthemachineandrequest repair service.
HOW TO SPIN DRYING
Caution: Ensurethatthespindryer drum completely stops before reaching in to remove the laundry.
Bespeciallycareful of children.
LAUNDRY GUIDE
WASHING TIME
HIGH (49L)
WASHING ACTION
(NON-PUMP)
Extremelysoiledheavy fabric 10~15minutes STRONG
Linen,cotton,etc. 8~10 minutes
Ordinaryclothes(underwear, etc.) 7 minutes
Slightlysoiledsynthetic fiber 2~5minutes NORMAL
100%wool,mixed wool knitting, thinsynthetic 2~5minutes
fiberwithtags indicating hand washing
KIND OF CLOTHING
■Water level
•Whenyoufillthewaterupin
thewashtub,refer the lower
lineofeachmarksonthe
overflowfilter.
■Spin Drying Time
■Washing time & Wash action table
TIME
1minute
1~2minutes
3~5minutes
5minutes
TYPE OF LAUNDRY
thin(syntheticfiber)
wool
cotton
thick(cotton)
MID. (42L)
LOW (35L)
5
DW-6510(¿ )-Dema 01.3.269:21PM ˘`5

At the end of every washing:
•Switchofftheelectricityofthepowerpoint.
•Checkthatbothtimersare set to the “O”position.
•Wipeoffspillage(detergent powder,etc.), and generally wipe over the tub and base with a dry duster.
■Cleaningafterusewillextendthelifeofyourwashingmachine.Before cleaning disconnect the power
cordfromtheelectricaloutlet.
•Dirtmaybealsocollectedunderneath the pulsator.
•Cleanoutoccasionallybyremove the screw located in the
centerofthepulsator.
•Hookthepulsatorandpullupwards.
•Washoff the lint stuck on the bottom of the wash tub.
(Whenreplacingthepulsator,makesurethatthescrewmustbefirmlytightened
)
OverflowFilterandLintFilter
Pulsator
CLEANING AND MAINTENANCE
•Useascrewdrivertoloosenthescrew of the pulsator, and remove the pulsator.
•Removethedrainstrainerfrom the bottom of the tub using a sharp tool such as a driver.
•Washoff the lint stuck in the strainer.
•Re-installthedrainstrainerandpulsator.
DrainStrainer
•Removetheoverflow Filter by pulling it forward.
•Washoff the lint stuck on the overflow Filter
duringoverflowing.
•
Re-installtheoverflowFilter:Byfirstinsertingits
bottomsectionandthen pushing the upper part
firmlyintoplace.
•Ifthedregsarepiledupinthelintfilterafter
finishingthewash,pushdownandpullitoutas
showninfigure.
•Removethecollectedlintandwashthefilter
net.
A
!
@
6
DW-6510(¿)-Dema 01.3.269:21PM ˘`6

*Designandspecificationscouldbechangedwithoutnotice.
SPECIFICATIONS
Full name of appliance Electric clothes washing machine
Intended use Household
Type of Appliance Twin-tub
Power source Refer to specification LABEL
Dimensions (unit:mm) 802 X 440X 937(WX DX H)
Appliance Weight 22.5kg (NON PUMP), 23.5kg (PUMP)
Rated operating time Washing: 1 hour operation
Spinning: 15min. operation
Protection against electric shock Class 1 appliance
Protection against moisture Splash-proof Appliance
Standardized water consumption 49| (High), 42| (Medium), 35| (Low)
Operating pressure 0.3kgf/cm2 ~ 3kgf/cm2(3N/cm2~30N/cm2)
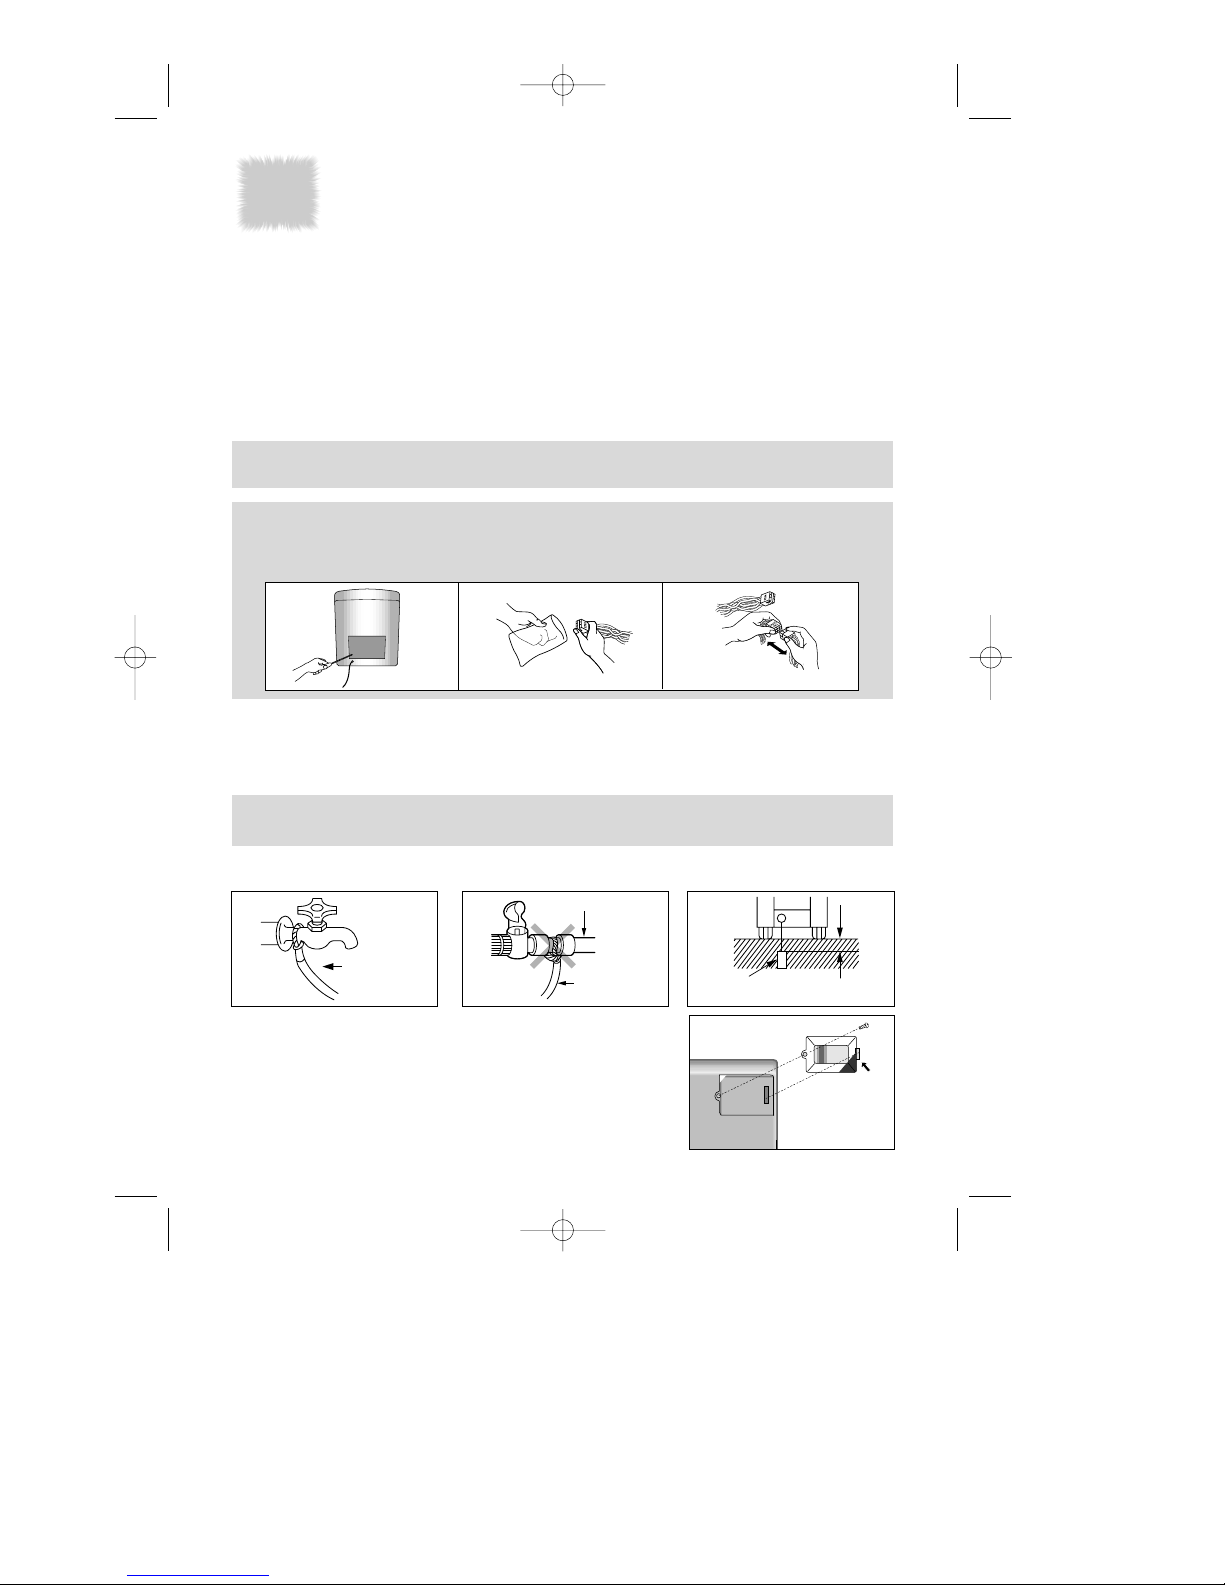
•Avoidusing excessive amounts of bleach, soap powder of detergent. Use the amount recommended
bytherespectivemanufacturers.
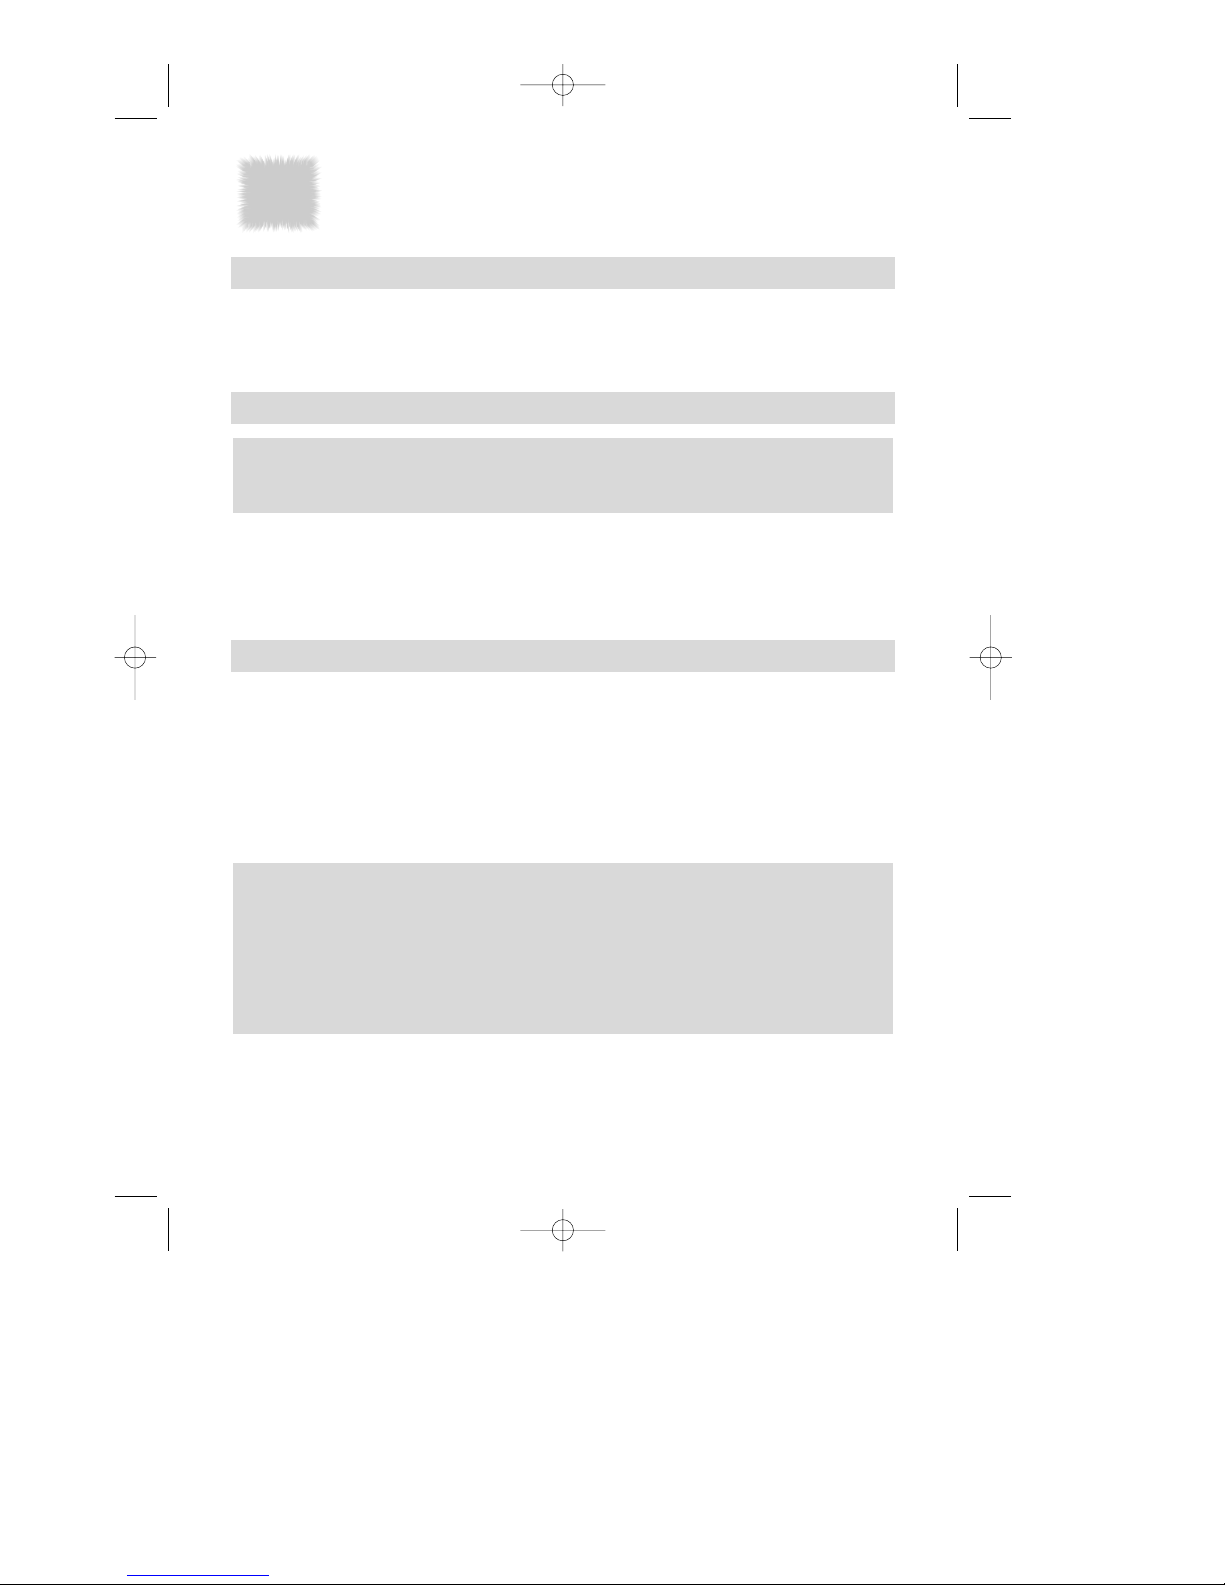
•Ifthemachineisinstalledinareas subject to freeze, ensure that it is completely drained after use.
•Whenwashingdelicatese.g.,silks,finenylons,laces,etc.,itisadvisabletoplacetheminameshbag
topreventthepossibilityofdamage.
•Donotwashlintattractingfabricswithlintproducers, e.g., black socks or dark coloredjumperswith
whitefluffytowels,napkins,etc.
•Avoidplacing a wet load on the control panel.
Theremaybetimeswhenyoususpectyourwashingmachinerequires maintenance. Before calling for a
serviceengineer,pleasecheckthefollowingpoints,tosaveunnecessary cost. You may be pleasantly
surprisedthatanapparent malfunction can be easily rectified as follows.
If your washing machine will not start, check whether
•Thehousecircuitbreakeristrippedorafuseisblown.
•Thecordisfirmlyconnectedtothepowerpointorthepowerpointisnotswitchedon.
(Checkwithasmalltablelamportoaster, etc.)
•Somethingispreventing the pulsator from rotating.
•Thewashtimerisset.
If the spin dryer will not operate, check whether
•Thespindryerlidisclosed.
•Thespintimerisset.
If there is excessive noise, check whether
•Somethingistouchingthepulsatorasitrotates.
•Themachineisplacedonalevelsurface.
•Theclothesinthespindryer drum is excessively unbalanced during spinning.
•Anarticleislodgedbetweenthespindryer drum and tub.
POINTS TO REMEMBER
BEFORE YOU CALL FOR SERVICE
7
DW-6
WASHER-S
INSTRUCT
=
•Thankyouforse
•Beforeoperating
instructionscomp
•Whenyouinstal
toBASE.
DW-6510(¿)-Dema 01.3.269:21PM ˘`7

DW-6510
WASHER-SPINDRYER
INSTRUCTION MANUAL
=
WASHTIMER
R
O
T
A
T
I
O
N
L
I
M
I
T
VALVESELECTOR
SPINTIMER
R
O
T
A
T
I
O
N
L
I
M
I
T
•Thankyouforselectingthiswasher-spindryer.
•Beforeoperatingthisunit,pleaseread these
instructionscompletely.
•Whenyouinstallthisunit,besure to assemble legs
toBASE.
DW-6510(¿)-Dema 01.3.269:21PM ˘`8

VISION CREATIVE, INC.
`–‚‡†·º„fi•˛ 5¡526
·º¿ · ” ø 16 ˆ
·ª · · TEL
MODEL DWM-4030M-MAS(¿)- ‚»•„ `˘˙
BUYER Dema, DW-6510
1´2000.10.2 6´
2´7´
ˇ`⁄3´8´
4´9´
5´10 ´
`ƒ˘˙ ˙(2000.10.11)
¿
˛˛……
‚µ
¿¿
¿
ˇˇ
–
MEMO
¿¿‹‹¶¶
Ù
ˆˆ‡‡
VVIISSIIOONN
··ªª··
Á
`˙
TEL: 757-9340 FAX: 774-1039
DW-6510(¿)-Dema 01.3.269:21PM ˘`9
Table of contents
Other Daewoo Washer manuals

Daewoo
Daewoo DWF-312W User manual

Daewoo
Daewoo DWF-600M User manual

Daewoo
Daewoo DWD-FC1011 User manual

Daewoo
Daewoo DWF-172M User manual

Daewoo
Daewoo DWD-E113R User manual

Daewoo
Daewoo DW-900C User manual

Daewoo
Daewoo DWD-FV2021-4 User manual

Daewoo
Daewoo DWD-WD1132 User manual

Daewoo
Daewoo DWF-260NPNP User manual

Daewoo
Daewoo mini User manual

Daewoo
Daewoo DWD-F1012 User manual

Daewoo
Daewoo DWD-FD1411 User manual

Daewoo
Daewoo WM710T1WU4RS User manual

Daewoo
Daewoo DWM-500M User manual

Daewoo
Daewoo DWD-CV701PC User manual

Daewoo
Daewoo DW-503M User manual

Daewoo
Daewoo DWD-FU107'S User manual

Daewoo
Daewoo DWF-5510P User manual

Daewoo
Daewoo DWF-6688 User manual

Daewoo
Daewoo DWF-160M User manual