manuals.online logo
Brands
  1. Home
  2. •
  3. Brands
  4. •
  5. Dakota Alert
  6. •
  7. Transmitter
  8. •
  9. Dakota Alert UT-4000-ANZ User manual

Dakota Alert UT-4000-ANZ User manual

2. Use your fingernail or a flathead screwdriver to pry open the magnetic contact’s cover.
3. Mount the magnetic contact with a drill and two screws (included), then snap the cover back on.
4. Mount the transmitter bracket with a drill and two screws (included). Make sure that the arrow on the bracket is
facing up.
5. If you’re mounting your transmitter outdoors, push the silicone plugs into the push button’s screw holes to
waterproof the casing.
6. Slide the transmitter down onto the bracket.
SPECIFICATIONS
• Power source: CR2 battery • Transmitter range: up to 1.6 km*
• Frequency: 433 MHz • Dimensions: (W × H × D) 50 × 95 × 22mm)
*Actual range will vary depending on local terrain and obstructions.
TECHNICAL SUPPORT:
If you encounter any difficulty in the operation of this product after reading the manual, please contact us.
We will be happy to answer your questions and help you in any way we can.
WARRANTY:
Dakota Alert warrants this product to be free of defects in material and workmanship for a period of one year from
the date of purchase. This warranty does not cover damage resulting from accident, abuse, act of God or improper
operation. If this product does become defective, simply return it to Target Technology Ltd. Please include a note
describing the troubles along with your name and return address as well as the original sales receipt. If the product is
covered under warranty it will be repaired or replaced at no charge. If it is not covered by warranty, you will be notified
of any charges before work is done.
Freephone New Zealand: 0508 242 333
Phone (64) 6 751 2969
Fax (64) 751 2717
PO Box 730, New Plymouth 4342
NEW ZEALAND
Freephone Australia: 1300 588 195
Fax (64) 751 2717
AUSTRALIA
www.bealert.co.nz www.bealert.com.au
NEW ZEALAND AUSTRALIA
This UT-4000 Dakota Alert Universal Transmitter sends a signal to your DCR-4000 receiver
when its button is pressed or it detects a door/window opening. Connect multiple Dakota Alert
transmitters to your receiver to create a complete security system.
Universal
Transmitter
UT-4000-ANZ
USER GUIDE
Transmitter
Bracket
Magnetic
cover
CONTENTS
• Universal Transmitter • Screws (4)
• Transmitter bracket • CR2 battery
• Magnetic contact • User Guide
• Silicone plugs (4)
SETTING UP YOUR UNIVERSAL TRANSMITTER
1. To install the battery, see “Installing the battery.”
2. To select a tune and connect your transmitter to your receiver, see “Connecting to your receiver.”
3. To mount your transmitter, see “Mounting your universal transmitter.”
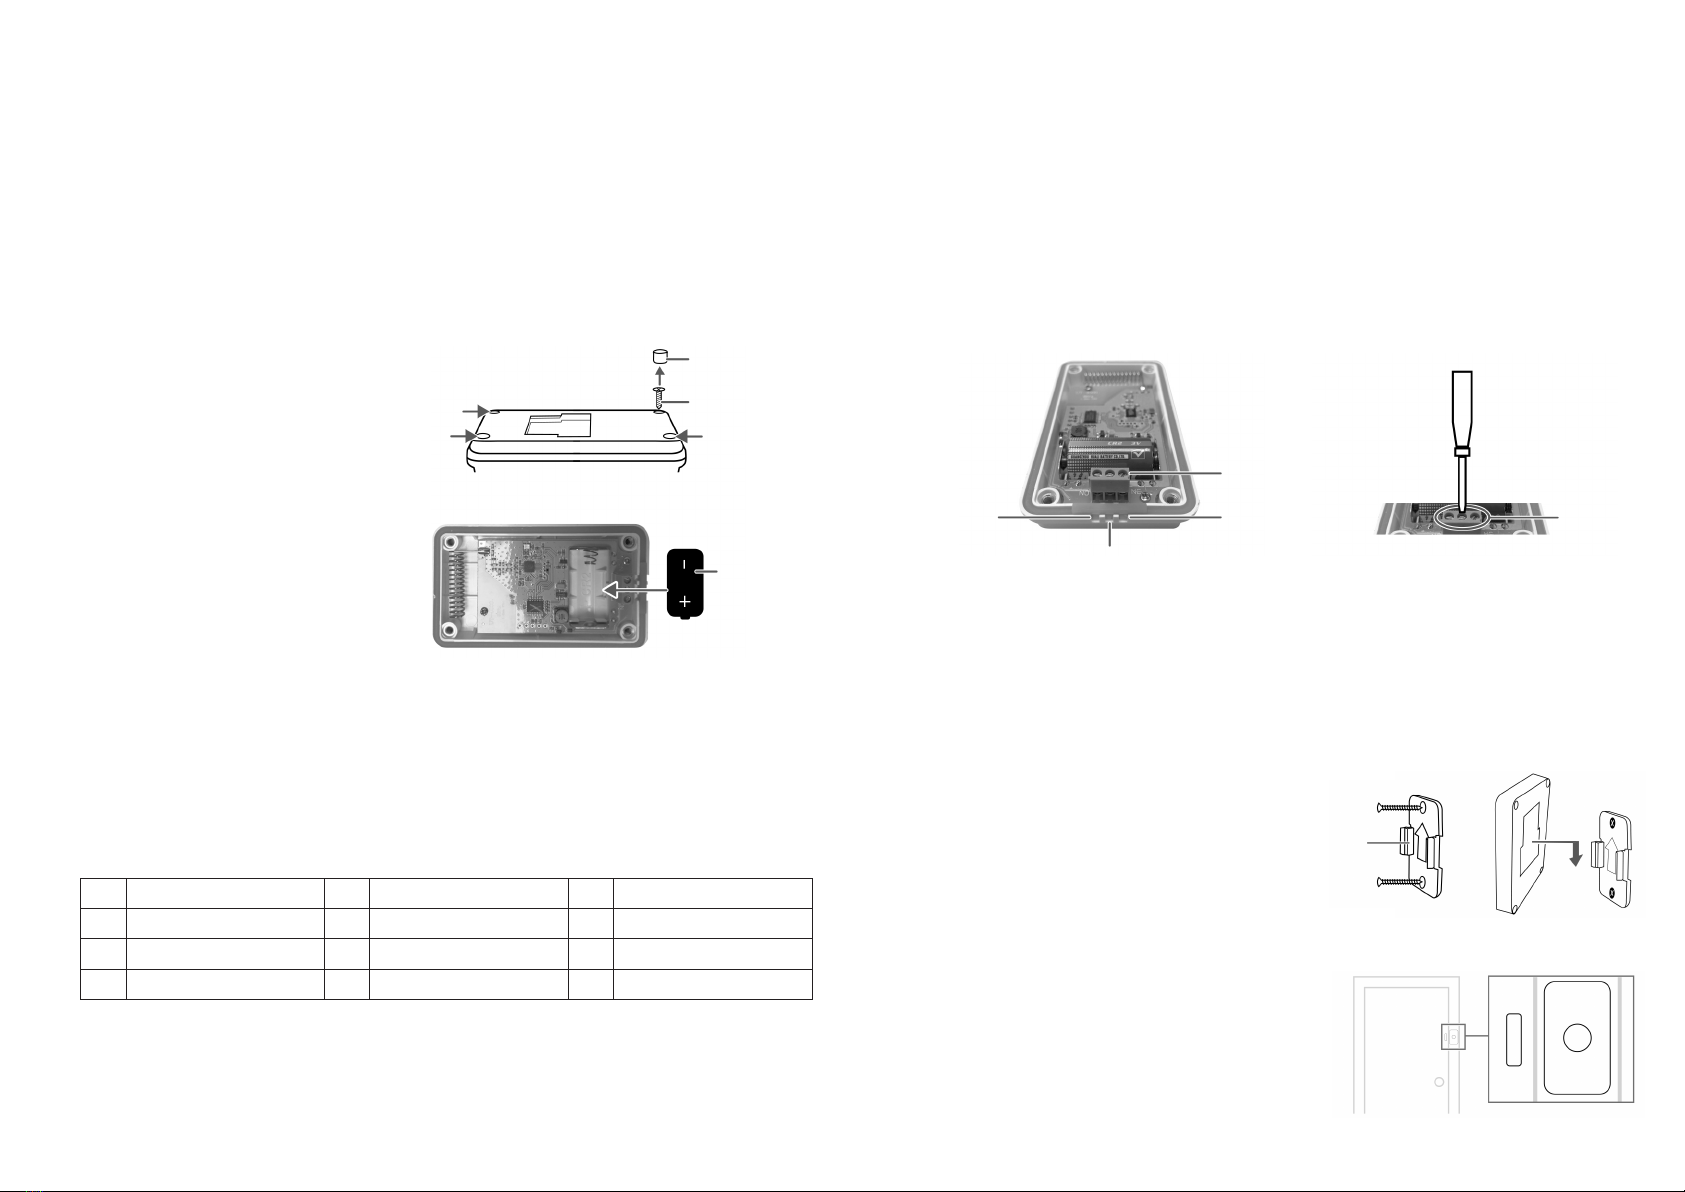
INSTALLING THE BATTERY
1. Remove the four silicone plugs (if inserted) and
screws on the back of the transmitter to take off
the cover.
2. Insert the CR2 battery in the transmitter. Make
sure that the + and – symbols on the battery
match the symbols in the compartment.
3. Replace the cover and secure it with the screws.
Note: If you are mounting your transmitter
outdoors, push the silicone plugs into the screw
holes to waterproof the casing.
CONNECTING TO YOUR RECEIVER
Note: You can connect up to 16 transmitters to your receiver.
1. Place your receiver and transmitter near each other.
Note: Be careful not to activate your transmitter until you find the tune you want. Keep the magnetic contact away
from the push button to avoid accidentally activating it.
2. Press and hold the MODE and (volume) buttons on the receiver for three seconds. When all four lights flash,
release the buttons.
3. Press (volume) repeatedly until you find the tune you want.
4. After you choose a tune, activate the transmitter (press its button or separate it from the magnetic door contact).
The receiver beeps.
Note: If you accidentally activate the transmitter on a tune you don’t want, press the volume button on the receiver
to continue cycling through the tunes to select the tune you want, then reactivate the transmitter.
5. If you are coding more than one transmitter, repeat steps 3 and 4.
6. After your transmitter(s) are coded, press and hold the MODE button until the LEDs stop flashing.
7. To test the tune, activate the transmitter. You’ll hear the selected tune through your receiver and the lights will flash.
CONNECTING AN EXTERIOR DETECTOR (OPTIONAL)
Your universal transmitter can be activated by any type of detector that provides a normally open (N/O) or normally closed
(N/C) output. Both N/O and N/C contacts can be used simultaneously with the magnetic contact and push button.
1. Remove the four silicone plugs (if inserted) and screws on the back of the transmitter to take off the cover.
2. Insert wires through the silicone gaskets and into the terminals on the bottom of the transmitter:
• For a normally closed connection, insert the wires into the N/C and common terminals.
• For a normally open connection, insert the wires into the N/O and common terminals.
3. After inserting the wires, tighten the terminals with a small screwdriver.
Note: A 22 AWG solid wire can easily pierce the silicone gasket. If using a lighter gauge wire, you may need to
pierce the gasket with a paper clip or small needle.
4. Replace the cover and secure it with the screws.
Note: If mounting your transmitter outdoors, push the silicone plugs into the screw holes to waterproof the casing.
MOUNTING YOUR UNIVERSAL TRANSMITTER
You can use the transmitter as a doorbell that activates when
its button is pressed or as a warning that activates when the
magnetic contact is separated from the push button.
Doorbell
1. Use a drill and two screws (included) to mount the transmitter
bracket. Make sure that the arrow on the bracket is facing up.
2. If you’re mounting your transmitter outside, push the silicone
plugs into the screw holes to waterproof the casing.
3. Slide the transmitter down onto the bracket.
Door/Window mounting
1. Choose mounting locations where the magnetic contact can be
10mm or less from the push button.
1 Ding Dong (high) 5 Alarm/Siren 9 William Tell
2 Ding Dong (low) 6 Coo Coo Clock 10 Cannon in D
3 Westminster 7 Bird Chirping 11 Morning
4 Fur Elise 8 Twinkle Twinkle 12 Toreador March
Silicone plug
CR2 battery
Screw
Common
Normally Closed
(N/C)
Terminals
Normally Open
(N/O)
Terminals
Transmitter
Bracket

Other Dakota Alert Transmitter manuals

Dakota Alert UT-3000 User manual

Dakota Alert

Dakota Alert UT-3000 User manual

Dakota Alert MURS Alert MAPS User manual

Dakota Alert

Dakota Alert MURS Alert MAPS User manual

Dakota Alert WMT-3000 User manual

Dakota Alert

Dakota Alert WMT-3000 User manual

Dakota Alert WPT-3000 User manual

Dakota Alert

Dakota Alert WPT-3000 User manual

Dakota Alert BBT-2500 User manual

Dakota Alert

Dakota Alert BBT-2500 User manual

Dakota Alert WPT-3000 User manual

Dakota Alert

Dakota Alert WPT-3000 User manual

Dakota Alert UT-2500 User manual

Dakota Alert

Dakota Alert UT-2500 User manual

Dakota Alert DCHT-2500 User manual

Dakota Alert

Dakota Alert DCHT-2500 User manual

Dakota Alert WMT-3000 User manual

Dakota Alert

Dakota Alert WMT-3000 User manual

Dakota Alert BBT-4000 User manual

Dakota Alert

Dakota Alert BBT-4000 User manual

Dakota Alert DCMT-4000 User manual

Dakota Alert

Dakota Alert DCMT-4000 User manual

Dakota Alert UT-2500 User manual

Dakota Alert

Dakota Alert UT-2500 User manual

Dakota Alert WHT-3000 User manual

Dakota Alert

Dakota Alert WHT-3000 User manual

Dakota Alert DAPT-4000 User manual

Dakota Alert

Dakota Alert DAPT-4000 User manual

Dakota Alert UT-3000 User manual

Dakota Alert

Dakota Alert UT-3000 User manual

Dakota Alert WHT-3000 User manual

Dakota Alert

Dakota Alert WHT-3000 User manual

Dakota Alert DAPT-4000 User manual

Dakota Alert

Dakota Alert DAPT-4000 User manual

Dakota Alert DCPT-4000 User manual

Dakota Alert

Dakota Alert DCPT-4000 User manual

Dakota Alert WPT-3000 User manual

Dakota Alert

Dakota Alert WPT-3000 User manual

Dakota Alert SBB-4000 User manual

Dakota Alert

Dakota Alert SBB-4000 User manual

Dakota Alert MURS Alert User manual

Dakota Alert

Dakota Alert MURS Alert User manual

Dakota Alert UT-3000 User manual

Dakota Alert

Dakota Alert UT-3000 User manual

Dakota Alert DCPT-2500 User manual

Dakota Alert

Dakota Alert DCPT-2500 User manual

Dakota Alert DCMT-2500 User manual

Dakota Alert

Dakota Alert DCMT-2500 User manual

Popular Transmitter manuals by other brands

Sigma R1 DUO COMFORTEX+ manual

Sigma

Sigma R1 DUO COMFORTEX+ manual

Tecfluid LU Series instruction manual

Tecfluid

Tecfluid LU Series instruction manual

AMX TX32 Schematic diagram

AMX

AMX TX32 Schematic diagram

Jamara CCX Pro 2,4 GHz instructions

Jamara

Jamara CCX Pro 2,4 GHz instructions

Olson Technology OTOT-1000 instruction manual

Olson Technology

Olson Technology OTOT-1000 instruction manual

Berker 2721 Series Operation and assembly instructions

Berker

Berker 2721 Series Operation and assembly instructions

TeleAlarm S37L Series operating instructions

TeleAlarm

TeleAlarm S37L Series operating instructions

SWIT S-4903T user manual

SWIT

SWIT S-4903T user manual

Regin CTHRA Instruction

Regin

Regin CTHRA Instruction

R.V.R. Electronica TEX1000LIGHT user manual

R.V.R. Electronica

R.V.R. Electronica TEX1000LIGHT user manual

MTT MS3121 user manual

MTT

MTT MS3121 user manual

Enersound T588-15 user manual

Enersound

Enersound T588-15 user manual

RF Limited Magnum 1012 OPERATING CONTROL AND FEATURES

RF Limited

RF Limited Magnum 1012 OPERATING CONTROL AND FEATURES

EYC P064 Series instruction manual

EYC

EYC P064 Series instruction manual

WEVI VW-5 operating instructions

WEVI

WEVI VW-5 operating instructions

Jay electronique UD Series installation guide

Jay electronique

Jay electronique UD Series installation guide

BAYKON MX08 Technical manual

BAYKON

BAYKON MX08 Technical manual

Lynx yellobrik OTX 1410 quick reference

Lynx

Lynx yellobrik OTX 1410 quick reference

manuals.online logo
manuals.online logoBrands
  • About & Mission
  • Contact us
  • Privacy Policy
  • Terms and Conditions

Copyright 2025 Manuals.Online. All Rights Reserved.