Dakota Lithium PS2400 User manual

1
PORTABLE POWER STATION
USER MANUAL
DAKOTALITHIUM.COM

2
TABLEOFCONTENTS
GOFURTHER.
LASTLONGER.
PLAYHARDER.
General Safety Rules 03
Product Specications 04
Inputs and Outlets 05
Button Features 06
LCD Display 07
List of Fault Codes 08
Operating Instruction 09
What It Powers / Parallel Integration Use 11
How to Charge 12
Troubleshooting 14
Cleaning 15
Transportation and Storage 15
Notice 16
Maintenance 17
Recycling 17
Accessory List 17

3
GeneralSafetyRules
warning
1. Read this manual before using this product. Failure to follow the instructions and
safety precautions in this manual can result in damage to the product or personal
property, or serious injury or death. DO NOT use the product with incompatible
components or alter the product in any way.
2. Improper use may result in re, property damage, or personal injury. Make sure to
use the product according to the following safety rules and guidelines.
3. Do not expose the product to any liquid or submerge in water. If the battery
comes into contact with water, it may cause chemical decomposition of the
battery. This may cause the battery to catch re or explode.
• DO NOT disassemble, repair or modify the unit or the battery by yourself.
• DO NOT place the unit close to or in a re or expose it to heat. Keep out of direct sunlight.
• DO NOT charge, use or store the unit in a bathroom or in an area exposed to rain or moisture.
• Only use the output socket to power external devices. Never connect the output to mains power
under any circumstances.
• DO NOT touch the unit or the plug- in points if your hands are wet.
• DO NOT connect any metallic objects to the AC input or output.
• DO NOT rub your eyes if uid from inside the unit should get in your eyes.
• DO NOT dispose of the unit together with household waste.
• DO NOT use any inappropriate power cords.
• If rust peculiar odors, overheating or other abnormal circumstances are observed, stop using the
unit immediately and contact the dealer or our customer service center. The unit complies with
all legal requirements for transport of dangerous goods.
• Only charge, use and store the unit within an ambient temperature of 0 to 40°C (32 ~104°”F).
• Switch the unit off immediately if it has accidentally fallen, was dropped or was exposed to
vibrations.
• Once the unit is fully charged, unplug the adapter or charger. We are not liable for any damage
caused by using different brand charging cables.
• Use of different cables will void the product’s warranty and may cause damage or serious bodily
injury.
• Use and store the unit only in a clean and dry environment. DO NOT use and store in a dusty
and wet environment.
• Check the unit prior to every use. DO NOT use the unit if it is damaged or broken.
• DO NOT use the unit if the power cord is damaged or broken.
• Keep the unit away from children. DO NOT let children use the power supply unit.
• Keep this product away from pets.
• DO NOT use or store the unit in an area or environment with high temperature.
• Should uid from inside of the unit come in contact with your skin or clothing, wash the affected
areas with tap water.
• In a storm, unplug the power cord from the socket.
• DO NOT place the unit on its side or upside down while in use or storage.
1

4
Productspecifications
GENERAL PARAMETER
Battery Type Lithium Iron Phosphate
Rated Capacity 51.2V,40Ah / 2060.8Wh
Net Weight About 25Kg
Product Size 430x300x280mm
Operating Temp. -10 to 40°C
Charging Temp. 0 to 40°C
Storage Temp. -20 to 45°C
INPUT
AC Charge Input Voltage AC 100-130V
AC Charge Input Power AC 1500W
Solar Charge Input 12-75V, 800W Max.
Car Charger DC 12V/24V, 192W Max.
OUTPUT
AC Output Voltage*4 110V/60Hz
Rated AC Power Output 2400W(4800W Peak)
Power Output after 2-in-Parallel 4800W
Output Waveform Pure Sine Wave
UPS Switching Time 10 ms
Cigarette Lighter Socket Output 12V/10A
DC Output*2 12V/5A
USB-A Output*2 5V/3A,9V/2A,12V/1.5A 18W Max.
USB-C Output*2 5V/9V/12V/15V,3A ; 20V/5A 100W Max.
Wireless Charger 10W
LED Light 5W
2

5
INPUTSANDOUTLETS
3
1. DC Output
2. Cigarette Lighter Socket Output
3. USB-A Output
4. USB-B Output
5. LCD Screen Display
6. AC Output 2400W X4
7. PV Input
8. Air Intake Vent with Cooling Fan
9. OLP Reset
10. AC Input
11. Earth Terminal
12. AC Parallel Interface
13. LED Light
14. Wireless Charger
Note: No User-serviceable Parts Inside.
Recommended to fully charge the PS2400 before use.

6
BUTTONFEATURES
4
14. Wireless Charger
Press “Power ON/OFF” Button to turn on
the wireless charger. Press”Power ON/OFF”
Button to shut down the output(s) when not
in use.
15. Power ON/OFF
Press the button (15) to turn on or turn off the
equipment.
16. Mode
Fast charge mode is on by default. Press
the “Mode” button to switch to slow charge
mode. The slow charge outputs one quarter of
the maximum allowable power.
17. LED Light
The LED light will function whether or not that
“Power ON/OFF” button has been activated.
Press the button (17) to turn on the LED light.
Then press it again, to turn the light off.
18. DC Output
Before pressing DC Output button (18)
to turn on, please make sure the “Power
ON/OFF” is ON rst. To stop DC output,
press (18) again.
19. USB Output
Before pressing the USB Output button
(19) to turn-on, please make sure the
“Power ON/OFF” is ON rst. To stop
USB output, press (19) again.
Note: All USB-C cables are different.
If the USB-C port is not working,
please try to use the AC adapter to
charge.
20. AC Output
Before pressing the AC Output button
(20) to turn on, please make sure the
“Power ON/OFF” is ON rst. To stop AC
output, press (20) again.

7
LCD
DISPLAY
5
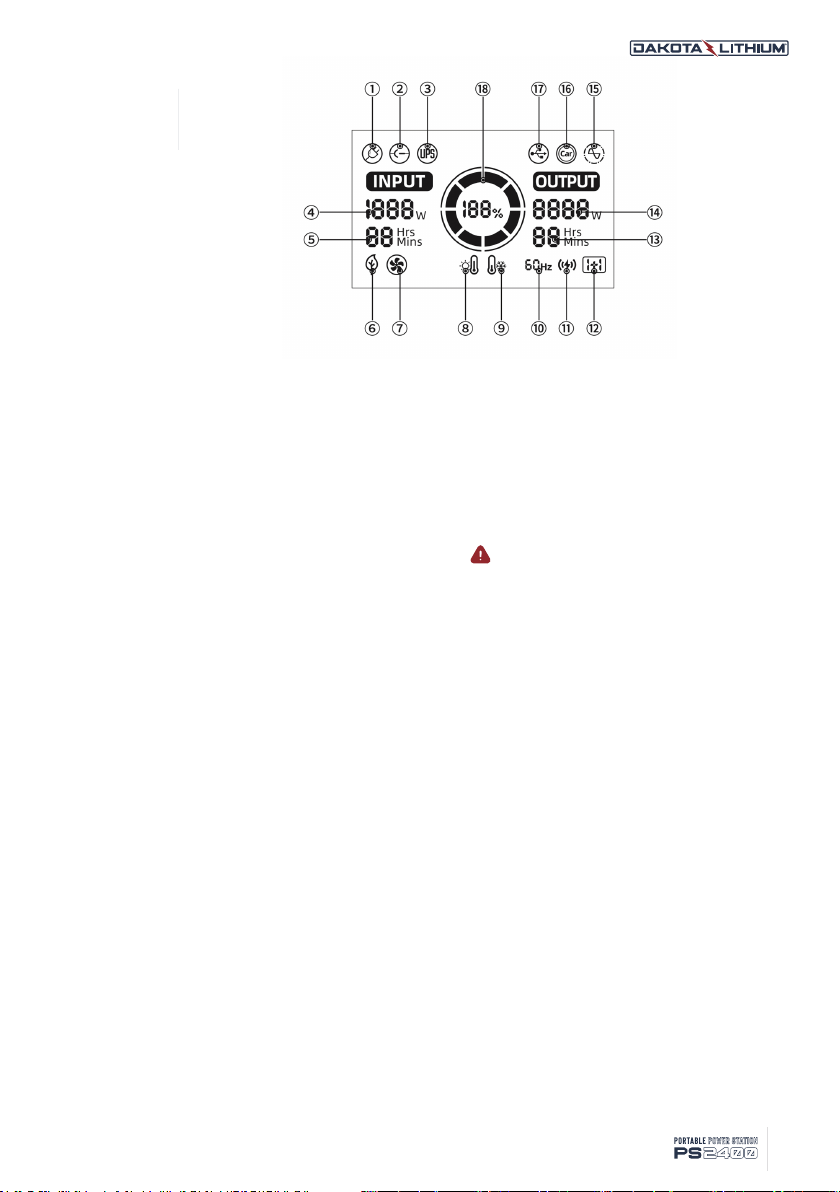
1. AC Input: When the AC charging cable is
inserted, this icon will be displayed on the LCD.
2. DC Input: When the DC/SOLAR charging cable
is inserted, this icon will be displayed on the LCD.
3. UPS Mode: When the device is in the AC
charging state and the AC output is turned on,
the UPS mode automatically starts and this icon
will be displayed on the LCD.
4. Input Power: When charging, the display shows
“INPUT” and charging power in Watts.
5. Input Time: When charging, the display shows
full remaining charge time.
6. Quick Charge Switching: When the AC
charging mode is used, the icon will be displayed
when the charging mode is switched to slow
charge.
7. Fan Start Cooling Status: When the fan is
running,this icon is displayed on the LCD.
8. High Temperature Alarm: When the inverter or
battery pack temperature is too high, this icon will
be displayed on the LCD.
9. Low Temperature Alarm: When the
temperature of the inverter or battery pack is too
low, this icon will be displayed on the LCD.
10. AC Output Frequency: When the AC switch
is turned on, the display shows “output” and the
icon.
11. Wireless Charger: When the wireless charge
outputs, this icon will be displayed on the LCD.
12. AC Parallel State: When the AC output is
synchronized, this icon will be displayed on the
LCD.
13. Output Time: In the output state, the LCD
screen displays the estimated remaining output
time.
14. Output Power: Displays the total used power of
DC output, USB-A, USB-C and AC output.
Note that this value will be adjusted multiple
times as the energy consumption of the
connected device changes. This is evident
when the port is initially activated using a
connected device.
15. AC Outputs: After the AC output switch is
turned on, the icon lights up and displays the total
AC output power, current remaining time and
current frequency.
16. Cigarette Lighter Socket Output: When the
Cigarette Lighter Socket Output is turned on, the
icon lights up and shows the total power used by
the DC output, the current remaining time and
frequency.
17. USB Output: When the USB output is turned on,
the icon lights up and shows the total power used
by the DC output, the current remaining time and
frequency.
18. Battery Level Indicator: Displays the current
battery level in the form of energy circle +
percentage. The main switch is turned on and the
battery quantity is displayed. During the charging
process, the energy circle is updated dynamically.

8
ListofFaultCodes
CODE SIGNIFICANCE SOLUTIONS
E01 Battery over-voltage Please disconnect the charging cable and stop charging
E02 Battery under-voltage Please disconnect the output and charge the device
E03 Inverter overheating Please disconnect the output and wait 1-2 hours before operation
E04 Abnormal input voltage Please disconnect the AC charging cable or Solar PV input cable
E05 Abnormal grid frequency Please disconnect the charging cable
E06 Abnormal output voltage Please disconnect the output and check the electric appliance
E07 AC output short circuit Please disconnect the output and check the electric appliance
E08 AC output overload Please disconnect the output
E16 AC charging overload Please disconnect the output
FAULT
NOTE: When the DC load is abnormal, the system will
automatically turn off the output and will not show the fault
code. Please disconnect the output and check the electrical
equipment then try again. When the USB load is abnormal,
the corresponding output power will be zero and the system
will not show the fault code. Please disconnect the outputs
and check the electrical equipment then try again.

9
RE-CHARGING
Use the original AC line to charge, the
full charge time is about 1.8-2.5 hours.
When charging, the LCD screen will be lit.
The LCD display will provide the battery
charging status in real time and the device
will display 100% when it is fully charged. It
is recommended to fully charge the device
every 3 months to maintain the life of the
device.
POWER OUTPUT ATTENTION
Press the appropriate output button to
select the desired outlet type. The output
port button must be pressed to activate
the corresponding output. When activated,
the LCD display will turn on and provide
detailed information about the output.
When no output is activated, the LCD
screen will automatically turn off.
OVERLOAD CONDITION
If the output ports are overloaded,the
device will automatically turn off the output
power. The code “E08” will be displayed on
the LCD screen.
DISCHARGING
Hold the “Power on/off” button for 1
second to turn on the device. Hold the
“Power on/off” button for 3 seconds to
turn off the device. The device uses an
advanced battery management system that
allows it to charge the connected device
through AC or DC output or USB output.
HOW TO SWITCH FREQUENCY?
The device can intelligently identify the
frequency of voltage when charging and
can automatically set the frequency, so
please charge before using. After plugging
in the charging cable, the display will show
the frequency of current grid voltage. If
it displays “F50”, it is 50Hz. If it displays
“F60”, it is 60Hz. You can also manually set
and change the voltage frequency. Before
using the power station,please conrm
the voltage frequency of your electrical
equipment, 50 Hz or 60 Hz? Then hold the
“Power on/off” button for 1 second to turn
on the device. If “50” is displayed on the
LCD, it means that the operating frequency
of the power station is 50Hz. If “60” is
displayed on the LCD screen,it means 60Hz.
If the frequency displayed on the LCD
display does not match the frequency of
the local power grid, you must change the
frequency according to the following steps:
Step 1: Hold the ‘Power on/off’ button for 3
seconds to power off(the LCD display screen
will turn off).
Step 2: Hold the “AC on/off” button down
for 1 second, while holding the rst button
down hold the “Power On/off” button for
1 second. Release both ngers and you will
see the frequency.
OPERATINGINSTRUCTION
6

10
COOLING FAN
The equipment is designed with an internal
cooling fan to ensure that the product
runs within the proper temperature range.
When the device experiences a high output
load, it will automatically turn on the fan.
During discharging and charging, the fan
may run intermittently to keep the internal
temperature within the operating range.
When the AC circuit is activated, the fan is
likely to start to ensure normal operation.
POWER SAVING SLEEP MODE
(1) No charging (AC input + PV), no
discharging (DC+USB+AC). When charging
is not connected and only the main switch
is turned on, it will enter sleep mode after
5 minutes.
(2) If any charging is connected (regardless
of whether there is power) it will not sleep.
(3) If the USB port is outputting <5W,
DC<5W and AC<25W, it will enter sleep
mode after a delay of 8 hours.
(4) The self-consumption of the whole
machine is less than 5mA after shutting
down all switches and entering sleep mode.
(5) Self-consumption after switching of the
equipment is less than or equal to 200μA.
STORAGE
If it will be stored for more than 1 month
and the maximum storage time shall not
exceed 6 months, please charge it to at
least 50% capacity and keep it indoors at
a normal temperature. Please keep it away
from direct sunlight. Excessive temperature
will lead to reduced service life, overheating,
and re. Extremely cold conditions below
the specied storage range can also impair
the performance and service life of the
equipment. Please keep away from corrosive
chemicals and gasses.
After taking it out of storage, perform
a visual inspection to ensure that the
appearance of the equipment and all
accessories are normal. Check the vents on
the intake and exhaust sides to make sure
they are free of foreign objects.
OPERATINGINSTRUCTION

11
Laptops (41.4Wh)
around
44 Recharges
Mini Fridge (40W)
around
46 Hours
Deep Freezer
around
6 Hours
Household Ref.
around
15 Hours
32” TV (60W)
around
30 Hours
DJI Drone (89.2Wh)
around
20 Recharges
CPAP without heated
Humidier (15W)
123 Hours
Smartphone (10Wh)
around
185 Recharges
Go-Pro (5.9Wh)
around
314 Recharges
Switch (16Wh)
around
115 Recharges
Powertools
around
20 Recharges
Floodlight (5W)
around
370 Hours
WHATITPOWERS?
PARALLELINTEGRATIONUSE
7
8
STEP 1: Turn off each AC
output and then insert the
paralleling line.
Step 2: Turn on each of the
AC ON/OFF each Power
Station.
Step 3: Insert and start the
loaded equipment.
NOTE: This feature is only available for PS2400, which requires second PS2400 sold separately.

12
HOWTOCHARGE
Re-chargingtime
ACcharging
9
Use the AC charging cable we provided to charge the device. It takes 1.8 to 2.5 hours
to full capacity. When the LCD shows that the battery power is 100% it means that the
battery is fully charged and the input power will turn off after several minutes.
From AC socket charging
1.8-2.5 hours
From solar charging
800W 4-7 hours
Depending on solar conditions
From car port 12V
32-34hours
NOTE: If the AC output power is greater than 450W during charging, the charging current will
decrease. When the device is charging, if the AC input current is more than 1500W, the device
will be overloaded, a fault code “E016” will show on the LCD screen and, the output will be
shut off after 10 seconds. Disconnect the output load then press the AC switch once to clear it

13
HOWTOCHARGE
12Vcarcharger
Solarpanelcharging
9
The total open circuit voltage of solar modules after series-parallel connection should not exceed
the specied voltage! Please place as many solar panels in direct sunlight as possible.
Supports 100W/120W/150W/600W/800Wsolar panel charging, charging time will vary based on
the sunlight intensity.
Use the provided car charger to charge. It will take 32 to 34 hours to fully charge. When
the LCD shows that the battery power is 100%, it means that the battery is fully charged.
CAUTION:
1. Do not plug in power supplies with different voltages in both PV input ports at the same time!
2. You can hook up two solar panels to PV input ports when Power Stations are wired in parallel. Be
sure to conrm that both solar panels have the same voltage specications.
CAUTION: Do not charge the product with solar PV input and car port at the same time!

14
TROUBLESHOOTING
10
THE DEVICE DOES NOT DISCHARGE:
(1) Check whether the output buttons are activated;
(2) Check whether the total output power exceeds the rated output power;
(3) Check whether the temperature of the equipment is too high.
THE DEVICE CANNOT BE CHARGED:
(1) Conrm that the wall plug power cord is inserted fully into the DC Input.
(2) If the device cannot be charged immediately after it is discharged, please wait for an
hour and try again. It may be the over-temperature protection.
IN THE EVENT THAT THE UNIT CATCHES FIRE:
Never attempt to extinguish a re if it is unsafe to do so. Contact your local re
department. If it is safe to do so use an Lithium appropriate re extinguisher. Do not touch
any hot or burnt components. Dispose of the unit only when safe to do so after the unit is
extinguished and fully cooled.
GETTING THE BATTERY PACK WET.
Warning: Getting your battery pack wet could cause electric shock or other bodily harm.
Never attempt to power on a wet battery pack.
(1) Surface Water: If your battery pack was lightly splashed with water, wipe the unit dry and
allow it to fully dry for several hours before powering on.
(2) Water got inside: If water entered the battery pack, do not touch the battery pack and
place it in a safe area until fully dry. Do not attempt to power the battery pack on and
dispose of the battery pack in accordance with local laws.
(3) Battery fell into water: Do not attempt to retrieve the battery back and contact your
local re department for guidance. If the unit is retrieved from the water, do not touch
the battery pack and place it in a safe area until fully dry and dispose of it properly in
accordance with proper battery disposal.

15
CLEANING
TRANSPORTATION&STORAGE
11
12
Be sure that the product is disconnected from all input power sources and output devices.
Use a clean, dry, lint-free cloth to wipe it down. Remove any debris, dirt, or other blockages
on both side vents. When cleaning debris from the side vents, do not allow the debris, dirt
or other blockages to enter the body of the product.
DO NOT use abrasive cleaners or solvents.
DO NOT use compressed air to clean side cooling vents, as this will force
foreign particles into the internal circuitry.
To avoid the risk of electrical shock, DO NOT use metal objects to clean
ports.
• Battery life may be reduced if not used for an extended period of time. Discharge
the Power Station to 30% battery life, then charge to 85% every 3 months to prolong
battery life.
• Store indoors, in cool temperatures, mild humidity, and away from direct sunlight
• DO NOT place the product near a heat source, such as a car in direct sunlight, a re
source, or a heating stove.
• Leaving in a vehicle or other conned spaces in extreme hot temperatures can lead to
decreased service life, overheating, and re. Extreme cold conditions below specic
storage range can also harm the product performance and service life.
• Store the product in a dry environment. DO NOT place the product where it may
contact water or high humidity. Keep away from corrosive chemicals and gasses.
• Make sure no small metal objects can fall on or around the product while in storage.
• Never transport a product with a battery power level higher than 30%.
• Never store the product in environments below -4º (-20ºC) or above 113º (45ºC).
• After removing it from storage, visually inspect it to ensure the product and all
accessories look satisfactory. Review the intake and exhaust side vents to ensure
they are clear of debris. Allow the product to return to ambient temperatures before
recharging or charging other devices.

16
NOTICE
13
NOT PERMITTED ON AIRCRAFTS
TO PRESERVE THE BATTERY LIFESPANS,
PLEASE USE AND RECHARGE AT LEAST
ONCE EVERY 3 MONTHS
USE ORIGINAL OR CERIFIED
CHARGER AND CABLES
AVOID EXTREME TEMPERATURE
AVOID DROPPING
DO NOT DISASSEMBLE
IT’S NOT WATERPROOF,DO NOT
EXPOSE TO LIQUIDS
PLEASE DISPOSE OF BATTERIES AND
ELECTRONIC GOODS IN ACCORDANCE
WITH LOCAL REGULATIONS

17
MAINTENANCE
RECYCLING
ACCESSORYLIST
14
15
16
Recharge as needed. There are no pre-designated intervals at which to recharge as long
as the product is being used regularly. Avoid discharging completely on a regular basis, as
this can impact overall life. Regularly inspect all ports and wall charger for any debris, dirt,
damage and corrosion.
DO NOT attempt to x.
DO NOT cover the product with towels, clothing or other items. Regularly check if the
side vents are collecting dirt or dust, and clean following cleaning procedures noted in
manual.
Dispose of the unit in hazardous material-specic recycling locations only after a complete
discharge (if possible). Batteries contain hazardous chemicals. Strictly follow your local
regulations regarding battery disposal and recycling. Dispose of the unit immediately if it
cannot be powered on after over-discharging.
Always return your used electronic products, batteries and packaging materials to
dedicated collection points to prevent uncontrolled waste disposal and promote the
recycling of materials.
Principal
Machine
Recommend to use 120W/200W/300W/400W/600W/800W Solar Panels (not Included).
User
Manual
AC Wall Plug
Power Cable
MC4-Anderson
Connector Cable
12V Car
Anderson Cable
PS2400
Parallel Cable
(optional accessory)

DAKOTALITHIUM.COM I CONTACT: SUPPORT@DAKOTALITHIUM.COM
Go further. Last longer. Play Harder.
Table of contents