Danger Sidekick LX User manual

Sidekick LX™
Reference Guide
27-4007-01 Rev. A - R4.4 - July 9, 2007
Copyright © 2007 Danger, Inc. All rights reserved.

-2-
Contents
Welcome! 5
Device Basics 6
Opening and Closing the Display 6
Control Buttons 7
Phone Controls 9
Sound Controls 11
Mini Music Player 11
Volume Controls 12
Wireless On/Off Control 13
Display Controls 13
Battery Charger 14
Removable Battery 15
SIM Card Slot 16
Memory Card Slot 17
USB / Power Port 18
Registration 18
Setting Up Your Device 22
Bluetooth®Technology Setup 22
Backgrounds 23
Font Size 24
Backlighting 24
Key Guard Mode 25
Device Privacy Code 26
Sound Profiles 26
Application Customization 27
The Device Interface 28
The Jump Screen 28
Menus 29
Quick Jump 29
Indicators 30
Type and Edit Text 32
Navigate in Text Boxes 32
Delete Text 32
Cut, Copy, Paste, Undo 32
AutoText 33
Type Special Unicode
Characters 34

-3-
The Desktop Interface 35
Using the Applications 36
myFaves
Add a Contact to myFaves 36
Communicate with a myFaves
Contact 37
Assign an Icon to a myFaves
Contact 38
Replace a myFaves Phone
Number 38
Phone
Make a Phone Call 39
Use Bluetooth Hands-Free Headset
or Car Kit 40
Answer a Phone Call 40
Add a Number to Your Speed Dial
List 41
Check Your Voice Mail 41
Change Your Phone Ringtone 42
Import Contacts from Your SIM
Card 42
Text Messaging
Send a Text Message 43
Picture Messaging
Send a Picture Message 44
Web Browser
Browse the Web 45
Bookmark a Web Page 46
Copy Text on a Web Page 46
Email
Send an Email Message 47
Fetch Email from External
Accounts 48
Fetch Email Using Your Device’s
Web Browser 51
Attach a Photo, Sound, or vCard to
an Email Message 52
Address Book
Add a Contact to the Address
Book 53
Communicate with a Contact 54

-4-
Import Address Book Contacts 55
Set and Send “My vCard” 56
Send any Contact’s vCard 57
Calendar
Add an Event to Calendar 57
Notes
Create a Note 58
Send a Note via Email 59
To Do
Add a Task 59
Camera
Take a Photo 60
Send Photos by Email or Picture
Message 61
Use Photo for Caller ID or Key
Guard Background 61
Music Player
Copy Music to the Memory Card 62
Play Songs 63
Create a Playlist 65
Download Catalog
Download Items from the
Catalog 65
Manage Your Downloaded Items 67
Instant Messaging
Sign On 68
Send an Instant Message 68
Switch Between IM
Conversations 69
Keyboard Shortcuts 70
Troubleshooting 71
Handling and Safety Precautions 76
Regulatory and Compliance
Information 80
Legal Information 84

-5-
Welcome!
Thank you for buying a SidekickLX™device. Your Sidekick will
change the way you communicate, get organized, and stay
connected.
Here’s what you’ll find in the box:
Sidekick LX™device
SIM card
Removable battery
microSD™card
USB cable
Battery charger (wall adapter)
Hands-free stereo headset
Carrying case
1.InsertSIMCard
1Removethebackcover.
•Pressthecoverlatchwith your left thumb.
•Pushthecoverrightto release.
•Liftthecovertoremove it.
2InsertyourSIMcard.
•Goldcontactsfacedown.
•Twobracketsmustbeon topof thecard.
1Insertthebattery,topedgefirst.
2Replacethebackcover.
Slidethecoverbacktothe original position
whilepressingthecoverlatchwith yourlef t
thumb.
3InsertthebatterychargerintotheUSB
port.
4Letyourdevicechargeforatleast4
hours!
5PressthePowerbutton .
2.InsertBattery 3.Register
1Waitforactivation.
You’llknowyourdevicehasbeenactivated
whenthisWelcomescreenappears:
2Stepthroughaccountregistration.
Justfollowthepromptsuntilyousee the
Congratulationsscreen.
3SelecttheStartbutton.
TheJumpscreenopens,showingthe ring
ofapplications.Rollthetrackballto scroll
throughtheapplications,thenpressthe
trackballtoenteranapplication.Press
toreturntotheJumpscreen at anytime.
IndicatorsandIcons
WirelessSignalStrengthIndicator Thenumber
ofsignalbandsshowingtotheright of the radio tower
iconrepresentsthestrengthofthesignal at your current
location.
Ifyouseean Xflashing over the radio tower icon,
you’vetemporarilylostnetworkconnectionandcan make
nocalls.
ServiceConnectivityIndicatorsOne dot =
deviceisconnectingtotheGPRS/EDGEnetwork; two dots
=gettingIPaddress;threedots= connecting to the data
service;= fully connectedto the data ser vice.
BluetoothIndicatorWhenyou see this icon just to
theleftofthe , you know that Bluetooth features are
available.
GSM(Phone)ServiceOnly A phone icon in the place
ofthe“G”meansyouareusing (or only have access to)
GSMphoneservice.Ifyouhavea call in progress you’ll
alsoseeatimer.Ifthephone icon is hollow, you can only
makeemergencyphonecalls.
SoundProfileSetting When you have sound
turnedoff(“Silent”soundprofile),thetitle bar will indicate
whetheryouhaveflashinglightsorvibration set for alerts
ornotifications.Fromlefttoright,the icons indicate: totally
silent(nosound,noflashinglights,no vibration), flashing
lightsonly,andvibrationonly.
D-PadLightIndicatorsDuringdevicesleep, the center
oftheD-padwillglowablinking color: blue = pending
message,green=normalsleep,red= low battery.
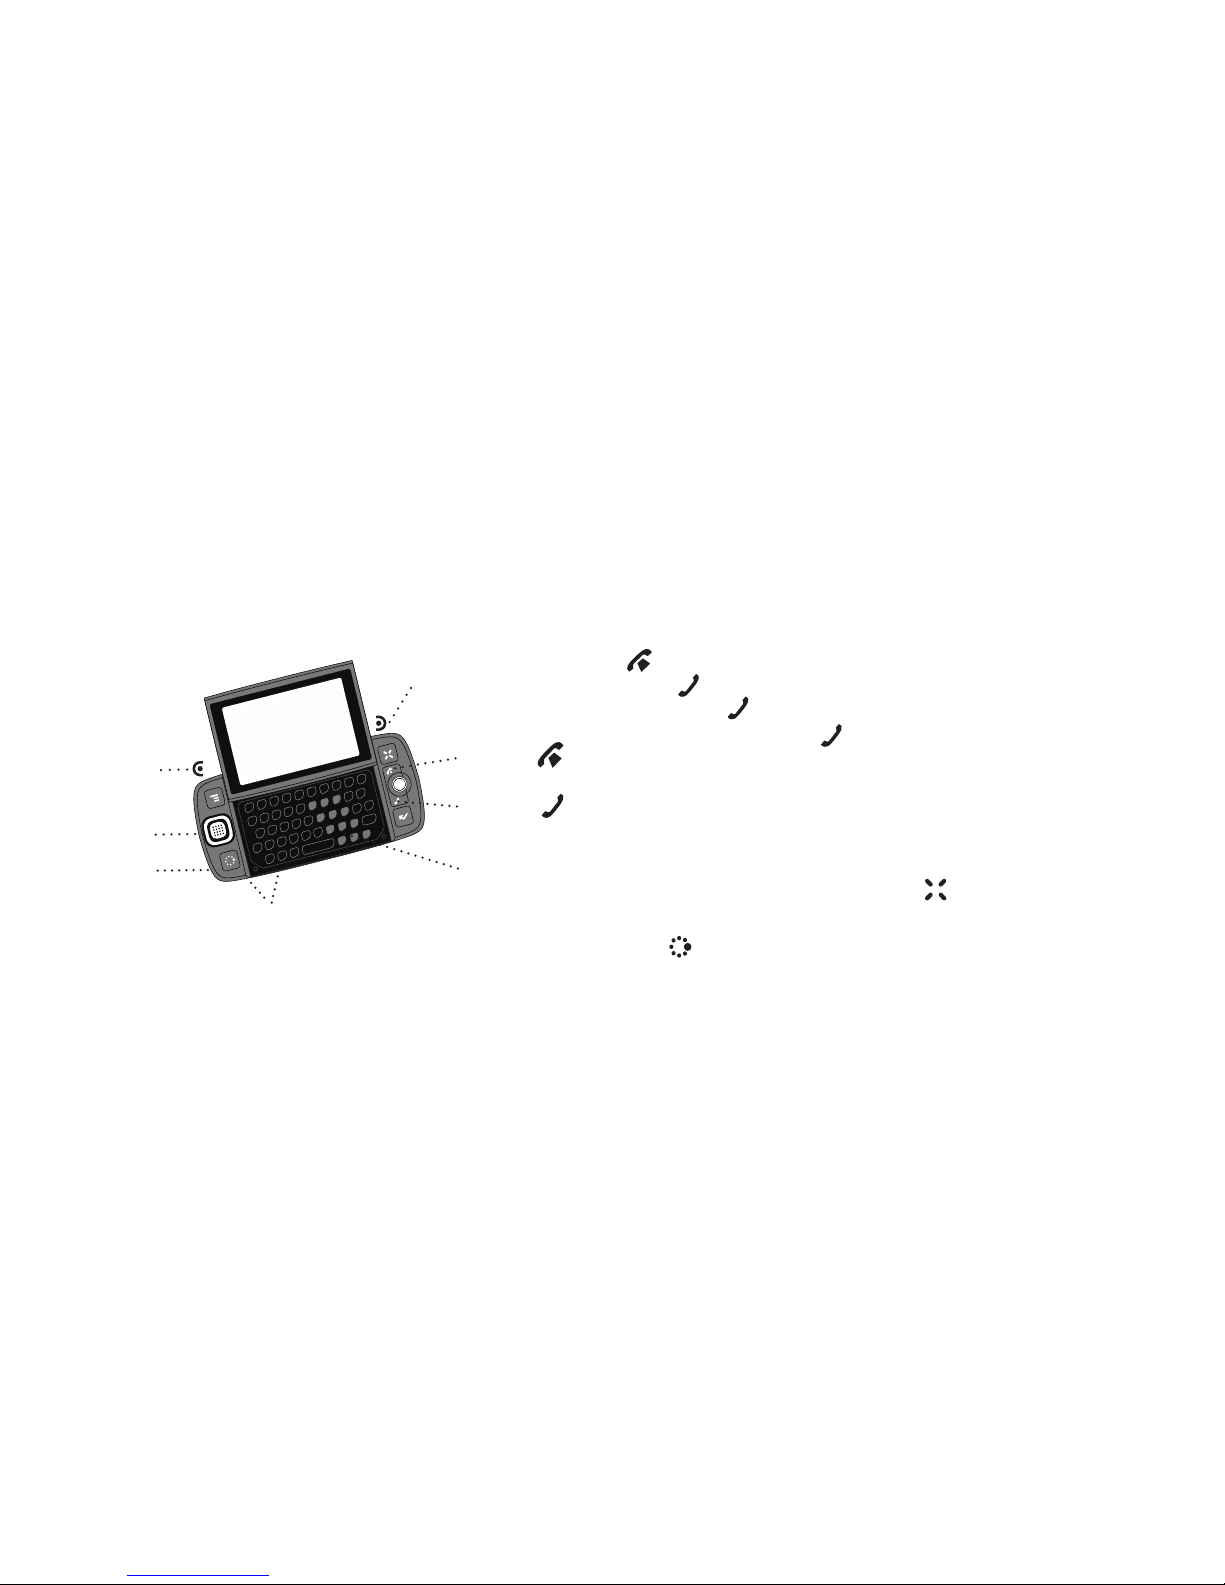
TRACKBALLPress toselectitemsonthescreen.Roll
thetrackballtonavigatethescreen.
SEND/ENDCALLbuttonsWhenthebuttons are lit,
usethemtosendorenda call. When unlit, press these
buttonstopageup ordown .
DONEbuttonPress togoback through screens you
werepreviouslyviewing.Onascreenor in a dialog box,
press tosavechanges.
DeviceControls
UsingtheApplications
Bluetooth
On
Screen
Title
BatteryStrength
WirelessSignal
Strength
DateandTime
Service
Connectivity
Status
Sound
Profile
Setting
NewMessage
Notification
(Email)
JumpScreen
MakeaCall
Press, type a
nameornumber,
thenpress .
EndaCall
Press .
AnsweraCall
Press .
AssignSpeedDial
GotoPhone,press and
selectSettings>Speed
Dial&CallingCards.
CallaSpeedDialNumber
Pressandholdspeed
dialnumberusingthe
keyboardordialpad.
SetUpVoiceMail
Pressandholdthe#1key.
Followtheprompts.
Phone WebBrowser
QuicklyContactaContact
1FromtheAddressBook’s“Browse
Contacts”screen,highlightacontact,then
pressandholdthetrackball.
2Amenuopensthatlistsallthe
communicationoptionsavailableforthat
contact.Selecttheactionyouwant to take.
AddressBook
RetrieveMessages
Pressandholdthe#1key.
TheContactDetailsScreen
1FromtheBrowseContactsscreen,selecta
contacttoopentheirDetailsscreen.From this
screenyoucanviewalltheinformation you’ve
storedforthatcontact.
2Simplyselectaphonenumber,email
address,orotherdetailtolauncha
communicationwiththatperson.
AssignaPhotoCallerIDIcon
Youcanassignphotoiconsto50 of
yourcontacts.
1FromtheBrowseContactscreen,
selectacontacttoopentheContact
Detailsscreen.
2SelecttheEditbuttontoopenthe
EditDetailsscreen.
3SelecttheEditIdentitybutton,
thenscrolltohighlighttheicon .
4Pressthetrackballtoopenthe
listoficons.Select togoto the
Cameraandselectanexistingphoto
orcaptureanewone.
GotoaWebPage
1StarttypingtheURL.TheGoTo
boxopens.FinishtypingtheURL.
2Pressthetrackballtogotothe
page.
ChangeTextSize
Press andselectView>Text
Size.
CreateaBookmark
1FromtheWebpageyouwant
tobookmark(orfromanypage),
press + N.
2Completetheinformationinthe
AddBookmarkdialogbox,then
press .
Sidekick®“Shuriken”
27-4006-01Rev.02.May14,2007
©Danger,Inc.Allrightsreserved.
Get
Started
ChangeRingtone
Press and
selectSettings>
General.
RightShoulder
Button
LeftShoulder
Button
PowerOn/PowerOffButton
VolumeButtons
D-pad
+-
USB/
PowerPort
HeadsetJack
MenuButton
JumpButton
CancelButton
DoneButton
SendCallButton
EndCallButton
Trackball
Opening&ClosingtheDisplayPress your left thumb
onthelower-leftcornerofthedisplay and gently push
upinaclockwisedirection.Thedisplay will spring
smoothlyintotheopenposition.
Toclosethedisplay,reversethemotionto pivot the
displaycounter-closewise.
CANCELbuttonPress todismissanychangesyou
havemadetoascreenordialog box.
MENUbuttonPress toopenalist of actions you can
takeonthecurrentscreen.
JUMPbuttonPress togodirectlyto the Jump
screen,yourstartingpointforlaunchingall the device
applications.
Start Guide
Reference Guide
Limited Warranty (Terms & Conditions)
If any of these items are missing, please contact your T-Mobile
Customer Care department.

-6-
Device Basics
Opening and Closing the Display
To open the display, press your left thumb on the lower-left
corner of the display and gently push up in a clockwise direction.
The display will spring smoothly into the open position.
Alternatively, use your right index finger to push down gently on
the upper-right corner of the display. The screen will spring into
the open position.
The normal operating position of the device is horizontal, with
the trackball on the right, as shown on the left.
To close the display, reverse the motion to pivot the display
counter-clockwise and snap it into the closed position.
!Protect the display from scratches by always using the
carrying case to transport your device.

-7-
Control Buttons
MENU
JUMP
TRACKBALL + SEND/END
CANCEL
DONE
TRACKBALL Press the trackball to select a highlighted item
or press and hold to open a pop-up menu. Roll the trackball to
reverse or advance the current selection through the “selectable”
items on a screen. Rolling the trackball left or right with a folder
highlighted opens/collapses folder contents. Adjust trackball
speed and acceleration from the Jump Menu > Settings >
Trackball & D-Pad screen. Read what the trackball colors mean
during sleep in “Trackball light indicators” on page 31.
SEND/END buttons
When the buttons are lit, use them to send/
end a call. When unlit, press to page up
or to page down.
DONE button Press DONE to go back through the screens
you were previously viewing, until you reach the Jump screen. On
a screen or in a dialog box, press DONE to save your changes
and dismiss the screen or dialog box.
CANCEL button Press CANCEL to dismiss any changes you
have made to a screen or dialog box.
MENU button Press MENU to open a list of actions you can
take on the current screen.
JUMP button Pressing JUMP takes you back to the
Jump screen, your starting point for launching all the device
applications.

-8-
RIGHT SHOULDER
BUTTON
LEFT SHOULDER
BUTTON
POWER ON / OFF BUTTON
VOLUME BUTTONS
D-PAD
+-
USB /
POWER PORT
HEADSET JACK
DIRECTIONAL PAD (D-Pad) Press up, down, left, or right to
scroll or move within text fields, and navigate in games. By
default, the D-Pad navigates folders and screens, jumping over
individual items. You can make the D-Pad navigate the same
as the trackball (moving item-by-item) from the Jump Menu >
Settings > Trackball & D-Pad settings screen.
LEFT AND RIGHT SHOULDER buttons The function of
these buttons depends on which application you’re using. For
example, while using the Camera, the right shoulder button
captures a photo. While using the Phone, the left shoulder
button toggles Mute and the right shoulder button toggles
Speakerphone. While in the Email and Picture Messaging
compose screens, the right shoulder button opens your photo
albums so you can select a photo to attach to the message, and
the left shoulder button opens the voice recorder.
POWER ON/OFF button Press the Power button for three
seconds to power the device on or off. You can also press the
Power button twice (“double-tap”) to power off.
VOLUME buttons Press and hold +or -to step through your
Sound Profiles or to increase/decrease the volume on the phone
or music player. To silently mute your device, press and hold -.

-9-
Phone Controls
SPEAKERPHONE BUTTON
(while on phone)
SPEAKER
VOLUME BUTTONS + -
DIAL PAD
SEND CALL
END CALL
MUTE BUTTON
(while on phone)
HEADSET JACK
DIAL PAD Use the keyboard dial pad to dial a number with one
hand.
END CALL and SEND CALL buttons When the Send and End
buttons are lit, it means you can use them to place a call. Press
to end a call or clear the screen of a number you’ve typed.
Press to call the phone number you’ve typed or highlighted in
a list. Press with no number typed to display a list of recently-
dialed numbers. Press from the Jump screen to open the
Recent list.
SPEAKER When using the device as a handset, place the
speaker, located in the D-Pad, to your ear.
MICROPHONE When you are using the phone, speak into the
microphone, located by the CANCEL button.
VOLUME buttons The volume buttons are located under the
JUMP button. While on a phone call, press +to increase or -to
decrease volume. Use the left and right shoulder buttons to turn
Mute or Speakerphone on and off.

-10-
BLUETOOTH HANDS-FREE HEADSET OR CAR KIT To use a
Bluetooth hands-free headset or car kit, do the following:
1Press JUMP to go to the Jump screen. Press MENU to open
the menu, then select Bluetooth to open the submenu. Make
sure Bluetooth features are “on”.
2
While you are in your car, make sure your hands-free headset or
car kit is ready to pair by following the manufacturer’s instruc-
tions. On your Sidekick, go into the Phone application. Press
MENU and select Settings > Pairing.
3From the Pairing dialog box, select your Bluetooth hands-
free headset or car kit from the list of devices (it may take a
few seconds for the list to populate). If prompted, type the
device’s PIN code, then press DONE to dismiss the PIN
Code dialog box.
4By default, your call’s sound will go through the device
handset. To send or receive your call using a Bluetooth
device, press MENU and select Transfer Sound to, then
select your Bluetooth device from the submenu.
Transfer the call’s sound either before or during a call.
5Place your call.
6When finished with your call, press END CALL .
STEREO HEADSET JACK
Always connect your headset to your
device before making/receiving a call.
To use the headset button:
nPress the button once to answer a call and again to end it.
nDuring a call, press once to answer a second incoming call
and put the first caller on hold.
n
With two callers on the phone, press the button once to end the
active call and press again to resume the on-hold call.

-11-
Sound Controls
Mini Music Player
To open the mini music player (transport controls) from anywhere
on the device, press JUMP +DONE .
Press one of the four sides of the D-Pad, or use the trackball to
select a control. You can also use these shortcuts:
- Pause song now playing , or resume play if paused .
- Play previous song in Play Queue .
- Play next song in Play Queue .
The shuffle and loop icons indicate, when they are green, that
shuffle is on , loop once is on , or loop repeatedly is on .
Select an icon to cycle through settings.
To jump to the Play Queue screen, press the Play Queue icon .
To scroll through the songs in the Play Queue, press the D-Pad
left/right or select the forward control with the trackball.
To go to a specific place in a song
, roll the trackball up, then
select the song progress bar at the top of the player. A slider opens:
The row of bars is referred to as the “scrubber bar”. The
highlighted bar indicates where you are in the currently-playing
song. Roll the trackball right to fast forward, left to rewind. To
close
the scrubber bar, press DONE .

-12-
Volume Controls
There are two ways you can open the volume controls:
nPress MENU +DONE . Roll the trackball left or right to
step through your sound profiles. Left is louder, right is softer.
(Read more in “Sound Profiles” on page 26.)
nPress the +or -volume buttons on the lower-left edge of
your device. Continue pressing the buttons to step through
your sound profiles:
To switch to the “silent” sound profile without making a
sound, hold down the - volume button.
If you are playing a song or on the phone, the volume control
panel includes separate volume controls for the music or phone
call. This control is focused by default; to change your Sound
Profile, roll the trackball down to focus the Sound Profile pane,
then roll the trackball left or right to select a profile.

-13-
Wireless On/Off Control
If you need to turn off your device’s GSM, GPRS, EDGE, and
Bluetooth wireless connectivity (for example, during aircraft
takeoff and landing), do the following:
1From the Jump screen, press MENU and select Airplane
Mode > Turn Wireless Off.
2Your device is now offline. Confirm offline status by looking
at the title bar; the radio tower icon and “OFF” should blink
alternately.
3To turn wireless back on, from the Jump screen, press MENU
and select Airplane Mode > Turn Wireless On.
Display Controls
To adjust the display backlight brightness:
1Press MENU then select Settings > Battery & Display.
2Select the Brightness slider to open it for adjustment. By
default, brightness is set to 1/4 of the range, as shown below:
Roll the trackball right to increase brightness; roll left to
decrease.
3When ready, press the trackball to apply the setting.

-14-
Battery Charger
Your device comes with a removable, rechargeable lithium-ion
battery. When you first receive your device, it is important that
you fully charge the battery, described below.
!Only use the charger and battery provided with your device
or approved by T-Mobile, or you risk damaging your device. Do
not insert battery chargers from previous Sidekick models into
the stereo headset jack.
If you attach your device to your computer via USB, be aware
that the power received may not be enough to charge your
device. For example, when computers are in “sleep” mode,
only a trickle charge may be supplied via USB. In this situation
you can lose more power than you gain.
1 Attach the battery charger to your device.
Locate the battery charger that came in the box with your
device. Insert the charger’s USB lead (plug) into your device’s
USB port. Now plug the power cord into a standard electrical
wall outlet.
An orange charge indicator light will go on and a lightning
bolt icon will appear over the battery icon in the title bar,
indicating the charger is connected and the battery is
charging. Note that if your device has discharged completely,
it may take up to 15 minutes before you see any indication of
charging on the screen.

-15-
2 Let the device charge for at least four (4) hours.
Put the device in a safe place and let the battery charge for at
least four hours with the device powered on.
As the device is charging, the bars in the battery icon fill
repeatedly from left to right. When your device is fully
charged, the lightning bolt icon will disappear and the bars
will stop moving and remain in the filled position.
For efficient operation, charge your device nightly. If you
plan to leave your device unattended for an extended period
of time, be aware that the battery will discharge after two
days if it is turned on and not attached to the charger. If your
device does fully discharge, simply attach it to the charger to
recharge.
Removable Battery
To replace your rechargeable battery, or if you need to insert or
remove your SIM card, first you will need to remove the installed
battery. Begin by powering down your device:
1 Press and hold the power button three seconds to power
down.
2 Turn the device over. With the camera at the top, slide the
cover to the right by carefully pressing the raised line on the
cover with your left thumb. Lift the cover to remove it.
RAISED LINE

-16-
3 Push the battery in slightly along the bottom edge, then lift
the battery from that same edge to remove it.
4 Replace with a new battery by first inserting the top notched
edge (with the gold contacts) and then pushing the battery
down to lock into place.
5 Replace the cover. Once the battery makes contact, the
power-on sequence begins.
SIM Card Slot
To access your SIM card, you must first remove the battery.
1 Remove the battery cover and battery by following
“Removable Battery”, steps 1-3, on page 15.
2Notice the SIM card slot, which is shaped like a SIM card and
is located just to the right of center.
3 To insert the SIM card, slide the card into the slot with the
gold contacts facing down and the notched corner at the
upper right. Be sure the two side brackets are on top of the
card, holding the card in place.

-17-
4
To remove the SIM card, insert your nail or paper clip into the
notch to the left of the card in order to move the card slightly
to the right. Then gently use your finger to slide the card to the
right and free of the two brackets. Lift the card to remove it.
Memory Card Slot
Your device comes with a Micro Secure Digital (microSD™) flash
memory card. To insert or remove the memory card, you must
first remove the back cover as described in “Removable Battery”,
step 2, on page 15.
1 With the back cover removed and the camera at the top, you
can see the memory card slot on the right edge of the device.
2 To insert the memory card, hold the card with the gold
contacts facing down and the card notch facing up. Insert the
card into the slot and push to lock into place.
3 To remove the memory card, push the card in slightly and
release; the card should spring partly out of the slot. Pull the
card free of the device.

-18-
USB / Power Port
The USB/power port is located on the top left edge of your
device. With a flash memory card installed, you can manage the
contents of the card by connecting a USB cable to the device
and your computer.
The memory card will appear as a drive on your computer, and
you will be able to add or remove music or image files using your
computer’s file system. Remember that you cannot transfer files
unless you have first installed a memory card. For instructions on
installing, read “Memory Card Slot” on page 17.
While your device is connected to your computer via the
USB port, the memory card contents are not available for
playing music or viewing photos from your device.
Registration
Before you can start using your Sidekick, you must complete
registration. This section of the guide takes you through
registration in more detail. Note that these instructions are for
new users, not returning users. Returning users can sign in using
their username/password.
1 Wait for account activation.
Before you can use your account, your account must be
activated. This can take up to 48 hours, but usually takes
only 1-3 hours. While you wait, step through the screens that
appear. If applicable, you’ll be given the opportunity to select
your language. When you see the Welcome screen, you’ll
know your device has been activated:

-19-
Press the trackball to select the New User button and advance
to the next screen. On subsequent screens, select the Next
button to advance.
2 Type your first name and last name.
Use the keyboard to type your First name, then roll the
trackball down to highlight the Last name field. Type your last
name, scroll down to highlight the Next button, then press the
trackball to advance to the next screen.
3 Select a username.
The username you type will become the first part of your
email address (for example, username@example.com).
Before you select a username, read the following:
nUsernames must start with an alphabetic character (A-Z)
and can include numbers (0-9), dashes (-), periods (.), and
underscores (_), but no other punctuation. Although you
can use periods within a username, do not use a period
at the beginning or end of the name, and do not use two
periods (..) in a row.
nUsernames must be at least 2 but no more than 32
characters long.

-20-
nUsernames are not case-sensitive. For example, if your
username is “bridget”, you will be authenticated if you sign
in by typing “Bridget”, “BRIDGET”, or any combination of
upper or lowercase letters.
Once you decide on a username, type it in the text box, then
select Next.
4 Select a password.
Select a secure password that follows the rules below:
nPasswords cannot be the same as your username.
nPasswords must contain 4-15 characters, can include
both letters and numbers, but no spaces, single quotes ('),
semicolons (;), backslashes (\), or percent signs (%).
n
For enhanced security, do not choose an actual word
that appears in any language dictionary. Do not choose
a proper name, such as the name of a child, local sports
team, pet’s name, or city of birth. Do not choose adjacent
letters on your keyboard or a sequential or repeating
combination of letters or characters, such as “12345678”,
“222222”, “abcdefg”.
nFor enhanced security, do choose a password that is more
than seven characters long, mixes letters and numerals,
and uses upper- and lower-case letters.
Table of contents
Other Danger Cell Phone manuals