Danger hiptop 2 User manual

hiptop® 2
Reference Guide
27-2009-01 Rev. C - Release 2.1 - September 10, 2004
Copyright © 2004 Danger, Inc. All rights reserved.

2 Contents
Contents
Welcome! 6
I. Device Controls 8
Opening and Closing the Display 8
Phone Controls 9
Control Buttons 10
II. Registration 12
III. Device Basics 16
Battery Charger 16
USB Port 17
Wrist Strap Holder 17
The Jump Screen 18
Title Bar and Indicators 19
Menus 20
Device Settings 21
Sound and Display Controls 21
Backlighting 22
Key Guard Mode 22
Device Privacy Code 23

Customization 24
Default Locale Setting 25
Typing and Editing Text 25
Navigating in Text Boxes 25
Deleting Text 26
Entering Special Unicode Characters 26
Cut, Copy, Paste 27
AutoText 27
IV. The Desktop Interface 28
V. Using the Applications 30
Phone
Make a Phone Call 30
Answer a Phone Call 31
Add a Number to Your Speed Dial List 31
Change Your Phone Ringtone 32
Check Your Voice Mail 32
Import Contacts from Your SIM Card 33
Text Messaging
Send a Text Message 33
Contents 3

Web Browser
Browse the Web 34
Bookmark a Web Page 34
Email
Send an Email Message 35
Fetch Email from External Accounts 35
Fetch Email Using Your Device’s Web Browser 39
Attach a Photo to an Email Message 39
Address Book
Add a Contact to the Address Book 40
Import Address Book Contacts 41
Calendar
Add an Event to Calendar 42
Notes
Create a Note 43
To Do
Add a Task 43
Camera
Take a Photo 44
Send a Photo by Email or Multimedia Message 44
4 Contents

Catalog
Purchase Items from the Catalog 45
Manage Your Purchases 46
WAP Browser
Browse WAP Pages 47
Receive WAP Messages 47
Multimedia Messaging
Send a Multimedia Message 48
Instant Messaging
Sign On 49
Send an Instant Message 50
Switch Between IM Conversations 50
VI. Keyboard Shortcuts 51
VII. Troubleshooting 52
VIII. Handling and Safety Precautions 56
Battery Handling 56
Device Handling and Use 57
Battery Charger Handling 58
IX. Regulatory Compliance Information 59
Regulatory Compliance Information for North America 59
Regulatory Compliance Information for Europe 61
Contents 5

Welcome!
Thank you for buying a hiptop®2 device. Your hiptop will change
the way you communicate, get organized, and stay connected.
Your hiptop connects seamlessly to wireless networks, which
gives you the ability to browse the Internet, exchange instant
messages, send and receive email with image attachments and
multimedia messages with voice notes. Other features include
a full-featured phone, personal information management (PIM)
applications, access to a personal Web portal, entertainment
applications, and a built-in camera.
For the latest instructions on all the hiptop applications, open
the online version of this Reference Guide by clicking Help on
the Desktop Interface.
6 Welcome!

Welcome! 7
Here’s what you’ll find in the box:
hiptop®2 device
SIM card
Battery charger
Hands-free headset
Carrying case
hiptop Start Guide
hiptop Reference Guide
If any of these items are missing, please contact your wireless operator’s
Customer Care department. Note that you may also find your wireless
operator’s Service Guide in the box.
Now, let’s get started!

Warning
Device Controls
Opening and Closing the Display
To open the display, press your left thumb on the lower-left corner of the
display and gently push up in a clockwise direction. The display will spring
smoothly into the open position.
Alternatively, use your right index finger to push down gently on the upper-
right corner of the display. The screen will spring into the open position.
The normal operating position of the device is horizontal, with the wheel on
the right, as shown above.
To close the display, reverse the motion to pivot the display counter-clockwise
and snap it into the closed position.
Do not open or close the display in the wrong direction as this may damage
your device. Stop if you feel any resistance; the display should spring smoothly
into position. Protect the display from scratches by always using the carrying
case to transport your device.
I.
8 Device Controls

Phone Controls
VOLUME BUTTONS + -
DIAL PAD
SEND CALL
END CALL
SPEAKERPHONE ON / OFF
MUTE ON / OFF
HEADSET JACK
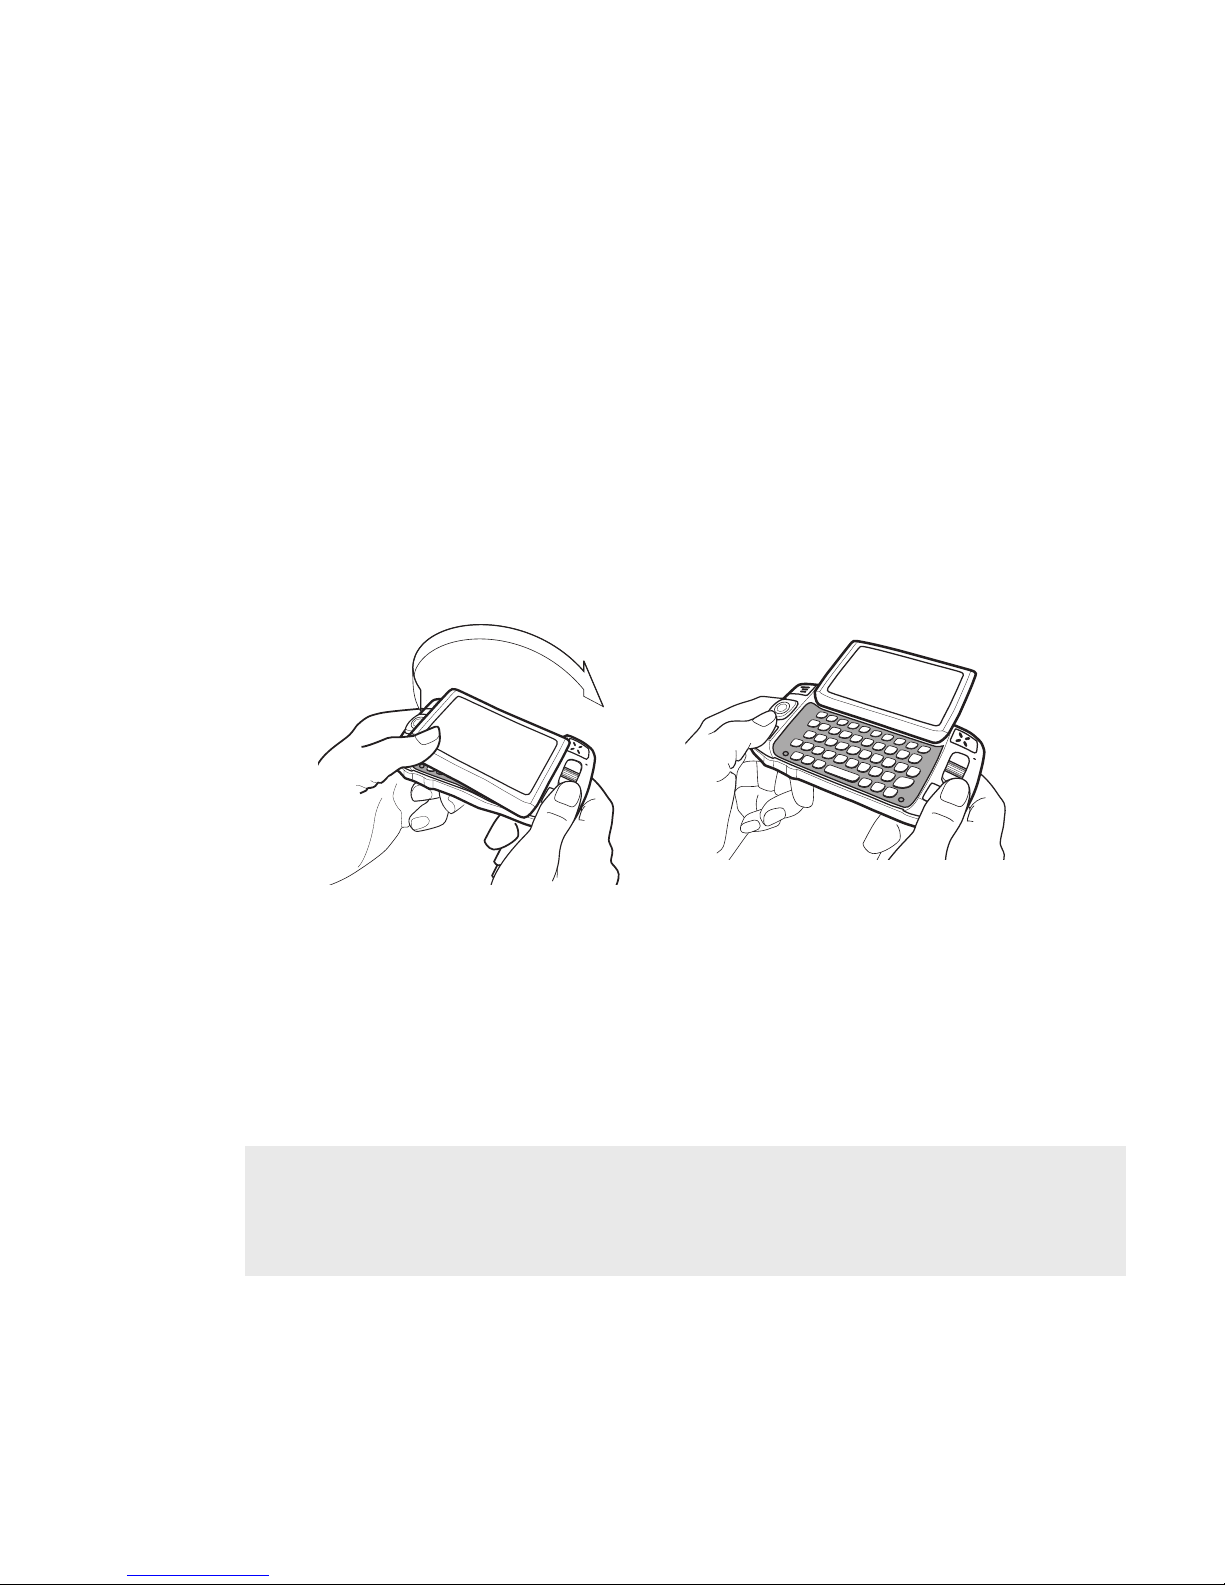
DIAL PAD Use the keyboard dial pad to dial a number with one hand.
END CALL and SEND CALL buttons During a phone call, press to end
the call or to clear the screen of a number you’ve typed. Press to call the
phone number you’ve typed or highlighted in a list. Press with no number
typed to launch a list of recently-dialed numbers.
SPEAKER When using the device as a handset,
place the speaker (under the D-pad) to your ear.
HEADSET JACK If using an active headset,
press the headset button once to answer a call
and a second time to end it. During a call, press
once to answer a second incoming call and put
the first caller on hold. With two active calls, press
the button once to end the foreground call and
press again to resume the background call.
MICROPHONE When you are using the Phone, speak into the microphone.
VOLUME buttons The volume buttons are located under the JUMP button.
While on a phone call, press + to increase and - to decrease volume. Use the
shoulder buttons to turn Mute or Speakerphone on and off.
Device Controls 9
MICROPHONE
SPEAKER
VOLUME BUTTONS

Control Buttons
MENU
JUMP
WHEEL
CANCEL
DONE
WHEEL Pressing the wheel selects a highlighted item or opens a pop-up
menu. Rotate the wheel up/down to reverse/advance the current selection
through the “selectable” items on a screen, or to scroll up/down a Web page.
Use the SEND CALL and END CALL buttons while using the Phone. When not on
the phone, use these buttons to page up and page down.
DONE button Pressing DONE takes you back through the screens you
were previously viewing, until you reach the Jump screen. On a screen or in
a dialog box, press DONE to save your changes and dismiss the screen or
dialog box. If a menu is open, press DONE to close it.
CANCEL button Pressing CANCEL dismisses any changes you have made to
a screen or dialog box.
MENU button Pressing MENU opens a menu of actions you can take on the
current screen. If you press MENU and nothing opens, this means there are
no menu actions available for the current screen.
JUMP button Pressing JUMP takes you back to the Jump screen, your
starting point for launching all the device applications.
10 Device Controls

DIRECTIONAL PAD (D-Pad) Press up/down/left/right to scroll or move
within text fields, and navigate in games. The D-Pad “rocks” into four different
directions.
LEFT AND RIGHT SHOULDER buttons The function of these buttons
depends on which application you’re using. For example, while using the
Camera, the right shoulder button captures a photo. While using the Phone,
the left shoulder button toggles Mute, and the right shoulder button toggles
Speakerphone.
POWER button Press the Power button for three seconds to turn the device
on or off. You can also press the Power button twice (“double-tap”) to power
down.
VOLUME buttons While not using the Phone, press and hold + or - to step
through your Sound Profiles.
Device Controls 11
RIGHT SHOULDER
BUTTON
LEFT SHOULDER
BUTTON
POWER BUTTON
VOLUME BUTTONS
DIRECTIONAL PAD
+-

II. Registration
Before you can start using your hiptop, you must complete the registration
steps, as explained in step 3 in the Start Guide. This section of the Reference
Guide takes you through the registration process in more detail. Note that
these instructions are for new users (not returning users). Returning users
can simply sign in using their existing username and password.
1 Wait for account activation.
Before you can use your account, your account must be activated. This
can take up to 48 hours, but usually takes only 1-3 hours. While you
wait, step through the screens that appear. If applicable, you’ll be given
the opportunity to select your language just before the Welcome screen
appears. When you see the Welcome screen, you’ll know your device has
been activated:
Press the wheel to select the New User button and advance to the next
screen. On subsequent screens, select the Next button to advance.
12 Registration

Registration 13
2 Type your first and last names.
Use the keyboard to type your First name, then rotate the wheel to
highlight the Last name field. Type your last name, scroll to highlight the
Next button, then press the wheel to advance to the next screen.
3 Select a username.
The username you select will be the first part of your email address (for
example, username@example.com). Before you select a username, read
the following guidelines:
Usernames must start with an alphabetic character (A-Z) and can
include numbers and underscores ( _ ), but no other punctuation.
Usernames must be at least two but not more than 32 characters long.
Usernames are not case-sensitive. For example, if your username is
“bridget”, you will be authenticated if you sign in by typing “Bridget”,
“BRIDGET”, or any combination of upper or lower case letters.
Once you decide on a username, type it in the text box on the screen:

4 Select a password.
Select a password that follows the rules below then type it in the text box:
Passwords must contain 4-15 characters, can include both
letters and numbers, but no spaces, single quotes ('), semicolons (;),
backslashes (\), or percent signs (%).
Passwords are case-sensitive. For example, if you set your password
to be “Hard2Guess”, then you will not be authenticated if you sign in
by typing “hard2guess”.
After you type your password, type it again to confirm.
5 Select your time zone.
Open the pop-up menu to see a list of time zones. Select yours from the
list, then select Next.
6 Select a “secret question” and type your answer.
If you ever forget your password, you’ll need to contact your operator’s
Customer Care representative. For security purposes, they will ask you
to provide an answer to the “secret question” you select on this screen.
Press the wheel to open the Question pop-up menu, scroll to highlight a
question, then press the wheel to select it.
Rotate the wheel to highlight the Answer field, then type your answer.
14 Registration

Registration 15
7 Read and agree to the end-user agreement.
Before you can finish registration, you must read and agree to the end-
user agreement. You can read it in a number of places: by selecting
the on-screen View Agreement link, in the Legal Information included
in the box, or from the Desktop Interface. Once you read the end-user
agreement, select the Next button to indicate your acceptance and
transmit your registration data.
8 Wait while data transmits.
Wait while the data you entered in Registration transmits to your wireless
operator. The service will check to see if your username has already been
taken. If it has, you will be offered alternatives. You can either pick one of
these alternatives or type a different username. Note that If you are out of
network coverage, you’ll be asked to “try again” to resume registration.
9 Congratulations!
Once your account has been set up,
you’ll see the
Congratulations screen:
Select the Start button to proceed.
10 Read the hints.
Before going to the Jump screen, take a minute to step through the hints
that appear. After reading each hint, select Next to advance. Select Done
at any time to dismiss the Hints screen and reveal the Jump screen. You
can always open these hints later from the Jump screen menu.

Warning
Device Basics
Battery Charger
Your device comes with a built-in rechargeable lithium ion (Li-Ion) battery. The
battery should be fully charged when you receive your device, but if it isn’t,
follow the instructions below to charge the battery.
Only use the battery charger provided with your device to charge your battery,
or you risk damaging your device.
1 Attach the battery charger to your device.
Locate the battery charger that came with your device in the box. Insert
the charger lead (the small round end of the adapter) into your device’s
power jack (the small round hole located on the lower right side of your
device) and plug the power cord into a standard electrical wall outlet.
A lightning bolt icon will appear over the battery icon (in the title bar),
indicating the charger is connected and the battery is charging. Note that
if your device has discharged completely, it may take up to 15 minutes
before you see any indication of charging on the screen.
III.
16 Device Basics

Device Basics 17
Tip
2 Let the device charge for at least four (4) hours.
Rest the device in a safe place and let the battery charge for at least
four hours, or overnight, to ensure maximum battery life. As the device is
charging, you will see the bars in the battery icon fill repeatedly from left
to right in an animated fashion. When your device is fully-charged, the
lightning bolt icon will disappear and the bars will stop moving and remain
in the filled position.
For efficient operation, charge your device nightly. If you plan to leave your
device unattended for an extended period of time, be aware that the battery
will discharge after two days if it is turned on and not attached to the charger.
If your device does fully discharge, simply attach it to the charger; all your data
will be restored from the service.
USB Port
The USB port is located under a cover between the power jack and headset
jack on the right side of your device. Although the current hardware version of
the device has a USB port, it is primarily used by developers as they create
new device applications, ringtones, and services. There are no immediate
plans to expand the functionality of the USB port.
Wrist Strap Holder
To carry your device securely, use a wrist strap with a flexible loop on one end.
(Straps are optional accessories.) Thread the loop under the strap holder and
through the “tunnel” on the back of your device, near the Power button.

The Jump Screen
The Jump screen is your entry point to all the device applications.
1 Go to the Jump screen from any screen by pressing JUMP . The Phone
splash screen is selected by default.
2 Press MENU from the Jump screen to open the Jump screen menu:
From this menu you can open device-wide Settings and Controls screens.
You can also Sign In, view Network Status, open Hints, place the device
in Key Guard mode, and Power Off your device from this menu.
3 To select a particular application, use the wheel to scroll through the “ring”
of application icons. When the application you want is highlighted, simply
press the wheel once to open that application.
18 Device Basics

Device Basics 19
Title Bar and Indicators
The device display indicators appear at the top of your screen at all times.
Screen Title
Battery Strength
Wireless Signal Strength
Date and Time
Service Connectivity Status
New Message Notification (Email)
Sound Profile Setting
Wireless signal strength indicator. The number of signal bands showing to
the right of the radio tower icon represents the strength of the signal at your
current location. If you see an X flashing over the radio tower icon, you’ve
temporarily lost network connection.
Service connectivity indicators. One dot = device is connecting to the
GPRS network, two dots = getting IP address; three dots = connecting to the
data service; “G” = fully connected to the data service.
GSM (Phone) service only. A phone icon in the place of the “G” means you
are using (or only have access to) GSM phone service. If you have a call in
progress you’ll also see a timer.
Battery indicators. The number of bars showing in the battery icon
represents the charge remaining in the battery. When connected to the
charger, a lightning bolt appears, and when your battery is almost out of
charge, an exclamation point appears.
Phone call indicators.
You have a call in progress; in the example, time elapsed is 3 mins, 40 secs.
Note that the phone icon blinks. If you have two calls active, the time displayed
will be for the foreground call.
Call forwarding is turned on. Your phone will not ring.

Sound Profile setting. When you have sound turned off (“Silent” sound
profile), the title bar will indicate whether you have flashing lights or vibration
set for alerts or notifications. From left to right, the icons indicate: totally silent
(no sound, flashing lights, or vibration), flashing lights only, and vibration only.
Communication services notifications. When you receive a new email,
text, IM, picture, or voice mail message, or when a Web page has finished
loading, you’ll see a visual “balloon” notification move across the title bar, while
you’re in any application except games.
Until you check your new message or go to your Web page you’ll see the
appropriate icon in the title bar as a reminder. The examples shown to the left
illustrate a pending email message, text message, and loaded Web page.
Menus
Almost every screen on your device has a set of actions you can take while
on that screen. These actions are listed in a floating window, called a menu,
which you open by pressing the Menu button MENU . Notice that some menu
items expand into submenus, as shown with Settings below.
Frequently-used menu items also have keyboard shortcuts that use the Menu
button plus a shortcut key. For example, take a look at the menu shown above.
To compose a new email message, you could press MENU + N rather than
opening the menu and selecting New Message with the wheel.
20 Device Basics
Table of contents
Other Danger Cell Phone manuals