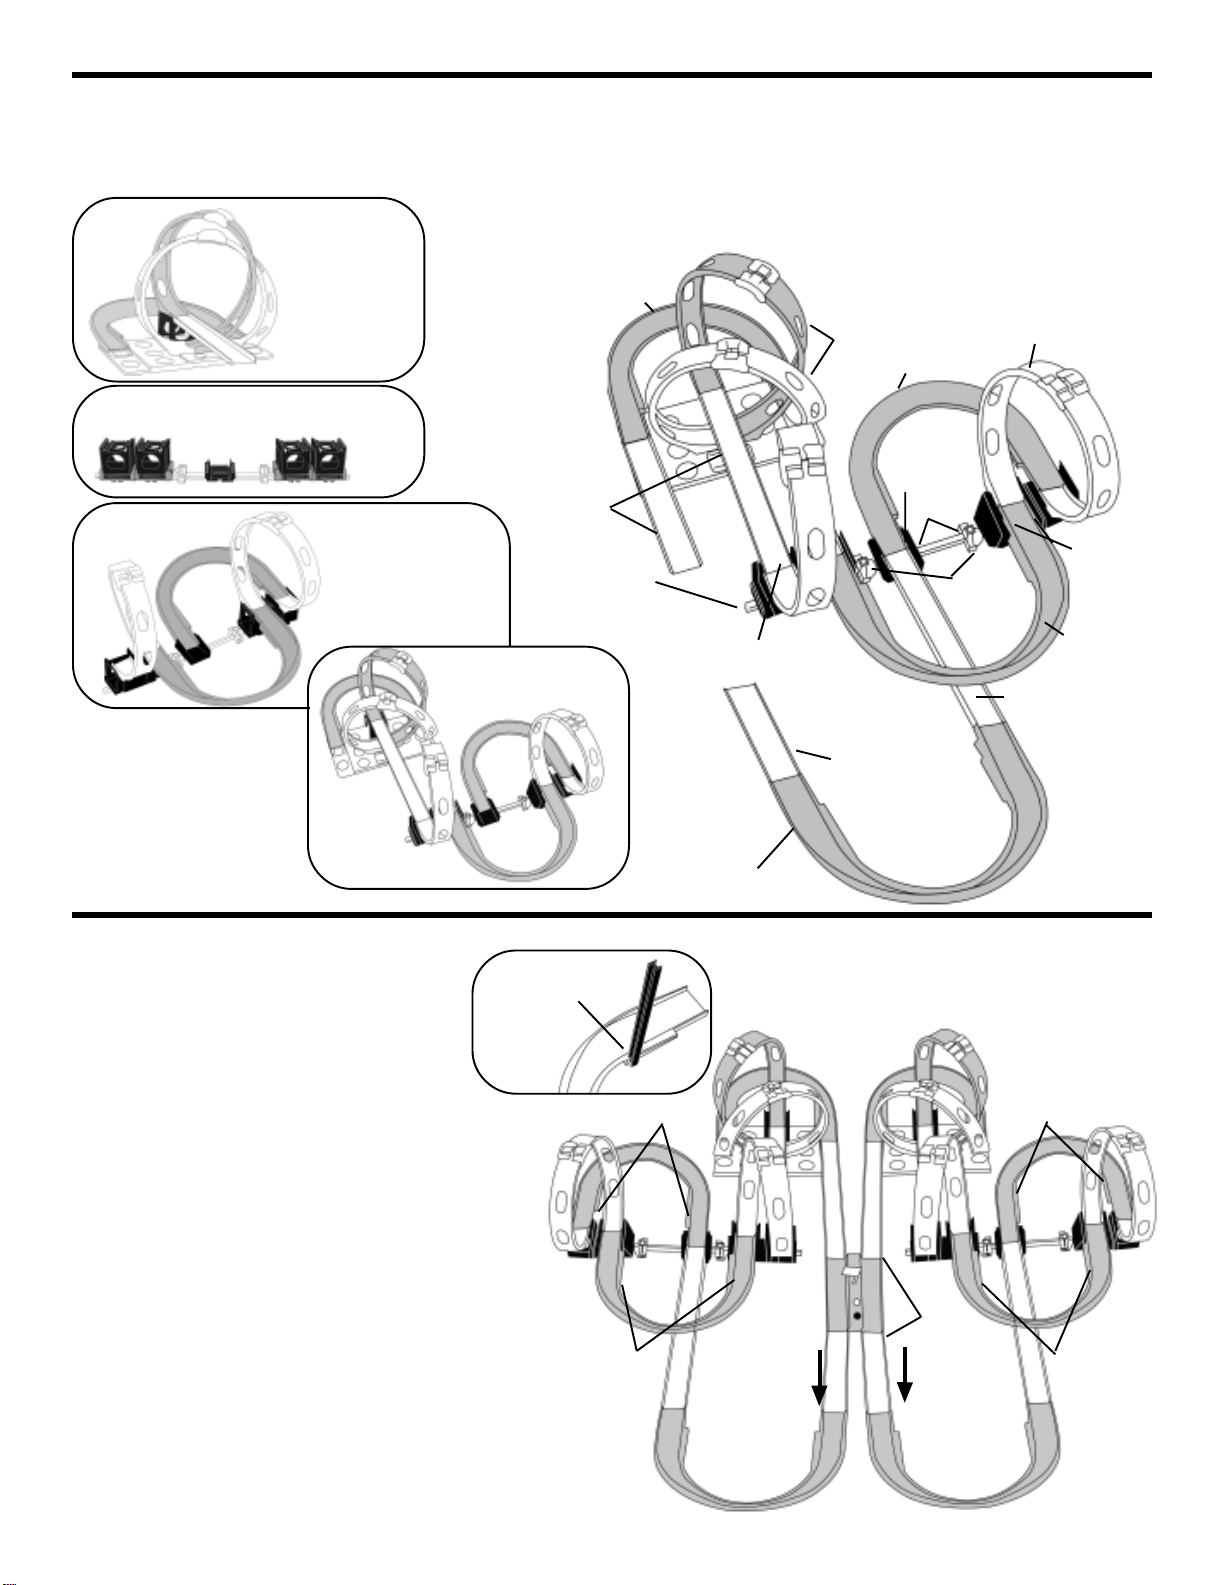
manuals.online logo
Brands
  1. Home
  2. •
  3. Brands
  4. •
  5. darda
  6. •
  7. Toy
  8. •
  9. darda Speed Racer ALPINE CHALLENGE User manual

darda Speed Racer ALPINE CHALLENGE User manual

ITEMNO. 11157
PAGE 1
The store where you purchased this item does not have parts. You will get the easiest service from Darda Division
of Life-Like Products, LLC Tell us the part(s) needed and be sure to include your name and address printed clearly.
Mail to DARDA / 1600 Union Avenue / Baltimore, MD 21211 / ATTN: Dock 2
BEFORE YOU BEGIN ...
1. Unpack the parts. Save the packing materials.
2. Match the parts to the drawings below.
3. If you have each part, put a check in the box next to the picture of the part. Look in the carton again and check all of
the packing materials to make sure you haven't missed anything. IF A PART IS MISSING OR DAMAGED ...
Speed Racer
ALPINE CHALLENGE
DARDACARS (2)
CHECKLIST
LOOP HALVES (16) 7" STRAIGHT TRACK (2)
14" STRAIGHT TRACK (6) LARGEBASEPLATE (2)
LOOPJOINERS (16) TRACKJOINERS (10)
START/WINBOX(1)
BARS(18)
STACKINGBRIDGE(10) LARGEJOINER(10)
FLEXI-CURVE(8)
COUPLER (6)
SMALLJOINER(4)
TUNNEL(1)
MOUNTAINCUT-OUT(2)
ICICLES(2)
SHEET OF STICKERS (1)
Raised edges
face down
Slide the Track Joiner - with the raised edges facing
down - half way into the channel on the underside of
the track piece. Now slide the adjoining track piece
over the open half of the joiner, so that it meets the
first piece. Be sure the tracks meet with no gaps.
Connecting Track Using Track Joiners
Track
Joiner
WARNING:
!
CHOKINGHAZARD
-
Smallparts.
Not for Children Under 3 Years
Making Loops
• Put two loop halves together so that the pins at the
top of each loop half go into the proper holes, creating a
tight fitting seam between the two loop halves.
• Holding the loop halves together, slide one loop joiner
over one end of the seam and the other loop joiner over
the other end of the seam. *IMPORTANT: Make all 8
Loops in this set before building the track.
PAGE 2
Attaching bridges to large baseplates.
• Attach the stacking bridge to the slots on the top of the
large base plate, by squeezing the bridge together and push-
ing the tabs into the slots at the top of the base plate. The
bridge will snap into a locked position.
• When connecting the bars and couplers, make sure the
bars are pushed in as far as they can go. Also, make sure
couplers are positioned as shown in each illustration.
Using Bars and Couplers
• To attach track pieces to the built-in track joiners on
Baseplates and Large Joiners, slide the grooved underside
of the track over half of the built in track joiners, as shown.
Using Built-In Track Joiners on Baseplates
and Large Joiners
Building the Mountains
• Fold one mountain along the score lines.
• Insert one bar into a coupler as shown.
• Place the left side of the mountain into the groove of the
bar and slide the left center tab under the coupler.
• Bend the mountain, and position the right center tab into
the adjoining hole in the coupler.
• Slide the groove of another bar along the right side of the
mountain base.
• Slide two small joiners, with the flat sides facing down,
over the outside tabs so that the mountain stands up
straight.
• Build the second mountain using two more bars, two
more small joiners, another coupler, and the remaining
mountaincut-out.
Track on Baseplate
Track on
Large Joiner
Pins
Loop Joiners
Loop Halves Completed Loop
Finished Mountain
Insert tab
under coupler
Small Joiner
slides over
outer tab
Score Lines
• Attach Icicle Sheets to two of your completed loops to
make the "Ice Caves." To do this, unhook one Loop Joiner,
and insert the icicle's tabs on either side of the locking pins.
Then replace the Loop Joiner to secure the icicle in place.
Remove one Loop
Joiner, then
replace it over top
the icicle tabs.
Small Joiner
slides over
outer tab
STEP 2
• Locate 2 more bars, 2 couplers, and 4 more large joiners.
• Attach 2 large joiners to each of the 2 bars, but this time slide the bars through the long channel on the
underside of the large joiners.
• Connect all 3 bars from this step, using the couplers as shown in Figure 2.2.
• Attach 2 stacking bridges to the large joiners on the left side and 2 on the right. Leave the large joiner in the
middle empty for now.
STEP 1
• Start building the set by locating and
attaching one stacking bridge to one
baseplate.
• Next, attach one end of a loop to
the
built-in track joiner on the stacking
bridge
,
as shown to the right. Attach the other
end of the loop to the built-in track joiner in
front of the stacking bridge on the baseplate.
• Attach another loop
by placing one end in
the unused half of the built-in track joiner on
the baseplate, as shown to the right. Attach
the other half to the built-in track joiner to the
left of the stacking bridge, at a 90° angle.
• Next, attach a flexi-curve
to the built-in
track joiners on either side of the baseplate,
as shown.
• To complete the step, add a 14" Straight
track to the unused half of the stacking
bridge.
• Put this configuration to the side for now.
Built in
Track Joiner
FIGURE 1
First
Loop
Flexi-Curve
Stacking
Bridge
Straight Track Large Baseplate
Attached on
Built-inTrack
Joiner
Built-in
Track Joiner
Second
Loop
FIGURE 2.1
PAGE 3
• Attach 1 large joiner to 1 bar by sliding the bar
through the short channel on the underside of the
large joiner. See Figure 2.1. The bar goes through the
SHORT CHANNEL on the
uderside of this Large Joiner
FIGURE 2.2
Underside View
long channel
Bar
Couplers
The bar goes through the
LONG CHANNELSof these 2
Large Joiners.
Stacking
Bridges
Bar
Bar
Stacking
Bridges
The bar goes through the
LONG CHANNELSof these
2 Large Joiners.
Underside View
short
channel
FIGURE 3
FIGURE 4
STEP 3
STEP 4
• Attach 2 loops to the built-in track
joiners on the 4 stacking bridges, as
shown to the right.
• Next, attach 2 flexi-curves using the
built-in track joiners on the stacking
bridges, as shown in Figure 3.
Connect the assemblies
here with the large Joiner.
Flexi-Curve
Loop Flexi-Curve Loop
FIGURE 5
STEP 5
• Attach one 14" straight track to the open end
of the built-in track joiner on the large baseplate.
Using a track joiner, connect the start-win
box to the other end of the 14" straight track.
Be sure that the start-win box is positioned as
shown in Figure 5.
• Next, attach one 7" straight track and one
flexi- curve using 2 track joiners, as shown in
Figure 5.
• Attach one end of another 14" straight track
to the flexi- curve using a track joiner. Then
connect the other end of the 14" straight track
to the flexi-curve on the middle large joiner.
Second 14" Straight
Track 7" Straight Track
Start/Win Box
First 14"
Straight Track
Track Joiner
Track Joiner
Track Joiner
Track Joiner
Built-In Track Joiner
Flexi Curve
PAGE 4
• Attach the open end of the straight
track from Figure 1 using the large
joiner at the open end of Figure 3,
as shown in Figure 4.
STEP 6
• Once you have completed your
set, attach 8 bars to the flexi-curves
shown in Figure 7. Attach by sliding
through the notches on the interior of
the curves. These will help stabilize the
layout.
STEP 7
FIGURE 6.5
FIGURE 6.1
FIGURE 6.3
Bars
Bars
Bars
Bars
Track
Joiners
Cars race
in this
direction Cars race
in this
direction
FIGURE 7
PAGE 5
*NOTE ABOUT STICKERS, TUNNEL, and MOUNTAINS
The photo on the front of the box suggests where to
place the stickers, tunnel, and mountains. When placing
thesedecorationson your layout, please remember:
1) Do not place stickers across any track connections.
2) Place the tunnel flat on the ground so that it does not
impede the cars on the track.
3) Mountains can be placed wherever you like, so long as
they do not impede the cars on the track.
• Attach the second half of the set to
the start-win box using 2 track joiners.
Your completed set should now look
like Figure 7.
Note: You will have 2 Track Joiners
left over.
FIGURE 6.2
• Assemble the second half of the set, which is a mirror image of the half you just assembled. Figures 6.1
through 6.4 illustrate how to build the mirror image. Figure 6.5 shows the completed mirror image.
Slidebarinto
notch oninner
sideof
flexi-curve
Flexi-Curve
2 Stacking Bridges
Bars
Large
Joiner
Bar Couplers
2 Stacking
Bridges
On Large
Joiners
Loop
Loops
Flexi-Curve
14" Straight
7" Straight
Flexi Curve
14" Straight
Tracks
Flexi-Curve
FIGURE 6.4
PAGE 6
STEP 8
-
Get set, go!
Press down the red button on the start-win box. A "brake" will emerge narrowing track so cars
cannot pass. Rotate the checkered flag so it faces parallel to track. (White spokes will cross track on
both sides when flag is in proper position.)
Wind the cars by pressing down and rolling
back and forth until the clicking sound gets
louder. Cars cannot be overwound.
Red and Green
Buttons
Checkered
Flag
Loops
FlexiCurve
Flexi Curve
Alternate #2
RM759157J5018
Squeeze
the top bridge
and
push the
tabs into the
slots at the top
of the lower
bridge.
The bridge will snap
into a locked position.
Note: The direction of
the hole on the two
stacking bridges will
be facing opposite
ways.
To Stack Bridges
Load pre-wound cars into position by backing them into the starting gate, one on each track. When the back wheels are in line
with the Green button, the Start/Win Box will hold the cars in place. Press the Green button to start both cars simultaneously.
The winning car will spin the checkered flag to its side of track.
Flexi Curves
Loops (3)
14' Straight
Track Loop
Loops (2)
14" Straight
Track Loop
14" Straight
Tracks
7" Straight Track
7" Straight Track
Base Plate
with Stacking
Bridge
Base Plate with
Stacking Bridge
Start/Win
Box
Items not used in Alt. 2
(4) Small Joiners
(2) 14" Straight Tracks
(8) Stacking Bridges
(6) Large Joiners
(6) Couplers
(4) Flexi Curves
(16) Bars
(2) Track Joiners
Flexi Curve
14"Straight
Track Bar and 2 Large
Joiners with a Loop
Baseplate with 2
Bridges
STACKED
Baseplate with 2
Bridges STACKED
Loop
Alternate #1
Loop connected
to 14" Straight on
Baseplate
Bar through the
notch of Flexi Curve
Items not used in Alt. 1
(4)LoopHalves
(2) 14" Straight Tracks
(4)LoopJoiners
(17)Bars
(6)StackingBridges
(8)LargeJoiners
(6)Couplers
(6)Flexi-Curves
(7)TrackJoiners
NOTE: The Start/Win Box
is not used and only one
car is used in this alternate.
Flexi Curve
Loop
2 Large Joiners
on a Bar
Loops
14" Straight
Track
Loops (2)
NOTE: The two sides of this
alternate will mirror each other.
2 Large
Joiners on
a Bar

This manual suits for next models

1

Other darda Toy manuals

darda CREATE-A-COURSE User manual

darda

darda CREATE-A-COURSE User manual

darda NASCAR VICTORY LANE User manual

darda

darda NASCAR VICTORY LANE User manual

Popular Toy manuals by other brands

BOMBARDIER SeaDoo Speedster 200 Operator's guide

BOMBARDIER

BOMBARDIER SeaDoo Speedster 200 Operator's guide

Märklin 37836 manual

Märklin

Märklin 37836 manual

Vstone Robovie-X Assembly manual

Vstone

Vstone Robovie-X Assembly manual

E-BLOX CIRCUIT BUILDER 115 instruction manual

E-BLOX

E-BLOX CIRCUIT BUILDER 115 instruction manual

LEGO FIRST 45806 Assembly instructions

LEGO

LEGO FIRST 45806 Assembly instructions

Black Horse Model Edge 540-V3 Instruction manual book

Black Horse Model

Black Horse Model Edge 540-V3 Instruction manual book

Faller 282733 manual

Faller

Faller 282733 manual

TILLIG TT BAHN 16810 quick start guide

TILLIG TT BAHN

TILLIG TT BAHN 16810 quick start guide

Enabling Devices St. Bernard Puppy user guide

Enabling Devices

Enabling Devices St. Bernard Puppy user guide

Hornby CLASS 101 Operating and maintenance instructions

Hornby

Hornby CLASS 101 Operating and maintenance instructions

LEGO 10731 Assembly instruction

LEGO

LEGO 10731 Assembly instruction

FEBER My friendly Dino 12V Use and care instructions

FEBER

FEBER My friendly Dino 12V Use and care instructions

GAME OF BRICKS 10293 instruction manual

GAME OF BRICKS

GAME OF BRICKS 10293 instruction manual

Mega Bloks Halo Hierarch's Shadow Convoy 97521 Assembly instructions

Mega Bloks

Mega Bloks Halo Hierarch's Shadow Convoy 97521 Assembly instructions

Thames & Kosmos Ooze Labs Quicksand Oozebleck manual

Thames & Kosmos

Thames & Kosmos Ooze Labs Quicksand Oozebleck manual

Amax ROCK FORCE instruction manual

Amax

Amax ROCK FORCE instruction manual

REVELL KIT 6523 Assembly manual

REVELL

REVELL KIT 6523 Assembly manual

LEGO JUNIORS 10723 Building instructions

LEGO

LEGO JUNIORS 10723 Building instructions

manuals.online logo
manuals.online logoBrands
  • About & Mission
  • Contact us
  • Privacy Policy
  • Terms and Conditions

Copyright 2025 Manuals.Online. All Rights Reserved.