Dat Optic eBOX-U User manual

1
eeeBOX-U
eBOX-U
Manual

2
e
eBOX-U MANUAL Ver 1.0
【Contents】
zIntroduction ------------------------------------------------------------------- 2
zSafe Precaution -------------------------------------------------------------- 2
zFeatures ------------------------------------------------------------------------ 3
zSpecification ------------------------------------------------------------------ 3
zSystem Requirement ------------------------------------------------------- 4
zInstallation --------------------------------------------------------------------- 5
zFunction ------------------------------------------------------------------------ 11
zAuto Power -------------------------------------------------------------------- 13
zPartitioning & Formatting ------------------------------------------------- 14
zTrouble Shooting ------------------------------------------------------------- 21

3
【Introduction】
Thank you for choosing eBOX-U. It is an easy-to-use storage that
allows a dedicated approach to storing a data.
【Safe Precaution】
Please read the safe precautions carefully before you using eBOX-U.
Ensure that you use the product correctly according to the procedure described in this guide.
1. The following sfety precautions are intended to remind you to operate the product safely
and correctly. Please read and ensure that you understand them before you proceed
to the other sections of this guide.
Warning
Do not attempt to disassemble or alter any part of the product that is not
describe in this guide.
Do not allow the product to come into contact with water or other liquids.
In the event that water or other liquids enter the interior, immediately
unplug the product from the computer. Continued use of the product may
result in fire or electrical shock. Please consult your product distributor or
the closest support center.
Do not handle the product near a heat source or expose them to direct flame
or heat.
Never place the product in close to equipment generating storage
electromagnetic fields. Exposure to strong magnetic fields may cause
malfunctions or corrupt data.
【Features】
Install up to eight of 3.5〞HDD. 。
Compatible with any brand HDD and also different capacity.
Change mode by dipswitch
Plug and play, no driver need.
【Specification】
Model :eBOX-U
Warning This mark indicated topice that could lead serious injury of
your body or damage of the product if ignored or handled incorrectly.


5
Computer model IBM PC/AT Compatible, Power Macintosh, PowerBook, iMac
OS Windows 2000, Windows XP, Mac OS 9.0 or higher
Interface USB
¾Can’t operate properly under Windows 95/ Windows 98SE/ Windows 3.x/
WindowsNT/ Windows ME
¾Please be noted the following product may run irregularly which are not under
warranty.
9Toshiba DynaBook, Satellite series (All K6 CPU models)
9IBM Aptiva E series (All K6 CPU models)
9Sotec E-note M260 series
9All AMD K6 system
9PC with sis7000/7001/7002 PCI to USB host controller
※To install SATA HDD, please purchase SATA to IDE covert board.
【Installation】
Before installing Hardware Disk
Warming Please unplug the power cord before installing. It may
exposure to strong magnetic fields and malfunctions or damage.
Installing Hardware Disk
Please follow up HDD User Manuel. Hareware normally set up as Master, but please
be ntoed it my change when connect to PC.
[ Example] HITACHI made HDD

6
Connect with S-ATA hardware drive.
‧If only install one HDD, please set S-ATA covert adapter as Master.
‧If connect two S-ATA HDD ,Please set second S-ATA convert adapter as SLAVE。
Please make sure you connect
properly。
7
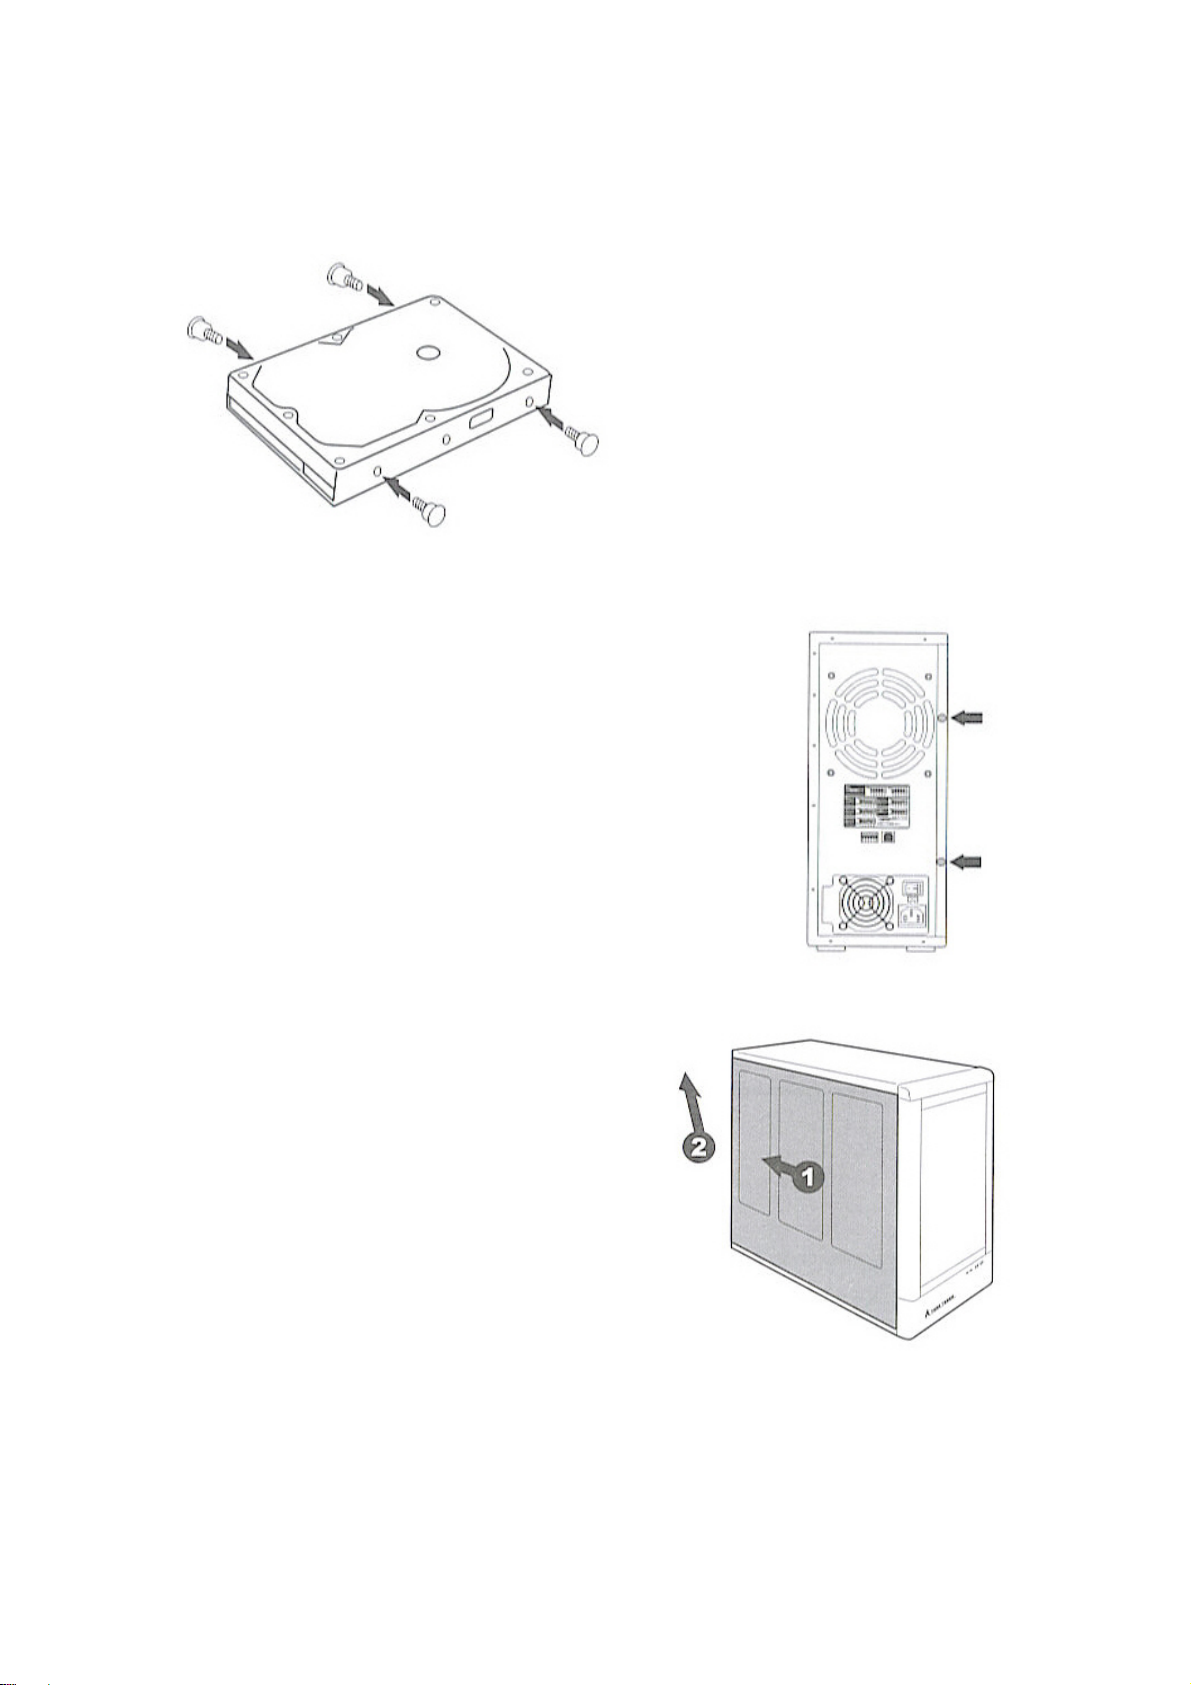
Fasten HDD with screws
3:Unfasten the screws on the back of the TERATOWER。
4:Remove left side panel

8
When install two or more HDD,set upper HDD us
Master and lower HDD as Salve. Please refer to the
diagram.
5:Remove front panel,and pull out the AC cable
and flat cable。Insert HDD in trun
from up to down.
6:Press the rubbers on each side to fasten the HDD

9
7:Connect AC cable and flat cable to HDD。
Please connect properly incase of any damage.
8:Fasten left side panel.
Flat Cable
AC cable
10
Power on and off
※If auto power effective, Tera tower will automatically on when PC operating.
Power ON
Press once, power will turn on
Power OFF
Press power for 3 seconds
Table of contents
Other Dat Optic Storage manuals


