DAVI & CIA Dp smart User manual

USER’S MANUAL
MA30-02/A
27/02/2012
www.davicia.com

USER’S MANUAL
MA30-02/A
1
INDEX
Page
1.
1.1.
1. DESCRIPTION
DESCRIPTIONDESCRIPTION
DESCRIPTION
1.1. Pa t list
2
3
2.
2.2.
2. INSTALLATION
INSTALLATIONINSTALLATION
INSTALLATION
2.1. Sta tup
4
5
3.
3.3.
3. OPERATION
OPERATIONOPERATION
OPERATION
3.1. LCD symbol desc iption
3.2. Key functions
3.3. Recommended location fo measu ement (Guide)
3.4. Analysis modes
3.5. Po t ait
3.6. Moistu e
3.7. Sebum
3.8. Evenness, Po es, Spots and W inkles
3.9. Results
3.10. Image t ansfe
6
6
7
7
8
8
9
9
9
10
10
4.
4.4.
4. SETUP
SETUPSETUP
SETUP
4.1. P og amming
4.1.1. Date/Time setting
4.1.2. Language setting
4.1.3. Mode setting
4.1.4. Measu ements setting
4.1.5. Bluetooth settings
4.1.6. Advanced settings
4.2. Connecting with PC
4.2.1. Connecting with cable
4.2.2. Connecting with Bluetooth
11
11
11
12
12
12
13
13
14
14
14
5.
5.5.
5. MAINTENANCE AND CLEANING
MAINTENANCE AND CLEANINGMAINTENANCE AND CLEANING
MAINTENANCE AND CLEANING
5.1. Inst uctions fo installing batte ies
5.2. Inst uctions fo cha ge and connect
5.3. Envi onmental
5.4. Equipment disposal
15
15
15
16
16
6.
6.6.
6. TROUBLESHOOTING
TROUBLESHOOTINGTROUBLESHOOTING
TROUBLESHOOTING
17
7.
7.7.
7. TECHNI
TECHNITECHNI
TECHNICAL SPECIFICATIONS
CAL SPECIFICATIONSCAL SPECIFICATIONS
CAL SPECIFICATIONS
18
8.
8.8.
8. WARRANTY CERTIFICATE
WARRANTY CERTIFICATEWARRANTY CERTIFICATE
WARRANTY CERTIFICATE
19
9.
9.9.
9. CE DECLARATION OF CONFORMITY
CE DECLARATION OF CONFORMITYCE DECLARATION OF CONFORMITY
CE DECLARATION OF CONFORMITY
20

USER’S MANUAL
MA30-02/A
2
1. DESCRIPTION
(1) Swivel head*
(2) Moistu e senso
(3) Came a and lighting
(4) LED indicato
(5) On/Off button
(6) LCD sc een
(7) Memo y
(8) Exte nal adapte connexion
* The head otates 90 deg ees clockwise. Tu ning in any othe way can cause damage to the equipment.
1
5
2
3
4
6
7 8

USER’S MANUAL
MA30-02/A
3
1
11
1.1.
.1. .1.
.1. PART LIST
PART LISTPART LIST
PART LIST
dpsma t
dpsma tdpsma t
dpsma t
Batte ies (x2) Cha ge (x1) USB cable (x1)
Hand st ap (x1) Case (x1) Use ’s Manual
C adle (x1) Cleaning cloth (x1)

USER’S MANUAL
MA30-02/A
4
2. INSTALLATION
Befo e putting the device into use, please ead with ca e the info mation given in the Ope ating Inst uctions.
They contain impo tant inst uctions fo installation, p ope use and maintenance of the device.
The manufactu e shall not be liable fo damages a ising out of failu e to heed the following inst uctions:
o When using elect ical components unde inc eased safety equi ements, always comply with the app op iate
egulations.
o Imp ope installation will ende the wa anty null and void.
o Ensu e the voltage ma ked on the powe supply unit, matches you main powe supply.
o This device is designed fo use indoo s.
o Obse ve the pe missible ambient tempe atu es fo use.
Caution upon installation and usage
o Humidity
HumidityHumidity
Humidity: Do not install the p oduct in the place with ain leakage o of high humidity. If the p oduct is leaking,
it may cause damage o fi e.
o Repai :
Repai :Repai :
Repai : Do not disassemble o emodel the p oduct because it may cause dange such as an elect ic shock.
When a p oblem occu s, do not attempt to epai it. Instead, contact the selle .
o Elect icity:
Elect icity:Elect icity:
Elect icity: Do not use elect icity except fo what is p esc ibed he e. Using imp ope elect icity may cause an
elect ic shock o dange .
o Installation Envi onment:
Installation Envi onment:Installation Envi onment:
Installation Envi onment: Do not install the p oduct in a too hot o cold place. (Recommended Tempe atu e :
15ºC ~ 35ºC)
o Sunlight:
Sunlight:Sunlight:
Sunlight: Do not expose the came a of the p oduct to the sun o a di ect ay of light. It may cause p oduct
damage.
o Shock o Vib ation:
Shock o Vib ation:Shock o Vib ation:
Shock o Vib ation: Do not d op the p oduct o give it a st ong shock o vib ation.
o If the p oduct does not wo k p ope ly
If the p oduct does not wo k p ope lyIf the p oduct does not wo k p ope ly
If the p oduct does not wo k p ope ly:
::
: If a p oblem occu s while using the p oduct (unidentified noise, smell o
smoke), stop using it and tu n the powe off and contact the selle .
o Di t on Lens:
Di t on Lens:Di t on Lens:
Di t on Lens: Make su e to keep came a lenses clean and away f om pollution. If polluted by finge p int o
exte nal di t, cleanse it with cotton stick soacked with 70% Ethyl Alcohol solution o use ai blowe to emove
the dust.
o Afte
AfteAfte
Afte -
--
-Sales Se vice:
Sales Se vice:Sales Se vice:
Sales Se vice: When any of the following occu s, tu n the powe off and have the p oduct epai ed at
the place of pu chase.
- Powe Connecto is damaged
- The p oduct is leaking
- Liquid is spilt ove the p oduct o it has alien substance.
- P oduct does not wo k as indicated in this manual. (Attempting to ope ate the p oduct against
manual may cause mo e se ious damage.)
- P oduct is d opped to the floo and se iously damaged.

USER’S MANUAL
MA30-02/A
5
2.1.
2.1. 2.1.
2.1. STARTUP
STARTUPSTARTUP
STARTUP
The dpsma t equipment wo ks with echa geable batte ies. It is ecommended to fully cha ge the batte ies
befo e using the equipment fo the fi st time.
Tu n On
o P ess the On/Off button (5) until the LED
indicato stops blinking and the sc een
tu ns on.
Tu n Off
o P ess the On/Off button (5) fo 2-3
seconds. The device will be switched off
automatically.
o By p essing the On/Off button, you will be able to go back to the home sc een.
o If the device is not in use fo 9 minutes, it will be switched off automatically.
o Make su e to switch off the device when changing Mic o SD ca d.

USER’S MANUAL
MA30-02/A
6
3. OPERATION
The analyze dpsma t allows fo captu e and view images of the skin unde high magnification and detail.
Following a e the steps to pe fo m a complete diagnosis.
3.1
3.13.1
3.1.
. .
. LCD SYMBOL DESCRIPTION
LCD SYMBOL DESCRIPTIONLCD SYMBOL DESCRIPTION
LCD SYMBOL DESCRIPTION
Display
DisplayDisplay
Display
Desc iption
Desc iptionDesc iption
Desc iption
Batte y fully cha ged
Most of the batte y cha ged
Half of the batte y cha ged
Out of batte y: Batte y need to cha ge o eplace.
Guide is enabled
Measu ement Indicates the measu ement mode which is enabled
P evious
Captu e
Next
Measu ement

USER’S MANUAL
MA30-02/A
7
3.2
3.23.2
3.2.
. .
. KEY FUNCTIONS
KEY FUNCTIONSKEY FUNCTIONS
KEY FUNCTIONS
Designation
DesignationDesignation
Designation
Function
Function Function
Function
• On / Off
• Go to homesc een
• Enable / Disable the guide
• Left
• Right
• Homesceen: P ess and hold to move to the Bluetooth
pa ing mode.
• Album: Exit image view
• Captu e image
• Left
• Homesc een: P ess and hold to go to the Album
• Diagnosis: P evious measu ement
• End of diagnosis: Go to Bluetooth settings
• Confi m
• Diagnosis: Captu e image
• Album: See the images
• Right
• Homesc een: P ess and hold to go to the Configu ation
• Album: Delete an image
• Diagnosis: Next measu ement
3.3
3.33.3
3.3.
. .
. RECOMMENDED LOCATION F
RECOMMENDED LOCATION FRECOMMENDED LOCATION F
RECOMMENDED LOCATION FOR MEASUREMENT (GUIDE)
OR MEASUREMENT (GUIDE)OR MEASUREMENT (GUIDE)
OR MEASUREMENT (GUIDE)
The following guide is just o ientative.
Moistu e
Sebum T-zone Sebum U-zone
Unifo mity Spots W inkles

USER’S MANUAL
MA30-02/A
8
3.4.
3.4. 3.4.
3.4. ANALYSIS MODES
ANALYSIS MODESANALYSIS MODES
ANALYSIS MODES
On the home sc een you can select between fou diffe ent modes of analysis:
Exp ess:
Exp ess:Exp ess:
Exp ess:
1. Moistu e
2. Unifo mity and spots
3. Sebum
4. W inkles
Simple:
Simple:Simple:
Simple:
1. Moistu e
2. Sebum
Full:
Full:Full:
Full:
1. Moistu e
2. Sebum
3. Unifo mity
4. W inkles
5. Spots
The fou th mode is View
ViewView
View, which allows you to view and captu e images with the
two pola izations of the device. Captu es a e not sto ed.
NOTE: The measu es that have been disabled in the settings will not be
pe fo med. The above lists co espond to the full set of measu ements
conside ing that all of them a e enabled.
3.
3.3.
3.5
55
5.
. .
. CUSTOMER REGISTRATION
CUSTOMER REGISTRATIONCUSTOMER REGISTRATION
CUSTOMER REGISTRATION
The custome eco d is optional. At the beginning of each test (except Simple mode) we can egiste the client
so that the contents of the analysis a e sto ed in the memo y of dpsma t.
If you use the softwa e dpsma t de mop ime, you must egiste the client to analyze the data late .
If you use the softwa e dpsma t de mop ime, you must egiste the client to analyze the data late .If you use the softwa e dpsma t de mop ime, you must egiste the client to analyze the data late .
If you use the softwa e dpsma t de mop ime, you must egiste the client to analyze the data late .
Use the Up, Down,
Use the Up, Down,Use the Up, Down,
Use the Up, Down, Left and Right keys to ente custome data. P ess Confi m to save you selection.
Left and Right keys to ente custome data. P ess Confi m to save you selection. Left and Right keys to ente custome data. P ess Confi m to save you selection.
Left and Right keys to ente custome data. P ess Confi m to save you selection.
o Select fi st, the custome 's age g oup.
o Then select the gende of the custome .
o To ente the custome 's name, sc oll th ough the keyboa d and p ess the Confi m key to ente the selected
lette .
o Afte ente ing the name, p ess M.
o P ess Confi m to sta t measu ing.
USER’S MANUAL
MA30-02/A
9
3.
3.3.
3.6
66
6.
. .
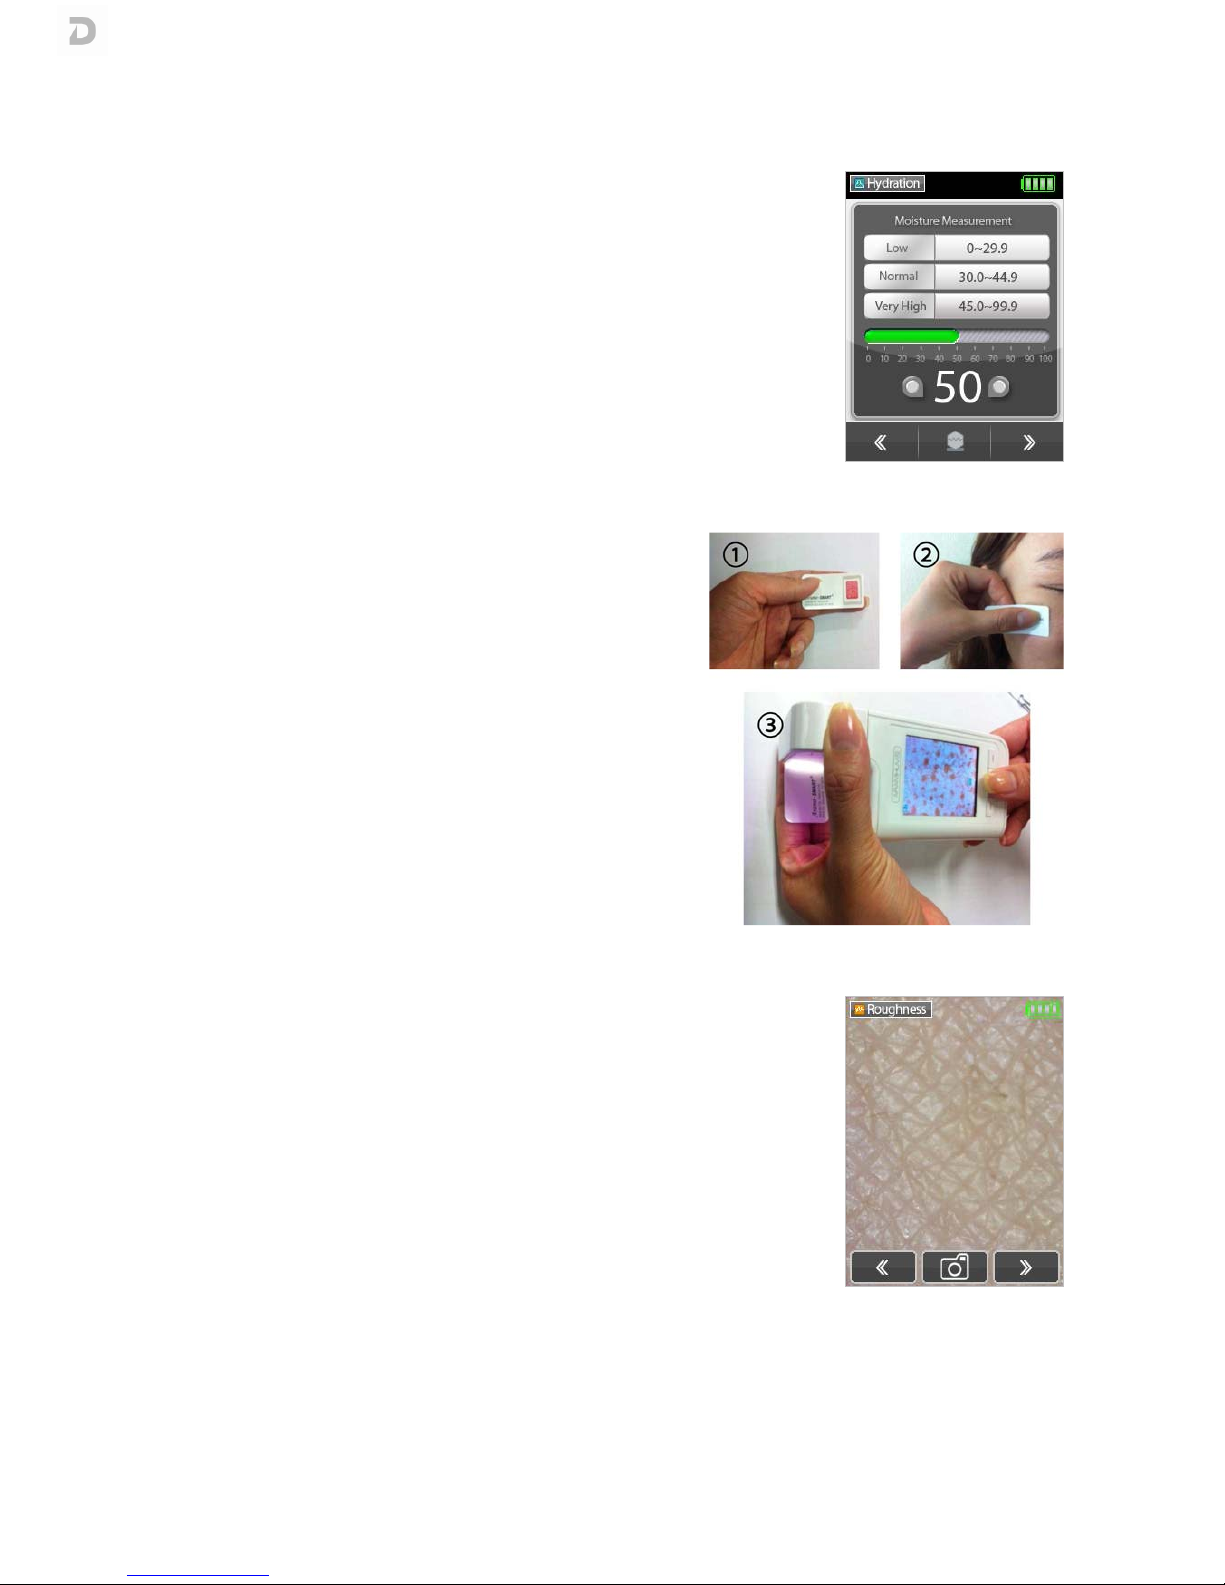
. MOISTURE
MOISTUREMOISTURE
MOISTURE
To take the moistu e measu ement co ectly it is impo tant that the senso is not
in contact with the skin at the beginning of the measu ement.
o When the device makes a “beep-beep” sound, place the moistu e senso in
contact with the skin
o The g een ba on the display will sta t moving
o With the “di i ing” sound the esult of the measu ement will appea on display
o P ess Next button to move to the next measu ement
3.
3.3.
3.7
77
7.
. .
. SEBUM
SEBUMSEBUM
SEBUM
The sebum measu ement of two diffe entiated a eas of the face,
is meant to dete mine the skin type (d y, no mal, mixed o oily).
This p ocess must be epeated fo both designated face a eas (U-
zone and T-zone).
o Take one sample of sebum indicato
o P ess the pink a ea of the sebum indicato on the skin fo 3
seconds, in the T-zone
o F ame the pink a ea, imp egnated with skin’s sebum, using
the came a
o P ess Captu e button
o P ess Next button
o Repeat the p evious steps fo the U-zone, using a new sebum
indicato sample
o P ess Next button when finished
3.
3.3.
3.8
88
8.
. .
. EVENNESS, PORES, SPOTS AND WRINKLES
EVENNESS, PORES, SPOTS AND WRINKLESEVENNESS, PORES, SPOTS AND WRINKLES
EVENNESS, PORES, SPOTS AND WRINKLES
In o de to diagnose fu the measu ements, captu e images of the ecommended
a eas
o Place the analyze head in the ecommended location acco ding to the
measu ement
o P ess and hold the Captu e button until the analyze finishes the auto focus
and takes the pictu e
o P ess Next button to go to the next measu ement

USER’S MANUAL
MA30-02/A
10
3.
3.3.
3.9
99
9.
. .
. RESULTS
RESULTSRESULTS
RESULTS
When finished taking the diffe ent measu ement images, the device analyzes the
Sebum captu es to dete mine the client's skin type.
The esults shown in the device include the deg ee of moistu e and the skin type
of the client. The emaining images will be analyzed by the de mop ime softwa e.
Click Next to see the esults, until you each the data t ansfe sc een.
3.
3.3.
3.10
1010
10.
. .
. IMAGE TRANSFER
IMAGE TRANSFERIMAGE TRANSFER
IMAGE TRANSFER
The images taken by dpsma t, as well as the esults, can be t ansfe ed to
Pe sonal Compute s via C adle, USB data-cable p ovided by the supplie o
Bluetooth.
Each time a diagnosis is finished, the sc een displays the options to t ansfe o
save the images:
o P ess Bluetooth button to pai the dpsma t to the host device
o P ess Send button to t ansfe the images via Bluetooth
o P ess Finish button to save the images to the Album
F om the Album it is also possible to send the images, at any time.
NOTE: Once the images a e t ansfe ed, they a e automatically deleted f om the
analyze .
USER’S MANUAL
MA30-02/A
11
4. SETUP
4.1
4.14.1
4.1.
. .
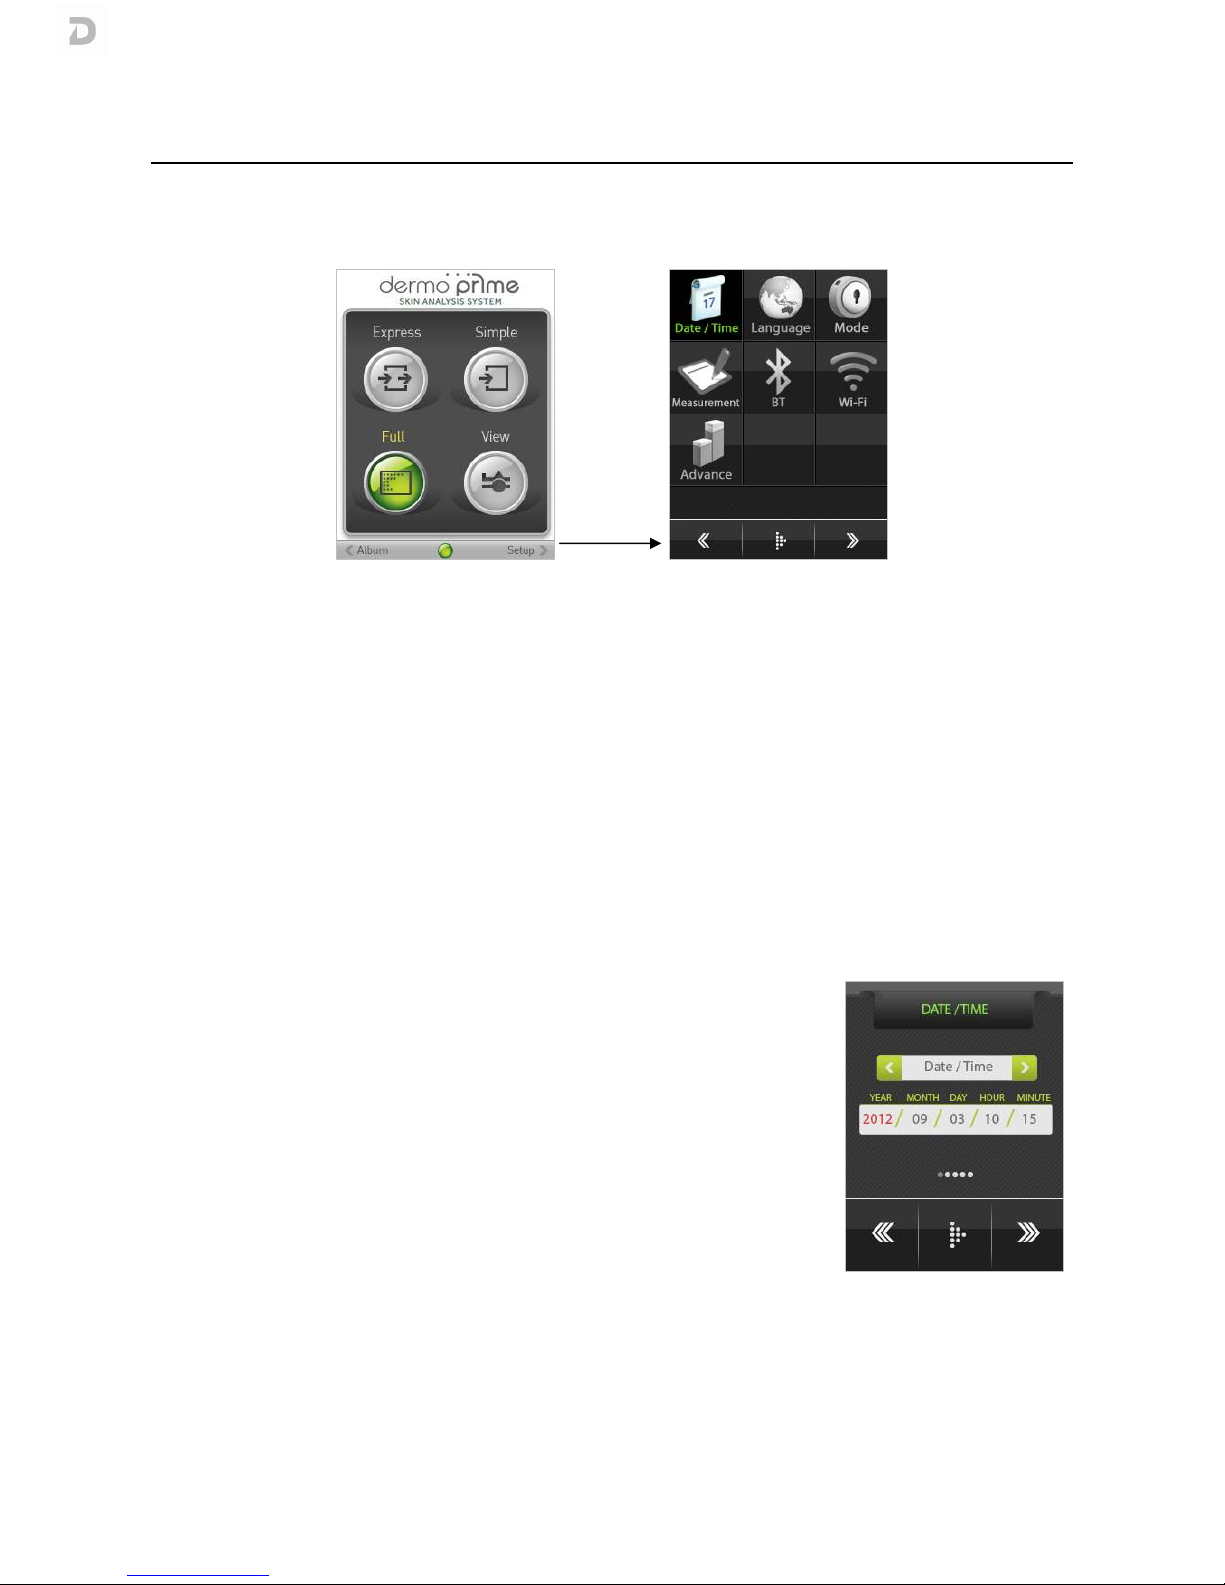
. PROGRAMMING
PROGRAMMINGPROGRAMMING
PROGRAMMING
o P ess and hold Setup button fo 2-3 seconds to ente the setup menu.
o P ess Left o Right keys to move left o ight th ough the diffe ent menu options
o To confi m an option p ess the middle button
The options of the setup menu a e:
Date / Time
Date / TimeDate / Time
Date / Time
Modify date and time settings
Language
LanguageLanguage
Language
Change the language of the softwa e
Mode
ModeMode
Mode
Set the diagnosis mode
Measu ement
Measu ementMeasu ement
Measu ement
Select the measu ements you want to diagnose
BT
BTBT
BT
Select the Bluetooth pai ing device
Wi
WiWi
Wi-
--
-Fi
FiFi
Fi
This option is pe manently disabled
Advance
AdvanceAdvance
Advance
Info mation elated to the softwa e ve sion and contact details
o To exit the setup menu, p ess the On/Off button.
4.1.1. Date / Time setting
4.1.1. Date / Time setting4.1.1. Date / Time setting
4.1.1. Date / Time setting
If you select the Date / Time
Date / TimeDate / Time
Date / Time option, the display shows the following sc een:
o P ess Left o Right keys to move th ough the diffe ent values
o P ess Up o Down keys to dec ease o inc ease the selected value
o P ess Confi m to set the cu ent value and move to the next one
o Once the date and time a e set, p ess the On/Off button to go back to the
setup menu

USER’S MANUAL
MA30-02/A
12
4.1.
4.1.4.1.
4.1.2
22
2.
. .
. Language
LanguageLanguage
Language setting
setting setting
setting
If you select the Language
LanguageLanguage
Language option, the display shows the following sc een:
o P ess Left o Right keys to move down o up th ough the language options
o P ess Confi m to set the language
o To go back to the setup menu, p ess the On/Off button
4.1.
4.1.4.1.
4.1.3
33
3.
. .
. Mode
ModeMode
Mode setting
setting setting
setting
If you select the Mode
ModeMode
Mode option, the display shows the following sc een:
o P ess Left o Right keys to move down o up th ough the mode options (see
3.4. Analysis modes)
o To go back to the setup menu, p ess the On/Off button
4.1.
4.1.4.1.
4.1.4
44
4.
. .
. Measu ements
Measu ementsMeasu ements
Measu ements setting
setting setting
setting
If you select the Measu ement
Measu ementMeasu ement
Measu ement option, the display shows the following sc een:
o P ess Left o Right keys to move down o up th ough the measu ement
options
o P ess Confi m key to enable/disable the selected measu ement
o G een: measu ement is enabled
o G ay: measu ement is disabled
o To go back to the setup menu, p ess the On/Off button
USER’S MANUAL
MA30-02/A
13
4.1.
4.1.4.1.
4.1.5
55
5.
. .
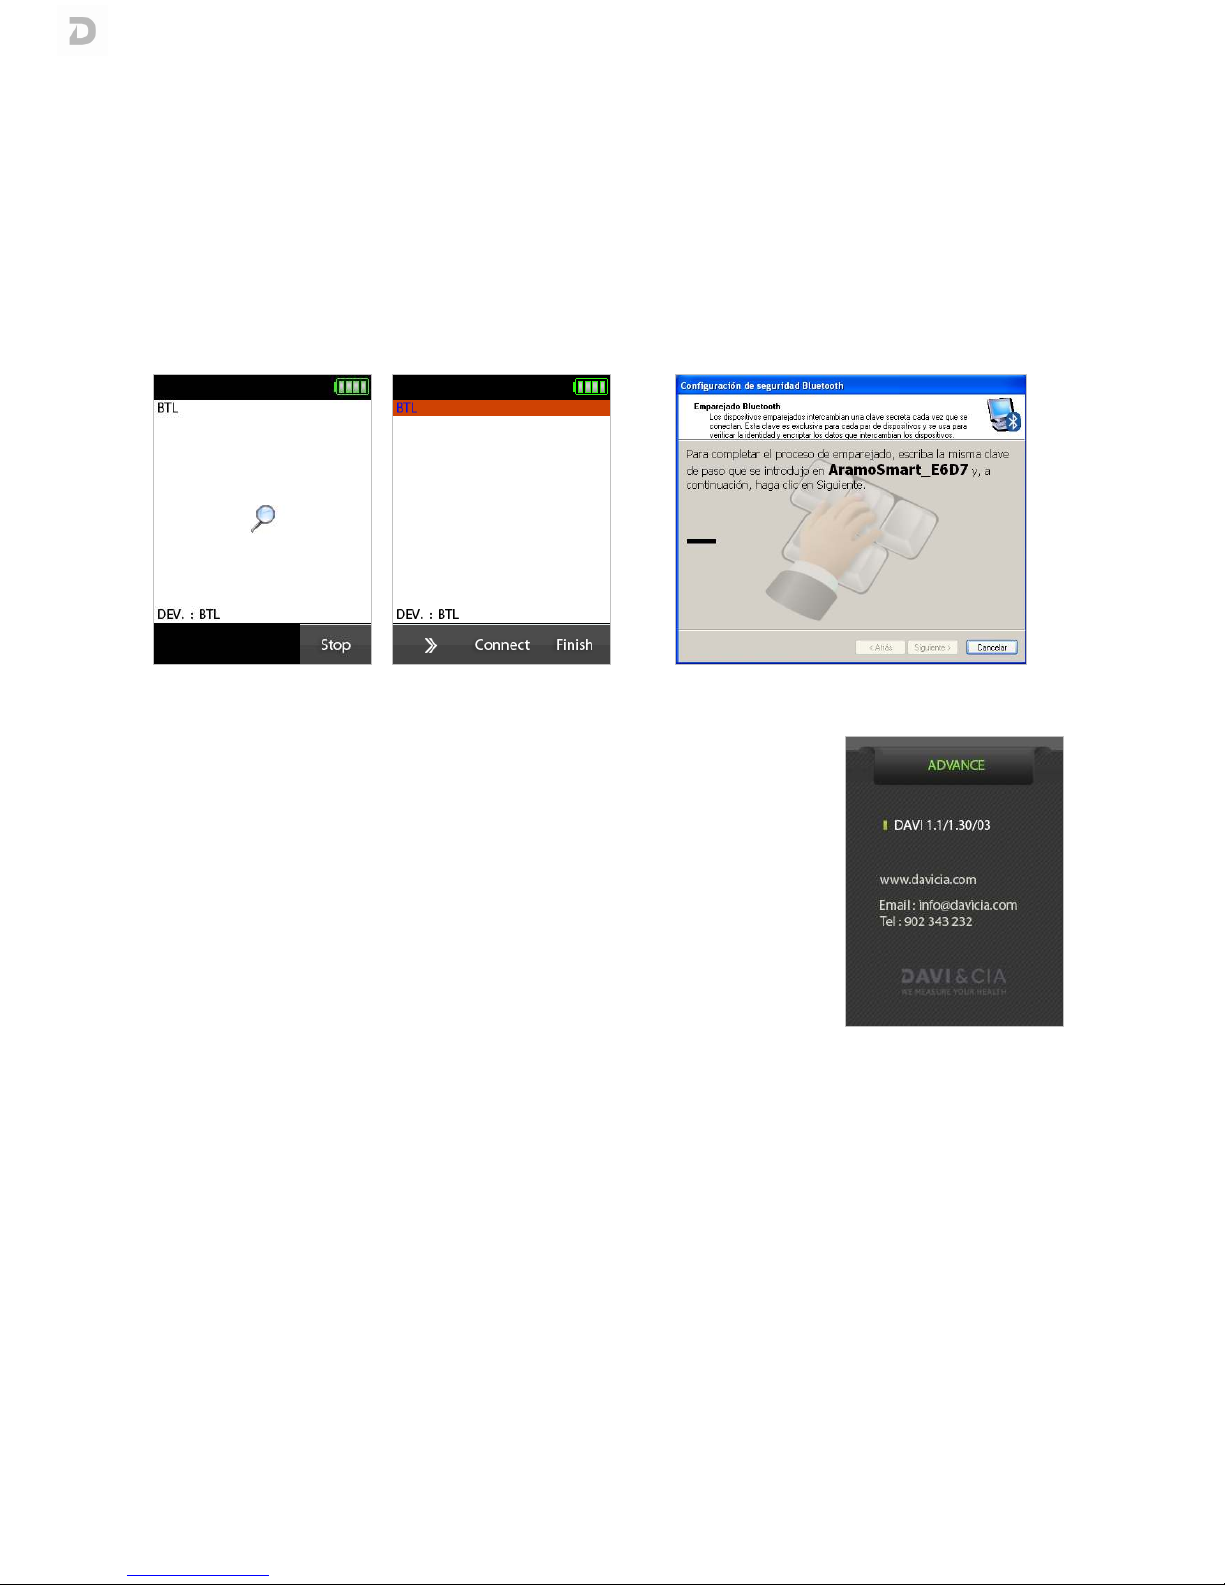
. Bluetooth
BluetoothBluetooth
Bluetooth settings
settings settings
settings
If you select the BT
BTBT
BT option, the display shows the following sc een:
o The display will show all devices that a e eady to connect via Bluetooth. Wait until the list is full and the
sea ch is complete.
o P ess the Left o Right keys to sc oll th ough Bluetooth devices
o When the desi ed device is selected, p ess Connect.
o If the host device equi es pai ing code, ente "0" (numbe ) in Bluetooth pai ing settings.
o When the connection is completed, the analyze sc een will display "Bluetooth device connected"
4.1.
4.1.4.1.
4.1.6
66
6. Advance
. Advance. Advance
. Advanced
dd
d settings
settings settings
settings
If you select the Advanced
AdvancedAdvanced
Advanced option, the display shows the following sc een:
o This sc een includes the softwa e ve sion and the contact details
o To go back to the setup menu, p ess the On/Off button

USER’S MANUAL
MA30-02/A
14
4.
4.4.
4.2
22
2.
. .
. CONNECTING WITH PC
CONNECTING WITH PCCONNECTING WITH PC
CONNECTING WITH PC
The images taken with the analyze can be t ansfe ed to othe devices eithe wi elessly o using a USB cable
p ovided by the supplie .
4.2.1. Connecting with cable
4.2.1. Connecting with cable4.2.1. Connecting with cable
4.2.1. Connecting with cable
o Plug the USB cable to the c adle and to the PC as indicated in the pictu es below.
o Plug the device into the c adle. If you wish not to use the c adle, connect the USB cable di ectly to the device.
o On the display on the device will appea the message “USB connexion”. If the message doesn’t appea , tu n
on the device.
o The PC will automatically ecognise the device and will enable image b owsing.
NOTE: Always use the USB data-cable p ovided by the supplie .
4.2.
4.2.4.2.
4.2.2
22
2. Connecting with
. Connecting with . Connecting with
. Connecting with Bluetooth
BluetoothBluetooth
Bluetooth
o Place the Bluetooth device within 1 m (3 ft) f om the analyze .
o P ess and hold “M” button, on the side of the analyze .
o Follow the steps in the Bluetooth settings (see 4.1.5. Bluetooth settings)
PC
C adle
(
back side
)

USER’S MANUAL
MA30-02/A
15
5. MAINTENANCE AND CLEANING
The device does not equi e any outine maintenance. Howeve , we ecommend cleaning the sc een and
moistu e senso at egula inte vals. The egula ity of these cleaning is dependent on the level of use and the
state of the equipment.
o We would ecommend using smooth, slightly moistened wipes when cleaning the equipment.
o Please do not use la ge amounts of wate when cleaning the equipment as this will cause damage to the
elect onics, you should also ef ain f om using co osive liquids.
o Clean only the exte io su face of the equipment, neve the batte ies o any othe inne component.
5.1
5.15.1
5.1.
. .
. INSTRUCTIONS FOR INSTALLING BATTERIES
INSTRUCTIONS FOR INSTALLING BATTERIESINSTRUCTIONS FOR INSTALLING BATTERIES
INSTRUCTIONS FOR INSTALLING BATTERIES
1. Slide to open the batte y
cove
2. Inse t the batte y 3. Close the batte y cove
5.
5.5.
5.2
22
2. INSTRUCTIONS FOR CHARGE AND CONNECT
. INSTRUCTIONS FOR CHARGE AND CONNECT. INSTRUCTIONS FOR CHARGE AND CONNECT
. INSTRUCTIONS FOR CHARGE AND CONNECT
Using cha ge
1. Connect the equipment to the powe supply
2. The LED indicato (4) will tu n on
o O ange: Batte y is cha ging
o Blue: Batte y is fully cha ged
3. When the LED indicato tu ns blue, unplug the
equipment.
Using c adle
1. Plug the cha ge into the c adle
2. Connect the device to the c adle.
3. The LED indicato (4) will tu n on
o O ange: Batte y is cha ging
o Blue: Batte y is fully cha ged
4. When the LED indicato tu ns blue, unplug the
equipment.

USER’S MANUAL
MA30-02/A
16
Batte y cha ging and ope ation time
Batte y
Batte yBatte y
Batte y
Cha ging
Cha gingCha ging
Cha ging
Ope ation (Continuous use)
Ope ation (Continuous use)Ope ation (Continuous use)
Ope ation (Continuous use)
Standa d (1150mAh) 180 minutes 100 minutes
o Batte y cha ging hou s a e measu ed using the standa d adapto p ovided by the supplie .
o Cha ging and ope ation hou s can be diffe ent depending on use ci cumstance.
o Batte y ope ation hou s can be diffe ent in va ious ci cumstances including ope ating mode, batte y life time.
o Batte y can be used even if the deice is on sleep o switched off.
o It is suggested to pu chase new batte y when the batte y last less than half compa e to its initial use.
5.3
5.35.3
5.3.
. .
. ENVIRONMENTAL
ENVIRONMENTALENVIRONMENTAL
ENVIRONMENTAL
All batte ies contain toxic compounds; disposal of batte ies should be delegated to a competent o ganization,
complying with the deposit of Poisonous Waste Regulation 1972.
Please do not incine ate batte ies.
The optimum ope ating tempe atu e fo the device is -10ºC to +50ºC; although it will ope ate at highe and lowe
tempe atu es the scale’s batte y life will adve sely be affected.
5.
5.5.
5.4
44
4. EQUIPMENT DISPOSAL
. EQUIPMENT DISPOSAL. EQUIPMENT DISPOSAL
. EQUIPMENT DISPOSAL
All elect ical and elect onic p oducts should be disposed of sepa ately f om the
municipal waste st eam via designated collection facilities appointed by the
gove nment o the local autho ities.
This c ossed-out wheeled bin symbol on the p oduct means the p oduct is cove ed
by the Eu opean Di ective 2002/96/EC.
The co ect disposal and sepa ate collection of the equipment will help p event
potential negative consequences fo the envi onment and human health. It is a
p econdition fo euse and ecycling of used elect ical and elect onic equipment.

USER’S MANUAL
MA30-02/A
17
6. TROUBLESHOOTING
Symptoms
Symptoms Symptoms
Symptoms Co ection
Co ectionCo ection
Co ection
I cannot tu n on the device. - The batte y might be discha ged. Please use it afte cha ging fully.
I see that the cha ging lamp is
blinking.
The batte y is not cha ging ve y
well.
- Please emove the batte y f om the device and put it on again.
- Please check the connection among a device, a batte y, and a cha ge .
- A batte y cannot be cha ged if the e is an alien substance on the
cha ging po t. In this case, please use the device afte cleaning the
cha ging po t of the device.
The e a e dust o an alien
substance on the device.
- Please use a smooth fab ic to clean the device. Do not use benzene,
alcohol o a synthetic dete gent in o de to clean.
I cannot powe on the device
even the batte y is still full.
- The batte y might be dislocated on the device. Please emove the
batte y f om the device and put it on, and then powe on again.
The using time of the batte y is
diffe ent f om the manual.
- The batte y using time will be sho tened if you put the cha ged batte y
in low o high tempe atu e envi onments.
- The batte y using time va y in se vice type, using envi onment, using
pe iod of the batte y.
- The batte y is consumed without using the device, and the batte y
using time will be sho tened if you use additional functions of the
device, such as the Bluetooth.
The sc een is f ozen and the
keys not wo king when using the
device.
- Please emove the batte y f om the device and put it on again.
- If the device is still not wo king, please contact to the custome se vice
cente .
I cannot t ansfe the
file by Bluetooth.
- Please check whethe the pa ing is completed with the device which
you want to t ansfe .
No Bluetooth function on the
hosting device.
- Make su e to use the Bluetooth hosting devices that have Bluetooth
ce tified with the logo. You may need an exte nal Bluetooth dongle fo
those devices that do not have Bluetooth featu e.
When pai ing cannot be done. - B ing the device to close with the Bluetooth hosting device.
- Make su e the pass code fo connection is “0” (ze o) fo pai ing.
- Refe to the pai ing inst uction f om the manual.
- The analyze needs to sea ch fo the hosting devices, not the othe
way a ound. Check fo the name of the hosting devices (PDA o PC)
befo e sea ch.
I cannot find the images f om the
album.
- Inse t the SD ca d once mo e.
- Remove the SD ca d and inse t fi mly.
When PC cannot ecognize the
device.
- Make su e the USB connection is fi mly plugged (with p essu e).
- Make su e the device has SD ca d plugged fi mly on the ight socket of
the bottom.
- T y on diffe ent USB po ts in case the PC has faulty po ts
- Make su e the PC OS is one of listed below : 98SE, 2000, XP, Vista, and
Windows 7 and USB suppo tive PC unit.
When date and time is w ong. - Change the date and time on the f ont sc een.

USER’S MANUAL
MA30-02/A
18
7. TECHNICAL SPECIFICATIONS
Model: dpsma t
Manufactu e : A am Huvis Co., Ltd. unde licence f om DAVI & CIA
Display: 2.2 inches TFT LCD
320 x 240 pixels QVGA – 40.2 x 55.66 mm
Weight: 127 g (with batte y)
Maximum exte nal
dimensions:
57 x 116 x 18 mm
Image senso :
Type:
Maximize pixel:
Available pixel:
Captu e mode:
1/2.7 Type CCD Image Senso
1188(H) x 888(V) x 2 2,109,888 Pixel
1152(H) x 864(V) x 2 1,990,656 Pixel
X1, X30, X60
Bluetooth:
Ve sion:
F equency ange:
Available distance:
Fully Qualified Bluetooth V2.0+EDR System
2402 ~ 2480MHz
Up to 10M / 1Mbps
Powe supply:
Li-Ion Batte y 4.2V 1150mA
AC Adapto DC 5V / 1000mA
Memo y ca d: Mic o SD Ve 2.0 (2GB)
In ope ation:
Tempe atu e:
Humidity:
-10 ºC to +50 ºC
5 % to 85 %

USER’S MANUAL
MA30-02/A
19
8. WARRANT CERTIFICATE
We p ovide a 1
11
1-
--
-yea
yeayea
yea gua antee f om the date of pu chase. The gua antee cove s manufactu ing defects o
defects occu ing as a esult of no mal use and ope ation.
It excludes all emovable pa ts such as batte ies, wi es, powe supply devices, etc. Faults falling within the
gua antee pe iod shall be ectified f ee of cha ge upon p esentation of the pu chase eceipt fo the appliance. No
othe ights can be taken into conside ation.
Retu n shipment is at the custome 's expense if the appliance is anywhe e othe than at the custome 's
headqua te s.
In the event of damage du ing shipment, gua antee ights will be g anted only if the appliance is shipped in the
o iginal packaging. You a e the efo e ecommended to keep the o iginal packaging.
Following expi y of the gua antee pe iod, all se vices equested will be dealt with by ou specialist technicians at
the use 's expense.
Table of contents
Other DAVI & CIA Personal Care Product manuals


