davoline SHAPE 060 BL Quick start guide

User Manual
Assembly �nstruct�ons
Hood
SHAPE 060 BL - SHAPE 060 WH -
SHAPE 060 GR
SHAPE 090 BL - SHAPE 090 WH -
SHAPE 090 GR Read th�s manual pr�or to perform�ng any task!

1, en_US
IMPORTER
DAVOLINE KLIMATECHNIKI S.A.
35, MARİNOU ANTİPA,THESSALONIKI / GREECE
12.08.2020
User Manual
2

Table of contents
1 TECHNICAL DRAWING.............................................................................. 4
2 WARNING AND SAFETY PRECAUTIONS................................................. 6
2.1 Life-Threatening Danger, Poisoning Danger!...................................... 8
3 USAGE WITH AND WITHOUT CARBON FILTER................................... 13
4 REPLACEMENT OF CARBON FILTER.................................................... 14
5 CLEANING AND PREVENTIVE MAINTENANCE.................................... 15
5.1 Removing the aluminium filters......................................................... 15
5.2 Washing in Dishwasher..................................................................... 16
5.3 Hand Wash........................................................................................ 16
6 APPLIANCE POSITION............................................................................ 17
6.1 Installation and Unpacking of the Appliance...................................... 17
6.2 Recommendations for Energy Saving............................................... 17
7 CONTENT OF PACKAGE......................................................................... 18
8 OVERVIEW OF hood................................................................................ 19
9 ASSEMBLY OF PRODUCT....................................................................... 20
9.1 Installation of the Sheet Metal Flue................................................... 21
10 USE OF PRODUCT................................................................................... 23
10.1 Efficient Use With Regard to Energy Saving:.................................. 23
10.2 Use of Hood:.................................................................................... 24
11 REPLACING THE LAMPS........................................................................ 25
11.1 Halogen Lamp Replacement........................................................... 25
12 AUTHORIZED SERVICE........................................................................... 26
13 TECHNICAL TABLE.................................................................................. 28
Table of contents
12.08.2020 User Manual 3

1 TECHNICAL DRAWING
395
350
411
596
414
213
166,5
400
20 24
80
330
690
350
130
411
796
414
261
250
400
20 25
80
380
Fig. 1
TECHNICAL DRAWING
12.08.2020
User Manual
4

690
350
130
411
896
414
261
250
400
20 25
80
380
Fig. 2
TECHNICAL DRAWING
12.08.2020 User Manual 5

2 WARNING AND SAFETY PRECAU-
TIONS
WARNING AND SAFETY PRECAU-
TIONS
nThis appliance can be used by
children of 8 years and older,
people with physical, sensory or
mental capability deficiency or
people with lack of experience or
knowledge; as long as they are
provided supervision or instruc-
tions for the safe use of the appli-
ance and they comprehend the
dangers.
nChildren should not tamper with
the appliance. Cleaning and user
maintenance operations must not
be performed by children unless
supervised.
nThis product is designed for home
use.
nUsage voltage of your product is
220-240 Volt~50-60 Hz.
nPower cord of your product is
fitted with a grounded plug. This
cord must be plugged into a
grounded outlet.
nThe whole electrical wiring must
be installed by a qualified electri-
cian.
nInstallation by unauthorized per-
sons could lead to poor operation
performance, damage to the
product, and accidents.
nFeeder cable of the appliance
mustn't be exposed to jamming or
crashing during assembly. Feeder
cable mustn't be placed near the
cooker. In such cases, it might
melt down and lead to fire.
nDo not plug in the appliance
before the installation.
nMake sure that the installation
place allows the user to easily
unplug the power cable in case of
any danger.
nDo not touch your product's lamps
when they work for a long time.
The lamps may burn your hand as
they will be hot.
nKitchen hoods are manufactured
for household use in normal home
cooking. There is a risk of mal-
function in other types of use, and
the product guarantee will be void.
nComply with the rules and instruc-
tions regarding discharge of out-
going air, stipulated by the rele-
vant authorities. (This warning
does not apply to uses without
flue.)
nFlammable foods must not be
cooked under the appliance.
nStart your product after you place
pot, pan etc. on the stoves. Other-
wise, high temperature may cause
same parts of your products to
deform.
nTurn off the cooker's burner before
taking the saucepan, pan, etc. off
the cooker.
nDo not leave boiling oil on the
stove. Pots that contain boiling oil
may catch fire by itself.
nSince oils could catch fire when
you cook fried foods in particular,
be careful about your curtains and
tablecloths.
nEnsure timely replacement of the
filters. Filters not replaced in a
timely manner pose risk of fire due
to accumulated grease deposits
on them.
WARNING AND SAFETY PRECAUTIONS
12.08.2020
User Manual
6

nDo not use non-fire-resistant fil-
tering materials instead of the
filter.
nDo not operate your product
without filter, and do not remove
the filters when the product is in
operation.
nIn case of any fire, de-energize the
hood and any other cooking
devices. (Plug off the appliance or
turn off the main switch.)
nIf your product's periodic cleaning
is not made in a timely manner, it
could pose risk of fire.
nDe-energize the appliance before
any maintenance operations.
(Plug off the appliance or turn off
the main switch.)
nWhen electric cooker hood and
devices fed with energies other
than electricity operate simultane-
ously, the negative pressure in the
room must not exceed 4 Pa ( 4 X
10 bar ).
nGas or fuel oil burning appliances,
such as room heaters, which
share the same environment with
your product, must be fully insu-
lated from the exhaust of this
product or they must be hermet-
ical.
nWhen you make a flue connection
for your product, use pipes with a
diameter of 150mm or 120 mm.
The length of the duct connection
as well as the number of elbows
must be as minimum as possible.
nChildren must not play with the
appliance.
nFor your safety, use ”MAX 6 A”
fuse in the hood system.
nSince the packing materials could
be dangerous, keep them away
from children.
nIf the feeder cable is damaged, it
must be replaced by its manufac-
turer or its authorized technical
service or any other personnel
qualified at the same level, in
order to avoid any dangerous sit-
uation.
nIn case of any deflagration, de-
energize the cooker hood and
cooking appliances, and cover the
flame. Never use water to extin-
guish the fire.
nWhen cooking appliances are in
operation, their accessible parts
could be hot.
nThis appliance is not intended to
be used by people with physical,
sensory and mental disabilities
(including children) or those who
have not adequate experience and
knowledge regarding its use,
unless they are under the supervi-
sion of a person responsible for
the safety of the appliance.
nAfter the installation of the hood,
the minimum distance must be 65
cm between the product and any
electric cooker; and 75 cm
between it and any gas ranges or
cookers burning other fuels.
nOutput of the hood must not be
connected to air ducts, where
there exist another smokes.
nYou must be careful when using
the appliance spontaneously with
other appliances (e.g. gas, diesel
fuels, coal, wood, etc. burning
heaters, shower heaters), which
use the same air in the same envi-
ronment. Attention must be paid
when using them simultaneously.
It is because the hood could
adversely affect the combustion,
by discharging the ambient air.
WARNING AND SAFETY PRECAUTIONS
12.08.2020 User Manual 7
nThis warning does not apply to
uses without flue.
nWhen electric cooker hood is used
simultaneously with devices that
use gas or other fuels, there must
be sufficient ventilation in the room
(might not apply to devices that
discharges the air back into the
room).
2.1 Life-Threatening
Danger, Poisoning
Danger!
DANGER!
Warning - Choking Hazard
The packaging materials are
dangerous for children. Never
allow children to play with pack-
aging materials.
DANGER!
Warning - Death Hazard
There are life-threatening
danger and poisoning danger
due to reabsorbed combustion
gases. During the air discharge
outlet use, unless sufficient air
supply is provided, do not use
the appliance simultaneously
with devices that discharge
toxic gases through flue such
as ventilated, gas, oil, wood or
coal burning heaters, shower
heaters, water heaters,
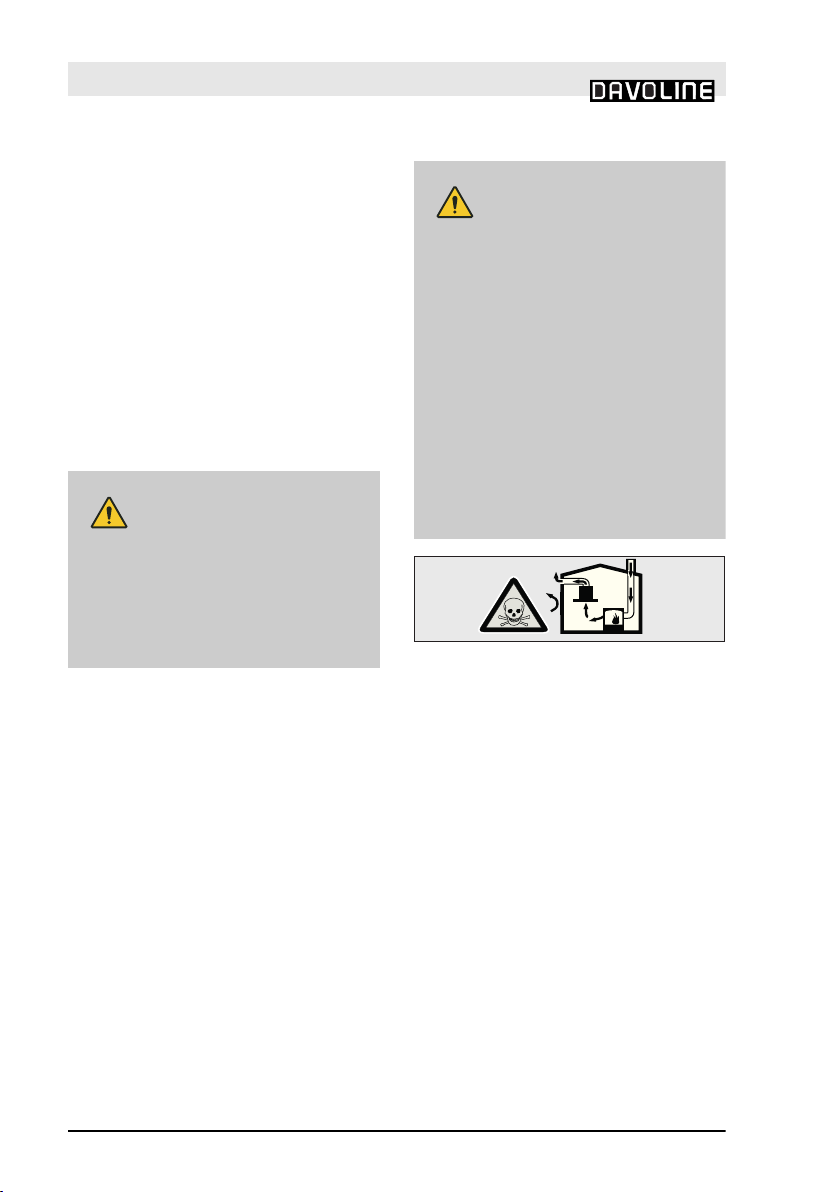
etc.Fig. 3
Fig. 3: Poisoning Danger
Ventilated goods (e.g. gas, oil, wood or
coal burning heaters, shower heaters,
water heaters) take combustion air
from the installation location, and dis-
charge the waste gas through a waste
gas system (e.g. flue). When the
cooker hood is active, it absorbs air
from the kitchen and neighbouring
rooms. If adequate air entry is not pro-
vided, vacuum emerges. In such a
case, the toxic gases are absorbed
from the flue and waste gas channel,
and are taken into to door again. Fig. 3
WARNING AND SAFETY PRECAUTIONS
Life-Threatening Danger, Poisoning Danger!
12.08.2020
User Manual
8

nTherefore, adequate fresh air
ingress must always be
ensured.Fig. 4
Fig. 4
WARNING!
Fire danger!
– The oil residue in the oil
filter may catch fire.Clean
the oil filter at least once
every 3 months.Never
operate the device without
the oil filter.
– The oil residue in the oil
filter may catch fire. Never
work with open flame (ex.
flambe) near the device.
The apparatus is allowed to
be installed near a solid
fuel (e.g. wood or coal)
heater only if it has a non-
removable cover. No
sparks should be scattered.
– Hot oils and fats catch fire
easily. Hot oils and fats
should never be left unat-
tended. Never try to put out
the fire with water. Turn off
the cooker. Kill the flames
carefully using a cover, fire
blanket or a similar mate-
rial.
– Gas operated cookers that
do not have a cooking pot
on create high heat during
operation. A ventilation
device placed over the
cookers can be damaged
or burned for this reason.
Operate gas cookers only
when there is a cooking pot
on them.
– Operating multiple gas
cookers simultaneously
creates high heat. A venti-
lation device placed over
the cookers can be dam-
aged or burned for this
WARNING AND SAFETY PRECAUTIONS
Life-Threatening Danger, Poisoning Danger!
12.08.2020 User Manual 9

reason. Never operate two
gas cookers longer than 15
minutes on high flame set-
ting. A large burner over
5kW (Wok) has the power
of two gas burners.
WARNING!
Electrocution hazard!
– A malfunctioning device
may cause electric shock.
Never turn on a malfunc-
tioning device. Pull the
power plug and switch off
the circuit breaker. Call
customer service.
– Unsuitable repairs pose
hazards. Repairs and
replacement of damaged
power cords must be per-
formed only by a customer
services technician trained
by us. If the device is mal-
functioning pull the power
plug and switch off the cir-
cuit breaker. Call customer
service.
– Water leaking into the
device may cause electric
shock. High pressure or
steam cleaners must not be
used.
DANGER!
Danger of physical injury!
– During the installation,
there is a danger of phys-
ical injury due to the sharp
edges. Use protective
gloves throughout the
installation process of the
appliance.
– Due to risk of dropping the
appliance, assembly of all
safety bolts and covers
must be performed as
specified in the user
manual.
– Objects placed on the
appliance may fall over. Do
not place any objects on
the device.
– LED lights are very bright
and may damage eyes
(Risk group 1). You must
not look directly at running
LED lights for longer than
100 seconds.
WARNING AND SAFETY PRECAUTIONS
Life-Threatening Danger, Poisoning Danger!
12.08.2020
User Manual
10
This manual suits for next models
5
Table of contents
Other davoline Ventilation Hood manuals


