DAX BATHTUB FILLERS DAX-8129 User manual

DAX-8129
BATHTUB FILLERS SERIES

FEATURES
DAX-8129
• Floor mount
• Brass body
• Chrome finish
• Anti-scalding protection
• Ceramic cartridge
• Flow rate 5.0 GPM
• Hand shower included
• Mounting parts and water lines included
4-5/16”
9-1/16”
39-3/8”
G1/2 G1/2
1-1/8”~2”
1”

ww w. daxib.c om
TECHNICAL SPECIFICATION DAX-8129
MODEL DAX-8129
ADA YES
ANSI APPROVED YES
ASME APPROVED YES
WATERSENSE CERTIFIED NO
NSF APPROVED YES
CONNECTION SIZE
FAUCETS HOLE
1/2”
1
FAUCET TYPE Bathshower mixer
FLOW RATE (GPM) 5.0 GPM
ANTI-SCALDING PROTECTION YES
HANDLE STYLE Single
NUMBER OF HANDLES 1
INSTALLATION TYPE Floor-mount
MATERIAL Brass
FINISH Chrome
SIDESPRAY
SPOUT HEIGHT
NO
39-3/8”
SPOUT REACH 9-1/16”
POP-IP INCLUDED
CARTRIDGE TYPE
NO
Ceramic
MAX DECK THICKNESS 2”
BATHTUB FILLER DAX-8129
ww w. daxib.c om
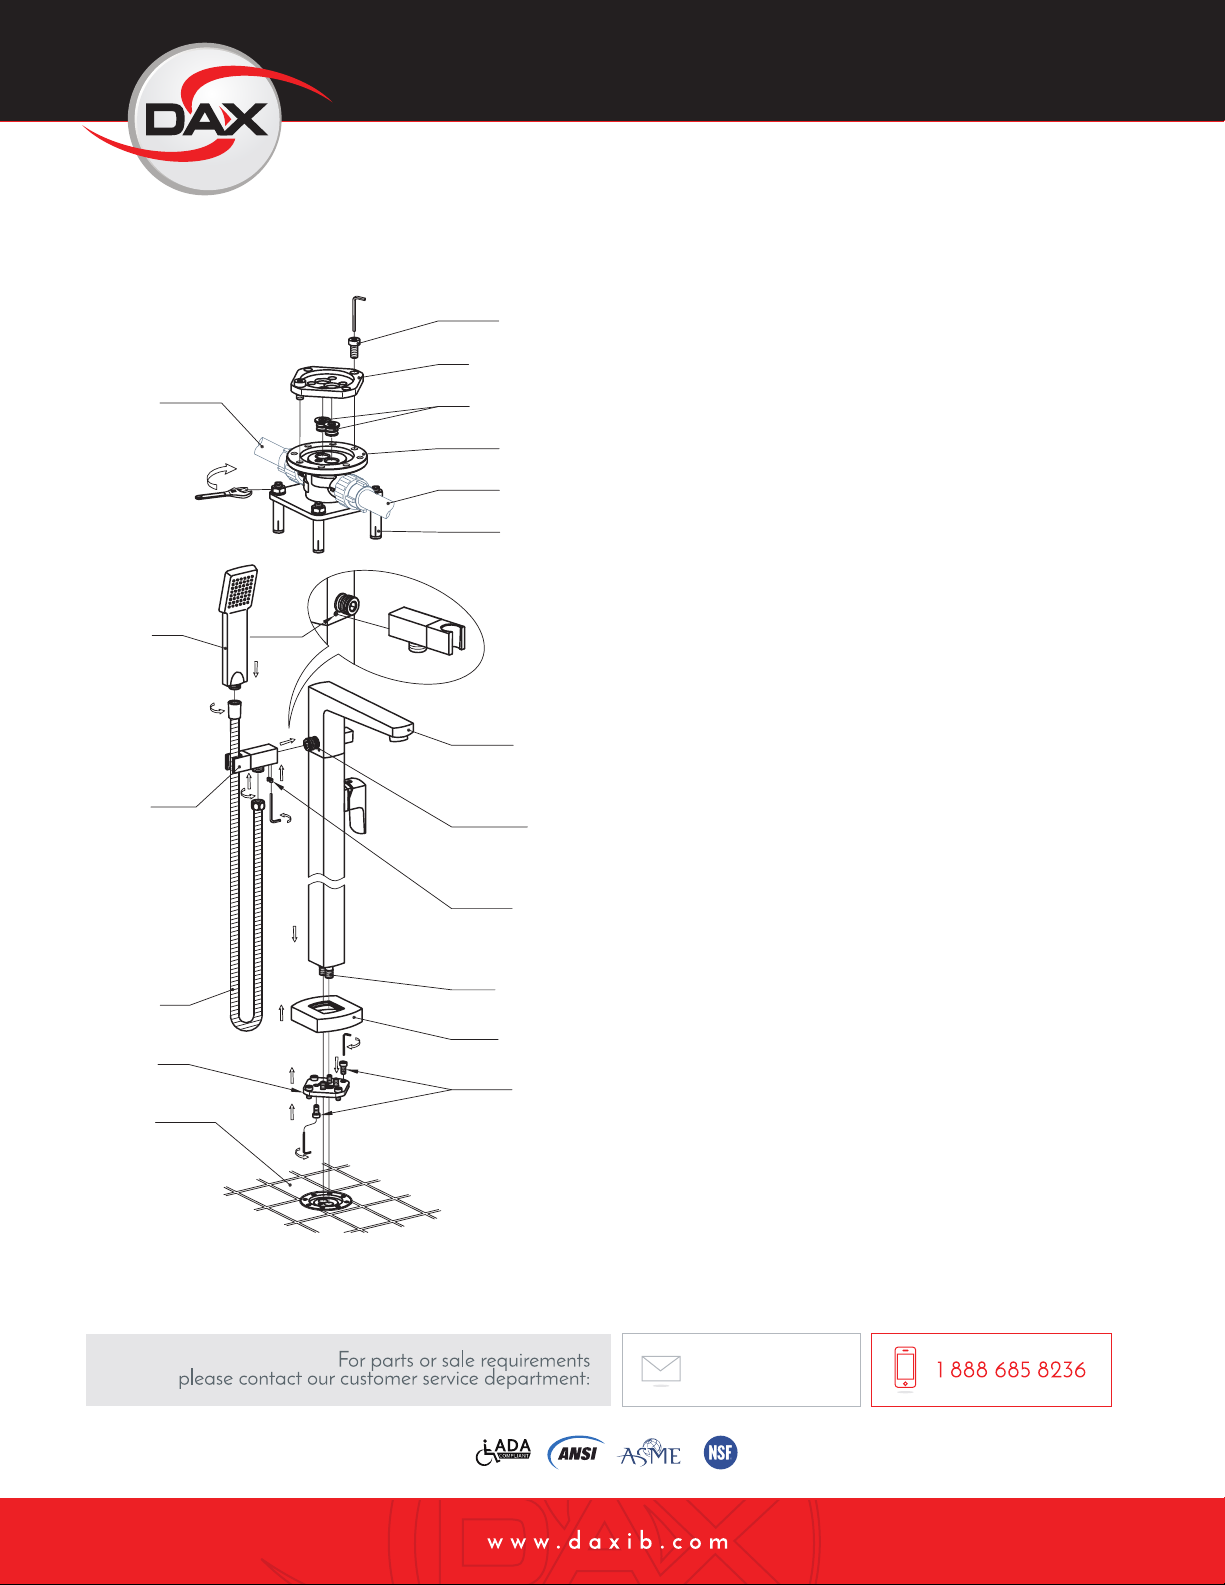
INSTALLATION GUIDE DAX-8129
Installation steps
1. As shown in Fig.1, take 4 mounting holes on inlet base as
benchmark to drill holes on the oor (Note: ensure hot water
inlet which printed with “HOT” faces to the bathtub). Fix inlet
base on the oor with expansion bolt.
2. Pave cold and hot water inlet pipes on the oor and connect
to the inlet base. (Note: ”HOT” mark for hot water inlet,
”COLD” mark for cold water inlet).
3. Insert plug into outlet of inlet base and tighten it with ange
(Note to keep the side with counter bore of ange face
upward), run water and keep pressure for 2 hours test, ensure
each joint has no leakage occurs. Note: as the product is a
built-in valve, do test it well and ensure no leakage before
paving oor tiles.
4. Remove ange and plug.
5. Put on protection sheath for paving oor tiles (Note: the
height of tiles should be at the same level or a bit higher
than the top surface of inlet base. Make edge of tiles along
protection sheath for a better appearance).
6. As shown in Fig.2, put on escutcheon to faucet body carefully
to avoid scratch to the surface of faucet body.
7. Remove protection sheath from inlet base and inner pipe,
pass ange (keep the side with counter bore back against
faucet body) through inner pipe and x to faucet body rmly
with cylindrical screws,insert inner pipe into the outlet of inlet
base, connect ange and inlet base with cylindrical screws
and x by allen key.
8. Close escutcheon to oor tiles.
9. Fix shower holder to shower holder joint and tighten with set
screw (Note to aim M5 screw on faucet body at the hole of
shower holder).
10. Connect handshower and shower holder with hose,run water
to check if the installation is qualied.
Cold water inlet
Handshower
M5 Screw
Shower holder
Hose
Flange
Finished floor
Figure 2
Figure 1
Cylindrical screw
Flange
Plug
Inlet base
Hot water inlet
Expansion bolt
Faucet body
Shower holder joint
Set screw
Inner pipe
Escutcheon
Cylindrical screw
Other DAX Bathroom Fixture manuals

Popular Bathroom Fixture manuals by other brands

Kohler
Kohler Mira Sport Max J03G Installation and user guide

Moen
Moen 186117 Series installation guide

Hans Grohe
Hans Grohe Raindance Showerpipe 27235000 Instructions for use/assembly instructions

Signature Hardware
Signature Hardware ROUND SWIVEL BODY SPRAY 948942 Install

fine fixtures
fine fixtures AC3TH installation manual

LIXIL
LIXIL HP50 Series quick start guide


