Daytona E-VIBALL User manual

DAYTONA
E-VIBALL
User manual

-
1
Preface
This USER MANUAL introduces the basic operating method and repairing method,
please read it carefully and thoroughly. Correct operating, maintenance and repairing
could reduce the trouble of motorcycle and keep the motorcycle in its best performance.
The service station of our company, which set up everywhere, would be glad to offer
more detailed instructions and help, to offer the convenient for your motorcycle.
This USER MANUAL is the integrated parts of the motorcycle, it must be
accompanied with motorcycle when sold.
The problem concerning with the contents of the manual, supplements to the manual
or the operation of motorcycle should be consulted with your dealer.
This USER MANUAL is compiled with the newest information available, our
company is not obliged to inform if changed in advance.
All right reserved, if you need quotation please contact with our company.

-
2
Important note
Due to rapid improvement of our
product, pictures and contents in this
manual may be different with actual
motorcycle. Take the actual motorcycle
as standard.

-
3
Contents
Safety driving
4
Vehicle identification number
9
Parts installation position
12
Important parts system
16
Driving instruction
38
Service and maintenance
44
Main technical data
59

-
4
Safety driving
Safety driving rules…………………………………………………………………5
Protective measures…………………………………………………………………6
Vehicle refit caution………………………………………………………………6
Loading of goods……………………………………………………………………7
Attachment installation………………………………………………………………8
Safety use of the headlight………………………………………………………8

-
5
Safety driving rules
1. Before riding, Check the
motorcycle and make sure that is in
good condition.
2. The driver must passed the
examination held by traffic controlling
department to get the driver license
before he could drive. Do not lend the
motorcycle to the man who has no
driving license.
3. Avoiding of the damage from the
other vehicles, you must be dressed in
attractive manner. So please pay
attention to the following:
●Please dress in colorful clothing;
●Do not come to close the other
vehicle, do not drive in the dead corner
of other driver’s sight;
● Prohibit to over passing and
overtaking.
4. Strictly observe the local traffic
regulation.
● Over speed driving is the reason of
many accidents, so driving speed must
be limited to the range allowed by
traffic condition and road condition;
● Turning signal light must be lit
when turning or changing the lane to
attract the attention of other driving and
passerby.
●Do not make show with your bike.
5. Driving with special attention at
cross road or parking exit.
6. When driving you must hold the
handlebar with both hand and rest your
feet on the step.

-
6
Protective measures
1. For your safety, the rider and
passenger should take on safety suits,
wear helmet, dust proof glasses and
gloves etc.
2. Do not dress in loose clothing, it
may be caught by handle lever, foot step
bar or wheel to cause danger.
Vehicle refit caution
Refitting the motorcycle or replacing
the original device at will, would leave
the motorcycle in the dangerous
situation. The customer must obey the
regulation of motorcycle using traffic
management department.

-
7
Loading of goods
1. Handle feeling will change with
load and no load. Be careful, when the
load is overweight, the handle is easy to
swing and overload driving should be
avoided.
2. All goods must be fixed firm on
the motorcycle to ensure that driving
vibration does not change the center of
gravity and the motorcycle remains
stable while driving.
3. The center of gravity of loading
goods should be close to the center of
gravity of the vehicle and loading
weight at two sides must be equal
approximately. Otherwise, it will affect
the operation of the vehicle at various
degrees.
4. After mounting goods, inspection
must be carried out to prevent the goods
from falling or losing.
5. Do not put the goods on the
handlebar, cushions or fender.
6. This motorcycle designed for one
driver and one passenger.
7. Overloading or improper loading
may cause accidents or injure to the
people.

-
8
Attachment installation
If the customer installs the
attachment which is not verified by our
company, the attention should be paid
to the following points:
1. The installation of the attachment
must not affect the travel of the cushion,
position of light and turning angle of
the handlebar.
2. The attachment installed should
not hinder your motorcycle operation
using your hands and feet. Otherwise, it
is no use of handling of emergency
event.
3. Do not install the electric
apparatus, which its power is higher
than specified, Otherwise the fuse will
be burned or the electrical system will
be in trouble due to low voltage.
Safety use of the headlight
The headlight is cooled by air during
riding ,no cover such as a poncho
allowed to cover headlight surface
preventing from deformation due to
poor cooling.

-
9
Vehicle identification number
Vehicle identification number……………………………………………………10
Product standard number……………………………………………………11

-
10
Vehicle identification number
VIN and motor number are the
numbers should be remembered by
customer, it is convenient to register or
order the parts.
1. VIN is engraved on main pipe of
frame front part (Lift VIN cover, you
can see it);
2. Statutory plate is riveted on
under the right side of the frame.
①VIN
②Statutory plate
-
11
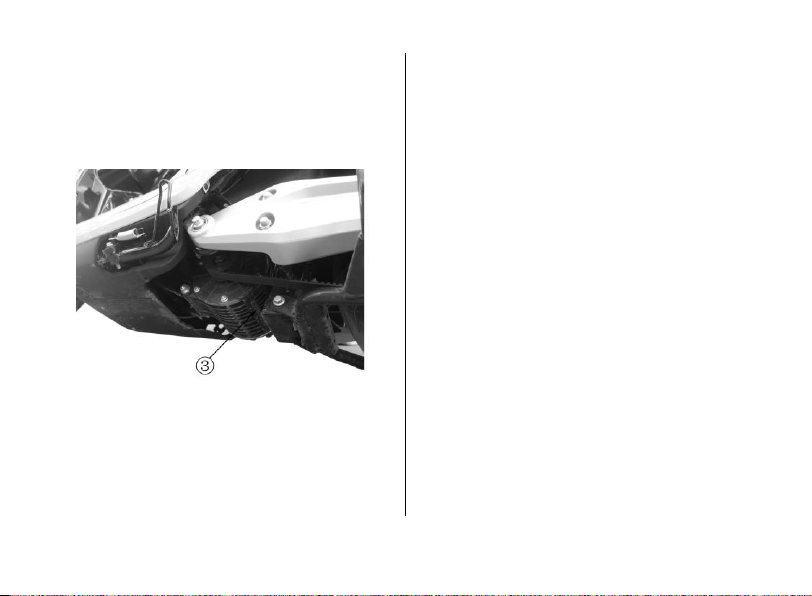
3. Motor number is engraved at
side of the motor at body bottom;
③Motor number
Product standard number
Q/ML J021009

-
12
Parts installation position
Head part…………………………………………………………………………13
Frame left Side…………………………………………………………………14
Frame right Side…………………………………………………………………15

-
13
Head Parts
①Ignition switch ②Start, gear button ③Accelerator grip ④Front braking lever
⑤Double flash switch ⑥Meter ⑦Overpass switch ⑧Rear braking lever
⑨Dimmer switch ⑩Turning switch ⑾Horn, constant cruising button
-
14
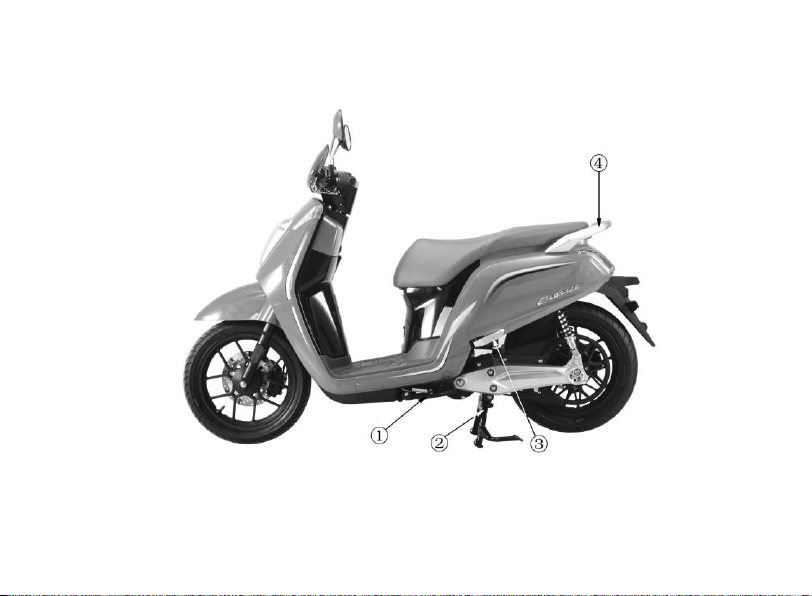
Frame left side
①Side stand ②Main stand ③Left rear foot step ④Rear handhold

-
15
Frame Right side
①Charging port ②Right rear foot step ③Met-in box(Open the seat)

-
16
Important parts system
Instrument panel and signal system………………………………………………17
Braking system………………………………………………………………20
Controlling system…………………………………………………………………25
Other Parts…………………………………………………………………………35

-
17
Instrument panel and signal system

-
18
①Left turn indicator:Turn on left
turning light switch, it flashes.
②Hi Beam indicator: When
Hi-Beam headlamp is lit, it is comes on.
③Speedometer/Trouble code :
Displays transient speed or trouble code
when there is a trouble.
④READY indicator:After power is
on press the start button, the vehicle is
ready for driving, the indicator lights.
⑤P-gear indicator:This indicator
comes on when the side stand is put
down, the vehicle cannot be drove.
⑥Right turn indicator:Turn on
right turning light switch, it flashes.
⑦Blue tooth indicator:It comes
on while your mobile phone connected
with Smart controlling box.
⑧Battery 2 power indicator:This
symbol indicates the current state of
charge and discharge of the left battery
pack. The last grid flashes when the
battery charge is less than 10%.
⑨Signal strength of mobile
network:When the mobile phone and
smart controlling box are normally
connected, the mobile network signal is
strong and this indicator is always on,
when the signal is weak, this indicator
will flashes.

-
19
⑩GPRS signal strength:When the
mobile phone and smart controlling box
are normally connected, the GPRS
signal is strong and this indicator is
always on, when the signal is weak, this
indicator will flashes.
(11)Displays Environmental temp
(12) System Failure:When the
power system failure affects driving,
this indicator comes on.
(13) Power system overheat:When
the power system temperature is too
high to affect the normal driving, this
indicator comes on.
(14)Constant speed cruise
indicator :When the vehicle is in
constant cruise mode, this indicator
comes on.
(15) Mileage display:Display the
accumulated mileage value (Within 10
seconds of power on) and trip mileage
value.
(16) Gear indicator:Displays the
current power train drive gear.
(17) Display the clock
(18) Battery 1 power indicator:
This symbol indicates the current state
of charge and discharge of the right
battery pack. The last grid flashes when
the battery charge is less than 10%.
This manual suits for next models
2
Table of contents


