Daytona bemodern User manual

Daytona Users Instructions 200551_01
Page 1 of 4
Daytona Electric Fire
User’s Instructions for Fan Heater Model with Thermostat control.
These instructions should be read carefully and retained for future reference.
Fire Installation
Unpack the heater carefully and retain all packaging for future use. Ensure that all packing items are moved and read any warning labels
carefully (see Maintenance Section).
If the fire is to be installed in front of an existing chimney opening and there is any risk of chimney debris falling down onto the fire it
is recommended that before installation the flue or opening is sealed off with non-combustible non-fibrous insulation materials. Do
not install into an existing fireplace that is prone to dampness. Should it be
necessary to cap and seal the chimney to prevent personal injury, a
professional should be hired to do the work.
The appliance must be positioned so that plug is accessible. Only when you
are certain that you have completed the installation should you plug in and
switch on at the wall socket.
Preparation for Use.
Check that the supply voltage details on your fuel effect fire are in accordance with
your electricity supply. Your fire is fitted with a plug incorporating a 13 Amp fuse.
In the event of replacing the fuse in the plug supplied, a 13 Amp fuse approved by
ASTA to BS 1362 must be used. Before switching on, please read the following
operation instructions:
Safety Thermal Cut-out
The appliance is fitted with an Electric Safety Control (E.S.C). This is a safety
device, which switches off the fire if for any reason, the appliance overheats. The
E.S. Control will only be re-set after the appliance has cooled down, in order to re-
set the E.S. Control proceed as follows:
•Switch off the appliance and leave for approximately 5-10 minutes.
•Switch on the appliance and E.S. Control should normally re-set. Ensure that
the appliance is functioning correctly.
Important Notes
•For the fitting of the fire in the surround please see the instructions supplied with the surround
•These Instructions should be read carefully and retained for the future reference.
•This heater must not be located immediately below a fixed socket outlet.
•Do not use the heater in the immediate surrounds of a bath, a shower, or a swimming pool.
•Do not cover this heater, or obstruct the air inlet or outlet, otherwise there is a risk of overheating.
•Do not stand the fire on the carpet – stand on a firm surface which projects 250 mm (10 inches) beyond the front of the fire and is free
of dust and lint.
•Certain carpets can be discoloured by heat. Ensure that furniture, curtains and other combustible materials are positioned no closer
that 1m from the front of the fire.
•On heaters where the supply cord passes through a slot in the side of the casing, alternative positions are provided in the other side.
•This heater must be placed against a vertical surface i.e. back panel against a fireplace.
•Under no circumstances should the heater be used as a free standing appliance.
•During normal operation this appliance will emit noise from the internal fan unit.
•This appliance is not intended for use by persons (including children)
with reduced physical, sensory or mental capabilities, or
lack of experience and knowledge, unless they have been given supervision or instruction concerning use of the appliance by a
person responsible for their safety. Children should be supervised to ensure that they do not play with the appliance.
Warning: This appliance must be earthed.
The wires in the mains lead connected to this appliance are coloured in accordance with the following code:
GREEN and YELLOW Earth
BLUE Neutral
Brown Live
As the colour of the wires in the mains lead of this appliance may not correspond with the coloured markings identifying the terminals in your
plug, proceed as follows:
•The wire which is coloured Green and Yellow must be connected to the terminal in the plug which is marked with the letter E or by the
earth symbol or coloured Green or Green and Yellow.
•The wire which is coloured Blue must be connected to the terminal which is marked with the letter N or coloured Black.
•
The wire which is colo
ured Brown must be connected to the terminal which is marked with letter L or coloured Red.
Daytona Users Instructions 200551_01
Page 2 of 4
•If the E.S. Control operates again, it is advisable to have the appliance checked by a competent electrician.
CAUTION: In order to avoid a hazard due to inadvertent resetting of the thermal cut out, this appliance must not be supplied through an
external switching device, such as a timer, or connected to a circuit that is regularly switched on and off by the utility.
Under no circumstances should the heater be used as a free standing appliance. The heater must always
be placed against a vertical surface i.e. back panel against a fireplace and fixed in place using the brackets
provided.
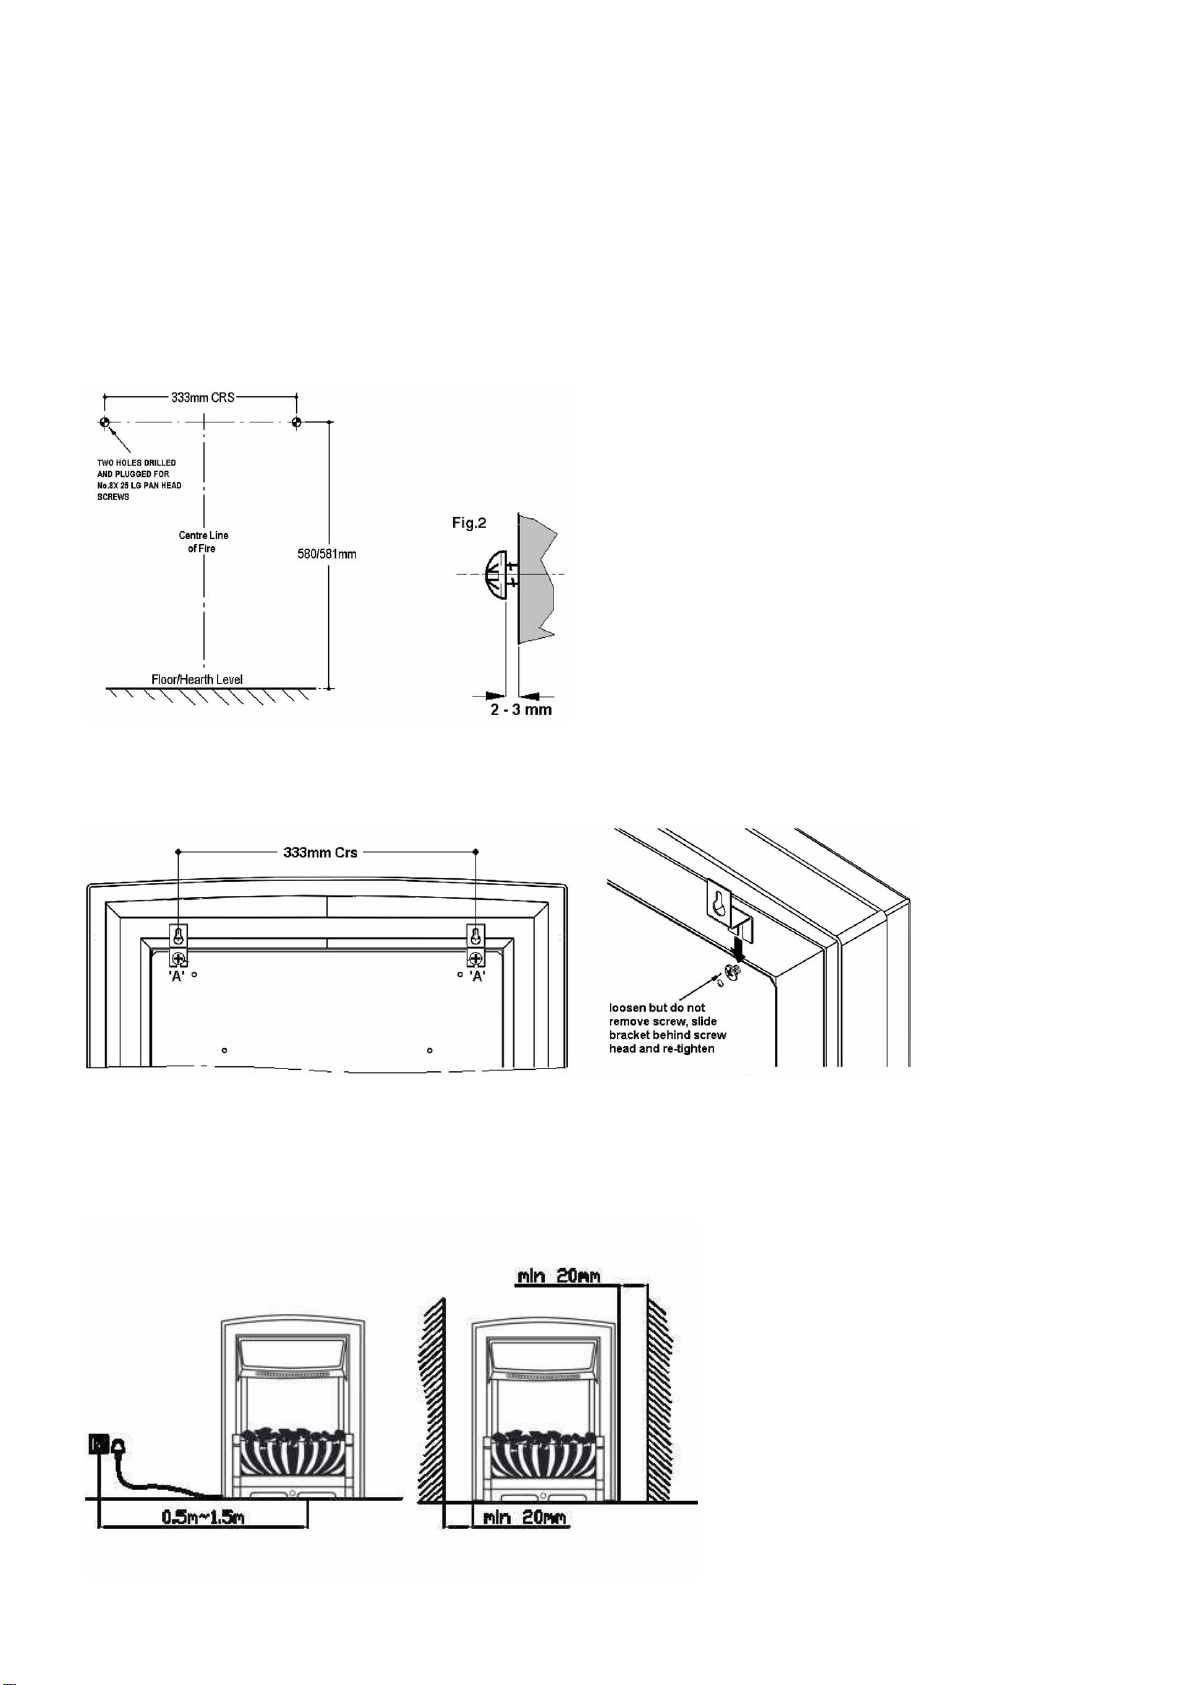
Wall/back panel preparation
Carefully mark out the holes positions, drill and plug wall as shown in figure3.
Fit two No.8x25 long pan head screws leaving approximately 2mm between the wall/panel and the screw head (see figure2)
Fig3 Fig2
Fitting brackets to appliance
Loosen but do not remove the two screws Ref. ‘A’ (figure4) and carefully slide each bracket behind the screw head (figure 5) and re tighten both
screws.
Fig4 Fig5
To finally fix the appliance, locate the keyhole slots in the brackets over the heads of the screws in the wall/panel and carefully
slide down to lock in place.
Fig 6. Minimum distances for installing the appliance
Daytona Users Instructions 200551_01
Page 3 of 4
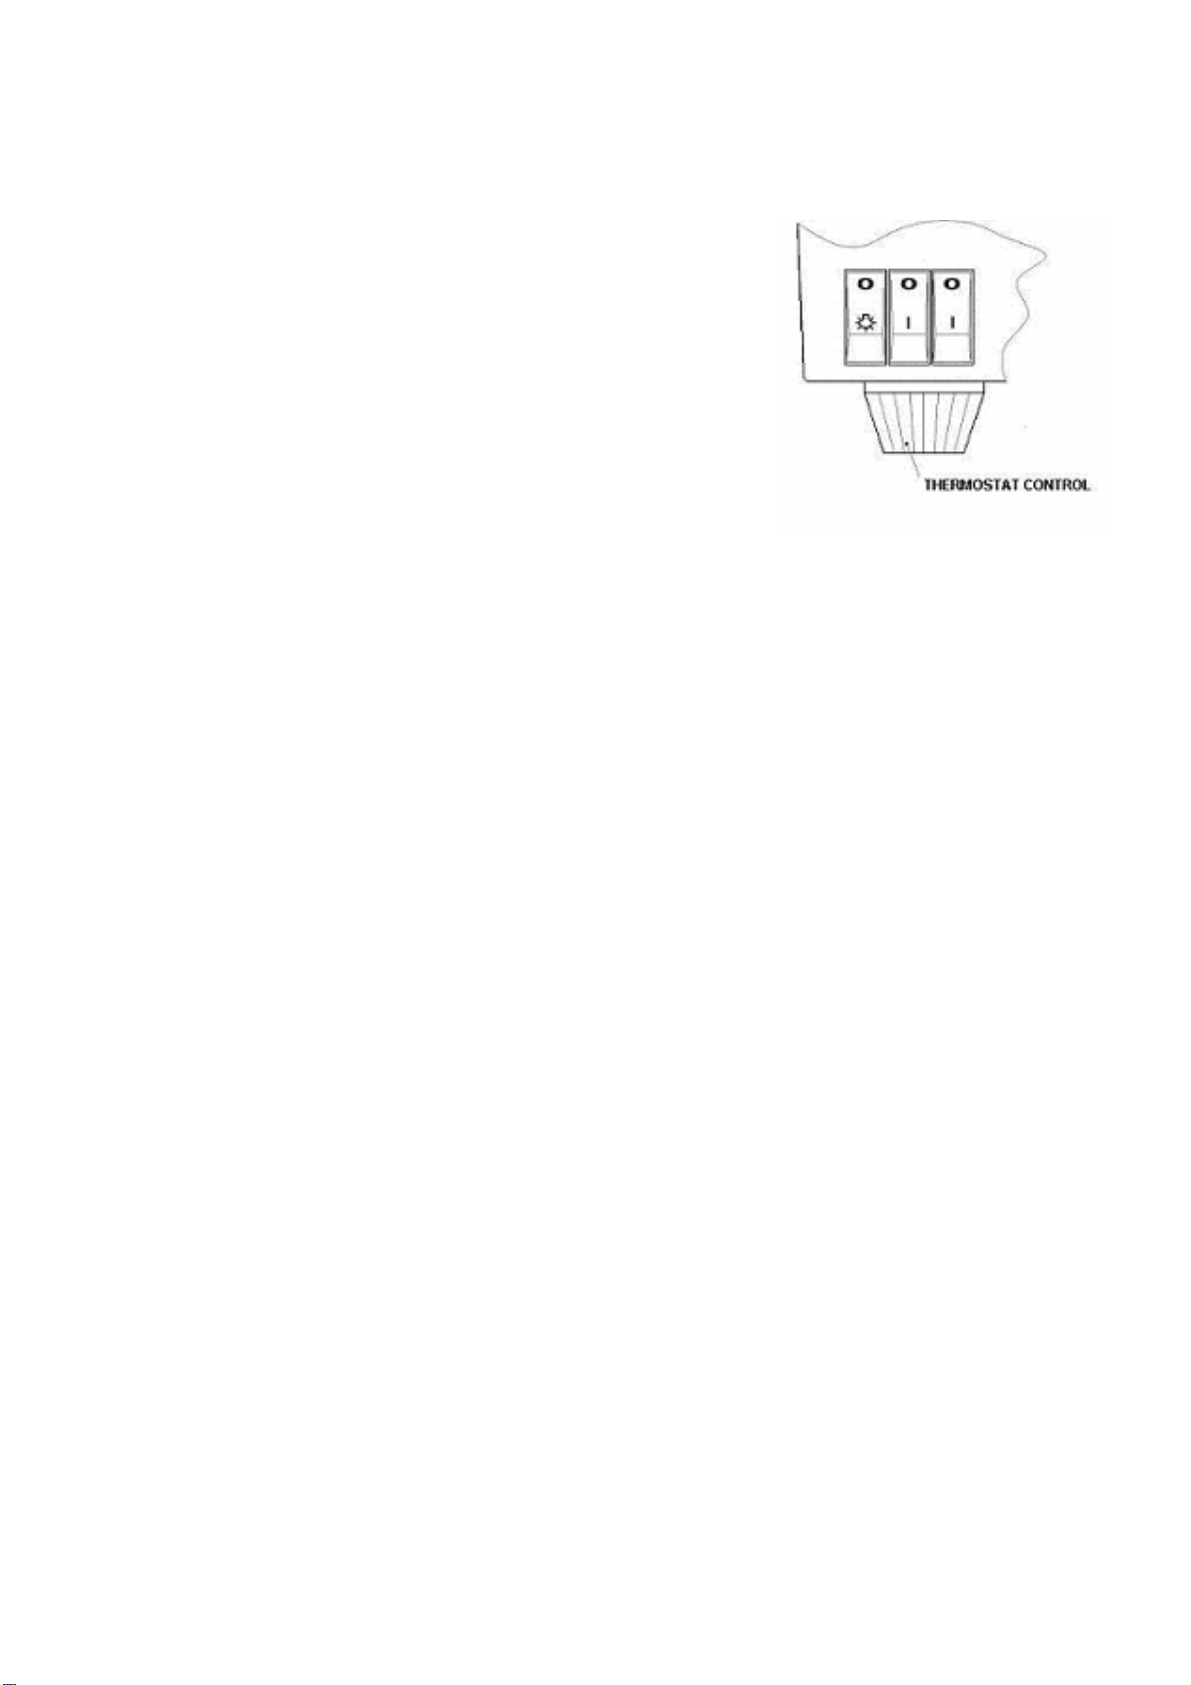
Operation
The switch on the left hand side (marked with O/ bulb symbol) controls the lamp.
The next two switches operate the fan convector heater. To use the heater the middle of the
three switches marked O/I (Ois off, Iis on) should be operated first for 1 kW of heat. The
right hand switch also marked O/I should be used together with the middle switch to give
2kW of heat.
Thermostat:
The thermostat is mounted at the left-hand side on the bottom face of the heater box and can
be used to control the heat output to maintain a constant room temperature to suit user
requirements. This will ensure that excessive heat is not produced unnecessarily.
To set the temperature:
The knob is marked with numbers to indicate the maximum and minimum temperature
positions. Start with setting 9 and when the room has reached a desired level turn the knob
slowly to left until the thermostat just ‘clicks’ off. The thermostat will then maintain the room
at the selected level. To increase the temperature, turn knob back to right to a higher setting.
Note: - It is possible that if the room temperature is higher than the thermostat setting
it will not come into operation and the heater will remain off until the temperature of
the room cools.
Maintenance
Warning: Before undertaking any maintenance or cleaning disconnect appliance from main supply. Only competent persons should
service / repair appliances.
The area around the fire should be kept free of any materials such as lint or house dust (i.e. animal hair/ carpet fibres ) that could be
drawn into the internal workings of the appliance and hence affect the performance. We recommend that you clean around the fan
grille housing at regular intervals. This can be done using standard vacuum cleaner and suitable attachment.
Please note if the supply cord on this appliance is damaged it must be replaced by the manufacturer, Authorised Service Agent, or a qualified
person to avoid hazard.
Note: To prevent scratching of plastic and the front screen, this appliance should be cleaned with a damp cloth only.
Replacing the lamp:
•Disconnect appliance from main supply.
•Remove the two screws (located in the top corners) that secure the coal bed. Carefully lift to remove the coal bed.
•Replace Lamp with either an Energy efficient – Mini Spiral lamp -230V-11w E14 (ELCC) available from Be Modern Ltd. Customer services
or alternatively a standard 230v-E14-SES -60 Watt- Clear candle lamp, hold the body of the lamp holder, if necessary, to prevent rotation.
DO NOT EXCEED 60 Watts.
•Replace all components in reverse order of removal.
Fault finding -– symptoms and cures:
It is highly unlikely you should have a fault with your heater, but should there appear to be a problem, please refer to the following checklist of
our most FAQ from customers. If these do not answer your query, please contact your retailer, or call us.
No light effect: Please check – does the heater still work? If Yes, – it will almost certainly need a new bulb. Check the bulb in a table lamp that
you know works. New bulb can be obtained from most electrical shops.
If No, – has the heater cut out operated? To protect against overheating please refer to the safety cut out paragraph. If still not working, first
change the 13Amp fuse in the plug with one you know works. Secondly, check the wall socket by plugging in a table lamp that you know works
on another socket. If this does not work, get an electrician to check the
Daytona Users Instructions 200551_01
Page 4 of 4
Electric Fire Guarantee
This fire complies with the European Safety Standards (LVD) EN60335-2-30 and the European Electro Magnetic Compatibility (EMC)
En55015, EN60555-2 and EN60555-3 which covers the essential requirements of the EEC Directives and 89/336
Waste electrical products should not be disposed of with household waste. Please recycle
where facilities exist. Check with your local authority or retailer for recycling advice.
Be Modern Ltd Customer Services
Tel. (0191) 489 8266 option 4
Fax (0191) 430 9522
Be
-
Modern
Ltd.
(the ‘Company’) provides a
twe
lve
month
guarantee in respect of electric fire (the ‘Product’)
ranges.
1. The twelve month Guarantee applies to:
a. All
products in the ranges manufactured by the ‘Company’ (but subject to the exceptions below):
where
b. The product has been purchased and installed within the UK and in respect of
c. The initial installation: and in favour of
d. The original purchaser
2. Proof of Purchase must be retained by the Purchaser
3. The twelve month Guarantee does not apply to:
a. Damage or inferior workmanship practices whilst the’ Product’ is being installed
b. Damage caused by mis-
use of the ‘Product’ or where normal standards of care and use have
not been complied with.
c. Damage through a malfunction or an inadequately installed electric fire.
d. Damage or defects due to mis-use, accident or unauthorised alterations.
4. During the 1 year after the “Product” has been supplied, the Guarantee covers the make g
ood (whether
by repair or replacement at the Company’s option) of defects arising from defective manufacture of
materials of “Product” covered in Para 1 all at no cost to the purchaser on the proviso:
a. The Product has been installed as Be Modern recommendations
b. The Purchaser uninstalls the Product and makes it available for collection by Be Modern.
Note: All lamps supplied with the product are classed as consumable items, and are the Purchasers
responsibility to replace. This Guarantee does not affect your statutory rights
On requiring service the purchaser should contact the retailer who supplied your product who will assist
and advise you as necessary.
Table of contents
Popular Stove manuals by other brands

Heta
Heta SCAN-LINE 40 manual

Dimplex
Dimplex WLL20-AU instruction manual

Evergreen Stoves
Evergreen Stoves ST0147-11 Installation and operating instructions

Euroheat
Euroheat Harmony 5 Installation and servicing

United States Stove Company
United States Stove Company Logwood 1261 owner's manual

Baxi
Baxi 3226424 Installer's guide


Drolet
Drolet A C03095 installation instructions

Harman Stove Company
Harman Stove Company PC 45 Installation & operating manual

LA NORDICA
LA NORDICA TermoRossella Plus DSA Instructions for installation, use and maintenance

Vermont Castings
Vermont Castings Cast Iron Brochure & specs

Mendip Stoves
Mendip Stoves 8 standard Operating/service instructions

Kenyon
Kenyon 550 series Operating instructions and parts list