DEAD FLY ZONE AMS-S1 User manual

AMS-S1 System Assembly Instructions
Once you receive your shipment, carefully unpack its contents.
The System is packaged into two boxes for its protection during shipment:
1) The Above-Drum Assembly (pictured below) and,
2) The In-Drum Assembly
You received or will receive your tubing, nozzles, fittings and insecticide directly from Dead Fly
Zone. Your system was shipped directly from our manufacturer’s warehouse.
The Above-Drum Assembly consists of the Control Box, Motor, Pump and associated fittings.
These are bolted to an Aluminum mounting plate and are pre-wired. These will be mounted on
the lid of the drum.
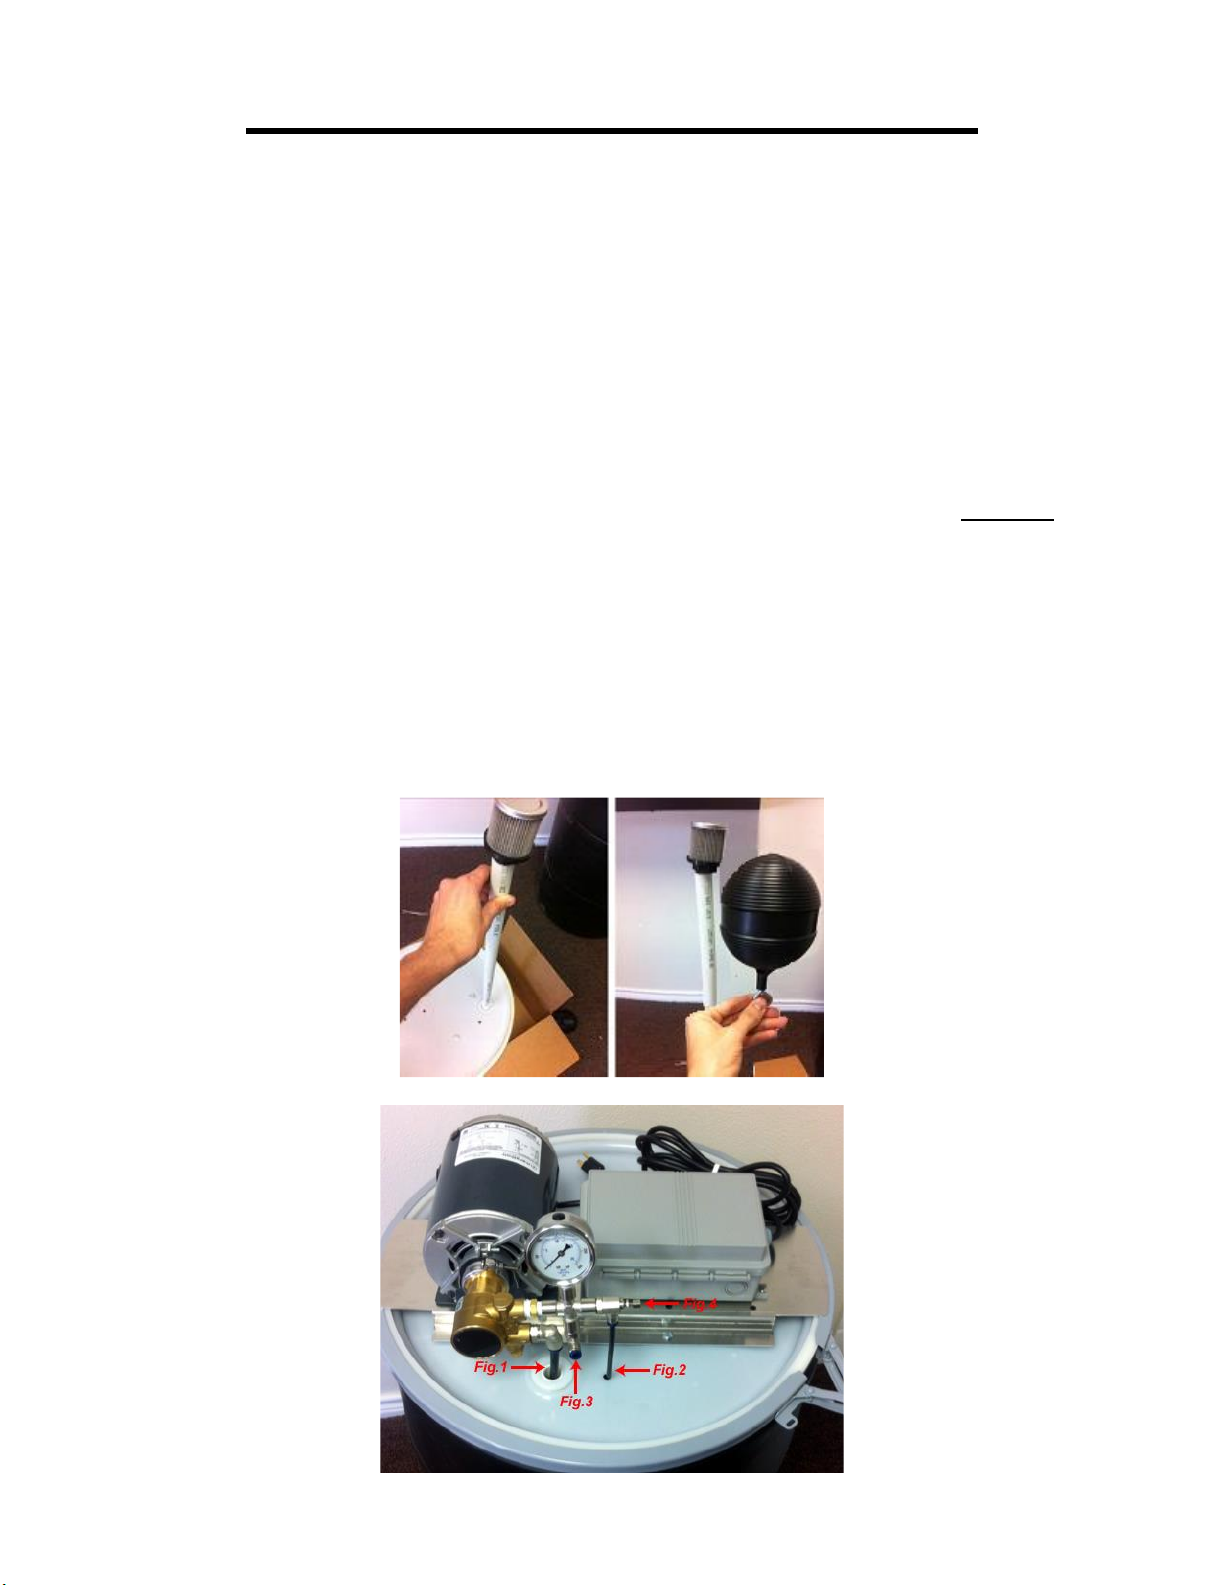
The In-Drum Assembly consists of the 3/8″ intake tube and intake filter, mounted in 3/4″ white
PVC tubing and a Float Ball. They will be mounted inside the drum.
Assembly and Programming
1) Before attaching the mounting plate to the drum lid, run the float switch string through the
hole in lid. The string is already running through the mounting plate. If you’re using your
own drum, you will have to drill a hole in your lid to accommodate the float switch string.
2) Place the Above-Drum Assembly on the drum lid so the pump intake fitting is directly
over the 3/4" threaded hole (Fig. 1). Align the 4 holes in the mounting plate with the 4
holes drilled in the lid. With the bolts, washers and nuts provided attach the mounting
plate to the lid and tighten. Once again, if you’re using your own drum, you will have to
drill holes in your lid for the mounting plate. Use the mounting plate as a template and
use the provided hardware to attach the mounting plate to your lid.
3) Carefully turn over the lid and tie the float ball to the string and make sure that the
measurement from the lid to the end of the ball is approximately 25”. You DO NOT want
the ball to hit the bottom of the drum when the lid is in place and the reservoir is empty.
Ideally, when the reservoir is empty, this float ball should hang about 6-8” from the
bottom of the drum. When the float ball is hanging straight down, it will pull the string
tight which will flip a switch in your pump, turning off the pump until the reservoir is
refilled. Running the pump and motor with an empty reservoir will burn out both units and
void your warranty.
4) Place the In-Drum Assembly tubing through the 3/4" threaded hole (Fig. 1), then thread
the pvc fitting into the hole (Fig. 1). Attach the supplied filter to the 3/8" tubing inside the
reservoir.

5) Turn the lid upright and place it on the drum so the In-Drum Assembly is inside the drum.
Connect the 3/8" intake tubing to the intake on the pump, inserting it until clicks (Fig. 1).
6) Connect the 12" long piece of 1/4" tubing to the needle valve and insert the opposite end
into the hole in the drum (Fig. 2).
7) Connect tubing that will go around your facility and connect to your spray nozzles to the
1/4" output (Fig. 3). Install your tubing, nozzles, and fittings by following the design we
did for you, if we did one. The design will show you where every single component of
your misting system is located in your facility. You will need to cut the tubing to the
correct lengths and push the tubing into the fittings and spray nozzles. You will feel a
“click”when the tubing is seated inside the fittings and spray nozzles correctly, and you
will not be able to pull it out without using the provided disconnect tool, which pushes the
collar inward and releases the ”teeth”inside the fittings and spray nozzles.
8) Once you have all your tubing and nozzles in place, fill your reservoir about 50% with
water only.
9) Turn your “Misting Time” knob to its highest setting and then press the “Mist Now” button
on the front of your faceplate (see red arrow in image below). Let the pressure build and
adjust your PSI on your liquid filled pressure gauge to 190-195. Adjust this pressure
using the key seen in Fig. 4.
10)Once you have confirmed all nozzles are spraying and your PSI is adequate, pour your
insecticide into the reservoir and fill with water to roughly 6” from the top. Use a broom
handle to give it a quick stir. Now replace lid and secure with lid ring.

Programming The Timer
1) First set the current time by turning the minute hand clockwise.
2) Your timer has trippers of 15 minute increments and an AM/PM indication on the outer
dial. Push the trippers outward for the times you want the system to activate and spray.
A good rule of thumb in livestock situations would be to spray every 2 hours for
approximately 30 seconds per cycle, starting at dawn and ending at dusk or 7am to 7pm.
3) Turn the “Misting Time” knob for the desired time you want each cycle to spray. Again,
30-40 seconds is a good starting point.
4) Use the “Mist Now” button to spray extra times outside your designated programmed
times or when you need to test nozzles and do not want to disrupt your timer.
Filling The Tank and Setting The Spray Cycle
Fill your reservoir tank up about half way with just water. Then pour BOTH containers
(Vector Ban and SynerPro) into your tank. Make sure your hose is at the bottom of the tank to
prevent foaming and then continue to fill until your water level is about 6 inches from the top.
Using a broom handle or a piece of PVC pipe, give the tank a good stir. If you are using your
system for residential purposes and not livestock, you will only have a container of Vector Ban
Plus and no SynerPro. Follow the same instructions for filling.
If you purchased our stall deodorizer (Sweet Smellin’ Stables), pour all of its contents in
the tank with the insecticide. Everybody goes into the pool together!
You will want to program your first spray cycle as soon as the sun comes up and it starts
to get warm. We recommend starting at 7am and then spraying every two hours until 7pm.
This will give you 7 spray cycles per day. We also recommend that you spray for approximately
30-40 seconds for each spray cycle. If you’re still seeing flies, increase the spray time in 5-10
second increments.
Table of contents


