Defender Car Vision 2010 HD User manual

Operation Manual
Defender Car Vision 2010 HD
Car DVR

The technical specifications and the product description can be changed without previous notification.
General Information
Thank you for choosing Defender Car Vision 2010 HD car digital video recorder. Before using the device,
read this manual attentively to take all the opportunities of the digital video recorder and to extend its useful
life. Keep this manual if any necessity.
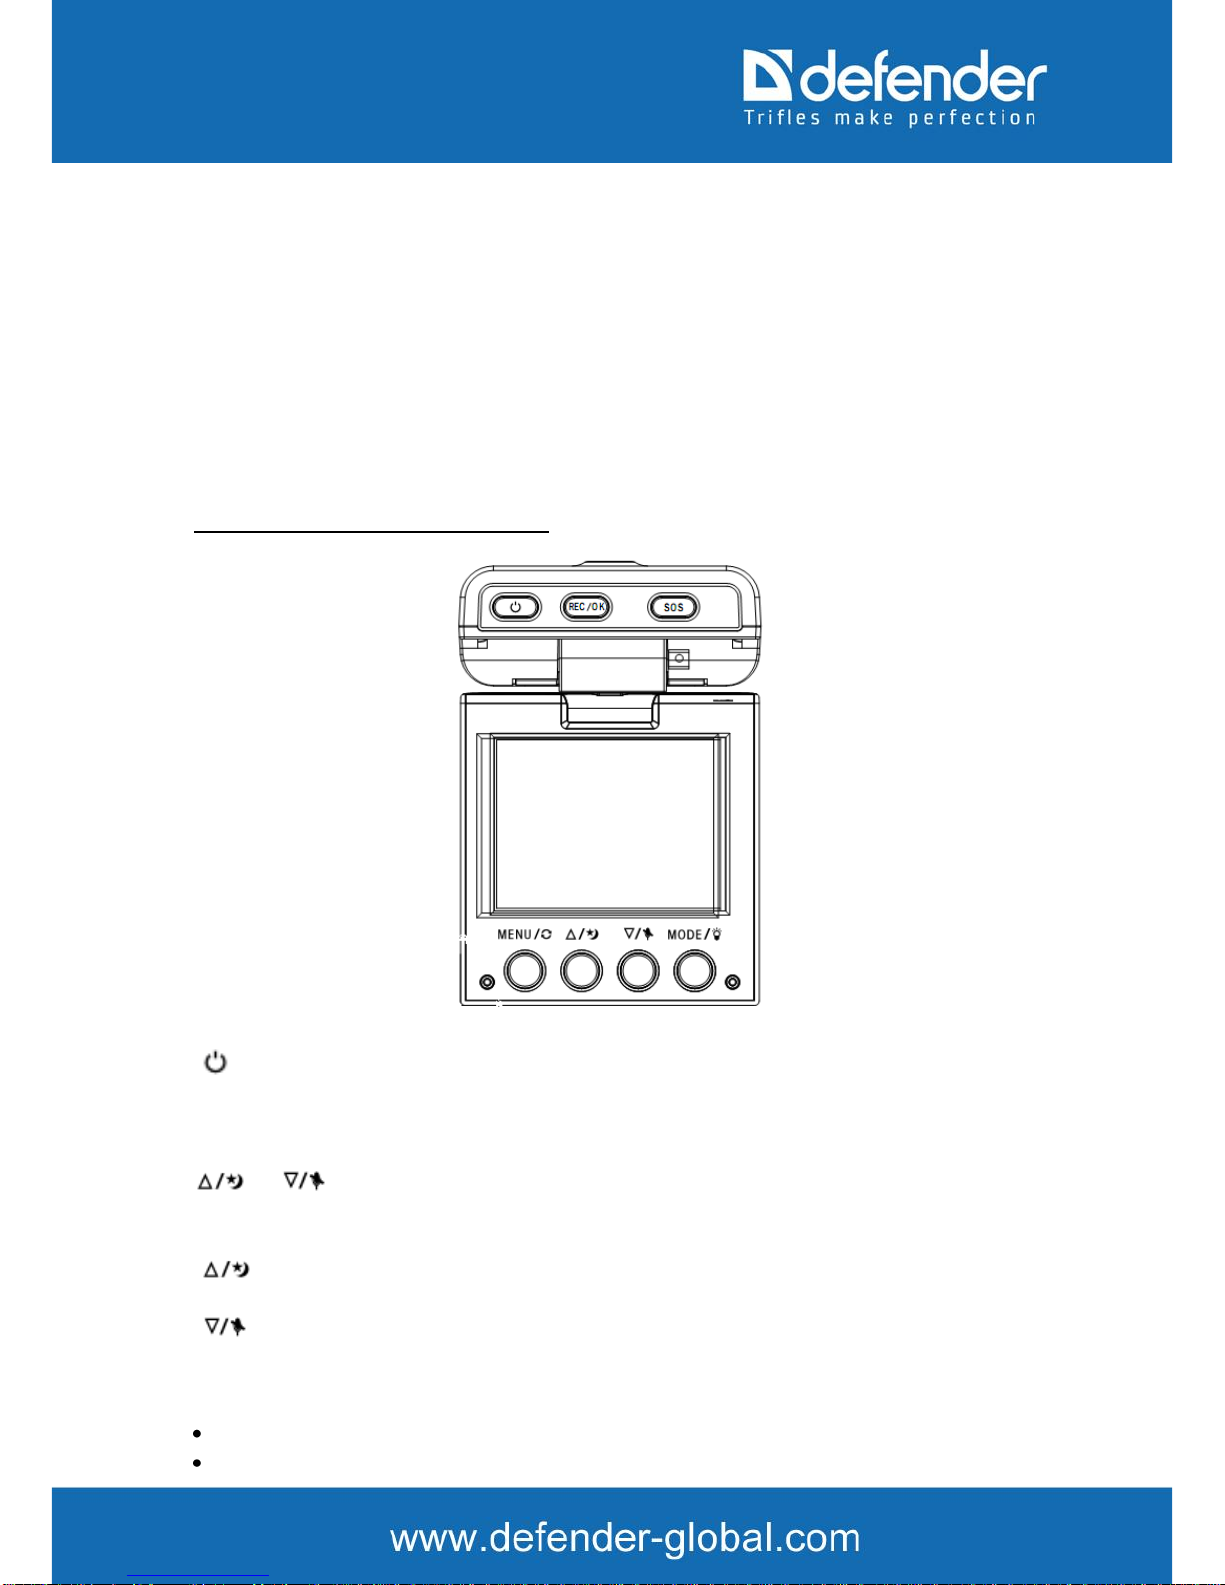
This Manual contains the information on technical specifications of the device, control buttons and software
and safety list neglecting or non-observing of which can cause the device damage, malfunction or failure.
The Manual contains recommendations on using the digital video recorder. The mentioned information will
allow to avoid errors related to improper operation of the device.
To define the used terms please refer Glossary at the end of the Manual and specialized literature, thematic
forums or support service.
Operation Guidelines
The car digital video recorder is designed and designated for mobile usage. The operation guidelines below
are meant for helping you to use properly the device without any hazard to safety of any person and to keep
it in working condition.
Please read this section attentively and strictly follow its instructions.
General Operation
• The device should be kept away from areas with extreme temperature change, direct sunlight or from heat-
radiating devices. Protect the device from moisture and do not place it in a dusty or smoggy environment. Do
not allow any contact with active chemical agents.
Protect the device from any impact, do not place heavy objects on it and do not insert in it the devices or
objects not matching standard sockets. If the device falls, it may cause the damage of LCD display and its
malfunctioning.
• Charge the device only from compatible chargers (mini-USB included). We recommend the first charging
for 12 hours.
• Observe laws and obey traffic laws in the country of stay.
PowerAdaptor Safety Precautions
• While charging the device, use only standard type power adapter (included). Usage of non-standard or other
type of the power adapter can lead to the damage of car digital video recorder and loss of the warranty.
• If the power adapter is disconnected from the car cigarette lighter, you should pull the plug, not the cable.
• Do not connect the car power adapter to other devices except ones of this model.
• Keep the car adapter out of the reach of children.
LCD Screen Safety Precautions
Liquid crystal display is a delicate device requiring delicate handling.
• To clean the LCD screen use only soft cloth or special wipes.
• Do not touch the screen surface with sharp objects.
• Do not press on the screen and do not place any objects on it. It can cause the damage of the screen and loss
of the warranty.
• Do not leave the display under the direct sunlight.
Socket Safety Precautions
• Do not apply any force while connecting to the sockets of the external devices. It may damage the contacts.
• Keep the sockets free from any foreign objects as well as liquid and dust. It can cause the damage of the
socket and the device in general.
• Before connecting, check that the jack socket is connected with the proper side. Otherwise turn the jack

socket.
Memory Card Safety Precautions
• Insert the memory card only by the proper side. Otherwise turn the memory card. Do not force the memory
card if it does not fit the slot, this can cause the damage of both the slot and the memory card.
• Keep the memory card socket away from any foreign objects, liquid and dust. It can cause the damage of
the socket and the device in general.
• If you fail to insert the card in the socket, check its conformity to the SD/SDHC specification.
• Do not remove the memory card when the device gains access to its contents (recording, reading, copying
and file playing back). It can cause the loss of the data or misoperation of the card.
• Do not use the memory card under the extreme temperature.
• Keep the card away from liquid or erosive materials.
Car DVRArrangement and Control Buttons
- power on/off.
"REC/OK" - to confirm the selected mode or setup function/ to start video recording / to stop video
recording.
and - in menu mode: "up" and "down" buttons to scroll menu items.
In video/ photo mode:
- switch between black and white/ colour mode.
- microphone on/off.
"MODE" - to switch on/off the diodes of night vision by pressing and holding this button for 3 seconds/
to switch between the modes by short pressing this button.
photo (the icon of photo camera appears in the right upper corner)
audio recording (the icon of microphone appears in the right upper corner)

playback (the playback arrow icon appear in the right upper corner)
video recording (the icon of video camera appears in the right upper corner)
While video recording, it is impossible to switch the modes by means of the "MODE" button. Firstly you
need to stop recording by pressing "OK" button and only then you can switch the modes.
“MENU”:
short press of the button- to open the configuration menu just press the button shortly
long press of the button - to turn to 180 degrees of the captured image and the device interface.
Key Functions and Possibilities
Sensor type: 1.3 MP
2.4” TFT LCD colour display
Camera lens viewing angle: 120°
Rotation angle: 270°
Video resolution: up to 1280*720 (HD 720P)
Video frame rate: 30
Video format: AVI
Still image resolution: up to 4032 х 3024 (12 MPix) with interpolation
Still image format: JPEG
External memory: micro SD card up to 32 GB (use the card the speed class of which is at least
6!); the card is not included
Built-in memory: 4 x 16 SDRAM
Power supply: Li-Ion battery (removable, rechargeable) 3.7 V, 500 mAh, charging via mini
USB/car cigarette lighter
Night vision (infrared)
Operation time without charging: up to 60 min of continuous recording
PC connection interface: USB 2.0
4X digital zoom
Motion detection sensor
Auto start upon power supply to mini-USB connector
Video recording while charging
Output to connect to TV
Built-in microphone and speakers
Package Contents:
AV-OUT cable
USB cable
Car cigarette lighter
Windshield mount
Battery
Battery installation and Removing
1. Open the battery container
2. Insert the battery observing the polarity.
3. Close the cover.
Battery Charging

The device can be charged via USB cable connected to the computer and by means of the wall charger or car
cigarette lighter with the voltage 5V 5% and the current rate at least 0.5A.
Check the battery charge:
- full battery charge
- middle battery charge
- low battery charge
- insufficient battery charge, connect the compatible battery charger.
Attention! While charging use only compatible battery chargers!
Micro-SD Memory Card
Insert the card (not included) into SD slot until its clicking position. The device is ready to be used.
1. To remove SD card, slightly press it, it is partially pulled out now and you may remove it.
2. If no card is in the slot the message “No Card” will appear on the screen.
Note: Check that you insert SD card by the correct side, otherwise you may damage the device and
the memory card.
3. While using low-speed memory cards the device can work incorrectly, from time to time not
responding.
Number of frames and video recording time:
SD
Card
1280*720
(720p)
848*480
(D1)
640*480
(640)
1280*1024
(1.3M)
1600*1200
(2M)
2048*1536
(3M)
2592*1944
(5M)
16G
128 min
128 min
256 min
12160
(frames)
11520
(frames)
10960
(frames)
9440 (frames)
8G
64 min
64 min
128 min
6080
(frames)
5760
(frames)
5530
(frames)
4720 (frames)
4G
32 min
32 min
64 min
3040
(frames)
2880
(frames)
2760
(frames)
2360 (frames)
2G
16 min
16 min
32 min
1520
(frames)
1440
(frames)
1380
(frames)
1180 (frames)
1G
8 min
8 min
16 min
760 (frames)
720 (frames)
690
(frames)
590 (frames)
Note: the number of frames to be saved will differ depending the device configuration, photo shooting and
used memory card.
Video recording mode
1) Connect the device to the car cigarette lighter via the car adapter. The DVR will start recording in 5
seconds after the car cigarette lighter is switched on. After the car cigarette lighter is switched off, the device
will save the recorded file and be switched off in 15 seconds.
2) To stop cycle recording, press the "OK" button forcedly. The current recording will be saved to the file.
3) If the memory is full, the DVR will delete the first (in the order of record) file not protected from deletion
to continue the cycle record.
4) To configure the video recording, open the menu by means of the button "MENU". All the settings are
divided in 2 parts for convenience of display.
In the first part of the "Video" configuration you can:
1. set the resolution (1280 * 720 / 848 * 480 / 640 * 480).

2. switch the date and time display on/off,
3. switch the motion detector on/off. In this mode the device will record by files of 2 minute duration.
If while saving a file, there is no motion in the frame, the device will be switched to stand-by mode
and start recording if any motion. If the memory card is full, old files will be re-recorded by new
ones.
4. switch the cycle recording on/off setting the duration of the file recording: 1 min/ 2 min/ 3 min/ 4
min/ 5 min,
5. switch night vision mode on/off,
6. switch the microphone on/off.
To enter the second part of the configuration, press the "MENU" button again. Here you can select:
1. The memory card formatting.
2. The menu language.
3. Automatic power off. (Battery save mode: the device will be automatically powered off if not used).
4. Automatic power off of the screen (Battery save mode: the screen will be automatically switched off
if no user's activity).
5. To reset.
6. To eliminate the light source twinkling by setting its frequency.
7. To set date and time.
8. To select the date format.
9. To select the TV-standard: NTSC/PAL.
10. To switch on/off the button sound.
11. Software version.
Attention! Remember to confirm your selection by pressing "OK" button.
Photo mode
To switch to photo mode, press "MODE" button. Keep on pressing the button until the photo camera icon
will appear in the right upper corner.
To shoot the photo, press the "OK" button.
To set the necessary configurations of the photo, open the menu in the photo mode by "MODE" button. All
the settings are divided in 2 parts for convenience of display.
In the first part of the "Photo" configuration you can:
1. set the resolution: VGA (640x480) / 1.3 MP/ 2 MP/ 3MP
2. switch the date and time display on/off
3. switch the shutter sound on/off.
To switch to the second part of the "Photo" configuration, press "MENU" button again. Here you can
select:
1. The memory card formatting.
2. The menu language.
3. Date format.
4. TV standard. NTSC/PAL
5. Automatic power off
6. Automatic power off of the screen
7. To reset

8. To set the frequency of the light source twinkling.
9. To set date and time.
10. To switch on/off the button sound.
11. Software version.
Audio Recording Mode
To switch to audio recording mode, press "MODE" button. Keep on pressing the button until the microphone
icon will appear in the right upper corner. To start/ stop the recording, press "OK" button.
Playback mode
To switch to playback mode, press "MODE" button. Keep on pressing the button until the arrow icon will
appear in the right upper corner.
To select necessary file, press "UP"/ "DOWN" buttons.
Press "OK" button to playback or to pause.
In the playback mode open "MENU" for the following options:
1. To delete the file
2. To lock the file in order to protect it from deletion.
3. To set the volume
4. To find the necessary file by its image (icon)
SOS Function or How to Protect Files form Deletion
Using "SOS" button you can protect the file from deletion in the video recording mode. The locked files will
be marked by "lock" icon. You can delete these files manually. While cycle recording, the device will not
delete them if the memory card is full.
While connecting to the computer you must select the usage mode.
To select the mode move the pointer by "UP"/ "DOWN" buttons. To activate the selected mode press “OK”
button.
The following modes are available:
1. Memory card reader
2. DVR
Notes:
!! While making video record the device will automatically save the video file and switch off in 5 minutes
after the power supply to mini-USB plug is cut off.
Low Battery Warning Function
In 2 minutes before the full battery discharge, the device will warn by sound signal. If no charge
immediately, the DVR will save the file and power off.
Memory Card Speed Identification
If you use high-speed memory cards, the memory card icon will be displayed in white in the top of the
screen, otherwise the icon will be red.
Black and White Mode
When the DVR is in one of the operating modes (photo, video recording or playback), use the / button
to switch to black and white or colour mode. In black and white mode the drawbacks of the image due to the
bad light are not so visible.

Image Display to TV
Power on the device, connect it to TV via AV-OUT cable.
Reboot Function
If the device is not responding, disconnect the power source, remove the battery and put it back in 20
seconds. It will reboot the device.
Troubleshooting
The problem:
а) I can't make photo / video.
Check the spare place on the memory card. Format the memory card.
b) What to do if the image is displayed incorrectly on TV?
Connect the device to TV using AV cable. Check the AV plug is promptly inserted into TV video terminal
and also that the relevant TV input and the chromatic system are selected.
c) The image is out of focus.
Use clean soft fibreless wipe to clean the camera lens with special optics cleaner and accurately wipe the
lenses. We recommend the following Defender ECO CLN 30591, Defender CLN 30604, Defender CLN 30593,
Defender CLN 30607.
d) If the device fails to operate (not responding), disconnect the power supply source and remove the
accumulator to reboot the system.
e) If the device is broken down, disconnect the power supply source and refer to the customer care.
Table of contents
Other Defender Dashcam manuals