DeFever Lioness User manual

Lioness Operations Manual Ver 2016.2.docx
Lioness
San Francisco
Owner’s Notes

Printed 7/2/2016 MV Lioness Owners Notes v2015.2 Page 2 of 36
Table of Contents
1. Description --------------------------------------------- 3
2. Reminders---------------------------------------------- 4
3. Quick Start Checklist ---------------------------------- 5
4. Check-in List ------------------------------------------- 9
5. Start-up -----------------------------------------------11
6. Anchoring ---------------------------------------------14
7. Dinghy-------------------------------------------------17
8. Domestic Water---------------------------------------19
9. Electrical Power---------------------------------------21
a. Shore power------------------------------------21
b. Generator---------------------------------------22
c. Inverter/Charger-------------------------------23
d. Charging System-------------------------------23
e. Electronic Systems-----------------------------24
i. Computer Charting----------------------24
ii. VHF Radios-------------------------------24
10. Heating System---------------------------------------24
11. Troubleshooting Heating System --------------------25
12. Fuel Management-------------------------------------26
13. Galley--------------------------------------------------28
14. Intercoms ---------------------------------------------29
15. Heads--------------------------------------------------30
16. Discharge the Holding Tank--------------------------30
Appendices
A1. Waste Management Plan -----------------------------34
A2. Lioness 12 Volt Charging Circuit---------------------35
A3. Instructions -------------------------------------------36
Printed 7/2/2016 MV Lioness Owners Notes v2015.2 Page 3 of 36
Description
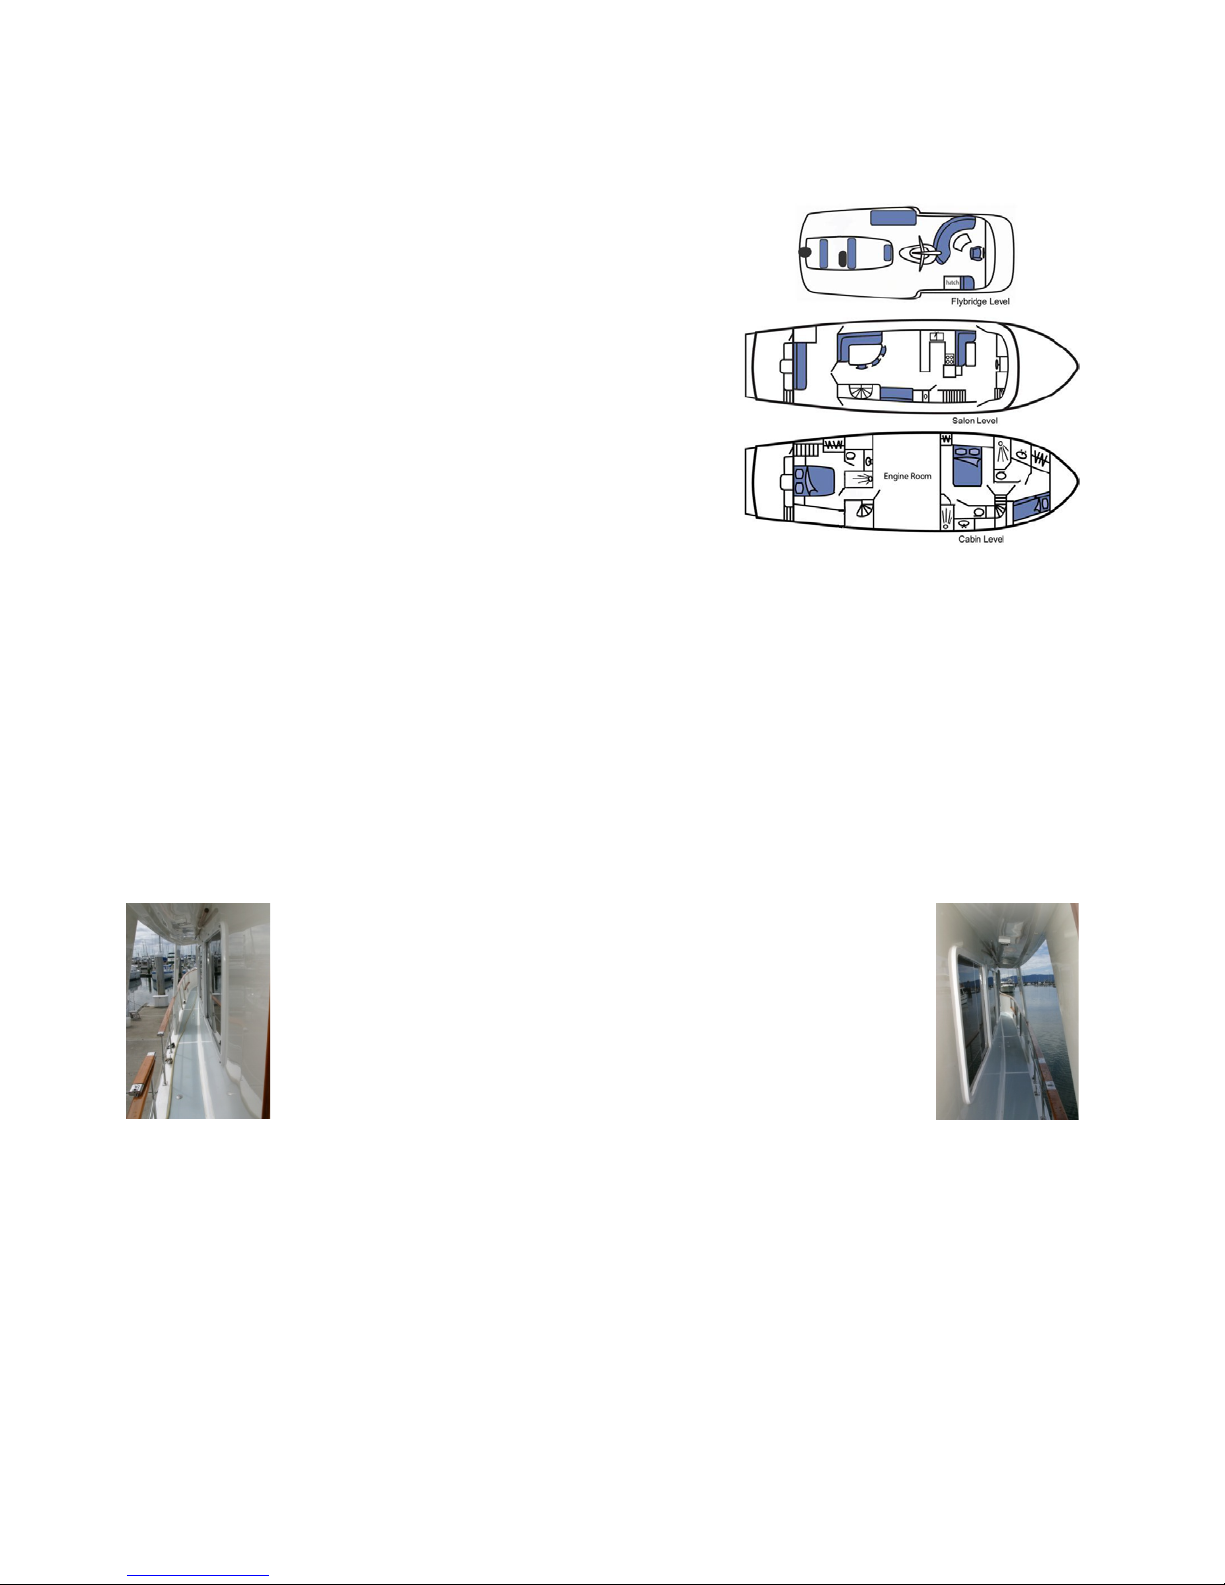
Lioness is a 1991 49’ DeFever, often described
as a raised pilothouse (RPH) trawler. The lower
deck has two staterooms each with private
bath. The master is located down the 5 steps
from the Galley. The forward stateroom is
accessed via stairs off the wheelhouse. The
mid deck has the salon, galley, and cockpit.
The boat deck has the flybridge and dinghy.
Lioness is a comfortable ship with long range
capability. She has Naiad stabilizers for
comfort, a Portuguese bridge and covered
walkways for safety. She was built to cruise so
she is quiet and easy to run for long periods of time.
Lioness is powered by a pair of Perkins 240 turbocharged diesel engines
rated at 240 horsepower each. AC power is provided by an 8kw Westerbeke
generator. There are 4 steel fuel tanks; two forward tanks at 150 gallons
each, two aft tanks at 250 gallons each for a total of 800 gallons.
She carries 400 gallons of water in two 200 gallon tanks. The water tanks
are accessed through a hatch in the master stateroom, aft of the bed. Hot
water is provided by a 20 gallon tank heated electrically and by heat
exchanger from the engines.

Printed 7/2/2016 MV Lioness Owners Notes v2015.2 Page 4 of 36
Lioness Reminders
•Before shifting the engines into reverse, ALWAYS make sure the
stabilizers are LOCKED/Center. The switch for the
stabilizers is located overhead in the center of the
wheel house. The switch should be in the middle
for off. Note – it is best to position the switch to
“Center” for 5 seconds before moving it to “Off.”
•If you enter the engine room while cruising, please enter from the
lazarette and wear ear protectors hanging on the handle of the
lazarette/engine room door. The engine room door should always be
closed while under way. Use caution while the engines are running. There
are many rotating parts that could catch your clothing or hair. Please be
cautious in the engine room at all times as there are many sensitive
systems in this area.
•There are life preservers in the dinghy, in the locker on the Portuguese
bridge and on the flybridge.
•Make sure that only ONE fuel tank is online at a time. DO NOT OPEN THE
VALVES FOR MORE THAN ONE FUEL SUPPLY AND ONE RETURN AT ANY
ONE TIME! The fuel tanks will gravity feed to the lowest side. If the boat
is listing because of weight it will list further. In a long range vessel this
is a safety feature to avoid contaminated fuel, provides the ability to
balance the vessel and makes it easy to calculate fuel usage. Use only
the Port Aft and Starboard Aft fuel tanks. The fuel manifold is located on
the forward engine bulkhead. Start with the Port Aft tank.
•The holding tanks (black water) should be monitored daily. There is a
tank monitor located on the front of the sink cabinet in the master head.
Pump out to an approved facility as necessary. Most of the larger harbors
(Anacortes, Friday Harbor, Nanaimo, etc.) have pump out facilities and/or
pump out vessels that will come to your boat. Ask the local harbormaster
for information.

Printed 7/2/2016 MV Lioness Owners Notes v2015.2 Page 5 of 36
Quick Start Checklist
At beginning of Charter
☐Power panel: All “Red Dot” breakers ALWAYS ON, “Green Dot” items
ON FOR CRUISING, all other breakers ON AS NEEDED
☐Install the American Flag and Burgee in the flange on rail in the cockpit
and bow rail respectively.
First Thing Each Day (Details under Lioness Start-up page 11)
☐Check Weather on VHF then monitor CH 16. “Weathermap+” is our
favorite weather app. VHF Channel 4 is great for the San Juans.
☐Check tides and currents for planned route.
☐Check engine oil, coolant in main expansion tanks. Check Generator
oil.
☐Check under-engine oil pads to see if there is any leakage.
☐Check fuel (engine room) and water tank (under master cabin floor)
levels at each sight tube then turn off sight tube valves.
☐Check holding tank levels (Located in Master Head)
☐Are all portholes closed and secure?
☐Turn off anchor light if illuminated.
☐Check power usage and voltage for both battery banks frpm gauge in
the overhead above the pilothouse helm. Bank #1 is house battery
and bank #2 is start battery for both engines.
Starting Engines
☐Pilothouse instruments ON at main panel and navigation panel behind
steering wheel warmed up.
☐Stabilizers in “Off” position for maneuvering.
☐Turn on navigation instruments at each unit.
☐Before starting engines move shift and throttle controls fore and aft.
Turn wheel 3 turns to each side and stop with it centered amidships.
☐Make sure shift controls are in neutral
☐Turn one key ON, low oil pressure buzzer will sound.
☐Press start button
☐Run engine at least one minute at 800 rpm then idle.
☐Check engine gauges.
☐Repeat procedure for other engine.

Printed 7/2/2016 MV Lioness Owners Notes v2015.2 Page 6 of 36
Before Leaving Dock
☐Switch shore power breaker to off position on panel.
☐Turn off dockside shore power breaker.
☐Disconnect shore power cord from shore side first, remove adapters
and stow all in starboard cabinet of Portuguese bridge.
☐On panel, move slide to inverter and move breaker to ‘up’ position.
☐Make lines ready to bring aboard and insure that they cannot foul a
propeller.
Soon After Leaving Dock
☐Fenders hauled aboard and stowed.
☐Remove lines and place safely on deck or hang on hooks on bulwarks.
Stow any other deck gear.
☐Doors and hatches closed and secured as appropriate.
Underway
☐“Every vessel shall at all times maintain a proper look-out…”
72COLREGS.
☐Stabilizers On or Off as needed.
☐RPM under 1200 until engines warm to 140°. (Most efficient cruising
speed is 1900-2000 RPM.)
☐Be courteous, watch your wake.
Approaching Dock
☐Fenders out on appropriate side.
☐Thruster ON (green button).
☐Bow line OUTSIDE stanchions and bloused around toward amidships.
White lines are for bow and stern, black lines are for spring lines from
amidships.
☐Stabilizers in “Center” position for 5 seconds then in “Off” position.
☐Engines idle, wheel centered for engine/thruster maneuvering.
☐Come to a complete stop before maneuvering.
☐Mate ready to secure appropriate line (amidships or stern line first).
Upon Arrival at Dock in Marina
☐Lines secure: 2 forward spring lines, 2 aft spring lines, bow line, stern
line.
☐Make sure dock and boat circuit breakers are both off before
connecting cord.
☐Connect shore power cord then turn on dock and shore power
breakers.

Printed 7/2/2016 MV Lioness Owners Notes v2015.2 Page 7 of 36
☐Shore power available displays dim green light above switch on panel.
☐Monitor electric use and limit to capacity of shore facilities and
connections. Do not exceed the 30 amp capacity or breaker will trip.
Mooring at Anchor
☐Stabilizers in “Off” Position.
☐Anchor is lowered per Anchoring instructions.
☐Desired scope should be a minimum of 3:1 or 4:1 for most sheltered
coves.
☐Use heavy blue snubber line with chain hook and chafe guard.
Stopping Engines
☐Use Stop Button before turning key.
(Stop solenoids are electric so they will not operate when the key is
off.)
Generator Starting/Stopping
☐Hold “Preheat” switch for 30-45 seconds, then hold both “Preheat” and
“Start” until generator starts. Hold ‘Preheat’ button for 30 seconds
after generator starts.
☐Check starboard exhaust outlet for water flow.
☐After one minute for warm-up select the proper breaker (green light)
and lift to turn on. Add needed circuits one at a time.
☐Stopping: Switch individual breakers off, turn main breaker off, wait
one minute for cool-down.
☐Hold Stop button until generator stops.
Overnight Checklist in Marina
☐Shore power “On”.
☐Check that appropriate breakers are on. Be sure that inverter/charger
is switched on. Leave breaker marked “Charger” on main panel off.
Overnight at Anchor
☐If necessary, run generator until batteries fully charged as shown on
remote display in PH overhead(13.2 volts).
☐Anchor light “On”.
☐Check DC consumption at Magnum remote display and DC amp meter.
☐Turn off Inverter to conserve power.
☐Turn off unnecessary DC electrical items including radios, lights, etc.
End of Charter before leaving vessel (See Lioness Check-in page 9)
☐Fuel tanks topped off?

Printed 7/2/2016 MV Lioness Owners Notes v2015.2 Page 8 of 36
☐Dinghy gas tank topped off (Cap Sante has ethanol free gasoline,
better for outboard).
☐Holding tanks empty?
☐Shore Power connected?
☐Power panel: All breakers “Off” except green dots.
☐Place all linens in cockpit.
☐Canvas covers on in all locations appropriate.
☐Blinds closed for sunlight and theft deterrent.

Printed 7/2/2016 MV Lioness Owners Notes v2015.2 Page 9 of 36
Check-In list for Lioness
1. Dive the boat (AYC takes care of this),
a. Check the hull for fiberglass damage or scratches.
b. Props
c. Stabilizers
d. Thruster Prop
e. Underwater gear
f. Zincs
i. 2 shaft zinc’s on each prop shaft
ii. One 5” button type zinc on each rudder and
iii. One 5” button type zinc on each V-strut
iv. Vetus Thruster zincs
v. Main plate zinc on the transom
2. Check the railings for damage to the varnished surfaces.
3. Check the dinghy for any scratches or damage along with the level of
fuel in the fuel tank and the gas can for refilling the dinghy.
4. Make sure the port railing next to the davit is secure and all eye bolts
are in place. Check for any damage to the path (fiberglass, stainless,
etc.) of launching and retrieving the dinghy from the fly deck to the
water level.
5. The outboard on the dinghy should be purged of fuel before lifting it
back onto the flybridge.
6. Check the dinghy propeller for damage.
7. Make sure the dinghy has all tie-down straps in place.
8. Check to make sure the anchors are secure and extra lines are in the
lazarette.
9. Check the barbeque for use, propane in the lazarette and clean
accordingly.
10. Galley propane tanks are located on the port side of the flybridge.
11. The covers should be reinstalled on the flybridge, dinghy, barbeque,
windlass, compass covers on both the flybridge and in the
wheelhouse and instrument covers in the main pilothouse.
12. Remove the flags from the stern and bow and stow in the salon.
13. The lazarette should be organized, clean and secured.

Printed 7/2/2016 MV Lioness Owners Notes v2015.2 Page 10 of 36
14. The power cord adaptors should be located in the starboard
Portuguese bridge cabinet along with the main power supply cord.
15. The domestic water tanks should be full or refilled.
16. The main fuel tanks should be full or refilled.
17. The holding tank must be emptied.
18. Window blinds should be closed when the charter is finished to
alleviate UV damage to the interior of the saloon.
19. Turn the thermostat switch to Low.

Printed 7/2/2016 MV Lioness Owners Notes v2015.2 Page 11 of 36
Lioness Start-up Procedure
1. A. Check the oil level in both engines. The dipstick handles are on
the inboard side of each engine. DO NOT OVERFILL THE OIL
CAPACITY of the engines. It is ok for the engines to run when
the oil level is near the lower line. Checking the oil should
happen daily, before cruising.
B. Check the transmission fluid in each engine – toward the rear.
Any fluid on the dipstick means adequate fluid. Be sure to push
the dipstick down on the tube to ensure no leakage.
C. Check all fan belts to make sure they are taut and not slack.
D. Make sure there is adequate coolant in the expansion tank
mounted on the wall outboard of each engine.
2. Check the oil level in the Westerbeke generator.
3. Complete a visual check of the engine room for leaks, loose items
that should be secured, or anything unusual.
4. Confirm that you have chosen the correct fuel tank to draw from.
Remember, only draw from and return to one tank at a time. The
feed valve and return valve to the same tank should be open. (See
Fuel Management for details).
5. Close and “dog” the lazarette door.
6. Review the exterior area around the hull and the flybridge to confirm
that there are no obstacles in the water or loose items that should be
secured.
7. Leave the inverter switch on, if you plan to use any 110V outlets
while cruising.
8. Make sure the stabilizer switch, (located overhead in the pilot house
above the helm), is turned to the “OFF” position (Center) until clear
of the marina or anchorage.
9. If you are not using the engine for the day, start and run the
generator for at least ½ hour each morning and evening. The 8kw
generator will provide approximately 65 amps of power. If the
generator runs every evening, there may be no need to run it in the
morning.
10. Review your power usage and the main breaker panel to make sure
you have power to everything you need to get underway.
11. Make sure the shore power is disconnected. (See instructions, if
necessary)
12. Check to make sure that the shift levers are in the neutral position.
13. Check the raw water strainers for eel grass or other debris. The
strainers for the mains are forward of each engine. Shine a flashlight
from the back, thru the glass sidewall to see if there anything in the
bowl. If there is debris, it must be cleared.

Printed 7/2/2016 MV Lioness Owners Notes v2015.2 Page 12 of 36
14. To clear the strainer, close the seacock (open lock nut opposite
handle), remove the basket and any debris. Replace the basket and
re-open the seacock. The starboard basket does not come all the
way out. Remove what you can see.
15. Leave the keys to the respective engines in the ignition slots on the
helm.
16. To start one engine, turn the respective key to the “ON” position (the
alarm will sound signifying low oil pressure). Then push the start
button for the same engine for a few seconds, the engine should
start easily. When the engine starts, adjust the idle to 800 RPM for
that engine. Repeat the above procedure for the second engine.
Diesel engines should only ‘warm up’ for 3-4 minutes. No need to
get to ‘operating temperature’ to engage gears. Go to stern and look
to make sure water is flowing from exhausts on both sides.
17. Push the power button at the bottom of the thruster control. The
thruster power is “ON” when the green light is illuminated on the
control. Turning on the lower helm thruster control does not turn on
the upper helm or aft helm control. Each thruster must be activated
individually.
18. After the engines run for a minute or two idle the engines down.
You may test the bow thruster both left and right by moving the
lever for a half second in each direction.
19. You are ready to untie from your moorage and maneuver away.
20. It is good to station your crew around Lioness as additional eyes to
make sure you have lots of clearance from obstructions. It is often
helpful to have one crew member with the extra fender in hand
available to place the fender between the boat and any hard object if
you come too close. NEVER try to fend off with your hands or feet!
21. Remember, Lioness is 54’ overall in length and has a beam of 15'.
Bridge clearance is approximately 25’ above the water. She weighs
27.5 tons and will react slowly but predictably.
22. Make sure all mooring lines, fenders and anything that is loose is
stowed before getting underway. No lines should be stored in the
port or starboard walkways as they could fall overboard and foul the
props.
23. Turn on the stabilizers only when you are under way and will not be
using reverse to maneuver. If the stabilizers are on when reversing,
they will try to balance the boat while moving backwards and may
give unpredictable results.
24. Turn on the VHF radios, (monitor channel 16) and the auto pilot if
you are using it.
25. For navigation gear, make sure all switches on the ‘nav panel’ are
switched on. Turn on each unit individually. Garmin 7607 (on top of
nav area) is designed to be moved to flybridge when needed. Press

Printed 7/2/2016 MV Lioness Owners Notes v2015.2 Page 13 of 36
‘menu’ on Garmin 7610 for options. There is a white 3-ring binder
with the Garmin manual, or press ‘menu’ for the electronic version.
VHF radios are powered on from the main panel. Starboard radio is
tuned to channel 16 and port radio is tuned to Scan.
26. When coming into port, make sure the stabilizers are in Center
position for about 5 seconds and then in the center OFF position.
Lioness will not maneuver well in reverse with the stabilizers “ON”.

Printed 7/2/2016 MV Lioness Owners Notes v2015.2 Page 14 of 36
Manuals
Detailed operating manuals for most of the equipment are located in the
cabinet at the top of the stairs to the pilothouse. There are 3 ‘accessories’
manuals. This information is in a loose alphabetical order, either by type of
equipment, e.g. water heater, or by brand name, e.g. Icom.
Anchoring
Chain Markings
The anchor rode consists of 400’ of chain with about 20’ of nylon line at the
“bitter end”. The nylon line is used in case of emergency to release the
anchor by cutting the line. Lioness’ main anchor is a 110 lb ‘bruce’ style
anchor.
1. The chain is marked with paint to aid in determining proper scope.
2. White is painted on the chain for the last 4’.
3. Red is marked each 50’
These markings are listed inside the electric panel
Colored cable ties mark the chain.
1. White at 50’ / 2 white at 100’
2. Yellow at 150’ / 2 yellow at 200’
3. Red at 250’ / 2 red at 300’
4. Orange at 350’ / 2 orange at 400’
Windlass/Capstan
ALWAYS use the diesel engines to position the vessel so the windlass is
lifting the chain vertically and not pulling the boat. The windlass on Lioness
is a Maxwell 2200. The anchor can be raised or lowered with the switches
on deck or the toggle switch on the lower helm.
Before using the windlass, make sure the windlass switch on the panel is ‘on’
AND the windlass circuit breaker is also on. The circuit breaker is located
inside the cabinet to the right of the electrical panel.
Retrieval of the anchor is by 12 volt electric motor. This motor can overheat
when overloaded. If it overheats, the circuit breaker in the pilothouse
cabinet locker will pop, and it will need ½ hour to cool off.
In an emergency you can let the anchor free fall from the windlass, use the
handle (looks like a sailboat winch handle) located in the forward locker near
the Portuguese bridge. Insert the handle in the top of the capstan, and
rotate it to release the brake or apply the brake. This allows the anchor and
chain to free fall. You may also need the anchor windlass handle to adjust

Printed 7/2/2016 MV Lioness Owners Notes v2015.2 Page 15 of 36
the tension on the windlass clutch. Be careful when dropping the
anchor so that it does not “run away”. Use the chain stopper!
Scope and tide swing
Proper scope is important for safe anchoring. The sheltered coves of the
Northwest require a 3:1 or 4:1 scope. Scope is the relationship of length of
rode (chain, line, cable) to the depth of the water PLUS the 10’ of bow above
the water. If the water is 20’ deep, 3:1 scope would be 90’ of chain from
the bow. Greater scope will increase the radius the boat can swing during
the changing wind and tide. Longer scope than your neighbor could swing
you into their path. The greater the scope the more holding power the
anchor will have. Heavy conditions could require a scope as much as 10:1
and would indicate a poor choice for the night.
It is important to check the tide tables to know at what point in the range
you are anchoring. It is not uncommon to see a 15’ change from high to low
tide. If you anchor in 10’ at low tide with 30’ of rode, at high tide you will
have 30’ of rode in 25’ of water. This situation would not provide an
effective amount of holding power. Likewise, anchoring in the same
conditions at high tide will put you hard aground at low tide.
Setting the Anchor
1. The boat should be stopped facing into the wind or current.
2. Ensure that the “Windlass” switch on the DC panel is on. There is an
additional breaker in the locker just left of the lower helm to the right
of the electric panel.
3. Lower the anchor using the port side deck switch, or the toggle
switch at the helm.
4. If the brake binds be VERY CAREFUL starting the anchor moving.
5. Control the speed by turning the brake wheel clockwise to tighten
and counterclockwise to loosen.
6. Let out the proper amount of rode based on scope desired.
7. Put both engines astern momentarily to put a strain on the anchor.
8. Verify the anchor is set by seeing the chain angle out away from the
bow and then observing boat coast forward and slack the chain.
9. Install a single or double chain bridle from portside Portuguese
bridge, slack a belly in the chain, and allow tension to be held by the
bridle.
Retrieving the Anchor
1. Start engines and warmup. The anchor windlass uses a great deal of
electrical power, and requires the engines to be running.
2. Briefly put in forward gear so windlass is only pulling in slack chain.
Repeat as needed.

Printed 7/2/2016 MV Lioness Owners Notes v2015.2 Page 16 of 36
3. Step on the windlass switch to retrieve the anchor.
4. Wash the chain with plenty of water (hose fitting on deck) as it is
retrieved.
5. As the chain tightens stop the windlass and wait until the boat
catches up then continue raising the anchor.
6. When the anchor is clear of the water make sure it is clean of mud.
A boat brush and hose may be needed to assist this.
7. Be careful for the last couple feet to make sure the anchor is facing
the proper direction. This is important, as this is a very large anchor
and you don’t want to ding the fiberglass by pulling it tight in the
wring position.
Other
1. Spare anchors and rope are located in the lazarette.
2. A polypropylene line is on a reel located in the lazarette. Use this for
a stern line to shore, if needed.

Printed 7/2/2016 MV Lioness Owners Notes v2015.2 Page 17 of 36
Dinghy
Launching the Dinghy (Best done with two or three people)
1. Locate the dinghy key in starboard cabinet in pilothouse.
2. Undo pelican hook and lower lifeline from starboard side of boat deck
and aft rail lifeline
3. Prepare the davit for use:
a. Insert the davit control cord (stowed in the port aft flybridge,
starboard side cabinet) into back side of davit.
b. Press the “out” button to release the tension to unclip the cable.
4. Attach the hoist cable to the dinghy bridle.
5. Remove the tie-downs from the dinghy.
6. Place fenders on starboard side of Lioness.
7. Lead bowline of dinghy to cockpit and secure.
8. Press the “in” button to raise the dinghy until the cable weight is ½
inch from the top of hoist.
9. Swing the dinghy outward until it is parallel to the starboard side of
Lioness. (Both launch and retrieval of the dinghy requires the bow to
face the stern of Lioness.) Be careful not to hit the railing sides or
upright. Make sure a crew member can hold the dinghy from
banging the side of boat deck or hull as it is lowered.
10. Press “out” until the dinghy is floating.
11. Unclip the snap hooks of the bridle from the dinghy and retrieve the
cable.
12. Clip the bridle hooks to the boat deck.
13. Store the davit control in the starboard cabinet of the flybridge.
14. Replace the starboard lifeline and aft lifeline.
Starting the Dinghy (see the dinghy operations manual for detailed
instructions)
1. Tilt the outboard up (button on throttle) pivot lock out of the way and
lower outboard.
2. Turn on the fuel line by putting the lever in-line with the hose.
3. Squeeze the fuel bulb until fuel fills the line.
4. Push key in to set choke.
5. Lift the high idle lever.
6. Make sure the red kill switch is attached and turn the key.
7. When the engine starts, the choke will automatically turn off.
8. Let the engine idle at high idle to warm up for a minute or so.
9. Attach the raymarine ‘dragonfly’ chart plotter unit.
10. Bring a portable VHF unit (from pilothouse) when operating dinghy.

Printed 7/2/2016 MV Lioness Owners Notes v2015.2 Page 18 of 36
Retrieving the Dinghy
1. Remove the gas line and run the gas from the engine.
2. Run the bilge pump to insure there is no water in the dinghy.
3. Raise the outboard.
4. Remove the starboard rail and remove the safety chain on the boat
deck.
5. Attach the davit control to the back of the davit.
6. Turn the dinghy so that it’s bow is facing the stern of Lioness on the
starboard side
7. Lower the cable and bridle.
8. Attach the bow bridle (the cable with two short cables) through the
to the lift rings in the floor of the dinghy.
9. Attach the stern bridle to the transom lift rings.
10. Make sure the hooks and cables are not twisted.
11. Press the “in” button on the davit control until the cable weight is ½”
from the top of davit.
12. Pivot the dinghy (transom first) until it is over the chocks. Be careful
not to hit the rails with the dinghy.
13. Position the dinghy so the propeller is just above the stern light on
the deck.
14. Lower the dinghy keeping it centered on the chocks. Look
underneath to be sure it’s centered.
15. Secure the tie-downs (two on transom and one on bow).
16. Unsnap the cable from the bridle.
17. Snap the cable to the deck plate.
18. Press “in” until cable is snug. Be careful not to over-tighten.

Printed 7/2/2016 MV Lioness Owners Notes v2015.2 Page 19 of 36
Domestic Water
Location and operation of the domestic water supply system
The domestic water tanks supply the galley, head sinks and showers. There
are two 200 gallon water tanks located under the master stateroom,
accessed through a hatch in the aft floor. Sight tubes are accessed in the
same place.
The fresh water pump is what pressurizes the system and is
located just aft of the port engine. The pressure accumulator
for the domestic water system keeps the pump from cycling on
and off for a small water demand. It is located just Outboard
of the port engine. There is a spare water pump mounted
above the primary Paragon pump. See directions on the side of
the washer if the Paragon pump fails.
If you run the water tank completely dry, the pump may lose its prime. Try
to avoid this by switching to the other tank before it’s completely empty. If
the pump loses its prime, it may require detaching the supply hose from the
inboard pump inlet, filling that hose completely with water, and reattaching
the hose.
Do not use the washer.
Checking level
Each water tank has a sight tube similar to the sight tubes for the fuel tanks.
By checking often you will have a good idea of water usage.
1. Locate the sight tube for the desired tank. As noted above, both sight
tubes are located under the deck hatch aft of the master stateroom
bed. Open sight glass tube valves to check water and then close again.
2. Open the top and bottom valves.
3. Read the level of the tank.
4. Shut off the valves on the top and bottom. (For safety never leave
valves open.)
5. Keep one tank’s supply valve closed so you know when you’ve emptied
one tank, and switch to the other side. Try to fill the tanks at your
next opportunity.
6. If possible, use the port tank first.

Printed 7/2/2016 MV Lioness Owners Notes v2015.2 Page 20 of 36
Filling
1. There are two deck plates, one on each side of the house. The deck
key is located in the cabinet in the wheelhouse. Do not put water in
the diesel tank by mistake. If this happens, stop immediately!
Report this to AYC, and change the engine supply/return tank at the
fuel manifold in the engine room.
2. Attach the small (12”) blue in-line filter to the hose. After turning on
the hose supplying domestic water from the pier, let the water run
through the hose (overboard) for a minute or two to wash any
contaminated water from the hose. Fill until water comes out the
vent on the hull just outside the deck fill. A completely empty tank
takes about 20 minutes to fill.
3. Be sure to return the deck key to the cabinet in the wheelhouse.
Weight transfer
1. Each water tank holds 200 gallons which amounts to almost 1,500
pounds per side. It is important to manage the level of Lioness by
burning fuel and drawing water to maintain an even distribution of
fluids.
2. To switch the supply from one tank to another, just turn the supply
valve to the open/closed position for the respective tank. Open the
future supply before closing the valve to the tank not to be drawn
from. The locations of the supply valves for the respective tanks are
under the floor in the master stateroom.
Table of contents
Other DeFever Boat manuals

Popular Boat manuals by other brands

Albemarle
Albemarle 282 EXPRESS FISHERMAN owner's manual

Sportsman
Sportsman OPEN 232 Owner's manual and quick reference guide

Jeanneau
Jeanneau MERRY FISHER 6 MARLIN owner's manual

Performance Cruising
Performance Cruising Gemini 105Mc owner's manual

Fountaine Pajot
Fountaine Pajot SUMMERLAND 40 LC user guide

Hobie
Hobie Quest 13 Assembly instructions

Grady-White Boats
Grady-White Boats Freedom 307 owner's manual

Coaster
Coaster 600 DAY CRUISER 15 owner's manual

Yamaha
Yamaha 2013 AR240 HO Owner's/operator's manual

Jeanneau
Jeanneau SUN ODYSSEY 44 DS owner's manual

Aquaglide
Aquaglide Supersport owner's manual

Boston Whaler
Boston Whaler 255 Conquest user manual


