Defy DMC 6056 X User manual

Page 1 Small appliance
Instruction manual
DMC 6056 X
10 in 1 MULTICOOKER INOX

CONTENT
IMPORTANT SAFEGUARDS....................................................................... 3
................................................................... 9
......................................................................................... 9
.................................................................................11
.....................................................................................13
....................................................................................... 15
................................................................................... 16
..................................................................... 19
....................................................................................... 20
......................................................... 24
............................................................................................ 24
...................................................................... 24
........................................................................................... 25
Prepare For Cooking
Function Selection
Product Structure
Technical Data Of The Product
Instructions Before Use
Operation Guidelines
Daily Check And Maintenance
Safety Precautions
Environment For Storing The Product
Clean After Use
Electrical Schematic Diagram
Troubleshooting

Page 3
x Joint use of the same
socket with another
appliance may cause
unusual heat and fire.
x Do not immerse the
appliance, power cord or
power plug in water or in
other liquids.
x Disconnect the power plug
after using the appliance,
before cleaning the
appliance, before leaving
the room or if a fault
occurs.
x Do not disconnect the plug
by pulling on the cord.
x Prevent damage to the
power cord by not
squeezing, bending or
rubbing it on sharp edges.
Keep the cord away from
hot surfaces and open
flames.
x Do not use an extension
cord with the appliance.
x NEVER use the appliance
if the power cord or the
appliance is damaged.
x Do not place the unit on an
unstable location. Never
use it on newspaper, foam
or any object that may
easily block the vent hole
at the bottom.
Safety and set-up
Please read this instruction
manual thoroughly prior to
using this appliance! Follow
all safety instructions in
order to avoid damages due
to improper use!
Keep the instruction manual
for future reference. Should
this appliance be given to a
third party, then this
instruction manual must
also be handed over.
x NEVER use this product
for purposes other than
those specified.
x This appliance is intended
for household use only.
x Never use the appliance in
or near to combustible,
inflammable places and
materials.
x Check if the mains voltage
on the rating label
corresponds to your local
mains supply. The only
way to disconnect the
appliance from the mains
is to pull out the plug.
x Use a 220V-50Hz socket.
Fire or electric shock may
occur if 220V AC- 50Hz is
not used.
x Please use an individual
socket with earthed wire of
more than 10A rated
current;

Page 4
x The maximum cooking
amount shall not exceed
the MAX level inside the
inner pot.
x In operation, never move
this product and never
prohibit compulsory
opening.
x NEVER have your hands
or face near to the exhaust
valve or float valve during
operation to avoid
scalding.
x NEVER touch the cover
with hands during
operation to avoid
scalding.
x After cooking, do not
uncover the cooker until
you confirm that there is
no pressure inside.
x When opening the cover
after cooking, do not touch
the inner pot and cover
inside with hands directly
to avoid scalding.
x CAUTION: In order to
avoid a hazard due to
inadvertent resetting of the
thermal cut out, this
appliance must not be
supplied through an
external switching device,
such as a timer, or
connected to a circuit that
is regularly switched on
and off by the utility.
x NEVER use it in a place
which is near water or fire.
Do not use it in a place
exposed to direct sunshine
or oil splash. Keep it in a
place out of the reach by
children.
x If a spare part such as wire
or plug is damaged or the
product fails, stop the
operation instantly and
send it to the service
centre for inspection and
repair. Repair by the user
is not allowed.
x Never make unauthorized
replacement of any spare
part inside the pressure
cooker, as this may cause
electric shock, fire or
injury.
x Before use each time, be
sure to check the anti-
block shield, float valve
and exhaust valve for
obstruction, wipe the
surface of the inner pot
and the heating plate to
confirm they are free of
any foreign object; Check
the exhaust valve for
sealing location.
x Avoid cooking such foods
as oat meal in the pot, as
they may easily clog the
anti-block shield.
x When cooking dry foods,
first soak the dry food for a
period of time.

Page 5
x The ducts in the pressure
regulator allowing the
escape of steam should be
checked regularly to
ensure that they are not
blocked. The container
must not be opened until
the pressure has
decreased sufficiently.
Refer to page 13 for
correct opening procedure.
x This appliance is not
intended for use by
persons (including
children) with reduced
physical, sensory or
mental capabilities or lack
of experience and
knowledge, unless they
have been given
supervision or instruction
concerning the use of the
appliance by a person
responsible for their safety.
x Children must be
supervised to ensure that
they do not play with the
appliance.
x Always keep the appliance
out of the reach of
children.
x Do not leave the appliance
unattended as long as it is
in use. Extreme caution is
advised when the
appliance is being used
near children and people
with limited physical,
sensory or mental
capabilities.
x Before using the appliance
for the first time, clean all
parts which come into
contact with water
carefully. Please see full
details in the “Care and
maintenance” section.
x Dry the appliance before
connecting it to mains
supply.
x Never operate or place
any part of this appliance
on or near hot surfaces
such as gas burner,
electric burner or heated
oven.
x Operate the appliance with
delivered parts only.
x Do not use the appliance
with damp or wet hands.
x Do not touch plug with wet
hands. This may cause
burn or electric shock.
x Always use the appliance
on a stable, flat, clean and
dry surface.
x Make sure that there is no
danger that the power cord
could be accidentally
pulled or that someone
could trip over it when the
appliance is in use.
x Position the appliance in
such a way that the plug is
always accessible.
x Do not stick any foreign
objects on the appliance.
x Do not use the appliance
outdoors or in the
bathroom.

Page 6
x Do not touch hot surfaces.
Use handles or knobs. Use
pot holders when removing
lid or handling hot
containers.
x To protect against
electrical hazards, do not
immerse cord, plugs, or
the Base in water or other
liquid.
x Unplug from outlet when
not in use or before putting
on or taking off parts. Allow
unit to cool before
cleaning.
x Do not operate any
appliance with a damaged
cord or plug or after the
appliance malfunctions, or
is dropped or damaged in
any manner. Return the
appliance to the
manufacturer, for
examination repair or
adjustment. See Warranty
section.
x The use of accessories or
attachments, not
recommended or sold by
the manufacture, may
cause fire, electric shock
or injury.
x Do not let cord hang over
edge of table or counter, or
touch hot surfaces.
x Do not place appliance
base on or near a hot gas
or electric burner, or in a
heated oven.
x Extreme caution must be
used when moving an
appliance containing hot
liquids.
x Any servicing should be
performed by an
authorized service agent.
x Do not wrap the power
cord around the appliance.
x Do not dismantle the
appliance under any
circumstances. No
warranty claims are
accepted for damage
caused by improper
handling.
x It is strictly prohibited to
use a non-brand cover
during heating. May cause
electric shock or other
serious injury.
x Our Household Appliances
meet applicable safety
standards, thus if the
appliance or power cord is
damaged, it must be
repaired or replaced by a
service centre to avoid any
dangers. Faulty or
unqualified repair work
may cause danger and
risks to the user.
x Do not insert foreign
objects such as metal
scraps and needles into a
gap. May cause electric
shock or unusual action.
x When the unit is operating,
the cover has a higher
temperature, so never
touch it with your hand;
This may cause scalding.

Page 7
x It is prohibited to modify or
repair the unit by an
unqualified technician as
this may cause fire or
electric shock. Please
send it to a designated
service agent for repair or
replacement of spare
parts.
x If the electric pressure
cooker does not work, or
there is no pressure inside
the pot and the float valve
falls down; When the unit
works, pressure inside is
on the rise, and so is the
float valve. Do not open
the cover forcibly until the
pressure is completely
discharged; Otherwise
scalding or other injury
may result.
x Do not wash or immerse it
in water as this may cause
electric shock and short
circuit.
x Carry out regular
inspection of the exhaust
valve and anti-block shield
to make sure that they are
unobstructed.
x Do not add any heavy
object to the exhaust valve
or replace it with other
object.
x When cooking, never
move your hand or face to
the exhaust valve vent to
avoid scald. In cooking, do
not cover the exhaust
valve vent with a rag.
x When there is foreign
object between the inner
pot bottom and heating
plate, first remove the
foreign object before
using. May cause
overheating or abnormal
operation.
x When moving the product,
please hold the cooker
handle.
x To move the unit, never lift
the cover handle directly to
prevent the cover from
falling down.
x Food to be cooked should
not exceed the MAX level,
and otherwise the food
may be half-cooked or
failure may happen.
x Do not place the inner pot
on other appliance for
heating.
x To avoid deformation or
failure of the inner pot.
Please use the supplied
special inner pot.
x Never use the product in
the following places:
x Unstable surfaces;
x Places near water or fire;
x Adjacent to walls and
furniture;
x Places exposed to direct
sunshine or oil splash.
IMPORTANT SAFEGUARDS
Caution
The appliance must not be disposed of with regular household
waste. At the end of its service life, the appliance must be
properly delivered to a collection point for the recycling of
electrical and electronic equipment. By Collection and recycling of
old appliances, you are making an important contribution to the
conservation of our natural resources and provide for
environmentally sound and healthy disposal.
Page 8
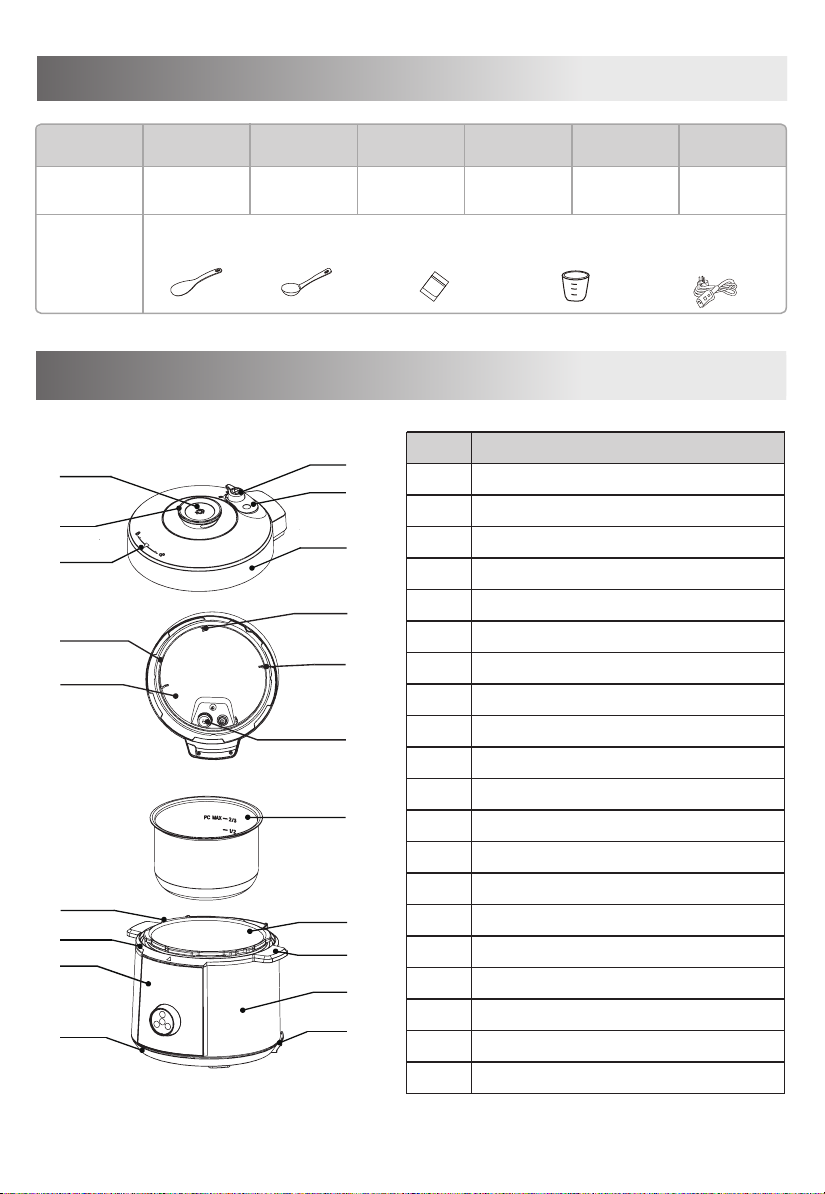
Technical Data Of The Product
Product Structure
Model Capacity Power Supply Rated Power Size of
Inner Pot
Working
Pressure
Keep Warm
Temperature
Accessories Spoon Measuring cup
Soup Spoon User Manual
DMC 6056 X
80kPa 140° F~176° F
1100W 8.66"5.5 L 220-240V~
50/60Hz
No. Description
1
2
3
4
5
6
7
8
9
10
11
12
13
14
15
16
17
18
19
20
Steam release key
Lid handle
Seal ring
Lid open/close mark
Internal side of lid
Water box
Housing cover
Control Box
Base
Exhaust opening
Float valve
Lid
Seal ring bracket
Sealing gate
Block proof cover
Inner pot
Outer pot
Cooker body handle
Cooker body
Power cord socket
1
2
3
6
7
8
9
10
11
12
16
17
18
19
13
14
4
5
15
20
Power Cord
Components
Page 9
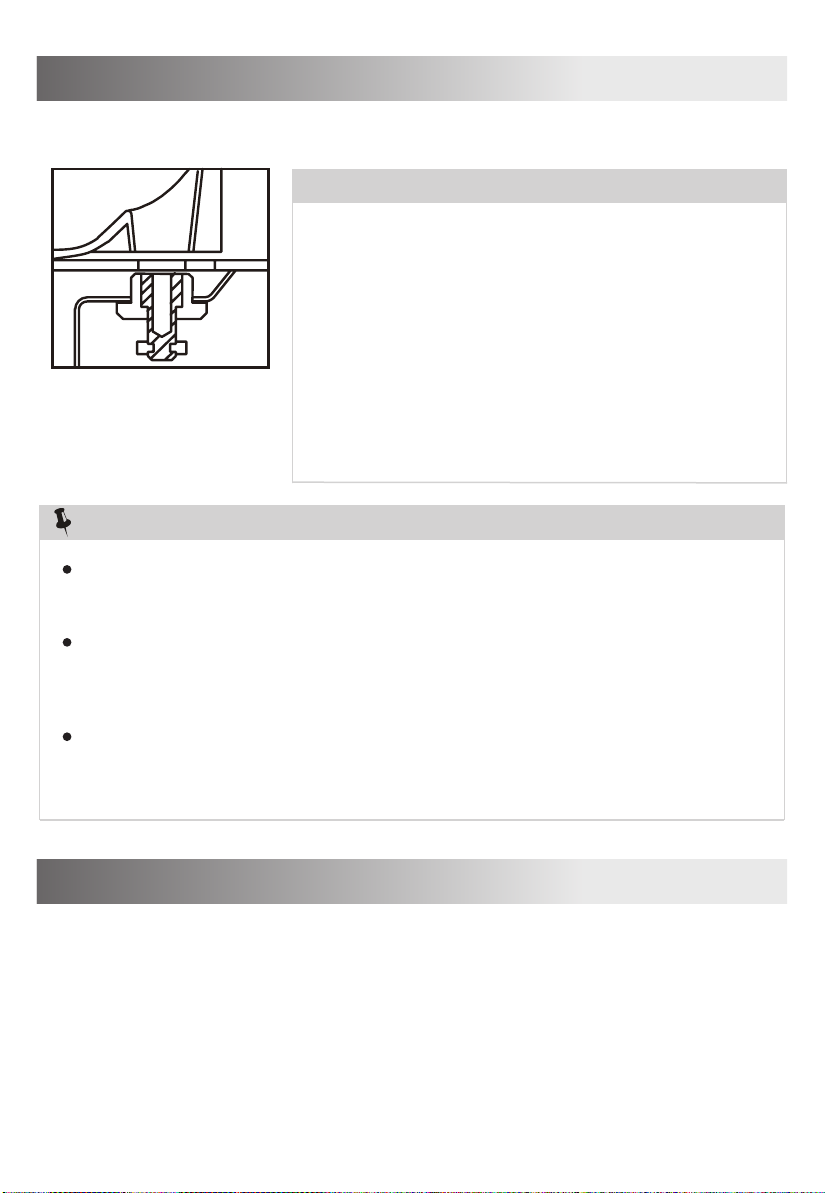
Product Structure
1. Confirm that the float valve, block proof cover and
seal ring are correctly installed before use each
time;
2. Before putting the inner pot into the cooker each
time, please remove the dirt and water from the
external side of the inner pot and internal side of
the external pot;
3. Please move the product with the handle of the
cooker body;
4. Please remove the water from the housing cover
with cloth.
Tips:
Instructions Before Use
When using for the first time, please take out all accessories from the cooker
body, read the User Manual carefully, particularly regarding usage and cautions
for avoiding property loss or physical injury.
Exhaust valve: Pull out the exhaust valve from the lid. Clean the internal side
of the exhaust valve and the exhaust valve and float valve of the lid with
brush and cloth at least once a month.
Sealing gate: Please remove oil and dirt from the sealing gate with detergent
and brush. The remained oil and dirt in it may appear in yellowish. After
washing, it may recover to the original color as stainless steel. It is suggested
to clean the sealing gate once every 2 months.
Water box: After cooking, the steam may stay in the water box of the external
pot as water. Water in the box should be removed for avoiding bad odor,
please clean it with clean cloth.
Note:
Structural diagram of float valve
Page 10

Instructions Before Use
Pressure Holding or Cooking Time Adjustment:
First, turn the knob to select the required function, then press the “Time” key, and
then adjust the required pressure holding time or cooking time by turning the
knob.
Pressure or Temperature Adjustment:
First, turn the knob to select the desired function, then press the “Temp/Pressure”
key, and then adjust the cooking pressure or temperature by turning the knob.
Timer Adjustment:
First, turn the knob to select the required function, then press the “Preset” key,
and then adjust the required time by turning the knob.
Operation
Page 11
Large digital screen
Small digital screen
Instructions Before Use
Use and maintenance of the inner pot
1. Do not use with the pot empty
It may cause yellowish and spotted inner pot or distorted bottom if it is used on
empty for an extended period.
2. Do not use to store acid, alkali and preserved foods for a long period
Although the inner pot has excellent anti-corrosion properties, do not keep any
of the above in the pot to prevent corrosion. Do not use the keep warm function
for more than 2h.
3. Keep it clean to prolong the service life
Do not immerse it in water for a long period.
Clean the inner pot with soap, weak detergent or warm water to remove dust, oil
and dirt.
4.
Do not use a metal shovel or other hard instrument to clean in order to prevent
damage to the inner surface of the pot.
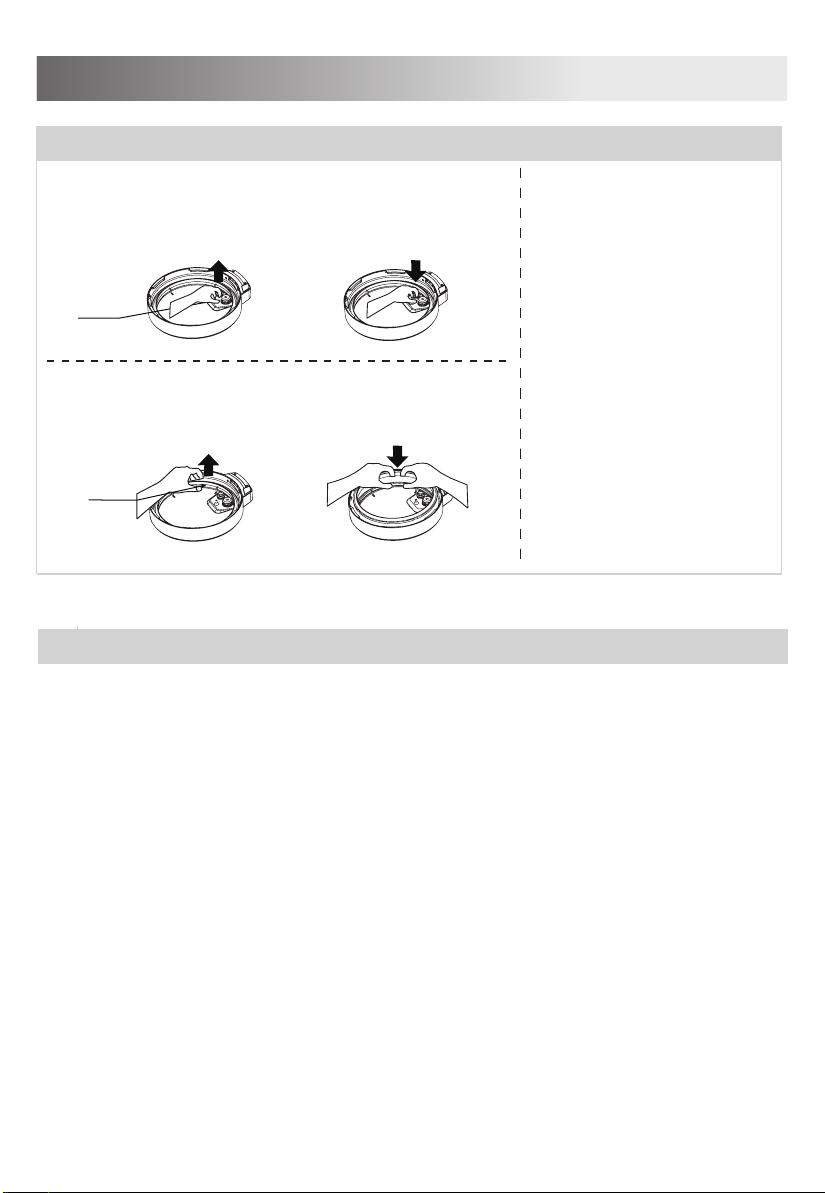
Disassemble Install
Disassemble and install the block proof cover
Disassemble and install the seal ring
Block
proof
cover
Seal ring
Pull it out upwards Press it down to install
Disassemble Install
Pull it out upwards Press it down to install
Disassemble and install the block proof cover and seal ring
1. Check if the seal ring and
block proof cover are
correctly installed in the
upper cover before use
each time.
2.
1.
After use, please clean the
seal ring and around the
block proof cover to
prevent the jamming of the
cover, keep it clean to
avoid bad odor.
Please do not pull the seal
ring, otherwise, the
distorted seal ring may not
seal properly and effect
pressure.
2. Do not use a damaged
seal ring, please replace it
at the authorized repair
office.
Page 12

Prepare For Cooking
Usable Capacity
3. Take out the inner pot, place food and
water into the inner pot
• The total amount of food and water shall not
exceed the Max marked on the inner pot.
• The amount of rice and water when cooking
shall not exceed the Max on the inner pot.
4 Place the inner pot into the cooker
• Wipe to clean the external surface of the
inner pot, keep foreign objects and water
from the inner surface of pressure cooker;
• Turn the inner pot to the left and right to
ensure good contact with the heating plate.
5 Safely close the lid
• Before closing the lid, check if the sealing ring
is well installed.
• Hold the handle of upper cover, aim the “ ”
mark on the edge of the upper cover aiming
at the “ ”mark on the edge of the housing
cover, put the top cover horizontally on the
cooker body, turn the upper cover clockwise
for about 30°to the lock place, and aim the
“ ” mark on the edge of the housing cover at
the “ ” mark on the lid.
1 Opening the lid correctly
• Holding the lid handle with your hand, rotate
approximately 30 degrees counterclockwise
until the lid is in the open position, then lift
the lid up to open.
2 Check if the parts and accessories of lid
are correctly installed
• Check if the floater valve and exhaust valve
are jammed, confirm if the sealing ring and
block proof cover are correctly installed.
Page 13
Function Selection
Under any state, press “Start/Cancel” button for two seconds to cancel the
current work state and return to standby state.
When the cooker is working, it is normal that it makes a "cluck" sound.
To cook a small amount of food, the inner pot may possibly lift when
opening the lid, please shake the lid to drop the inner pot back in the cooker
body and then remove the lid.
Tips:
1. Prepare for cooking according to the method on the previous page
2. Switch on
In standby mode, turn the large knob to the required menu icon.
3. Select the required function
Select the required function and press the “Start/Cancel” key to start cooking.
4. When the current cooking process needs to be canceled, press and hold
“Start/Cancel” key 2S to return to standby mode.
After cooking is completed, with the exception of functions “ ” and “ ”
entering standby mode, the rest of the functions will enter keep warm mode.
5. You can change the temperature setting of your product to Celsius or
Fahrenheit. For this, after the product is plugged in, when the "--------" symbol
appears on the screen, you need to hold down the temperature button for 5
seconds. The temperature setting will appear on the display as C or F.
General Function
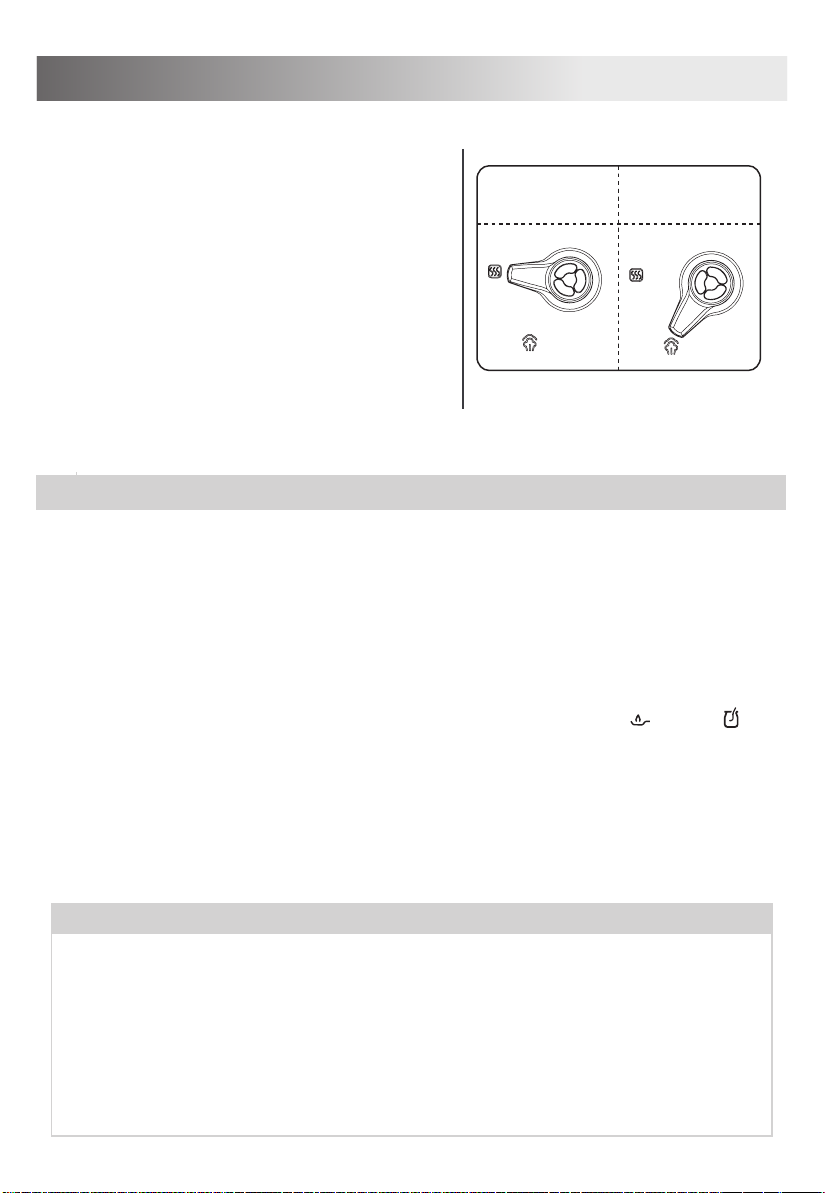
6 Switch the exhaust valve properly
• When working, please turn the exhaust valve
to the sealing position, to ensure a good seal.
• For manual exhaust, please turn the exhaust
valve handle to the exhaust position, the
electric pressure cooker keeps at the exhaust
state; when exhausting, do not keep the
hands or face above the exhaust opening;
• Check if the floater valve drops down before
using (before heating, the floater valve is
down).
Sealing schematic
diagram
Exhaust schematic
diagram
Page 14

Function Selection
Safely open the lid
1. Make sure the pressure cooking program has completed or press “Start/-
Cancel” key to terminate the program.
2. Release pressure in one of the following ways.
Quick Release:
Press the “Steam Release ” key on the lid handle to let out steam until
the float valve drops down.
Caution:
Please keep hands and face away from the hole on the top of the exhaust
valve when using Quick Release. The escaping steam is very hot and can
cause scalding.
Never pull out the exhaust valve when it is letting out steam.
Please be aware that Quick Release is not suitable for food in large liquid
volume or with high starch content (e.g. porridge, congee, sticky liquids,
soup, etc.). Food content may splatter out with steam. Use Nature Release
instead.
Nature Release:
Allow the cooker to cool down naturally until the float valve drops down.
This may take 10 to 15 minutes after cooking is finished and the cooker is
in Keep-Warm mode.
Putting a wet towel on the lid can speed up cooling.
3. Open the lid: Hold the lid handle, turn the lid counterclockwise to the open
position, and lift the lid up to open.
Caution: Do not open the lid until pressure inside the pot is completely
released. As a safety feature, until the float valve drops down, the lid is
locked and cannot be opened.
If the float valve is stuck due to food debris or stickiness, you can push it
down with a pen or chopsticks, when you are certain the pressure has been
released by pressing the “Steam Release ” key on the lid handle.
Page 15
Operation Guidelines
Standby After supplying power, the default is standby state, the digital
screen flashes “----”
Function
Meat/
Chicken/
Bean/
Steam
Operation Guidelines
1. Normal cooking: Turn the large knob to the corresponding menu
icon and icon lights up, the digital screen displays the pressure-
holding time of the current menu; press the “Time” key, then turn
the large knob to adjust the required pressure-holding time; press
the “Temp/Pressure” key, turn the large knob to adjust the
pressure. Refer to the pressure icon , the more pressure
bars, the greater the pressure, and vice versa; Short press the
“Start/Cancel” key to start cooking, the buzzer sounds 3 times,
the large digital screen displays , when the product starts
the pressure, the large digital screen displays the
pressure-holding countdown time. When the countdown is
completed, the cooking ends and the buzzer sounds 10 times.
2. Scheduled cooking: Turn the knob to the corresponding menu icon
and icon lights up, press the “Preset” key, the icon flashes, and
the large digital screen displays the default scheduled time as
“2:00”. Turn the large knob to set the scheduled cooking time. The
scheduled time is adjustable from 0:10-24:00. Press the
“Start/Cancel” key to start the scheduled cooking. The buzzer
sounds 3 times, icon lights up and stay. The digital screen
displays the countdown of the scheduled cooking time. When the
countdown is completed, the cooking starts.
3. Exit current working status: Press and hold the “Start/Cancel” key for
2 seconds to exit the current working status and return to standby.
Page 16
Operation Guidelines
Function Operation Guidelines
Rice
1. Normal cooking: Turn the large knob to icon lights up, the
large digital screen displays the pressure-holding time of the
current menu; Press the “Temp/Pressure” key, turn the large
knob to adjust the pressure. Refer to the pressure icon , the
more pressure bars, the greater the pressure, and vice versa;
Short press the “Start/Cancel” key to start cooking, the buzzer
sounds 3 time, the large digital screen displays , when the
product starts the pressure, the large digital screen displays the
pressure-holding countdown time. When the countdown is
completed, the cooking ends and the buzzer sounds 10 times.
2. Scheduled cooking: Turn the knob to the icon lights up,
press the “Preset” key, the icon flashes, and the large digital
screen displays the default scheduled time as “2:00”. Turn the
large knob to set the scheduled cooking time. The scheduled
time is adjustable from 0:10-24:00. Short press the
“Start/Cancel” key to start the scheduled cooking. The buzzer
sounds 3 times, icon lights up and stay. The digital screen
displays the countdown of the scheduled cooking time. When
the countdown is completed, the cooking starts.
3. Exit current working status: Press and hold the “Start/Cancel”
key for 2 seconds to exit the current working status and return
to standby.
Page 17
Operation Guidelines
Cake
Slow cook
Yogurt
Function Operation Guidelines
1. Normal cooking: Turn the knob clockwise until the icon light is
on, and the large digital screen displays “6:00”, indicating that the
cooking time is 6 hours. Press the “Time” key, then turn the knob
to set the cooking time; press the “Start/Cancel” key to start
cooking, the buzzer sounds 3 times, the digital screen displays
the cooking time and starts to count down. When the countdown
is completed, the cooking is completed, and the buzzer sounds
10 times.
2. Exit current working status: Press and the “Start/Cancel” key for 2
seconds to exit the current working status.
1. Normal cooking: Turn the knob clockwise until the icon lights
up, the small digital screen displays 95 °C, and the large digital
screen displays “4:00”, indicating that the cooking time is 4 hours.
Press the “Time” key, then turn the knob to set the
pressure-holding time; press the “Temp/Pressure” key, then turn
the knob to set the cooking temperature; press the “Start/Cancel”
key to start cooking, the buzzer sounds
3 times, the digital screen displays the cooking count down time.
When the countdown is completed, the cooking is completed,
and the buzzer sounds 10 times.
2. Scheduled cooking: Turn the knob clockwise in the standby state,
the icon lights up, press the “Preset” key, the icon lights up,
and the digital screen displays the default scheduled time as “2:00”.
At this time, the knob can be used to set the scheduled cooking
time. The scheduled time is adjustable from 0:10-24:00. Press the
“Start/Cancel” key to start the scheduled cooking. The buzzer
sounds 3 times. The digital screen displays the countdown of the
scheduled cooking time. When the countdown is completed, the
cooking starts.
3. Exit current working status: Press and the “Start/Cancel” key for 2
seconds to exit the current working status.
1. Normal cooking: Turn the knob clockwise until the icon lights
up, the small digital screen displays 140 °C, and the large digital
screen displays “0:40”, indicating that the pressure-holding
cooking time is 40 minutes. Press the “Time” key, then turn the
knob to set the pressure-holding time; press the “Temp/Pressure”
key, then turn the knob to set the cooking temperature; press the
“Start/Cancel” key to start cooking, the buzzer sounds 3 times,
and the digital screen displays . When the product enters
he pressure-holding status, the digital screen displays the
pressure-holding time and starts to count down. When the
Page 18
Operation Guidelines
Daily Check And Maintenance
To use the product safely with a longer service life, please carefully check and
maintain it.
If the following occursSolutions
• Power cord and plug has swelled, deformation,
damaged or color has changed.
• One part of the power cord and plug are hotter.
• Power cord is flexible with discontinuous power
supply.
• The electric pressure cooker has abnormal
heating and generates bad odor.
• There's abnormal noise or vibration when power
is on.
Stop using, contact
the customer care
line.
• There's dust or dirt on the plug or socket. Remove the dust or dirt.
Fry
Cake
Function Operation Guidelines
countdown is completed, the cooking is completed, and the
buzzer sounds 10 times.
2. Exit current working status: Press and hold the “Start/Cancel”
key for 2 seconds to exit the current working status.
1. Normal cooking: Turn the knob clockwise until the icon lights
up, the small digital screen displays 160 °C, and the large digital
screen displays “0:30”, indicating that the pressure-holding
cooking time is 30 minutes. Press the “Time” key, then turn the
knob to set the pressure-holding time; press the
“Temp/Pressure” key, then turn the knob to set the cooking
temperature; press the “Start/Cancel” key to start cooking, the
buzzer sounds 3 times, and the digital screen displays .
When the product enters the pressure-holding status, the digital
screen displays the holding time and starts to count down. When
the countdown is completed, the cooking is completed, and the
buzzer sounds 10 times.
2. Exit current working status: Press and the “Start/Cancel” key for 2
seconds to exit the current working status.
Remarks: When using function, do not close the lid. Once the
lid is closed, it will report an error and stop heating. Once the
cooking starts, the inner pot must be placed in, otherwise it will
report an error.
Page 19

Safety Precautions
To avoid personal injury and property loss, be sure to observe the following safety
precautions.
• Meanings of the symbols:
• The danger caused by mistaken use if following warnings are neglected includes
to two grades
“Forbidden” items
General
Forbid
Disassembly
Forbidden
Wet hands
Forbidden
Spray Water
Forbidden
Remove the
power plug
Must be
executed
Contact
Forbidden
“Mandatory” items
Warning
AC 220-240V
It may possibly cause death or serious injury if the warming
items are ignored.
Warning
It may cause physical injury or property damage if the
caution items are ignored.
Caution
Use 220-240V~ 50/60Hz power outlet
• Failure to use AC 220-240V~ 50/60Hz electricity can
cause fire or electric shock.
• Danger of fire if the bad socket is adopted.
A socket shall be used alone
• A socket of more than 10A rated current with ground-
ing wire shall be used alone;
• If shared with other electrical appliances, the socket
may cause abnormal heat and result in fire.
It is strictly prohibited to use other lid
• It is strictly prohibited to use other lid for heating, and
in the (switching on) process, the use of non-original
lid is not allowed.
• As this may cause electric shock or safety hazards.
Page 20
Table of contents
Other Defy Kitchen Appliance manuals


Popular Kitchen Appliance manuals by other brands

Crown
Crown SX-5G3 Installation & operation manual

Lacor
Lacor 68404 Instructions for use and maintenance

George Foreman
George Foreman GR82 George Jr. owner's manual

Küppersbusch
Küppersbusch EEB 650.0 Instructions for use and installation instructions

ArteVino
ArteVino OXYVD8WCOUS user manual

Zelmer
Zelmer ZSM2101X user manual


