Defy 600 MGSE User manual

PAGE 1 OF 20
OWNER’S
MANUAL
www.defy.co.za
Part Number 068 518
SLIMLINE
MULTIFUNCTION
EYE LEVEL OVENS
600 MGSE
DBO 454
600 MGE
DBO 457
NOTE
THE CLOCK / TIMER
MUST BE SET
TO ENABLE THE
OVEN TO WORK
You can rely on Defy. To simplify
Introduction
Unpacking
Owner’s responsibility
Cupboard design
Electrical installation
afety advice
Installation
The control panel
Automatic oven timer
witching the oven on and off
automatically
Multifunction oven
Fan only - Defrosting
tatic oven for traditional baking
Fan assisted oven
Thermofan oven
Turbo grilling
Conventional grilling
Maintenance
Cleaning
Care guide for tainless steel
Problem check
Do’s and Don’ts
Defy ervice Centres
Warranty
Features
Page 2
2
2
2
2
3
4
5
5
6
8
9
9
10
10
11
12
13
14
15
17
17
18
19
20

PAGE 2 OF20
• Cooking appliances generate
considerable heat. The layout and
materials of the mounting cabinet
should take account of the
characteristics of the o en.
• Surfaces immediately adjacent to the
o en should be able to withstand
temperatures of up to 100°C without
delaminating or discolouring.
• O erhanging doors abo e the o en may
be subjected to heat as well as
condensation if ery moist foods are
being cooked.
Intr ducti n
Congratulations on the purchase of this
quality appliance.
We trust that you will enjoy many years of
trouble free use.
Please read these instructions carefully
before using the appliance.
This manual will pro ide you with
information on how to operate and care
for your appliance in order that you gain
the maximum benefit from it.
Unpacking
• Remo e all packing from the o en
ca ity and position the accessories.
• Ensure that packaging material is
disposed of in a responsible manner and
that plastic bags are cut up to pre ent
children playing with them and
accidentally suffocating.
• If the appliance is damaged in any way,
do not use it. Report the damage to your
dealer, who will take the necessary
correcti e action.
Owner’s resp nsibility
Since the following are not factory
faults, they are the owner’s
responsibility.
• Damage to exterior finish.
• Breakage of glass and other
components.
• Replacement of the light bulb.
• Damage through improper use or
installation of the appliance.
• Damage caused by mo ing the
appliance.
Electrical installati n
This appliance must be earthed and the
manufacturer and the seller do not accept
responsibility for any damage due to
incorrect installation or electrical
connection.
This appliance should not be connected
through an earth leakage system.
Refer to S.A.N.S.10142
Support the o en in front of the aperture
and make the electrical connection before
installing. This will ensure enough cable
length for subsequent ser icing.
C nnecti n t the p wer supply
The connection must be carried out by a
licensed electrician, who will ensure that
the o en is correctly connected and safely
earthed. The rated current is printed on the
serial number label attached to the o en
side trim.
The appliance must be connected to the
mains through a double pole isolating
switch which has a minimum clearance
between the contacts of 3 mm. in both
poles.
A means for disconnection must be
pro ided in the fixed wiring.
Cupb ard design
• Your Defy o en is designed to gi e you
years of trouble free ser ice, howe er it
is important that it be correctly
installed.

PAGE 3 OF 20
Safety advice
This section contains safety instructions that will
help you a oid risk of injury and damage. All
warranties will become oid if you do not follow
these instructions.
General safety
• This appliance is not intended for use by
persons (including children) with reduced
physical, sensory or mental capabilities, or
lack of e perience and knowledge, unless they
have been given supervision or instruction
concerning the use of the appliance by a
person responsible for their safety.
• Children should be supervised to ensure that
they do not play with the appliance.
• Connect the appliance to an earthed outlet/line
protected by a fuse of suitable capacity. Ha e the
earth installation made by a qualified electrician.
Our company shall not be liable for any
problems arising due to the appliance not being
earthed in accordance with the local regulations.
• If the supply cord is damaged, it must be
replaced by the manufacturer, its ser ice agent or
similar qualified persons in order to a oid a
hazard.
• Do not operate the appliance if it is defecti e or
has any isible damage.
• Do not carry out any repairs or modifications on
the appliance.
• Ne er wash down the appliance with water!
There is the risk of electric shock!
• Ne er use the appliance when your judgment or
coordination is impaired by the use of alcohol
and/or drugs.
• The appliance must be disconnected from the
mains during installation, maintenance, cleaning
and repair procedures.
• Be careful when using alcoholic drinks in your
dishes. Alcohol e aporates at high temperatures
and may cause a fire since it can ignite when it
comes into contact with hot surfaces.
• Do not heat closed tins and glass jars in the o en.
The pressure that would build up in the tin/jar
may cause it to burst.
• Do not place baking trays, dishes or aluminium
foil directly onto the bottom of the o en. The
heat accumulation might damage the bottom of
the o en.
• Keep all entilation slots clear of obstructions.
• The appliance may be hot when it is in use.
Ne er touch the hot burners, inner sections of
the o en or heaters etc.
• Always use heat resistant o en glo es when
putting in or remo ing dishes from the hot o en.
• Do not use the appliance with the front door
glass remo ed or cracked.
• The rear surface of the o en gets hot when it is
in use. Make sure that the electrical connection
does not come into contact with the rear surface
as connections may get damaged.
• Do not trap the mains cable between the o en
door and frame and do not route it o er hot
surfaces as the cable insulation may melt and
cause a fire as a result of a short circuit.
• Make sure that the function knobs are switched
off after e ery use.
• When using gas, ensure that the room is well
entilated.
• Always keep children and infirm persons away
from the appliance when it is in use.
• Only use the appliance for preparing food.
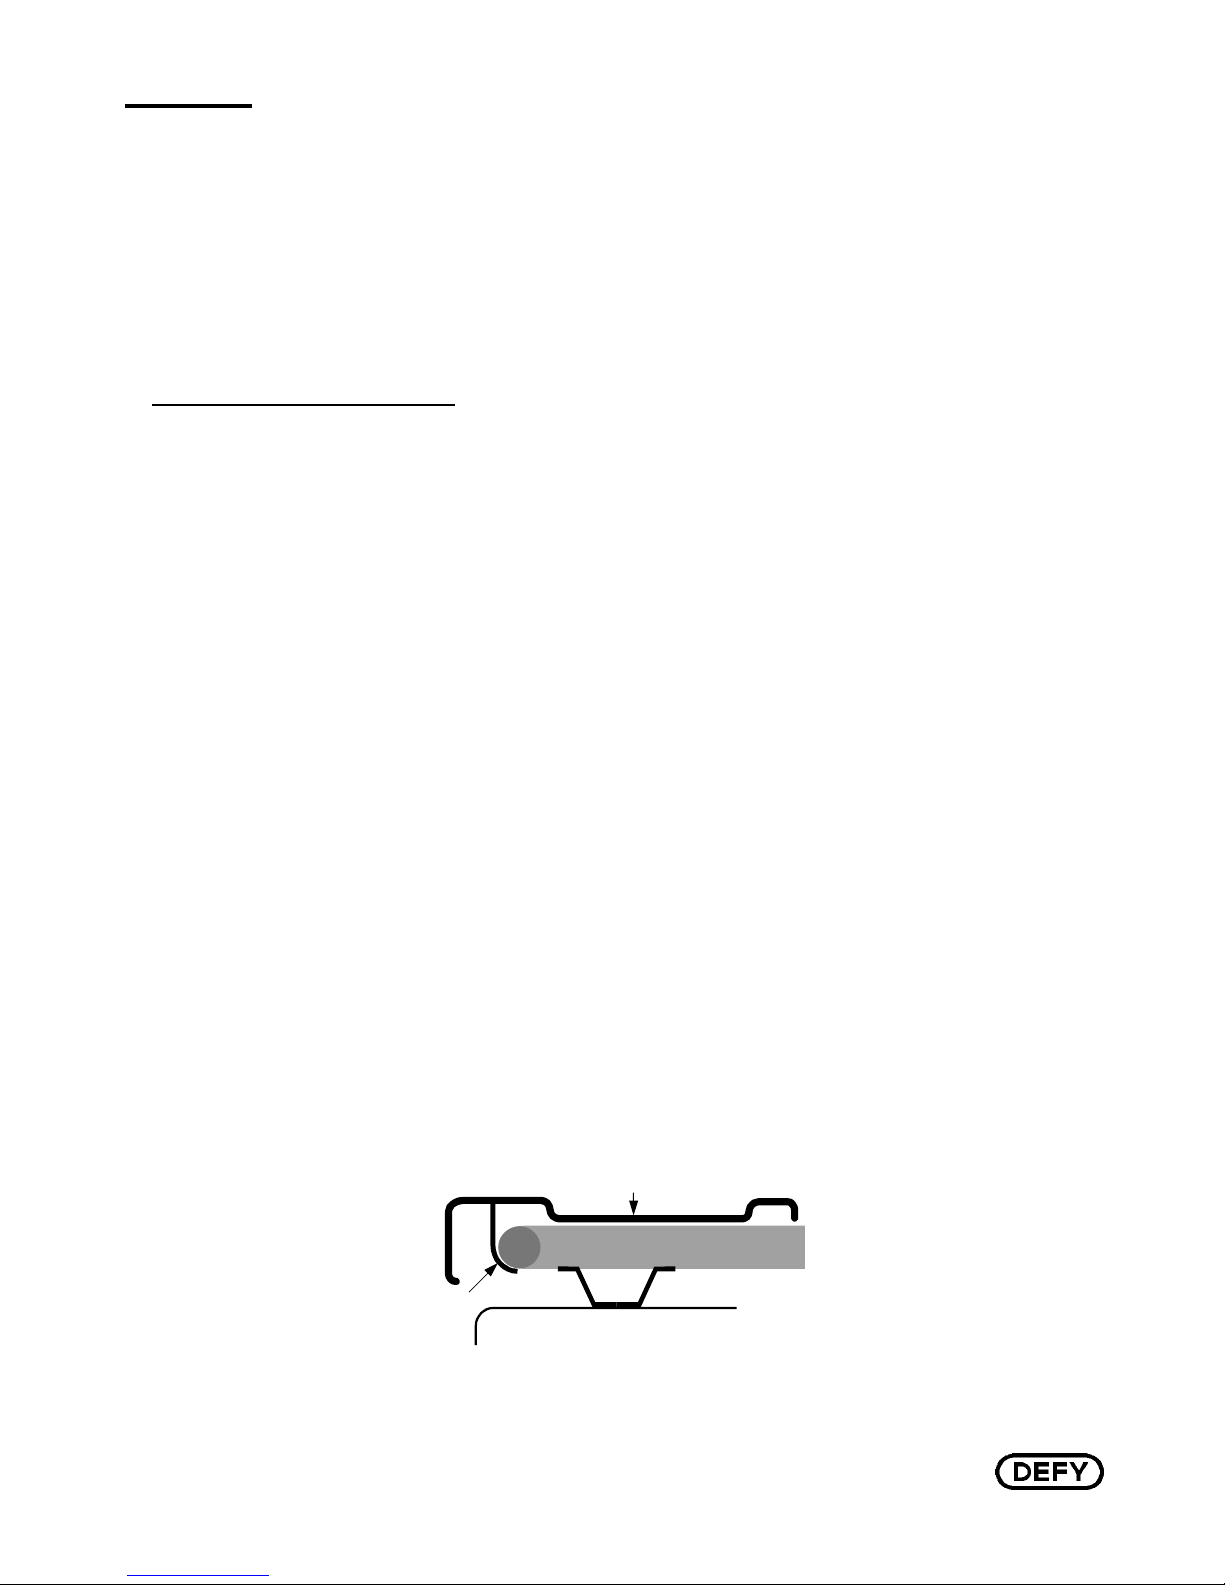
• Use a deep pan, large enough to co er the
appropriate burner.
• Always dry food thoroughly before placing it in
hot oil or fat. Frozen food in particular will spit
and splatter if added too quickly.
• Ne er fill the pan more than one third full of fat
or oil.
• Ne er heat fat or fry with a lid on the pan.
• Do not fry too much food at once. This lowers
the temperature of the oil or fat and results in
fatty foods.
• Do not lea e hot fat or oil unattended. If
o erheating occurs, these could catch fire.
• Do not store flammable items in the o en.
• Always keep the o en door gasket clean.
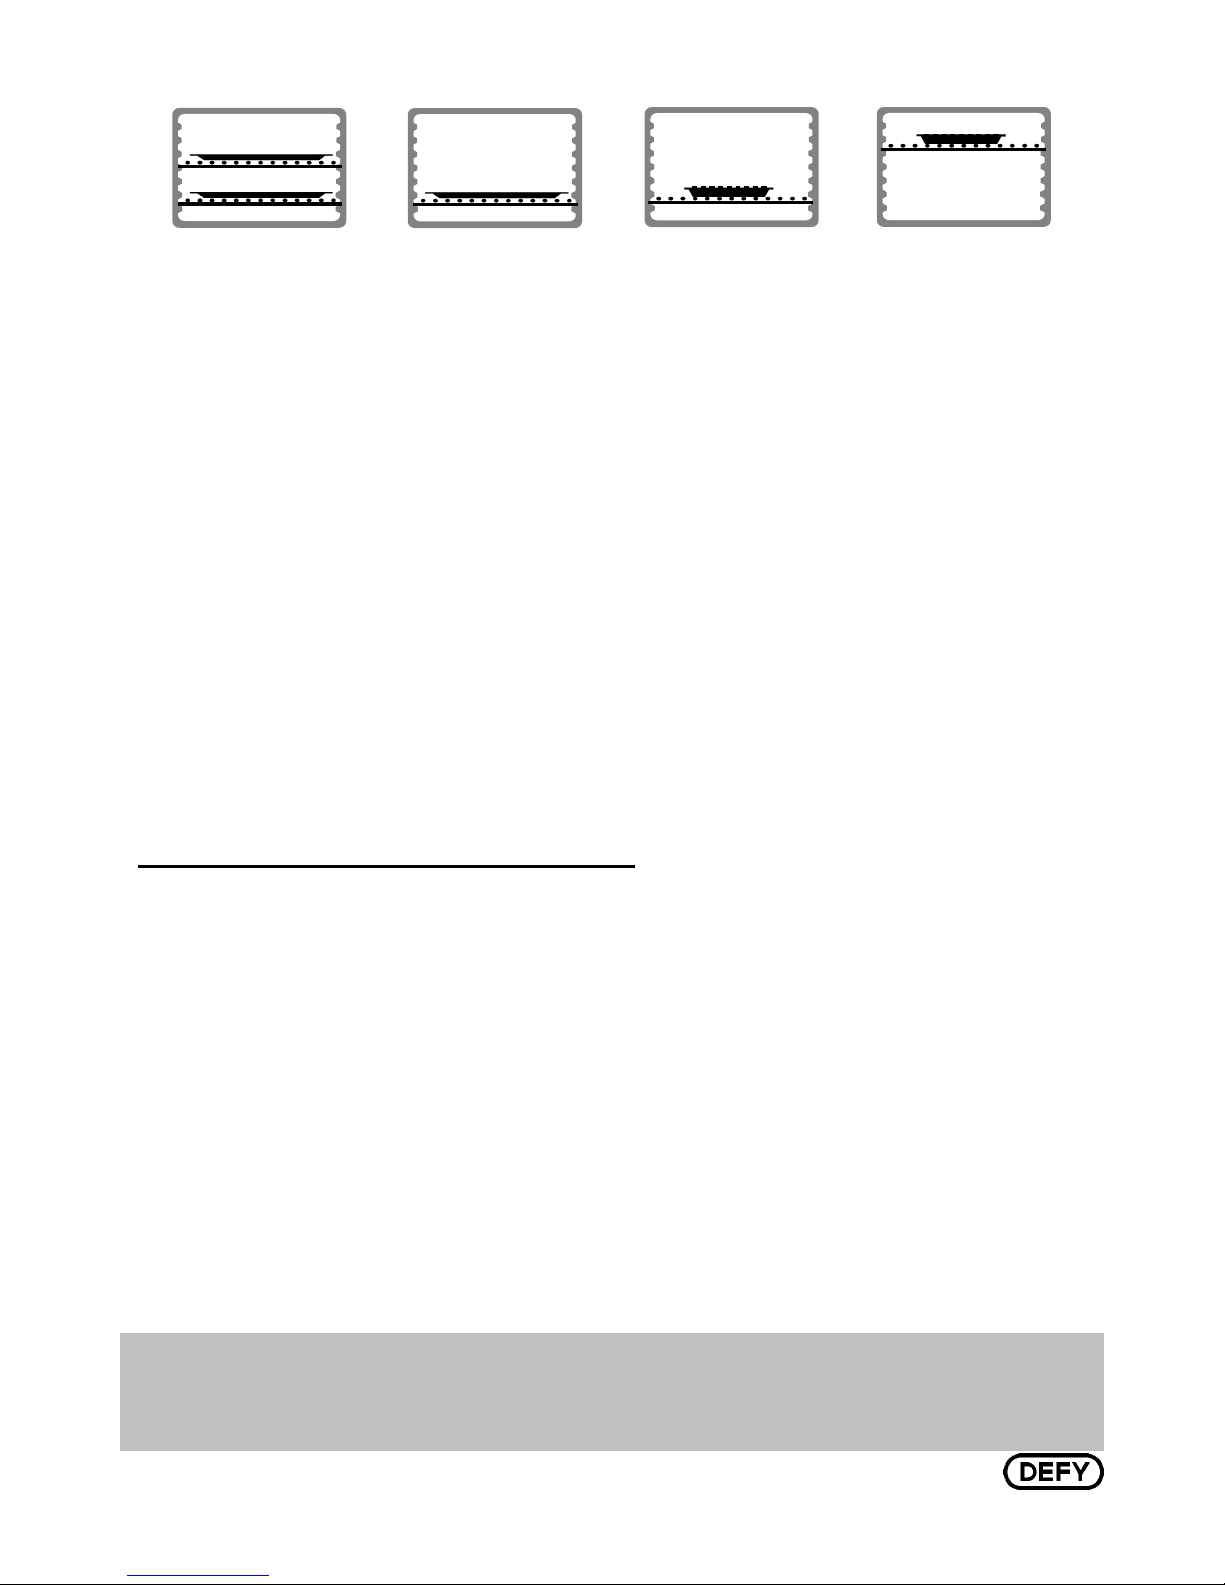
Figures in this manual are schematic
and may not match your appliance
exactly.
DANGER
Risk of scalding by hot steam!
Take care when opening the oven
door as steam may escape.
WARNING Hot surfaces may cause
burns! Do not touch the hot surfaces
of the appliance. Use oven gloves.
Keep children away from the
appliance.
DANGER Risk of fire by overheated
oil! When heating oil, do not leave it
unattended. Never try to extinguish a
fire with water! When oil has caught
fire, immediately cover the pot or pan
with a lid. witch off the hob if safe to
do so and phone the fire service.

PAGE 4 OF20
Installati n.
• Insert the o en into the cupboard.
• Open the door to expose the fixing holes in the side trims.
• Secure the o en by 4 countersunk screws (fasteners are not supplied ).
590
Aperture
Typical section showing
ventilation requirements.
565
900
Above floor
level
Floor
60
+
_3
0
+
_3
0
+
_3
0
+
_3
0
APERTURE
590 H X 565 W X 570 D

PAGE 5 OF 20
Setting the time f day
• When the power is first connected ( or after a power failure), the clock display will flash
00.00.
• To set the clock, press buttons 1 and 2 and hold them down.
• Press button 5 or 6 until the correct time of day is displayed.
• Release the buttons. The clock is now set.
• Please note that the clock has a 24 hour display.
• For example 3.00 PM will be displayed as 15.00.
Aut matic ven timer / cl ck.
Butt n Functi ns
1 = MINUTE MINDER
2 = COOKING PERIOD
3 = TOP TIME
4 = MANUAL CONTROL
5 = UBTRACT
6 = ADD
+
-
6
5
4
3
2
1
600 MGSE
MULTIFUNCTION
THERM FAN
SELECTOR THERMOSTAT
THERM FAN
SELECTOR THERMOSTAT
MULTIFUNCTION
600 MGE
MULTI FUNCTION SELECTOR
TATIC OVEN
FAN A I TED OVEN
THERMOFAN OVEN
TURBO GRILL
CONVENTIONAL GRILL
DEFRO T - FAN ONLY
The oven thermostat is market at 70°C. When set to this position the oven may
be used to keep food warm.
OVEN
THERMO TAT
MULTI FUNCTION ELECTOR
CLOCK / TIMER
MODEL
600 MGE
MODEL
600 MGSE
EYE LEVEL OVEN
The C ntr l Panel.
EYE LEVEL OVEN
The oven thermostat is marked at 70°C. When set to this position
the oven may be used to keep food warm.

PAGE 6 OF20
Minute minder
• Suppose that you wish to time the boiling of a 5 minute egg.
• First boil the water.
• Press and hold button 1. The display will show 00.00.
• Press button 6 until the display shows 00.05.
• Release the buttons and place the egg in the boiling water.
The display will again show the time of day.
• After 5 minutes the timer will emit an electronic tone which lasts for about one minute
• (2 beeps e ery 2 seconds). To cancel the tone, press any of the buttons.
Note:
• During the operation of the minute minder, the remaining time may be displayed by
pushing button 1.
• The minute minder can be used simultaneously and independent of any automatic control
programme.
• The display will always re ert to the time of day after any program has been set.
Switching the ven n and ff aut matically (Aut bake)
Autobake is intended for dishes such as roasts and casseroles. These are not affected by a
waiting period in a cold o en.
• Prepare your meal and place it in the o en.
• Set the cooking period required by pressing buttons 2 and 6 until the desired period is
displayed.
• Set the stop time by pushing buttons 3 and 6 until the desired stop time is displayed.
• Release the buttons and the clock will again display the time of day.
• The word AUTO will light up on the clock display.
• Set the multifunction selector where applicable to the desired cooking function.
• Now set the oven thermostat to the desired temperature setting.
The automatic control will switch the o en on and the symbol will light up in the
clock display.
Cooking will commence at the selected temperature and for the selected cooking period.
The o en will automatically switch off at the selected stop time and emit an electronic tone
for about one minute ( 4 beeps e ery 2 seconds ).To cancel the tone, press any of the but-
tons.
• The word AUTO will flash until button 4 is pressed and manual control is restored.
• Return the multifunction selector to the OFF position.
• The o en thermostat must be turned to the OFF position in an anti-clockwise direction.
It is n t advisable t use the Aut bake functi n f r c king peri ds
that are less than 60 minutes
+
-
6
5
4
3
2
1

PAGE 7 OF 20
Suppose you ha e to go out and you will not be back in
time to switch off a meal already cooking in the o en and
requiring another 40 minutes before it is done. Proceed as
follows:
• Press and hold button 2. The clock will display 00.00.
• Press button 6 until the clock displays 00.40.
• Release the buttons and the clock will again display the time of day and the word AU-
TO will light up in the display.
• After 40 minutes the o en will switch off automatically and emit an electronic tone for
about one minute. ( 4 beeps e ery 3 seconds )
• The word AUTO will flash until button 4 is pressed and manual control is restored.
• The o en thermostat must be turned to the OFF position in an anti-clockwise direction.
Imp rtant
If the Automatic start and or stop functions are not required, the clock must be set to
manual mode. Unless this is done, the oven will not work. Press button 4.
Switching the ven ff aut matically
+
-
6
5
4
3
2
1

PAGE 8 OF20
The Defy multifunction o en features 6 distinct cooking functions. (described below)
These functions may be selected by turning the multifunction selector knob until the re-
quired function symbol is displayed at the top of the knob bezel.
Multifunction oven
Symb l Functi n Element selecti n
2 Static Oven The bottom and top heat elements are used
• Use the static o en mode for traditional baking and roast-
ing.
1 Defr sting Only the fan is used. No heat is generated.
• In this mode the fan at the back of the o en will circulate
air at room temperature, substantially reducing the defrost-
ing period required for frozen food.
3 Fan Assisted Oven The fan plus the bottom and top heat
elements are used
• Use the fan assisted o en mode for traditional baking and
roasting where a more e en heat distribution is required.
4 Therm fan Oven The fan plus the element surrounding
the fan is used
• Registered by Defy in 1978, Thermofan cooking differs
from con entional cooking in that it uses the principle of
forced con ection within the o en.
• The ad antages are:
• Both baking trays may be used at the same time.
• Different dishes can be cooked simultaneously without
flavour or aroma transfer. Hence fish, meat and cakes
can be baked at the same time.
• The oven door may be opened any time for inspection
purposes without risk.
5 Turb Grill The fan plus the grill element are used
• This mode is recommended to reduce shrinkage when grill-
ing meat or fish.
6 Grill Only the grill element is used
• This mode is recommended for con entional grilling such
as toasted cheese sandwitches.

PAGE 9 OF 20
Multifuncti n ven– Operati n
1 Fan nly Used f r defr sting
• Set the multifunction knob to fan only. In this mode the fan at the back of the o en will
circulate air at room temperature, substantially reducing the defrosting period required for
frozen food.
WARNING: Under n circumstances sh uld the b tt m bake element be
c vered with aluminium f il. N r sh uld a pan r tray be p siti ned
directly ab ve the bake element.
Doing so would reflect the heat from the bake element downwards. Heat to the
oven would be restricted and overheating of the space below the element
would result in damage to the oven enamel.
2 Static Oven Used f r traditi nal baking
• Use the wire shelf only. Remo e the baking trays during baking in static mode as they are
to be used for Thermofan baking only.
• Set the multifunction selector to static oven and the oven thermostat to the required
temperature. The indicator light will glow and remain on until the o en has reached the
selected temperature.
• When the indicator light switches off, the food should be placed in the o en.
• During cooking the indicator light will cycle on and off as the o en thermostat maintains
the selected temperature.
• After completion, return the multifunction selector and the oven thermostat to the OFF
position in an anti-clockwise direction.
Baking guide
• Bake on a wire shelf only. The recommended position is
shown on the right.
• Place the food halfway between the back of the o en and
the door.
• Do not open the o en door until at least two thirds of the
baking time has elapsed.

PAGE 10 OF20
3 Fan assisted ven F r traditi nal baking & even heat distributi n
• Use the wire shelves only. Remo e the baking trays during fan assisted mode as they are to
be used for Thermofan baking only.
• Set the multifunction selector to fan assisted oven and the oven thermostat to the
required temperature. The indicator light will glow and remain on until the o en has reached
the selected temperature.
• No preheating is necessary and the food can be placed in the o en immediately.
• During cooking the indicator light will cycle on and off as the o en thermostat maintains the
selected temperature.
• After completion, return the multifunction selector and the oven thermostat to the OFF
position in an anticlockwise direction.
Baking guide
• Cooking / baking is done at slightly lower temperatures than in the
static mode.
• Baking may be done on two wire shel es simultaneously.
• The recommended shelf positions are shown on the right.
• Place the food halfway between the back of the o en and the door.
• Do not open the o en door until at least half of the baking time has
elapsed.
4 Therm fan ven
Registered by Defy in 1978, Thermofan cooking differs from con entional cooking in that it
uses the principle of forced con ection within the o en. The ad antages are:
1. All the trays may be used at the same time.
2. Different dishes can be cooked simultaneously without fla our or aroma transfer. Hence
fish, meat and cakes can be baked at the same time.
3. The o en door may be opened any time for inspection purposes without risking a flop.
4. By circulating hot air around the food, spit-roast chickens may be done without using a
rotisserie.
5. Cooking is done at slightly lower temperatures, sa ing electricity and reducing splatter.
Baking
• Thermofan o ens are supplied with two baking trays and two wire shel es to support the
trays. The position of the shel es will be determined by the size of the items to be baked.
Ideally, unused trays and shel es should be left in position to optimise airflow in the o en.
If desired, an additional tray and shelf may be purchased from the nearest Defy Parts Centre
so that baking may be done on three trays simultaneously.
• Set the multifunction selector to Thermofan oven and the oven thermostat to the required
temperature.
• The indicator light will glow and remain on until the o en has reached the selected
temperature. When the indicator light switches off, the food should be placed in the o en.
During baking the indicator light will cycle on and off as the o en thermostat maintains the
selected temperature.
• After completion, return the multifunction selector and the oven thermostat to the OFF
position in an anti-clockwise direction.

PAGE 11 OF 20
Baking guide
• Thermofan baking may be done on one or two baking trays depending on olume.
• Large items: One or two cake tins may be placed as shown and as close to the door as
possible. If one tin is used , it should be placed centrally left to right .
• Small items: The entire area of each tray may be utilised. A oid any time delays between
positioning the two trays.
• All o ens extract a certain amount of moisture from the food being cooked. The greater
capacity of the Thermofan oven allows more food to be cooked and thus more moisture
may be released. This is normal and is not detrimental to the food or the o en.
Caution: Thermofan baking relies on good contact between the bottom of the cake tin
and the oven tray. Do not use spring form baking tins with a raised bottom. The
lack of contact will cause the bottom of the cake to be underdone. These tins may be
used on a wire shelf where no insulating air space is created.
• The oven door must remain closed when Turbo grilling.
• Use only a wire shelf when grilling as the intense heat could warp the baking trays.
• Turbo grilling is most suitable for meat as drying out and shrinkage will be reduced.
• Set the multifunction knob to turbo grill.
• Set the oven thermostat to the grill position.
• Pre-heat the grill element for about 5 minutes
• Place the food on the grid/roast pan and place this on the wire shelf near to the grill ele-
ment.
• Monitor the grilling process to a oid burning the food.
• Care must be taken not to touch the grill element while handling food in the o en. If nec-
essary, partially withdraw the shelf to impro e access.
• After completion, return the multifunction selector and the oven thermostat to the OFF
position in an anticlockwise direction.
5 Turb grilling. For meat and fish
Recommended shelf positions
WARNING:
ACCESSIBLE PARTS BECOME HOT DURING BAKING AND GRILLING.
ALWAYS USE OVEN GLOVES WHEN HANDLING FOOD IN THE OVEN
AND KEEP CHILDREN WELL AWAY FROM THE PRODUCT WHEN IT IS IN USE.
T/F BAKING T/F BAKING T/F ROASTING TURBO & NORMAL GRILLING

PAGE 12 OF20
6 C nventi nal grilling.
• The oven door must remain partially open ( about 80mm.) when grilling.
• Use only a wire shelf when grilling as the intense heat could warp the baking tray.
• Set the multifunction knob to conventional grill.
• Set the oven thermostat to the grill position.
• Operating instructions are otherwise the same as those for turbo grilling mentioned
pre iously.
NOTE
THE CONTROL PANEL COOLING FAN PROTECTS THE CONTROLS FROM EXCESSIVE
HEAT WHILE THE OVEN IS WORKING AND WILL CONTINUE TO OPERATE FOR ABOUT
20-35 MINUTES AFTER THE OVEN IS SWITCHED OFF
NOTE
THE OVEN DOOR SHOULD REMAIN CLOSED WHEN TURBO GRILLING
AND REMAIN PARTIALLY OPEN WHEN USING CONVENTIONAL GRILL.
WARNING: Under no circumstances should the bake element be
covered with aluminium foil. Nor should a pan or tray be positioned
directly above the bake element.
Doing so would reflect the heat from the bake element downwards. Heat
to the o en would be restricted and o erheating of the space below the
element would result in damage to the o en enamel.

PAGE 13 OF 20
Maintenance.
Grasp the open door on
both sides near the hinges
Grasp the door on both
sides near the hinges.
Maintain upward pressure
on the door to pre ent the
clasps from disengaging
Lift the door upwards and
outwards until it is free of
the hinge housing.
After cleaning, refit the door
in re erse order.
Lift-off oven door.
The o en door may be remo ed to impro e o en access during cleaning.
Open the door fully and
flip the retainer clasps up
and o er the hooks on the
upper hinge arms
Oven light
The o en light is switched on by the multifunction selector switch and switches off
when the knob is returned to 0.
To replace a faulty light bulb, proceed as follows.
• Switch off the power at the wall switch to a oid the possibility of electric shock.
• Remo e the light co er by unscrewing it in an anti-clockwise direction.
• Unscrew the faulty bulb and fit a new 25 watt bulb rated for 300°C.
• Refit the light co er.

PAGE 14 OF20
HOOK
ELEMENT GUARD
ELEMENT
Cleaning
Switch ff the electrical p wer supply bef re cleaning any part f
the ven.
General cleaning.
• Wipe down cabinet, door, control knobs, trims and handles with a hot soapy cloth.
• Use only liquid household cleaners and a oid abrasi e powders, scouring pads and caus-
tic cleaners.
• Rinse and wipe down with a clean cloth.
• Do not use a steam cleaner.
Cleaning the oven.
• Open the o en door and allow the o en to cool down.
• Clean the o en with a damp, hot soapy cloth. Do not use a steam cleaner.
• It may be necessary to soak burnt soils with a liquid cleaner to soften them before scrub-
bing them with a nylon brush or scouring sponge.
• Hea y soils on the bottom of the o en may require o ernight soaking under a sponge
liberally sprinkled with household ammonia. The soil can then be remo ed the following
morning by washing normally.
• Do not use metal objects or steel wool to clean the o en.
• For your con enience, the shel es and the bake element guard may be remo ed to im-
pro e access.
• After cleaning fit the bake element guard into the guard clips. (see diagram)
• Note: For both safety and performance reasons the oven should not be operated
without the oven element guard in place.

PAGE 15 OF 20
.
Stainless steel is not ad ersely affected by normal household use but because of it’s rep-
utation for durability, it is sometimes assumed to be indestructible, and therefore sub-
jected to misuse or e en abuse. Care should be taken to a oid such ‘abnormal use’.
Cleaning materials
DO USE
• A soft cloth or synthetic sponge.
• Soap, or a mild household detergent.
• Diluted ammonia in warm water.
• A nylon bristle brush.
• Cleaners labelled “Suitable for stainless
steel”.
Cleaning procedure
• Frequent cleaning is recommended rather than an occasional aggressi e clean.
• Routine cleaning will preser e the corrosion resistance and appearance of the stain-
less steel for many years.
• Clean the stainless steel as often as necessary ( i.e. when noticeably dull or dirty ) and
use the simplest cleaning method that will effecti ely do the job.
• Use clean water, or a mild detergent solution applied with a soft cloth or sponge.
Rinse well and wipe dry.
.
Care guide f r stainless steel. F r 600MGSE m del
ALWAYS WIPE IN THE DIRECTION OF
THE BRUSHED TEXTURE ON THE STAINLESS STEEL
CORRECT WRONG
• DO NOT USE
• Acids.
• Coarse abrasi e cleaning powders.
• Metallic scourers, steel wool or metal
scrapers.
• Wire brushes or emery paper.
• So called ‘sil er cleaners’.
• Kitchen scourers/foam pads.

PAGE 16 OF20
CONDITION ACTION NOTES AND COMMENTS
Requires routine cleaning. Mild detergent solution ap-
plied with soft sponge or
cloth. Rinse and wipe dry.
If possible use warm to hand
-hot water. A 5% addition of
ammonia is beneficial.
Finger prints. Pre-treat finger marks with
alcohol or an organic sol-
ent. Follow immediately
with routine cleaning.
Minimize re-occurrence by
applying a wax or silicone
based household polish to
the clean dry surface.
Wipe with a little baby oil
and a soft lint free cloth.
Buff to shine.
Apply whene er necessary.
Stubborn stains and
Discolouration.
Use a little Ceran cleaning
paste. (a ailable from Defy
Ser ice Centres).
Rinse and dry.
Repeat se eral times rather
than resorting to a single
aggressi e cleaning method.
Grease and fat splatter. Wipe off excess with a soft
cloth or paper towel. Use a
water borne degreasing
agent (dishwashing liquid).
Follow up by routine clean-
ing.
Scratches on the brushed
finish.
For slight scratches, use a
nylon pad loaded with an
iron-free abrasi e polishing
compound. Follow the direc-
tion of the original texture.
Follow up with routine
cleaning.
For deep scratches use a
coarser abrasi e initially and
follow up as for light
scratches.
Deep scratches will be diffi-
cult to remo e completely.
Do not use steel wool or
metal scourers unless they
are made from stainless
steel.
IT MUST BE APPRECIATED THAT SOME OF THE SUGGESTED PROCEDURES WILL
ALTER THE SURFACE APPEARANCE OF THE TREATED AREA. THEY SHOULD
THEREFORE BE APPLIED WITH DUE CONSIDERATION AND CARE.

PAGE 17 OF 20
Do not attempt any repairs yourself.
Before calling a ser ice technician to assist with a problem, please check:
• The mains distribution board for tripped circuit breakers.
• That the wall switch is on.
• Remember that you may be charged for a ser ice call e en during the warranty period
if the fault is due to or caused by any of the abo e.
If y u have f ll wed the instructi ns and still have a pr blem, c ntact the
nearest Defy Technical Supp rt Centre. They will be able t advise y u n
any aspect f the pr duct r send a qualified technician t repair it.
Pr blem check.
• Clean your appliance regularly. This
will prolong it's good looks and
enhance hygiene le els.
• Use flat bottomed pots and pans when
cooking on the hotplates. This will
maximise efficiency and reduce
electricity costs.
• Keep children well away from the
cooking appliance. Explain the dangers
to them. Being safety conscious is
being safe, not sorry.
• Super ise the cooking process.
O ercooked or spoiled food is wasteful.
• Lea e about a 40mm. air gap between
baking tins and the o en walls.
Adequate air circulation is important
for good baking results.
• Get into the habit of wearing o en
glo es when handling utensils in a hot
o en. This will help to a oid accidental
burns.
• Partly slide out the o en shelf before
remo ing hot dishes from the o en.
This will pre ent accidental contact
with the hot o en sides.
D D n’t
• Use pots which are smaller than the
hotplate diameter. This wastes
electricity and allows the pot handles to
o erheat.
• Lea e the appliance unattended
especially when grilling. This is good
practice and a oids accidents.
• Use abrasi e cleaning materials. They
will scratch surfaces and fascia
graphics.
• Allow fat splashes to dry and bake onto
the sto e/o en surface before cleaning
them. It is easier to clean spills while
they are still slightly warm and soft.
• Put baking tins on the floor of the o en.
This will pre ent heat circulation and
spoil baking results.
• Use the appliance to heat the home.
Neither the hotplates nor the o en were
designed for this purpose and damage
could occur.
• Allow pot handles to o erhang the front
of the appliance. Children might be
tempted to grab them with harmful
consequences.
OVER THE YEARS, DEFY'S SERVICE CENTRES HAVE IDENTIFIED THIS LIST OF DO'S AND DON'TS AS
BEING IMPORTANT FOR CUSTOMER SATISFACTION AND SAFETY. PLEASE READ IT AND
FAMILIARISE YOURSELF WITH ITS CONTENTS.

PAGE 18 OF20
Defy Service Centres
BLOEMFONTEIN
CAPE TOWN
DURBAN
EAST LONDON
JOHANNESBURG
Commercial Head Office,
Administration, Distribution, National Groups,
Tel. ales, Contracts and Credit.
POLOKWANE
PORT ELIZABETH
PRETORIA.
160 Long treet, Hilton,
Bloemfontein 9301.
Tel. 051 400 3900
Bloemfontein. e[email protected]
5A Marconi Rd.
Montague Gardens, 7441.
Tel. 021 526 3000
CapeTown. [email protected]
35 Intersite Avenue,
Umgeni Business Park, Durban 4051.
Tel. 031 268 3300
Durban. [email protected]
16 Bowls Rd. Arcadia,
East London 5201.
Tel. 043 743 7100
EastLondon. [email protected]
Cnr. Mimetes & Kruger ts. Denver ext.12
Johannesburg. 2094.
Tel. 011 621 0200 or 011 621 0300
Gauteng. [email protected]
87 Nelson Mandela Drive.
uperbia 0699.
Tel. 0152 92 1166 / 7 / 8 / 9.
Polokwane. [email protected]
112 Patterson Road,
North End, Port Elizabeth 6001.
Tel. 041 401 6400
PortElizabeth. e[email protected]
Block A1 Old Mutual Industrial Park.
Cnr. D.F.Malan Drive & Moot tr.
Hermanstad. 0082.
Tel. 012 377 8300
Pretoria. [email protected]
OTHER AREAS ARE SERVICED BY OVER 200 AUTHORISED AGENTS.
FOR FURTHER DETAILS PLEASE CONSULT THE NEAREST REGIONAL
DEFY TECHNICAL SUPPORT CENTRE

PAGE 19 OF 20
This certificate is issued by DEFY APPLIANCES (PTY) LIMITED manufacturers of Defy and Ocean
products, hereinafter the Company, to the original purchaser only, of the appliance described on the
certificate and shall constitute the only warranty gi en in respect of this appliance.
The Company warrants to the original purchaser that for a period of TWO YEARS from date of
purchase the appliance is free from defect under normal domestic use, both in workmanship and
material, subject to the following conditions.
1. Repair or replacement of any part of this appliance, found by the Company to be defecti e, shall be
at the election of the Company. The Company reser es the right to effect such ser ice through any of
its Ser ice Di isions or Authorised Ser ice Dealers. The cost of such ser ice shall be borne by the
Company in full, pro ided that the appliance is located no further than 50 km from a Company
Ser ice Centre or an Authorised Ser ice Dealer. Where the appliance is located beyond the 50 km
radius, the purchaser shall be liable for the standard tra elling charges, as determined by the
Company.
CARRY IN SERVICE Microwa e o ens, Compact cookers and small appliances are repaired in our
ser ice centres and are not collected from the customers home. Faulty units should be deli ered to
the purchasing dealer or to the nearest Company Ser ice Centre for warranty repairs.
2. Rusted or corroded plates, itreous enamelware, fuses and lamps are specifically excluded from
these warranties. It is an express condition of these warranties that the purchaser takes due care and
attention in the use and maintenance of the appliance. Abuse, misuse in conflict with operating
instructions, connection to incorrect oltages and subjection to commercial use shall release the
Company from its obligations.
3. This warranty shall become oid and cease to operate if the appliance is dismantled by, or any
repairs to the appliance are effected by any persons not duly authorised by the Company, or if
substitute parts not appro ed by the Company are used in the appliance, or if the serial number of the
appliance is remo ed.
4. The Company shall not be responsible for damages resulting from fire, flood, ci il disturbances or
any Act of God. The Company shall not, in terms of these warranties be responsible nor held liable
for any consequential loss or damage of any kind caused by or due to the failure or malfunction of
the appliance.
5. The Company shall not be responsible for transportation or other costs other than those incurred
within the pro isions of Point 1 of this Certificate.
6. These warranties shall not apply to the appliance if it is purchased or used beyond the borders of the
Republic of South Africa, Namibia, Botswana, Swaziland and Lesotho.
7. Where ser ice is requested under warranty and no fault or defect can be found by the Company, all
costs incurred will be for the purchaser's account.
8. This Certificate as well as your in oice will ser e as proof of purchase. For the purpose of warranty,
it will be essential to produce this Certificate and in oice. Failure to do so, will render the purchaser
liable for ser ice costs.
KEEP THIS CERTIFICATE AND SALES INVOICE AS PROOF OF
PURCHASE FOR WARRANTY PURPOSES.
Warranty

PAGE 20 OF20
The Manufacturer stri es for continuous impro ements. For this reason, the text
and illustrations in this book are subject to change without notice.
Defy Slimline 600 MGSE and 600 MGE
Multifunction Eye level Ovens
Multifunction.
Defrost.
Con entional cooking.
Fan assisted cooking.
Thermofan cooking.
Con entional cooking and grilling.
Turbo grill.
Stainless steel or all glass cosmetics.
Remo able door.
Automatic o en timer.
Illuminated displays.
Roast pan and wire rack.
A choice of six cooking modes.
Speeds up defrosting.
Traditional top and bottom elements.
Allows traditional baking on two shel es.
Excellent for bulk baking.
No fla our transfer and sa es electricity.
Traditional baking and grilling at its best.
Superior grilling. Reduces splatter.
Modern and hard wearing.
Allows impro ed access for cleaning purposes.
Start time, cooking time, minute minder and
time of day.
Easy to read and comprehend.
Accessories for cooking con enience.
PART NO. 068 518
You can rely on Defy. To simplify
This manual suits for next models
1
Table of contents
Other Defy Oven manuals

Defy
Defy DBO767-Black User manual

Defy
Defy GEMINI MASTER CHEF User manual

Defy
Defy DBO474-Black User manual

Defy
Defy DUALMASTER DGS679 User manual

Defy
Defy DBO482 User manual

Defy
Defy 600STE User manual

Defy
Defy DGS178 User manual

Defy
Defy 600 E User manual

Defy
Defy DBO488 User manual

Defy
Defy 600STE User manual

Defy
Defy Slimline 600MTE DBO464 User manual

Defy
Defy 600 MGE User manual

Defy
Defy EYE LEVEL 600 MSE User manual

Defy
Defy 600 SU User manual

Defy
Defy DBO472-Black User manual

Defy
Defy DBO488E User manual

Defy
Defy 600 EMBW User manual

Defy
Defy GEMINI MULTI FUNCTION THERMOFAN User manual

Defy
Defy 600C User manual

Defy
Defy DBO467-Black User manual