DeKo DKCD12XL01 User manual

INSTRUCTION MANUAL
CORDLESS DRILL
1
Model No.: DKCD12XL01
DEKO TOOLS CO., LIMITED
www.dekotools.com Made in China
V21-07

2
General Power Tool Safety Warnings
1) Work area safety
a) Keep work area clean and well lit. Cluttered or dark areas invite accidents.
b) Do not operate power tools in explosive atmospheres, such as in the presence of flammable
liquids, gases or dust. Power tools create sparks which may ignite the dust or fumes.
c) Keep children and bystanders away while operating a power tool. Distractions can cause you to
lose control.
2) Electrical safety
a) Power tool plugs must match the outlet. Never modify the plug in any way. Do not use any
adapter plugs with earthed (grounded) power tools. Unmodified plugs and matching outlets will
reduce risk of electric shock.
b) Avoid body contact with earthed or grounded surfaces, such as pipes, radiators, ranges and
refrigerators. There is an increased risk of electric shock if your body is earthed or grounded.
c) Do not expose power tools to rain or wet conditions. Water entering a power tool will increase the
risk of electric shock.
d) Do not abuse the cord. Never use the cord for carrying, pulling or unplugging the power tool.
Keep cord away from heat, oil, sharp edges or moving parts. Damaged or entangled cords increase
the risk of electric shock.
e) When operating a power tool outdoors, use an extension cord suitable for outdoor use. Use of
a cord suitable for outdoor use reduces the risk of electric shock.
f) If operating a power tool in a damp location is unavoidable, use a residual current device (RCD)
protected supply. Use of an RCD reduces the risk of electric shock.
3) Personal safety
a) Stay alert, watch what you are doing and use common sense when operating a power tool. Do
not use a power tool while you are tired or under the influence of drugs, alcohol or medication. A
moment of inattention while operating power tools may result in serious personal injury.
b) Use personal protective equipment. Always wear eye protection. Protective equipment such as
a dust mask, non-skid safety shoes, hard hat or hearing protection used for appropriate conditions
will reduce personal injuries.
c) Prevent unintentional starting. Ensure the switch is in the off-position before connecting to
power source and/or battery pack, picking up or carrying the tool. Carrying power tools with your
finger on the switch or energising power tools that have the switch on invites accidents.
d) Remove any adjusting key or wrench before turning the power tool on. A wrench or a key left
attached to a rotating part of the power tool may result in personal injury.
WARNING: Read all safety warnings, instructions, illustrations and specifications pro-
vided with this power tool. Failure to follow all instructions listed below may result in electric
shock, fire and/or serious injury.
Save all warnings and instructions for future reference.
The term "power tool" in the warnings refers to your mains-operated (corded) power tool or
battery-operated (cordless) power tool.
WARNING:

3
e) Do not overreach. Keep proper footing and balance at all times. This enables better control of
the power tool in unexpected situations.
f) Dress properly. Do not wear loose clothing or jewellery. Keep your hair and clothing away from
moving parts. Loose clothes, jewellery or long hair can be caught in moving parts.
g) If devices are provided for the connection of dust extraction and collection facilities, ensure
these are connected and properly used. Use of dust collection can reduce dust-related hazards.
h) Do not let familiarity gained from frequent use of tools allow you to become complacent and
ignore tool safety principles. A careless action can cause severe injury within a fraction of a second.
4) Power tool use and care
a) Do not force the power tool. Use the correct power tool for your application. The correct power
tool will do the job better and safer at the rate for which it was designed.
b) Do not use the power tool if the switch does not turn it on and off. Any power tool that cannot be
controlled with the switch is dangerous and must be repaired.
c) Disconnect the plug from the power source and/or remove the battery pack, if detachable, from
the power tool before making any adjustments, changing accessories, or storing power tools.
Such preventive safety measures reduce the risk of starting the power tool accidentally.
d) Store idle power tools out of the reach of children and do not allow persons unfamiliar with the
power tool or these instructions to operate the power tool. Power tools are dangerous in the hands
of untrained users.
e) Maintain power tools and accessories. Check for misalignment or binding of moving parts,
breakage of parts and any other condition that may affect the power tool’s operation. If damaged,
have the power tool repaired before use. Many accidents are caused by poorly maintained power
tools.
f) Keep cutting tools sharp and clean. Properly maintained cutting tools with sharp cutting edges
are less likely to bind and are easier to control.
g) Use the power tool, accessories and tool bits etc. in accordance with these instructions, taking
into account the working conditions and the work to be performed. Use of the power tool for opera-
tions different from those intended could result in a hazardous situation.
h) Keep handles and grasping surfaces dry, clean and free from oil and grease. Slippery handles
and grasping surfaces do not allow for safe handling and control of the tool in unexpected situations.
5) Battery tool use and care.
a) Recharge only with the charger specified by the manufacturer. A charger that is suitable for one
type of battery pack may create a risk of fire when used with another battery pack.
b) Use power tools only with specifically designated battery packs. Use of any other battery packs
may create a risk of injury and fire.
c) When battery pack is not in use, keep it away from other metal objects, like paper clips, coins,
keys, nails, screws or other small metal objects, that can make a connection from one terminal to
another. Shorting the battery terminals together may cause burns or a fire.
d) Under abusive conditions, liquid may be ejected from the battery; avoid contact. If contact
accidentally occurs, flush with water. If liquid contacts eyes, additionally seek medical help.
Liquid ejected from the battery may cause irritation or burns.
e) Do not use a battery pack or tool that is damaged or modified. Damaged or modified batteries

4
may exhibit unpredictable behaviour resulting in fire, explosion or risk of injury.
f) Do not expose a battery pack or tool to fire or excessive temperature . Exposure to fire or tem-
perature above 40 °C may cause explosion.
g) Follow all charging instructions and do not charge the battery pack or tool outside the tempera-
ture range specified in the instructions. Charging improperly or at temperatures outside the speci-
fied range may damage the battery and increase the risk of fire.
6) Service
a) Have your power tool serviced by a qualified repair person using only identical replacement
parts. This will ensure that the safety of the power tool is maintained.
b) Never service damaged battery packs. Service of battery packs should only be performed by the
manufacturer or authorized service providers.
1) Wear ear protectors and goggles when impact drilling. Exposure to noise can cause hearing
loss.
2) Dusts from materials such as lead-containing coatings, some wood types, minerals and metal
can be harmful to one’s health and cause allergic reactions, lead to respiratory infections and/or
cancer. Materials containing asbestos may only be worked by specialists.
– please always keep the working place clean and well-ventilated.
– it is recommended to wear a p2 filter-class respirator.
Observe the relevant regulations in your country for the materials to be worked.
3) Before any work on the machine (e.G., Maintenance, tool change, etc.) as well as during trans-
port and storage, set the rotational direction switch (forward/reverse switch ) to the center posi-
tion. Unintentional actuation of the on/off trigger can lead to injuries.
4) Hold power tool by insulated gripping surfaces, when performing an operation where the
cutting accessory or fastener may contact hidden wiring. Cutting accessory and fasteners contact-
ing a “live” wire may make exposed metal parts of the power tool “live” and could give the operator
an electric shock.
5) Hold the machine with a firm grip. High reaction torque can briefly occur while driving in and loos-
ening screws. Secure the workpiece. A workpiece clamped with clamping devices is held more
secure than by hand.
6) Never operate at higher speed than the maximum speed rating of the drill bit. At higher speeds,
the bit is likely to bend if allowed to rotate freely without contacting the workpiece, resulting in
personal injury.
7) Always start drilling at low speed and with the bit tip in contact with the workpiece. At higher
speeds, the bit is likely to bend if allowed to rotate freely without contacting the workpiece, resulting
in personal injury.
8) Apply pressure only in direct line with the bit and do not apply excessive pressure. Bits can
bend causing breakage or loss of control, resulting in personal injury.
Additional Safety Warnings for Drills and Screw Drivers

5
Battery/Charger
Before using battery charger, read all instructions and cautionary markings
on battery charger, battery pack, and product using battery.
Do not disassemble charger or operate the charger if it has received a sharp blow, been dropped
or otherwise damaged in any way. Replace damaged cord or plugs immediately. Incorrect reassem-
bly or damage may result in electric shock or fire.
Do not recharge battery in damp or wet environment. Do not expose charger to rain or snow. If
battery case is cracked or otherwise damaged, do not insert into charger. Battery short or fire may
result.
Charge only DEKO approved rechargeable batteries. See Specifications. Other types of batteries
may burst causing personal injury and damage.
Charge battery pack in temperatures above +50 degrees F (10 degrees C) and below +104
degrees F (40 degrees C). Store tool and battery pack in locations where temperatures will not
exceed 120 degrees F (49 degrees C). This is important to prevent serious damage to the battery
cells.
Battery leakage may occur under extreme usage or temperature conditions. Avoid contact with
skin and eyes. The battery liquid is caustic and could cause chemical burns to tissues. If liquid
comes in contact with skin, wash quickly with soap and water. If the liquid contacts your eyes, flush
them with water for a minimum of 10 minutes and seek medical attention.
Place charger on flat non-flammable surfaces and away from flammable materials when
re-charging battery pack. The charger and battery pack heat during charging. Carpeting and other
heat insulating surfaces block proper air circulation which may cause overheating of the charger and
battery pack. If smoke or melting of the case are observed unplug the charger immediately and do
not use the battery pack or charger.
Battery Care
When batteries are not in tool or charger, keep them away from metal objects. For example, to
protect terminals from shorting DO NOT place batteries in a tool box or pocket with nails, screws,
keys, etc. Fire or injury may result.
DO NOT PUT BATTERIES INTO FIRE OR EXPOSE TO HIGH HEAT. They may explode.
Battery Disposal
WARNING: Do not attempt to disassemble the battery or remove any component project-
ing from the battery terminals. Fire or injury may result. Prior to disposal, protect exposed terminals
with heavy insulating tape to prevent shorting.
WARNING:
WARNING:
Production Specification
Save These Instructions for Future Use
Symbols Explanation in the Manual and/or on the Drill and Battery.
6
Denotes risk of personal injury or damage to the tool.
It is environmental friendly and could be recycled.
Do not dispose of power tools and batteries/rechargeable batteries into
household waste!
Dispose the products according to the regulation and requirement of
local council.
Keep the battery away from the fire.
Keep the battery away from moisture or water.
Read instruction manual before use.
Conforms to relevant legislation and safety standards.
MAX.40
Charging temperature do not exceed 40°C.
Model
Rated voltage DC 12V
0-350/0-1350/min
10mm(3/8")
No load speed
Chuck size
DKCD12XL01
22mm
18+1 Settings
Torque settings
Max. drilling dia. in wood
28 N.mMax. torque
Max. drilling dia. in steel 10mm
The center position of the control buton locks the tool in the OFF position. When changing the
position of the control button, be sure the switch is released.
Torque Adjustment Ring (18+1 Torque Settings)
Your tool has an electronic adjustable torque screwdriver system for driving and removing a
wide range of fasteners. Circling the torque adjustment ring are numbers and a drill bit symbol.
These numbers are used to set the ring to deliver a torque range. The higher the number on the
ring, the higher the torque and the larger the fastener that can be driven. To select any of the
numbers, rotate until the desired number aligns with the arrow.
2-Speed Gear Switch
The 2-speed feature of your tool allows you to shift gears for greater versatility. To select speed
1 (highest torque setting), turn the tool off and permit it to stop. Slide the gear switch all the way
forward to speed 2(highest speed setting).
WARNING: Do not change speed when the tool is running. Always allow the drill to come to
a complete stop before changing speeds.
Keyless Chuck
WARNING: Always lock off trigger switch and disconnect tool from power source when
changing accessories.
WARNING: Always ensure the bit is secure before starting the tool. A loose bit may eject
from tool causing possible personal injury.
Your tool features a double-sleeve keyless chuck . To insert a drill bit or other accessory, follow
these steps.
1. Turn tool off and disconnect tool from power source.
2. Hold the sleeve A to secure the chuck with one hand and grasp
sleeve B with the hand to change accesory. Rotate the sleeve
counterclockwise (as viewed from the front) far enough to accept
the desired accessory.
3. Insert the accessory into the chuck and tighten securely by rotating
the sleeve A clockwise.
LED Worklight
This drill features an LED worklight. This LED worklight could automatically be turned on when
the speed control trigger is squeezed.
WARNING: The light of this power tool is intended to illuminate the power tool’s direct area
of working operation and is not suitable for household room illumination.
Installing and Removing the Battery Pack
NOTE: For best results, make sure your battery pack is fully charged. To install the battery
pack into the tool handle, align the battery pack with the rails inside the tool’s handle and slide
it into the handle until the battery pack is firmly seated in the tool and ensure that it does not
disengage. To remove the battery pack from the tool, press the release button and firmly pull
the battery pack out of the tool handle.
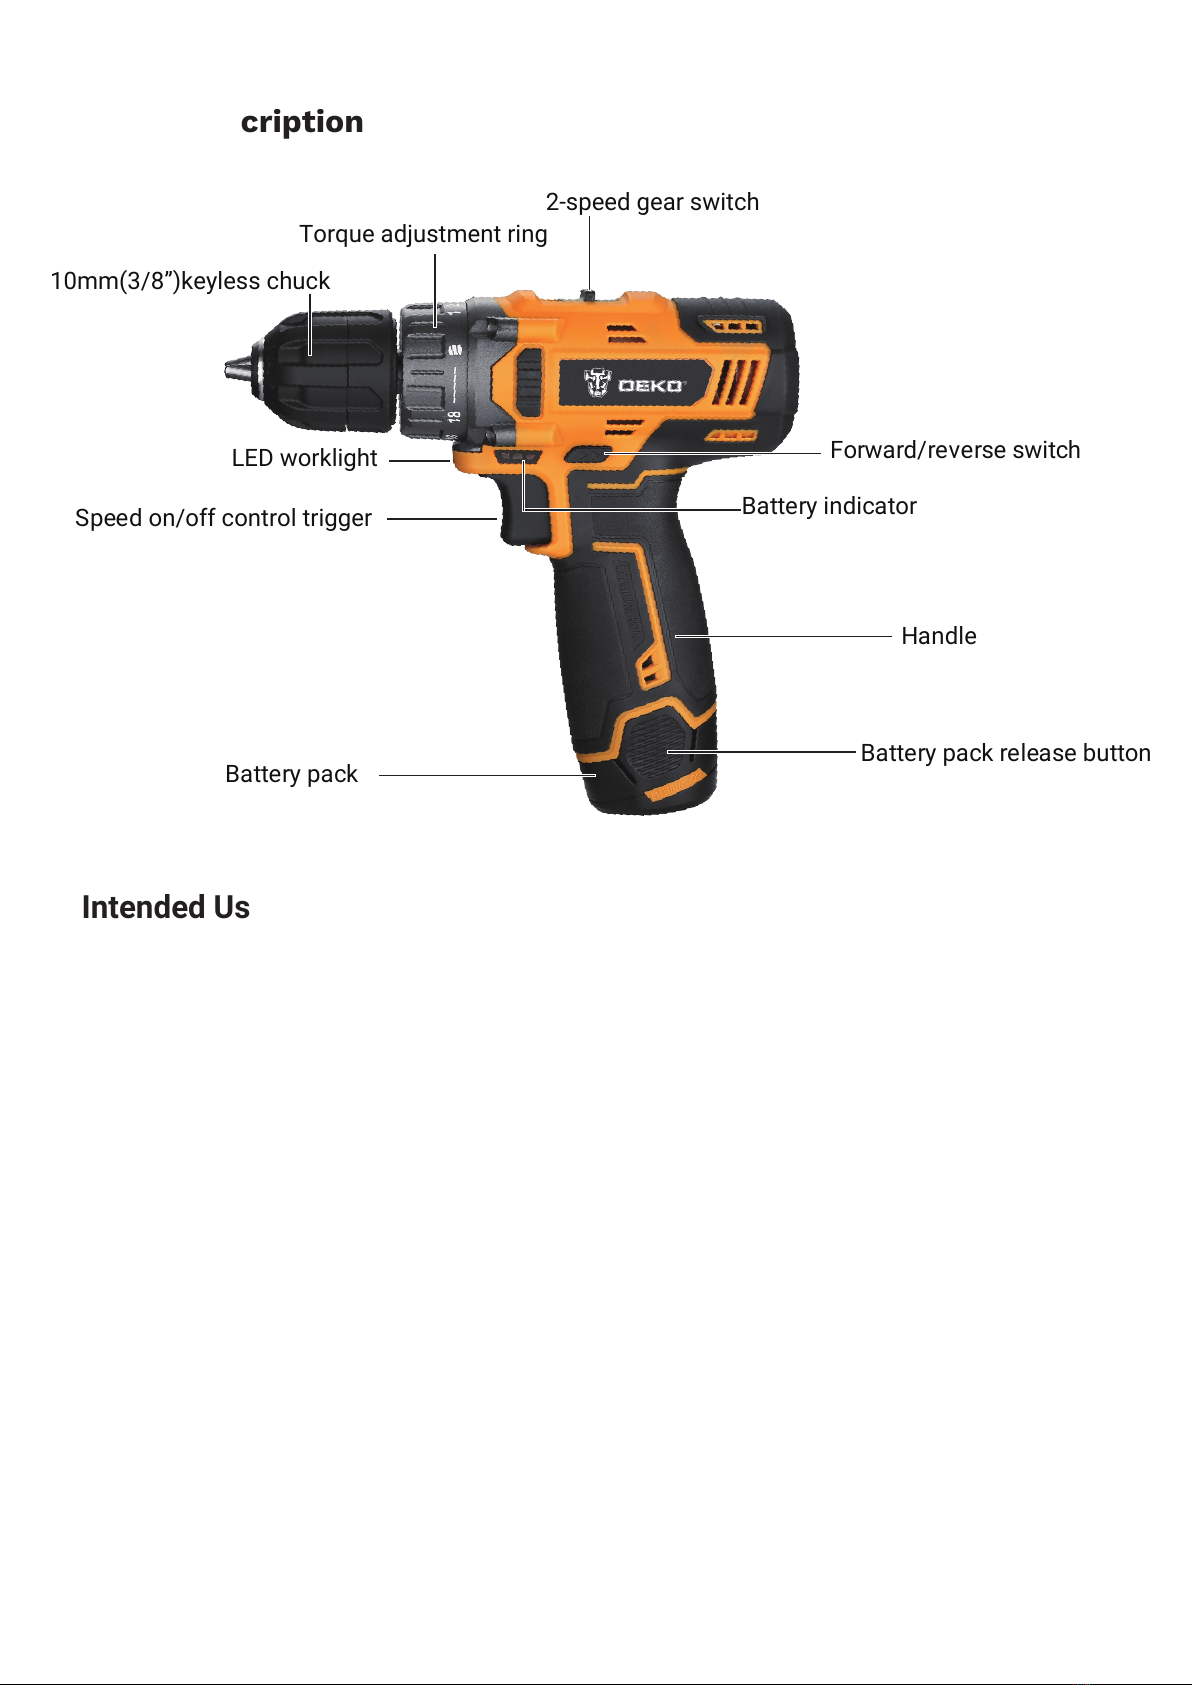
Parts Description
7
Intended Use
The machine is intended for driving in and loosening screws as well as for drilling in wood,
metal, ceramics and plastic.
DO NOT use under wet conditions or in presence of flammable liquids or gases.
DO NOT let children come into contact with the tool. Supervision is required when inexperi-
enced operators use this tool.
Variable Speed Control Trigger
To turn the tool on, squeeze the
speed on/off control trigger
. To turn the tool off, release the
trigger. The chuck will stop as soon as the trigger is fully released.
NOTE: Continuous use in variable speed range is not recommended. It may damage the switch
and should be avoided.
Forward/Reverse Switch
A forward/reverse switch determines the direction of the tool and also serves as a lock-off
button.
To select forward rotation, release the switch and depress the forward/reverse control button
on the right side of the tool.
To select reverse, release the switch and depress the forward/reverse control button on the left
side of the tool.
Speed on/off control trigger
Battery pack
Handle
Battery pack release button
10mm(3/8”)keyless chuck
Torque adjustment ring
2-speed gear switch
Forward/reverse switch
Battery indicator
LED worklight
The center position of the control buton locks the tool in the OFF position. When changing the
position of the control button, be sure the switch is released.
Torque Adjustment Ring (18+1 Torque Settings)
Your tool has an electronic adjustable torque screwdriver system for driving and removing a
wide range of fasteners. Circling the torque adjustment ring are numbers and a drill bit symbol.
These numbers are used to set the ring to deliver a torque range. The higher the number on the
ring, the higher the torque and the larger the fastener that can be driven. To select any of the
numbers, rotate until the desired number aligns with the arrow.
2-Speed Gear Switch
The 2-speed feature of your tool allows you to shift gears for greater versatility. To select speed
1 (highest torque setting), turn the tool off and permit it to stop. Slide the gear switch all the way
forward to speed 2(highest speed setting).
WARNING: Do not change speed when the tool is running. Always allow the drill to come to
a complete stop before changing speeds.
Keyless Chuck
WARNING: Always lock off trigger switch and disconnect tool from power source when
changing accessories.
WARNING: Always ensure the bit is secure before starting the tool. A loose bit may eject
from tool causing possible personal injury.
Your tool features a double-sleeve keyless chuck . To insert a drill bit or other accessory, follow
these steps.
1. Turn tool off and disconnect tool from power source.
2. Hold the sleeve A to secure the chuck with one hand and grasp
sleeve B with the hand to change accesory. Rotate the sleeve
counterclockwise (as viewed from the front) far enough to accept
the desired accessory.
3. Insert the accessory into the chuck and tighten securely by rotating
the sleeve A clockwise.
LED Worklight
This drill features an LED worklight. This LED worklight could automatically be turned on when
the speed control trigger is squeezed.
WARNING: The light of this power tool is intended to illuminate the power tool’s direct area
of working operation and is not suitable for household room illumination.
Installing and Removing the Battery Pack
NOTE: For best results, make sure your battery pack is fully charged. To install the battery
pack into the tool handle, align the battery pack with the rails inside the tool’s handle and slide
it into the handle until the battery pack is firmly seated in the tool and ensure that it does not
disengage. To remove the battery pack from the tool, press the release button and firmly pull
the battery pack out of the tool handle.
8
The machine is intended for driving in and loosening screws as well as for drilling in wood,
metal, ceramics and plastic.
DO NOT use under wet conditions or in presence of flammable liquids or gases.
DO NOT let children come into contact with the tool. Supervision is required when inexperi-
enced operators use this tool.
Variable Speed Control Trigger
To turn the tool on, squeeze the
speed on/off control trigger
. To turn the tool off, release the
trigger. The chuck will stop as soon as the trigger is fully released.
NOTE: Continuous use in variable speed range is not recommended. It may damage the switch
and should be avoided.
Forward/Reverse Switch
A forward/reverse switch determines the direction of the tool and also serves as a lock-off
button.
To select forward rotation, release the switch and depress the forward/reverse control button
on the right side of the tool.
To select reverse, release the switch and depress the forward/reverse control button on the left
side of the tool.
WARNING:
WARNING:
WARNING:
WARNING:
sleeve A
sleeve B

Screw Driving
1. Select the desired speed/torque range using the gear switch to match the speed and torque to
the planned operation.
2. Turn the torque adjustment ring to the desired position. Torque setting of 1-18 is for screw driv-
ing.
NOTE: Use the lowest torque setting required to seat the fastener at the desired depth. The lower
the number, the lower the torque output.
3. Insert the desired fastener accessory into the chuck.
4. Make some practice runs in scrap or on unseen areas of the workpiece to determine the proper
position of the torque adjustment ring.
5. Always start with lower torque settings, then advance to higher torque settings to avoid damage
to the workpiece or fastener.
Drilling
NOTE: If drilling thin material, use a wood “back-up” block to prevent damage to the material.
1. Turn the torque adjustment ring to the drill symbol . Select the desired speed by turning the
2-speed gear switch.
2. Always choose appropriate drill bits for different materials.
3. Always apply pressure in a straight line with the bit. Use enough pressure to keep drill biting, but
do not push hard enough to stall the motor or deflect the bit.
4. Hold tool firmly with both hands to control the twisting action of the drill.
WARNING: Drill may stall if overloaded, causing a sudden twist.
WARNING:
9
Charging input port
Battery and Charging
Note: The battery is supplied partially charged to prevent possible problems. Therefore, you should
charge it prior to use. Batteries will not reach full charge the first time they are charged. Allow
several charging/discharging cycles for them to fully charge.
WARNING Do not continue to press the On/Off switch after the machine has been automati-
cally switched off. The battery can be damaged. The battery is equipped with an NTC temperature
control which allows charging only within a temperature range of between 10°C-40°C(50°F-104°F).
A long battery service life is achieved in this manner. Observe the notes for disposal.
Use only original DEKO battery in conjunction with your DEKO power tool.
This measure alone protects the battery against dangerous overload. When
using other batteries, e.g.imitations, reconditioned batteries or other
brands, there is danger of injury as well as property damage through
exploding batteries.
Do not open the battery. Danger of short-circuiting may occur. Protect the
battery against heat, e.g., against continuous intense sunlight, fire, water,
and moisture. Danger of explosion may occur.
Use only original DEKO charger to charge
the battery. When the charger incdicator light is in red
color, the battery is under charging. when the charger light
turns green, the battery is fully charged.
The battery indicator indicates the battery voltage by LED
color: green for high battery and red for low battery.
WARNING:
WARNING:
full battery low battery
battery indicator

Always expect the stall. Grip the drill firmly to control the twisting action and avoid injury.
5. IF DRILL STALLS, it is usually because it is being overloaded or improperly used. RELEASE
TRIGGER IMMEDIATELY, remove drill bit from work, and determine cause of stalling. DO NOT
DEPRESS TRIGGER ON AND OFF IN AN ATTEMPT TO START A STALLED DRILL — THIS CAN
DAMAGE THE DRILL.
6. To minimize stalling or breaking through the material, reduce pressure on drill and ease the bit
through the last fractional part of the hole.
7. Keep the motor running when pulling the bit back out of a drilled hole. This will help prevent jam-
ming.
Residual risks
Even when the tool is used as prescribed it is not possible to eliminate all residual risk factors.
The following hazards may arise in connection with the tool’s construction and design:
1, Damage to lungs if an effective dust mask is not worn.
2, Damage to hearing if effective hearing protection is not worn.
3, Health defects resulting from vibration emission if the power tool is being used over longer
period of time or not adequately managed and properly maintained.
Maintenance and Cleaning
Before any work on the machine (e.g., maintenance, tool change, etc.) as well as during transport
and storage, set the rotational direction switch to the center position.Unintentional actuation of
the On/Off switch can lead to injuries.
For safe and proper working, always keep the machine and ventilation slots clean.
To ensure product SAFETY and RELIABILITY, repairs and any other maintenance or adjustment
should be performed by a qualified repair person, always using DEKO replacement parts.
10
Transport
The contained lithium-ion batteries are subject to the Dangerous Goods Legislation requirements.
The user can transport the batteries by road without further requirements. Dispatch batteries only
when the housing is undamaged. When being transported by third parties (e.g.: air transport or
forwarding agency), special requirements on packaging and la belling must be observed. For
preparation of the item being shipped, please observe possibly more detailed national regulations
and consult an expert for hazardous material.
Disposal
The machine, rechargeable batteries, accessories, and packaging should be sorted for envi-
ronmental-friendly recycling. Do not dispose of power tools and batteries/rechargeable
batteries into household waste! Please recycle them at collection points provided for the
purpose. Ask your local authority for information about recycling.

DEKO TOOLS CO., LIMITED
www.dekotools.com
Made in China
Table of contents
Other DeKo Power Screwdriver manuals


Popular Power Screwdriver manuals by other brands


Ingersoll-Rand
Ingersoll-Rand 41 Series Maintenance information

Ryobi
Ryobi HP596K Manual del operador

MaxPro PROFESSIONAL
MaxPro PROFESSIONAL MPCD18Li/2V manual

Black & Decker
Black & Decker FireStorm FS360 instruction manual

Ingersoll-Rand
Ingersoll-Rand 41 Series Maintenance information

Truper
Truper MAX-20TS manual


