dellonda DG217 User manual

Model No. DG217
Thank you for purchasing a Dellonda product. Manufactured to a high standard, this product will,
if used according to these instructions, and properly maintained, give you years of trouble free performance.
DG217 Issue:1 18/02/22
www.dellonda.co.uk
Dellonda 1500W Electric Tiller/
Cultivator 40cm Working Width 6
Blades 10m Cable
Electrical Safety
• WARNING! It is the user’s responsibility to check the following:
• Check all electrical equipment and appliances to ensure that they are safe before using. Inspect power supply leads, plugs and
all electrical connections for wear and damage. Sealey recommend that an RCD (Residual Current Device) is used with all electrical
products. You may obtain an RCD by contacting your local Sealey Stockist.
• If the product is used in the course of business duties, it must be maintained in a safe condition and routinely PAT (Portable
Appliance Test) tested.
• Electrical safety information, it is important that the following information is read and understood.
• Ensure that the insulation on all cables and on the appliance is safe before connecting it to the power supply.
• Regularly inspect power supply cables and plugs for wear or damage and check all connections to ensure that they are secure.
• Important: Ensure that the voltage rating on the appliance suits the power supply to be used and that the plug is fitted with the
correct fuse - see fuse rating in these instructions.
• DO NOT pull or carry the appliance by the power cable.
• DO NOT pull the plug from the socket by the cable. Remove the plug from the socket by maintaining a firm grip on the plug.
• DO NOT use worn or damaged cables, plugs or connectors. Ensure that any faulty item is repaired or replaced immediately by a
qualified electrician.
• This product is fitted with a BS1363/A 13 Amp 3 pin plug.
• If the cable or plug is damaged during use, switch the electricity supply and remove from use.
• Replace a damaged plug with a BS1363/A 13 Amp 3 pin plug. If in doubt contact a qualified electrician.
• Class II products are wired with live (brown) and neutral (blue) only, and are marked with the
• Class II symbol;
• A) Connect the BROWN live wire to the live terminal ‘L’.
• B) Connect the BLUE neutral wire to the neutral terminal ‘N’.
• C) After wiring, check that there are no bare wires and ensure that all wires have been correctly connected.
• Ensure that the cable outer sheath extends inside the cable restraint and that the restraint is tight.
• DO NOT connect either wire to the earth terminal.
• Sealey recommend that repairs are carried out by a qualified electrician.
General Safety
• WARNING! This product is not intended for use by persons, including children, with reduced sensory or mental capacity or lack of experience or
knowledge, unless they are under the supervision of the person responsible for their safety or has instructed them on how to use this product,
also the product is not intended for use by children and persons with reduced mobility or with a poor physical disposition.
• Familiarise yourself with the applications, limitations and hazards of the product.
• Maintain the cultivator in good condition (use an authorised service agent).
• Replace or repair damaged parts. Use recommended parts only. Unauthorised parts may be dangerous and will invalidate the warranty.
• Keep the cultivator in good working order, regularly maintained and clean for best results.
• DO NOT remove the plug from the power socket by pulling on the cable. Keep the supply cable away from sharp edges.
• If using an extension cable ensure that is clearly marked for outdoor use.
• WARNING! Keep hands, feet or any body part or clothing away from the rotating tines.
• Wear suitable/protective clothing, (long trousers), and appropriate personal protection equipment.
• DO NOT operate the cultivator barefoot or with open toed shoes. Always wear sturdy non-slip boots.
• DO NOT operate the cultivator when you are tired or under the influence of alcohol, drugs or intoxicating medication.
• Keep bystanders and pets at a safe distance from the cultivator when in use.
• Only use the product for it’s designed purpose.
• The cultivator must only be operated by one person.
• DO NOT operate the product with one hand. Grip the handles firmly with both hands.
• Work only in daylight or good artificial light.
• DO NOT use in the rain or if there is a risk of lightning.
• DO NOT operate the cultivator on a slope that is too steep for safe operation.
• DO NOT operate up or down slopes. Work across slopes, slow down and ensure you have good footing. Take extreme care when changing
direction on slopes.
• Operate the cultivator at walking pace only. DO NOT over reach. Maintain proper footing and balance at all times.
• WARNING! Take extra care when reversing or pulling the cultivator towards you.
• WARNING! Be aware of your surroundings. DO NOT operate the cultivator near underground utilities and use caution when tilling near fences and
buildings.
• DO NOT pick up or carry the cultivator while the motor is running.
• DO NOT operate the cultivator with a damaged or missing guard.
• DO NOT leave the cultivator running unattended and always turn off after use.
• Before carrying out any maintenance or adjustments, switch off the product, disconnect from the power source and wait until the tines have
stopped rotating.
Recommended fuse rating
13 Amp
Important Information
Please read these instructions carefully. Note the safe operational requirements, warnings & cautions. Use the product correctly and with care
for the purpose for which it is intended. Failure to do so may cause damage and/or personal injury and will invalidate the warranty. Keep these
instructions safe for future use.
1
www.dellonda.co.uk
Refer to
instruction
manual
Wear eye
production
Wear ear
protection
Wear protective
gloves
Wear safety
footware
Warning Keep people
and animals at a
safe distance
Risk of injury
from ejected
parts

• WARNING! Be aware of the power cable during tilling. Take care not to trip over the cable and guide the cable away from the rotating tines.
• If the tines strike a foreign body, switch off and remove the plug from the power source. Examine the product for signs of damage and carry out
any necessary repairs.
• If abnormal vibrations occur or there are unusual sounds emitted during tilling, switch off, remove the plug from the power source then check for
the cause immediately. Vibrations generally indicate a malfunction. Have the product repaired at an authorised service centre.
• WARNING! The warnings, cautions and instructions in this manual cannot cover all possible conditions and situations that may occur. It must
be understood by the operator that common sense and caution are factors which cannot be built into this product, but must be applied by the
operator.
About the Product
Powerful 1500W motor makes light work of almost any soil and digging of various surfaces such as vegetable/flower patches as well as your
lawn. Six steel blades gives you maximum durability and efficiency. Weighing in at just 11kg makes the Dellonda electric tiller/cultivator easy and
comfortable to use and manoeuvre round your garden/lawn. 10m power cable gives you freedom to cover a wider area in your garden/lawn.
• SPECIFICATION
• Model no: ....................................................................DG217
• Cable Length: ..................................................................10m
• Cutting Width:.... ...........................................................40cm
• Noise:..............................................................................93dB
• Power:..........................................................................1500W
• Speed:.........................................................................400rpm
• Supply:............................................................................230V
• Type:................................................................................Push
Contents
2
www.dellonda.co.uk
Assembly
• Unpack the product and check contents. Should there be any damaged or missing parts contact your supplier immediately.
• ATTACH THE WHEELS
• Slide wheel (fig 1-14) and washer (fig 1-16) onto the shaft and secure in place by inserting the split pin (fig 1-17) into the hole at the end of the
shaft and using pliers (not supplied), bend the ends of the split pin away from each other.
• Push fit the clip-on wheel trim (fig 1-15) into place.
• Repeat for the other wheel.
• HANDLE ASSEMBLY
• Attach the mid handle section (fig 1-10) to the outside face of the lower handle section (fig 1-5) and secure with locking nut and screw (fig 1-4).
• Repeat for other mid handle section (fig 1-10).
• DO NOT over tighten screws.
• Locate upper handle assembly (fig 1-1) between mid handle sections (fig 1-10) and secure with locking nut and screw (fig 1-4).
• Fully tighten all screws.
• ATTACH CABLE CLAMP
• Place the cable from the motor into the cable clamp (fig 1-3) and clip the clamp onto the lower part of the mid handle section (fig 1-10).
• Repeat for the other cable clamp and locate the clamp towards the upper part of the mid handle section.
Item Description
1 Upper handle assembly
2 Power cable
3 Cable clamp
4 Locking nut & screw
5 Lower handle assembly
6 Gearbox
7 Tines
8 Guard
9 Motor cover
10 Mid handle section
11 Not used
12 Safety button
13 Switch trigger
14 Wheel
15 Wheel trim
16 Washer
17 Split pin
Fig.1
Operation
• Risk access the area to be worked. Remove all objects that may damage the tines or be ejected causing possible injury.
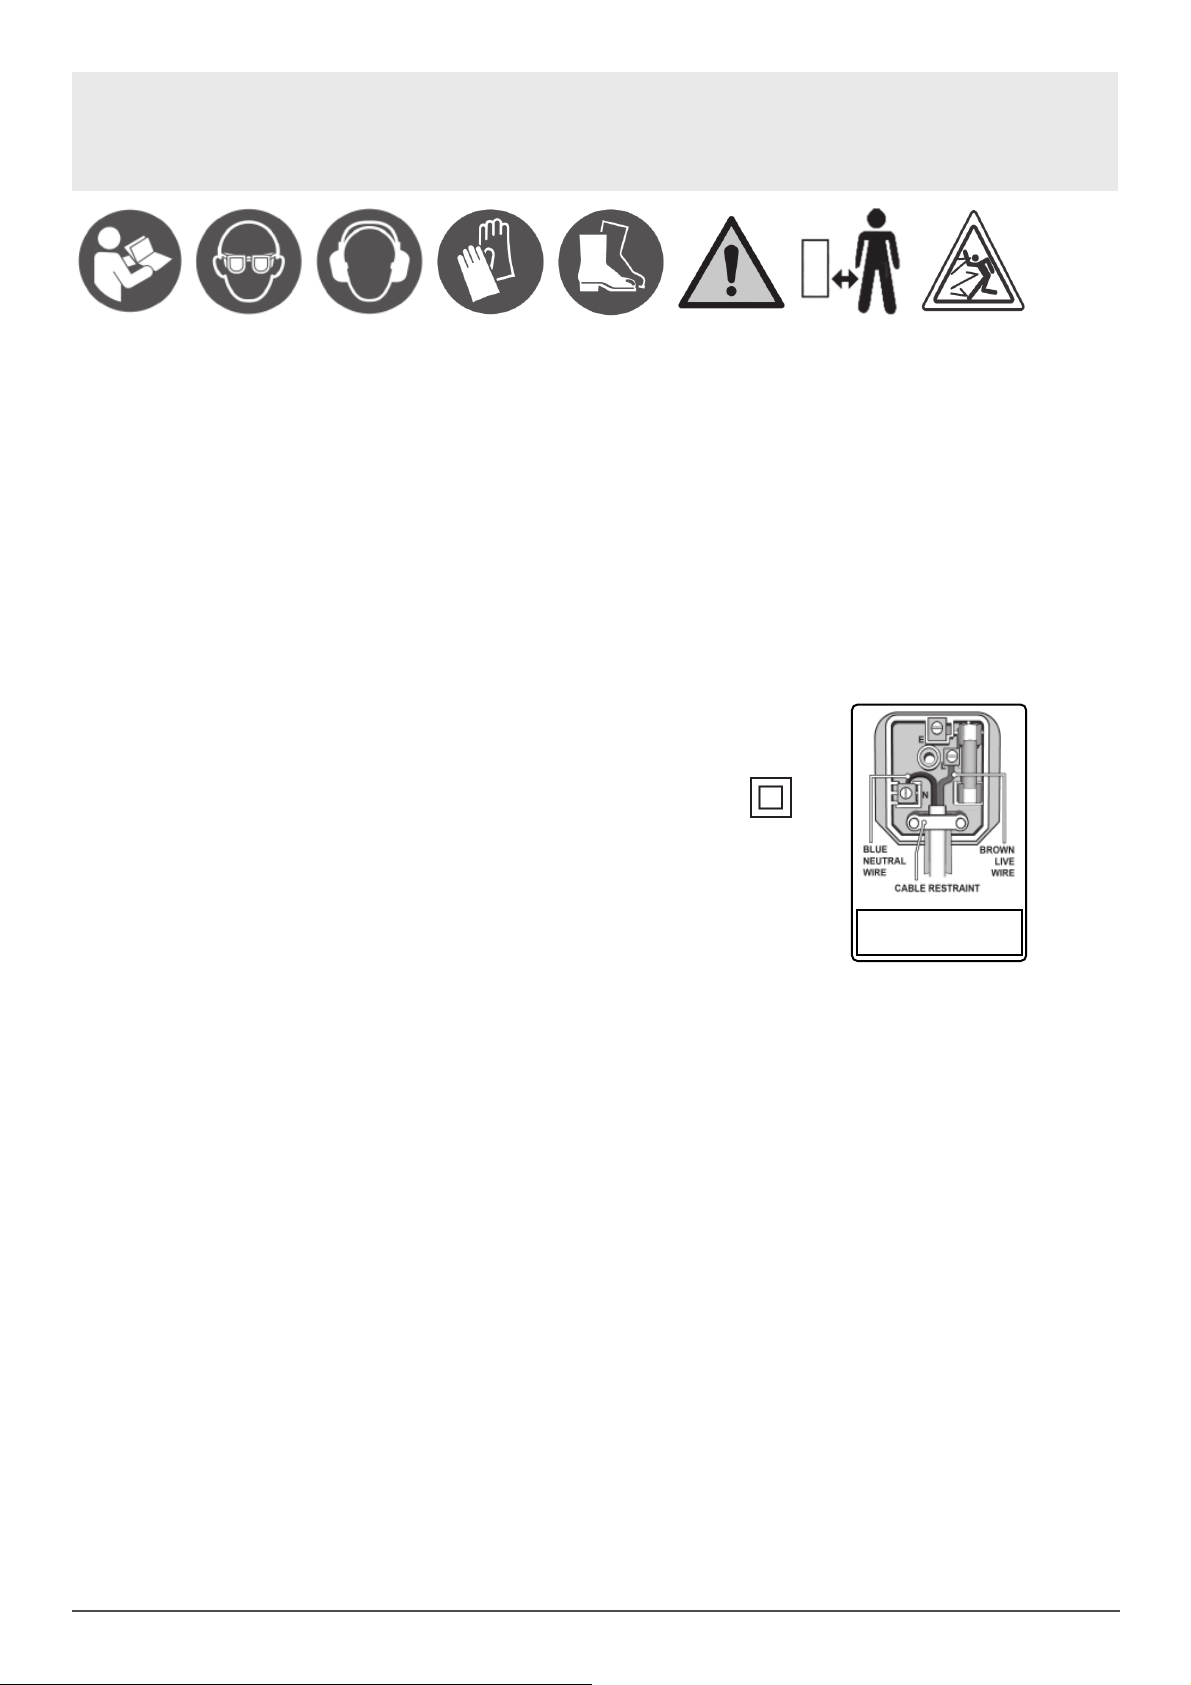
• It is recommended that the cultivator wheel assembly is placed in the transport position (fig 2) when not in use or when being positioned ready
for use.
• Move the cultivator to the work area prior to starting the motor.
• Pull out the spring loaded pin (fig 2) and move the wheel assembly to the working
position (fig 2).
• WARNING! DO NOT attempt to adjust the wheel assembly if the cultivator is
connected to the power source
• STARTING THE CULTIVATOR
• Connect the cultivator power cable (fig 1-2) to a power source.
• WARNING! Hold the cultivator firmly while switching on.
• To start, press the safety button (fig 1-12), then pull the switch trigger (fig 1-13) back
towards the handle.
• WARNING! The tines will start to rotate as soon as the switch trigger is pulled.
• Hold the switch trigger (fig 1-13), while releasing the safety button (fig 1-12) to keep
the motor running.
• STOPPING THE CULTIVATOR
• To stop the cultivator release the switch trigger (fig 1-13).
• WARNING! The tines will continue to rotate for a period of time after the motor is switched off.
• Disconnect the cultivator power cable (fig 1-2) from the power source.
• Pull out the spring loaded pin (fig 2) and move the wheel assembly to the transport position (fig 2).
Maintenance
• WARNING! Disconnect from the mains power supply before undertaking any cleaning or maintenance.
• Regularly check that all fixings are firmly tightened.
• Ensure ventilation openings are clear of any obstructions and debris.
• Check the condition of the tines.
• If the tines are blunt or damaged take them to a specialist for sharpening or repair.
• REMOVING THE TINES
• WARNING! Disconnect from the mains power source and wear protective gloves.
• With the wheel assembly in the transport position (fig 2) lay the upper handle assembly (fig 1-1) down onto a flat level surface.
• With care remove the M8 x 40 bolt (fig 3) and M8 locking nut (fig 3) and place in a secure location.
• Slide the tine blade off the shaft.
• Repeat for the other tine blade.
• REFITTING THE TINES
• Wipe clean the drive shaft.
• Slide the tine blade onto the shaft (fig 3).
• Align the fixing hole on the tine with the corresponding hole on the shaft and secure with the M8 x 40 bolt (fig 3) and M8 locking nut (fig 3).
• Repeat for the other tine blade.
• NOTE: Always replace the tines in pairs and each tine can be fitted to either side of the shaft.
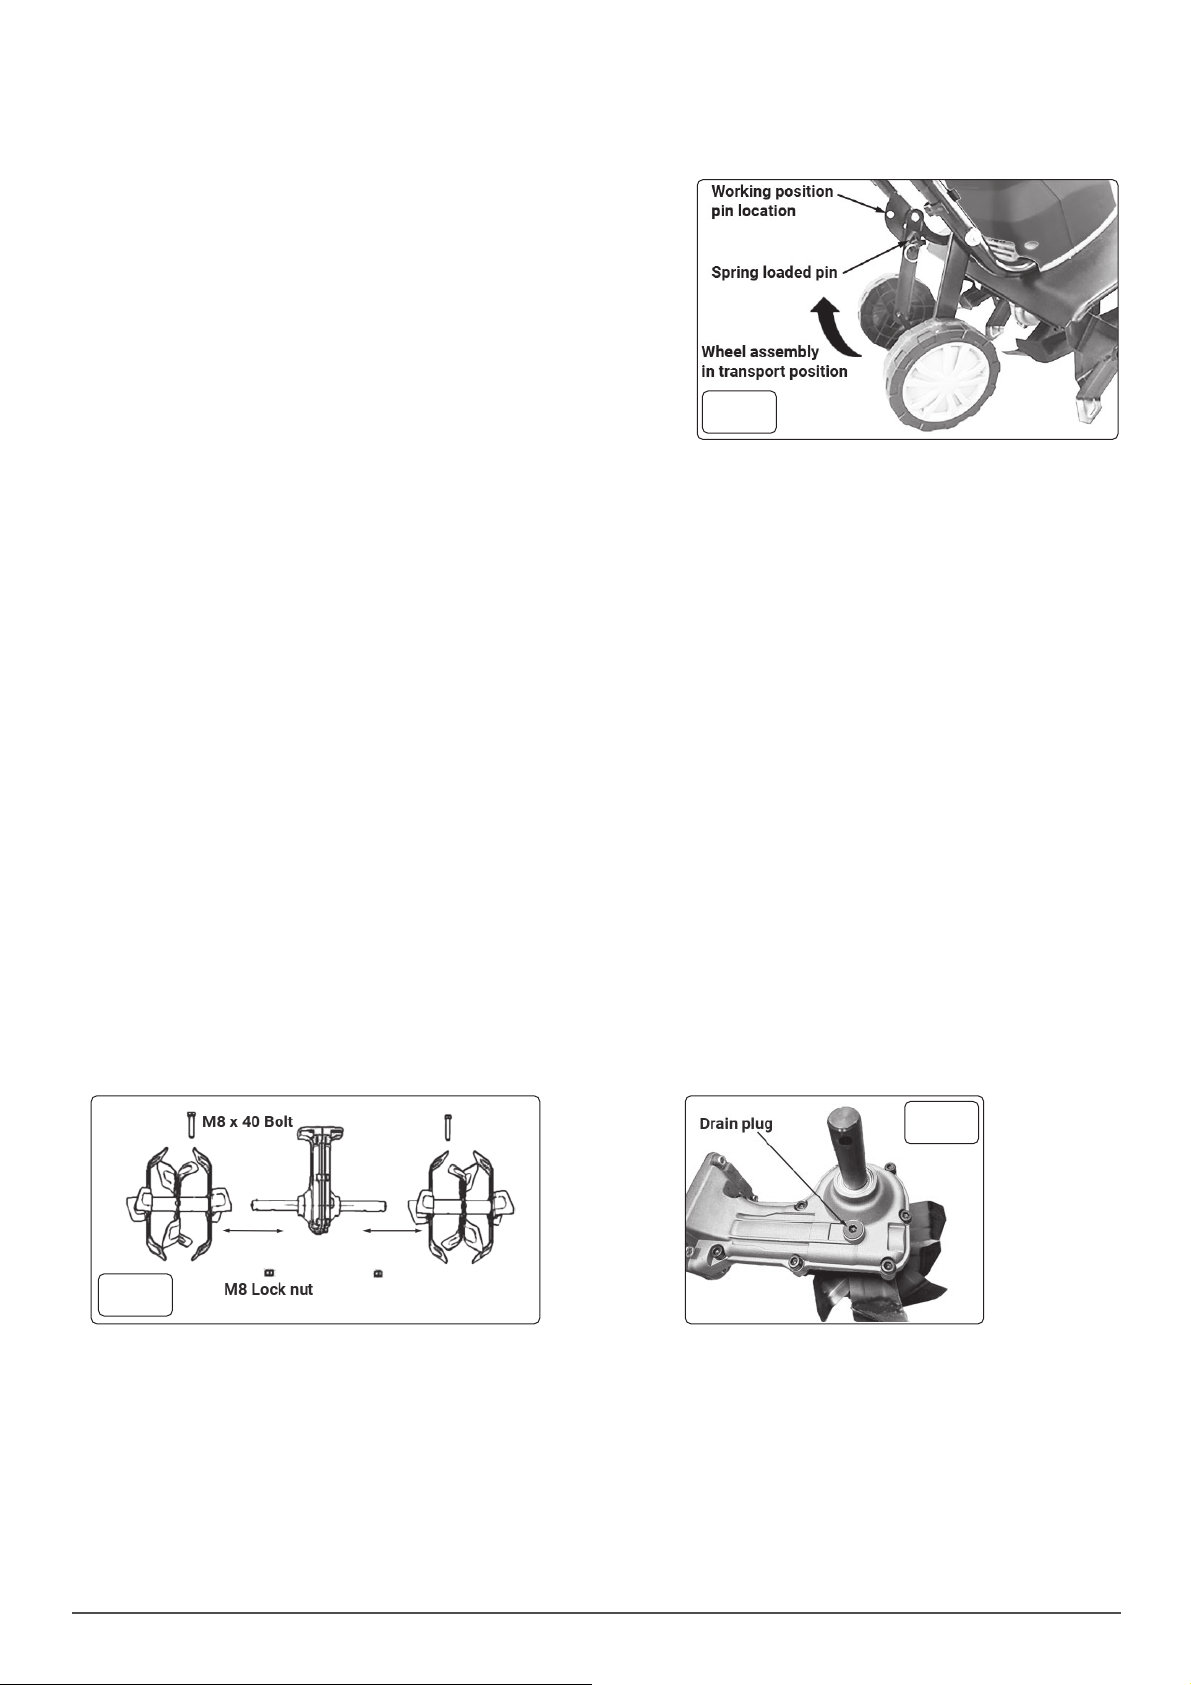
• CHECKING TRANSMISSION LUBRICANT
• On a flat level surface lay down the cultivator onto it’s left side.
• Remove the tine blade (fig 4).
• Clean the area around the drain screw of any debris.
• Unscrew the drain plug (fig 4) with a hex key (not supplied) and place in a secure location.
• Check the level of the lube. It should be level with the outer rim of the drain plug opening.
• Refill as required with a lithium grease EP0.
• Reinstall the drain plug.
• Reattach the tine blade.
• CLEANING
• Where possible clean the cultivator after each use.
• To remove soil and debris from the tines and guard use a stiff brush or a dampened cloth.
• DO NOT allow water ingress to the motor.
• Clean other areas with a soft damp cloth.
• DO NOT use solvents
• STORAGE
• Store the cultivator in a clean, dry, dark, dust free and frost free childproof location.
• Use, if possible, original packaging.
• DO NOT store in direct sunlight for long periods of time.
• Cover the cultivator with a non moisture retaining cover.
Fig.2
Fig.3
www.dellonda.co.uk
Fig.4
3

Troubleshooting
Dellonda Limited
Kempson Way, Suffolk Business Park, Bury St Edmunds, Suffolk. IP32 7AR
Note: It is our policy to continually improve products and as such we reserve the right to alter data, specifications and component parts without prior
notice.
Important: No Liability is accepted for incorrect use of this product.
Warranty: Guarantee is 12 months from purchase date, proof of which is required for any claim.
Environment Protection, Waste Electrical and Waste Electronic Equipment Regulations
(WEEE)
Recycle unwanted packaging materials. When this product is no longer required, or has reached the end of its useful life, please dispose
of in an environmentally friendly way. Drain any fluids (if applicable) into approved containers, in accordance with local waste regulations.
It is our policy to continually improve products and we reserve the right to alter data, specifications and parts without prior notice. No
liability is accepted for incorrect use of this product. Guarantee is 12 months from purchase date, proof of which is required for any claim.
Problem Possible cause Remedy
Motor does not start No power Check mains connection
Defective power cable Contact Dellonda service centre
Defective safety switch/plug combination Contact Dellonda service centre
Overheating protection activated Working depth too deep. Set to shorter depth
Tines blocked. Switch off. Remove any blockages
Soil too hard. Select correct work depth. Wait 15 minutes for
motor to cool down before restarting
Abnormal noises Tines are jammed Switch off. Remove any objects
Lubrication running low See Maintenance section - Checking transmission lubricant
Loose fixings or components Tighten all fixings.
Contact Dellonda service centre if noises persist
Abnormal vibrations Worn or damaged tines Contact Dellonda service centre
Working depth to deep Set to correct working depth
Poor results Working depth too shallow Set to correct working depth
Worn tines Contact Dellonda service centre
Table of contents
Popular Tiller manuals by other brands


EarthWise
EarthWise TC70090 owner's manual

Euro Systems
Euro Systems Euro102 operating instructions

Go-On
Go-On 750-2 Translation of the original instructions

KingKutter
KingKutter TG-54-XBX Operator's manual

Ardisam
Ardisam 5055 Operating instructions & parts explosions

Weed Eater
Weed Eater 11792 owner's manual