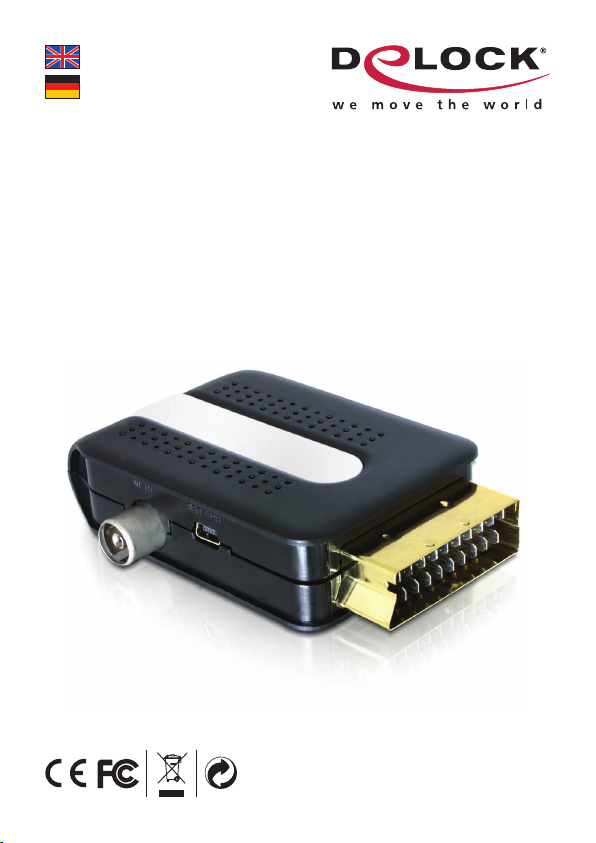
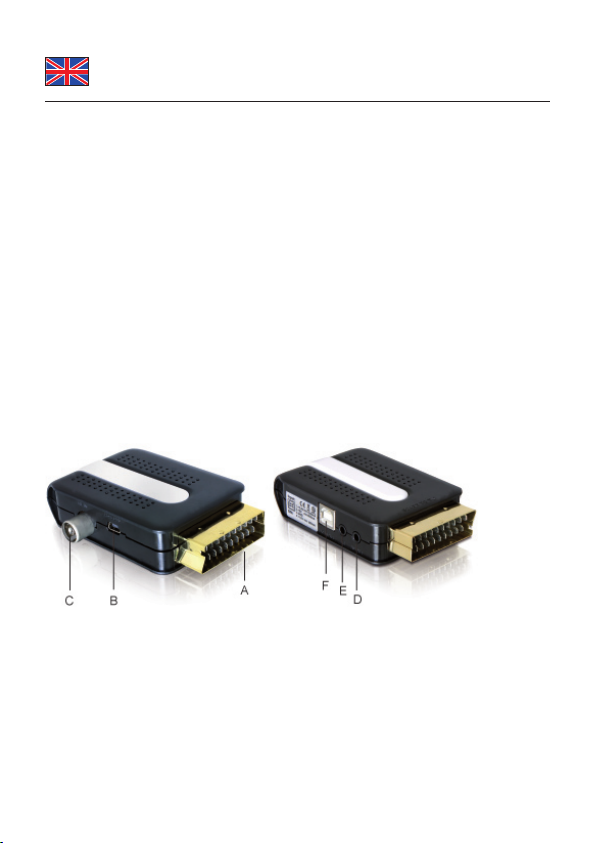
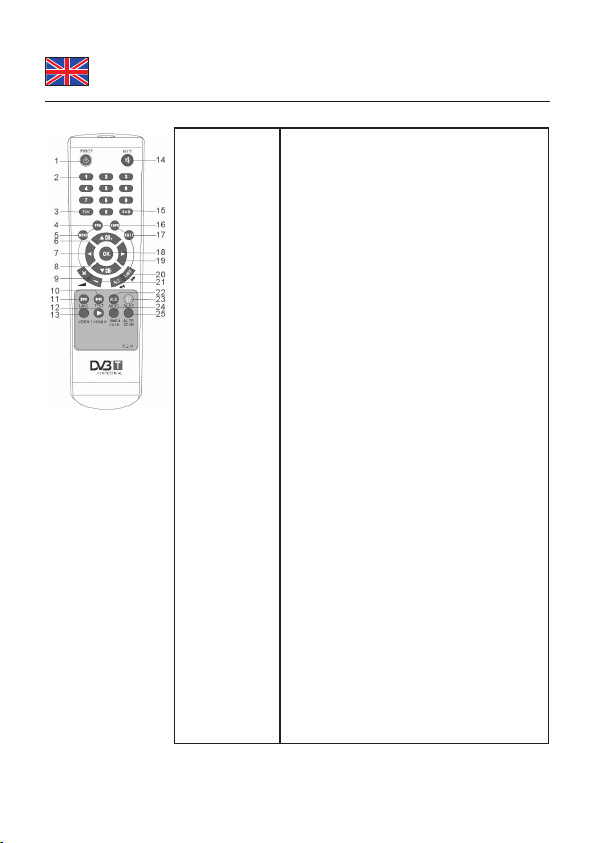
DeLOCK 61639 User manual

SCART DVB-T Receiver
Gebrauchsanweisung
User manual
Product-No:61639
User manual no:61639-a
www.delock.com

-1-
1. Description
The Delock DVB-T receiver can be connected directly to your Scart port or via
Video connector to your TV. Thus you can receive radio and TV in all DVB-T ar-
eas. By using the USB port you can also connect a USB memory stick or a USB
hard disk drive in order to record movies or to watch your stored movies. Pictures
and MP3 les can be played via USB as well.
2. Specication
• Interface: SCART and Video
• Resolution: 720X576 (PAL)
• Allows simultaneous recording and TV watching
• TimeShift functions, automatic station search
• Recording of TV programs in MPEG2 format
• Programming of automatic recording
• With videotext function and EPG
• Multi-Media Player: MP3/DivX/JPEG/BMP
• Software with multilingual surface: GB, F, D, I, E, S, P, FIN, NL, TK, CZ, GR, DK
3. Technical data
Demodulator Mode COFDM: 2K and 8K
Frequency Range VHF:170~230 MHz UHF:470~862 MHz
Bandwidth 7M/8M
Input Signals Voltage -78~-10 dBm
Input Impedance 75 Ohm (RF connector)
Video Decoder MPEG2 compatible (Main Prole @ Main Level )
1.5-15Mb/s(720*576)
Standard NTSC/SECAM/PAL Compliant
Audio Decoder MPEG2 Layer I & II
A/V Output Scart Out
Media Supported USB 1.1/SD/MMC card; Jpeg, Mp3, Bmp, DivX (5.0 or
above), Xvid
Input Voltage STB unit: +12V, 300mA; +5V, 600mA; +3.3V, 1200mA;
Adaptor: AC 100 V - 250 V ~ 0.5 A , 50/60 Hz
Power Consumption < 8W
Record format *.mpg
Bitrate for record Maximum 6Mbps

-2-
4. Package content*
• SCART DVBT Receiver
• Antenna, Video cable, USB extension cable
• Remote control, Infrared receiver, 2x AAA battery
• Power supply
• User manual
*Make sure that the product package contains all items before operation. If any
item is missing or damaged, then please contact your dealer immediately.
5. Connectors
a. SCART Connector
b. Mini USB, to connect USB devices like USB drive, USB HDD, etc.
c. Antenna connector
d. Audio/Video Output
e. Connector for Infrared receiver
f. USB connector for power supply

-3-
6. Remote Control
1. POWER
2. Keys 0-9
3. FAV
4. EPG
5. MENU
6. CH (UP)
7. LEFT
8. CH (Down)
9. Volume +/-
10. Text >>|
11. REC |<<
12. TV/RADIO
13. ZOOM
14. MUTE
15. SUB
16. INFO
17. EXIT
18. OK
19. RIGHT
20. LIST >>
21. ALT<<
22. AUDIO
23. PAUSE
ON/OFF switch
Keys for channels
Favorite List
The EPG menu of the current TP is displayed.
Press to access the system menu.
Previous channel
Left move
Next channel
Volume control
In DTV mode, press to show the rich text of the
current channel. In media mode, next track.
In DTV mode, record current program to the
chosen device. In media mode, previous track.
In DTV mode, toggle switch between TV and
Radio. In media mode, PLAY function.
Zoom in/out picture in screen
Mutes the current channel
Enter subtitle menu in DTV mode. In Media mode,
show subtitle in Mpeg 2, DivX or Xvid playback
If you press the INFO button once, a banner is
displayed on the upper part of the screen, and if
you press the button again before the upper banner
is disappeared, the banner will show the details of
the currents channel.
Close current active menu and go back to up menu.
You can select an item.
Right move
in DTV mode, display the satellite list, and
select available satellites. In Media mode, FAST
FORWARD function.
In DTV mode, shift the current channel to last channel
you turned. In Media mode, FAST BACK function
Sets the current channel audio to stereo/left-mono/
right-mono.
Press to pause the current program playback.

-4-
7. Start up DVBT receiver
1. Connect the USB power supply to the DVBT receiver and to the power
socket.
2. Connect the Infrared receiver to the female port E of the receiver.
3. Connect the antenna into female port C of the receiver.
4. Now connect the receiver with the Scart female port to your TV.
Note: You can also connect the DVBT receiver by using the included video cable
to your TV.
8. Introduction
1. After connection switch on the receiver by using the remote control (power
button).
2. Choose the language, proceed as follows: Press the „menu“ button, choose „
Digital TV“ by pressing the „OK“ button -> „Conguration“ -> „OSD“ -> OSD
language“ and choose your language. Leave the Menu by pressing the „Exit“
button.
3. Press on the remote control „AUTO SCAN“, in order to search for the
different channels.
4. After the channels are found you can enjoy digital TV.
9. Control of remote control
9.1 Help Information
Under EPG, MENU, LIST, TELETEXT, GAME window, you can press <INFO>
key to watch help information on how to operate current function.
9.2 POWER ON/OFF
Power on
In “standby” mode, press <POWER> to switch power on.
Power off
When it is running, pressing <POWER> will enter into the “Standby" mode.
9.3 VOLUME UP/DOWN AND MUTE
Press <VOL+/-> to adjust volume when system is in normal playing mode; and it
will show volume bar on the screen;
Press <MUTE> to enter mute mode when normally playing and repress <MUTE>
to back the normal state.
9.4 TV /RADIO SWITCH
Press <TV/RADIO>, to switch between TV and Radio.

-5-
9.5 PROGRAM SWITCH
Press key <UP/DOWN> to switch to the previous or next program.
If there are favorite programs that have been set up, just press <FAV> key to en-
ter Favorite program list and press key <UP/DOWN> to switch to the previous or
next of your favorite program.
9.6 DISPLAY INFORMATION OF PROGRAM
Press key <INFO> to show the information of current program when it is in nor-
mal playing state.
9.7 PROGRAM RETURN
Press <ALT> under state of full-screen to return to the previous program played.
9.8 SCREEN ZOOM
Press <ZOOM> to zoom current image being played if in full-screen.
It will show the scaling ratio when zooming images, such as, “ZOOM 2 (2 times
magnication), “ZOOM 3 (3 times magnication)”, “ZOOM 4 (4times magnica-
tion)”, “ZOOM 1/2 (1/2 times magnication)”, “ZOOM 1/3(1/3times magnication)”,
“ZOOM 1/4(1/4times magnication)”, and “ZOOM OFF”. When zooming in, press
<Left>, <Right>, <Up> and <Down> to move the image to the destination.
9.9 ELECTRONIC PROGRAMS GUIDE (EPG)
Press key <EPG> on the remote controller to enter EPG page.
There you can see today´s TV program. Now you can also switch between daily
and weekly program.

-6-
In Daily Mode.
- 1 shows the EPG mode: Daily mode or Weekly mode
- 2 shows time and date
- 3 shows date and weekday
- 4 shows program list, press <UP/DOWN> to switch between programs
- 5 shows the time range and program information
- 6 shows the detailed program information in Area 5;
- 7 shows help information.
- Press <LEFT/RIGHT> to switch between Area 4 and Area 5.
In Weekly Mode.
Press <GREEN> key to enter Weekly Mode to display the programs and program
information in different time ranges of the currently program list within one week,
as shown in the below Figure.
- Press <|<< & >>|> key to switch among Sunday---Saturday in Area 3;
- Press <UP/DOWN> key to move upward and downward to switch between the
different programs in Area 5;
- Press <LEFT/RIGHT> key to choose to view the program information in different
time ranges in Area 6.
When the cursor stops on Area 5 in Daily Mode or Area 6 in Weekly Mode, press
the <YELLOW> key to choose the detailed information corresponding to the cur-
rent program, as shown in the below Figure.
When the cursor stops in Area 5 Daily Mode and Area 6 in Weekly Mode, press
the <BLUE> key to enter Wakeup Timer menu to book programs, as shown in the
Paragraph 10.2.3.6 Wakeup Timer.
9.10 TELETEXT
If you want to watch teletext, please press <TEXT> and than <OK>on the remote
controller to enter Teletext page.
- Input three digits to go to corresponding page you want.
- Press <Up> to go to the previous page; while press key <Down> to go to the
next page.
- Press <Left> to page back 100 pages; while press <Right> to page forward 100
pages.
- Press <EXIT> key to exit from Teletext.

-7-
9.11 SUBTITLE
Subtitle will be shown for some programs. Press <SUB-TITLE> key to enter Sub-
title menu of the current programs.
- Press <LEFT/RIGHT> key to choose whether to open Subtitle, press <UP/
DOWN> key move upward and downward to choose language.
9.12 RECORD
There are two ways to record TV program. One is realtime recording. Another is
EPG recording.
Before you record TV program you should select your device, like your USB
HDD. Press key <LEFT> or <RIGHT>, it will popup device list menu, you can
choose one folder as the recording device.
Realtime Recording
After selecting device, press key <EXIT> to exit device list menu. Then press key
<REC>, you can record current TV program into selected device. This is realtime
recording.
During recording, it will show message “REC”. If there is no signal or poor signal,
it will popup message “REC PAUSE”. Press “REC” again to stop recording.
EPG Recording
There are two ways to setup EPG recording.
1. In EPG menu, you can choose Timer by pressing blue key to setup wakeup
timer window. Once you choose wakeup mode as “RECORDER”, one EPG
recording is setup.
2. Under <MENU> “Digital TV”, “CONFIGURATION”, you can choose wakeup
timer to enter EPG recording setup.
For both ways, you should select timer number from 1 to 10; select timer mode as
“ONCE”, “DAILY”, or “WEEKLY”; choose wakeup date, and on time and duration.
Please be noted that on time must be later than current time.
9.13 DISK MANAGER
You can delete or play the le on the record device (USB). In the main menu, you
can enter “DISK MANAGER” menu item to operate delete or play function.

-8-
10.1 Main Menu
The DVB-T Receiver contains a facilitated user interface, this function is to make
user easy to call all device functions.
Operation Steps: Press <MENU>, you can see this main menu.
- When the menu appears, you can close it through the <EXIT> button. Or when
you are in a sub menu you can close it also through <Exit>.
- <OK> key: When you press the key that will go to current sub-level menu item.
- < L R> key: The focus will move left or right.
- <▲▼> key: The focus will move up or down.
- <EXIT> key: Close all menus.
10.2 Digital TV
10.2.1 Channel Manager
The Receiver offers an efcient function of program management such as pro-
gram deleting, marking, moving and locking. There are two independent pages
for program management, TV and Radio.
10.2.1.1 Channel Management
- It will pop up dialogue box prompting that ”Channel not available” if there are no
channels in database, and it will not enter channel organizer page.
The Channel Organizer menu includes four options: Favorite Channel, Delete
Channel, Skip Channel, Lock Channel.
- Press <UP/DOWN> key to navigate channel
- Press <RED> to set or cancel Delete Channel.
- Press <BLUE> key to set or cancel Lock Channel. There you need to enter a
password (0000). For un-locking press the <blue> button again.
- Press <GREEN> key to set and cancel Favorite Channel.
- Press <YELLOW> key to store the channel on a different place. Now choose
the order and press <OK> to store it there.
- To rename channel, press <LEFT/RIGHT> and enter a new name by using the
numbers. Afterwards please press <OK> to save the name.
10.2.1.2 Channel Sorting
There are three sorting ways:
1. by region country
2. by FTA(free of charge), Scramble(encrypted), or ALL Channels
3. by alphabetic order A-Z, or Z-A

-9-
10.2.1.3 Channel Grouping
The channels can be sorted into different groups. Choose 1-8 in order to enter
the different groups.
10.2.1.4 Edit Channel
- Press <RED> key to enter Add a new channel.
a) Area Name: choose area name
b) Carrier: Choose the different DVBT provider.
c) Channel Name: Name the new channel „new channel“ or enter a channel
name.
d) Audio PID, Video PID, PCR PID, Press <0-9> number key to revise values.
e) Press <OK> key to conrm the adding.
- Press <YELLOW> key to change a channel.
10.2.1.5 Delete All
In order to delete all channels press <OK> and enter the password “0000”.
10.2.2 Installation
10.2.2.1 Only FTA/ALL
This is a option for channel list. When you choose Only FTA, in channel list it only
showes Free to Air channel even if the unit found all channels. If you choose ALL,
it will show all channels.
10.2.2.2 AUTO SEARCH
Press auto-search, all TV and radio channels will be searched.
As soon as all channels are found, this sub-menu will be closed.
10.2.2.3 MANUAL SEARCHING
If you want to nd digital TV through the frequency, you should use the manual
search.
- Enter following parameter: Channel Name, Frequency and Band Width
- Press <OK> to start manual scan.
10.2.2.4 RANGE SEARCHING
- Prior to range scanning, you need to congure relevant parameters including:
Start Frequency, End Frequency, and Band Width.
10.2.2.5 LCN Setting
Choose <ON >, all channels will be listed according to a logical channel number.
If you choose <OFF>, it will show channel according to the order of frequency.

-10-
10.2.2.6 Antenna Setting
Setting for the power supply of the antenna. When the setting is activated, the
device can output 5V to the antenna. If you switch off the setting, there will be no
power output at all.
10.2.3.1 CONFIGURATION
10.2.3.2 OSD
Here you set the menu surface.
1. OSD Theme, here you can set different colours for the user surface.
2. Time display, if it is activated you will always see the time on the surface.
3. OSD display: choose the seconds how long the information of each channel
shall be displayed.
4. OSD see through, decide how many percent of the surface shall be
displayed.
5. OSD language, choose the language for the menu.
6. MP4 subtitle language: choose subtitle language
7. Choose the 1. tone language and 2. tone language
10.2.3.3 TV TYPE SETTING
You can set following:
- Display Mode: AUTO, PAL, NTSC
- Aspect ration:4:3LB, 4:3PS,16:9
- Brightness: 0% to 100%
- Contract: 0% to100%
- HUE: -6 to 6
- Saturation: 0 to 12
10.2.3.4 SYSTEM SETTING
Choose following settings:
- EQ Setup: to setup sound effect
- Surround: to set stage effect
- Active Antenna: to output +5V to active antenna
- JPEG Effect: On/OFF
- LCN: Logical channel number—On/Off
- Area: to set region country
10.2.3.5 TIME SETTING
Here, you can set up time mode, Date, time, and GMT offset, summer time.

-11-
10.2.3.6 WAKEUP TIMER
Here you can make up to 10 different settings how you want to be woken up. You
can also enter information about a birthday to receive congratulations.
10.2.3.7 PASSWORD SETTING
You can change the password at any time.
- Please input your old password (default value is 0000)
- Input your new password.
- Repeat your new password.
- Press OK.
The new password will be used from now on for all requests.
10.2.3.8 Software update
Please do not use this menu. It is ment to run a rmware update. Please get it
done by your dealer or Delock.
10.2.3.9 FACTORY DEFAULT SETTING.
If you want to reset factory default setting, just press <OK> and enter your pass-
word. After this press <YES>.
10.3 Movie
Here you can watch movies which you recorded on your external USB memory.
10.4 Music
Here you can listen to music which you recorded on your external USB memory.
10.5 Photo
Here you can watch the MPEG photos which you saved on your external USB
memory.
10.6 GAME
There are three games provided and you can choose between: Box Man, Hit Rat,
Tetris
10.6.1 BOXMAN
- Press direction keys, Up, Down, Left and right to move the cartoon man.
10.6.2 TETRIS
- Press key Left or Right to move the square left or right
- Press key Up to change the direction.
- Press key Down to accelerate the square.

-12-
10.6.3 HIT RAT
Use the direction keys 1,2,3,4,5,6,7,8,9, to hit the rat.
10.7 HDD manager
In this menu you can nd your data, unless you have connected an external USB
memory. You will have access at any time and can play-back the data as well as
record current TV program.
10.7.1 BASIC FUNCTIONS
You can enjoy all music, photos, lms. Insert USB memory stick or MP3 player,
press MENU to enter the main menu, and then choose <MOVIE>, <MUSIC> or
<PHOTO> to enter media playing mode.
- Press <OK> to choose folder or played le.
- Movie must be played under menu item <MOVIE>.
- Music must be played under menu item <MUSIC>.
- Photo picture must be played under menu item <PHOTO>.
- Press <EXIT> to exit media mode.
10.7.2 KEY DEFINITION
- VOL+/-, MUTE, ZOOM is the same as Digital TV denition under media mode.
- AUDIO is used to switch among left, right and stereo.
- FAST BACKWARD: press ALT(<<) to fast backward playback.
- FAST FORWARD: press LIST (>>) to fast forward playback.
- NEXT TRACK: press TEXT (>>|) to go to the next track.
- PREVIOUS TRACK: press RECORD(|<<) to goto previous track.
- SEQUENCE PLAYBACK: During PHOTO (JPEG and BMP) playback, press
TV/RADIO(>) to enter sequence playback mode.
- Press Left or Right to rotate the photos under full screen browse.
- Press <UP> or <DOWN> to view lens photo vertically or horizontally under full
screen browse.
- Press EXIT to exit full-screen browse.

-13-
11. Support Delock
If you have further questions, please contact our customer support
[email protected] / www.delock.com or phone +49 30 81789324*.
You can contact our service hotline during the following times:
Mon – Fri: 9:00 – 16:30 pm
* A connection fee applies according to fee schedule of your local telephone
provider.
You can nd current product information on our homepage: www.delock.com
12. Final clause
Information and data contained in this manual are subject to change without
notice in advance. Errors and misprints excepted.
13. Copyright
No part of this user manual may be reproduced, or transmitted for any purpose,
regardless in which way or by which means, electronically or mechanically,
without explicit written approval of Delock.
Edition: 07/2008

-14-
1. Kurzbeschreibung
Den Delock DVB-T Empfänger können Sie direkt an Ihrer Scart Buchse oder
auch per Video Anschluss an Ihren Fernseher anschließen. Sie können somit
Radio und Fernsehen in allen DVB-T Gebieten empfangen. Durch die USB
Schnittstelle können Sie auch USB Speicher oder USB Festplatten anschließen
und dann Filme aufzeichnen oder auch Ihre gespeicherten Filme abspielen. Es
können auch Fotos und MP3 Dateien per USB abgespielt werden.
2. Technische Daten
• Anschluss: SCART und Video
• Auösung: 720X576 (PAL)
• Aufnahme und Fernsehen zur gleichen Zeit möglich
• TimeShift Funktionen, automatischer Sendersuchlauf
• Aufzeichnung von TV-Sendungen im MPEG2-Format
• Programmierung automatischer Aufzeichnung
• Mit Videotextfunktion und EPG
• Multi-Media Wiedergabe: MP3/DivX/JPEG/BMP
•
Software mit multilingualer Oberäche: GB, F, D, I, E, S, P, FIN, NL, TK, CZ, GR, DK
3. Technische Spezikation
Demodulator Mode COFDM: 2K and 8K
Frequenzbereich VHF:170~230 MHz UHF:470~862 MHz
Bandbreite 7M/8M
Signal-Eingangsspannung -78~-10 dBm
Einganswellenwiderstand 75 Ohm (RF Anschluss)
Video Decoder MPEG2 kompatibel (Main Prole @ Main Level)
1.5-15Mb/s (720*576)
Standard NTSC/SECAM/PAL kompatibel
Audio Decoder MPEG2 Layer I & II
A/V Ausgang Scart Out
Media Unterstützung USB 1.1/SD/MMC card; Jpeg, Mp3, Bmp, DivX (5.0
or above), Xvid
Eingangsspannung STB unit: +12V, 300mA; +5V, 600mA; +3.3V,
1200mA;
Adapter: AC 100 V - 250 V ~ 0.5 A, 50/60 Hz
Stromverbrauch < 8W
Aufzeichungsformat *.mpg
Bitrate der Aufnahme Maximum 6Mbps

-15-
4. Packungsinhalt*
• SCART DVBT Empfänger
• Antenne, Video Kabel, USB Verlängerungskabel
• Fernbedienung, Infrarot Empfänger, 2x AAA Batterien
• Netzteil
• Bedienungsanleitung
*Überzeugen Sie sich vor Inbetriebnahme, dass alle Bestandteile des
Lieferumfangs in der Verpackung enthalten sind. Sollte etwas fehlen oder
beschädigt sein, wenden Sie sich bitte umgehend an Ihren Fachhändler.
5. Anschlüsse
a. SCART Anschluss
b. Mini USB, zum Anschluss von USB Geräten wie z.b. USB Speicher, USB
Festplatten, etc.
c. Antennenanschluss
d. Audio/Video Ausgang
e. Anschluss für den Infrarot Empfänger
f. USB Buchse zum Anschluss des Netzteils

-16-
6. Fernbedienung
1. POWER
2. Tasten 0-9
3. FAV
4. EPG
5. MENU
6. CH (UP)
7. LEFT
8. CH (Down)
9. Volume +/-
10. Text >>|
11. REC |<<
12. TV/RADIO
13. ZOOM
14. MUTE
15. SUB
16. INFO
17. EXIT
18. OK
19. RIGHT
20. LIST >>
21. ALT<<
22. AUDIO
23. PAUSE
24. USB/ Move
25. Auto SCAN
Ein-/und Ausschalten
Tasten für Sender
Favoritenliste
EPG Menü öffnen, aktuelle Sendungen werden
angezeigt.
Menü Taste
Sender oben (weiter)
Im Menü nach links
Sender unten (zurück)
Lautstärke höher +/Lautstärke niedriger -
DTV Modus: Videotext
Media Modus: vorwärts
DTV Modus: Aufnahme des aktuellen Programms
Media Modus: rückwärts
TV Modus: Umschalter zwischen TV und Radio
Media Modus: Play Funktion
Zum rein- und rauszoomen von Bildern
Lautlos ein/aus
DTV Modus: Untertitel anzeigen
Media Modus: zeigt Untertitel in Mpeg 2, DivX oder
Xvid
Info Taste, zeigt Informationen über den aktuellen
Sender an.
Im Menü nutzen Sie die Hilfe Taste um Informationen
zur Bedienung des Menü’s zu erhalten.
Schließt aktuelles Menü, um in das vorherige Menü
zu gelangen.
OK Taste zum auswählen.
Im Menü nach rechts
DTV Modus: Listet alle Sender auf, um diese schnell
auszuwählen.
Media Modus: schnellere Wiedergabe
DTV Modus: zurück zum vorherigen Sender zu
gelangen
Media Modus: schnelleres Zurückspulen
Audio Kanal auf stereo/links-mono/rechts-mono zu
setzen.
Pause um das Bild anzuhalten.
Um zum USB Speicher Menü zu gelangen.
DTV Modus, um die Programmsuche zu starten
Media Modus, Wiederholen

-17-
7. Den DVBT Empfänger in Betrieb nehmen
1. Stecken Sie das USB Netzteil in den DVBT Empfänger und in die Steckdose.
2. Schließen Sie den Infrarot Empfänger in die Buchse E des Empfängers.
3. Stecken Sie die Antenne in die Buchse C des Empfängers.
4. Schließen Sie nun den Empfänger mit der SCART Buchse an Ihren
Fernseher an.
Hinweis: Sie können diesen DVB-T Empfänger auch über das mitgelieferte Video
Kabel an Ihren Fernseher anschließen.
8. Einführung
1. Nach dem Anschließen schalten die den Empfänger mit Hilfe der
Fernbedienung (Powertaste) ein.
2. Wählen Sie Ihre Sprachen, gehen Sie dazu wie folgt vor: drücken Sie
die Taste „Menu“, dann wählen Sie mit der „OK“ Taste „Digital TV“-> „
Konguration“ -> „OSD“ -> OSD Sprache“ und wählen Sie Ihre Sprache aus.
Mit der „Exit“ Taste verlassen Sie die Menü’s wieder.
3. Drücken Sie auf der Fernbedienung „AUTO SCAN“, um die verschiedenen
Sender zu suchen.
4. Nachdem die Sender gefunden wurden, können Sie digitales Fernsehen
erleben.
9. Steuerung der Fernbedienung
9.1 Hilfe - Information
In den Menüs EPG, MENU, LIST, TELETEXT, GAME, können Sie jederzeit die
Taste <INFO> drücken, um Hilfe für die einzelnen Menüfunktionen zu erhalten.
9.2 POWER Ein/Aus
Power Ein
Im Standby Modus drücken Sie die <POWER> Taste, um das Gerät
einzuschalten
Power Aus
Wenn das Gerät an ist, drücken Sie auf <POWER>, um das Gerät in den
Standby Modus zu schalten.
9.3 Lautstärkeeinstellung und lautlos
Drücken Sie <VOL+/->, um die Lautstärke während des Fernsehens einzustellen;
ein Lautstärkeregler wird auf dem Bildschirm zu sehen sein.
Drücken Sie <MUTE>, um den Ton auf lautlos zu stellen. Drücken Sie diese Taste
erneut, um den Lautlosmodus auszuschalten.

-18-
9.4 TV / RADIO
Drücken Sie <TV/RADIO>, um zwischen dem TV- und Radioprogramm zu
wechseln.
9.5 Sender umschalten
Drücken Sie <UP/DOWN>, um zum vorherigen oder nächsten Sender zu
schalten. Falls Sie eine Favoritenliste angelegt haben, drücken Sie einfach
<FAV>, um sich die Liste anzeigen zu lassen und wechseln Sie zu den
verschiedenen Sendern mit <UP/DOWN>.
9.6 Bildschirminformation des aktuellen Senders anzeigen
Drücken Sie die <INFO> Taste, um die Information des aktuellen Programms
anzuzeigen, wenn Sie gerade fernsehen.
9.7 Zum vorherigen Programm wechseln
Drücken Sie <ALT> im normalen Vollbildmodus, um zu dem Sender zu wechseln,
den Sie zuletzt gesehen haben.
9.8 Bild zoomen
Drücken Sie <ZOOM>, um das aktuelle Bild zu zoomen, wenn Sie gerade im
Vollbildmodus sind. Es wird Ihnen die Zoomgröße angezeigt, wie z.b. “ZOOM
2 (2fache Vergrößerung), “ZOOM 3 (3fache Vergrößerung)”, “ZOOM 4 (4fache
Vergrößerung)”, “ZOOM 1/2 (1/2 Vergrößerung)”, “ZOOM 1/3 (1/3 Vergrößerung)”,
“ZOOM 1/4 (1/4 Vergrößerung)” und “ZOOM aus”. Beim einzoomen drücken Sie
bitte <Links>, <Rechts>, <oben> and <unten>, um das Bild zu verrücken.

-19-
9.9 ELECTRONIC PROGRAMS GUIDE (EPG) Programmführer
Drücken Sie die Taste <EPG> auf der Fernbedienung, um die EPG Seite zu
öffnen.
Dort sehen Sie das Fernsehprogramm von heute. Sie können nun auch zwischen
täglichem und wöchentlichem Programm wählen.
Tägliches Programm
- 1 zeigt den EPG Modus: Tägliches oder wöchentliches Programm
- 2 zeigt Datum und Uhrzeit
- 3 zeigt Datum und Wochentag
- 4 zeigt die Programmliste, drücken Sie <UP/DOWN>, um andere Sender zu
wählen
- 5 zeigt Sendung und Zeit des Programms an
- 6 zeigt detaillierte Informationen zum Programm in Feld 5
- 7 Info Assistent
- Drücken Sie <LEFT/RIGHT>, um zwischen Feld 4 und Feld 5 zu wechseln
Wöchentliches Programm
Drücken Sie die <GRÜNE> Taste, um in die Wöchentliche Programmübersicht zu
gelangen. Dort werden die Sendungen einer Woche angezeigt.
- Drücken Sie <|<< & >>|> Taste um zwischen den Tagen Montag bis Sonntag zu
wechseln
- Drücken Sie die <UP/DOWN> Taste, um zwischen den verschiedenen
Programmen in Feld 5 zu wechseln;
- Drücken Sie die <LEFT/RIGHT> Taste, um die Programminformation der
folgenden Sendungen zu sehen.
Table of contents
Languages:
Other DeLOCK Receiver manuals