Delta OHM HD40.1 User manual

Operating manual
P
ortable Thermal Printer
HD
40.1
www.deltaohm.com
English
Keep for future reference.

HD40.1 -2-V2.0
INDEX
INTRODUCTION.......................................................................................................... 3
KEYBOARD AND LED DESCRIPTION............................................................................ 6
INSTALLATION AND USE ............................................................................................ 8
CONNECTIONS .............................................................................................................. 8
HOW TO LOAD THE PAPER ................................................................................................. 9
BATTERIES..................................................................................................................10
HOW TO CHARGE BATTERIES .............................................................................................10
NOTES ON BATTERY USAGE...............................................................................................10
HOW TO REPLACE BATTERY BACK ........................................................................................11
BATTERY DISPOSAL .......................................................................................................11
PRINTER CONFIGURATION ................................................................................................12
PRINTING PARAMETERS IN DETAIL.......................................................................................12
RS232 SERIAL INTERFACE........................................................................................ 13
INSTRUMENT STORAGE ............................................................................................ 14
SAFETY INSTRUCTIONS............................................................................................ 14
TECHNICAL SPECIFICATIONS................................................................................... 15
ORDERING CODES .................................................................................................... 17

HD40.1 -3-V2.0
INTRODUCTION
The HD40.1 is a lightweight, compact, portable thermal printer. The connection to the
instruments or to a PC is made through the RS232 serial input.
A careful design allows you to replace the thermal paper roll in a few seconds.
A four NiMH rechargeable battery pack provides power supply and ensures long
autonomy: it is possible to print up to 3000 lines at full charge.
Standard thermal paper roll width: 57 mm.
Print resolution :203 dpi
Print characters (each line): 24
Protection degree: IP40.

HD40.1 -4-V2.0
Portable Thermal Printer

HD40.1 -5-V2.0
HD40.1
1. STATUS Led: shows the printer status.
2. MENU key: advances paper by two lines. When you turn on the printer, if you
press the Menu key and the ON/OFF key, you activate the printer configuration
mode.
3. Cover that gives you access to the paper roll and the printing mechanism.
4. POWER Led: provides information on rechargeable battery status.
5. ON/OFF Key: switches on and off the printer. If you press it with the MENU
key, it gives you access to the configuration mode.
6. Power supply connector. The positive pole is in the middle .
7. 9-pole D-Sub male connector for RS232 serial connection.

HD40.1 -6-V2.0
KEYBOARD AND LED DESCRIPTION
Press the ON/OFF key until the Status led starts blinking to turn on the printer, then
release the key.
Press the ON/OFF key until the Status led remains on to turn off the printer, then
release the key.
To access the configuration mode, press the ON/OFF key and the MENU key to turn on
the printer: when the paper roll starts advancing, release both keys (see chapter
Printer Configuration).
When the printer is on, press the MENU key to advance paper by two lines.
When you turn on the printer, press the MENU key with the ON/OFF key to activate
the printer configuration mode.
The POWER Led provides information on the rechargeable battery status.
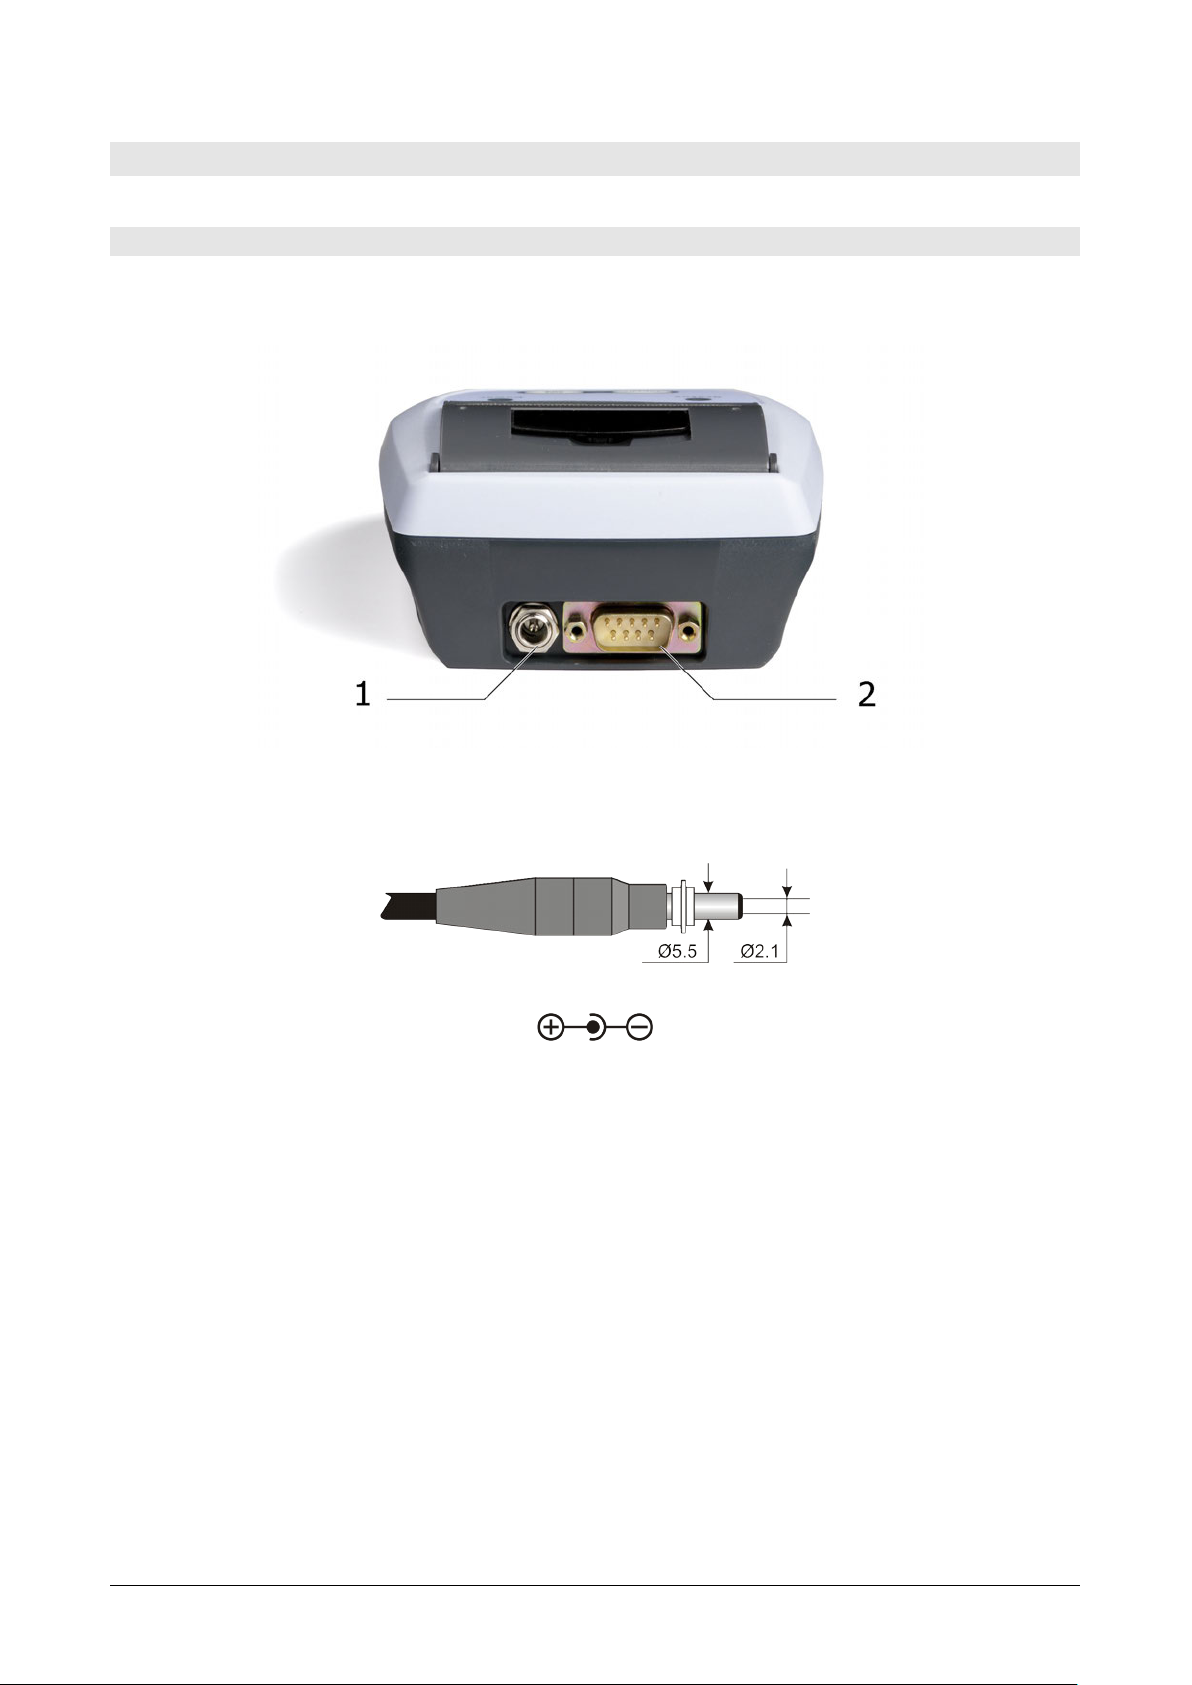
When you connect an external power supply, the printer checks rechargeable battery
status and, if necessary, it starts charging batteries.
A pre-charge phase may precede the real charge to avoid excessive stress on
batteries when they are significantly discharged, or their temperature is too low: in
this phase the POWER led blinks every second.
After this first phase, the quick charge starts: the POWER led remains on and it turns
off when the battery is fully charged.
At this point, it is possible to disconnect the external power supply and use
rechargeable batteries only.
Warning: if you connect an external power supply and the POWER led turns off
immediately instead of lighting, it means that there is a fault or there are no batteries.
The STATUS led shows the printer status. If the led blinks every two seconds, it
means that the printer is on and ready to print. If you disable the automatic switch -
off, the led blinks twice every two seconds (to set automatic switch-off, see chapter
Configuration).
To turn off the printer, press the ON/OFF key until the STATUS led stops blinking and
remains on: now you can release the key. The printer turns off.
The following table shows different POWER and STATUS led combinations.
ON/OFF key
MENU key
POWER Led
STATUS Led

HD40.1 -7-V2.0
STATUS LED
Description
Always off.
Printer is off.
Blinks slowly (every two seconds).
Printer is on and ready to print.
Remains on.
Printer is turning off. When the printer is on, you are
pressing the ON/OFF key to turn it off.
Blinks twice every two seconds.
Printer is on and ready to print. You have disabled the
automatic switch-off.
POWER LED (*)
Description
Blinks quickly (every second).
Pre-charge followed by quick charge.
Remains on.
Quick charge.
Always off.
Batteries charged; printer ready to print.
Blinks quickly and then it turns off.
Error: no batteries, no connection, faulty batteries.
(*) External power supply connected.

HD40.1 -8-V2.0
INSTALLATION AND USE
CONNECTIONS
The printer has one input (1) for the battery charger power supply and one plug (2)
for RS232 serial connection.
Power supply connector
The power supply connector is 5.5 mm in outer diameter and 2.1 mm in inner
diameter.
The positive pole is in the middle
The printer is provided with the SWD10 power supply which features:
•Output voltage: 12 Vdc
•Maximum current: 1A.
The printer is supplied with a four 1.2V rechargeable battery pack located in the
battery compartment: the printer does not work without batteries.
See at the following chapters how to charge batteries.
RS232 serial connector
The printer is equipped with an RS232 serial communication interface with 9-pole D-
sub male connector (2).

HD40.1 -9-V2.0
A null modem cable is necessary to connect the printer to the instrument: use the
HD2110CSNM cable for instruments with 8-pole Mini DIN connector (e.g. HD21…
series).
Use the 9CPRS232 cable for instruments with 9-pole connector (e.g. HD25.2, etc.).
HOW TO LOAD THE PAPER
The printer uses thermal paper rolls which are 57 mm wide and max. 32 mm in
diameter. Loading thermal paper roll is easy and quick.
Follow the steps below to replace the paper roll:
1) Pull the lid to open the cover.
2) Insert the paper roll according to the sense of rotation as shown below.

HD40.1 -10 -V2.0
3) Pull the paper and close the cover centring the paper roll.
4) Tear off excess paper. The printer is ready.
BATTERIES
HOW TO CHARGE BATTERIES
Use the SWD10 battery charger supplied with the printer to charge batteries.
Follow the steps below:
•Connect the battery charger plug to the mains and the battery charger connector
to the socket in the rear of the printer.
•If batteries are extremely discharged or temperature is too low, the POWER led
blinks for a few seconds (pre-charge) and then it remains on to indicate printer
quick charge.
•Charge the batteries until the POWER led turns off.
•Now the printer is ready: disconnect the battery charger cable.
Note: The first time you use the printer, you need to fully charge batteries.
NOTES ON BATTERY USAGE
•A new NiMH battery performs best only after fully discharging and charging it at
least twice or three times.
•Battery autonomy changes significantly depending on printing intensity and
quantity. Even a charged battery will eventually discharge if unused.
•The battery may be charged and discharged hundreds of times, but the battery will
eventually become exhausted. When autonomy (both when printing and waiting) is
far lower than usual, battery pack needs replacing.
•Use only the BAT-40 Delta OHM battery pack and charge it by using the SWD10
battery charger, or alternatively, one complying with our technical specifications.
•NiMH batteries last longer if you discharge them completely from time to time.
•Extreme temperatures may negatively affect battery performance.

HD40.1 -11 -V2.0
HOW TO REPLACE BATTERY BACK
Follow the steps below to replace the battery pack:
•Disconnect the external power supply and turn off the printer.
•Unscrew (2) the battery compartment cover located at the bottom of the printer
(1).
•Remove the connector. Make sure you don’t tear wires.
•Remove the battery pack.
•Plug the connector to your new battery pack: a notch on the connector will help
you insert it correctly.
•Position the pack in the battery compartment.
•Screw the battery compartment.
BATTERY DISPOSAL
Recycle or dispose of batteries properly.
Do not throw batteries in the dustbin.
Do not throw batteries into fire.

HD40.1 -12 -V2.0
PRINTER CONFIGURATION
The printer operating parameters are as follows (factory values have been
underlined):
1. Interface selection: RS232
2. RS232 serial communication baud rate: 9600, 19200 or 38400.
3. Automatic switch-off delay: 0, 5, 10 or 15 minutes.
4. Printing density: -2, -1, 0, +1, +2.
Please follow the steps below to change these parameters:
•When the printer is off, press the MENU key and the ON/OFF key until the printer
turns on and the paper roll advances. The first parameter you want to change will
appear.
•Press the MENU key to change a parameter: the new value is printed.
•Press the ON/OFF key to confirm a parameter that you selected and go to the next
one.
•Finally, after confirming the last parameter, the printer exits the configuration
menu.
PRINTING PARAMETERS IN DETAIL
1. Baud Rate
The baud rate is the RS232 serial port communication rate, expressed as bit/second.
The following values are available: 9600, 19200 and 38400 baud.
2. Automatic switch-off delay
When this interval of time has elapsed, the printer turns off automatically if you have
neither entered any command nor pressed any key.
You can set the following intervals: 0 or 5, 10 or 15 minutes. If you choose 0, the
automatic switch off is disabled and the printer turns off only if you press the
ON/OFF key.
3. Printing density
This parameter allows changing the intensity of print character. “0” is the standard
value, -2 and -1 reduce intensity, +1 and +2 increase it.

HD40.1 -13 -V2.0
RS232 SERIAL INTERFACE
The printer has an RS232 serial interface with a 9-pole RS232 connector located in the
rear of the printer. Two different connection cables are available on request according
to the device you want to connect - instrument or PC -:
•9CPRS232: is a 9 pole – 9 pole cable for any instrument with standard serial
connector and for PC connection. It is also suitable for other brand instruments.
•HD2110CSNM: is a 9 pole – 8 pole MiniDIN cable for Delta OHM instruments
equipped with this connector (e.g. HD21…).
Printer Connector
Device Connector
Cable Code
DB9 male
Instrument with DB9 male
9CPRS232
DB9 male
Instrument with MiniDIN
HD2110CSNM
DB9 male
Computer with DB9 male
9CPRS232
Both cables are null modem.
Front view of DB9 male connector pin assignment:
Front view of MiniDIN male circular connector pin assignment:
The following tables show cable connections.
9CPRS232 Cable
HD2110CSNM Cable
DB9 to
instrument or PC
DB9 to printer
MiniDIN to
instrument
DB9 to printer
1
4
1
9
2
3
2
1, 6
3
2
3
4
4
1
4
8
5
5
5
2
6
Disconnected
6
3
7
8
7
5
8
7
8
7
9
9

HD40.1 -14 -V2.0
INSTRUMENT STORAGE
Instrument storage conditions:
•Temperature: -25…+65°C.
•Humidity: less than 90%RH without condensation.
•Do not store the instrument in places where:
•humidity is high;
•the instrument may be exposed to direct sunlight;
•the instrument may be exposed to a source of high temperature;
•the instrument may be exposed to strong vibrations;
•the instrument may be exposed to steam, salt or any corrosive gas.
The instrument case is made of ABS plastic: do not use any incompatible solvent for
cleaning.
SAFETY INSTRUCTIONS
Authorized use
The technical specifications as given in chapter TECHNICAL SPECIFICATIONS must be
observed. Only the operation and running of the measuring instrument according to
the instructions given in this operating manual is authorized. Any other use is
considered unauthorized.
General safety instructions
This measuring system is constructed and tested in compliance with the EN61010-1
“Safety requirements for electrical equipment for measurement, control and
laboratory use” and has left the factory in perfect safety technical conditions.
The smooth functioning and operational safety of the measuring system can only be
guaranteed if the generally applicable safety measures and the specific safety
instructions in this operating manual are followed during operation.
The smooth functioning and operational safety of the instrument can only be
guaranteed under the environmental and electrical operating conditions that are in
specified in chapter TECHNICAL SPECIFICATIONS.
Do not use or store the product in places such as listed below:
•Rapid changes in ambient temperature which may cause condensation.
•Corrosive or inflammable gases.
•Direct vibration or shock to the instrument.
•Excessive induction noise, static electricity, magnetic fields or noise.
If the measuring system was transported from a cold environment to a warm
environment, the formation of condensate can impair the functioning of the measuring
system. In this event, wait until the temperature of the measuring system reaches
room temperature before putting the measuring system back into operation.
Obligations of the purchaser
The purchaser of this measuring system must ensure that the following laws and
guidelines are observed when using dangerous substances:
EEC directives for protective labour legislation
National protective labour legislation
Safety regulations

HD40.1 -15 -V2.0
TECHNICAL SPECIFICATIONS
Printing method Thermal
Resolution 203 DPI (8 dot/mm)
Printing width 48 mm centred in the paper roll
Paper roll width 57...58 mm
Max. paper roll diameter 32 mm
Number of columns 24
Printing speed Up to 90 mm/sec (depending on
battery charge and ambient
conditions)
Sensors Paper detection
Character set IBM II 858 table
Printing formats Normal or extended
Character font 1 (16 x 24 dot – 2 mm x 3 mm)
Thermal head durability
Mechanism life 100 million pulses (temperature:
20...25 °C)
Abrasion resistance 50 km of paper (temperature: 20...25
°C)
Cover group durability 2000 opening/closing cycles or more
Communication interface RS232
Baud rate 9600, 19200 and 38400 baud (the
factory parameter is 38400 baud)
Mains power supply (SWD10) 100-240 Vac/12 Vdc-1A mains
battery charger
Batteries Four 1.2 V AA rechargeable batteries
(NiMH)
Printing autonomy 3000 lines 24 characters each. It
prints one line every 10 seconds
Switch-off function 0, 5, 10 or 15 minutes
Dimensions 103 mm x 163 mm x 52 mm
Weight 380 gr. (with batteries and paper roll)
Material ABS
Operating conditions
Operating temperature 0…+50 °C
Operating relative humidity 20…80 %RH not condensing
Storage conditions -25...+70 °C / 10...90 %RH not
condensing
Protection degree IP40

HD40.1 -16 -V2.0
Connections
Serial interface 9-pole D sub male connector
Battery charger power supply 2-pole connector (positive in the
middle)

HD40.1 -17 -V2.0
ORDERING CODES
HD40.1 The kit includes: 24-column portable thermal printer, serial
interface, battery pack, SWD10 power supply, instruction manual, 5
thermal paper rolls.
The serial cable for PC/instrument connection must be ordered separately.
HD2110CSNM RS232C 8-pole MiniDin - 9-pole D Sub female null-modem cable for
connecting the printer to instruments with MiniDIN connector.
9CPRS232 RS232C 9-pole – 9-pole D Sub female null-modem cable for
connecting the printer to instrument with 9-pole D Sub connectors.
SWD10 100-240 Vac/12 Vdc-1A Mains battery charger.
BAT-40 Spare battery pack.
RCT The kit includes 4 thermal paper rolls 57 mm wide and 32 mm in
diameter.
Delta OHM metrological laboratories LAT N° 124 have been ISO/IEC 17025 accredited
by ACCREDIA in Temperature, Humidity, Pressure, Photometry/Radiometry, Acoustics
and Air Speed. They can provide calibration certificates for the accredited quantities.

HD40.1 -18 -V2.0
Notes


GHM GROUP – Delta OHM | Delta Ohm S.r.l. a socio unico
Via Marconi 5 | 35030 Caselle di Selvazzano | Padova | ITALY
Phone +39 049 8977150 | Fax +39 049 635596
www.deltaohm.com | sales@deltaohm.com
WARRANTY
Delta OHM is required to respond to the "factory warranty" only in those cases provided by
Legislative Decree 6 September 2005 - n. 206. Each instrument is sold after rigorous inspections;
if any manufacturing defect is found, it is necessary to contact the distributor where the
instrument was purchased from. During the warranty period (24 months from the date of invoice)
any manufacturing defects found will be repaired free of charge. Misuse, wear, neglect, lack or
inefficient maintenance as well as theft and damage during transport are excluded. Warranty does
not apply if changes, tampering or unauthorized repairs are made on the product. Solutions,
probes, electrodes and microphones are not guaranteed as the improper use, even for a few
minutes, may cause irreparable damages.
Delta OHM repairs the products that show defects of construction in accordance with the terms and
conditions of warranty included in the manual of the product. For any dispute, the competent court
is the Court of Padua. The Italian law and the “Convention on Contracts for the International Sales
of Goods” apply.
TECHNICAL INFORMATION
The quality level of our instruments is the result of the continuous product development. This may
lead to differences between the information reported in the manual and the instrument you have
purchased. In case of discrepancies and/or inconsistencies, please write to sales@deltaohm.com.
Delta OHM reserves the right to change technical specifications and dimensions to fit the
product requirements without prior notice.
DISPOSAL INFORMATION
Electrical and electronic equipment marked with specific symbol in
compliance with
2012/19/EU Directive must be disposed of separately from household waste.
European users can hand them over to the dealer or to the manuf
acturer when
purchasing a new electrical and electronic equipment, or to
a WEEE collection point
designated by local authorities. Illegal disposal is punished by law.
Disposing of electrical and electronic equipment separately from normal waste helps to
preserve natural resources and allows materials to be recycled in an environmentally friendly
way without risks to human health.
V2.0
01/2023
Other manuals for HD40.1
1
Table of contents
Other Delta OHM Printer manuals