Demeliss AIRFLOW SA-2303 User manual

MODEL SA-2303
231007_rev0
GR NO
RO
CN DK
SE
PT DEIT ESFR EN NL
PL
SLFI

FR 03
EN 06
PL 09
NL 12
IT 15
ES 18
PT 21
DE 24
28
SE 30
RO 33
CN 36
DK 38
FI 41
SL 44
GR 47
NO 50
guarantee 54
3
FR INFORMATIONS À CONSERVER POUR CONSULTATION ULTÉRIEURE.
À LIRE ATTENTIVEMENT AVANT D’UTILISER L’APPAREIL.
AVERTISSEMENTS
Cet appareil peut être utilisé par des enfants âgés d'au moins 8 ans et par des personnes
ayant des capacités physiques, sensorielles ou mentales réduites ou dénuées d’expérience
ou de connaissance, s'ils (si elles) sont correctement surveillé(e)s ou si des instructions
relatives à l'utilisation de l'appareil en toute sécurité leur ont été données et si les risques
encourus ont été appréhendés. Les enfants ne doivent pas jouer avec l’appareil. Le
nettoyage et l'entretien par l'usager ne doivent pas être eectués par des enfants sans
surveillance. Si le câble d'alimentation est endommagé, il doit être remplacé par le
fabricant, son service après vente ou des personnes de qualification similaire afin d'éviter un
danger. Lorsque la brosse souante est utilisée dans une salle de bains, débranchez-la
après usage, car la proximité de l'eau peut présenter un danger même lorsque la brosse
souante est arrêtée. Pour assurer une protection complémentaire, l'installation, dans
le circuit électrique alimentant la salle de bain, d'un dispositif à courant diérentiel résiduel
(DDR) de courant diérentiel de fonctionnement assigné n'excédant pas 30 mA, est
conseillée. Demandez conseil à votre installateur. MISE EN GARDE: Ne pas utiliser
cet appareil près des baignoires, des douches, des lavabos ou autres récipients
contenant de l’eau. Retirez complètement l’emballage avant d’utiliser
l’appareil. Gardez l’emballage hors de portée des enfants pour éviter tout
risque d’ingestion et d’étouement. Assurez-vous que la tension indiquée
sur la plaque signalétique correspond à celle de la prise secteur utilisée. La
coque plastique de l’appareil ne doit en aucun cas être ouverte. N’insérez pas de doigts ou
de corps étrangers dans l’appareil ; les ouvertures d’aération ne doivent en aucun cas être
obstruées. Protégez l’appareil de la chaleur. Ne le mettez pas à proximité d’une source
de chaleur (par ex. : cuisinière, radiateur, etc.). AVERTISSEMENT - RISQUE DE
DÉCHARGE ÉLECTRIQUE ! N’immergez pas l’appareil et sa fiche dans l’eau ou tout
autre liquide. Ne manipulez pas l’appareil avec les mains humides ou mouillées. Pour
éviter tout risque de surchaue ou d’incendie, ne couvrez pas l’appareil lorsqu’il est allumé.
N’utilisez pas de laque pour cheveux, de vaporisateur d’eau ou tout autre vaporisateur
lorsque l’appareil est en marche. Évitez de placer l’appareil sur le rebord d’un lavabo ou
d’une baignoire. Si l’appareil tombe dans l’eau,
débranchez-le immédiatement. Ne mettez pas la
main dans l’eau pour retirer l’appareil. Faites
attention aux risques de brûlures ! Ne pas toucher
une zone autre que la poignée (6) délimitée par la
ligne d’indication (19).
DESCRIPTION
Cet appareil est destiné à sécher, coier, lisser et boucler les cheveux avec l’accessoire
adéquat. Ne l’utilisez pas sur les cheveux synthétiques ou extrêmement mouillés ni sur les
animaux domestiques.
L’appareil est exclusivement destiné à un usage ménager intérieur.
N’utilisez pas l’appareil à d’autres fins. Toute autre utilisation peut entraîner des dommages
à l’appareil ou aux biens ainsi que des blessures.
Le fabricant décline toute responsabilité en cas de dommages ou de blessures résultant
d’une mauvaise utilisation ou d’un non-respect de ce mode d’emploi.
AVANT D’UTILISER L’APPAREIL
AVERTISSEMENT Les emballages ne sont pas des jouets ! Ne laissez pas les enfants jouer
avec les emballages , car ils présentent un risque d’étouement en cas d’ingestion !
— Vérifiez le contenu de l’emballage pour vous assurer qu’aucun article ne manque ou
n’a été endommagé lors du transport. Si l’appareil est endommagé ou certaines pièces
manquent, ne l’utilisez pas et rapportez-le à votre fournisseur.
— Retirez complètement l’emballage et conservez-le pour une utilisation ultérieure.
— Déroulez complètement le cordon d’alimentation.
— Nettoyez l’appareil avec un chion doux et humide et, si nécessaire, un peu de détergent
doux. Essuyez avec un chion doux et sec.
19 6

4
APERÇU DU PRODUIT
1
2
3
4
11
16
12
13
15 14
17
19
18
20
5
6
8
9
10
7
1. Sortie d’air 11. Brosse volumisante
2. Bouton de déverrouillage 12. Poils de brosse
3. Bouton de réglage du débit
d’air (avec témoins bleus) 13. Embout isolant
4. Bouton de réglage de la
température et de l’air froid
(avec témoins rouges)
14. Brosse lissante
5. Interrupteur Marche/Arrêt
(I/O)15. Poils de brosse
6. Poignée 16. Accessoire bouclant (vers la droite )
7. Entrée d’air avec filtre 17. Accessoire bouclant (vers la gauche )
8. Couvercle du filtre 18. Embout isolant
9. Cordon d’alimentation avec
fiche d’alimentation 19. Limite de la zone de préhension
10. Bande serre-câble 20. Embout séchant
MODE D’EMPLOI
AVERTISSEMENT ! La surface de l’appareil peut devenir chaude pendant
le fonctionnement et le restera pendant un certain temps après utilisation.
Ne touchez que la poignée de l’appareil. Gardez les accessoires (y compris
l’embout isolant) susamment éloignés de votre corps ou de votre cuir
chevelu et ne les gardez pas trop longtemps sur vos cheveux.
AVERTISSEMENT ! Lorsque vous utilisez l’embout, gardez l’air chaud loin de vos yeux ou
d’autres parties du corps sensibles à la chaleur.
AVERTISSEMENT ! Les accessoires deviennent très chauds pendant le fonctionnement.
Nepas toucher! Veuillez toujourséteindre l’appareil,ledébrancher dela prisede courantet
le laisser refroidir complètement avant de retirer et de monter les accessoires.
REMARQUE : Assurez-vous toujours que vos cheveux sont propres et démêlés avant
d’utiliser l’appareil.
REMARQUE : Assurez-vous toujours que l’appareil, la sortie d’air, l’entrée d’air, le filtre, le
couvercle du filtre et les accessoires sont propres et ne sont pas obstrués par des peluches,
des cheveux ou d’autres objets.
REMARQUE : Pour éviter la surchaue et garantir les performances, vérifiez
régulièrement que le filtre et le couvercle du filtre ne sont pas obstrués et nettoyez-les en
conséquence, si nécessaire.
REMARQUE : L’appareil dispose d’une fonction mémoire. Après avoir été éteint puis
rallumé, il fonctionne avec les mêmes réglages de la température et de débit d’air que lors
de la dernière utilisation.
REMARQUE : Si un dysfonctionnement survient, débranchez immédiatement l’appareil
de l’alimentation électrique. Attendez quelques secondes, puis rebranchez et rallumez-le.
Si le problème persiste, n’utilisez pas l’appareil tant qu’il n’a pas été contrôlé et réparé par
un électricien qualifié.
• Protection contre la haute tension activée : l’appareil s’éteint automatiquement et
le témoin de température (rouge) clignote.
• Protection contre la basse tension activée : l’appareil s’éteint automatiquement et
les témoins de température (rouges) clignotent.
• CTN (coecient de température négatif) anormal : si la température détectée
par le CTN est supérieure à la valeur réglée, l’appareil ajuste automatiquement la

5
puissance de sortie.
— Vérifiez que l’interrupteur marche/arrêt est en position O.
— Assemblez l’accessoire approprié (brosse volumatrice, brosse lissante, boucleur, embout
séchant)en eectuantunléger mouvementderotation surl’unitéprincipale enfonction
de l’application souhaitée. Assurez-vous que le bouton de déverrouillage s’enclenche en
position .
— Pour retirer l’accessoire, faites glisser l’interrupteur de
déverrouillage vers l’arrière, maintenez-le en position,
puis retirez l’accessoire de l’unité principale.
— Branchez l’appareil à l’alimentation électrique.
— Placez l’interrupteur marche/arrêt sur la position Ipour
allumer l’appareil.
— Appuyez plusieurs fois sur le bouton de réglage du débit d’air pour sélectionner le débit
d’air souhaité. Le témoin correspondant (bleu) s’allume ( : faible/ : moyen/
: élevé).
— Appuyez plusieurs fois sur le bouton de réglage de la température et de l’air froid pour
sélectionner la température souhaitée. Le témoin correspondant (rouge) s’allume (
: air froid/ : bas/ : moyen/ : haut).
— Alternativement, pendant le fonctionnement avec les réglages de température basse/
moyenne/haute, continuez à appuyer sur le bouton de réglage de la température et
de l’air froid pour activer la fonction d’air froid. Les témoins de température (rouges)
s’éteignent et l’appareil passe automatiquement en mode de fonctionnement avec
débit d’air élevé. Relâchez le bouton de réglage de la température et de l’air froid pour
désactiver la fonction d’air froid. L’appareil fonctionne avec les réglages précédents.
— Une fois l’opération terminée, mettez l’interrupteur marche/arrêt en position Opour
éteindre l’appareil.
— Débranchez l’appareil de l’alimentation électrique. Posez-le sur une surface résistante à
la chaleur pour qu’il refroidisse.
Coiffage et lissage des cheveux à l’aide de la brosse volumatrice /
brosse lissante
— Allumez l’appareil. Réglez la température et le jet d’air souhaités.
— Divisez les cheveux en mèches égales, de préférence d'environ 5 cm de large et 5 mm
d'épaisseur.
— Tenez l'appareil par la poignée d'une main et la mèche de cheveux de l'autre main.
— Brossez la mèche de cheveux de la racine à la pointe d'un mouvement doux et lent. Pour
obtenir le meilleur résultat de coiage / lissage, assurez-vous que la mèche de cheveux
se glisse profondément dans les zones internes des poils et près des sorties d'air. Veillez à
ne pas laisser les poils et les sorties d'air trop longtemps sur vos cheveux.
— Répétez l'opération pour les autres mèches de cheveux.
— Laissez les cheveux refroidir avant de les coier et de les lisser davantage.
Bouclage les cheveux à l’aide d’un accessoire bouclant
— Allumez l’appareil. Réglez la température et le flux d’air souhaités.
— Attendez que l'accessoire bouclant atteigne la température réglée.
— Tenez l’appareil par la poignée.
— Enroulez une mèche (pas trop épaisse, 5 cm de large environ) autour du rouleau à friser
pendant 5 à 8 secondes. Veillez à ne pas laisser l'accessoire bouclant trop longtemps sur
vos cheveux.
— Répétez l’opération pour les mèches restantes.
— Laissez vos mèches refroidir avant de vous coier.
Séchage et coiffage des cheveux à l’aide de l'embout séchant
— Assurez-vous que les cheveux ne sont pas trop mouillés. Si nécessaire, essorez l’excès
d’humidité de vos cheveux à l’aide d’une serviette.
— Démêlez les cheveux et appliquez un produit de protection contre la chaleur.
— Il est recommandé de régler la température élevée et le jet d’air fort pour sécher les
cheveux, puis la température basse et le jet d’air faible pour coier les cheveux.
— Pour sécher les cheveux, répartissez-les en plusieurs sections et prenez une mèche de la
section inférieure.
NETTOYAGE
REMARQUE : L’appareil est doté d’une fonction d’auto-nettoyage. Il est recommandé
de faire fonctionner l’appareil en mode d’autonettoyage, après avoir nettoyé le filtre et le
couvercle dufiltre.N’essayezjamaisde faire fonctionnerl’appareilenmode auto-nettoyage
plus de deux cycles consécutifs, afin d’éviter d’endommager le moteur.
• Dans les 10 secondes qui suivent l’arrêt de l’appareil et son branchement à
l’alimentation électrique, appuyez sur le bouton de réglage du débit d’air et sur le
2.
1.
6
bouton de réglage de la température et de l’air froid pendant environ 3 secondes
pour activer la fonction d’autonettoyage.
• L’appareil fonctionne en mode auto-nettoyage avec le jet d’air réglé sur le niveau le
plus élevé pendant environ 10 secondes et s’éteint automatiquement par la suite.
— Avant de le nettoyer, débranchez l’appareil et laissez-le refroidir complètement.
— Ne nettoyez pas l’appareil avec de la laine d’acier, des produits chimiques forts, des
produits alcalins, des produits abrasifs ou des produits désinfectants, car ils pourraient
endommager sa surface.
— N’immergez pas l’appareil dans l’eau ou d’autres liquides pour le nettoyer. Assurez-vous
que les parties électriques ne sont pas mouillées ou exposées à l’humidité.
— Retirez les cheveux présents sur l’appareil, en particulier sur l’accessoire.
— Tirez doucement sur le couvercle du filtre pour le détacher de l’entrée d’air / du filtre.
Nettoyez le filtre et le couvercle du filtre avec un chion doux et humide, puis essuyez-
les avecunchion douxet sec.Aubesoin, servez-vousd’une brosse.Assurez-vous quele
filtre et le couvercle du filtre sont complètement secs avant de les remonter sur l’entrée
d’air / le filtre.
— Nettoyez l’appareil avec un chion doux et humide et, si nécessaire, un peu de détergent
doux. Essuyez avec un chion doux et sec.
— L’appareil ne doit être réutilisé qu’après séchage complet.
ENTREPOSAGE
— Veillez à ce que l’appareil soit complètement refroidi avant de le ranger.
— Rangez l’appareil dans un endroit frais et sec, à l’abri de l’humidité et hors de portée des
enfants.
Ce symbole, apposé sur le produit ou son emballage, indique que ce produit est
conforme à la directive européenne 2012/19/UE et qu’il ne doit pas être traité
avec les déchets ménagers.
Il doit être remis à un point de collecte approprié pour le recyclage des équipements
électriques et électroniques.
En s’assurant que ce produit est bien mis au rebus de manière appropriée, vous aiderez
à prévenir les conséquences négatives potentielles pour l’environnement et la santé
humaine.
Le recyclage des matériaux aidera à conserver les ressources naturelles.
EN PLEASE KEEP THIS INFORMATION FOR FUTURE REFERENCE.
PLEASE READ CAREFULLY BEFORE USING THE DEVICE.
WARNINGS
This appliance can be used by children aged from 8 years and above and persons with
reduced physical, sensory or mental capabilities or lack of experience and knowledge if they
have been given supervision or instruction concerning use of the appliance in a safe way and
understand thehazardsinvolved. Childrenshall notplay withtheappliance. Cleaning
and user maintenance shall not be made by children without supervision. If the supply
cord is damaged, it must be replaced by the manufacturer, its service agent or similarly
qualified persons in order to avoid a hazard. When the appliance is used in a bathroom,
unplug it after use, since the proximity of water presents a hazard even when the appliance
is switched o. For additional protection, the installation of a residual current device
(RCD) having a rated residual operating current not exceeding 30 mA is advisable in the
electrical circuit supplying the bathroom. Ask your installer for advice. WARNING! Do
notusethisappliancenearbathtubs,showers,basinsorothervesselscontaining
water. Remove allpackaging materialsbefore using theappliance. Keepthe
packaging materials away from children they pose a risk of swallowing and
suocation. Ensurethe rated voltageshown on therating labelcorresponds
with thevoltage of thepower supply. Donot openthe housingunder anycircumstances.
Do not insert fingers or foreign objects in any opening of the appliance and do not obstruct
the airvents. Protectthe applianceagainstheat. Donot place closetoheat sourcessuch
as stoves or heating appliances. WARNING - RISK OF ELECTRIC SHOCK! Do not
immerse the appliance and its plug in water or other liquids. Do not operate the appliance
with the wet hands. To avoid overheating or fire, do not cover the appliance when it is
switched on. Do not use hair sprays, water vaporizers or any other vaporizers during use
of the appliance. Do not place the appliance on the edges of basins or bathtubs. Should
the appliance drop into water, unplug it immediately.
Do not reach into the water to retrieve the appliance.
Be carefulto avoid riskof burns! Do nottouch the
area other than the handle (6) limited by the
indication line (19).
19 6
7
DESCRIPTION
This appliance is intended for drying, styling, straightening and curling hair with the
respective attachment. Do not use it on synthetic or extremely wet hair, and do not use
it on pets.
The appliance is only intended for household indoor use.
Do not use the appliance for other purposes. Any other use might lead to damage of the
appliance, property or personal injury.
The manufacturer will accept no liability for damage or injuries resulting from improper use
or non-compliance with this manual.
BEFORE USING THE APPLIANCE
WARNING! Packaging materials are not a toy! Do not allow children to play with
packaging materials, as they pose a choking hazard if swallowed!
— Check the delivery contents for any missing items or any possible transport damage. If
the appliance is damaged or some parts are missing, do not use it and bring it back to
your dealer.
— Remove all packaging materials and keep them for future use.
— Fully uncoil the power cord.
— Cleanthe appliancewith asoft dampcloth and,if necessary, alittlemild detergent.Wipe
with a dry soft cloth.
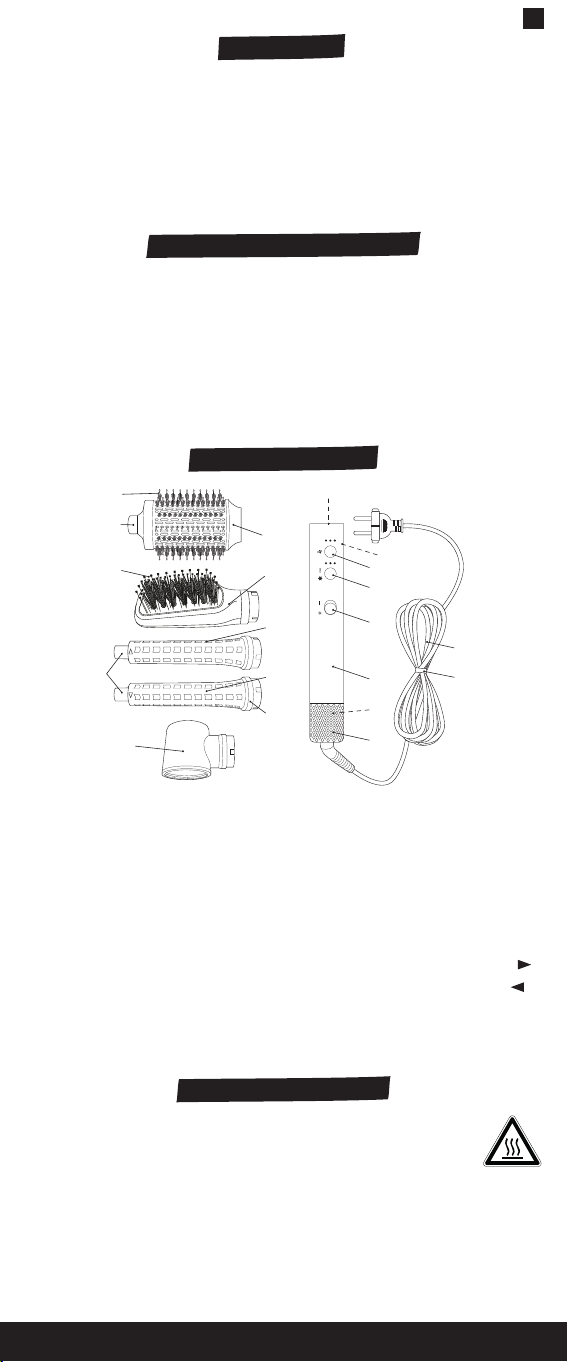
PRODUCT OVERVIEW
1
2
3
4
11
16
12
13
15 14
17
19
18
20
5
6
8
9
10
7
1. Air outlet 11. Volumizing brush
2. Release switch 12. Bristles
3. Air blow setting button (with
blue indicators) 13. Insulation tip
4. Temperature setting & cold air
button (with red indicators) 14. Straightening brush
5. On/o switch (I/ O)15. Bristles
6. Handle 16. Curling barrel (rightward direction )
7. Air inlet with filter 17. Curling barrel (leftward direction )
8. Filter cover 18. Insulation tip
9. Power cord with plug 19. Gripping area limit
10. Cable band 20. Nozzle
INSTRUCTIONS FOR USE
WARNING! The surfaces of the appliance are liable to get hot during use
and will stay hot for some time after operation. Only touch the appliance
by the handle. Keep the attachments (including the insulation tip) well away
from your body or head skin and do not keep them on your hair for too long.
WARNING! When using the nozzle, keep the hot air well away from your eyes or other
heat sensitive parts of the body.
WARNING! The attachments become very hot during operation. Do not touch! Always
switch o the appliance, disconnect it from the power supply and let it completely cool
down before removing and assembling the attachments.
NOTE: Always ensure your hair is clean and tangle-free before using the appliance.

8
NOTE: Always ensure the appliance, air outlet, air inlet, filter, filter cover and attachments
are clean and free of blockage, e. g. lint, hair or other objects.
NOTE: To avoid overheating and ensure performance, check the filter and filter cover for
blockage regularly and clean them accordingly, if necessary.
NOTE: The appliance features a memory function. After the appliance is switched o and
on again, it operates with the same settings of the temperature and air flow as previous
operation.
NOTE: If the malfunction occurs, unplug the appliance immediately from the power
supply. Wait a few seconds, connect the appliance to the power supply and switch it on
again. If the malfunction remains, do not use the appliance, until it has been checked and
repaired by a qualified electrician.
• high voltage protection activated: the appliance switches o automatically and the
temperature indicator (red) is flashing.
• low voltage protection activated: the appliance switches o automatically and the
temperature indicators (red) are flashing.
• NTC (negative temperature coecient) abnormal: if the temperature detected by
the NTC is higher than the set value, the appliance will adjust the output power
automatically.
— Ensure the on/o switch is in the position O.
— Assemble the suitable attachment (volumizing brush, straightening brush, curling barrel,
nozzle)with aslight twistmotion ontothe mainunitaccording tothe desiredapplication.
Ensure the release switch engages in position .
— To remove the attachment, slide the release switch backward, hold it in position and then
remove the attachment from the main unit.
— Connect the appliance to the power supply.
— Set the on/o switch to the position Ito switch on the
appliance.
— Press the air blow setting button repeatedly to select
the desired air blow. The respective indicator (blue)
turns on ( : low / : medium / : high).
— Press the temperature setting & cold air button repeatedly to select the desired
temperature. The respective indicator (red) turns on ( : cold air / : low /
: medium / : high).
— Alternatively, during operation with the settings of low / medium / high temperature,
keep pressing the temperature setting & cold air button to activate the cold air function.
The temperature indicators (red) turn o and the appliance switches automatically to
the operatingmode with highairblow. Release thetemperature setting& cold airbutton
to deactivate the cold air function. The appliance operates with the previous settings.
— When the operation is finished, set the on/o switch to the position Oto switch o the
appliance.
— Disconnect the appliance from the power supply. Place it on a heat-resistant surface to
let it cool down.
Styling and straightening hair with volumizing brush / straightening
brush
— Switch on the appliance. Set the desired temperature and air blow.
— Divide the hair into equal strands, preferably approx. 5 cm wide and 5 mm thick.
— Holdtheappliance on thehandle with onehand andthe strand ofhair with anotherhand.
— Brush the strand of the hair from the roots to the tips in a gentle and slow motion. To
achieve the best styling / straightening result, ensure the hair strand gets deep into the
inner areas of the bristles and close to the air outlets. Make sure not to keep the bristles
and air outlets on your hair for too long.
— Repeat the same operation for the other strands of the hair.
— Let the hair cool down before styling and straightening it further.
Curling hair with curling barrel
— Switch on the appliance. Set the desired temperature and air blow.
— Wait until the curling barrel reaches the set temperature.
— Hold the appliance on the handle.
— Roll a strand of hair (approx. 5 cm in wide, not too thick) onto the curling barrel for
approx. 5 - 8 seconds. Make sure not to keep the curling barrel on your hair for too long.
— Repeat the same operation over the entire strand of the hair.
— Let the hair cool down before styling it further.
Drying and styling hair with nozzle
— Ensure the hair is not too wet. Squeeze the excess moisture out of your hair with a towel
if necessary.
2.
1.

9
— Detangle the hair and then apply some heat protectant on it.
— Itisrecommended toset the hightemperature/ airblow for dryingthe hair;and then the
low temperature / air blow for styling the hair.
— To dry the hair, divide the hair into sections and grab a piece from the bottom section.
CLEANING
NOTE: The appliance features a self-cleaning function. It is recommended to operate the
appliance in self-cleaning mode, after the filter and filter cover are cleaned. Never attempt
to operatetheappliance inself-cleaning modemore thantwo continuous cycles,to protect
the motor unit from damage.
• After the appliance is switched o and connected to the power supply, within
approx. 10 seconds, keep pressing the air blow setting button and the temperature
setting & cold air button for approx. 3 seconds to activate the self-cleaning
function.
• The appliance operates in self-cleaning mode with the setting of high air blow for
approx. 10 seconds and switches o automatically afterward.
— Before cleaning, unplug the appliance and let it cool down completely.
— Do not clean the appliance with steel wool, strong chemicals, alkali, abrasive or
disinfecting agents as they may damage its surface.
— Do not immerse the appliance in water or other liquids to clean it. Make sure that the
electrical parts do not become wet or damp.
— Remove any hair left on the appliance, especially on the attachment.
— Gently pull the filter cover to detach it from the air inlet / filter. Clean the filter and filter
cover with a soft damp cloth and wipe them with a dry soft cloth afterward. Use a brush,
if necessary. Ensure the filter and filter cover are completely dry before refitting the
filter cover to the air inlet / filter.
— Cleanthe appliancewith asoft dampcloth and,if necessary, alittlemild detergent.Wipe
with a dry soft cloth.
— The appliance may only be used again after it is dried completely.
STORAGE
— Before storage, always make sure that the appliance is completely cooled down.
— Store the appliance in a cool, dry place, protected from moisture and out of the reach
of children.
This symbol, displayed on the product or on its packaging, indicates that this
product complies with the European Directive 2012/19/EU and must not be
disposed of with household waste.
It must be taken to an appropriate collection point for recycling electrical and electronic
equipment.
By ensuring that this product is disposed of in an appropriate way, you will be helping to
prevent potential harmful consequences for the environment and human health.
Recycling materials will help to conserve natural resources.
PL ZACHOWAĆ NINIEJSZE INFORMACJE NA PRZYSZŁOŚĆ.
DOKŁADNIE PRZECZYTAĆ PRZED SKORZYSTANIEM Z URZĄDZENIA.
OSTRZEŻENIA
Urządzenie może być użytkowane przez dzieci od 8 roku życia oraz osoby o ograniczonych
zdolnościach psychicznych, sensorycznych, umysłowych lub nieposiadające wiedzy i
doświadczenia, o ile pozostają pod nadzorem lub otrzymały instrukcje dotyczące
bezpiecznego użytkowania urządzenia oraz rozumieją potencjalne zagrożenia. Dzieci nie
powinny bawićsię urządzeniem. Czyszczeniei konserwacjanie powinny byćwykonywane
przez dzieci pozostające bez nadzoru. Aby uniknąć niebezpieczeństwa, wymianę
uszkodzonego przewodu sieciowego urządzenia należy powierzyć producentowi, jego
serwisowi lub innej osobie o podobnych kwalifikacjach. Gdy urządzenie jest używane w
łazience, po użyciu wyjmij wtyczkę z gniazdka, ponieważ bliskość wody stwarza zagrożenie
nawet wtedy, gdy urządzenie jest wyłączone. Jako dodatkowe zabezpieczenie zaleca się
zainstalowanie w obwodzie elektrycznym obejmującym łazienkę urządzenia ochronnego
różnicowoprądowego (RCD) o wartości znamionowej nieprzekraczającej 30 mA. W tym
celu należy skonsultować się z wykwalifikowanym elektrykiem. OSTRZEŻENIE! Nie
używaj urządzenia w pobliżu wanny, prysznica, umywalki lub innego naczynia wypełnionego
wodą. Przed użyciem urządzenia usuń wszystkie elementy opakowania.
Dzieci nie powinny bawić się materiałami opakowaniowymi, gdyż grozi to
połknięciem materiału przez dziecko lub uduszeniem! Przed podłączeniem
do sieci elektrycznej upewnij się, że napięcie sieciowe podane na tabliczce
znamionowej jest zgodne z napięciem zasilającym. Pod żadnym pozorem nie otwieraj
10
obudowy. Nie wkładaj do wnętrza urządzenia palców ani obcych przedmiotów i nie zasłaniaj
otworów wentylacyjnych. Chroń urządzenie przed działaniem wysokiej temperatury.
Nie ustawiaj urządzenia w pobliżu źródeł ciepła, jak piece lub urządzenia grzewcze.
OSTRZEŻENIE — NIEBEZPIECZEŃSTWO PORAŻENIA PRĄDEM! Nie zanurzaj
urządzenia ani wtyczki w wodzie ani innych płynach. Nie obsługuj urządzenia mokrymi
dłońmi. Aby uniknąć przegrzania lub pożaru, nie przykrywaj włączonego urządzenia.
Podczas użytkowania urządzenia nie należy rozpylać lakierów do włosów, korzystać ze
spryskiwaczy lub innych kosmetyków w formie mgiełki. Nie kładź urządzenia na
krawędziach umywalek lub wanien. Jeżeli urządzenie wpadnie do wody, natychmiast je
odłącz. Nie próbuj wyciągnąćurządzeniaz wody. Uważaj,aby uniknąć ryzykapoparzenia!
Nie dotykaj obszarów poza uchwytem (6) ograniczonych linią (19).
OPIS
To urządzenie służy do suszenia, modelowania, prostowania i kręcenia włosów przy użyciu
odpowiedniej końcówki. Urządzenie nie służy do prostowania włosów syntetycznych ani
mokrych, ani sierści zwierząt.
Urządzenie nadaje się jedynie do stosowania w gospodarstwach domowych i w
pomieszczeniach.
Nieużywajurządzeniadoinnychcelów.Wszelkieinneużyciemożeprowadzićdouszkodzenia
urządzenia, własności lub obrażeń ciała.
Producent nie ponosi żadnej odpowiedzialności za uszkodzenia lub obrażenia wynikające z
niewłaściwego użytkowania lub nieprzestrzegania niniejszych instrukcji.
PRZED UŻYCIEM URZĄDZENIA
OSTRZEŻENIE! Materiałypakowe niesą zabawką!Nienależy pozwolić, bydzieci bawiły się
materiałami pakowymi, , gdyż w przypadku połknięcia stanowią one zagrożenie uduszeniem!
— Sprawdź zawartość przesyłki pod kątem braków lub uszkodzeń transportowych.
Jeśli urządzenie jest uszkodzone lub brakuje niektórych części, nie używaj go i zwróć
sprzedawcy.
— Zdejmij wszystkie materiały opakowaniowe i zachowaj je do wykorzystania w przyszłości.
— Całkowicie rozwiń przewód zasilający.
— Oczyść urządzenie miękką wilgotną ściereczką i, jeśli to konieczne, niewielką ilością
łagodnego detergentu. Wytrzyj miękką, suchą ściereczką.
OPIS PRODUKTU
1. Wylot powietrza 11. Szczotka nadająca objętość
2. Przełącznik do odblokowania/
zablokowania końcówek 12. Igły
3. Przycisk regulacji nadmuchu
powietrza (niebieskie wskaźniki) 13. Końcówka izolacyjna
4. Przycisk regulacji temperatury i
chłodnego powietrza (czerwone
wskaźniki)
14. Szczotka prostująca
5. Włącznik/wyłącznik (I/O)15. Igły
6. Uchwyt 16. Końcówka cylindryczna do kręcenia
włosów (ruch w prawo )
7. Wlot powietrza z filtrem 17. Końcówka cylindryczna do kręcenia
włosów (ruch w lewo )
8. Pokrywa filtra 18. Końcówka izolacyjna
9. Przewód zasilający z wtyczką 19. Ograniczenie obszaru chwytania
10. Kabel 20. Dysza
INSTRUKCJA UŻYCIA
OSTRZEŻENIE! Powierzchnia urządzenia może być gorąca w trakcie używania i przez
jakiś czas po zakończeniu pracy. Trzymaj urządzenie wyłącznie za jego uchwyt.
Końcówki (w tym końcówkę izolacyjną) należy trzymać z dala od ciała oraz skóry
głowy. Nie można trzymać ich na włosach zbyt długo.
OSTRZEŻENIE! Przed użyciem dyszy upewnij się, że gorące powietrze nie jest
kierowane na oczy ani inne wrażliwe na ciepło części ciała.
OSTRZEŻENIE! Końcówki mogą bardzo nagrzać się podczas pracy urządzenia. Nie
dotykaj! Przed zdjęciem lub założeniem końcówek wyłącz urządzenie, odłącz je od zasilania i
poczekaj, aż całkowicie ostygnie.
UWAGA: Przed użyciem urządzenia upewnij się, że włosy są czyste i niesplątane.
UWAGA: Zawsze dbaj o to, aby wlot i wylot powietrza, filtr, pokrywa filtra i końcówki były
czyste i niezablokowane przez nagromadzone kłaczki, włosy lub inne obiekty.

11
UWAGA:Abyuniknąćprzegrzaniaizapewnićodpowiedniąwydajność,regularniesprawdzaj,
czy filtr i pokrywa filtra nie są zablokowane. W razie potrzeby odpowiednio je wyczyść.
UWAGA: Urządzenie jest wyposażone w funkcję pamięci. Po wyłączeniu i ponownym
włączeniu urządzenia działa ono zgodnie z takimi samymi ustawieniami temperatury i
nadmuchu co wcześniej.
UWAGA: Jeśli dojdzie do usterki, natychmiast odłącz urządzenie od źródła zasilania.
Poczekaj kilka sekund, podłącz urządzenie do zasilania i włącz je. Jeśli mimo to usterka wciąż
występuje, nie korzystaj z urządzenia do czasu, aż zostanie sprawdzone i naprawione przez
wykwalifikowanego elektryka.
• aktywowane zabezpieczenie przed wysokim napięciem: urządzenie wyłącza się
automatycznie, a wskaźnik temperatury (czerwony) miga.
• aktywowane zabezpieczenie przed niskim napięciem: urządzenie wyłącza się
automatycznie, a wskaźniki temperatury (czerwone) migają.
• Nieprawidłowy TWR (ujemny temperaturowy współczynnik rezystancji): jeśli
temperatura wykryta przez TWR jest wyższa niż ustawiona wartość, urządzenie
automatycznie dostosuje moc wyjściową.
— Upewnij się, że przełącznik wł./wył. ustawiony jest w pozycji O.
— Aby użyć odpowiedniej końcówki (na przykład szczotki nadającej objętość, szczotki
prostującej, lokówki, dyszy), zamontuj ją na głównej części urządzenia, wykonując lekki
ruch obrotowy. Upewnij się, że przełącznik zablokowania/odblokowania znajduje się w
pozycji .
— Aby usunąć końcówkę, przesuń przełącznik odblokowania/zablokowania do tyłu,
przytrzymaj go w tej pozycji, a następnie wyciągnij końcówkę z głównej części urządzenia.
— Podłącz urządzenie do zasilania.
— Aby włączyć urządzenie, ustaw przełącznik wł./wył. w pozycji I.
— Aby wybraćodpowiednią moc nadmuchupowietrza, naciśnij przyciskregulacji nadmuchu
kilka razy. Włączy się odpowiedni wskaźnik (niebieski) ( : słaby/ : średni /
: silny).
— Aby wybrać odpowiednią temperaturę, naciśnij przycisk regulacji temperatury i
chłodnego powietrza kilka razy. Włączy się odpowiedni wskaźnik (czerwony) ( :
chłodne powietrze / : niska / : średnia / : wysoka).
— Aby aktywować funkcję chłodnego powietrza, możesz też podczas regulowania
temperatury (niska/średnia/wysoka) przytrzymać przycisk regulacji temperatury i
chłodnegopowietrza.Wskaźnikitemperatury(wkolorzeczerwonym)znikną,aurządzenie
automatycznie przełączy się na działanie w trybie silnego nadmuchu powietrza. Aby
wyłączyć funkcję chłodnego powietrza, puść przycisk regulacji temperatury i chłodnego
powietrza. Działanie urządzenia zostanie przywrócone do poprzednich ustawień.
— Po zakończeniu przesuń przełącznik do pozycji O, aby wyłączyć urządzenie.
— Odłącz urządzenie od źródła zasilania. Umieść urządzenie na powierzchni odpornej na
wysoką temperaturę, aby ostygło.
Modelowanie i prostowanie włosów za pomocą szczotki nadającej
objętość/szczotki prostującej
— Włącz urządzenie. Wybierz odpowiednią temperaturę i nadmuch powietrza.
— Podziel włosy na równe pasma, najlepiej około. 5 cm szerokości i 5 mm grubości.
— Jedną ręką trzymaj urządzenie za uchwyt, a drugą za pasmo włosów.
— Rozczesuj pasmo włosów od nasady aż po końce delikatnym i powolnym ruchem. Aby
osiągnąć najlepszy efekt stylizacji/prostowania, upewnij się, że pasmo włosów wchodzi
głęboko w wewnętrzne obszary igieł i blisko wylotów powietrza. Uważaj, aby nie
przytrzymywać igieł i wylotów powietrza przy włosach zbyt długo.
— Powtórz tę samą operację na każdym paśmie włosów.
— Przed dalszym modelowaniem/prostowaniem pozwól włosom ostygnąć.
Kręcenie włosów za pomocą lokówki
— Włącz urządzenie. Wybierz odpowiednią temperaturę i nadmuch powietrza.
— Poczekaj, aż lokówka osiągnie ustawioną temperaturę.
— Trzymaj urządzenie za uchwyt.
— Nawiń pasmo włosów (o szerokości ok. 5 cm, niezbyt grube) na końcówkę cylindryczną
lokówki i przytrzymaj przez ok. 5-8 sekund. Uważaj, aby nie przytrzymywać końcówki
przy włosach zbyt długo.
— Powtórz tę samą operację na każdym paśmie włosów.
— Przed dalszą stylizacją pozwól włosom ostygnąć.
Suszenie i modelowanie włosów z użyciem dysz
— Upewnij się, że włosy nie są zbyt wilgotne. Wyciśnij ręcznikiem nadmiar wilgoci z włosów,
jeśli to konieczne.
— Rozczesz włosy i nałóż na nie środek termoochronny.
12
— Zaleca się, aby do suszenia włosów ustawiać wysoką temperaturę/nadmuch powietrza, a
do modelowania włosów – niską temperaturę/nadmuch powietrza.
— Aby wysuszyć włosy, podziel je na partie i chwyć pasma z dolnej partii.
CZYSZCZENIE
— UWAGA: Urządzenie jest wyposażone w funkcję samoczyszczenia. Zalecana jest praca
urządzenia w trybie samoczyszczenia po wcześniejszym umyciu filtra i jego pokrywy. Aby
zabezpieczać silnik przed uszkodzeniami, nie używaj urządzenia w trybie samoczyszczenia
więcej niż przez dwa cykle z rzędu.
• Aby włączyć funkcję samoczyszczenia, należy wyłączyć urządzenie i podłączyć je do
źródła zasilania, a następnie, w ciągu około 10 sekund, nacisnąć i przytrzymać przycisk
regulacji nadmuchu powietrza oraz regulacji temperatury i chłodnego powietrza przez
około 3 sekundy.
• Urządzenie będzie działać w trybie samoczyszczenia z mocnym nadmuchem przez około
10 sekund, a następnie wyłączy się automatycznie.
— Przed czyszczeniem odłącz urządzenie od zasilania i poczekaj na całkowite jego
ostygnięcie.
— Nie czyść urządzenia wełną stalową, silnymi środkami chemicznymi, alkalicznymi,
ściernymi lub dezynfekującymi, gdyż mogą one uszkodzić powierzchnię.
— Podczas czyszczenia nie zanurzaj urządzenia w wodzie ani żadnych innych płynach.
Upewnij się, że elementy elektryczne nie zostają zamoczone ani zawilgocone.
— Usuń wszelkie włosy pozostałe na urządzeniu, zwłaszcza na końcówce.
— Delikatnie pociągnij pokrywę filtra, aby oddzielić ją od wlotu powietrza/filtra. Wyczyść
filtr i pokrywę filtra wilgotną, miękką szczoteczką, a następnie osusz je suchą, miękką
ściereczką. W razie potrzeby użyj szczoteczki. Przed ponownym zamontowaniem
pokrywy filtra na wlocie powietrza/filtrze upewnij się, że filtr i pokrywa filtra są całkowicie
suche.
— Oczyść urządzenie miękką wilgotną ściereczką i, jeśli to konieczne, niewielką ilością
łagodnego detergentu. Wytrzyj miękką, suchą ściereczką.
— Urządzenie może być używane wyłącznie po całkowitym wyschnięciu.
PRZECHOWYWANIE
— Przed schowaniem urządzenia upewnij się, że całkowicie ostygło.
— Przechowuj urządzenie w chłodnym, suchym miejscu, w którym jest chronione przed
wilgocią, poza zasięgiem dzieci.
Symbol ten widniejący na produkcie lub na jego opakowaniu wskazuje, że produkt
spełnia wymogi dyrektywy unijnej 2012/19/UE i że nie może być utylizowany
jako odpad gospodarstwa domowego.
Należyoddaćgodoodpowiedniegopunktuzbiórkisprzętuelektrycznegoielektronicznego
do powtórnego przetworzenia.
Utylizacja tego produktu w odpowiedni sposób pomoże w zapobieganiu potencjalnym
szkodliwym konsekwencjom dla środowiska i zdrowia ludzi.
Oddawanie materiałów do recyclingu pomaga chronić zasoby naturalne.
NL BEWAAR DEZE INFORMATIE VOOR LA TERE RAADPLEGING.
LEES DEZE HANDLEIDING AANDA CHTIG DOOR VOORDA T U HET
APPARAAT GEBRUIKT.
WAARSCHUWINGEN
Dit apparaat kan door kinderen vanaf 8 jaar en ouder worden gebruikt, als zij onder toezicht
staan of ingelicht werden over de veilige omgang met het apparaat en de hieruit
voortvloeiende gevaren hebben begrepen. Kinderen mogen niet met het apparaat
spelen. Schoonmaak- en onderhoudswerkzaamheden mogen niet worden uitgevoerd
door kinderen zonder toezicht. Als de stroomkabel van het apparaat beschadigd is, dient
het door de fabrikant, de dealer of een soortgelijk gekwalificeerde persoon vervangen te
worden, om gevaren te voorkomen. Als het apparaat wordt gebruikt in een badkamer,
haalt u het na gebruik uit het stopcontact, omdat de nabijheid van water gevaar oplevert,
zelfs als het apparaat is uitgeschakeld. Voor bijkomende bescherming adviseren we de
installatie van een stroomlekschakelaar (RCD) met een lekstroom van niet meer dan 30
mA in het elektrisch circuit dat de badkamer voedt. Vraag uw installateur om advies.
WAARSCHUWING! Gebruik dit apparaat niet in de buurt van een bad, douche, wastafel
of ander vat met water. Verwijder al het verpakkingsmateriaal voordat u het
apparaat gebruikt. Houd het verpakkingsmateriaal uit de buurt van kinderen; het
vormt een risico op inslikken en verstikking. Controleer of de op het
typeplaatje vermelde netspanning overeenkomt met die van uw stopcontact.
Open in geen geval de behuizing. Steek geen vingers of voorwerpen in het apparaat en
blokkeer nooit de ventilatieopeningen. Bescherm het apparaat tegen hitte. Plaats het

13
apparaat niet in de onmiddellijke nabijheid van warmtebronnen zoals fornuizen of
verwarmingen. WAARSCHUWING - GEVAAR OP ELEKTRISCHE SCHOK!
Dompel het apparaat en de stekker niet onder in water of andere vloeistoen. Bedien het
apparaat niet met natte handen. Om oververhitting of brand te voorkomen, dekt u het
apparaat niet af wanneer het is ingeschakeld. Gebruik tijdens het gebruik van het
apparaat geen haarsrays, waterverdampers of andere verdampers. Plaats het apparaat
niet op de randen van wastafels of badkuipen. Mocht het apparaat in water vallen, trek de
stekker er dan onmiddellijk uit. Reik niet in het water om het apparaat op te pakken.
Wees voorzichtig om brandwonden te vermijden! Raak het gebied buiten het handvat (6),
begrensd door de indicatielijn (19), niet aan.
BESCHRIJVING
Dit apparaat is bedoeld voor het drogen, stylen, glad maken en krullen van haar met het
respectievelijke hulpstuk. Gebruik het niet op synthetisch of extreem nat haar, en gebruik
het niet op huisdieren.
Het apparaat is uitsluitend bedoeld voor huishoudelijk gebruik .binnenshuis.
Gebruik hetapparaat niet vooranderedoeleinden. Enigander gebruik kanleidentot schade
aan het apparaat, eigendom of tot persoonlijk letsel.
De fabrikant accepteert geen aansprakelijkheid voor schade of letsel als gevolg van onjuist
gebruik of het niet naleven van deze gebruiksaanwijzing.
VOORDAT U HET APPARAAT GEBRUIKT
WAARSCHUWING!Verpakkingsmaterialenzijngeenspeelgoed!Staniettoedatkinderen
spelen met verpakkingsmaterialen , omdat zij bij het inslikken een verstikkingsgevaar
vormen!
— Controleer de inhoud van de levering op eventueel ontbrekende items of enige
transportschade. Als het apparaat is beschadigd of er sommige onderdelen ontbreken,
gebruik het dan niet en breng het terug bij uw dealer.
— Verwijder al het verpakkingsmateriaal en bewaar dit voor toekomstig gebruik.
— Rol het netsnoer volledig af.
— Reinig het apparaat met een zacht, vochtig doekje en eventueel een beetje mild
afwasmiddel. Wrijf droog met een droge zachte doek.
PRODUCTOVERZICHT
1. Luchtuitlaat 11. Voluminiserende borstel
2. Vrijgave-schakelaar 12. Borstelen
3. Knop instelling lucht blazen
(met blauwe indicatoren) 13. Isolatietip
4. Knop temperatuurinstelling
& koude lucht (met rode
indicatoren)
14. Recht uitrichtende borstel
5. Aan/uit-schakelaar (I/O)15. Borstelen
6. Handvat 16. Krulstaaf (rechter richting )
7. Luchttoevoer met filter 17. Krulstaaf (linker richting )
8. Filterafdekking 18. Isolatietip
9. Snoer met stekker 19. Gripoppervlak handvat
10. Kabelband 20. Sproeikop
GEBRUIKSINSTRUCTIES
WAARSCHUWING! De oppervlakken van het apparaat kunnen warm worden
tijdens gebruik en enige tijd warm blijven na gebruik. Raak het apparaat alleen
aan bij het handvat. Houd de hulpstukken (met inbegrip van de isolatietip) uit de
buurt van uw lichaam of hoofdhuid en houd ze niet te lang op uw haar.
WAARSCHUWING! Richt de warme lucht niet op uw ogen of andere warmtegevoelige
delen van het lichaam, wanneer u het aanzuigstuk gebruikt.
WAARSCHUWING! De hulpstukken kunnen heel heet worden tijdens de bediening.
Raak deze niet aan! Schakel het apparaat altijd uit, sluit het af van de stroomvoorziening
en laat het volledig aoelen voordat u de hulpstukken ervan verwijdert of erop monteert.
OPMERKING: Zorg er altijd voor dat uw haar schoon is en geen knopen bevat voordat u
het apparaat gebruikt.
OPMERKING: Zorg er altijd voor dat het apparaat, de luchttoevoer, het filter, de
filterafdekking en de hulpstukken schoon en niet verstopt zijn, bv. door een haarlint, haar
of andere voorwerpen.
OPMERKING: Om oververhitting te zorgen en te zorgen voor goede prestaties
controleert u het filter en de filterafdekking regelmatig op verstopping en reinigt u deze

14
dienovereenkomstig, indien noodzakelijk.
OPMERKING: Het apparaat is voorzien van een geheugenfunctie. Nadat het apparaat is
uit- en weer aangeschakeld, functioneert het met dezelfde instellingen voor temperatuur
en lucht blazen als bij de vorige bediening.
OPMERKING: Als er een fout optreedt, koppelt u het apparaat onmiddellijk los van de
stroomvoorziening.Wachteen paarseconden, sluit hetapparaat weer aanop destroombron
en schakel het nogmaals aan. Als de fout blijft bestaan, gebruikt u het apparaat niet totdat
het is gecontroleerd en gerepareerd door een gekwalificeerd elektricien.
• hoogspanningsbeveiliging geactiveerd: het apparaat schakelt automatisch uit en de
temperatuurindicator (rood) knippert.
• laagspanningsbeveiliging geactiveerd: het apparaat schakelt automatisch uit en de
temperatuurindicatoren (rood) knipperen.
• NTC (negatieve temperatuurcoëciënt) abnormaal: als de temperatuur
gedetecteerd door de NTC hoger is dan de ingestelde waarde, past het apparaat
automatisch het uitgangsvermogen aan.
— Zorg ervoor dat de aan/uit-schakelaar in de stand Ostaat.
— Monteer het geschikte hulpstuk (voluminiserende borstel, recht uitrichtende
borstel, krulstaaf, aanzuigstuk) met een lichte draaibeweging op de hoofdunit in
overeenstemming met de gewenste toepassing. Zorg ervoor dat de vrijgave-schakelaar
staat in de stand .
— Om het hulpstuk te verwijderen, schuift u de vrijgave-schakelaar naar achteren, houdt u
deze in zijn positie en verwijdert u vervolgens het hulpstuk van de hoofdunit.
— Sluit het apparaat aan op de stroomvoorziening.
— Zet de aan/uit-schakelaar in de stand Iom het apparaat in te schakelen.
— Druk herhaaldelijk op de knop instellen lucht blazen om de gewenste stand lucht blazen
te kiezen.De respectievelijkeindicator(blauw)gaat aan( :laag / : gemiddeld
/ : hoog).
— Druk herhaaldelijk op de knop temperatuurinstelling & koude lucht om de gewenste
temperatuur in te stellen. De respectievelijke indicator (rood) gaat aan ( : koude
lucht / : laag / : gemiddeld / : hoog).
— Als alternatief blijft u tijdens de bediening met de instelling laag/gemiddeld/hoog
temperatuur de knop temperatuurinstelling & koude lucht indrukken om de functie
koude lucht te activeren. De temperatuurindicatoren (rood) gaan uit en het apparaat
schakelt automatisch naar de bedieningsmodus met hoog lucht blazen. Laat de knop
temperatuurinstelling & koude lucht los om de functie koude lucht te deactiveren. Het
apparaat functioneert met de vorige instellingen.
— Wanneer het gebruik is beëindigd, zet u de aan/uit-schakelaar in de stand Oom het
apparaat uit te schakelen.
— Sluit het apparaat af van de stroomvoorziening. Leg het op een hittebestendig oppervlak
om het te laten aoelen.
Het stylen en glad maken van haar met voluminiserende borstel /
glad makende borstel
— Schakel het apparaat aan. Kies de gewenste temperatuur en lucht blazen.
— Verdeel het haar in gelijke strengen, bij voorkeur ca. 5 cm breed en 5 mm dik.
— Houd het apparaat met één hand aan het handvat vast en houd met de andere hand de
haarlok vast.
— Borstel de haarlok vanaf de wortels naar de punten in een zachte en langzame beweging.
Voor het beste styling-/steilresultaat moet u ervoor zorgen dat u de haarlok diep in
de kern van de borstelharen en dicht bij de luchtuitlaten komt. Zorg ervoor dat u de
borstelharen en luchtuitlaten niet te lang op uw haar drukt.
— Herhaal dezelfde handeling voor de andere haarlokken.
— Laat het haar aoelen alvorens het verder te stylen/glad te maken.
Het haar krullen met de krulstaaf
— Schakel het apparaat aan. Kies de gewenste temperatuur en lucht blazen.
— Wacht totdat de krulstaaf de ingestelde temperatuur bereikt.
— Houd het apparaat bij de handgreep vast.
— Rol een haarlok (ong. 5 cm breed, niet te dik) op de krulstaaf gedurende ong. 5-8
seconden. Zorg ervoor dat u de krulstaaf niet te lang op uw haar drukt.
— Herhaal dezelfde handeling over de gehele haarlok.
— Laat het haar aoelen alvorens het verder te stylen.
Haar drogen en stylen met aanzuigstuk
— Zorg ervoor dat het haar niet te nat is. Wring indien nodig het overtollige vocht uit uw
haar met een handdoek.
— Ontwar het haar en breng vervolgens wat hittebescherming erop aan.
15
— Het wordt aanbevolen om de hoge temperatuur / lucht blazen in te stellen voor het
drogen van haar, en vervolgens de lage temperatuur / lucht blazen voor het stylen van
haar.
— Om het haar te drogen, verdeelt u het haar in gedeeltes en pakt u een deel vanaf de
onderkant van het gedeelte.
REINIGEN
— OPMERKING: Het apparaat is voorzien van een zelfreinigende functie. Het wordt
aanbevolen om het apparaat te bedienen in de zelfreinigende modus, nadat het filter
en de filterafdekking zijn gereinigd. Probeer nooit het apparaat vaker dan in twee
opeenvolgende cycli te bedienen in de zelfreinigende modus, om de motoreenheid te
beschermen tegen beschadiging.
• Nadat het apparaat is uitgeschakeld en aangesloten op de stroomvoorziening
blijft u binnen ong. 10 seconden de knop lucht blazen instellen en de knop
temperatuurinstelling & koude lucht ong. 3 seconden indrukken om de
zelfreinigende functie te activeren.
• Het apparaat functioneert in de zelfreinigende modus gedurende ong. 10 seconden
met de instelling lucht blazen hoog en schakelt daarna automatisch uit.
— Haal voor het reinigen de stekker van het apparaat uit het stopcontact en laat het
volledig aoelen.
— Reinig het apparaat niet met staalwol, sterke chemicaliën, alkali, schuur- of
desinfecterend middellen omdat dit het oppervlak kan beschadigen.
— Dompel het apparaat niet onder in water of andere vloeistoen om het te reinigen. Zorg
ervoor dat de elektrische onderdelen niet nat of vochtig worden.
— Verwijder eventueel aanwezige haren op het apparaat, met name op het hulpstuk.
— Trek voorzichtig de filterafdekking eraf om deze los te maken van de luchttoevoer / het
filter. Reinig het filter en de filterafdekking met een zachte, vochtige doek en veeg ze
daarna af met een droge, zachte doek. Gebruik een borstel indien nodig. Zorg ervoor dat
het filter en de filterafdekking volledig droog zijn voordat u de filterafdekking weer op de
luchttoevoer / het filter aansluit.
— Reinig het apparaat met een zacht, vochtig doekje en eventueel een beetje mild
afwasmiddel. Wrijf droog met een droge zachte doek.
— Het apparaat mag pas opnieuw worden gebruikt nadat het volledig is opgedroogd.
OPSLAG
— Vóór opslag zorgt u er altijd voor dat het apparaat volledig is afgekoeld.
— Sla het apparaat op een koele, droge plek op waar het beschermd is tegen vocht en zich
buiten het bereik van kinderen bevindt.
Dit pictogram op het product of de verpakking geeft aan dat dit product
voldoet aan de Europese richtlijn 2012/19/EU en niet met het huisvuil mag
worden meegegeven.
Het moet naar een geschikt inzamelpunt voor het recyclen van elektrische en
elektronische apparatuur worden gebracht.
Door ervoor te zorgen dat dit product op de juiste manier wordt afgevoerd, helpt u
mogelijkeschadelijkegevolgenvoorhetmilieuendemenselijkegezondheidtevoorkomen.
De recycling van materialen draagt bij aan het behoud van de natuurlijke hulpbronnen.
IT INFORMAZIONI DA CONSERVARE PER FUTURA CONSULTAZIONE.
LEGGERE ATTENTAMENTE PRIMA DI UTILIZZARE L’APPARECCHIO.
AVVERTENZE
L’apparecchio può essere utilizzato da bambini a partire dagli 8 anni di età e da persone con
ridotte capacità fisiche, sensoriali o mentali, o mancanza di esperienza e/o conoscenza, solo
se sono supervisionati od istruiti circa l’uso sicuro dell’apparecchio e se sono consapevoli dei
rischi che ne derivano. Ai bambini non è permesso giocare con l’apparecchio. La
pulizia e la manutenzione a carico dell’utente non devono essere eseguite da bambini senza
la supervisione di un adulto. Se il cavo di alimentazione è danneggiato, esso deve essere
sostituito dal costruttore o dal suo servizio assistenza tecnica o comunque da una persona
con qualifica similare, in modo da prevenire ogni rischio. Se si utilizza l’apparecchio in un
bagno, scollegarlo dopo l’utilizzo poiché la vicinanza all’acqua rappresenta un rischio anche
da spento. Per un’ulteriore protezione, si consiglia di installare un interruttore
dierenziale (RCD) avente una corrente di esercizio residua non superiore a 30mA nel
circuito elettrico che alimenta il bagno. Rivolgersi all’installatore per una consulenza.
ATTENZIONE! non utilizzare l’apparecchio nei pressi di vasche da bagno, docce, lavandini
o altrirecipienti contenenti acqua. Rimuoveretuttoil materialedi imballaggio
dall’apparecchio. Tenere i materiali d’imballaggio fuori dalla portata dei bambini,
poichéquestipotrebberoingerirliesoocare. Primadicollegarel’apparecchio

16
alla rete elettrica assicurarsi che la tensione di rete indicata sulla targhetta corrisponda a
quella della fornitura di energia elettrica. Non aprire in nessun caso l’alloggiamento
dell’apparecchio. Non inserire dita o oggetti all’interno dell’apparecchio e non ostruire mai
le prese d’aria. Proteggere l’apparecchio dal calore. Non installare l’apparecchio in
prossimità di fonti di calore, come per esempio stufe o caloriferi. AVVERTENZA -
PERICOLO DI SCOSSE ELETTRICHE! Non immergere l’apparecchio e il suo
connettore in acqua o altri liquidi. Non utilizzare l’apparecchio con le mani bagnate. Per
evitare il rischio di surriscaldamento o di incendio, non coprire l’apparecchio quando è
acceso. Nonutilizzare sprayper capelli,vaporizzatorid’acqua oaltro tipodi vaporizzatore
durante l’uso dell’apparecchio. Non poggiare l'apparecchio sui bordi di lavandini o vasche
da bagno.Se l'apparecchiodovesse cadereinacqua, staccareimmediatamentela spina.Non
immergere le mani nell'acqua per recuperare l'apparecchio. Prestare attenzione per
evitare il rischio di ustioni! Toccare esclusivamente l’area del manico (6) delimitata
dall’apposita linea (19).
DESCRIZIONE
Questo apparecchio è stato progettato per asciugare, modellare, stirare e arricciare i capelli
con ilrispettivo accessorio. Nonutilizzarlo sucapellisintetici omolto bagnati epergli animali
domestici.
L’apparecchio è destinato esclusivamente all’uso domestico in ambienti interni.
Non utilizzare l’apparecchio per altri scopi. Qualsiasi altro uso potrebbe causare danni
all’apparecchio e alla proprietà o lesioni personali.
Il produttore non si assume alcuna responsabilità per danni o lesioni derivanti dall’uso
improprio o dalla mancata - osservanza di questo manuale.
MA DI UTILIZZARE L’APPARECCHIO
ATTENZIONE! I materiali di imballaggio non sono giocattoli! Non permettere ai bambini
di giocareconi materialidi imballaggioin ,quanto rappresentano unrischio disoocamento
se ingeriti!
— Controllareilcontenuto dellafornitura per accertarsiche non manchialcun componente
o che non vi siano danni dovuti al trasporto. Se l’apparecchio è danneggiato o mancano
alcune parti, non utilizzarlo e restituirlo al rivenditore.
— Rimuovere tutti i materiali di imballaggio e conservarli per un uso futuro.
— Svolgere completamente il cavo di alimentazione.
— Pulire l’apparecchio con un panno morbido inumidito e, se necessario, un po’ di
detergente delicato. Pulire con un panno morbido e asciutto.
PANORAMA DEL PRODOTTO
1. Uscita dell'aria 11. Spazzola volumizzante
2. Pulsante di rilascio 12. Setole
3. Pulsante di impostazione del
getto d'aria (con indicatori blu) 13. Punta isolante
4. Pulsante di impostazione della
temperatura e dell'aria fredda
(con indicatori rossi)
14. Spazzola per la stiratura
5. Interruttore di accensione/
spegnimento (I/ O)15. Setole
6. Manico 16. Barraarricciacapelli (direzionedestra )
7. Presa d’aria con filtro 17. Barra arricciacapelli (direzione sinistra )
8. Coprifiltro 18. Punta isolante
9. Cavo di alimentazione con spina 19. Delimitazione dell'area di impugnatura
10. Fascetta serracavo 20. Bocchetta
ISTRUZIONI PER L’USO
AVVERTENZA! Le superfici dell'apparecchio tendono a surriscaldarsi durante
l'usoerimangonocaldeperqualchetempoanchedopoilfunzionamento.Toccare
l’apparecchio solo mediante l’impugnatura. Tenere gli accessori (compresa la
punta isolante) a distanza di sicurezza dal corpo e dal cuoio capelluto, evitando
che restino troppo a lungo a contatto con i capelli.
AVVERTENZA! Quando si utilizza la bocchetta, tenere l'aria calda lontana dagli occhi o da
altre parti del corpo sensibili al calore.
AVVERTENZA! Gli accessori diventano molto caldi durante l'uso. Non toccare! Spegnere
sempre l'apparecchio, scollegarlo dall'alimentazione elettrica e lasciarlo rareddare
completamente prima di rimuovere o montare gli accessori.
NOTA: prima di utilizzare l'apparecchio, assicurarsi sempre che i capelli siano puliti e senza
nodi.

17
NOTA: assicurarsi che l'apparecchio, le prese di ingresso e uscita dell'aria, il filtro, il
coprifiltro e gli accessori siano sempre puliti e privi di ostruzioni, ad esempio lanugine, capelli
o altri oggetti.
NOTA: Per evitare il surriscaldamento e garantire le migliori prestazioni, verificare
regolarmente che il filtro e il coprifiltro non siano ostruiti e, se necessario, pulirli.
NOTA: L’apparecchioè dotatodi unafunzione dimemoria. Dopoaver spento l'apparecchio,
la volta successiva che lo si accende, funzionerà con le stesse impostazioni di temperatura e
di flusso d'aria utilizzate in precedenza.
NOTA: In caso di guasto, scollegare immediatamente l'apparecchio dalla presa di corrente.
Attendere alcuni secondi, quindi collegare l'apparecchio alla presa di corrente e accenderlo
di nuovo. Se il guasto è ancora presente, non utilizzate l'apparecchio finché non è stato
controllato e riparato da un elettricista qualificato.
• Protezione dall'alta tensione attivata: l'apparecchio si spegne automaticamente e gli
indicatori della temperatura (rossi) lampeggiano.
• Protezione dalla bassa tensione attivata: l'apparecchio si spegne automaticamente e
gli indicatori della temperatura (rossi) lampeggiano.
• NTC (coeciente di temperatura negativo) anomalo: se la temperatura rilevata
dall'NTC supera il valore impostato, l'apparecchio regolerà automaticamente la
potenza di uscita.
— Assicurarsi che l'interruttore di accensione/spegnimento sia in posizione O.
— Montare l'accessorio appropriato in base all'applicazione desiderata (spazzola
volumizzante, spazzola liscia capelli, barra arricciacapelli, bocchetta) sull'unità principale
con un leggero movimento di rotazione. Accertarsi che il pulsante di rilascio si innesti in
posizione .
— Per rimuovere l'accessorio, spingere il pulsante di rilascio all'indietro, tenerlo in posizione
e quindi rimuovere l'accessorio dall'unità principale.
— Collegare l’apparecchio a una presa di corrente.
— Portare l'interruttore di accensione/spegnimento sulla posizione Iper accendere
l'apparecchio.
— Premere ripetutamente il pulsante di impostazione del getto d'aria per selezionare il
livello desiderato. L'indicatore corrispondente (blu) si illumina ( : basso / :
medio / : alto).
— Premere ripetutamente il pulsante di impostazione della temperatura e dell'aria fredda
per selezionare la temperatura desiderata. L'indicatore corrispondente (rosso) si illumina
( : aria fredda / : basso / : medio / : alto).
— Inalternativa, durantel'usocon leimpostazionidi bassa/media /altatemperatura, tenere
premuto il pulsante di impostazione della temperatura e dell'aria fredda per attivare la
funzione aria fredda. Gli indicatori di temperatura (rossi) si spengono e l'apparecchio
passa automaticamente alla modalità con getto d'aria forte. Rilasciare il pulsante di
impostazione della temperatura e dell'aria fredda per disattivare la funzione aria fredda.
L'apparecchio tornerà a funzionare con le impostazioni precedenti.
— Aoperazioneconclusa,portarel'interruttoresullaposizioneOperspegnerel'apparecchio.
— Scollegare l'apparecchio dall'alimentazione. Riporlo su una superficie resistente al calore
per lasciarlo rareddare.
Modellatura e lisciatura dei capelli con la spazzola volumizzante /
spazzola liscia capelli
— Accendere l'apparecchio. Selezionare la temperatura e il getto d'aria desiderati.
— Dividere i capelli in ciocche uniformi, preferibilmente larghe circa 5 cm e spesse 5 mm.
— Tenere il manico dell'apparecchio con una mano e una ciocca di capelli con l'altra.
— Con un movimento lento e delicato, spazzolare la ciocca dalle radici fino alle punte. Per
ottenere il miglior risultato possibile, accertarsi che la ciocca di capelli entri in profondità
nelle zone interne delle setole, vicino alle uscite dell'aria. Accertarsi che le setole e le
uscite dell'aria non restino per troppo tempo a contatto con i capelli.
— Ripetere l'operazione con le altre ciocche di capelli.
— Lasciar rareddare i capelli prima di modellarli o lisciarli ulteriormente.
Arricciatura con la barra arricciacapelli
— Accendere l'apparecchio. Selezionare la temperatura e il getto d'aria desiderati.
— Attendere che la barra arricciacapelli raggiunga la temperatura impostata.
— Tenere l'apparecchio dall'impugnatura.
— Arrotolare una ciocca di capelli (larga circa 5 cm e non troppo spessa) sulla barra
arricciacapelli per circa 5 - 8 secondi. Fare attenzione a non tenere troppo a lungo la
barra riscaldanti sui capelli.
— Ripetere la procedura su tutti i capelli procedendo ciocca per ciocca.
— Lasciare rareddare i capelli prima di pettinarli.

18
Asciugatura e acconciatura dei capelli con la bocchetta
— Assicurarsi che i capelli non siano troppo bagnati. Se necessario, rimuovere l'umidità in
eccesso dai capelli con un asciugamano.
— Districare i capelli e applicarvi un termoprotettore.
— Si consiglia di impostare il livello di temperatura/getto d'aria alto per asciugare i capelli,
quindi passare al livello basso per acconciarli.
— Per asciugare i capelli, dividerli in ciocche e aerrarne una dalla parte inferiore.
PULIZIA
NOTA: L’apparecchio è dotato di una funzione di autopulizia. Dopo aver pulito il filtro
e il coprifiltro e averli rimontati, si consiglia di far funzionare l'apparecchio in modalità
autopulente. Non tentare mai di utilizzare l'apparecchio in modalità autopulente per più di
due cicli continui, per evitare di danneggiare il motore.
• Dopo aver spento l'apparecchio e averlo collegato all'alimentazione, premere
entro circa 10 secondi il pulsante di impostazione del getto d'aria e il pulsante di
impostazione della temperatura e dell'aria fredda per circa 3 secondi per attivare
la funzione di autopulizia.
• L'apparecchio funziona in modalità autopulente con un getto d'aria forte per circa
10 secondi, quindi si spegne automaticamente.
— Prima di pulirlo, scollegare l’apparecchio e lasciarlo rareddare completamente.
— Non pulire l’apparecchio con lana d’acciaio, prodotti chimici aggressivi, alcali, agenti
abrasivi o disinfettanti poiché potrebbero danneggiarne la superficie.
— Non immergere l’apparecchio in acqua o altri liquidi per pulirlo. Assicurarsi che le parti
elettriche non siano umide o bagnate.
— Rimuovere eventuali capelli rimasti sull'apparecchio, in particolare sugli accessori.
— Tirare delicatamente il coprifiltro per staccarlo dalla presa d'ingresso dell'aria/dal filtro.
Pulire il filtro e il coprifiltro con un panno morbido inumidito, quindi asciugarli con un
panno morbido e asciutto. Se necessario, usare un pennellino. Assicurarsi che il filtro
e il coprifiltro siano perfettamente asciutti prima di rimontare il coprifiltro sulla presa
d'ingresso dell'aria/sul filtro.
— Pulire l’apparecchio con un panno morbido inumidito e, se necessario, un po’ di
detergente delicato. Pulire con un panno morbido e asciutto.
— L’apparecchio può essere riutilizzato solo dopo che è stato asciugato completamente.
CONSERVAZIONE
— Prima di riporre l’apparecchio, verificare sempre che si sia completamente rareddato.
— Conservare l’apparecchio in un luogo fresco, asciutto, protetto dall’umidità e fuori dalla
portata dei bambini.
Questo simbolo, visualizzato sul prodotto o sulla confezione, indica che questo
prodotto è conforme alla Direttiva europea 2012/19/UE e non deve essere
smaltito con i rifiuti domestici.
Deve essere portato a un punto di raccolta previsto per il riciclaggio di apparecchiature
elettriche ed elettroniche.
Assicurando che questo prodotto sia smaltito in modo appropriato, contribuirai a
prevenire potenziali conseguenze dannose per l’ambiente e la salute umana.
Il riciclaggio dei materiali aiuterà a preservare le risorse naturali.
ES CONSERVE ESTA INFORMACIÓN PARA FUTURAS CONSULTAS.
LEA ATENTAMENTE LAS SIGUIENTES INSTRUCCIONES ANTES DE
UTILIZAR EL APARATO.
ADVERTENCIAS
Este aparato lo pueden utilizar niños mayores de 8 años y personas con capacidades físicas,
sensorialesomentales reducidasofaltadeexperienciayconocimientossiestánsupervisados
o han recibido instrucciones en relación al uso seguro del aparato y comprenden los riesgos
derivados. Será necesario supervisar a los niños para asegurarse de que no jueguen con
el aparato. La limpieza y el mantenimiento de usuario no lo deben realizar niños sin
supervisión. Si el cable de alimentación está dañado, deberá ser reemplazado por el
fabricante,su serviciotécnico o personalcualificado a finde evitar situacionesde peligro.
Cuando use el aparato en el baño, desenchúfelo después de usarlo, ya que la proximidad del
agua representa un peligro incluso cuando está apagado. Para una protección adicional,
se recomienda la instalación de un dispositivo diferencial residual (DDR) que tenga una
corriente de funcionamiento residual nominal que no exceda los 30 mA en el circuito
19
eléctrico que alimenta el baño. Pida consejo a su instalador. ¡ADVERTENCIA! No use
este aparato cerca de bañeras, duchas, palanganas u otros recipientes que contengan agua.
Retire todoslos materiales deembalaje antesde usar elaparato. Mantengalosmateriales
de embalaje fuera del alcance de los niños, ya que representan un riesgo de ingestión y
asfixia. Asegúrese de que la tensión nominal indicada en la etiqueta de especificaciones
coincide con la de su suministro eléctrico. No abra la carcasa del aparato bajo
ninguna circunstancia. No introduzca los dedos ni cualquier objeto extraño en
ninguna de las aberturas del aparato y no obstruya sus ranuras de ventilación.
Proteja el aparato del calor. No lo coloque cerca de fuentes de calor tales como,
cocinas o aparatos calefactores. ADVERTENCIA: ¡PELIGRO DE DESCARGA
ELÉCTRICA! No sumerja el aparato ni su enchufe en agua u otros líquidos. No utilice el
aparato con las manos mojadas. Para evitar el sobrecalentamiento o el fuego, no cubra
el aparato mientras está encendido. No utilice espráis para el cabello, vaporizadores de
agua u otro tipo de vaporizadores durante el uso del aparato. No coloque el aparato en
los bordes de lavabos o bañeras. Si el aparato se cae al agua, desenchúfelo de inmediato. No
introduzca la mano en el agua para recuperar el aparato. ¡Tenga cuidado para evitar
quemarse! Toque solo la zona del asa (6) delimitada por la línea indicadora (19).
DESCRIPCIÓN
Este aparato está destinado a secar, peinar, alisar y rizar el cabello con su respectivo
accesorio. No lo utilice en cabello sintético o extremadamente húmedo ni en mascotas.
El aparato ha sido diseñado únicamente para uso doméstico en interiores.
No use el aparato para otros fines que no sean los previstos. Cualquier uso diferente puede
provocar daños en el aparato, la propiedad o incluso lesiones personales.
El fabricante no se hace responsable de los daños o lesiones derivados del uso incorrecto o
el incumplimiento de este manual.
ANTES DE USAR EL APARATO
¡ADVERTENCIA! ¡Los materiales de embalaje no son un juguete! ¡No permita que los
niños jueguen con los materiales de embalaje ya que constituyen un peligro de asfixia si se
ingieren!
— Revise el contenido de la entrega para ver si falta algún artículo o si ha ocasionado algún
posible desperfecto en el transporte. Si el aparato está dañado o faltan algunas piezas, no
lo utilice y llévelo a su distribuidor.
— Retire todos los materiales de embalaje y guárdelos para un uso futuro.
— Desenrolle completamente el cable de alimentación.
— Limpie el aparato con un paño suave y húmedo y, si fuese necesario, un poco de
detergente suave. Seque con un paño suave y seco.
DESCRIPCIÓN DEL PRODUCTO
1. Salida de aire 11. Cepillo voluminizador
2. Interruptor de liberación 12. Cerdas
3. Botón de ajuste de soplado de aire
(con indicadores azules) 13. Punta de aislamiento
4. Ajuste de temperatura y botón de
aire frío (con indicadores rojos) 14. Cepillo alisador
5. Interruptor de encendido/apagado
(E/ S)15. Cerdas
6. Asa 16. Rizadordebarril (hacia laderecha )
7. Entrada de aire con filtro 17. Rizadordebarril (haciala izquierda )
8. Tapa del filtro 18. Punta de aislamiento
9. Cabledealimentación con enchufe 19. Límite de la zona de agarre
10. Banda de cable 20. Boquilla
INSTRUCCIONES DE USO
¡ADVERTENCIA! Las superficies del aparato pueden calentarse durante el uso
y permanecerán calientes durante un tiempo después de la operación. Toque
el aparato únicamente por el asa. Mantenga los accesorios (incluida la punta
aislante) bien lejos de la piel y no los mantenga en el cabello durante demasiado
tiempo.
¡ADVERTENCIA! Cuando use laboquilla,mantenga elairecaliente bienalejado de losojos
u otras partes del cuerpo sensibles al calor.
¡ADVERTENCIA! Los accesorios se calientan mucho durante el funcionamiento. ¡No
los toque! Apague siempre el aparato, desconéctelo de la fuente de alimentación y déjelo
enfriar completamente antes de retirar y montar los accesorios.
NOTA: Antes de usar el aparato, asegúrese siempre de que el cabello está limpio y sin

20
enredos.
NOTA: Asegúrese siempre de que el aparato, la salida y entrada de aire, el filtro, su cubierta
y los accesorios estén limpios y no estén bloqueados, por ejemplo, con pelusa, pelo u otros
objetos.
NOTA: Evite que el dispositivo se sobrecaliente y garantice su rendimiento comprobando
el filtro y la tapa del filtro de forma regular en busca de obstrucciones, y límpielos si es
necesario.
NOTA: El aparato dispone de una función de memoria. Después de que el aparato se
apague y se vuelva a encender, funcionará con los mismos ajustes de temperatura y flujo de
aire que durante la última operación.
NOTA: Si se produce un mal funcionamiento, desconecte el aparato inmediatamente de
la fuente de alimentación. Espere unos segundos, vuelva conectarlo a la red eléctrica y
enciéndalo. Si el error persiste, no utilice el aparato hasta que haya sido revisado y reparado
por un electricista cualificado.
• Protección de alta tensión activada: el aparato se apaga automáticamente y el
indicador de temperatura (rojo) parpadea.
• Protección de baja tensión activada: el aparato se apaga automáticamente y los
indicadores de temperatura (rojo) parpadean.
• NTC (coeficiente de temperatura negativo) anormal: si la temperatura detectada
por el NTC es superior al valor establecido, el aparato ajustará la potencia de salida
automáticamente.
— Asegúrese de que el interruptor de encendido/apagado esté en la posición S.
— Ensamble el accesorio adecuado (cepillo de volumen, de alisado, rizador, boquilla) con un
ligero giro en la unidad principal de acuerdo con la aplicación deseada. Asegúrese de que
el interruptor de liberación se enganche en su posición .
— Para quitar el accesorio, deslice el interruptor de liberación hacia atrás, manténgalo en
posición y luego retire el accesorio de la unidad principal.
— Conecte el aparato en la corriente eléctrica.
— Ajuste el interruptor de encendido/apagado en la posición Epara encender el aparato.
— Pulse el botón de ajuste de soplado de aire repetidamente para seleccionar la potencia
de soplado deseada. El indicador respectivo (azul) se enciende ( : bajo / :
medio / : alto).
— Pulse el botón de ajuste de temperatura y aire frío repetidamente para seleccionar la
temperaturadeseada. El indicadorrespectivo (rojo)seenciende ( :aire frío /
: bajo / : medio / : alto).
— Alternativamente, durante la operación con los ajustes de temperatura baja / media /
alta, mantenga presionado el ajuste de temperatura y el botón de aire frío para activar la
función de aire frío. Los indicadores de temperatura (rojo) se apagan y el aparato cambia
automáticamente al modo de funcionamiento con alto soplado de aire. Suelte el ajuste
de temperatura y el botón de aire frío para desactivar la función de aire frío. El aparato
funciona con los ajustes anteriores.
— Cuando termine la operación, ajuste el interruptor de encendido/apagado en la posición
Spara apagar el aparato.
— Desconecte el aparato de la fuente de alimentación. Colóquelo en una superficie
resistente al calor para dejar que se enfríe.
Peinado y alisado del cabello con cepillo voluminizador/cepillo
alisador
— Encienda el aparato. Ajuste la temperatura y el soplado de aire deseados.
— Separe el pelo en mechones iguales, preferiblemente de unos 5 cm de ancho y 5 mm
de grosor.
— Sujete el aparato por el asa con una mano y el mechón de pelo con la otra.
— Cepille el mechón de pelo desde la raíz hasta las puntas con un movimiento suave y lento.
Para lograr el mejor resultado posible a la hora de peinar o alisar el pelo, asegúrese de que
el mechón penetre hasta el fondo de las cerdas y cerca de las salidas de aire. Asegúrese
de no mantener las cerdas y las salidas de aire en el pelo durante mucho tiempo.
— Repita el mismo proceso con el resto de mechones de pelo.
— Deje enfriar el cabello antes de peinarlo y alisarlo aún más.
Rizar el cabello con el rizador de barril
— Encienda el aparato. Ajuste la temperatura y el soplado de aire deseados.
— Espere hasta que el rizador de barril alcance la temperatura establecida.
— Sujete el aparato por el asa.
— Enrolle un mechón de cabello (aproximadamente 5 cm de ancho, no demasiado grueso)
en el rizador de barril durante aproximadamente 5 - 8 segundos. Asegúrese de no
mantener el cabello en el rizador de barril durante demasiado tiempo.
— Repita la misma función en todo el cabello.
— Deje que el cabello se enfríe antes de continuar rizándolo.
Table of contents
Languages:
Other Demeliss Hair Styler manuals


