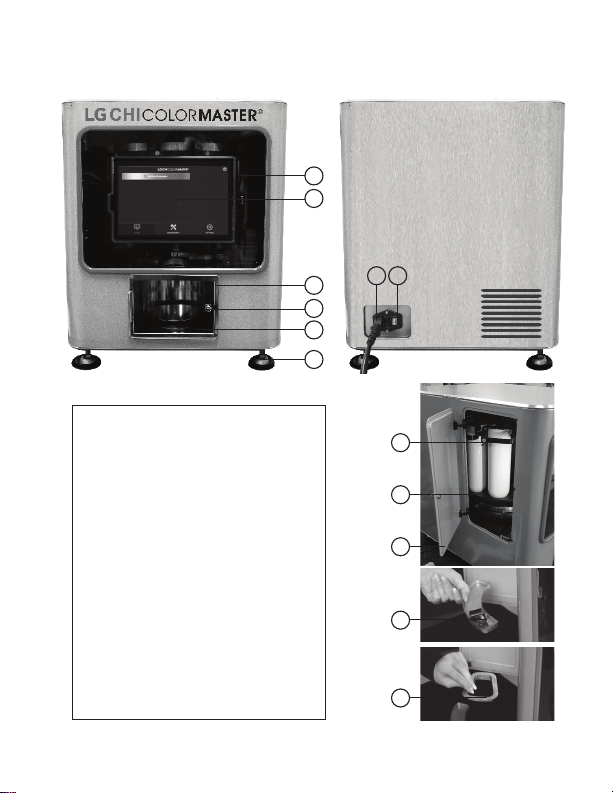
Farouk COLORMASTER LGCHI-01G User manual

CHILGM
Owner’s Manual
Before operating the appliance, please read these instructions
carefully and keep them for future reference.
Original Instructions
HAIR COLOR MIXING FACTORY
FAROUK SYSTEMS, INC.
250 PENNBRIGHT DR.
HOUSTON, TEXAS 77090
TEL: 281-876-2000
MFG: LG Farouk Co.,
2806, Nambusunhwan-ro
Gangnam-gu, Seoul
Republic of Korea
Authorized Representative:
Farouk Systems Europe, B.V.
De Brand 40, 3823 LL
AMERSFOORT
The Netherlands
TEL: +31 (0) 33 204 82 48
UK Responsible Person
(Obelis UK Sandford Gate
East Point Business Park
Oxford
OX4 6LB
United Kingdom)
CHI.COM

2
SPECIFICATIONS
HARDWARE
Power Module / Motor and Rotation Module / Control Units /
Canister’s installation units / Basket / Sensor module / Case
MACHINE MODEL: LGCHI-01G
POWER:
INPUT: 100 ~ 240 V 50/60 Hz, 2.5A
OUTPUT: 24V 8.4A
Weight: 91.5 lbs. / 41.5 Kg
Dimension: 18 X 20 X 21.5 in. / 46 X 51 X 55 cm
Canister: 12 canisters (10 colors, 2 peroxide)
Cable Length: 1.5m
Operation temperature: 32 ~ 104 °(0 ~ 40°)
Motor speed auto adjustable based on canister’s condition
SENSORS
Load Cell: Weight sensor till 1.1 lbs. / 500g
IR Sensor: Bowl detection
Tact switch: Door open detecting
R / Z Axis sensor: Motor rotation / location detection
CONTROLLER TABLET
Display: 10.3” IPS Full HD, 16:10
Camera 5MP for Front
OS: Android 9.0
SOFTWARE
Color Formulator : Simulation App
Play Store - Android 7.0 Over App Store - iOS 10.2 Over
COLOR MASTER : Dispenser App
. Android Only available
: Without Dispenser system does not support operation.
FCC Compliance Statement (for products subject to Part 15 subpart B)
This device complies with Part 15 of the FCC Rules.
Operation is subject to the following two conditions:
(1) This device may not cause harmful interference, and
(2) This device must accept any interference received, including
interference that may cause undesired operation.
English

3
IMPORTANT SAFETY INSTRUCTIONS
WARNING: THE LG CHI COLORMASTER FACTORY IS AN ELECTRICAL
APPLIANCE AND SHOULD NEVER BE USED OR HANDLED BY ANYONE
UNDER THE AGE OF 18, INCLUDING ANY PERSON WITH A DISABILITY,
LIMITED MOBILITY, OR A VISUAL IMPAIRMENT. MINORS SHOULD NEVER
USE OR TURN ON THIS DEVICE UNLESS UNDER THE SUPERVISION OF
SOMEONE OVER THE AGE OF 18.
BASIC SAFETY PRECAUTIONS SHOULD ALWAYS BE FOLLOWED WHEN
USING ELECTRIC APPLIANCES, INCLUDING THE FOLLOWING:
KEEP AWAY FROM WATER: AS WITH MOST ELECTRICAL APPLIANCES,
ELECTRIC PARTS ARE ELECTRICALLY LIVE WHEN SWITCH IS OFF.
TO REDUCE THE RISK OF INJURY OR DEATH BY ELECTRIC SHOCK:
1. IF USING ELECTRICAL APPLIANCE NEAR WATER, INSTALL GFCI
OUTLETS IN ALL ELECTRICAL OUTLETS INTO WHICH
ELECTRICAL APPLIANCE WILL BE PLUGGED.
2. DO NOT PLACE OR DROP INTO WATER OR OTHER LIQUIDS.
3. AVOID USING THE APPLIANCE IN OR NEAR WATER.
WARNING: TO REDUCE ELECTROCUTION, FIRE OR INJURY TO
PERSONS:
1. USE THIS APPLIANCE ONLY FOR ITS INTENDED USE AS
DESCRIBED IN THIS MANUAL.
2. NEVER OPERATE THIS APPLIANCE IF IT HAS A DAMAGED CORD
OR PLUG.
3. NEVER ALLOW THE POWER SUPPLY CORD TO BE PULLED,
JERKED, STRAINED, TWISTED, OR SEVERELY BENT, ESPECIALLY
AT THE PLUG CONNECTIONS. THE FOREGOING MAY DAMAGE
THE CORD, INCLUDING AT OR NEAR THE HIGH FLEX POINT
OF ENTRY INTO THE APPLIANCE, CAUSING IT TO RUPTURE AND
SHORT. HANDLE THE CORD CAREFULLY FOR LONGER LIFE.
English

4
DESCRIPTION
4. KEEP THE CORD AWAY FROM HEATED SURFACES. DO NOT WRAP
THE CORD AROUND APPLIANCE.
5. DO NOT USE OUTDOORS OR OPERATE WHERE AEROSOL SPRAY
PRODUCTS ARE BEING USED OR WHERE OXYGEN IS BEING
ADMINISTERED.
6. DO NOT USE AN EXTENSION CORD WITH THIS APPLIANCE.
7. DO NOT OPERATE WITH VOLTAGE CONVERTER.
8. IF APPLIANCE IS NOT WORKING PROPERLY CALL CUSTOMER
SERVICE FOR EXAMINATION BY A TECHNICIAN AND POSSIBLE
REPLACEMENT UNDER WARRANTY.
9. DO NOT LEAVE APPLIANCE IN HUMID PLACES.
10. KEEP ANY OPENINGS FREE OF LINT, HAIR AND THE LIKE.
11. DISCONTINUE USE IMMEDIATELY AND UNPLUG IF APPLIANCE
EVER BECOMES TOO HOT OR MALFUNCTIONS IN ANY WAY.
English

5
DESCRIPTION
1. Tablet Power & Signal Cable
2. Tablet
3. Basket
4. Basket Door
5. Bowl Scale
6. Foot
7. Machine Power Cable
8. Main Power Switch
9. Canister Mounting Handle
10. Canister Holder
11. Side Door
12. Drip Tray
13. Center Tray
1
9
2
11
10
12
13
3
4
5
7
6
8
English

6
INSTALLATION FOR THE DISPENSER
1) COLOR FACTORY UNBOXING
1. Remove all of the packing foam & shipping wraps from the Color factory.
2. Plug the power cord into the main power source at the back of the
machine.
2) TABLET INSTALLATION
1. Take out the tablet from the tablet box.
2. Open the right hand side door, and then place the tablet in the front
window area.
3. Gently mount the tablet using the mounting screw.
4. Plug the charging cable into the tablet.
5. Close the right hand side door.
6. Open the left hand side door, then push power button on the top of
tablet to turn it on.
3) SET UP THE WI-FI
1. Make sure the router is on to secure Wi-Fi connection
2. Swipe down twice on upper screen to access Wi-Fi button
3. Select and hold Wi-Fi button
4. Then, select Wi-Fi network to connect to dispenser
1. 3.
2.
INSTALLATION FOR THE DISPENSER (CONT.)
English

7
4) SET UP THE DISPENSER
1. Power on the main switch at the back.
2. The color master application will start automatically.
Notice: If it does not start automatically, make sure that the tablet power
cable is plugged in
INSTALLATION FOR THE DISPENSER (CONT.)
5) INITIAL INSTALLATION OF CANISTERS
1. In the COLOR MASTER application, go to MANAGEMENT tab
2. Select REPLACE to install canister
*The selected canister will move to the left side door
3. Open the left side door and pull the canister mounting handle out then
lift up
4. Match the nozzle to the slot in the canister holder and insert canister
(see picture 4)
5. Pull down and push in the canister mounting handle
6. Close the door and select YES that the canister has been replaced
7. Repeat steps 2-6 for all 12 canisters
8. Select CALIBRATION once all canisters have been installed
*Calibration tab will be flashing
9. In the calibration window, all of the canisters should be automatically
check marked. If not, select the ALL checkbox.
Select START to begin cleaning.
10. Select OK once cleaning is completed
NOTICE: Do not use a clear or transparent bowl for cleaning. If a bowl is not on the scale,
a prompt will appear.
WARNING:For safety reasons, rotation will not take place with an open door.
Close the door after each replacement/new position.
Do not shake the machine or the dispenser may be damaged while calibrating.
3. 4.
English

8
6) INITIALIZING THE MACHINE
1. In the COLOR MASTER application, go to MANAGEMENT tab
2. Select INITIALIZE POSITION tab
NOTICE: Do not place a bowl on the scale plate. If a bowl is on the scale, a
prompt will appear.
Do not open the door while in Initializing mode.
1.
SETTINGS
1. GENERAL
a) Select SETTINGS
b) Select GENERAL
1. 4.
5.
6. 7.
8.
2.
3.
English

9
1.
2. Machine Name
- Machine NAME is editable to recognize dispensers, if there are
multiple machines in same area.
a. To access the menu bar, swipe down twice on upper screen.
b. Press and hold Bluetooth Icon.
c. Under Connection Preference, select Bluetooth.
d. Press device name and rename to your preference.
e. Swipe up on the bottom bar and select the application to check
that the machine name has been updated.
LANGUAGE: Confirm or check language. The voice guide also changes
based on the voice/language selected. To change the language for the
+ADD COLOR FORMULATION screen, see Administration Options under
Advanced Settings.
UNIT: Select grams or ounces
CLEANING AMOUNT: Determine how many grams to dispense from each
can for cleanings. The recommended standard amount for each can will
be preset.
SERVER API: Data connection to server
AUTO CLEANING TIMING: Select frequency for Scheduled Automatic
Cleaning alert
Recomendations:
For a smaller salon, schedule your cleanings more frequently to avoid
any build up in the canisters. Every 1-3 days
For a larger salon, you can schedule your cleanings less frequently.
Once or twice, a week.
OPENING HOUR: Set up to your opening business hours and the
Scheduled Automatic Cleaning alert will appear at this time
LOG DATA SYNC: Sync the log data between machines
SAVE LOGS: Manually upload logs of the dispensing history
SAVE BACKUP: Back up the dispensing history and settings manually.
LOAD BACKUP: Load the dispensing history and settings.
English

10
3. ADVANCED
Warning: Changing advance settings may interfere with operation of
dispensing. This should only be accessed by the business
administrator or salon manager
1) ENTER THE PASSWORD TO ACCESS:
NOTICE: If you forget the password, call the Customer Service Center. Security
questions will be asked to confirm the assigned personnel to machine.
A. RESET ADMINISTRATOR PASSWORD
B. DISPENSING MESSAGE PARCELING
C. PARAMETER SETTINGS
D. SCALE CALIBRATION
E. SECURITY INFORMATION
F. MACHINE MODE
d. e.
a.b. c.
English

11
2) ADMINISTRATION OPTIONS
1. Select Manager Icon
2. From this screen, you can
a) MANAGE STYLISTS
i. Press ADD STYLIST to edit list of stylists if needed
ii. Press photo image to select the following options: take picture,
select picture and cancel.
iii. Fill in the required field.
iv. Press UPDATE to register.
Notice: The options to change or delete the stylist’s information are available.
b) RESET URL
c) LANGUAGE – change the language for +ADD COLOR FORMULATION screen
3. Enter store password
1.2. 3.
English

12
CREATE A GOOGLE ACCOUNT
- You must have a Google account to receive future software update.
1) DOWNLOAD AND INSTALLATION
1. Go to the Play Store
2. Download Color Master Factory & Color Master FORMULATOR application.
(Initially, the applications will already be installed)
3. Obtain store number, company number and pin number in advance
4. To register user, fill in phone, store, company and pin numbers.
5. Select the machine icon to view list of machines, then select
machine of choice.
DOWNLOADING AND
INSTALLING APPLICATION
DESCRIPTION OF ICONS
a2.
a1.
c.
English

13
DESCRIPTION OF ICONS
1) MACHINE DISPENSER ICONS
1. HOME: Go to Client List
2. MANAGER: Select to manage stylists, reset URL, change language
3. DISPENSER: Select to go back to dispenser list. On dispenser list,
if there is a number on the icon, this means there is a dispenser input.
4. ADD: Select to add new client
5. LATEST/ALPHABETICAL: Select to obtain order of clientele to your
preference of latest or alphabetical.
6. List of clients
7. Version of software
1 2 3
4
7
6
5
NOTE: During a Wi-Fi disconnection you cannot use the application.
If you cannot access any client information, please follow steps below:
Step 1. Press the connection icon to check connection between dispenser
and private device
Step 2. Close application and check for the WI-FI connection.
If no connection, please reconnect.
Step 3. Press connection icon to confirm connection.
English

14
2) REMOTE TABLET / PHONE ICONS
1. HOME: Go to Client List
2. CONNECTION: Connect between dispenser and tablet.
NOTE: Wi-Fi connection must be consistent to connect between them, otherwise
it cannot deliver formulation.
NOTICE: For multiple machines on same WI-FI connection, you can
rename to distinguish.
3. MANAGER: Select to manage stylists, reset URL, change language
4. ADD: Select to add new client.
5. LATEST / ALPHABETICAL: Press to obtain order of clientele to your
preference of latest or alphabetical order.
1 2 3
4
5
English

15
DAILY USER GUIDE
UPON ARRIVAL
- Clear out all apps and restart COLOR MASTER app
- The machine will automatically initialize
WARNING:Do not place anything on the scale and do not open the side
or front doors while initializing
- A prompt will appear for any scheduled automatic cleanings
- Place recommended CHI bowl on the scale. Select Ok and wait
until finished.
- The automatic cleaning may take 2 ~ 5 minutes to complete
- If there is any issue, contact the customer service center.
WARNING:Do not open the side or front doors while cleaning/dispensing
MAINTENANCE
CLEANING THE CANISTERS
1) CLEANING ALL CANISTERS MANUALLY
- Go to the MANAGEMENT tab
- Select CLEANING
- Cleaning window will appear with all 12 cans listed. Select the ALL
checkbox. *Individual canisters can also be selected or deselected
- Before cleaning begins, place a bowl on the scale and wait
until finished.
2) WIPE ONE BY ONE
We recommend cleaning the nozzle with this feature.
- From the MANAGEMENT tab, select WIPE ONE BY ONE
- Use a damp towel or tissue to wipe each individual can nozzle
- Select NEXT to rotate cans
English

16
TURN TABLET OFF AT NIGHT
CLEANING REMOVABLE PARTS
Notice: It is recommended to clean these parts at least once a week. Do not
use abrasive materials or harsh chemicals.
1) CLEANING THE DRIP TRAY
- Open the left hand side door
- Take out the tray
- Wipe away any product with a damp towel/tissue or gently rinse with water.
- Return the tray to the correct position by inserting into the groove.
2) CLEANING THE CENTER TRAY
- While the left hand side door is open, access the center tray through the
front basket door
- Gently push up along the edges to lift tray
- Remove through left door
- Wipe away any product with a damp towel/tissue or gently rinse with water.
- Return the tray to the correct position
3) CLEANING BASKET
It is VERY IMPORTANT to take out the scale plate before cleaning the basket.
- Gently pull the basket out
- Wipe away any product with a damp towel/tissue or gently rinse with water.
- Push the basket back in place
- Place the scale plate back making sure the scale pin sits properly on the
scale knob (see picture 4)
CHI COLOR MASTER TECHNICAL SUPPORT - 1-281-775-8705
1 2
33 4
English

17
1-YEAR WARRANTY CARD IF COLOR MASTER IS
LESS THAN 1 YEAR OLD
For a machine repair or replacement with a 1-year warranty
How to make a warranty claim?
Contact your authorized distributor for any questions regarding the Color Master
Factory. Your distributor will support you with training or might initiate a repair or
replacement order, depending on the distributor’s exchange policy (terms and
conditions may vary or depending on regional distributor’s exchange policy).
For all other questions and additional support, please contact your regional
Farouk Systems Customer Service center as below.
For customers in North America
Farouk Systems, Inc.
880 E. Richey Rd.
Houston, Texas 77073
TEL: +1 281-876-2000
For customers in Europe and Middle East
Farouk Systems Europe B.V.
De Brand 40 | 3823 LL AMERSFOORT | The Netherlands
TEL: +31 (0) 33 204 82 48
For technical support and repairs for Europe and Middle East, please contact
Farouk’s service partner below. Please note: Any repairs or replacements during
the warranty period will require authorization by Farouk Systems Europe B.V.
EXONDA SALON TOOLS GmbH
Friedländer Weg 39 | 36132 Eiterfeld, Germany
E-MAIL: [email protected]
English

CHILGM
Manuel de l’utilisateur
Avant l’utilisation de l’appareil. lire ces instructions attentivement
et conserver pour une référence ultérieure.
FAROUK SYSTEMS, INC.
250 PENNBRIGHT DR.
HOUSTON, TEXAS 77090
TEL: 281-876-2000
MFG: LG Farouk Co.,
2806, Nambusunhwan-ro
Gangnam-gu, Seoul
Republic of Korea
Authorized Representative:
Farouk Systems Europe, B.V.
De Brand 40, 3823 LL AMERSFOORT
The Netherlands
TEL: +31 (0) 33 204 82 48
CHI.COM

19
CARACTÉRISTIQUES
MATÉRIEL
Module d’alimentation / Module moteur et rotation / Unités de commande /
Unités d’installation de la cartouche / Panier / Module Capteur / Boîtier
PUISSANCE:
ENTRÉE: 100 ~ 240 V 50/60 Hz, 2,5A
SORTIE: 24V 8.4A
Poids: 91,5 lb / 41,5 kg
Dimension: 18 x 20 x 21,5 pouces / 46 X 51 X 55 cm
Cartouche: 12 cartouches (10 couleurs, 2 peroxyde)
Longueur de câble: 1,5 m
Température d’opération: 32 ~ 104 ° (0 ~ 40 °)
Vitesse du moteur réglable automatiquement en fonction de l’état de la cartouche
CAPTEURS
Cellule de chargement: capteur de poids jusqu’à 1,1 lb / 500 g
Capteur IR: détection de bol
Interrupteur tactile: détection d’ouverture de porte
Capteur d’axe R / Z: Rotation du moteur / détection de localisation
TABLETTE DE CONTRÔLE
Écran: IPS Full HD 10,3 pouces, 16:10
Caméra 5MP pour l’avant
Système d’exploitation: Android 9.0
LOGICIEL
Formulateur de couleur: Simulation d’App
Play Store - Android 7.0 sur l’App Store - iOS 10.2 et plus
COLOR MASTER: Distributeur d’App
. Disponible uniquement sur Android
: Sans le système de distribution, ne prend pas en charge le fonctionnement.
Déclaration de conformité FCC (pour les produits soumis à la section 15)
Cet appareil est conforme à la section 15 des règles de la FCC.
Son fonctionnement est soumis aux deux conditions suivantes:
(1) Cet appareil ne doit pas provoquer d’interférences nuisibles, et
(2) cet appareil doit accepter toute interférence reçue, y compris des interférences
pouvant entraîner un fonctionnement indésirable.
French

20
CONSIGNES IMPORTANTES DE SÉCURITÉ
AVERTISSEMENT : LE LG CHI COLORMASTER FACTORY EST UN
APPAREIL ÉLECTRIQUE ET NE DOIT JAMAIS ÊTRE UTILISÉ OU
MANIPULÉ PAR UNE PERSONNE ÂGÉE DE MOINS DE 18 ANS, Y
COMPRIS TOUTE PERSONNE HANDICAPÉE, À MOBILITÉ RÉDUITE
OU AYANT UNE DÉFICIENCE VISUELLE. LES MINEURS NE DOIVENT
JAMAIS UTILISER OU METTRE EN MARCHE CET APPAREIL, SAUF
SOUS LA SURVEILLANCE D’UNE PERSONNE ÂGÉE DE PLUS DE 18
ANS.
DES MESURES DE PRÉCAUTION DOIVENT TOUJOURS ÊTRE SUIVIES
LORS DE L’USAGE D’APPAREILS ÉLECTRONIQUES, INCLUANT LES
SUIVANTES:
TENIR À L’ÉCART DE L’EAU: COMME LA PLUPART DES APPAREILS
ÉLECTRIQUES, LES PIÈCES ÉLECTRONIQUES RESTENT SOUS
TENSION MÊME SI L’INTERRUPTEUR PRINCIPAL EST FERMÉ.
POUR RÉDUIRE LES RISQUES DE BLESSURES OU DE MORT PAR
CHOC ÉLECTRIQUE:
1. SI L’APPAREIL ÉLECTRIQUE EST UTILISÉ PRÈS DE L’EAU,
L’INSTALLATION D’UN DISJONCTEUR GFIC EST NÉCESSAIRE DANS
TOUTES LES PRISES ÉLECTRIQUES DANS LESQUELLES L’APPAREIL
ÉLECTRIQUE SERA BRANCHÉ.
2. NE PAS IMMERGER OU ÉCHAPPER DANS L’EAU OU AUTRES
LIQUIDES.
3. ÉVITER D’UTILISER L’APPAREIL DANS OU À PROXIMITÉ DE L’EAU.
AVERTISSEMENT: POUR RÉDUIRE LES POSSIBILITÉS \
D’ÉLECTROCUTION, D’INCENDIE OU DE BLESSURES DES
PERSONNES:
1. FAIRE USAGE DE CET APPAREIL UNIQUEMENT POUR L’UTILISATION
PRÉVUE DÉCRIT DANS CE MANUEL.
2. NE JAMAIS FAIRE FONCTIONNER CET APPAREIL SI SON CORDON
EST ENDOMMAGÉ OU BRANCHÉ.
French
Table of contents
Languages:
Other Farouk Hair Styler manuals

Farouk
Farouk CHI BIOSILK CA2306 User manual

Farouk
Farouk CHI LUXURY GF8409EU User manual

Farouk
Farouk CA2204 User manual

Farouk
Farouk CHI GF8482EU User manual

Farouk
Farouk CHI GF8280 User manual

Farouk
Farouk CHI LUXURY GF8508 User manual

Farouk
Farouk CHI CA2377 User manual

Farouk
Farouk CHI CA2168 User manual

Farouk
Farouk GF8269 User manual

Farouk
Farouk CHI BIOSILK CA2378 User manual