Denson DS1010 ROAD User manual
QUICK WATCH:
For Dutch viewers of Canal Digitaal or Belgium
viewers of TV Vlaanderen and/or TeléSat we
refer to the packed in QUICK INSTALLATION GUIDE.
15-06-2014
English
User manual
DS1010 ROAD

Content
Safety Precaution ....................................................................3
1. Reference········································································· 5
1.1 General Features ························································· 5
2. Product Overview ······························································· 6
2.1 Front Panel································································ 6
2.2 Rear Panel································································· 7
2.3 Remote Control Unit (RCU) ··········································· 8
3. Installation·······································································10
3.1 Powering On·····························································10
3.2 Antenna Settings ························································10
3.3 Factory Default··························································12
3.4 USALS Setup····························································12
4. Channel Manager·······························································13
4.1 Edit Channel·····························································13
4.2 Edit Favorite·····························································13
4.3 Sort Channels····························································14
4.4 User Channel List·······················································14
5. Settings···········································································14
5.1 System Settings ·························································14
5.2 OSD Setup·······························································15
5.3 Parental control··························································16
6. Times·············································································17
6.1 Time Settings····························································17
6.2 Event Timer······························································17
6.3 Sleep Timer······························································17
6.4 Standby hour·····························································18
7. Expansion········································································18
7.1 Games ····································································18
7.2 USB·······································································18

7.2.1 Basic Operations······················································18
7.3 Wireless Setting·························································22
7.4 Network Apps ···························································23
8. ABOUT STB····································································24
9. Basic Operation·································································25
10. Channel List ···································································25
10.1 OK List ·································································26
10.2 Favorite List····························································26
11. USB Control···································································26
11.1 Recording and Timeshift ·············································26
11.2 PVR List································································28
12. Additional Information·······················································28
12.1 Trouble Shooting ······················································28

Safety Precaution
This STB has been designed and manufactured to satisfy the international
safety standards. Please read the following safety precautions carefully before
operating this receiver.
Main Supply:
Before operating, please check the units operating voltage is 90~250V AC
50/60Hz.
Overload:
Do not overload a wall outlet, extension cord or adapter, neither use damaged
power cord or touch it with wet hand as this may result in electric shock.
Liquid:
The receiver shall not be exposed to dripping or splashing water, and that no
objects filled with liquids, such as base, shall be placed on the apparatus.
Ventilation:
Keep the slots on top of the receiver uncover to allow sufficient airflow to the unit.
Do not put the receiver on soft furnishings or carpets. Do not expose the
receiver to direct light or do not place it near a heater or in humid conditions. Do
not stack other electronic equipments on top of the receiver.
Cleaning:
Plug out the receiver from the wall outlet before cleaning. Clean the receiver by
a soft cloth or mild solution of washing-up liquid (no solvents).
Connection:
Disconnect the receiver from the mains when you connect it to satellite LNB or
disconnect it from LNB. Failure would possibly cause damage to the LNB.
Location:
Put the receiver indoor in order to avoid lightening, raining or sunlight.
Uncover:
Do not remove the cover, to reduce the risk of electric shock. Contact qualified
and licensed service personnel to repair the receiver, or contact your dealer.

1. Reference
1.1 General Features
DVB-S/DVB-S2 Satellite Compliant (MPEG-II/ MPEG-IV/ H.264)
SCPC & MCPC receivable from Ku and C band satellites
Universal, Single, Single S & C Band Wideband LNB
Sensitive Tuner with Loop-Through
DiSEqC1.0/1.1/1.2/1.3 (USALS)
Unicable Supported
Blind search supported
Auto DiSEqC Search
PAL/NTSC Conversion
True full Color (32 bits) on screen display (OSD)
Storing memory: 100 satellite, 4000 transponders and 6100 channels
8 favorite group and parental lock supported
Multi-language menu supported
Multi-language audio supported
Multi-language DVB Subtitle output
7 days Electronic Program Guide (EPG)
Teletext output through VBI and OSD
CI module Supported
USB 2.0 Interface
Support many network functions
2. Product Overview
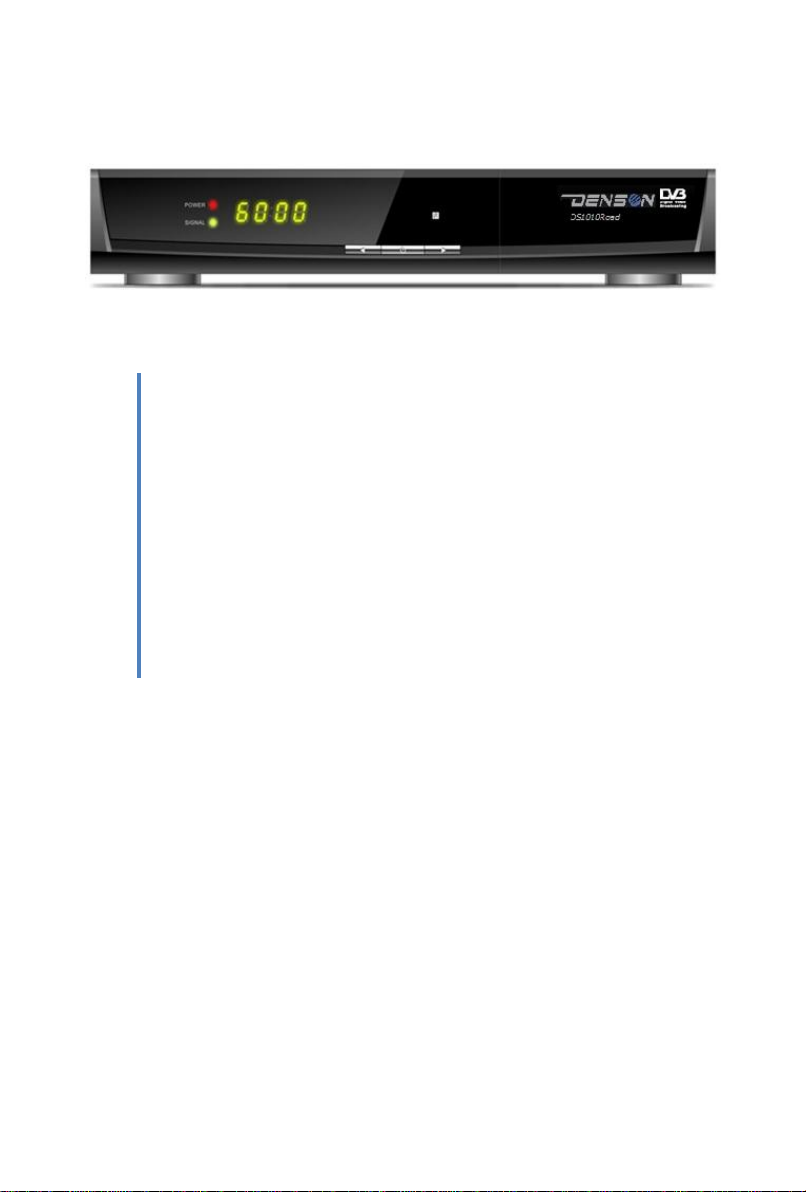
2.1 Front Panel
Figure 1. Front Panel
1. Signal LED
Signal indicator.
2. Power button/Power LED
Switch between operation and standby modes and power indicator.
3. Display
It displays channel information. In standby mode it displays local time.
4. /
Change channel in viewing mode and move the cursor up/down in menu mode.
5. /
Decrease / increase the volume in viewing mode and change settings in menu
mode.
6. MENU Button
Activate the main menu in viewing mode.
7. OK Button
Activate the highlighted sub menu in menu mode and activate the channel list in
viewing mode.

2.2 Rear Panel
Figure 2. Rear Panel
1. LNB IN
Connect the satellite antenna cable.
2. LOOP OUT
Connect another receiver.
3. LAN
Connect to the internet using an Ethernet cable
4. SPDIF
Digital Audio output (Coaxial).
5. AUDIO/ VIDEO
Connect to the TV using a RCA cable.
6. TV SCART
Connect to the TV using a Scart cable.
7. DV-OUT
Connect to the TV using an HDMI cable.
8. USB2.0
One USB 2.0 Host Port.
9. IR
Connect to the IR RECIEVER
10. DC/12V
Supply 12V DC to other apparatus.

2.3 Remote Control Unit (RCU)
You can control this receiver by this remote controller with full function.
1. POWER:
Switch between operation and standby modes.
2. MUTE: Mute audio.
3. DISPLAY: Set the HDMI mode.
4. MODE: Set the display format.
5. TV/R: Switch between TV and RADIO.
6. FIND: Quickly find channels which you want.
7. NUMERIC KEY (0~9): Enter a TV/radio channel
number or menu option number.
8. EPG (Electronic Program Guide): Display the
program guide.
9. USB: Enter USB menu.
10. MENU: Activate main menu.
11. EXIT: Exit current menu step by step.
12. CH+/CH-: Change program.
13. VOL+/VOL- : Change volume in viewing mode.
14. OK: Confirm the selected operation or display the
channel list while watching a program.
15.P /P: Page up/down on menu.
16. FAV: Display favorite channel list you set before.
17. RECALL: Move to the previous viewed channel.
18. SAT: Show the scanned satellite list.
19.AUDIO: Display the audio list.
20. ZOOM: Picture zooming function.
21.INFO: Display the program information.
22. PAUSE: Freeze the picture.
23. F1: Accessorial function.
Figure 3. Remote Control
Unit

24. F2 /SUB: Display the subtitle language list.
25. F3/TIMER: Setup event timer.
26. TXT: Display the teletext.
27.I: Previous.
28.I : Next.
29.:Fast rewind.
30.: Fast forward.
31. I I : Pause/Time shift.
32.●: Record.
33.: Play.
34.■: Stop.

3. Installation
You should install the receiver when powering on your product for the first time
after purchase.
Tip: The default password is 0000. If you have forgotten your password, please
contact your local product distributor.
3.1 Powering On
1. Connect the power cord of the product to a wall outlet.
2. Ensure the ON/OFF switch at the rear of the product is switched to ON.
3. Power on by pressing the STANDBY button on the remote control or the
STANDBY button at the front of the product.
3.2 Antenna Settings
Antenna Settings allows you to configure the antenna setting parameters.
Menu->INTALLATION->Antenna Settings
1. Satellite:Highlight the satellite you
want to search.
2. Transponder(TP for short): Press the
VOL+/VOL- button to change the TP.
3. LNB Type:Press the VOL+/VOL- button
to change the LNB frequency.
4. LNB Power: Press the VOL+/VOL-
button to select the required LNB power.
5. 22kHz:Press the VOL+/VOL- button to

select ON, OFF or Auto.
6. DiSEqC 1.0:Press the VOL+/VOL- button to select the required DiSEqC1.0
input.
7. DiSEqC 1.1:Press the VOL+/VOL- button to select the required DiSEqC1.1
input.
8. Motor:Press the VOL+/VOL- button to select DiSEqC1.2 or USALS.
9. Network search: Press the VOL+/VOL- button to select ON or OFF if you
want to implement network search.
10. Start search: Press the VOL+/VOL- button to select Satellite & Multi-Sat &
Blind scan & Transponder & Multi-Transponder which you want to start search.
3.2.1 Antenna Settings for Satellite
Press the VOL+/VOL- or OK button you can see the pre-stored Satellite list, in
this menu, you can execute Select, Add, Move, Delete, Rename Satellites.
3.2.2 Antenna Settings for Transponder
If you change the satellite, the transponder will be changed automatically. You
will find the transponder list of selected satellite here. In this menu, Press the
VOL+/VOL- or OK button you can see the pre-stored Transponder list, and you
can execute Select, Add, Delete, Edit Transponders by VOL+/VOL- keys.
3.2.3 Search Channels from Satellite
You can search the channels by many search ways. It includes the Satellite
Search, Multi Satellites search, Blind Search, TP Search and Multi TP Search.
You can highlight the Start Search and select the search way that you want,
then press the OK button to confirm.

3.2.4 Antenna Settings for Motor
Menu-> INTALLATION ->Antenna Settings->Motor
1. Motor Mode:
In motor menu, you can press ◄/►button, then the dish will be motorized to
East/West continuously, until you find the
best signal showed on the signal bar. And
you can set the maximum motor limit for
both East and West to prevent damage to
the antenna. When you set Disable the
Motor limit setting is released.
Tip:Before you use USALS, you should go
to Main Menu -> INSTALLION ->USALS Setup to set you local position firstly.
3.3 Factory Default
Menu->INSTALLTION -> Factory Default
You can restore the product to the factory default and you can also setup it
according to the wizard. It includes All, Channel List Only, Radio Channel Only,
Scramble Channel Only, TP Channel Only and SAT Channel Only options.
Warning: Please note that once you perform Factory Default all, all data and
settings will be deleted.
3.4 USALS Setup
Menu-> INSTALLTION ->USALS Setup
If you set the Motor Mode to USALS, you need set the longitude and the latitude
in USALS Setup.
4. Channel Manager
Tip:You can press the Sat button to choose different satellite according to the
help information, press OK to confirm, then all the channels of this sat will be
display.
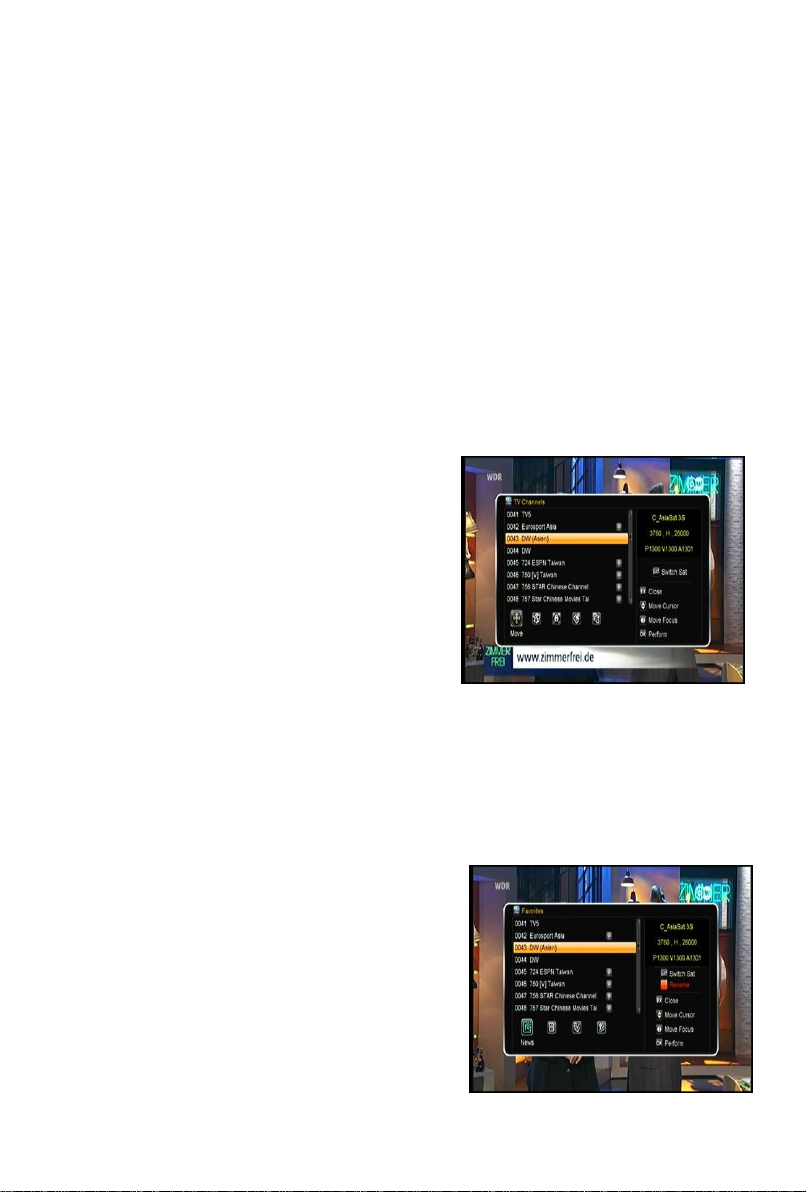
4.1 Edit Channel
Menu->EDIT CHANNEL->TV/Radio Channels
Edit Channels enables you to move, delete,
rename, lock/unlock, swap the channels in
the channel list conveniently.
Tip:Radio Channels operation similar to the
TV Channels.
In this menu, you can press the VOL+/VOL-
button to select the function. And then press
the OK button to execute it.
4.2 Edit Favorite
Menu->EDIT CHANNEL-> Favorites/Radio
Favorites
You can add or remove TV/Radio channels
from the favorite groups.
1. Highlight the channels you want to add or

remove from the favorite channel list.
2. Press the VOL+/VOL- button to change the favorite group and press the OK
button to mark the channel as selected favorite group.
3. Press Red key to rename favorite group.
4. Press the EXIT button to exit the menu and save it.
4.3 Sort Channels
You can sort the channels list.
Menu-> EDIT CHANNEL ->Sort Channels
Highlight the option you want and press the OK button to sort the channel list.
You can sort by Alphabet, Transponder, FTAToCAS, Favor and Default.
4.4 User Channel List
User Channel List allows you to save or load all the data and settings.
1. Menu->EDIT CHANNEL-> User Channel List->Save User Data
2. Menu->EDIT CHANNEL-> User Channel List->Load User Data
5. Settings
5.1 System Settings
Menu->SETTINGS->System Settings
Tip:You can set all the settings here by pressing VOL+/VOL- button.
1. Menu Language: Set the menu language.
2. Audio1: Set the preferred audio language.
3. Audio2: Set the sub-prime audio language.

4. Subtitle Language: Set the subtitle language.
5. EPG Language: Set the EPG language.
6. TXT Transparency: Set the transparency of teletext.
7. Digital Audio: If a channel has AC3 and PCM audio language at the same
time, when you select RAW it will set AC3 audio language as default output and
when you select PCM it will set PCM audio language as default output.
8.Scart Output:While the HDMI Mode is set to 576i or 480i mode, you can
change the scart output mode between CVBS and RGB mode.
9. Auto Channel Selection: If you set ON, in the channel list will play
automatically when you highlight the channel. If you set OFF, in the channel list
when you highlight the channel, you should press the OK button to play it.
10.Auto Exit CH List: If you set ON, the channel list will disappear when you
press OK on a Highlighted channel. If you set
OFF, the channel list will disappear when you
press OK on a playing channel.
11. Recall List: You can turn Recall List on or
off. If you set ON, when you press Recall
button of RCU you can get the recall list. If you
set OFF, when you press recall button you can
go back to the last program you have
selected.
12. Front Panel Light: Set the brightness of the LED.
5.2 OSD Setup
Menu->SETTINGS->OSD Setup
1. Menu Transparency: Set the transparency of all menus.
2. TXT Transparency: Set the transparency of teletext.
3. Display Mode: Set the HD format between 1080p, 1080i, 720p, 576i or 576p.

4. TV Type: Set the TV Type on
PAL/NTSC/Auto state.
5. Screen Mode: Set the display format
according to the screen ratio. Select TV
screen mode either 4:3 or 16:9 according to
the TV type, or press the MODE button of
RCU directly.
6. OSD Timeout: Set the display time of the
program information.
5.3 Parental control
Menu-> SETTINGS ->Parental Control
Parental Control allows you to set limits for each program or change your
previous password. You can also lock the changes you have made using
Installation Lock, Edit Channel Lock and System Lock. And you can change
Age Rating.
5.4 Menu-> SETTINGS -> calendar
Calendar can get the date information. And you can add the memo of the day.
5.5 Menu-> SETTINGS -> Color Settings
Color Setting can set the brightness, contrast and saturation.

6. Times
6.1 Time Settings
Menu->TIMES->Time Settings
Time Settings will set the time mode, time zone and summer time.
6.2 Event Timer
Event Timer You can set 8 timer events. It will record or play the program
automatically according to the timer event list that you set.
1. Menu->TIMES-> Event Timer or press the
TIMER button directly.
2. Press the RED button to setup a timer, and
press the OK button to save the timer after
setup.
3. In Event Timer menu, highlight one event,
press the YELLOW button will cancel this
timer and press the GREEN button can go to
edit this timer.
6.3 Sleep Timer
Menu->TIMES-> Sleep Timer
SLEEP Timer can set the automatic turn off time.

6.4 Standby hour
Menu->TIMES-> Standby hour
Standby hour can set the time display on front panel when standby.
7. Expansion
7.1 Games
Menu->EXPANSION-> Games
Games offer 8 funny games you can play.
7.2 USB
Menu->EXPANSION-> USB or press the USB button directly
USB can play many kinds of media files, you can record program and playback
it and you can do various operations when using USB HDD or USB disk.
Note: It supports FAT, FAT32 and NTFS format USB disk or USB HDD.
7.2.1 Basic Operations
1. Tool
In USB menu, you can press the RED button to select Rename/Delete/Move
To/Copy To/Lock File/Sort the folders and files. And also can create the new
folders and format the disk.
2. Upload
You can press the YELLOW button to upload data/channel/all to USB. And also
can upload the files to FTP.
7.2.2 Setting
1. Play Mode
Press the GREEN button to set the play mode. It include the Loop, Slide Show
Interval and Photo View Mode options.
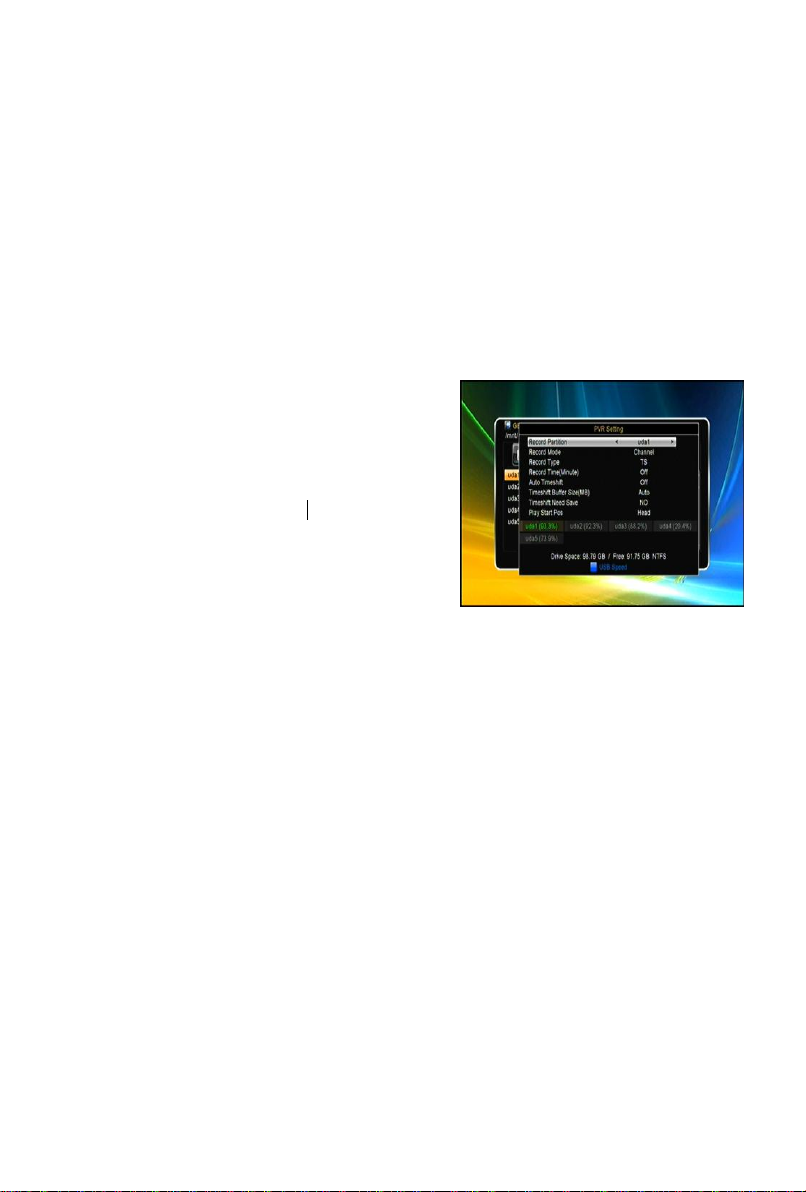
2. PVR Setting
Press the BLUE button to enter the PVR
Setting menu. In this menu, you can set the
options of Record Partition, Record Mode,
Record Type, Record Time,Auto Timeshift,
Timeshift Buffer Size, Timeshift Need Save
and Play Start Pos
7.2.3 Play Files
1. Music
1) Press the VOL+/VOL- to highlight the Music.
2) Press the CH+/CH- to change the folder or file and press the OK button to
open the folder or play the music file. It supports *.mp3, *.ogg, *.wav and *.flac
format music files.
OK: Play the selected file.
CH+/CH-: Change the highlighted item.
: Play the file.
■: Stop playing file.
I: Play the previous file.
I: Play the next file.
: Fast rewind.

: Fast forward.
PAUSE/||: Pause.
VOL+/VOL- : Adjust volume.
EXIT: Exit playing state and return to file list menu.
2. Photo
1) Press the VOL+/VOL- to highlight the Photo.
2) Press the CH+/CH- to change the folder or file and press the OK button to
open the folder or play the picture. It supports *.bmp, *.jpg, and *.gif format
photos.
Tip:You can press the Green button to go to Play Mode Set the Photo View
Mode state on Full Screen, 2x2 Thumbnail or 2x3 Thumbnail in the USB
menu. The picture followed is 2x2 Thumbnail mode.
OK: View the photo.
CH+/CH-/VOL+/VOL-: Highlighted the previous/next photo when photo view
mode is 2x2 Thumbnail or 2x3 Thumbnail. VOL+/VOL- button also can rotate
the picture when photo display of full screen.
I: Play the previous file.
I: Play the next file.
PAUSE/||: Pause.
ZOOM: Zoom in pictures, the zooms change as follows: x1 ->x2->x4 ->x8 ->x16
->x1.
EXIT: Exit the current menu.
3. Movie
1) Press the VOL+/VOL- to highlight the Movie.
2) Press the CH+/CH- to change the folder or file and press the OK button to
open the folder or play the movie file. It supports *.3GP, *.AVI,*.MKV, *.MP4,
*.MOV, *.MPG, *.TS, *.M2TS, *.DAT, *.VOB format movie files.
Table of contents
Other Denson Receiver manuals


