DENTIS DENOPS AN100-C User manual


2
Contents
“Warning : Changes to this product are not allowed”
1. Purpose & Environment
1.1 Purpose 3
1.2 User & Patient 3
1.3 Environment (Transport and Storage, Use) 3
2. FCC Statement
2.1 FCC Statement 4
2.2 FCC Radiation Exposure Statement 4
3. Caution & Symbol
3.1 Caution 5
3.2 Symbol 6
4. Configuration and Specification
4.1 Configuration 8
4.2 Specification 9
5. Function & Use
5.1 Function (Main Body) 10
5.2 Function (LCD) 11
5.3 Function (Sound) 12
5.4 Function (CRADLE) 13
5.5 Use(Basic function) 15
5.6 Use(Change amount of inject medicine, injection speed, mode) 16
5.7 Use(Change USER setting) 17
6. Disinfection, Sterilization and Storage
6.1 Disinfection 18
6.2 Sterilization 18
6.3 Storage 18
7. Trouble shooting and Warranty
7.1 Trouble shooting 19
7.2 Warranty & Expected Service Life 19

3
1. Purpose & Environment
1.1 Purpose
•This device is used for injection of medicine such as local anesthesia.
•This device is classified as a internally powered medical device.
1.2 User & Patient
•Only a doctor or specialist should use this device.
•A doctor or specialist may permit a nurse to manage the device but they should not operate it. For example, they may charge,
assemble and hold the product before using, and sterilize and store after using.
•There is no limit on the gender and age of the patient, but it can be applied differently depending on the doctor's prescription.
1.3 Environment(Transport and Storage, Use)
•Temperature : 0 - 40 ℃
•Relative humidity : 30 - 90 %RH
•Humidity : 0 - 2,000 m (106 - 80 Kpa)
Device name Model name Equipment Part
Anesthesia injection system AN100 Type B

3
2.1 FCC Statement
Federal Communication Commission Interference Statement
This equipment has been tested and found to comply with the limits for a Class B digital device, pursuant to Part 15 of the FCC Rules.
These limits are designed to provide reasonable protection against harmful interference in a residential installation. This equipment
generates, uses and can radiate radio frequency energy and, if not installed and used in accordance with the instructions, may cause
harmful interference to radio communications. However, there is no guarantee that interference will not occur in a particular
installation. If this equipment does cause harmful interference to radio or television reception, which can be determined by turning
the equipment off and on, the user is encouraged to try to correct the interference by one of the following measures:
•Reorient or relocate the receiving antenna.
•Increase the separation between the equipment and receiver.
•Connect the equipment into an outlet on a circuit different from that to which the receiver is connected.
•Consult the dealer or an experienced radio/TV technician for help.
2. FCC Statement
FCC Caution: Any changes or modifications not expressly approved by the party responsible for compliance could void the user’s
authority to operate this equipment.
This device complies with Part 15 of the FCC Rules. Operation is subject to the following two conditions: (1) This device may not cause
harmful interference, and (2) this device must accept any interference received, including interference that may cause undesired
operation.
2.2 FCC Radiation Exposure Statement:
This equipment complies with FCC radiation exposure limits set forth for an uncontrolled environment.
This equipment should be installed and operated with minimum distance 15cm between the radiator & your body.
This device and its antenna(s) must not be co-located or operation in conjunction with any other antenna or transmitter.

4
3. Caution & Safety regulations
3.1 Caution
Be sure to read the user manual before using this product.
Please use this product only for licensed dentists.
When injecting the anesthetic solution into the patient using this product, adjust the injection amount according to the decision of the physician.
Do not use on uneven floors, sloping areas or when there’s vibration.
Do not use in water or humid areas.
Do not touch the main body and power plug with wet hands.
Be careful not to move or get external shock when operating the machine.
If the product smells of smoke or burning, please contact the place of purchase.
This device complies with electromagnetic specifications. However, this equipment can cause improper operation due to loss of performance or degradation
due to external electromagnetic disturbances.
Please check if all the components are present after opening this product.
Please do not use any adapter other than the one provided by the manufacturer.
Unplug the adapter connected to the cradle in case of abnormal operation or problems with the product.
If the wire is damaged, please stop using it and contact the place of purchase to replace it.
Never use this product for anything other than its intended use.
Do not disassemble or modify unless by a technician from the place of purchase. No warranty shall be granted for arbitrary disassembly and modification.
Please do not use the used ampoule again.
Store the product in a CRADLE when not in use.
This device has obtained electromagnetic compatibility KC, CE, FCC certification.
In case of malfunction or damage, please contact the place of purchase
Please dispose of the product in accordance with the laws of your country.
When replacing the battery, contact the manufacturer of the product.
Electric shock hazard, do not saturate the Pump with liquids. Protect the Pump from exposure to condensed humidity, moisture, and liquid.
•When used in the vicinity of an electric scalpel (medical scalpel is an incision and resurfacing device using high-frequency current), check the following before
use - The distance from the pump to the electric scalpel (scalpel, scalpel and return electrode) and the scalpel should be kept at least 25cm.
- The electric scalpel and this pump should operate with the power from separate system and connect them safely.
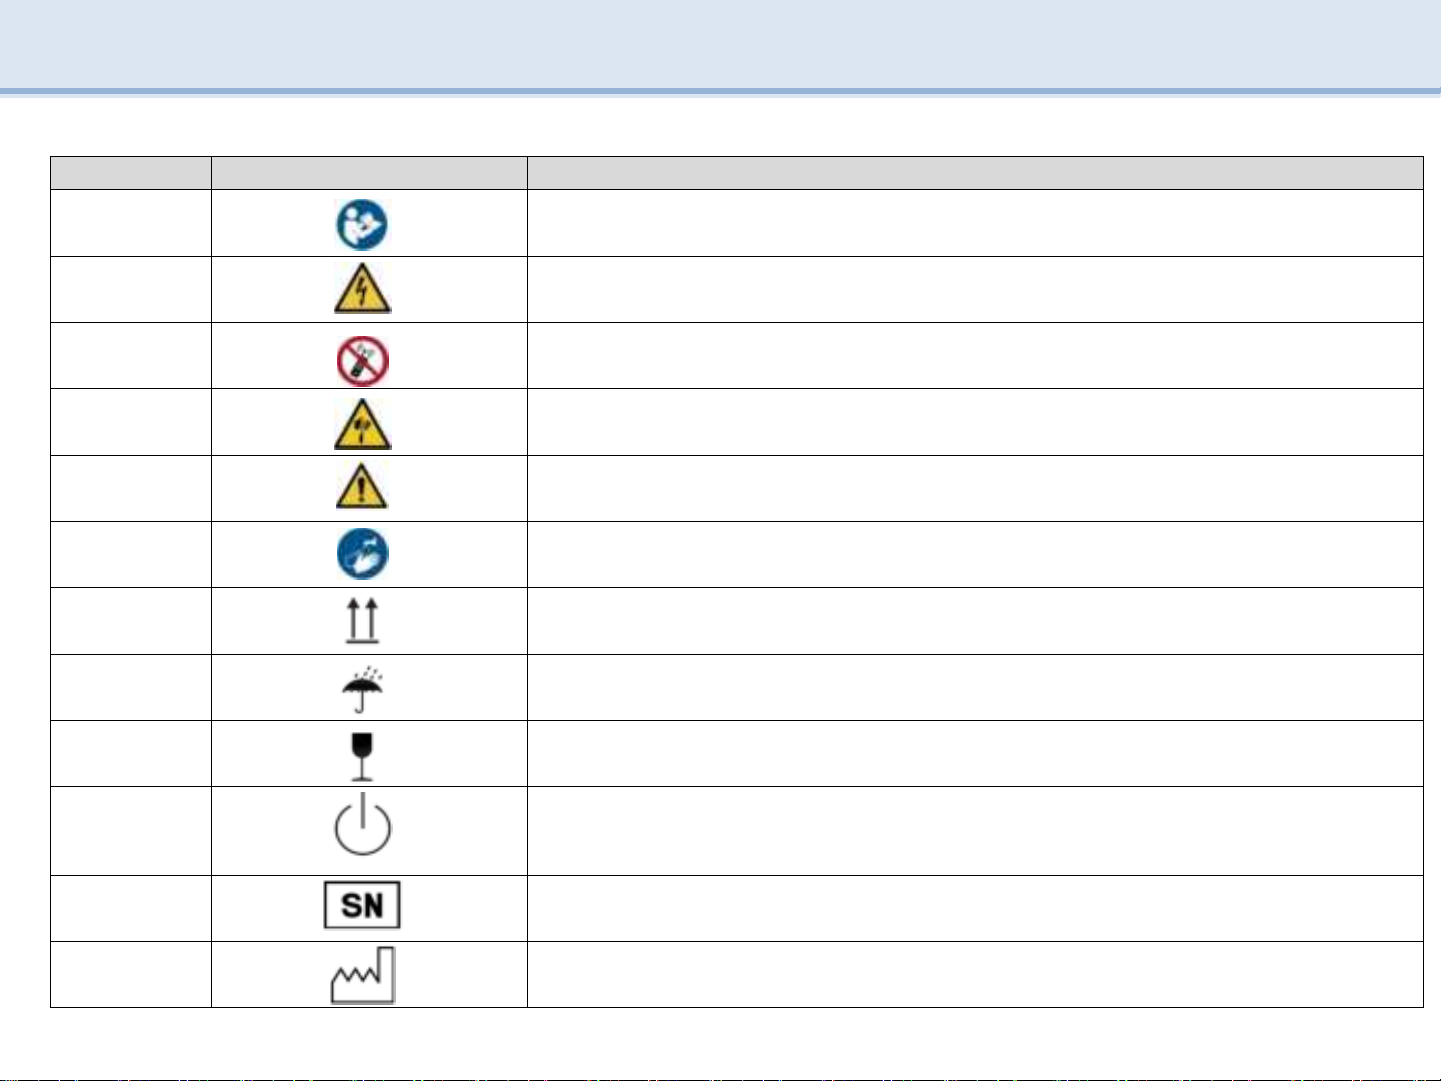
3. Caution & Symbol
3.2 Symbol
Part Symbol Explanation
Instruction
Manual
-
Be sure to read this instruction manual before using it to prevent safety accidents and understand
essential performance before using It. (ISO 7010-M002) (show on Label)
Electricity
-
Be careful not to touch the charging adapter with wet hands, as there is a risk of electric shock.
(ISO 7010- W012)
No activated
Mobile phone
- Do not use wireless equipment such as mobile phones within 30 cm during the procedure as malfunctions
may occur due to external electromagnetic forces. (ISO 7010-P013)
Sharp
-
Be careful not to get stung. (ISO 7010-W022)
Warning
-
Be careful not to drop the body on the floor during use. (ISO 7010-W001)
Wash your hand
-
Make sure to wash your hands before and after use. (ISO 7010-M011)
This side up
-
Indicates the correct direction of the package. (show on label)
Keep dry
-
Indicates a medical device that needs to be protect from moisture. (ISO 15223-1: 2012) (show on label).
Fragile
-
The contents of the packaging are fragile, so be careful and handle them.
(ISO 15223-1: 2012) (show on label).
Stand-by
- To identify the switch or switch position by means of which part of the equipment is switched on in order
to bring it into the stand-by condition.
(IEC 60417-5009)
Serial number
-
Indicates the manufacturer's serial number so that a specific medical device can be identified.
(ISO 15223-1)(show on label)
Date of
manufacture
-
Indicates the date when the medical device was manufactured. (ISO 15223-1)(show on label)
5

6
Part Symbol Explanation
Use no hand hooks
- Do not use hooks when handling packing cargo. (show on label)
Recycling - Indicate Recycling box location. (ISO 7001: 2007) (show on label)
Atmospheric
pressure limitation
- Indicates the range of atmospheric pressure to which the medical device can be safely exposed.
(ISO 15223-1:2012) (show on label)
Temperature limit
- Indicates the temperature limits to which the medical device can be safely exposed.
(ISO 15223-1:2012)(show on label)
Humidity
limitation
- Indicates the range of humidity to which the medical device can safely exposed.
(ISO 15223-1:2012) (show on label)
Sterilization
-
After use, make sure to sterilize the AMPOULE CASE with steam in the autoclave and store it in a
sterilization bag for the next use.
(ISO 7000-2868)
Discard
-
Do not dispose of this device with unsorted
waste. Please separate recyclable parts and throw than away
separately Classify recyclable parts and throw them away. (Directive 2002/96/EC) (show on label)
Type B Equipment
Part - This medical device corresponds to type B Equipment part . (IEC 60417-5840) (show on label)
Class 2 - This device is a 2-class medical device. (IEC 60417-5172) (show on label)
Manufacturer - Indicates the medical device manufacturer
(Directives 90/385/EEC, 93/42/EEC and 98/79/EC)(show on label)
EU representative
- Indicates the authorized representative in the European Community.
3.2 Symbol
3. Caution & Symbol

7
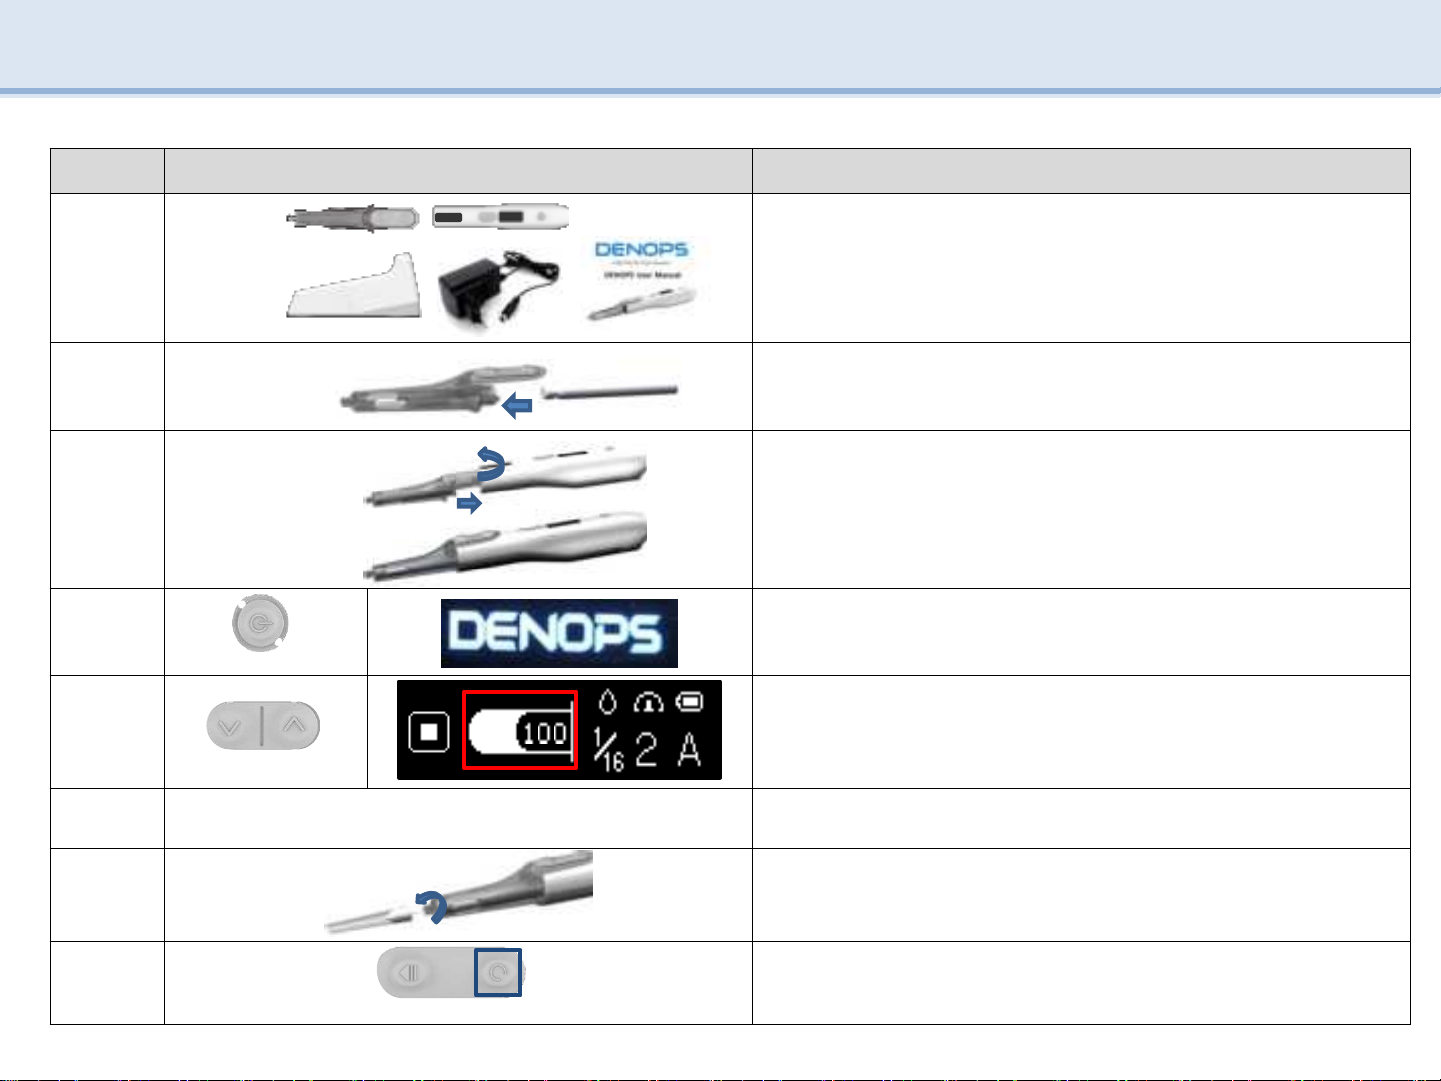
4. Configuration & Specification
4.1 Configuration
AMPOULE CASE Main Body CRADLE
Adapter User Manual

8
4. Configuration & Specification
4.2 Specification
List Category Unit Specification Etc.
Main body
(+ AMPOULE CASE)
Weight g 85
Amount of
inject
medicine
ml
Adjust 5 Steps
(Check the steps with the LCD)
1/16 : 0.11ml, 1/8 : 0.22ml, 1/4 : 0.45ml,
1/2 : 0.90ml, Full : 1.8ml
Injection time s Manual - 1step : 320s, 2step : 160s, 3step : 30s
Auto - 1step : 320s, 2step : 170s, 3step : 48s 1.8ml
Mode - AUTO, MANUAL, USER
Battery V 3.7
Lithium Polymer
mAh 550
Charging
time
h 6
Size mm 202.5 X 24.7 X 28
CRADLE Weight g 140
Size mm 176 X 41.4 X 75.3
Adapter
Rated input V AC 100 –240
Hz 50/60
Rated output V DC 5
A 2.0
Weight g 104
Dental needle
(Disposable,
Separately sold)
Size mm
27G/16, 25, 30
30G/ 12, 16, 25
31G/ 12

9
5. Function & Use
5.1 Function(Main body)
Part Name Function
LCD LCD
-
Show main body status
SW1 Operation button
-
Injection of medication / Stop
-
Aspiration (Over 2 seconds)
SW2 Reset button
-
Remove bubble
-
Initialization(Over 2 seconds)
SW3 Select button
-
Move menu : Amount of inject medication , Injection speed , Select
Injection mode
-
Sound Setting(Over 2 seconds)
SW4 Adjust button
-
Step Setting
-
Save User mode(Over 2 seconds)
SW5 Power button
-
Power On/Off(Over 2 seconds)
SW3+SW4 Connect hook
-
Hook the motor pin to the back of the ampule
(Setting before using the aspiration)
SW1 SW2 SW3 SW4 SW5
LCD

10
5.2 Function(LCD)
No. Part Function
①Motor movement
direction
-
Show forward( ), backward( ), stop( )
②Current amount of
inject medicine
-
Show current amount of inject medicine(1 ~ 100%).
③
Amount of inject
medicine
-
Amount of inject medicine icon
Adjust amount of
inject medicine
-
Show amount of inject medicine such as FULL, 1/2, 1/4. 1/8, 1/16.
④
Injection speed
-
Injection speed icon.
Adjust Injection
speed
-
Show injection speed(1 ~ 3 Step).
⑤Battery
-
Show current battery status.
⑥Mode
-
Auto(A) : Low-speed to high-speed injection.
-
Manual(M) : Inject constant speed.
-
User(U1~U5) : Save user-specified amount of inject medicine and injection
speed and use.
5. Function & Use
① ② ③ ④ ⑤
⑥

11
5. Function & Use
5.3 Function(Sound)
Part
Order
IMAGE Explanation
Sound
1
Press Select button (SW3) for more than 2 seconds to enter setting
mode.
2
Set ON/OFF with Adjust Button (SW4)
3SOUND ON SOUND OFF
Press the SELECT button (SW3) for more than 2 seconds to exit the
setup mode.
Language
1
Press Select button (SW3) for more than 2 seconds to enter setting
mode.
2
Press the SELECT button (SW3) to change to LANGUAGE SELECT mode.
3
Press the adjustment button (SW4) to select the language (KOR, ENG,
CHN).
4Language(KOR, ENG, CHN)
Press Select button (SW3) for more than 2 seconds to enter setting
mode.
Voice Guidance
1POWER ON Start pain-free anesthesia. 5Low Battery Please charge the battery.
2POWER OFF Treatment complete. 6Reay to Aspiration Ready for Aspiration.
3AMPOULE RESET Reset the ampoule position. 7Remove Bubble Remove air bubbles.
4SOUND ON Activate voice assistant. 8SOUND OFF Turn off voice assistant.
Setting Mode
SOUND ON
Setting Mode
SOUND OFF
LANGAUGE
KOREAN
LANGAUGE
ENGLISH
LANGAUGE
CHINESE

12
5.4 Function(CRADLE)
Part Name Explanation
ACRADLE
-
When the main body is not in use, put it on a CRADLE and charge it.
-
Store the Main body before and after use.
B DC power Port
-
Port to which the adapter jack can be connected.
CLED
-
Show charging status
Charging light(GREEN) : Standby charging
Charging light(BLUE) : Charging
DAdapter
-
Connect Plug to Outlet after connect charging DC JACK to DC power port
5. Function & Use
Only use the supplied charging adapter for charging.
A
B
C
D
13
5. Function & Use
5.5 Use(Basic function)
Order Image Explanation
1
Check the entire DENOPS component.
(Main
body, AMPOULE CASE, Adapter, CRADLE, User manual)
2
Connect the ampoule to the AMPOULE CASE.
3
Rotate the AMPOULE CASE 45 degrees to connect the AMPOULE
CASE and the main body.
4
SW5
Press SW5 (over than 2 seconds) to turn on the power and display.
5
SW3 SW4
After checking amount of inject medication (100%) on LCD and the
ampoule reset, press SW3 and SW4 at the same time to connect
hook.
※Use only when using aspiration (optional)
6-
Set amount of inject medicine, injection speed, mode
※Note page 14
7
Turn the needle 360 degrees to connect it to the main body.
※Before using DENOPS, keep the needle covered with a cap.
8
SW2
Press SW2to remove air bubble.(remove bubble after remove cap)
360˚
45˚

14
5. Function & Use
9
SW1
Press SW1 (over than 2 seconds) to operate aspiration.
10
SW1
Remove the needle cap and press SW1to start injection.
11
SW2
Press SW2 (over than 2 seconds) to initialize ampoule after
completion of inject medication.
12
Turn the needle 360 degrees in the reverse direction to separate
the
needle.
13
Disconnect the AMPULLE CASE by turning the AMPOULE CASE to
45
degrees on the main body.
14
Separate AMPOULE CASE and ampoule.
15
Attach the main body to the CRADLE and charge and store it.
5.5 Use(Basic function)
360˚
45˚
15
Order Image Explanation
1
SW3
-
Press SW3to select the desired setting.
change amount of inject medicine, injection speed, mode
※Change User mode setting (Note P15)
Amount of inject medicine
Injection speed
Mode
2
SW4
-
Press SW4to select the desired step.
Amount of inject medicine : 1/16, 1/8, 1/4, 1/2, FULL
Injection speed : STEP 1, 2, 3
Mode : AUTO, MANUAL, USER 1 ~ 5
Change amount of inject medicine
Change injection speed
Change mode
5. Function & Use
5.6 Use(Change amount of inject medicine, Injection speed, Mode)
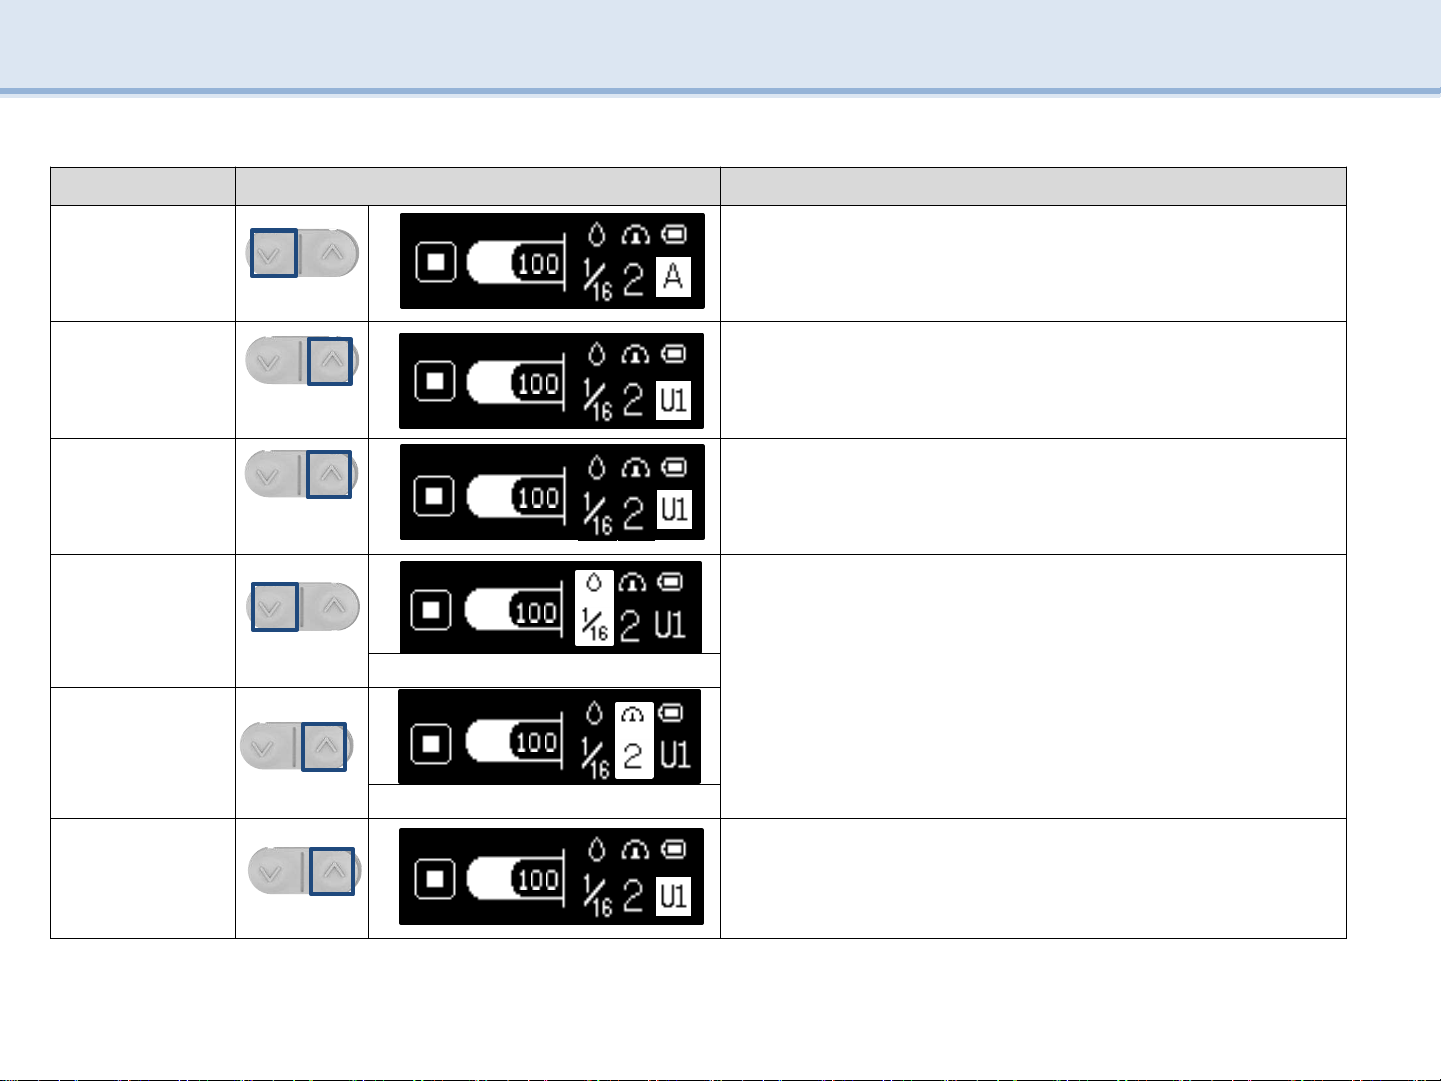
16
5. Function & Use
Order Image Explanation
1
SW3
-
Press SW3to select the desired mode.
2
SW4
-
In the Change Mode screen, press SW4to select U1 to U5.
3
SW4
-
Press SW4 for more than 2 seconds to change the USER setting.
4
SW3
-
Press SW3to select the desired mode change.
Amount of inject medicine, Injection speed
-
Press SW4to select the desired step.
Amount of inject medicine : 1/16, 1/8, 1/4, 1/2, FULL
Injection speed : STEP 1, 2, 3
Amount of inject medicine
5
SW4 Injection speed
6
SW4
-
Save the User mode by pressing SW4(over than 2 seconds) after
changing the amount of inject medicine and injection speed.
5.7 Use(Change User mode setting)

17
6. Disinfection, Sterilization and Storage
6.1 Disinfection(Main Body)
•Before and after use, wipe with just a dry cloth or with a cloth using Enzyssept.
•Please dilute the QUAT disinfectant and pour it into Dry Wipes.
6.2 Sterilization (AMPOULE CASE)
Sterilization condition
Operating
Condition
•
Temperature : 132 ℃(270 ℉)
•
Pressure : 150 kPa (1.6 kgf/㎠)
•
pre vacuum: 8 min(Wrapped)
•
Dry :30 min
Autoclave
•The use of the following substances is not permitted.
- High concentrations of organic acids and inorganic acids, hydrocarbons chlorinated
•Sterilization condition(Please refer to the sterilization method for each country.)
6.3 Storage
•Place DENOPS on CRADLE to charge after use.
•Please keep it away from places where there is humidity or water.
•Do not store near firearm.
•Store the product at room temperature and out of direct light.

18
7. Trouble shooting and Warranty & Expected Service Life
Num. Problem Cause Matter of management
1The display does not turn on
Drained battery Please charge the battery and use it again.
Etc. Contact the customer service center.
2Button does not operate Button failure Contact the customer service center.
3Not Charging
CRADLE breakdown Contact the customer service center.
faulty adapter Contact the customer service center.
4Device is running hot -Contact the customer service center.
5Damage to the device and other problems -Contact the customer service center.
7.1 Trouble shooting
7.2 Warranty & Expected Service Life
The warranty period of this product is 1 year.
The expected service life of this product is 3 years.
The expected service life of a lithium-polymer charging battery is 300 charging cycles, 4.1V full charge and 3.1V full discharge.
Free maintenance will be provided during the warranty period if a user has unexpected problems while following instructions correctly.
If there is a problem due to user carelessness or product modification or disassembly, you need to pay for the repair

(Ver 1.0) Jun/30/2021
KOREA +82-2-869-6020 / USA +1-323-677-4363
ⓒ2021 DENTIS CO.,LTD. All Right Reserved.
Specifications are subject to change without notice.
Trademarks are the property of DENTIS CO., LTD. Or their respective owners. Document No. : UEF-A1-11
DENTIS Co., LTD.
HEADQUARTER : 99, SeongSeoseo-ro, Dalseo-gu, Daegu, Republic of Korea
FACTORY : 6, Yuram-ro, Dong-gu, Daegu, Republic of Korea
Table of contents
Other DENTIS Dental Equipment manuals


