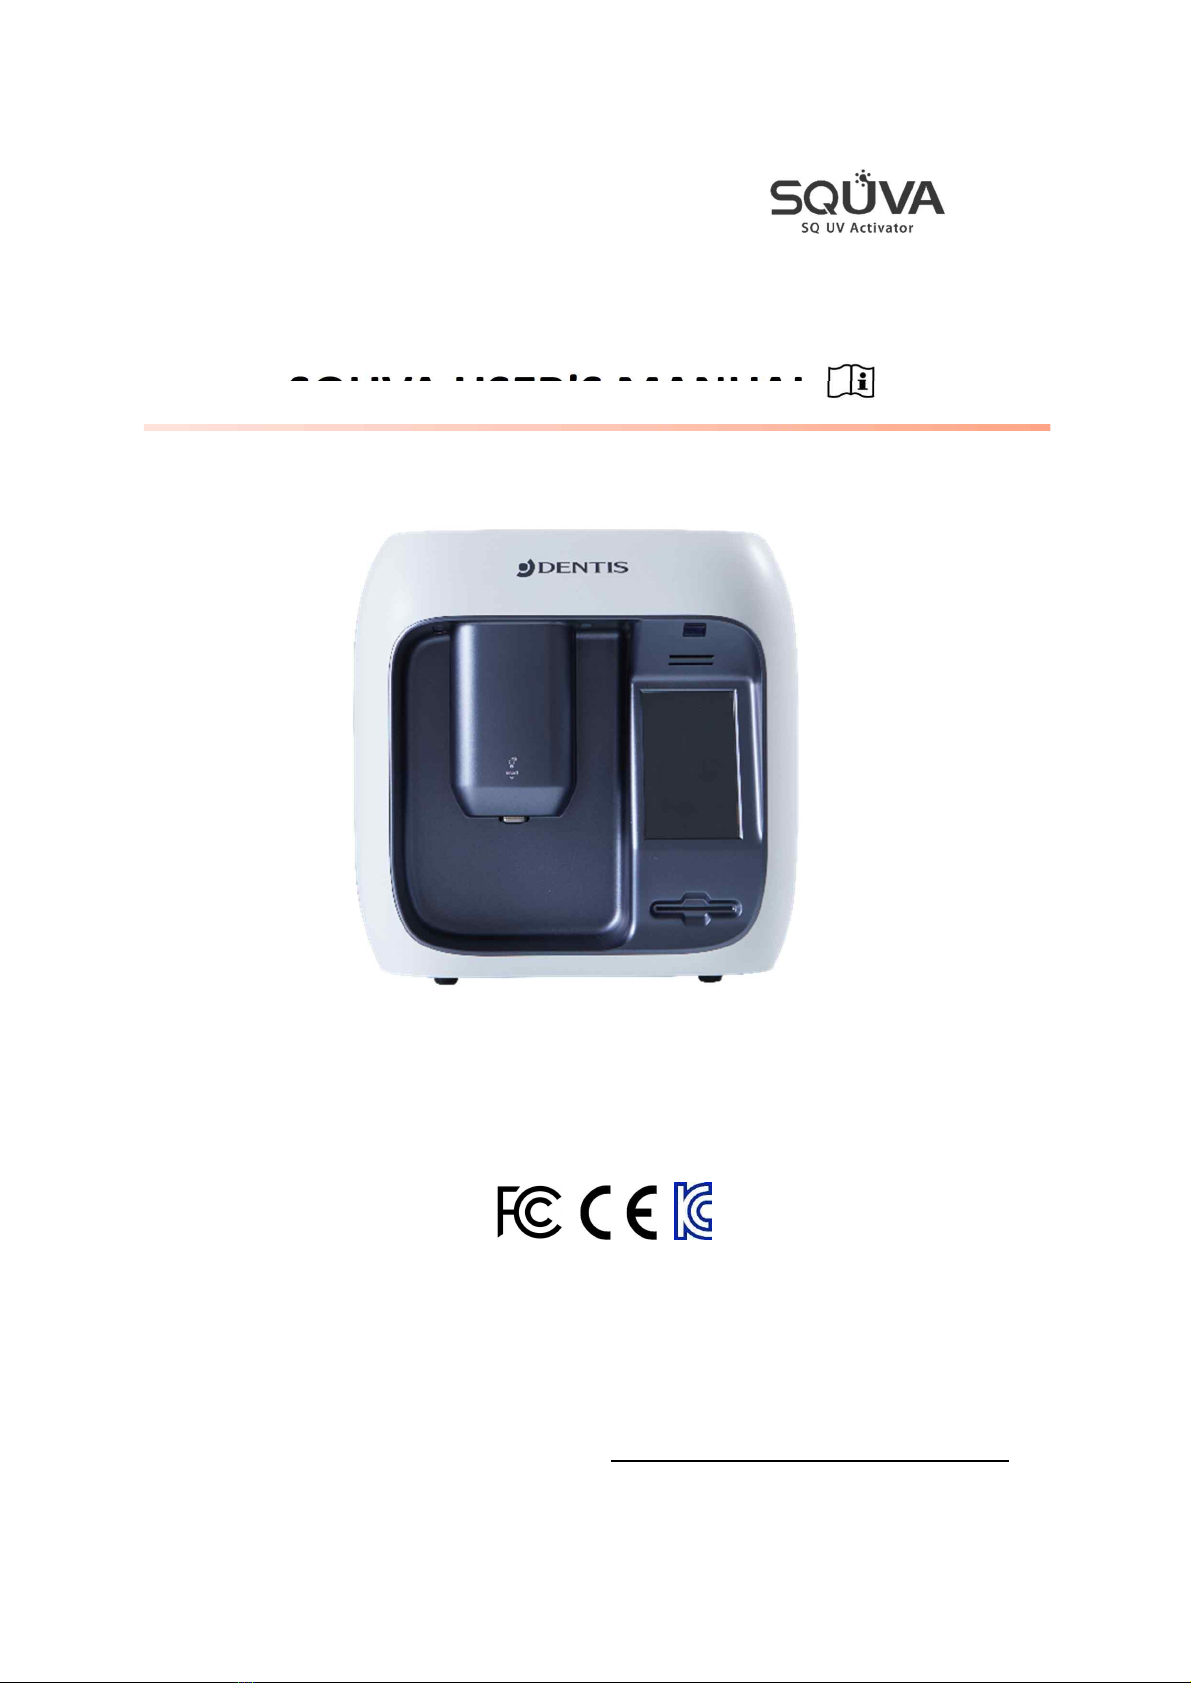
DENTIS SQUVA User manual
Global TOP 10 in Healthcare
SQUVA USER’S MANUAL
SQ UV ACTIVATOR
DENTIS CO., LTD.
99, Seongseoseo-ro, Dalseo-gu, Daegu, Korea
Tel. +82-53-583-2804, FAX. +82-53-583-2806 www.dentis.co.kr / www.dentisimplant.co.kr

Be sure to read the manual before using this product.
2
CONTENTS
1. Purpose of Use & Conditions for Use ......................................................................................................................... 3
1.1 Purpose of Use ................................................................................................................................................................... 3
1.2 Conditions for Use ............................................................................................................................................................. 3
2. CE & FCC.................................................................................................................................................................................... 3
2.1 FCC warning statement .................................................................................................................................................... 3
2.2 CE statement ....................................................................................................................................................................... 4
3. Warnings .................................................................................................................................................................................... 5
4. Warranty ..................................................................................................................................................................................... 6
5. Components and Specifications ...................................................................................................................................... 7
5.1 Components ........................................................................................................................................................................ 7
5.2 Specifications ...................................................................................................................................................................... 7
6. Use ................................................................................................................................................................................................ 8
6.1 Components ........................................................................................................................................................................ 8
6.2 How to use........................................................................................................................................................................... 9
6.3 Control part ...................................................................................................................................................................... 12
6.4 Sensor Explanation ......................................................................................................................................................... 13
7. Storage Method ................................................................................................................................................................... 13
8. Cleaning and Sterilization ............................................................................................................................................... 14
8.1 Cleaning and Sterilizing Fixture Driver ............................................................................................................. 14
8.2 Cleaning and Disinfection the Main Body ..................................................................................................... 14
8.3 Sterilization....................................................................................................................................................................... 14
9. Troubleshooting ................................................................................................................................................................... 14
“WARNING: Modification of this equipment is not allowed”

Be sure to read the manual before using this product.
3
1. Purpose of Use & Conditions for Use
1.1 Purpose of Use
The SQ UV ACTIVATOR is a product designed to increase hydrophicility on implant surface.
1.2 Conditions for Use
Ÿ Condition of Use
ž Temperature : 0 - 40 ℃
ž Relative humidity : 30 - 90 %RH
ž Atmospheric pressure : 0 - 2,000 m (106 - 80 Kpa)
Ÿ Transport environment
ž Temperature : 0 - 40 ℃
ž Relative humidity : 0 - 80 %RH
2. CE & FCC
2.1 FCC warning statement
Ÿ FCC Part 15.19(a)
This device complies with part15 of FCC rules. Operation is subject to the following two
conditions: (1) This device may not cause harmful interference, and (2) this device must accept
any interference received, including interference that may cause undesired operation.
Ÿ FCC Part 15.105
This equipment has been tested and found to comply with the limits for a Class B digital device,
pursuant to part 15 of the FCC Rules. These limits are designed to provide reasonable
protection against harmful Interference in a residential installation. This equipment generates,
uses and can radiate radio frequency energy and, if not installed and used in accordance with
the instructions, may cause harmful interference to radio communications. However, there is
no guarantee that interference will not occur in a particular installation. If this equipment does
cause harmful interference to radio or television reception, which can be determined by
turning the equipment off and on, the user is encouraged to try to correct the interference by
one or more of the following measures:
- Reorient or relocate the receiving antenna.
- Increase the separation between the equipment and receiver.
- Connect the equipment into an outlet on a circuit different from that to which the receiver
is connected.

Be sure to read the manual before using this product.
4
- Consult the dealer or an experienced radio/TV technician for help
Ÿ FCC Part 15.21
Changes or modifications not expressly approved by the manufacturer (or party responsible)
for compliance could void the user’s authority to operate the equipment
Ÿ RF Exposure
This equipment should be installed and operated with minimum 20 cm between the radiator
and your body.
2.2 CE statement
Ÿ RED Article 10.2
This device can be operated in at least one MemberState without infringing applicable
requirements on the use of radio spectrum.
ž RF Range: 13,535 kHz ~13,587 kHz
ž Max Output Power(E.I.R.P.): -27.46 dBm

Be sure to read the manual before using this product.
5
3. Warnings
Warnings
Ÿ Please read the USER manual before using the product.
Ÿ Check all components after opening this product.
Ÿ Please install this product in a well ventilated place.
Ÿ Do not use it in uneven, sloping, or vibrating area.
Ÿ Do not use in water or wet areas.
Ÿ Do not touch the body and power plugs with wet hands.
Ÿ Do not pull the power cable when disconnecting the power plug, but hold the power
plug and disconnect.
Ÿ Please connect a grounded wall outlet.
Ÿ Use input power in the range of AC 100 – 240 V, 50/60 Hz.
Ÿ Do not use adapters other than those provided.
Ÿ This product has been certified by the Electromagnetic Compatibility KC, CE and FCC
Ÿ This product complies with EM standards. However, electromagnetic interference may
cause performance degradation when used improperly.
Ÿ Do not disassemble or separate except for experts designated by supplier.
(No warranty can be obtained if arbitrarily disassembled or separated)
Ÿ If the product displays an ozone warning on the LCD or smells strange (ozone smell),
ventilate it immediately, remove the power plug, and contact your supplier.
Ÿ Do not put any substances other than FIXTURE in the lifting section.
(Risk of failure or electric shock)
Ÿ After reforming the FIXTURE, after the pump stops (approximately 30 seconds), change
the other FIXTURE.
Ÿ Do not insert FIXTURE driver during product operation.
Ÿ Make sure to use products within 8mm diameter of FIXTURE.
Ÿ Use FIXTURE in combination with the FXIUTRE support.

Be sure to read the manual before using this product.
6
Ÿ Use the FIXTURE support in the correct position on the TRAY.
Ÿ Do not place objects on the TRAY.
Ÿ Do not place items on top of the product
Ÿ When operating the instrument, be careful not to cause external shock
Ÿ If the wire is damaged, stop using it and contact your supplier to replace it
Ÿ If your product smells of smoke or burning, please remove the power plug and contact
your supplier.
Ÿ Be careful when installing the product
Ÿ Contact your supplier if there is a fault or damage
Ÿ If it is not used for a long time, remove it from the outlet and store it
Ÿ In case of failure, do not forcibly separate the closed lifting part and contact the place
of purchase
Ÿ Do not remove the RFID CARD during use
Ÿ Please contact the supplier when the RFID CARD exceeds the limit.
Ÿ Dispose of the product in accordance with the laws of the country concerned
Ÿ Never use this product for any purpose other than its intended use
Ÿ The temperature of the FIXTURE driver is high after reforming, so be sure to wear latex
gloves
4. Warranty
Ÿ UV LAMP : 700 hrs
Ÿ O3 FILTER : 1 years
Ÿ Product : 1 years
Be sure to read the manual before using this product.
7
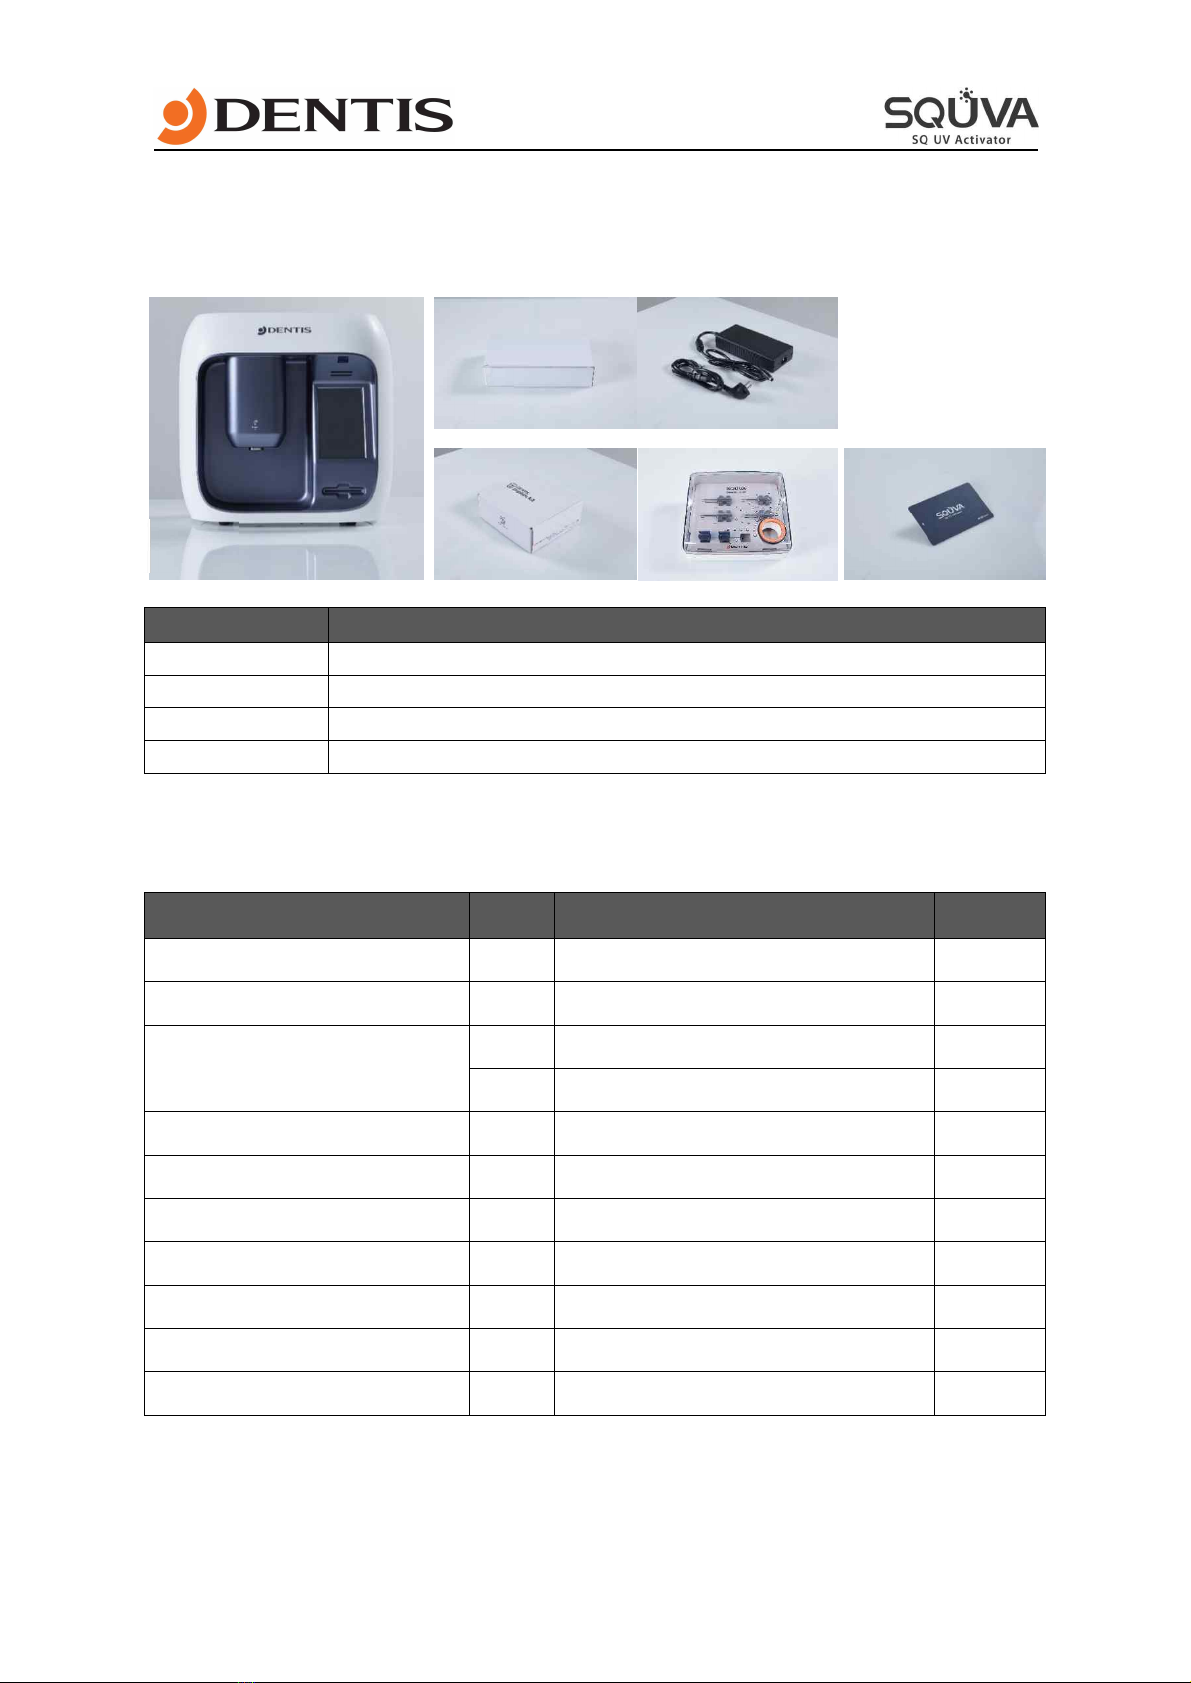
5. Components and Specifications
5.1 Components
No.
Description
①
SQ UV Activator
②
Adapter & Power Plug
③
FIXTURE Driver KIT
④
RFID CARD
5.2 Specifications
Category
Unit
Specification
Remark
Rated power input
-
AC 100 – 240 V , 50/60 Hz
Power consumption
W
137
Adapter Output
V
DC 24
W
250
Product size
mm
W336 x L185 x H330
Product weight
kg
6
Ozone accrual volume
ppm
Less than 0.05
Reforming time
s
10
Wavelength
nm
172
RF Range
kHz
13535 ~ 13587
RF Max Output Power(E.I.R.P.)
dBm
- 27.46
※ Values are measured with a tolerance of 10%
②
③
④
①

Be sure to read the manual before using this product.
8
6. Use
6.1 Components
MOTION SENSOR
SPEAKER
5” TOUCH LCD PANNEL
RFID CARD SLOT
TRAY
(FIXTURE INSERTION)
DC POWER
INPUT SOCKET
ON/OFF SWITCH
HANDLE
Product LABEL
Be sure to read the manual before using this product.
9
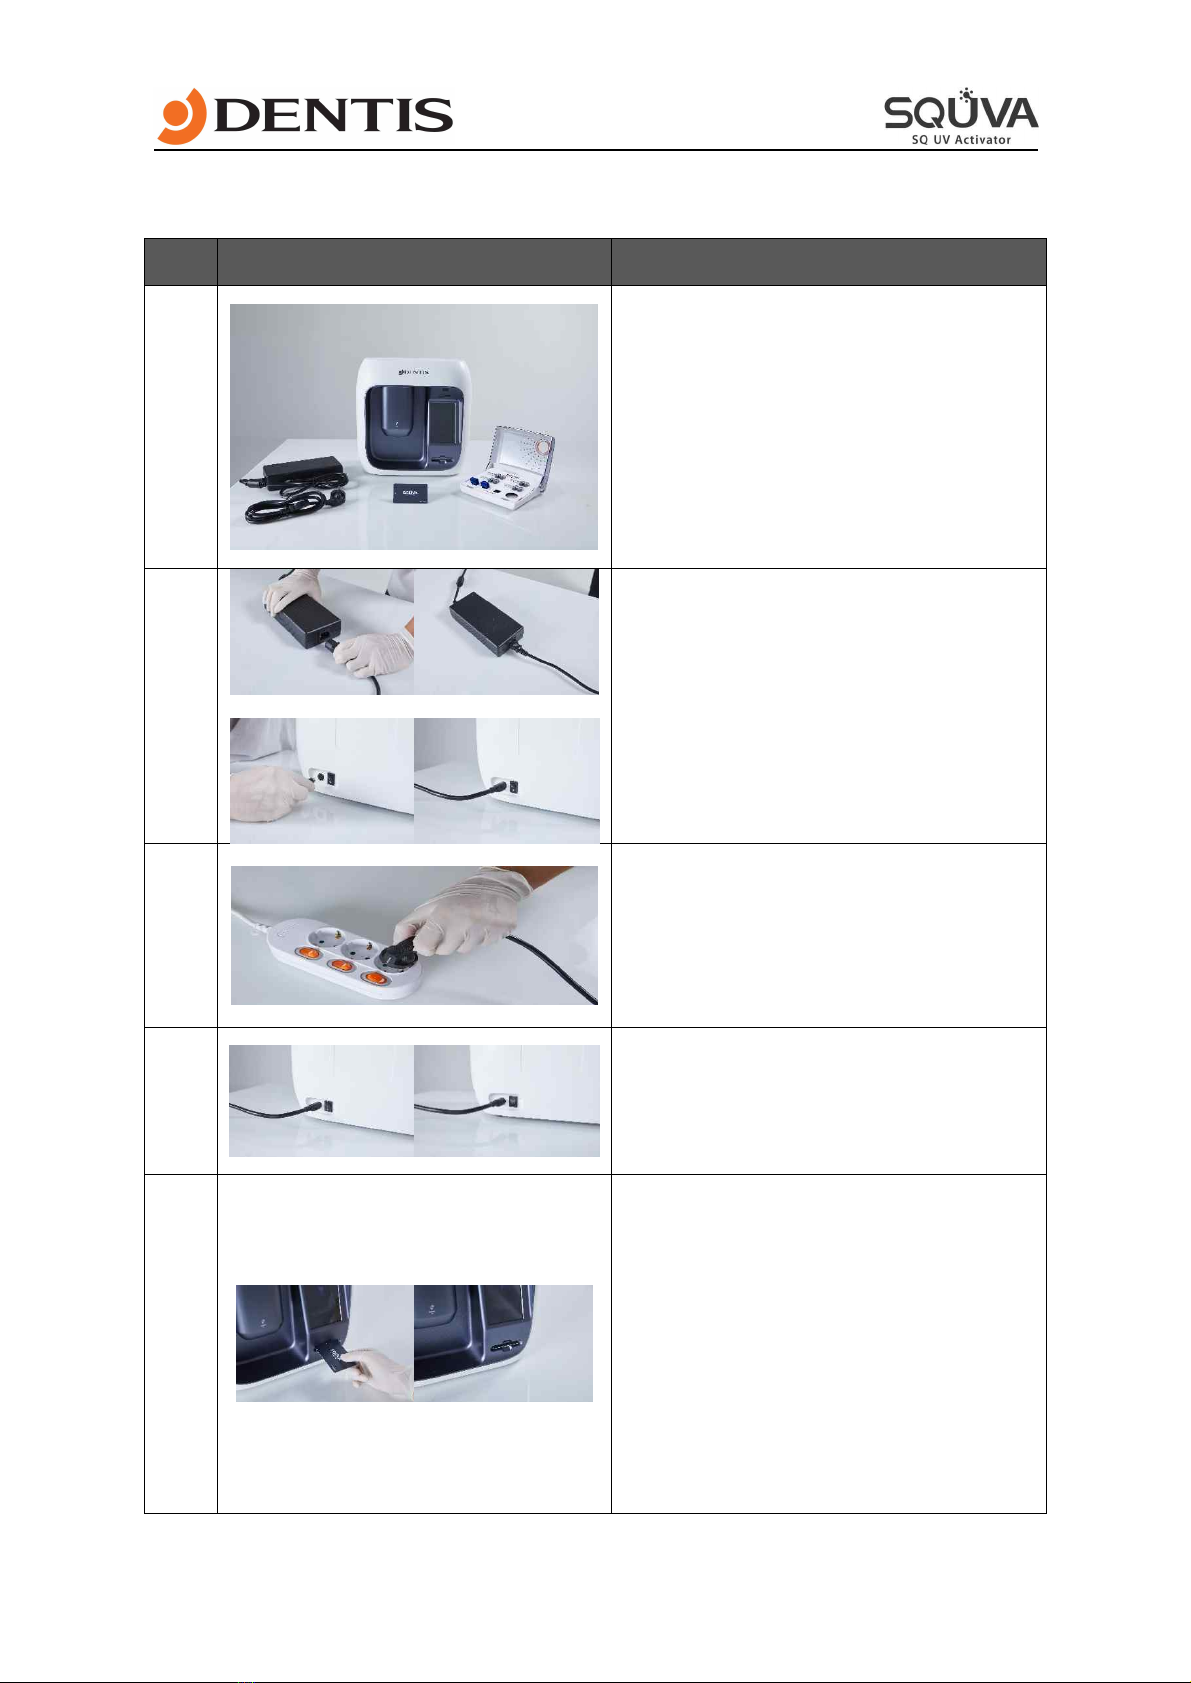
6.2 How to use
Step
Image
Description
1
Check the SQUVA components
- SQUVA
- Adapter
- RFID CARD
- Power Cord
- FIXTURE Driver KIT
- USER’S MANUAL
2
Connect the adapter and power cord.
Adapter outpt “4Pin Jack” at the back of
the body. (Pay attention to direction).
3
Plug the power cord into an outlet.
4
Turn on the power button at the back of
the main body.
5
Insert the RFID CARD into the designated
slot.

Be sure to read the manual before using this product.
10
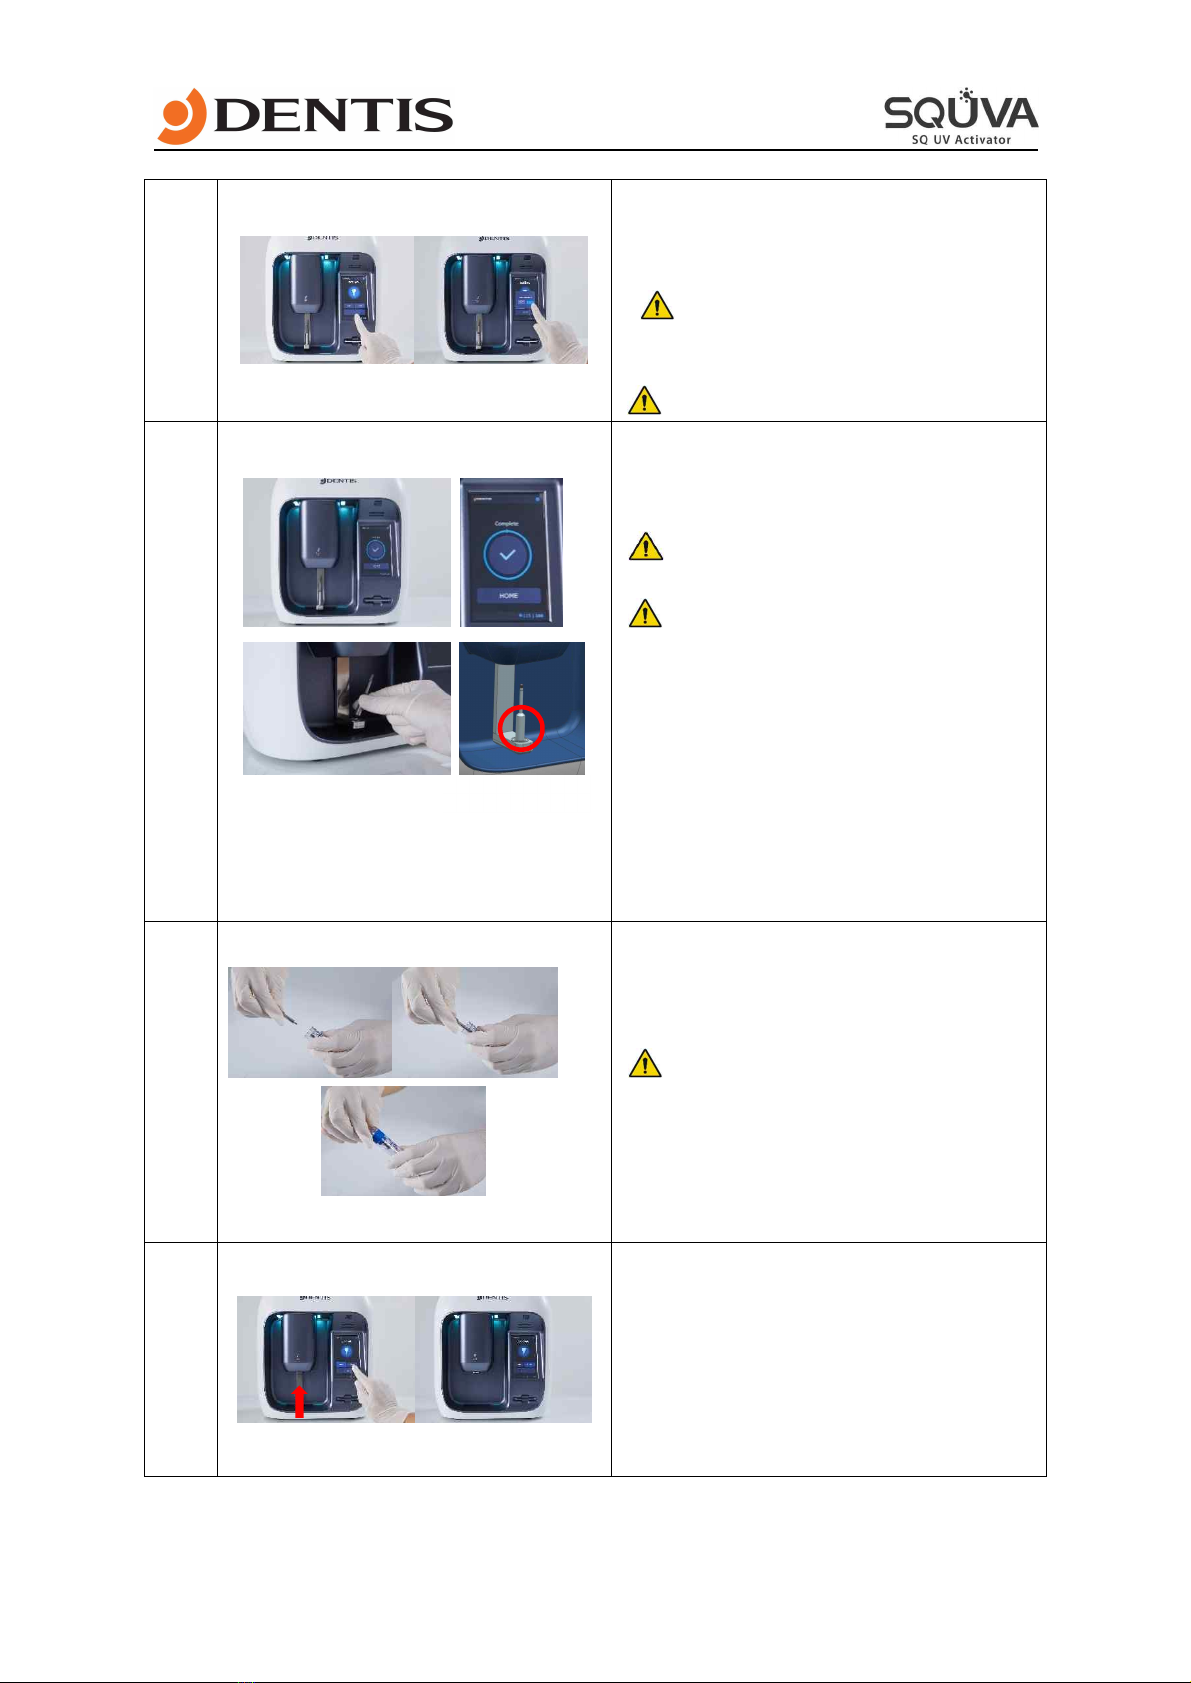
6
Press the “OPEN” button on the LCD.
(Make sure the TRAY is downward.)
7
Prepare a FIXTURE to be reformed.
Close the sterilized FIXTURE support by
rotating it clockwise two to three times.
( The FIXTURE support must be
sterilized before use)
( Do not allow FIXTURE to touch hands
or other parts)
( Handle the ampoule to prevent
contamination)
( Check that the FIXTURE is fully
engaged in the FIXTURE driver. Incomplete
tightening may cause FIXTURE to fall
during process)
8
Place the FIXTURE support in the center
groove of the TRAY.
( Ensure that it is correctly seated in
the middle circle)
(
out of circle
)
(
lean
)
CORRECT
INCORRECT
Be sure to read the manual before using this product.
11
9
With the TRAY lowered, press the "START"
button on the LCD screen to start the
refinement.
( Ensure that FIXTURE driver is
correctly engaged before pressing the
"START" button)
( Does not work when tray is raised)
10
If "Complete" is displayed on the LCD
screen, verify that the reforming has been
completed. Remove the FIXTURE driver.
(
When removing the FIXTURE driver,
lean and take out the FIXTURE driver)
( Burn hazard could result if you hold
the upper part of the FIXTURE Driver after
work, so please hold the lower part of the
driver (large area in the picture).
(The TRAY automatically comes down
when the reforming is complete, and the
TRAY automatically rises when the pump
stops. Press the "OPEN" button to take
out the FIXTURE driver from the TRAY that
is closed)
11
Insert the FIXTURE mounted on the
FIXTURE driver into the existing ampule
and remove it by turning the FIXTURE
support counterclockwise.
( Check that the FIXTURE is completely
separated from the FIXTURE driver.
Incomplete separation may cause FIXTURE
to fall during movement)
Fit angle driver to reformed FIXTURE and
install it on the patient
12
After use, close the TRAY using the
"CLOSE" button.
(Automatically closes after 30 seconds)
(
Wide Part
)

Be sure to read the manual before using this product.
12
6.3 Control part
No.
Image
Explanation
1
Lower the TRAY to where the FIXTURE driver is to
be placed.
2
TRAY with FIXTURE driver raised.
3
Reforming starts.
4
Display the number of RFID CARDs available.
※ when there are zero remaining, contact supplier to
recharge the CARD .
(Voice : Please charge the CARD.)
5
Motion sensor On/Off.
6
Select Language(Korean or English).
7
Adjust the Volume

Be sure to read the manual before using this product.
13
6.4 Sensor Explanation
※ The "non-contact sensor" at the top of the LCD can detect the user's hand at a distance of
2 cm and perform "START" action. (Prevent infection by non-contact method)
Be careful not to touch motion sensors to prevent infection.
No.
Image
description
1
Operation in the CLOSE state of the
TRAY.
When the front of the motion sensor
is detected by hand for more than 1
second (LED WHITE -> GREEN), pull
the hand away after changing the LED
(operation between 1 second and 2
seconds)
Return to original state after more
than 2 seconds (LED GREEN ->
WHITE): Lifting part not working
2
Operation with TRAY OPEN.
When the front of the motion sensor
is detected by hand for more than 1
second (LED WHITE -> GREEN)
continuously for more than 2 seconds
(LED GREEN -> BLUE) LED change
before hand removal
3
Operation with TRAY OPEN.
When the front of the motion sensor
is detected by hand for more than 1
second (LED WHITE-> GREEN)
When operating, put the hand away
before 2 seconds
l sensor operating distance : less than 2 cm
7. Storage Method
Ÿ Close and store the TRAY after use.
Ÿ Don’t twist the power cord and store it.
Ÿ Please keep it away from the water.
Ÿ In case of an earthquake, do not store on a high shelf.
Ÿ After use, turn the power button off.
Ÿ If not used for a long time, keep the adapter and main body separately.

Be sure to read the manual before using this product.
14
8. Cleaning and Sterilization
8.1 Cleaning and Sterilizing Fixture Driver
l The used kits and instruments should be cleaned with distilled or flowing water with a
temperature of 30~40℃, using a brush for 20 seconds to wash away any remaining
blood and external materials.
l Tools which have inner parts needs to be cleaned up, such as a torque wrench, should be
dismantled to wash away any remaining blood and foreign materials
l Make 1% TergazymeTM mixture mixed 1L 30~40℃ water and TergazymeTM 10mL in the
cleaning water tank and keep the kits and instruments in the 1% TergazymeTM mixture
for 10 minutes. (using ultrasonic cleaning machine is more effective)
l The kits and instruments should be washed using distilled or flowing water (30 ~ 40℃)
using a brush for cleaning 3 times.
l Use air blower, wipers or fabrics in order named to remove water on the kits and
instruments. Finally, use alcohol cotton to remove water stain on the kits and instruments.
8.2 Cleaning and Disinfection the Main Body
l Before and after using the product, sterilize the contents of FIXTURE KIT (FIXTURE support,
etc.) and FIXTURE CASE.
l The following substances cannot be used :
- High concentration organic and inorganic acids, chlorinated hydrocarbons
8.3 Sterilization
l Before and after using the product, sterilize the FIXTURE driver and FIXTURE case.
l Autoclave by adding FIXTURE case and FIXTURE driver
l Sterilization condition (Please refer to the sterilization methods for each country)
Sterilization condition
Operating condition
- Temperature: 132 ℃
- Pressure: 150kPa (1.6 kgf/㎠)
- Gravity: 15 min, pre vacuum: 8 min
- Dry: 30 min
Autoclave
9. Troubleshooting
No.
Problem
Cause
Solution
1
The screen does not
turn on
Power failure
Make sure AC power is supplied.
(AC 100 – 240 V, 50/60 Hz)
Be sure to read the manual before using this product.
15
The adapter is not
connected to the
main body
Connect the adapter to the main body
If the power cord is
not properly
engaged
Check the connection between the power
cord and the adapter.
Connect the power cord to a multi-tap or
AC power source.
Etc.
Please contact your supplier and AS
representative.
2
the button does not
work
LCD issue
Please contact your supplier and AS
representative.
3
The sensor is not
operating
Operational
Distance Error
When operating the sensor, operate it
within 2cm.
4
The lifting part does
not work
-
If the TRAY does not work after operating
the "OPEN" and "CLOSE" buttons, contact
your place of purchase and AS
representative.
5
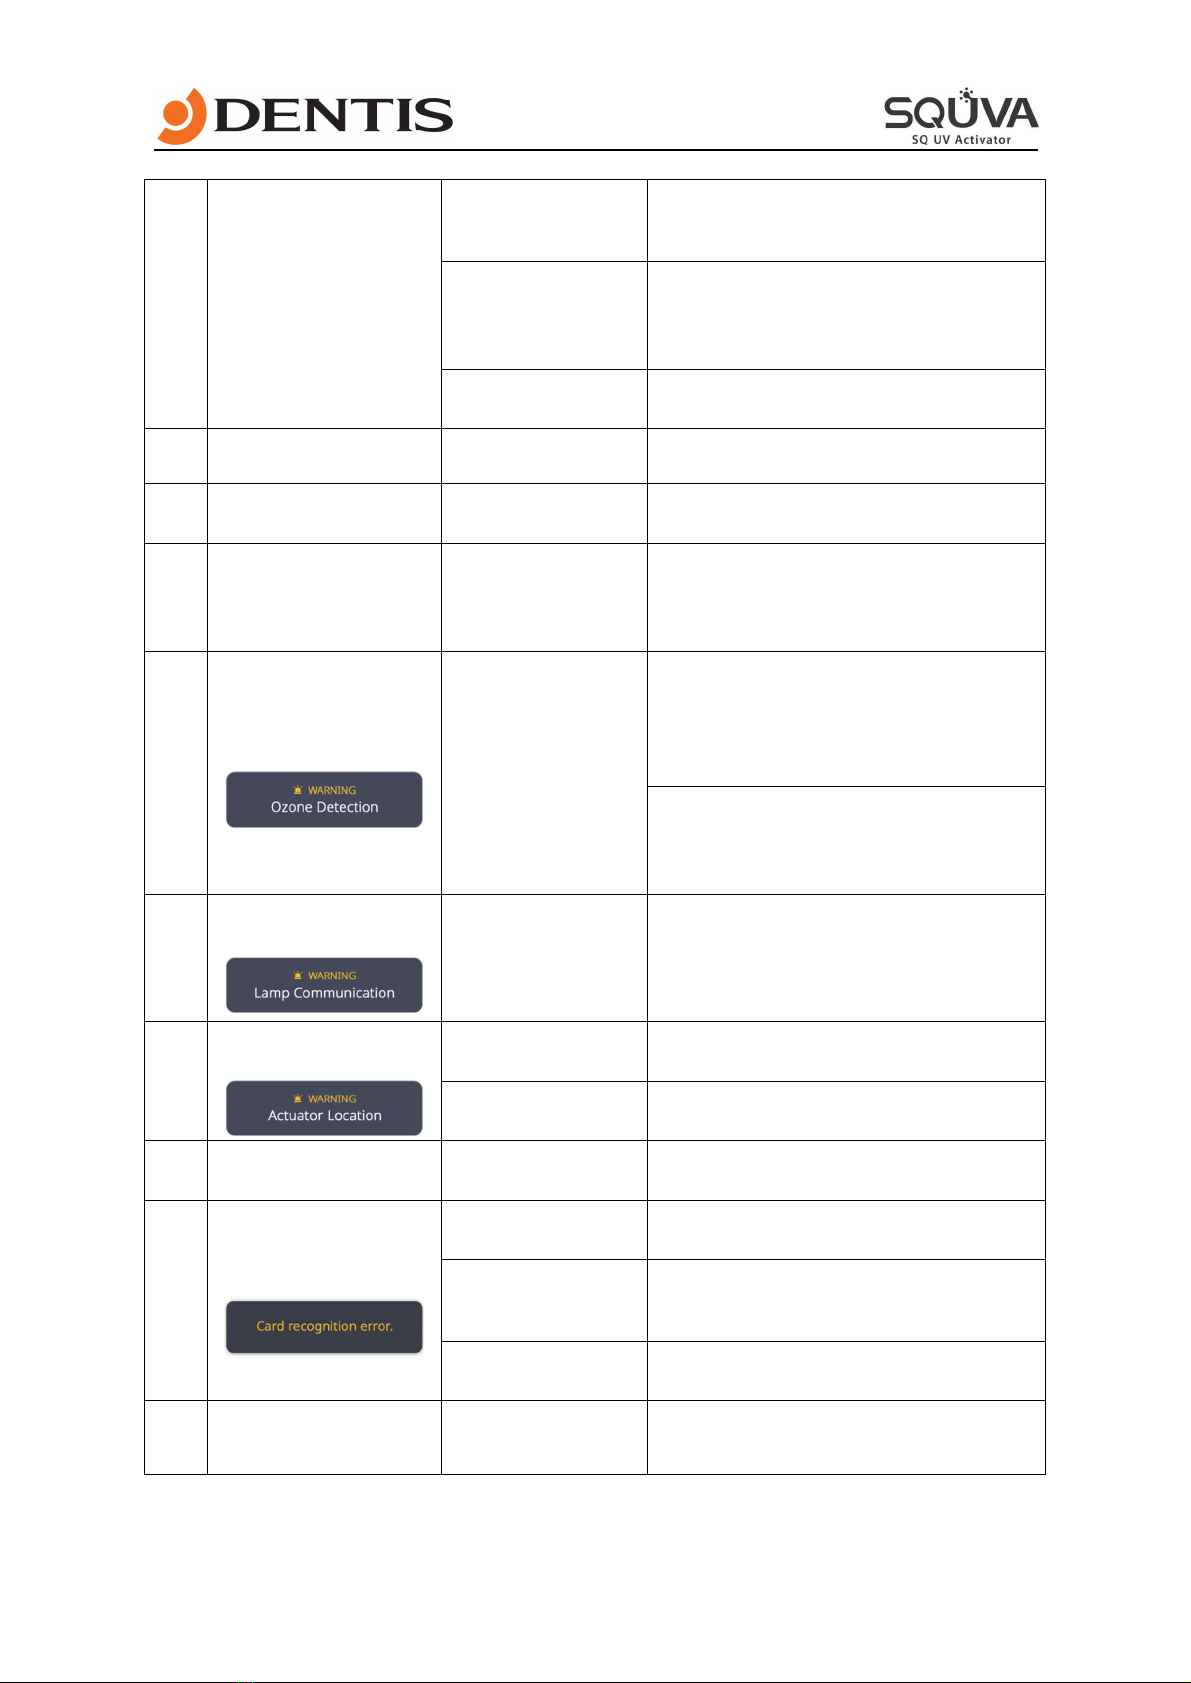
“Ozone Detection”
error message
Ozone
generation
Please stop the product and ventilate it.
Check that the product is fully ventilated
when reusing, stop the product if the
same symptoms occur, and contact your
supplier and AS representative.
Please contact the place of purchase and
the person in charge of AS for
replacement when the ozone filter has
reached its end of life.
6
“Lamp communication”
error message
Nonoperating
Please contact your supplier and AS
representative.
7
“Actuator location”
error message
-
Please contact your supplier and AS
representative.
Etc.
Please contact your supplier and AS
representative.
8
Product damage
-
Please contact your supplier and AS
representative.
9
If the RFID CARD is not
recognized
RFID CARD error
Please put the RFID CARD back in.
When CARD
availability has
exhausted
Please recharge your CARD.
Please contact supplier and AS
representative.
Etc
Please contact your supplier and AS
representative.
10
Etc.
-
Please contact your supplier and AS
representative.

EQ5QPP-PM020 (V0.9)
Date : 2020/10/26
DENTIS Co., LTD. http://www.dentis.co.kr/eng, http://www.dentisimplant.co.kr/eng
KOREA +82-2-869-6020 / USA +1-323-677-4363
ⓒ2019 DENTIS CO.,LTD. All Right Reserved.
Specifications are subject to change without notice.
Trademarks are the property of DENTIS CO., LTD. Or their respective owners.
Table of contents
Other DENTIS Dental Equipment manuals


Popular Dental Equipment manuals by other brands


Zhermack
Zhermack Hurrimix quick guide

iM3
iM3 Endo-A-class Vet LED Instructions for use

Dentsply Maillefer
Dentsply Maillefer GUTTA CORE A Series Directions for use

mk-dent
mk-dent HE20K/KL instruction manual

mectron
mectron COMPACT PIEZO LED Use and maintenance manual

EMS
EMS Mini Master Operation instructions

DENTSPLY
DENTSPLY trubyte Lucitone FRS manual

Renfert
Renfert Silent TS2 manual

Dentsply Sirona
Dentsply Sirona CEREC Zirconia meso Processing instructions

Ivoclar Vivadent
Ivoclar Vivadent Tetric Color Instructions for use

SAESHIN
SAESHIN Traus ENDO instruction manual

Centrix
Centrix NoMIX Instructions for use