Denver WS-650 User manual

[Skriv her]
WS-650
denver.eu
11/2022

Safety information
Please read the safety instructions carefully before using the product for the first time
and keep the instructions for future reference.
1. This product is not a toy. Keep it out of reach of children.
2. Keep product and batteries out of the reach of children and pets to avoid chewing and swallowing.
3. Never use old and new batteries or different types of batteries together. Remove the batteries when you are
not using the system for a longer period of time. Check the polarity (+/-) of the batteries when inserting them
in the product. Wrong positioning can cause an explosion.
4. Product operating temperature: Main unit: 0℃~+50℃ / Sensor: -40℃~+70℃ and storage temperature
is from -10℃~+60℃ Celsius. Under and over this temperature might affect the function.
5. Never open the product. Touching the inside electrics can cause electric shock. Repairs or service should
only be performed by qualified personnel.
6. Do not expose to heat, water, moisture, direct sunlight!
7. The unit is not waterproof. If water or foreign objects enter the unit, it may result in fire or electric shock. If
water or a foreign object enters the unit, stop use immediately.
8. Do not use non original accessories together with the product as this can make the product functionality
abnormal.

[Skriv her]
Overview
Weather Station

Rain gauge sensor
Temperature/humidity/Wind sensor

[Skriv her]
Main unit
1. Snooze/light button
2. Number of temperature/humidity /
Wind sensor 1/2/3
3. Outdoor temperature
4. Cycling through data from connected sensors
5. Outdoor humidity trend
6. Outdoor humidity trend
7. Weather forecast
8. Moon phase
9. Pressure history
10. Pressure value
11. Pressured trend
12. Indoor temperature alert
13. Indoor temperature
14. Indoor temperature trend
15. Station batteries low
29. MODUS button: switch display mode
30. Data from precipitation sensor
31. Signal from precipitation sensor
32. Low batteries in precipitation sensor
33. Wind speed
34. Signal from temperature/humidity/wind sensor
35. Low batteries in temperature/ humidity/wind
sensor
36. Outdoor humidity
37. Outdoor temperature alert
38. Low batteries in temperature/
Humidity/wind sensor
39. Power adaptor socket
40. Battery compartment
41. Stand
42. Alarm speaker

16. Indoor humidity trend
17. Indoor humidity
18. Alarm no.1/no.2
19. Time DCF signal reception,
daylight savings time (DST)
20. Day of the week
21. UP button: go forward in settings.Memory of
Max/min temperature and humidity.
22. Date.
23. Down button: go back in settings
24. Wind direction indicator
25. Channel button: search for sensor signal or
Switch through information from connected
sensors
26. Wind direction: S- south. W-west, N-north
E-east
27. ALARM Button: alarm activation/deactivation
28. SET button: switch between
℃/℉, function settings
43. Mounting holes
Rain gauge sensor
44. Rain gauge battery sensor
45. Rain gauge sensor grille
Temperature/humidity/Wind sensor
46. Wind sensor cups
47. Compass
48. Wind direction paddle
49. Temperature/humidity/wind sensor battery
Compartment.
Buttons: TX: semd Signal from Sensor to Station
1/2/3: switch sensor channel number.
WAVE: manually activate/deactivate DCF
50. Singal reception
51. Wind sensor cups
52. Mounting rod (26 mm Diameter)
53. Mounting base

[Skriv her]
Specificatons
Clock control: DCF77-radio signal
Time format: 12/24 h
Indoor temperature: 0 °C to +50 °C, 0,1 °C resolution
Outdoor temperature: -40 °C to +60 °C, 0,1 °C resolution
Temperature measurement accuracy: ±1 °C for range 20 °C to 24 °C
±2 °C for range 0 °C to 20 °C and 24 °C to 40 °C
±3 °C for range -20 °C to 0 °C and 40 °C to 50 °C
Indoor and outdoor humidity: 25 - 90 % RH, 1 % resolution
Humidity measurement accuracy: 5 %
Barometric pressure measurement range: 850 hPa to 1050 hPa
Wind sensor measurement range: 0 to 127,5 km/h
Rain gauge sensor measurement range: 0 to 2.999 mm
Radio signal range: Up to 50 m im free sight
Connected sensors: Max. 3 temperature/humidity /Wind sensors
Max. 1 rain gauge sensor
Power supply
Main unit 3 x AAA-Batterien ( not included) and AC 230 V/DC 5 V, 300 Ma
adapter (included)
Rain gauge sensor 2 x AA batteries (not included)
Temperature/humidity/Wind sensor 4 x AA batteries (not included)
The buttons
Mode button Set button Clock button Channel Button Up/down buttons
Installation
Power and Batteries
Plug the power adaptor into the main unit and insert batteries (3 x1.5V AAA). Continue with inserting batteries
into the wireless temperature/humidity /wind sensor(4 x1.5V AA) and the wireless rain gauge
Sensor (2 x1.5V AA). The battery compartment of the rain gauge sensor is protected by screws, so you need a
suitable screwdriver. Low battery levels will be indicated on the display (see 15,32 and 38).
Backlight
The weather station display is backlit. When you press the Sleep/Light button (1), the display lights up for five
seconds. When the weather station is powered by the power supply, the backlight is always on. You can
reduce the brightness of the display in two stages by pressing the snooze/light button. A third press puts the
display into standby mode.
Connecting the units
Place all units next to each other. The main unit will automatically detect the signals from the sensors usually
within 3 minutes. If the main unit does not detect the signals press and hold the channel button on the main

unit’s display
To repeat the search, or press and hold the TX button(49) on the temperature/humidity/ wind sensor. You find
the TX button under the battery cover.
Placement of sensors
To ensure correct measurements, the temperature/humidity /wind sensor and the rain gauge sensor must be
placed at least 1.5m above the ground on a horizontal surface without buildings and structures nearby.
Mounting
Both sensors must be firmly attached to prevent them from falling and being damaged.Do not place the
sensors onto metal objects as this will reduce their transmission range.
To assemble and mount the temperature/humidity/wind sensor, begin with screwing the mounting base (51)
onto a level surface. Place the mounting rod(50) in the base and fasten it with two screws. Put the
temperature/humidity/wind
Sensor on top of the rod. Before fastening it, make sure that the wind can flow freely around the wind sensor
from all sides. Check that the wind cups and wind paddle(48)for measuring wind speed and directino can
rotate freely.
Improtant. To make sure that the wind direction is measured correctly, it is important that you install the
temperature/ humidity/wind sensor in north-south direction using the built-in compass(47).The part with the
wind cups and wind
Cups and wind direction paddle should face south. See picture.
When you have aligned the temperature/ humidity wind sensor in north-south direction, fasten the sensor to
the mounting rod with two screws. Lastly, mount the rain gauge sensor by screwing it onto a suitable surface
and place the grille (45) in the sensor.
Weather forecasts
The weather station will start a 14- day learning process once turned on and set up. This learning process is
necessary for the weather station to be able to make weather forecasts. The display will show “LEARNING...“ at
The top of the display during this time.

[Skriv her]
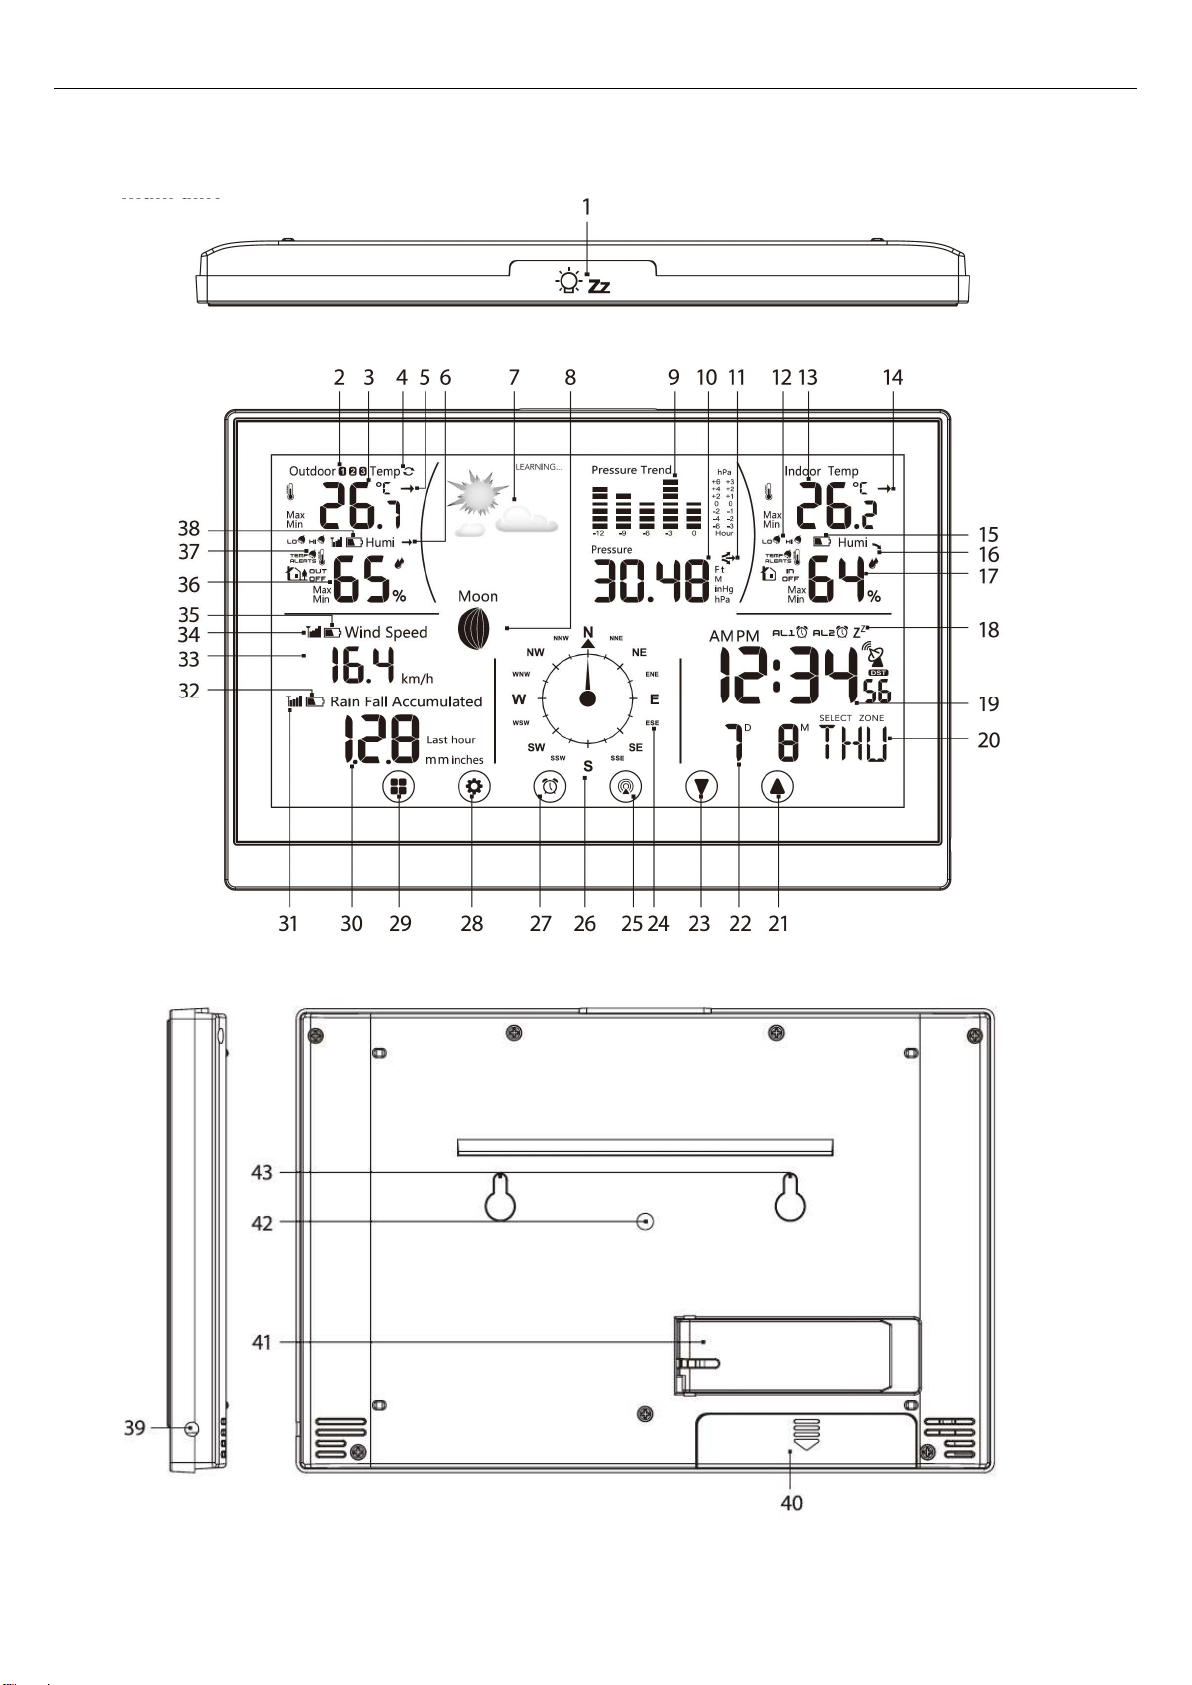
Changing channel and connecting additional sensors
1. Press the channel button on the main unit’s display repeatedly to select the desired channel1.2 or 3 for
the sensor. Then press and hold the channel button until the icon starts to flash.
2. Remove the battery cover of the temperature/humidity/wind sensor and set the sensor switch to the
corresponding channel you just selected.Data from the sensor will be loaded within 3 minutes.
If you press the channel button until the cycling symbol shows, data from all three sensors will be shown
automatically, sensor by sensor
3. If the sensor signal is not found, remove the batteries and proceed again,or press the TX button(49) to
reset.
Radio controlled clock (DCF77)
When turned on the first time, the base station automatically starts to search for a DCF signal for the time
setting. If no signal is found, the search stops and you need to set the time manually. It may take some
Time for the station to received the signal. The mian unit will updated the DCF signal every night at 1,2 and 3
o’clock. Note! The main unit only recieve the DCF77 signal on channel 1. Therefore, make sure that there is at
least one sensor on channel 1.
You can also activate a search for the DCF signal manually. Press and hold the wave button located in the
battery compartment of the temperature/humidity/wind sensor to initiate a search. To end the search Long-
press the wave button again.
Time,date and forecast settings
Press the mode button on the display, then hold the set button for 3 seconds to enter the time setting mode.
The current value starts to blink. The values are changed in this order: time zone>language>year>month
/day order>month> dat>12/24 hr>hour>minute> second>exit. Change the values with the up/down buttons
and confirm and move to the next value with the set button.
Alarm settings and features
Press the clock button on the display to select one of the two alarms, on the display indicated with AL 1 or AL
2. Both alarms can be active at the same time. To set the alarms, press the mode button twice and then hold
the set button for 3 seconds until the hour value starts to blink. Change the values with the up/down buttons
and confirm with the set button.
When the alarm goes off, the display lights up will and the alarm sounds for three minutes before it is turned
off. Press the snooze /light button on top of the base unit to snooze the alarm for 5 minutes.
Press any other button to turn off the alarm for the day.
Settings for altitude and atmospheric pressure
The weather station shows atmospheric pressure in hPa or in Hg and keeps a history of pressure readings for
the last 12 hours. To achieve more accurate calculations of pressure values you should manually
Set the altitude for the place where the weather station is being used:
1. Press the mode button on the display 3 times.
2. Press the set button or 3 seconds and use the arrows to set altitude between -90 m to +1990 m (10m
increments).
3. Press the mode button to switch between M/pha and Ft/inHg units.
4. Press the set button to quit settings.

Setting the unit for precipitation
1. Press the mode button 5 times, then press the set button for 3 seconds.
2. Use the up and down arrows to set mm or inches as units
3. Press the set button to quit settings
Setting the unit for wind speed.
1. Press the mode button 6 times, then press the set button for 3 seconds.
2. Use the up and down arrows to set km/h or mph as units.
3. Press the set button to quit settings
Temperatur alert
The weather staiton can alart you of temperature changes indoors and outdoors. To change alart settings,
press the mode button on the dispay 4 times, then hold the set button for 3 seconds You change the settings
with the set button in the following order: outdoor low temp> outdoor low alarm on/off> outdoor temp high>
outdoor high alarm on /off> indoor low temp> indoor low alarm on /off > indoor high temp>
Indoor temp alarm on/off . Change the values with the up/down buttons.
Temperature, humidity und pressure trends
Moon phases
1. New moon
2. Waxing crescent
3. First quarter
4. Waxing gibbous
5. Full moon
6. Waning gibbous
7. Last quarter
8. Waning crescent
Note: In the period between 18:00 and 06:00 , the moon icon will be surrounded by stars
Min./Max.-Temperature memory
The base station saves the min/mas temperature and humidity setting s for each day and deletes the values at
midngith, Prdss the up button once to display the maximum values and press it again the dispay the
minimum values .A third press takes you back to the standard dispay.
Displaying and deleting measured values from the rain gauge sensor
Pressing the down button repeatedly shows measured precipitation values in various time periods in the
following steps:
Accumulated
Rising
Constant
Falling

[Skriv her]
Today
Last hour
Yesterday
This week
Note: To delete the value being displayed, you press and should the down button.
EN
Manufacturer’s name or trade mark, commercial
registration number and address
Xiamen Innore Chongyuan Electronics Co., Ltd
No. 943, Tonglong Second Road, Tong'an District,
Xiamen,Fujian, 91350200568403208H
Model identifier YT60160
Input voltage 100-240VAC
Input AC frequency 50/60HZ
Output voltage 5VDC
Output current 300mA
Output power 1.5W
Average active efficiency ≥70%
Efficiency at low load (10%) ≥65%
No-load power consumption ≤ 0.1 W

Please notice - All products are subject to change without any notice. We take reservations for errors and omissions
in the manual.
ALL RIGHTS RESERVED, COPYRIGHT DENVER A/S
Elektrische und elektronische Geräte enthalten Materialien, Komponenten und Substanzen, welche
für Sie und Ihre Umwelt schädlich sein können, wenn mit den Abfallmaterialien (entsorgte elektrische
und elektronische Altgeräte) nicht korrekt umgegangen wird.
Elektrische und elektronische Geräte sind mit einer durchkreuzten Mülltonne gekennzeichnet. Dieses
Symbol bedeutet, dass die elektrischen und elektronischen Geräte nicht mit dem restlichen
Haushaltsmüll sondern getrennt davon entsorgt werden müssen.
In allen Städten befinden sich Sammelstellen, an denen elektrische und elektronische Geräte
entweder kostenlos bei Recyclingstellen abgegeben werden können oder auch direkt eingesammelt
werden. Weitere Informationen erhalten Sie bei der Umweltbehörde Ihrer Stadt/Gemeinde.
Hereby, Denver A/S declares that the radio equipment type WS -650 is in compliance with Directive
2014/53/EU. The full text of the EU declaration of conformity is available at the following internet address:
denver.eu and then click the search ICON on topline of website. Write model number: WS-650. Now enter
product page, and RED directive is found under downloads/other downloads.
Operating Frequency Range: 433.05 MHz- 434,79MHz
Max Output Power: 3,21dBm
DENVER A/S
Omega 5A, Soeften
DK-8382 Hinnerup
Denmark
www.facebook.com/denver.eu
Table of contents
Other Denver Weather Station manuals
Popular Weather Station manuals by other brands

Bresser
Bresser Meteo Champ HD instruction manual

Bresser
Bresser WIFI ClearView Weather Station 7in1 instruction manual

Bresser
Bresser 7002534 instruction manual

TFA
TFA weather boy instruction manual

Sharper Image
Sharper Image Hadrons SN004 instructions

Davis Instruments
Davis Instruments Rain Collector II installation manual