Denyo IGNITE 4 1000 User manual

USER MANUAL

We wish to thank you very much for having purchased our product. With proper handling
and maintenance, this product will provide dependable, long-term service. Our customer
service is always available, might you need it.
This manual is intended for users of the equipment. This manual is compiled from
information available and current at time of approval for printing.
Please consider that this manual may refer to controls and optional equipment that are not
present on your particular machine.
It is important that you know your machine and its equipment and how to operate it properly,
so
please read the operating instructions carefully and understand them before
operating the machine.
Machine specifications can be modified at any time without any obligation to update this
publications. It is recommended to read this manual thoroughly because incorrect operation
may result in the warranty being void.
Reproduction of this manual is not permitted, unless written approval is obtained
from factory.
Dear customer,

SAFETY RULES__NORME DI SICUREZZA .......................................................................................................................................2
SAFETY PRECAUTIONS TO BE OBSERVED__AVVERTENZE GENERALI....................................................................................................2
FIRE PRECAUTIONS__MISURE ANTI-INCENDIO.....................................................................................................................................2
FLAMMABLE FLUID PRECAUTIONS__PRECAUZIONI LIQUIDI INFIAMMABILI ......................................................................................2
ELECTRICAL HAZARD__PERICOLO DI ELETTROCUZIONE....................................................................................................................... 2
LUBRICATION AND SERVICING__LUBRIFICAZIONE EMANUTENZIONE................................................................................................2
TOWING SAFETY__SICUREZZA TORRE FARO.........................................................................................................................................2
SAFETY STICKERS GUIDE__GUIDA ETICHETTE DI SICUREZZA................................................................................................................2
TECHNICAL SPECIFICATIONS__CARATTERISTICHE TECNICHE .........................................................................................................2
MACHINE IDENTIFICATION__IDENTIFICAZIONE DELLA MACCHINA..................................................................................................... 2
TECHNICAL DATA__DATI TECNICI.......................................................................................................................................................... 2
MACHINE CONTROLS__CONTROLLI MACCHINA................................................................................................................................... 2
HANDLING AND TRANSPORT__MOVIMENTAZIONE E TRASPORTO ...............................................................................................2
TOWING &MOVING WITH TOWING VEHICLE__TRAINO ESPOSTAMENTO CON VEICOLO DI TRAINO ............................................... 2
HANDLING AND TRANSPORT WITH CRANE__MOVIMENTAZIONE ETRASPORTO CON GRU...............................................................2
HANDLING AND TRANSPORT WITH FORKLIFT__MOVIMENTAZIONE ETRASPORTO CON CARRELLO ELEVATORE.............................2
LIGHTING TOWER USE__USO DELLA TORRE FARO .......................................................................................................................2
STABILIZING THE UNIT__STABILIZZARE L’UNITÀ .................................................................................................................................. 2
DIRECTING THE FLOODLIGHTS__ORIENTAMENTO DEI PROIETTORI....................................................................................................2
PRELIMINARY CHECK &STARTING__CONTROLLI PRELIMINARI &AVVIAMENTO ............................................................................... 2
ENGINE STARTING AND STOP__AVVIAMENTO EARRESTO DEL MOTORE ...........................................................................................2
ROUTINE MAINTENANCE__MANUTENZIONE ORDINARIA ............................................................................................................2
DISPOSAL AND DECOMMISSIONING__SMALTIMENTO E MESSA FUORI SERVIZIO..........................................................................2
SPARE PARTS__PARTI DI RICAMBIO............................................................................................................................................2
ELECTRICAL DIAGRAM__SCHEMA ELETTRICO ..............................................................................................................................2
WARRANTY__GARANZIA............................................................................................................................................................2
TABLE OF CONTENTS__INDICE

Manual Code - MI150A00003
Revision Level 01 - 05/02/2018
4
Read this manual and learn the operating characteristics and
limitations of the machine before operating it.
The manufacturer declines all liability for injury to persons and
damage to components due to not respecting the safety rules.
Report all malfunctions to a maintenance responsible. If there
are any repairs to be done, do not operate the equipment.
Normal service and maintenance, if performed as required, can
prevent unexpected and unnecessary down time. This manual
describes standard inspections, operation and servicing with
the normal safety precautions required for normal servicing
and operating conditions.
Operators and maintenance personnel must be safety
conscious and alert to recognize potential operating or
servicing safety hazards at all times. They should immediately
take the necessary precautions to ensure safe operation and
servicing of the machine.
Leggere questo manuale e comprendere le caratteristiche e le
limitazioni d’uso della macchina prima del suo utilizzo.
Il costruttore declina ogni responsabilità per danni a persone e a
componenti per il mancato rispetto delle norme di sicurezza.
Segnalare qualsiasi malfunzionamento al responsabile della
manutenzione. Se ci sono delle riparazioni da fare, non
utilizzare l'apparecchio. La manutenzione regolare, se
effettuata come previsto, può aiutare ad evitare interruzioni
impreviste. Questo manuale descrive i controlli, il
funzionamento e la manutenzione standard con le normali
precauzioni di sicurezza da osservare per un uso e
manutenzione normali.
Gli operatori e i manutentori devono essere prudenti e attenti a
riconoscere i potenziali rischi operativi o di sicurezza in ogni
momento. Essi devono adottare immediatamente le
precauzioni necessarie per garantire condizioni sicure di
funzionamento e manutenzione della macchina.
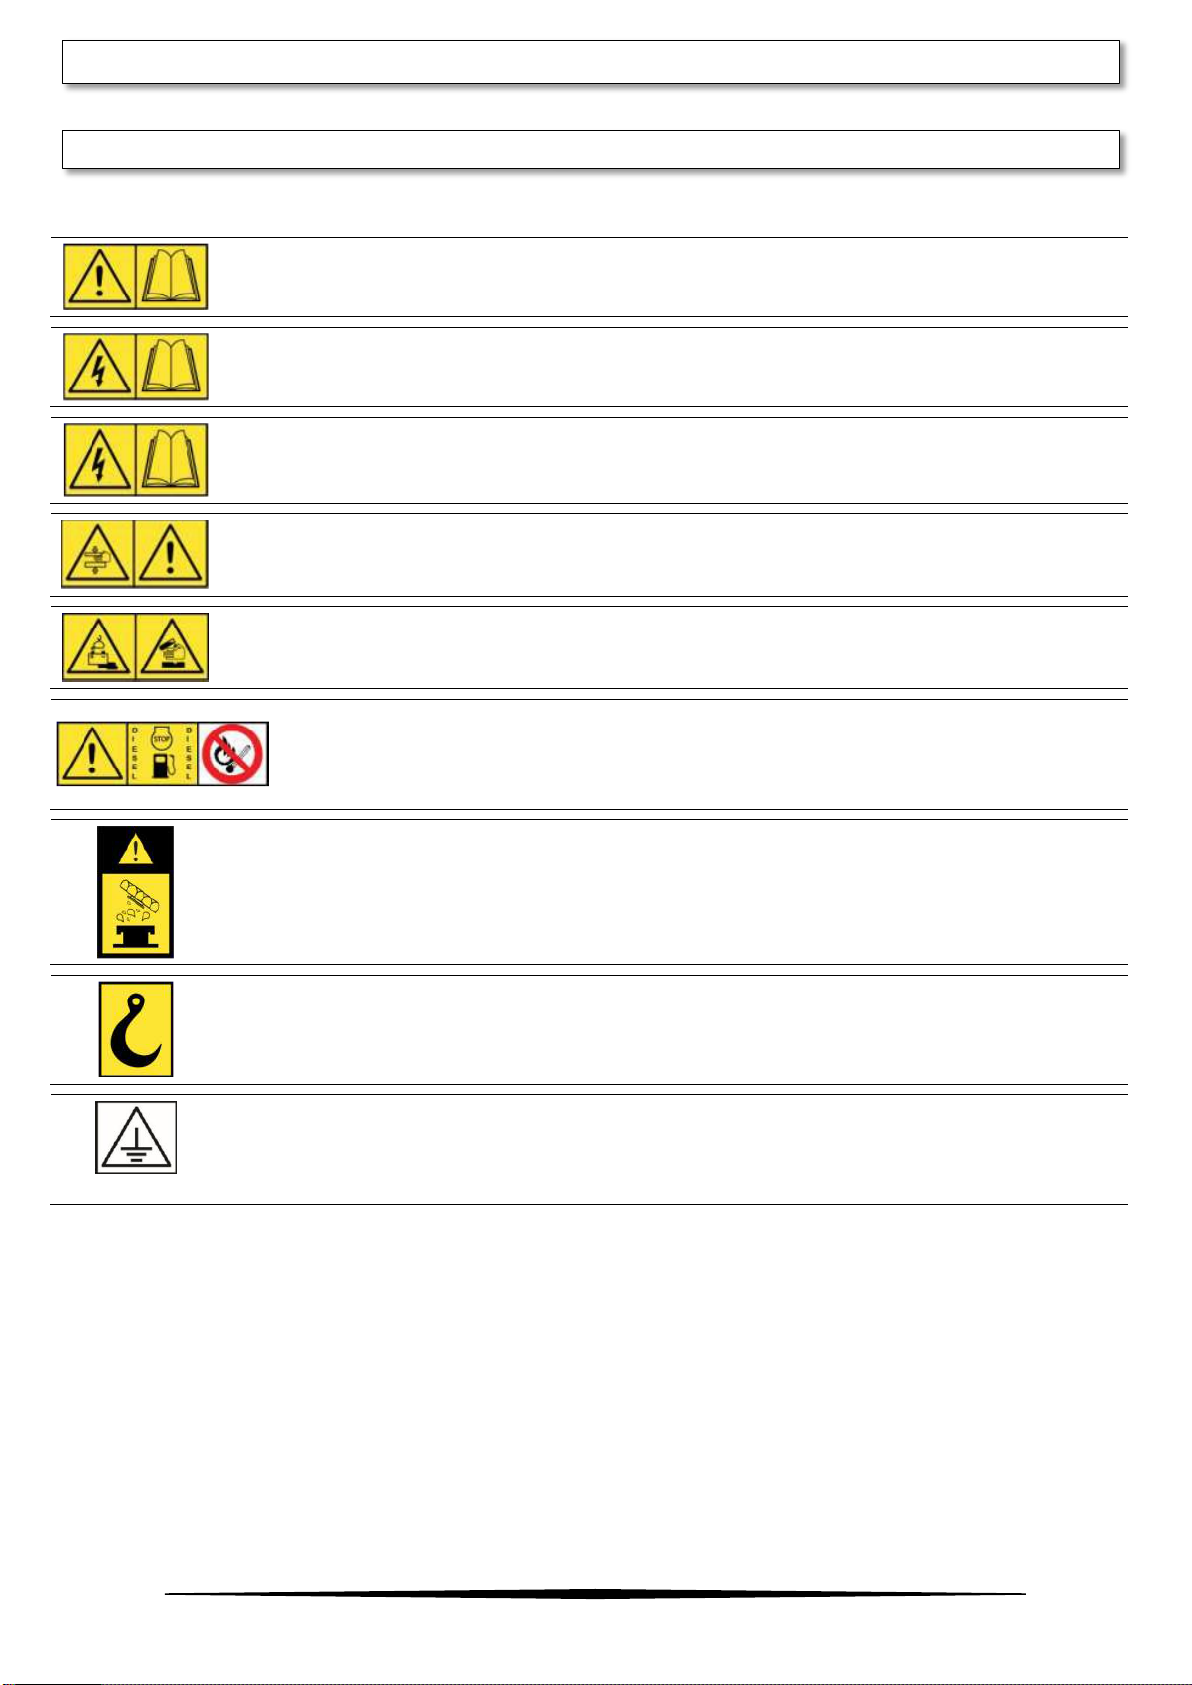
Be aware of operating risks that may be created
by weather changes. Follow the correct
procedures in the event of heavy rain or electrical
storm.
Essere consapevoli dei rischi derivati da
cambiamenti meteo. Seguire le procedure
corrette in caso di forte pioggia o tempesta
elettrica.
Lower tower when not in use, or if high winds or electrical
storms are expected in the area.
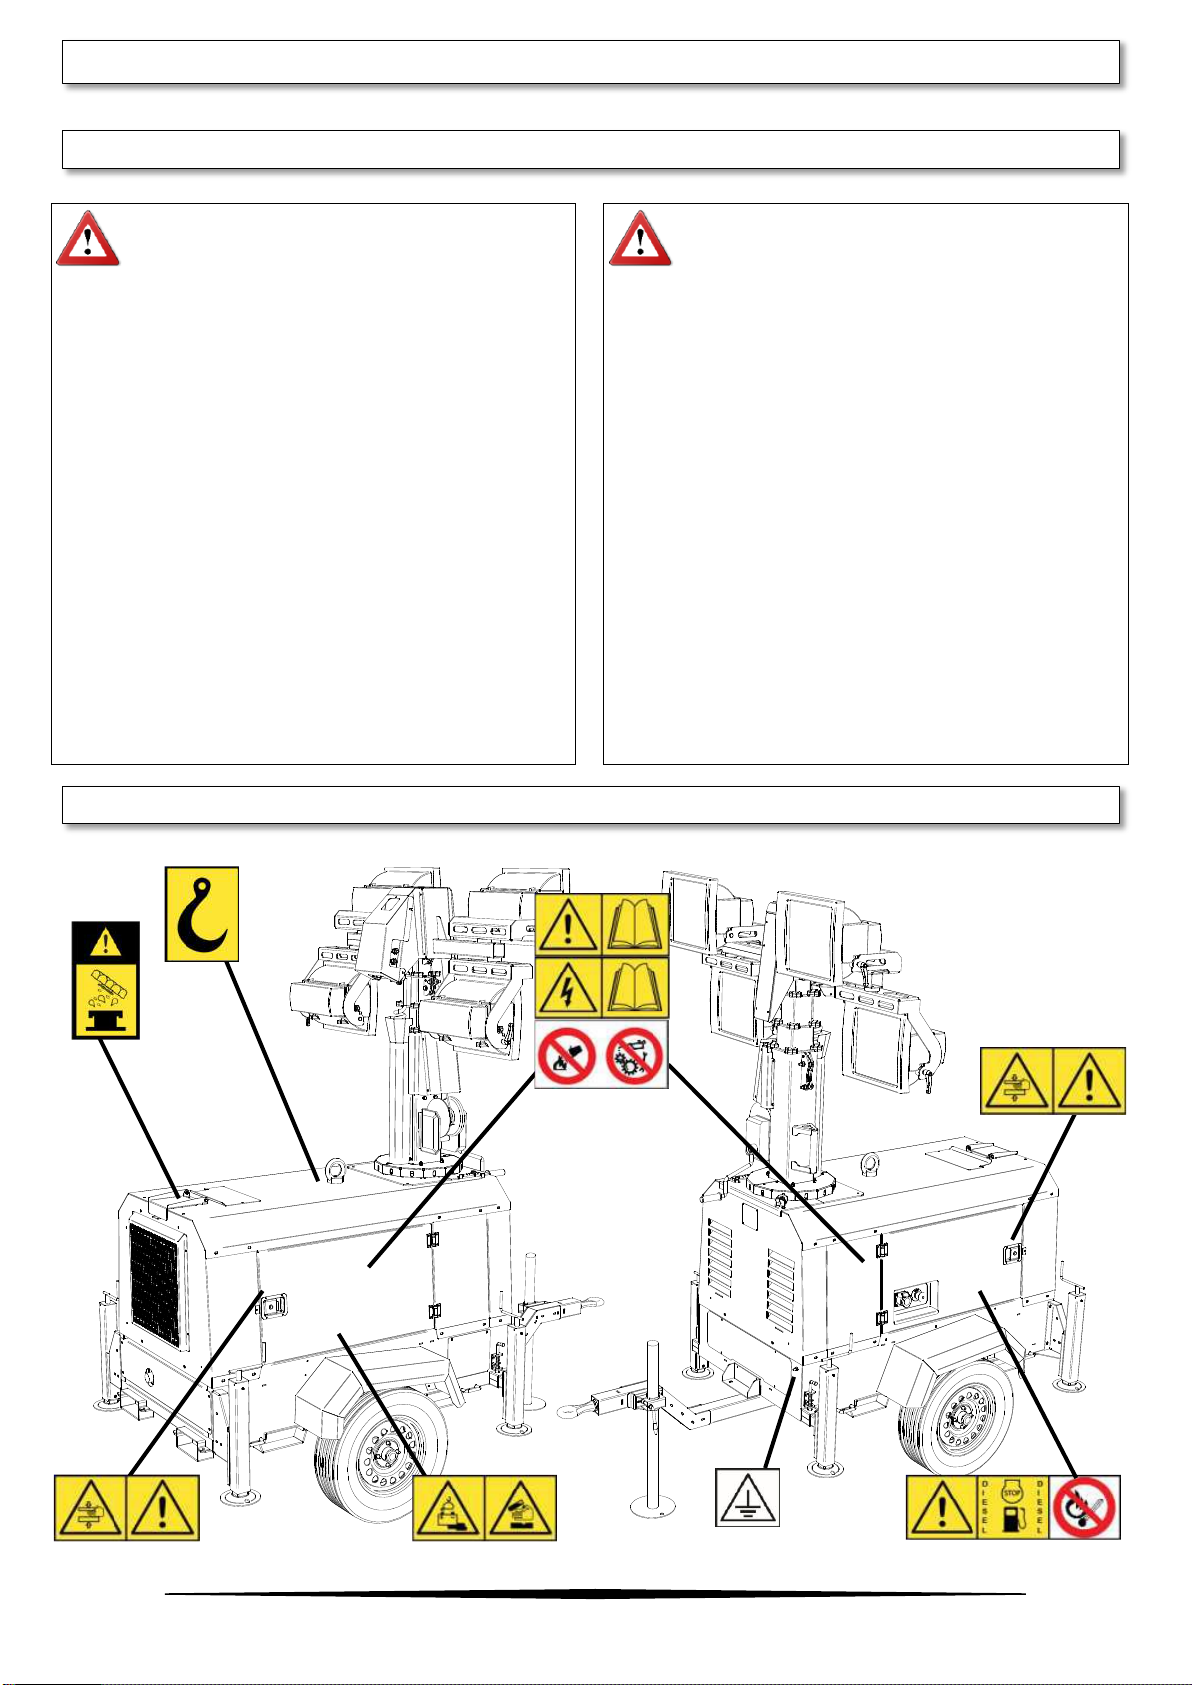
Use protective clothing and safety equipment:
gloves, safety boots, safety hard hat, goggles, ear protection,
and dust masks when necessary.
Know all side clearances and overhead obstructions for safe
operation of the machine.
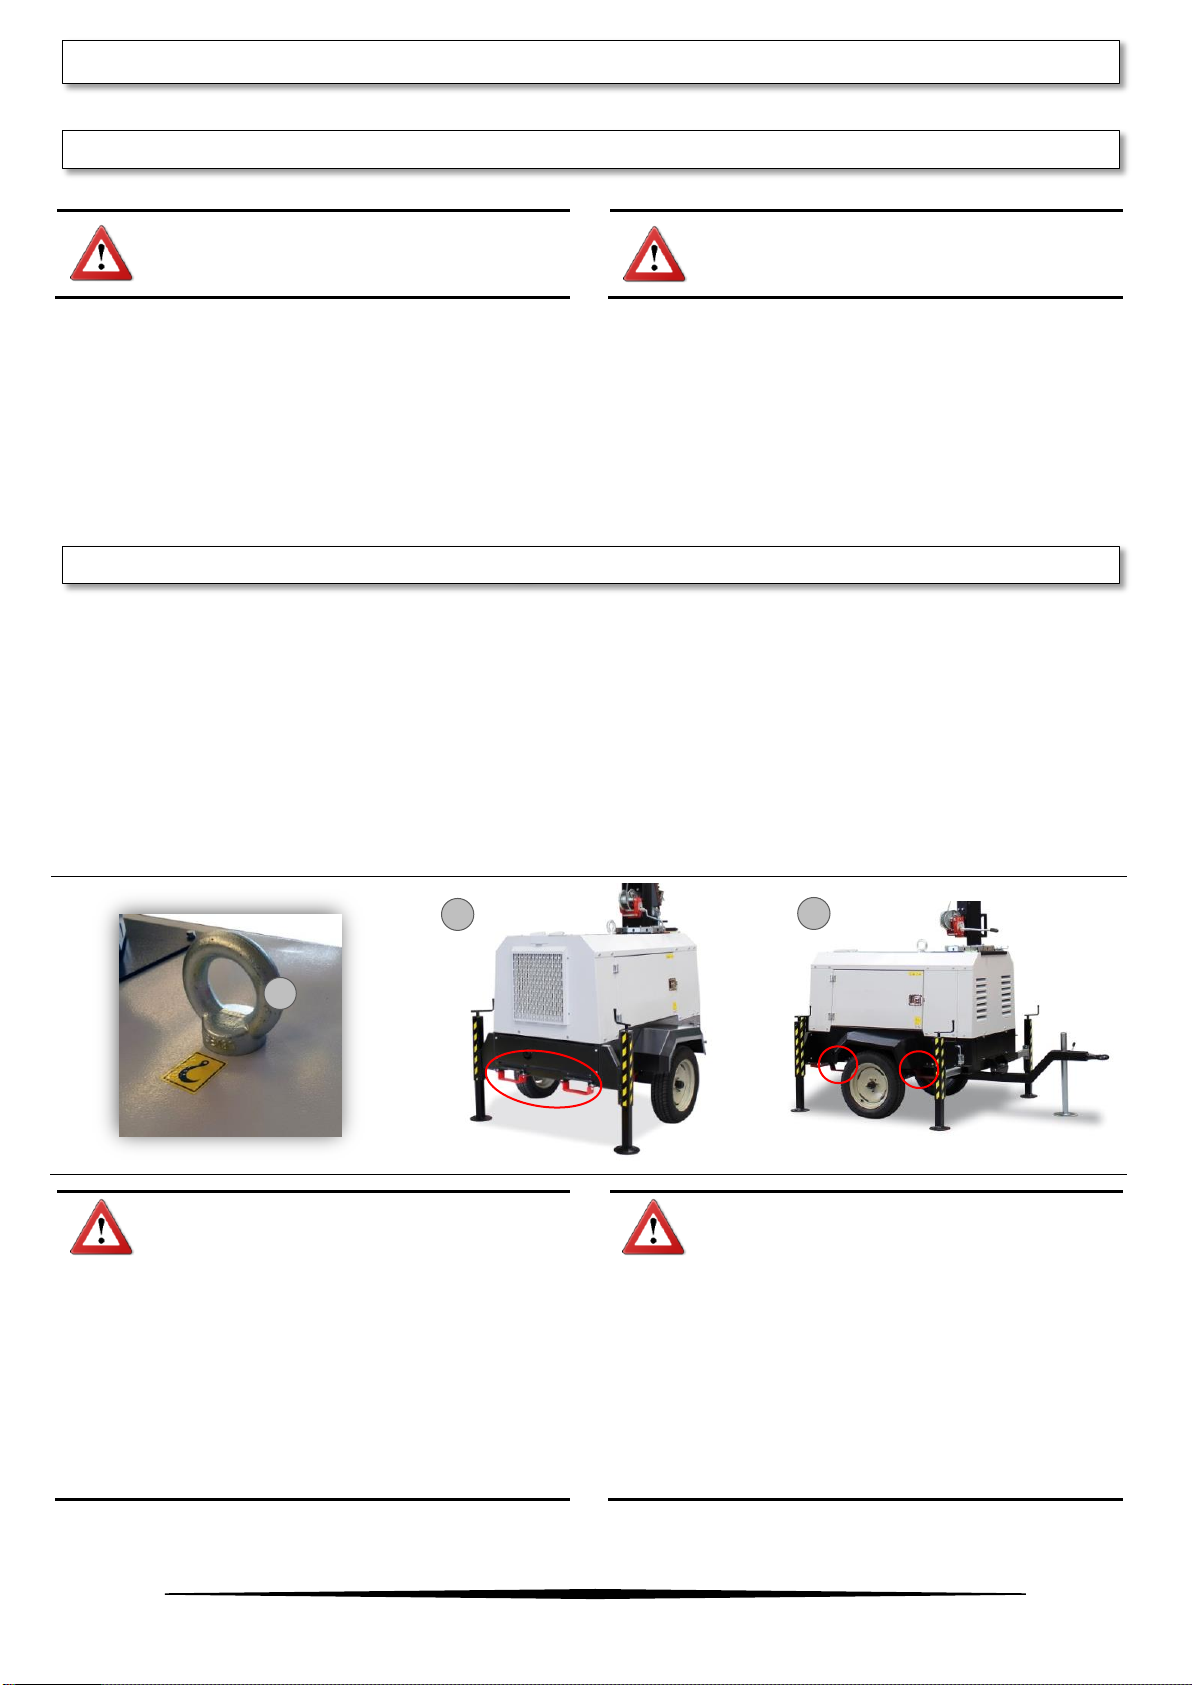
ALWAYS make sure area above the tower is open and clear
of any kind of obstruction.
Position and operate the lighting tower on a firm surface.
The machine must be levelled and outriggers extended
before raising tower.
Keep area around the machine clear of people while raising
and lowering the mast.
ALWAYS handle fuels and lubricants carefully, clean up spills
to avoid fire and slipping risks.
NEVER using the unit if is in need of repair.
The area near the exhaust pipe become hot in use. Be
careful if you need to work there.
Check that winch cables are in good condition and are
centered on each pulley.
DO NOT use the unit if insulation on the electrical cord is cut
or worn through.
DO NOT permit to untrained personnel to operate the
machine.
NEVER operate a unit if you are tired, not concentrated or
under the influence of drugs or alcohol.
Keep children and animals away from the machine.
Abbassare la torre quando non in uso, o se sono previsti
vento forte o temporali.
Utilizzare vestiario e dispositivi individuali di protezione:
guanti, stivali anti-infortunistica, caschi, occhiali, protezione
acustica e una maschera antipolvere, se necessario.
Identificare tutti gli spazi laterali ed eventuali ostacoli aerei
per un funzionamento sicuro della macchina.
Assicurarsi SEMPRE che lo spazio sopra la torre sia aperto e
libero da qualunque tipo di ostacolo.
Posizionare e usare la torre faro su una superficie solida.
Prima di sollevare la torre, la macchina deve essere livellata
e gli stabilizzatori estesi.
La zona intorno alla macchina deve essere interdetta al
transito mentre si alza o si abbassa il palo telescopico.
Maneggiare SEMPRE carburanti e lubrificanti con attenzione,
pulire le fuoriuscite per evitare il rischio di incendi e
scivolate.
NON usare MAI la macchina se necessita di manutenzione.
L’area in prossimità del tubo di scarico si riscalda durante
l'uso. Fare attenzione se dovete lavorare in questa zona.
Controllare che i cavi siano in buone condizioni e centrati su
ciascuna puleggia.
NON usare la macchina se la guaina di isolamento del cavo
elettrico è tagliata o usurata.
NON permettere a personale non addestrato l’uso della
macchina.
NON mettere MAI in funzione la macchina se si è stanchi,
poco concentrati o sotto l'influenza di droghe o alcool.
Tenere bambini e animali fuori dalla portata della macchina.
SAFETY RULES__NORME DI SICUREZZA
SAFETY PRECAUTIONS TO BE OBSERVED__AVVERTENZE GENERALI

Manual Code - MI150A00003
Revision Level 01 - 05/02/2018
5
Clean all dirt, oil and other fluids from
components to minimize fire risks and aid in
spotting loose or leaking components.
Pulire lo sporco, l'olio e altri fluidi dai componenti
per ridurre al minimo i rischi di incendio e di aiuti
nell'individuare componenti allentati o perdite.
Check the engine for oily rags or other debris that could be
potential cause of fire before starting the unit.
Have a fire extinguisher nearby. Be sure the extinguisher is
properly maintained and be familiar with its use.
In the event of fire, the following extinction means are
appropriated: carbonate anhydride (or carbon dioxide),
powder, foam, nebulized water. Avoid to use water jets.
In the event of fire, wear a breathing apparatus if there is
heavy smoke.
Non lasciare stracci sporchi di olio o altri detriti all’interno
del motore, potrebbero causare incendi prima di avviare
l’unità.
Tenere un estintore nelle vicinanze. Assicurarsi che
l'estintore sia correttamente manutenzionato e conoscerne
l’uso.
In caso di incendio, utilizzare i seguenti mezzi di estinzione:
anidride carbonica, polvere, schiuma, acqua nebulizzata.
Non utilizzare getti d'acqua.
In caso di incendio, indossare un autorespiratore se il fumo è
intenso.
Take due care when working with fuel. Diesel fuel
is a health hazard. Be aware that there is also
danger of fire and pollution.
Fare attenzione quando si maneggia il carburante.
Il gasolio è un pericolo per la salute. Siate
consapevoli del rischio di incendio e
inquinamento.
DO NOT clean the unit components using flammable fluids.
Check and ensure that all-fluid systems caps, drain, valves,
fittings, lines etc., are secure and leak free.
ALWAYS shut off engine while refueling and be very cautious
if engine is still hot.
NEVER smoke while checking or adding fuel or handling fluid
containers.
NEVER refuel near an open flame
DO NOT fill the tank completely.
DO NOT refuel in an enclosed area with poor ventilation.
DO NOT run engine without the fuel tank cap.
DO NOT use the machine in areas with risk of explosion or
fire.
NON pulire i componenti dell’unità con liquidi infiammabili.
Assicurarsi che i tappi dei circuiti di fluidi, scarichi, valvole,
raccordi, linee ecc, siano sicuri e privi di perdite.
Spegnere SEMPRE il motore durante il rifornimento e fare
molta attenzione se il motore è ancora caldo.
NON fumare durante il controllo/rabbocco carburante o la
manipolazione dei contenitori dei liquidi
NON fare mai rifornimento in prossimità di fiamme libere.
NON riempire completamente il serbatoio
NON fare rifornimento in un'area con scarsa ventilazione.
NON usare l’unità senza il tappo carburante.
NON usare l’unità in aree a rischio di esplosione o incendio.
DO NOT smoke or allow open flames or sparks
near the batteries.
NON fumare né lasciare fiamme libere o scintille
in prossimità delle batterie.
Before doing repair works, ALWAYS disconnect batteries.
Disconnect negative terminal first and reconnect last.
Before carrying out any welding on the machine, ALWAYS
make sure to disconnect batteries and alternator leads.
The tools must NOT come into contact with the battery
terminals with the risk of creating an electric arc.
Use jumper cables only. Improper use can result in severe
damage and safety risk.
NEVER use the machine if insulation on electrical cord is cut
or worn through.
NEVER operate lights without protective lens cover in place
Prima della manutenzione, scollegare SEMPRE le batterie.
Scollegare prima il polo negativo e ricollegarlo per ultimo.
Prima di effettuare saldature sulla macchina, accertarsi
SEMPRE di scollegare i cavi della batteria e dell'alternatore.
Gli utensili NON devono entrare in contatto con i terminali
della batteria con il rischio di creare un arco elettrico.
Utilizzare solo cavi dotati di clip. L'uso improprio può causare
gravi danni e rischi per la sicurezza.
MAI utilizzare la macchina se la guaina di isolamento sul cavo
elettrico è tagliata o usurata.
MAI azionare le luci se le lenti di protezione non sono in
SAFETY RULES__NORME DI SICUREZZA
FIRE PRECAUTIONS__MISURE ANTI-INCENDIO
FLAMMABLE FLUID PRECAUTIONS__PRECAUZIONI LIQUIDI INFIAMMABILI
ELECTRICAL HAZARD__PERICOLO DI ELETTROCUZIONE

Manual Code - MI150A00003
Revision Level 01 - 05/02/2018
6
or with a lens cover that is cracked or damaged!
posizione o se fessurate o danneggiate!

Manual Code - MI150A00003
Revision Level 01 - 05/02/2018
7
Only authorized and trained personnel is allowed
to perform the machine maintenance.
Please read the operator's manual and
maintenance manual before using or servicing the
machine.
Solo al personale autorizzato e qualificato è
consentito effettuare operazioni di manutenzione
sulla macchina. Si prega di leggere il manuale
operatore e il manuale di manutenzione prima di
utilizzare o riparare la macchina.
HIGH VOLTAGE! This equipment utilizes high voltage circuits.
Always exercise extreme caution when trouble shooting or
repairing any electrical circuit.
Only a qualified electrician should troubleshoot or repair
electrical problems occurring on the machine.
Before servicing the lighting tower, ensure that the engine
start switch is turned to OFF.
Disconnect electrical power and turn off engine before
removing protective covers on high voltage electrical
closures.
NEVER perform even routine service (oil/filter changes,
cleaning, etc.) if all electrical components aren’t shut down.
NEVER allow water to accumulate at the base of the
machine. If water is present, DO NOT service!
DO NOT service electrical components if your clothing or
skin is wet.
If the unit is stored outside, check the engine and generator
for any moisture. If wet, dry the unit thoroughly before
starting.
Never wash the unit with a high pressure hose or with any
kind of power washer.
Open main circuit breaker before disconnecting battery
cables.
Ensure to always relieve pressure before servicing any
pressurized system.
Be aware of hot exhaust pipes and engine.
KEEP AWAY from moving parts on generator and engine. Be
aware of the hazard if you wear loose clothing.
Check and replace all missing and hard-to-read labels.
Make sure slings, chains, hooks, ramps, jacks, and other
types of lifting devices are attached securely and have
enough weight-bearing capacity to lift or hold the
equipment safely.
ALTA TENSIONE! Questa unità utilizza circuiti ad alta
tensione. Adottare sempre la massima cautela in caso di
interventi per la risoluzione di problemi o per la riparazione
di qualsiasi circuito elettrico.
Solo ad un elettricista qualificato è consentito effettuare
interventi per la risoluzione di problemi o effettuare
interventi elettrici che possano rendersi necessari sulla
macchina.
Prima di effettuare la manutenzione sulla torre faro,
accertarsi che in modo che l'interruttore di avviamento del
motore sia spento.
Scollegare l’alimentazione elettrica e spegnere il motore
prima di rimuovere i carter di protezione sulle
apparecchiature elettriche ad alta tensione.
NON eseguire MAI operazioni di manutenzione ordinaria
(cambio olio / filtro, pulizia, etc.) se tutti i componenti
elettrici non sono spenti.
Fare in modo che l’acqua NON si accumuli MAI alla base
della macchina. Se è presente acqua, NON effettuare alcun
intervento di manutenzione!
NON effettuare la manutenzione dei componenti elettrici
con indumenti o pelle bagnati.
Se la macchina staziona all’esterno, controllare che non vi sia
umidità sul motore e sul generatore. Se bagnata, asciugare
completamente la macchina prima dell’avviamento.
Non lavare mai la macchina con un tubo flessibile ad alta
pressione o con qualsiasi tipo di idropulitrice.
Aprire interruttore principale prima di scollegare i cavi della
batteria.
Accertarsi sempre di aver scaricato la pressione prima di
eseguire qualsiasi intervento sui sistemi in pressione.
Siate consapevoli che i tubi di scarico e il motore possono
avere temperature molto elevate.
MANTENERSI LONTANI dalle parti in movimento sul
generatore e sul motore. Siate consapevoli che indumenti
ampi possono essere fonte di pericolo.
Controllare e sostituire tutte le etichette mancanti e difficili
da leggere.
Assicurarsi che imbracature, catene, ganci, rampe,
sollevatori, e altri dispositivi di sollevamento siano fissati in
modo sicuro e abbiano una portata sufficiente a sollevare o
sorreggere l’attrezzatura in condizioni di sicurezza.
SAFETY RULES__NORME DI SICUREZZA
LUBRICATION AND SERVICING__LUBRIFICAZIONE E MANUTENZIONE

Manual Code - MI150A00003
Revision Level 01 - 05/02/2018
8
Be careful while towing a trailer! Both the trailer
and vehicle must be in good condition and
securely fastened to each other.
Prestare attenzione nel traino di un rimorchio! Sia
il rimorchio che il veicolo di traino devono essere
in buono stato e fissati saldamente l'uno all'altro.
Check that the hitch and coupling on the towing vehicle are
adequately dimensioned and rated to the trailer's "gross
vehicle weight rating" (GVWR).
Do not tow a trailer using defective parts coupling!
Check the tires of the trailer: tread wear, tire pressure,
general conditions.
Connect breakaway safety line securely to towing vehicle.
If fitted, connect safety chains in a crossing pattern under
the connecting beam.
Check that wheel nuts are ALL tight.
Check that the road running lights are connected and
operating, if applicable.
Maximum recommended speed for highway towing is 75
km/h. Recommended maximum off-road towing speed is 15
km/h (less on uneven terrain).
When towing, maintain extra space between vehicles and
avoid soft shoulders, curbs and sudden lane changes. If you
are not experts in tow, to practice in a far from heavy traffic
area.
Verificare che il gancio e l'accoppiamento sul veicolo di
traino siano adeguatamente dimensionati e conformi alla
"classe peso lordo" del rimorchio (GVWR).
NON trainare rimorchi utilizzando accoppiamenti difettosi!
Controllare i pneumatici del rimorchio: usura del battistrada,
pressione di gonfiaggio, condizioni generali.
Collegare saldamente il cavo di sicurezza al veicolo di traino.
Se presenti, collegare le catene di sicurezza con uno schema
incrociato sotto il braccio di collegamento.
Controllare che TUTTI i dadi delle ruote siano ben serrati.
Controllare che le luci di funzionamento su strada siano
collegate e funzionanti, se presenti.
La velocità massima di traino consigliata su strada è pari a 75
km / h. La velocità massima di traino consigliata su sterrato è
pari a 15 km/h (inferiore su terreni sconnessi).
Durante il traino, mantenere una maggiore distanza di
sicurezza tra i veicoli ed evitare banchine non transitabili,
cordoli e repentini cambi di corsia. Se non si è esperti nel
traino, fare pratica in una zona lontana dal traffico intenso.
SAFETY RULES__NORME DI SICUREZZA
TOWING SAFETY__SICUREZZA TORRE FARO
SAFETY STICKERS GUIDE__GUIDA ETICHETTE DI SICUREZZA

Manual Code - MI150A00003
Revision Level 01 - 05/02/2018
9
Safety stickers meanings__Significato delle etichette di sicurezza
Attention! Read user’s manual before operating the
machine.
Attenzione! Leggere il manuale d’uso prima di
mettere in funzione la macchina.
Attention, high voltage! Read user’s manual before
operating the machine.
Attenzione, alta tensione! Leggere il manuale d’uso
prima di mettere in funzione la macchina.
Do not extinguish with water! Attention, don’t touch
the moving parts.
Non spegnere le fiamme con acqua! Attenzione, non
toccare gli organi in movimento.
Attention! Danger of crushing.
Attenzione! Pericolo di schiacciamento.
Attention, battery on board. Contains corrosive
liquids.
Attenzione, batterie a bordo. Contengono liquidi
corrosivi.
Attention! Diesel fuel on board. Stop the engine
while refueling. Keep anything that could cause
sparks, flame or fire at a safety distance from the
machine.
Attenzione! Gasolio a bordo. Spegnare il motore
durante il rifornimento. Tenere a distanza di
sicurezza dalla macchina tutto quanto può
provocare scintille, fiamme o incendi.
Attention! Hot liquid under pressure during machine
use and immediately after. Pay attention when
opening.
Attenzione! Liquidi in pressione ad alta temperatura
durante l’utilizzo della macchina e immediatamente
dopo. Prestare attenzione al momento dell’apertura.
Lifting point. Ensure lifting device has enough
capacity to handle machine weight.
Punto di sollevamento. Accertarsi che il dispositivo di
sollevamento abbia una portata sufficiente a
movimentare il peso della macchina.
Earthing point. The grounding of the machine always
needs to be done paying attention on the section of
the cable to be used (never to be less than 10 mm2).
Punto di massa. La messa a terra della macchina
deve sempre essere effettuata controllando la
sezione del cavo da utilizzare (mai inferiore a 10
mm2).
SAFETY RULES__NORME DI SICUREZZA
SAFETY STICKERS GUIDE__GUIDA ETICHETTE DI SICUREZZA

Manual Code - MI150A00003
Revision Level 01 - 05/02/2018
10
Information regarding the machine
model, code and year of production is on
the unit serial number plate. Always
quote the machine model and serial
number when contacting your dealer,
the factory and for any spare parts
requests. All of our products comply with
CE requirements. They are conform to
directives and fulfill all the relevant
safety requirements.
Le informazioni relative al modello di
macchina, codice ed anno di produzione
sono sulla targa dati. Quando si contatta
il rivenditore per eventuali richieste di
parti di ricambio, indicare sempre il
modello di macchina ed il numero di
serie. Tutti i nostri prodotti sono
conformi alle norme CE. Essi sono
conformi alle direttive e soddisfano tutti i
requisiti di sicurezza.
Type
Engine
Alternator
V
KVA Hz
COS
RPM I.CL. IP
Dimensions L x W x H
Weight
SERIAL N°
TECHNICAL SPECIFICATIONS__CARATTERISTICHE TECNICHE
MACHINE IDENTIFICATION__IDENTIFICAZIONE DELLA MACCHINA
1. Manufacturer’s logo
2. Manufacturer’s address
3.
Manufacture year
4.
Machine model
5.
CE Logo
6.
Generator symbol
7.
Engine type
8.
Alternator type
9.
Single phase machine
10.
Rated voltage
11.
Rated power
12.
Frequency
13.
Power factor
14.
Engine speed
15.
Insulation class
16.
Degree of protection
17.
Machine dimensions
18.
Dry weight
19. Machine serial number
1. Logo costruttore
2.
Indirizzo costruttore
3.
Anno di produzione
4.
Modello macchina
5.
Logo CE
6.
Simbolo generatore
7.
Tipo motore
8.
Tipo alternatore
9.
Macchina monofase
10.
Valore di tensione
11.
Valore di potenza
12.
Frequenza
13.
Fattore di potenza
14. Velocità rotazione motore
15.
Classe d’isolamento
16.
Grado di protezione
17.
Dimensioni macchina
18.
Peso a vuoto
19. Numero di serie macchina
17
1
3
4
5
6
7
8
9
10
11
12
13
14
15
16
18
19
2

Manual Code - MI150A00003
Revision Level 01 - 05/02/2018
11
FLOODLIGHTS__PROIETTORI
Type
Tipo
MH
Power of each lamp
Potenza di ogni lampada
1000W
Floodlight installed
Proiettori installati
4
IP level
Livello IP
65
Illuminated area (5 lux min.) (sqm)
Area illuminata (min. 5 lux) (sqm)
4200
MAST__PALO
Lifting method
Metodo di sollevamento
Manual
Manuale
Maximum Height
Massima altezza
8,5 m
Maximum Wind Speed
Velocità massima del vento
80 km/h
Rotation
Rotazione
340°
Safety brake
Freno di sicurezza
Mechanical
Meccanico
GENERATOR__GENERATORE
Model
Modello
Linz
Alumen LF
Rated Output
Potenza nominale
8 kVA
Power available to auxiliary socket
Potenza disponibile alla presa ausiliaria
3 kVA
Rated Frequency
Frequenza
50 Hz
Rated Voltage
Tensione
230 V
ENGINE__MOTORE
Type
Tipo
Kubota D1105
Number of cylinder
Numero di cilindri
3
Displacement
Cilindrata
1123 cm3
Engine speed
Velocità motore
1500 rpm
Fuel consumption
Consumo carburante
1,85 l/h
Avarage runtime before refueling
Autonomia rifornimento
43 h
Cooling system
Sistema di raffreddamento
liquid
GENERAL__GENERALE
Noise level
Livello rumorosità
68dBA 7m
Battery
Batteria
12 V –62 Ah
Fuel tank capacity
Capacità serbatoio
80 l
Dimensions in transport (L x W x H)
Dimensioni durante il trasporto (Lu x La x H)
2640 x 1380 x 2640 mm
Dimensions in operation (L x W x H)
Dimensioni durante l’uso (Lu x La x H)
2640 x 2580 x 8500 mm
Dry Weight
Peso a vuoto
770 Kg
TECHNICAL SPECIFICATIONS__CARATTERISTICHE TECNICHE
TECHNICAL DATA__DATI TECNICI

Manual Code - MI150A00003
Revision Level 01 - 05/02/2018
12
Control panel__Pannello di controllo
Fuel level indicator location
Posizione indicatore livello carburante
1. Hour meter
2. Low oil pressure alarm lamp
3. High coolant temperature alarm lamp
4. Battery charger failure alarm lamp
5. Glow plug signal lamp
6. Starting key
7. 40A RCBO
8. Floodlights switches
9. 230V 16A output socket
10. 12Vdc Circuit breaker (push to reset)
11. Emergency stop button
12. Fuel level indicator
13. Grounding terminal
1. Contaore
2. Lampadina d’allarme bassa pressione olio
3. Lampadina d’allarme alta temperatura refrigerante
4. Lampadina d’allarme avaria carica batteria
5. Lampadina di segnalazione preriscaldo candelette
6. Chiave di avviamento
7. RCBO 40A
8. Interruttori proiettori
9. Uscita di potenza 230V 16A
10. Interruttore termico 12Vdc (premere per resettare)
11. Pulsante stop d’emergenza
12. Indicatore livello carburante
13. Terminale per messa a terra
TECHNICAL SPECIFICATIONS__CARATTERISTICHE TECNICHE
MACHINE CONTROLS__CONTROLLI MACCHINA
1
2
3
5
6
7
8
9
10
4
11
12
13

Manual Code - MI150A00003
Revision Level 01 - 05/02/2018
13
Do not move the trailer with the tower raised!
NEVER release the jokey wheel or the stabilizer
(fixed to the rudder of the trailer) while are
supporting the unit! The machine would tip forward
and could cause damage or personal injury.
Before coupling the unit to a towing vehicle check the tyres and
check that all the lights work properly.
Procedure:
Turn off the lights and allow time for them to cool.
Lower the tower.
Ensure that the stabilizer (A) is down so the unit will not
tip over when the other stabilizers are raised.
Raise all the stabilizer and retract the retractable ones.
Couple the unit to a towing vehicle between the rudder
eye (B).
The unit can be now be towed to the new location.
Non spostare il rimorchio con la torre estesa!
NON sbloccare MAI il ruotino o lo stabilizzatore di
sostegno (fissati al timone del carrello), mentre
sostengono l'unità! La macchina si ribalterebbe in
avanti e potrebbe causare danni a cose o lesioni
personali.
Prima di collegare l’unità al veicolo di traino, controllare i
pneumatici e il funzionamento corretto di tutte le luci.
Procedura:
Spegnere i fari e attendere che si raffreddino.
Abbassare la torre.
Assicurarsi lo stabilizzatore (A) di sostegno sia abbassato
in modo che l’unità non si ribalti dopo aver alzato gli altri
stabilizzatori.
Alzare tutti gli stabilizzatori e ritirare quelli retraibili.
Collegare l’unità al veicolo di traino tramite l’occhiello (B)
del timone.
L’unità può essere ora trainata verso una nuova
postazione.
HANDLING AND TRANSPORT__MOVIMENTAZIONE E TRASPORTO
TOWING & MOVING WITH TOWING VEHICLE__TRAINO E SPOSTAMENTO CON VEICOLO DI TRAINO
B
A

Manual Code - MI150A00003
Revision Level 01 - 05/02/2018
14
Handling by crane is allowed only if the machine is
connected to the crane through the lifting eye.
Ensure that the lifting capacity of the crane and lifting
devices is suited to the weight of the machine to move. The
weight is specified in the provided documentation (user’s
manual) and on the data plate.
Connect the cable/hook to the lifting eye (C) and tension the
cable.
Lift the machine for about 10 cm (4 in.).
Move slowly and position the machine on the ground or on
the vehicle.
La movimentazione con gru è consentita solo se la
macchina è collegata alla gru tramite l'occhiello di
sollevamento.
Assicurarsi che la capacità di sollevamento della gru e dei
dispositivi di sollevamento sia adeguata al peso della
macchina da spostare. Il peso è specificato nella
documentazione fornita (manuale utente) e sulla targhetta.
Collegare il cavo/gancio all’occhiello di sollevamento (C) e
mettere il cavo in tensione.
Sollevare la macchina di circa 10 cm (4 pollici).
Spostare lentamente e posizionare la macchina sul terreno o
sul veicolo.
Ensure that the lifting capacity of the forklift is suited to the
weight of the machine to move. The weight is specified in
the provided documentation (user’s manual) and on the
data plate.
Insert the forks into the forklift pockets (transversal (D) or
longitudinal (E), depending on machine and your moving
requirements).
Lift the machine for about 10 cm (4 in.).
Move slowly and position the machine where needed.
Assicurarsi che la capacità di sollevamento del carrello
elevatore sia adeguata al peso della macchina da spostare. Il
peso è specificato nella documentazione fornita (manuale
utente) e sulla targhetta.
Inserire le forche nelle apposite tasche (trasversali (D) o
longitudinali (E), a seconda della macchina e delle esigenze
di movimentazione).
Sollevare la macchina di circa 10 cm (4 pollici).
Spostare lentamente e posizionare la macchina nel punto
desiderato.
All lifting operations must be carried out by
qualified personnel, such as fork lift operators,
crane operators and slingers. The operator
should be deemed responsible for using the
correct method of slinging and lifting the
generator unit.
Never leave the load insecure.
When moving and transporting the machine, do
not tilt it excessively.
When lifting and moving the machine, do not
stay or walk within it’s proximity.
Never leave the machine slung overhead.
Tutte le operazioni di sollevamento vanno
effettuate da personale specializzato, come
carrellisti, gruisti, imbracatori. Considerare
l’operatore come il responsabile nell’uso della
corretta tecnica di imbracaggio e sollevamento
macchina.
Non lasciare mai incustodito il carico.
Durante la movimentazione e trasporto della
macchina evitare di inclinarla eccessivamente.
Quando si solleva e si muove la macchina non
sostare nelle sue vicinanze.
Non lasciare la macchina in sospensione aerea.
HANDLING AND TRANSPORT__MOVIMENTAZIONE E TRASPORTO
HANDLING AND TRANSPORT WITH CRANE__MOVIMENTAZIONE E TRASPORTO CON GRU
HANDLING AND TRANSPORT WITH FORKLIFT__MOVIMENTAZIONE E TRASPORTO CON CARRELLO ELEVATORE
C
D
E

Manual Code - MI150A00003
Revision Level 01 - 05/02/2018
15
Jack up the unit as follows. Consider that the front stabilizers
are extendable (F), while the rear ones are not (G).
Extendable stabilizers: hold the stabilizer with one hand
and pull the locking pin to release it. Pull the stabilizer
outwards until it’s fully extended and ensure that the
locking pin locked it in place securely in the extended
position.
Jack the unit up by rotating the handle on the top of each
stabilizer clockwise.
Please refer to the bubble levels (H) installed on top of
the machine (near the mast) in order to have the machine
perfectly leveled and stable before rising the tower.
The wheels of the machine have to touch the ground at
all times.
Stabilizzare l’unità come segue. Gli stabilizzatori anteriori sono
estensibili (F), a differenza di quelli posteriori (G).
Stabilizzatori estensibili: tenere lo stabilizzatore con una
mano e estrarre il perno di bloccaggio per liberarlo.
Tirare lo stabilizzatore verso l'esterno fino alla sua
completa estensione e assicurarsi che il perno di
bloccaggio lo abbia bloccato saldamente in posizione di
massima estensione.
Sollevare l’unità ruotando in senso orario la maniglia sulla
parte superiore di ciascun stabilizzatore.
Fare riferimento alle livelle a bolla (H) installate sulla
parte superiore della macchina (vicino al palo) per avere
la macchina perfettamente livellata e stabile prima di
estendere la torre.
Le ruote della macchina devono sempre toccare il suolo.
The tower can be rotated up to 340 degrees in order to direct
the light as required.
Release the rotation locking pin (I) and turn the tower
using the rotation handles on the mast in order to direct
the lights as needed. Don’t forget to lock the rotation
afterwards.
Additionally to the mast rotation, each of the floodlight
can be adjusted on two axes and tilted back and forth.
This way the lights can be directed either vertically or
horizontally. In order to adjust the light on the vertical
axes, the encircled pin (L) needs to be unlocked by
pulling it and then turning the floodlight. For any
adjustments, the mast must be lowered to allow access.
La torre può essere ruotata fino ad un massimo di 340 gradi allo
scopo di direzionare la luce come desiderato.
Rilasciare il perno anti-rotazione (I) e ruotare la torre
utilizzando i manici di rotazione previsti sul palo al fine di
indirizzare i fari nella direzione richiesta. Non dimenticare
di riposizionare il perno anti-rotazione volta terminata
questa operazione.
Oltre alla rotazione del palo, ogni proiettore può essere
posizionato su due assi e inclinato avanti e indietro. In
questo modo i fari possono essere diretti verticalmente o
orizzontalmente. Per orientare il faro verticalmente, il
perno cerchiato (L) deve essere sbloccato tirandolo,
quindi ruotare il proiettore. In caso di eventuali
regolazioni, abbassare il palo per consentire l'accesso.
LIGHTING TOWER USE__USO DELLA TORRE FARO
STABILIZING THE UNIT__STABILIZZARE L’UNITÀ
DIRECTING THE FLOODLIGHTS__ORIENTAMENTO DEI PROIETTORI
L
H
F
G
I

Manual Code - MI150A00003
Revision Level 01 - 05/02/2018
16
Before starting and operating the unit, we suggest making the
following routine checks for improved safety, better efficiency,
longer product life and in order to avoid work disruptions.
Check that the machine is leveled correctly and stabilized
firmly.
Check that all the lamp lenses are clean and undamaged.
After adjusting the lights, prepare to raise the tower by:
•Inspecting the cable and replacing it, if damaged.
•Checking mounting hardware for proper tightness and
re-torquing if necessary.
Check fuel, engine oil and coolant level. Top them if
necessary.
Ensure that the fuel lines are undamaged and correctly
connected.
Ensure that all the electrical cables are undamaged and
correctly connected.
Check that the main switch and the circuit breakers are in
the OFF position.
Ensure that all the light switches are turned off in order
not to start the engine under load.
Drive the earth picket into the ground (earth) following
any risk assessment. (*)
Check that the grounding cable is securely attached to the
unit.
Check that the emergency stop button is not pressed. If
necessary, rotate the button clockwise to release it.
Open the frontal door to access the control panel.
Prima di avviare e far funzionare l'unità, si consiglia di effettuare
i seguenti controlli di routine per una maggiore sicurezza, miglior
efficienza, maggiore durata ed evitare interruzioni di lavoro.
Verificare che la macchina sia livellata correttamente e
saldamente stabilizzata.
Controllare che le lenti dei fari siano pulite e integre.
Dopo avere regolato i fari, predisporre il sollevamento
della torre eseguendo queste operazioni:
•Ispezionare il cavo e sostituirlo, se danneggiato.
•Verificare le coppie di serraggio dei componenti in
metallo, serrando nuovamente se necessario.
Controllare il livello del carburante, olio motore e liquido
refrigerante. Rabboccare, se necessario.
Assicurarsi che le tubazioni del carburante non siano
danneggiate e che siano correttamente collegate.
Assicurarsi che tutti i cavi elettrici siano integri e
correttamente collegati.
Verificare che l'interruttore generale e gli interruttori
automatici siano su OFF.
Assicurarsi che tutti gli interruttori luci siano spenti per
non avviare il motore sotto carico.
Collocare il picchetto di messa a terra (massa)
conformemente alla valutazione dei rischi. (*)
Verificare che il cavo di messa a terra sia saldamente
fissato all’unità.
Verificare che il pulsante di arresto di emergenza non sia
premuto. Se necessario, ruotare il pulsante in senso orario
per rilasciarlo.
Aprire lo sportello frontale per accedere al pannello di
comando.
For operators’ safety, the grounding of the machine always
needs to be done paying attention on the section of the cable to
be used (never to be less than 10 mm2). For the connection of
the grounding cable, please always use the clip located on the
control panel, on the right side of the machine. Always perform
grounding operations in compliance with local/international
regulations.
Per la sicurezza degli operatori, la messa a terra della macchina
deve sempre essere eseguita prestando attenzione alla sezione
del cavo da utilizzare (mai inferiore a 10 mm2). Per il
collegamento del cavo di massa, si prega di utilizzare sempre la
clip posta sul pannello di comando. Eseguire sempre le
operazioni di messa a terra in conformità alle normative
locali/internazionali.
LIGHTING TOWER USE__USO DELLA TORRE FARO
PRELIMINARY CHECK & STARTING__CONTROLLI PRELIMINARI & AVVIAMENTO

Manual Code - MI150A00003
Revision Level 01 - 05/02/2018
17
START
After checking and restoring if necessary the engine oil level,
and fuelling the unit, (if this is the first starting, it is necessary
to fuel the unit until the fuel gauge (4) is above the 50% of fuel
capacity), proceed as follows:
Ensure that all the lamp switches (3) are in OFF position.
Turning the key switch (2) in “GL” position; (the lamp 1 will
be lighted).
When the lamp (1) turns off, turning the key switch (2) in
“ST” position
If the engine does not start, turn the key switch (2) to the OFF
position (otherwise, the automatic engine shut off - DAS, will
prevent starting the engine), wait about 10 seconds and
repeat the starting procedure.
Let the unit run for about 10 minutes to allow the regular
warm-up.
Switch on the floodlights
STOP
Switch off the floodlights
Let the engine run in this condition for about one minute,
then turning the key switch (2) in OFF” position.
AVVIO
Dopo aver verificato ed eventualmente ripristinato il giusto
livello di olio nel motore e dopo aver rifornito di carburante la
macchina, (si noti che se si tratta del primo avviamento, è
necessario rifornire di combustibile la macchina sino a quando
l’indicatore carburante (4) sia oltre il 50% della capacità totale),
procedere come segue:
Assicurarsi che gli interruttori luci (3) siano in posizione OFF.
Ruotare la chiave d’avviamento (2) in posizione “GL”; (la
lampadina 1 si illuminerà).
Quando la lampadina (1), ruotare la chiave d’avviamento (2)
in posizione “ST”.
Se il motore non si avvia, riportare la chiave (2) in posizione
OFF (in caso contrario il dispositivo arresto di sicurezza - DAS,
inibisce la partenza), attendere circa 10 secondi e ripetere
l’operazione.
Lasciare la macchina in funzione per circa 10 minuti senza in
modo da consentire un regolare riscaldamento.
Accendere i proiettori.
ARRESTO
Spegnere i proiettori
Attendere per circa un minuto che il motore funzioni in
queste condizioni indi ruotare la chiave (2) in posizione
“OFF”.
LIGHTING TOWER USE__USO DELLA TORRE FARO
ENGINE STARTING AND STOP__AVVIAMENTO E ARRESTO DEL MOTORE
1
2
3
4

Manual Code - MI150A00003
Revision Level 01 - 05/02/2018
18
Poorly maintained equipment can become a safety hazard. In
order, for the equipment, to operate safely and properly over a
long period of time, periodic maintenance and occasional
repairs are necessary.
Any kind of maintenance work on the lighting tower must be
carried out by Authorized and trained personnel. It should be
done in a safe working environment and with the machine well
stabilized. The engine must be turned off and let cool down
sufficiently before starting to work on it.
While performing maintenance work, please use suitable
tools and clothes.
If you need to work while the engine is running, pay attention
to all moving parts, hot parts and electrical parts which may
be unprotected while the machine is open.
DO NOT modify any component if not authorized.
The repairs cannot be considered among the routine
maintenance activities. E.g. the replacement of parts that are
subject to occasional damage and the replacement of electric
and mechanic components that wear with use. This kind of
work is not –in fact- covered by warranty.
The periodic maintenance should be performed according to the
documentation provided by the engine and alternator
manufacturers. Please refer to the relevant manual supplied
with the machine and to the hour meter on the machine in order
to determine when service is needed.
L’attrezzatura sulla quale viene effettuata una manutenzione
insufficiente può diventare un pericolo per la sicurezza.
Affinché l’attrezzatura possa operare in sicurezza e
correttamente per un lungo periodo di tempo, è necessaria una
manutenzione periodica e riparazioni occasionali.
Qualsiasi tipo di intervento di manutenzione sulla torre faro deve
essere effettuata da personale autorizzato e qualificato. Deve
essere eseguito in un ambiente di lavoro sicuro e con la
macchina ben stabilizzata. Il motore deve essere spento e
lasciato raffreddare a sufficienza prima di iniziare a lavorare
sullo stesso.
Durante l'esecuzione di interventi di manutenzione, si prega
di utilizzare strumenti e indumenti idonei.
Se occorre lavorare mentre il motore è in funzione, prestare
attenzione a tutte le parti in movimento, le parti ad alta
temperatura e le parti elettriche che possono non essere
protette mentre la macchina è aperta.
NON modificare alcun componente senza autorizzazione.
Le riparazioni non possono essere considerate attività di
manutenzione ordinaria. Per esempio, la sostituzione di parti
soggette a danni occasionali e la sostituzione di componenti
elettrici e meccanici soggetti a usura. Questo tipo di intervento
non è infatti coperto da garanzia.
La manutenzione periodica deve essere effettuata secondo
quanto stabilito dalla documentazione fornita dai fabbricanti del
motore e dell’alternatore. Si prega di fare riferimento al relativo
manuale fornito con la macchina e al contaore montato sulla
macchina per determinare quando l’assistenza si rende
necessaria.
This machine is made of parts that, if not disposed of correctly,
can damage the environment and create ecological hazards.
The following parts and materials need to be brought to
authorized waste treatment sites:
- Metallic structure;
- Batteries;
- Engine and hydraulic oils;
- Cooling liquid;
- Filters;
- Cables.
These components have to be disposed of accordingly to local
laws and dispositions. Have qualified personnel disassemble the
machine and dispose of parts.
The machine owner is responsible for dismantling and disposal
of the machine and its components at the end of its working
life.
Questa macchina è costituita da parti che, se non smaltite
correttamente, possono danneggiare l’ambiente e creare un
pericolo ecologico. Le seguenti parti e materiali devono essere
conferiti in appositi siti autorizzati per il trattamento rifiuti:
- Struttura metallica;
- Batterie;
- Olio motore e olii idraulici;
- Liquido di raffreddamento;
- Filtri;
- Cavi.
Questi componenti devono essere smaltiti conformemente alle
leggi e ai regolamenti locali. Personale qualificato deve
occuparsi del disassemblaggio della macchina e dello
smaltimento dei suoi componenti.
Il proprietario della macchina è responsabile dello
smantellamento e smaltimento della macchina e dei suoi
componenti al termine del suo ciclo di vita.
ROUTINE MAINTENANCE__MANUTENZIONE ORDINARIA
DISPOSAL AND DECOMMISSIONING__SMALTIMENTO E MESSA FUORI SERVIZIO

Manual Code - MI150A00003
Revision Level 01 - 05/02/2018
19
N.
CODE / CODICE
DESCRIPTION
DESCRIZIONE
1
PFM08_C000_042
MAIN FRAME FOR FLOODLIGHTS
STRUTTURA CENTRALE
2
AC000_M038_007
HOSE CLAMP
FASCETTA CON GOMMA
3
PFM08_C000_038
CENTERING ROD BRACKET
SUPPORTO CENTRALE
4
AC000_E018_002
PG21 CABLE GLAND
PASSACAVO
5
AS000_E006_004
JUNCTION BOX
SCATOLA DI DERIVAZIONE
6
AC000_E018_008
PG11 CABLE GLANDE
PASSACAVO
7
PFM08_C000_045
JUNCTION BOX COVER
COPERTURA SCATOLA DI DERIVAZIONE
8
AS000_M023_001
ANTI-DRAG SPACER
DISTANZIALE
9
AC000_E000_005_06
IGNITOR SUPPORT
SUPPORTO ACCENDITORE 1000W
10
AC000_E026_002
1000W IGNITOR
ACCENDITORE 1000W
11
AC000_E026_001
1000W METAL HALIDE FLOODLIGHT
PROIETTORE
12
PFM08_C000_049ZN
LOWER FRAME FOR FLOODLIGHT
SUPPORTO INFERIORE PROIETTORE
13
AC000_E026_018
1000W LIGHT BULB
LAMPADA 1000W
14
AC000_M000_007
MULTIPOSITION HANDLE
MANIGLIA
15
PFM08_C000_010ZN
UPPER FRAME FOR FLOODLIGHT
SUPPORTO SUPERIORE PROIETTORE
16
AC000_E026_024
FLOODLIGHT GLASS
VETRO PROIETTORE
SPARE PARTS__PARTI DI RICAMBIO

Manual Code - MI150A00003
Revision Level 01 - 05/02/2018
20
N.
CODE / CODICE
DESCRIPTION
DESCRIZIONE
1
PFM08_C000_006ZN
6° SECTION MAST
SEZIONE PALO - 6°
2
PFM08_C000_005ZN
5° SECTION MAST
SEZIONE PALO - 5°
3
PFM08_C000_004ZN
4° SECTION MAST
SEZIONE PALO - 4°
4
PFM08_C000_003ZN
3° SECTION MAST
SEZIONE PALO - 3°
5
PFM08_C000_002ZN
2° SECTION MAST
SEZIONE PALO - 2°
6
PFM08_C000_001
1° SECTION MAST
SEZIONE PALO - 1°
7
PFM08_C000_039
MAST ROTATON PLATE
PIASTRA ROTAZIONE PALO
8
AC000_M000_084
WINCH BODY
CORPO VERRICELLO
9
AC000_M000_084_01
WINCH HANDLE
MANIGLIA VERRICELLO
10
PFM08_C031_062ZN
MAST ROTATION POSITIONING DEVICE, LEFT
PIASTRA SINISTRA PALO
11
PFM08_C031_063ZN
MAST ROTATION POSITIONING DEVICE, RIGHT
PIASTRA DESTRA PALO
12
PFM08_C031_061
ROTATION FLANGE
FLANGIA DI ROTAZIONE
13
PFM08_C000_060
COILED CABLE PROTECTION
PROTEZIONE CAVO
14
AC000_E006_016
COILED CABLE
CAVO
15
AC000_M038_007
HOSE CLAMP
FASCETTA CON GOMMA
16
PFM08_C000_047
COILED CABLE BOTTOM PLATE
FERMO CAVO
Table of contents
Popular Floodlight manuals by other brands

Beamz
Beamz LCB183 user manual

Pro-Elec
Pro-Elec PELL0273 manual

BEKA Schreder
BEKA Schreder OMNIstar quick start guide

Ignition
Ignition Co9 V2 LED Flood IP65 540W RGBW user manual

Cooper Lighting
Cooper Lighting ELX Series installation instructions

Al Nasser Group
Al Nasser Group Noortek FLD02 Series Maintenance and installation manual