DEPOT 2 U 99049M Use and care manual
Last update: 07/10/2021 99049M
HW
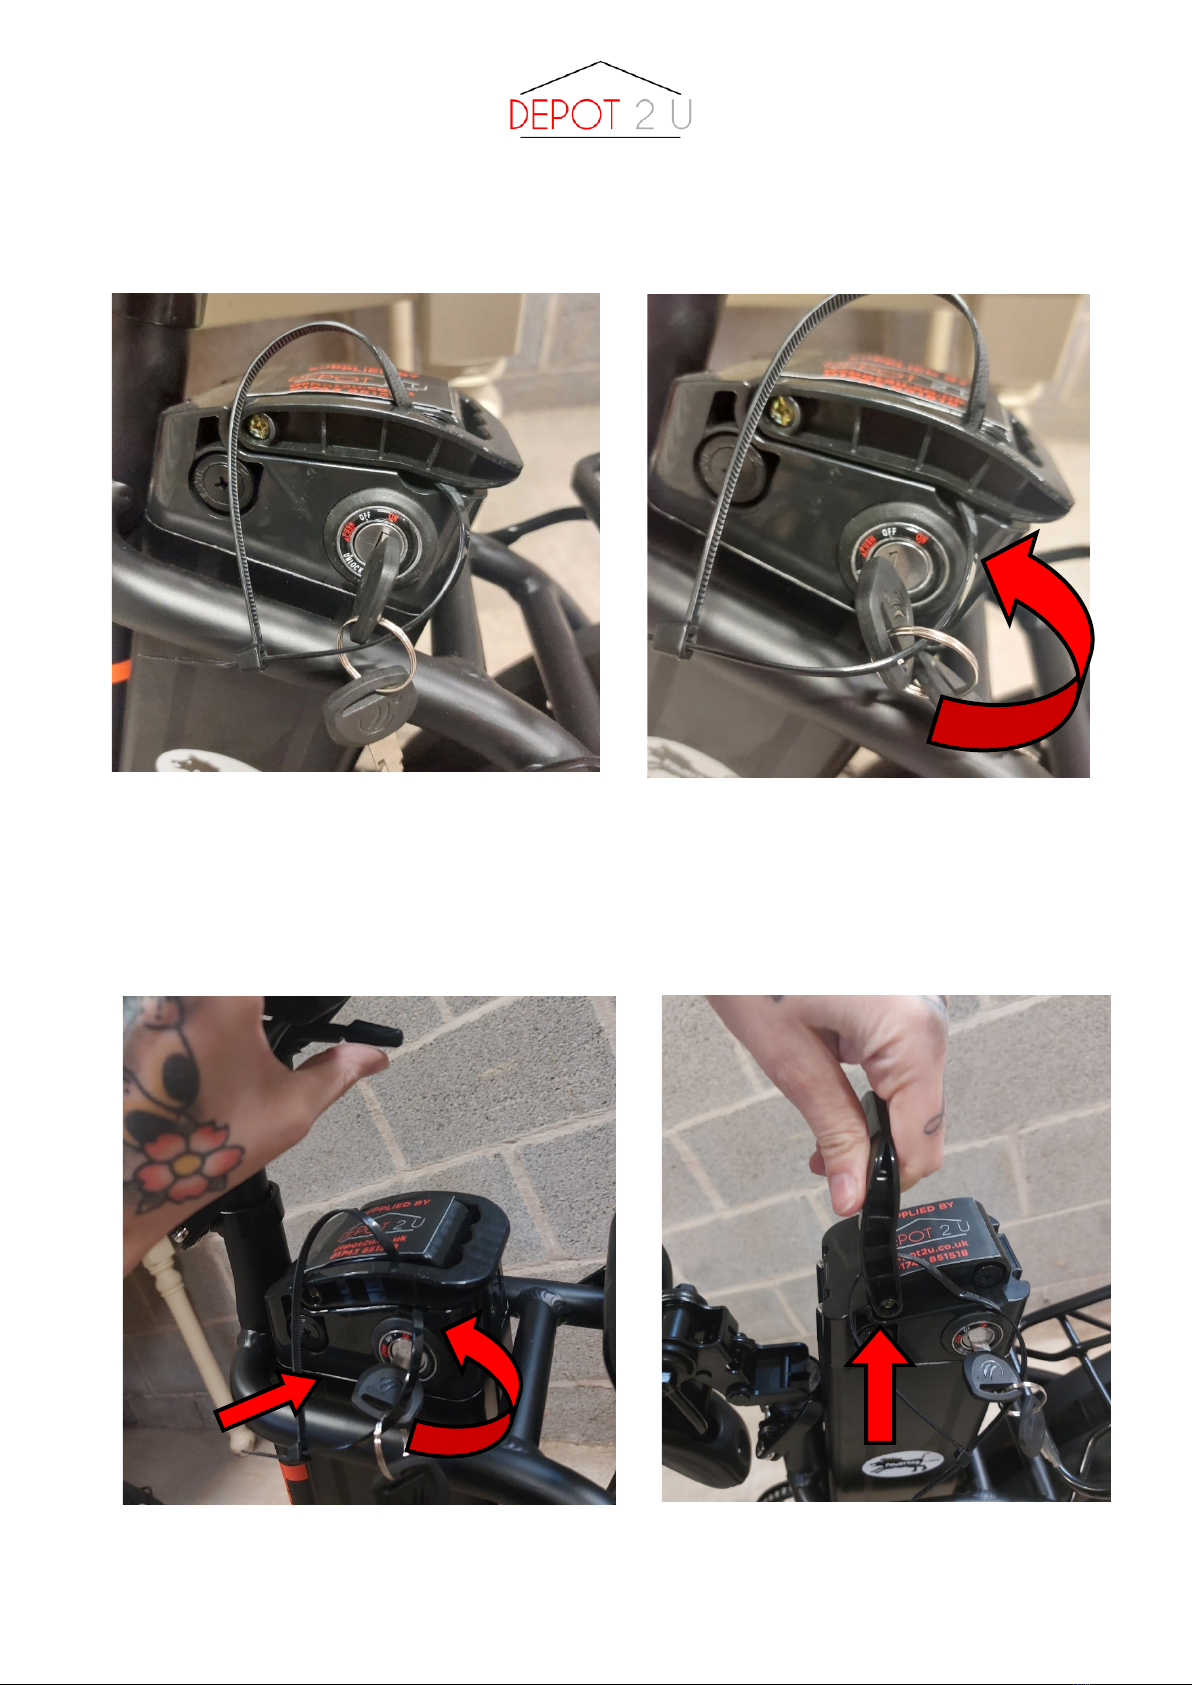
KEY & BATTERY GUIDE
1. BATTERY SWITCHED ON
2. BATTERY SWITCHED OFF
PUSH KEY IN AND TURN LEFT
TURN LEFT
3. BATTERY UNLOCKED
4. BATTERY RELEASED
PULL UP WITH HANDLE
Key in 12 o’clock position means the battery is
switched on. The battery must be switched on to
turn the bike on, which is done on the control pad
by pressing and holding the power button.
To turn battery off, turn the key
anticlockwise / left until it clicks.
To unlock the battery, push the key in and
simultaneously turn anticlockwise / left until it
clicks.
Remove battery by pulling up using the battery
handle. (You will need to lift the saddle into the
upright position to remove the battery.
Lift the blue lever under the back of the saddle to
do this.

Last update: 07/10/2021 99049M
HW
Folding Guide
2. FOLD HANDLEBARS
4. FOLD FRAME
PULL UP WITH HANDLE
Push the lever on the pedals and
fold the pedals in
Locate the red button on the handlebar frame
Press and move the lever to fold the handlebars
down—Be careful not to pinch your hand
Locate the latch on the bike frame
Pull the pin out, and up to release the catch
Fold the frame of the bike, be careful not to pinch
your hand
1. FOLD PEDALS
3. RELEASE CENTER LATCH

Depot2U
Last update: 07/10/2021
HW
#99049M Quick Operation Guide
Please regularly check your E-Bike for a ride-ready condition.
This includes tight spokes, inflated tyres and responsive brakes.
Although we check the E-Bikes before shipping, we strongly advise you check the above on the Bike
prior to riding for the first time.
1. Battery Charging
The battery can be charged on or off the Bike.
Please ensure you regularly charge the battery to prolong lifespan. Do not overcharge.
Regular charging / discharging will keep battery in best form.
To charge, raise the battery handle to expose the charging port underneath. Insert end of
charger and plug in. Red light denotes charging, green when fully charged.
2. Assembly
Carefully lift the bike out of the box. Unfold the bike to complete the frame and lock the
central locking pin in place. Some adjustment may be needed to get the locking clasp to fit
properly – this can be done by rotating the locking clasp clockwise / counter-clockwise to
tighten / loosen. This should be a snug fit, but not forced in. If the central frame or locking
clasp has movement once locked, it will need tightening. Once the mid-section is locked in
place, bring the handlebar stem up into position and lock with the locking clasp. Finally,
adjust the saddle and handlebar height with the relevant locking clasps, and then unfold the
pedals. To fold the pedals back in, squeeze the trigger inside of the pedals and fold in at the
same time.
3. Motor Starting
Ensure battery is switched to ON position (turn the key clockwise to third position)
Press and hold power button on the control panel for one second.
When the display illuminates, the bike is switched on.
Press and hold power button for 1 second to switch off controller and turn the key one
position to the left to switch off main power.
4. Controls
To switch front light on, press & hold the PLUS button (above the power button) for 1
second. Repeat the turn light off.
(Separate LED Battery light on rear with switch to power on)
Assist levels range between 0 (no assistance) & 5 (maximum assistance) – use the up and
down keys when the bike is switched on to cycle through the appropriate levels.
3 is a good balance of power and energy conservation.
5. Suspension
Front suspension forks can be engaged / locked by turning the red wheel on the suspension
fork clockwise / counter clockwise.
6. Tyre Pressure: We recommend between 20-25 PSI.
If your bike has been subjected to a lot of mud / water, please remove the battery as soon as possible
and wipe away any excess dirt / moisture that has accrued near the battery terminals.

Depot2U
Last update: 07/10/2021
HW
Warranty
Valid for 12 months from date of purchase.
All of our E bikes are subjected to a Pre-Delivery Inspection (PDI) before dispatch.
KEEP THE ORIGINAL PACKAGING / BOX FOR YOUR BIKE.
RETURNS ACCEPTED IN ORIGINAL PACKAGING.
**Warranty is held by us - Depot2U and covers mechanical breakdown only.
Wear and tear is excluded as is damage caused by improper usage.
This includes (but is not limited to):
Brake pad wear.
Tyre wear and damage.
Damage to paintwork.
Damage to battery due to accident.
Alterations made to battery and electronics.
Chain and gear wear and tear.
Please ensure you report any physical damage that may have been caused by delivery within
24 hours of receiving.
If you believe you have a warranty claim, please contact us on:
01743 851518
stores@depot2u.co.uk
In the first instance we will retrieve the bike from you and return to us.
Our mechanic will look at the bike to assess the issue. If the issue is deemed to be covered by
our warranty, then we will take the necessary steps to rectify the problem at no cost to
yourself.
If the issue is deemed to NOT be covered by our warranty, then you will be contacted to
discuss further action.
A local E Bike specialist may be used to assess the issue further and repairs made if possible,
at your cost.
If the bike has failed due to a non-warranty issue, then the bike can be returned to you at your
cost.
We will hold the bike for 4 weeks from the date of return.
After this period, it is at our discretion to dispose of the bike.
…………………………………………………………………………………………………………………
………………………………………..
Please fill in the below, sign and return to us to accept the above conditions and to validate
your 12 months warranty.
Buyer name (print)………………………………………………….
Buyer signature……………………………………………………….. Date………………….
Please post back to: Depot2U, New House Farm, Shoothill, Shrewsbury, SY5 9NR or
Other DEPOT 2 U Scooter manuals


