Derbi ATLANTIS CITY 50 2T User manual

1
El logotipo DERBI es marca registrada y propiedad de DERBI - Nacional Motor, S.A. Sociedad Unipersonal.
Prohibida la reproducción total o parcial de cualquier fotografía, gráfico o texto insertado en este manual.
© 2004 DERBI - Nacional Motor, S.A. Sociedad Unipersonal.
Impreso por Gràfiques Morán, S.L. - Palamós (Girona) Depósito Legal: GI - 76 - 2004
CODIGO MANUAL 0.0G.051.6.512.6

2
DERBI - NACIONAL MOTOR, S.A.
Sociedad Unipersonal desea agradecer-
le la confianza depositada por Ud. en la
elección del modelo ATLANTIS.
En este manual se especifican los
principales detalles para el cuidado de
su scooter para que obtenga el mejor
funcionamiento y la mayor duración con
un mínimo coste. Cuide su scooer. La
calidad DERBI se encargarádel resto,
con los recambios originales y una red
Nacional de más de cuatro mil Agentes
y talleres autorizados, estamos seguros
de que obtendráplena satisfacción en el
uso del vehículo.
Ante qualquier problema, dirigirse al
representante más próximo.
Bienvenido a DERBI
DERBI / NACIONAL MOTOR, S.A.
Sociedad Unipersonal vous remercie de
votre choix et de votre confiance en
votre nouveau scooter ATLANTIS.
Dans ce manuel sont spécifiés les
principaux détails pour l’entretien de
votre scooter afin d’obtenir le meilleur
fonctionnement et une plus grande
durée de vie au coût minimum. Prenez
soin de votre scooter, le département
qualitéDERBI se chargera du reste,
avec les pièces de rechange originales
et un réseau national de plus de quatre
mille agents et garages autorisés, nous
sommes sûrs que vous obtiendrez la
pleine satisfaction dans l’utilisation de
votre véhicule.
En cas de problème, s’adresser au
représentant le plus proche.
Bienvenue chez DERBI
Debido a su criterio de constante mejora en sus
productos, DERBI - NACIONAL MOTOR, S.A.
Sociedad Unipersonal se reserva el derecho de
introducir las modificaciones que crea oportunas,
sin previo aviso.
Etant donnéle critère d’amélioration constante de
ses produits, DERBI / NACIONAL MOTOR, S.A.
Sociedad Unipersonal se réserve le droit
d’introduire les modifications qu’il jugerait
opportunes sans préavis.

3
DERBI - NACIONAL MOTOR, S.A.
Sociedad Unipersonal desidera
ringraziare la fiducia che Lei ha posto
nella scelta del nuovo scooter
ATLANTIS.
Nel presente manuale si specificano i
principali dettagli per la cura del suo
scooter, affinchépossa ottenere il
miglior funzionamento e la maggior
durata con una spesa minima. Curi il
suo scooter, la qualitàDERBI
s’incaricheràdel resto, con i ricambi
originali ed una rete Nazionale di piùdi
quattromila Agenti ed officine
autorizzate, siamo sicuri del fatto che
otterrápiena soddisfazione dall’uso del
veicolo.
Per qualsiasi problema, rivolgersi al
rappresentante piùvicino.
Benvenuto a DERBI
DERBI - NACIONAL MOTOR, S.A.
Sociedad Unipersonal offers you our
thanks for the confidence you place in
us in your purchase of your new model
ATLANTIS.
This manual will explain the principal
details of how to maintain this scooter
so you can get a longer duration with a
minimum cost and the best performan-
ce. Take care of your engine. DERBI’s
quality will take care of everything else,
we are sure that you will get complete
satisfaction with the use of this vehicle,
with the original spare parts and a Natio-
nal web of more than four thousand
agents and shops.
If you encounter any problem, refer to
the nearest distributor.
Welcome to DERBI
DERBI - NACIONAL MOTOR S.A.
Sociedad Unipersonal möchte Ihnen für
das Vertrauen, das Sie durch die Wahl
des neuen Mopeds ATLANTIS
entgegenbringen, herzlichst danken.
In dieser Gebrauchsanweisung finden Sie
Ausführungen zu den wichtigsten
Einzelheiten, die für die Pflege Ihres
Mokick von Bedeutung sind. Durch
Einhaltung derselben sind optimale
Funktionstüchtigkeit und lange
Lebensdauer bei geringstem
Kostenaufwand gewährleistet. Pflegen Sie
Ihren Mopeds; die Qualität von DERBI
kümmert sich um alles übrige. Mit den
Original-Ersatzteilen und einem nationalen
Service-Netz von über 1000 autorisierten
Werkstätten sind wir sicher, daßIhnen Ihr
Fahrzeug größte Freude bereiten wird.
Willkomen bei DERBI
A causa del suo criterio di miglioramento costante
dei propri prodotti, DERBI - NACIONAL MOTOR,
S.A. Sociedad Unipersonal mantiene il diritto di
introdurre le modifiche che consideri necessarie,
senza avviso previo.
Due to its criterion of constant improvement of its
products, DERBI - NACIONAL MOTOR, S.A.
Sociedad Unipersonal reserves the right to
introduce any modifications it considers suitable,
without prior notice.
Im Hinblick auf die ständige Verbesserung ihrer
Produkte behält sich DERBI - NACIONAL MOTOR,
S.A. Sociedad Unipersonal das Recht vor, ohne
vorherige Ankündigung die als zweckmäßig
erachteten Änderungen einzuführen.

4
❀Asípuede Vd. contribuir a
la conservación del medio
ambiente.
De su estilo de conducir depende
también el consumo de combustible
y, por lo tanto, el nivel de emisión
de contaminantes de su scooter.
Asimismo, la manera de tratar el
vehículo influye en el nivel de ruidos
y en el desgaste del mismo.
En este Manual de Instrucciones se
incluyen una serie de informaciones
sobre una conducción ecológica y al
mismo tiempo económica de su
scooter.
Sírvase tener en cuenta todos los
textos de este Manual marcados
con un ❀
Contamos con Vd.
¡Proteja el medio
ambiente !
Vous pouvez contribuer
àla conservation de
l’environnement.
De votre manière de conduire
dépend également la consommation
de combustible et, donc, du taux
d’émission d’agents contaminants
de votre scooter.
La manière de traiter votre véhicule
a des répercutions sur le niveau de
bruits et la vie de votre véhicule.
Ce Manuel d’Instructions donne une
série d’informations sur une condui-
te écologique et économique de
votre scooter.
Voyez tous les textes de ce Manuel
marqués d’une ❀
Nous avons confiance
en vous. Protégez
l’environnement!

5
CosìpuòLei contribuire
alla conservazione del
medio ambiente.
Dal suo modo di guidare dipende
pure il consumo di combustibile e,
quindi, il livello di emissione di con-
taminanti del suo scooter.
Inoltre, il modo in cui tratta il veicolo
influisce sul livello di rumore e nel
proprio logoramento.
In questo Manuale di Istruzioni si
allegano una serie di informazioni
sulla guida ecologica e contempora-
neamente economica del suo scoo-
ter.
Voglia tener presente tutti i testi di
questo Manuale contrassegnati con
un ❀
Contiamo su di Lei.
Protegga il
medio ambiente!
This is how you can con-
tribute to preserving the
environment.
The way you ride determines your
fuel consumption and therefore how
much your scooter pollutes the
atmosphere.
In the same way, the way you
treat your moped affects its noise
level and wear and tear on the vehi-
cle.
In the Owner’s instruction handbo-
ok you will find a series of points of
information on how to ride in an eco-
logically sound manner, which will
also be the most economic way to
ride your scooter
Please pay attention to all the
points marked with a flower ❀in
this handbook.
We are counting on you!
Protect the
environment!
So können Sie zum
Umweltschutz beitragen
Von Ihrem Fahrstil hängt unter
anderem der Benzinverbrauch und
daher auch die Schadstoffabgabe
Ihres scooter ab.
Auch hat die Art und Weise, wie
Sie das Fahrzeug behandeln, Ein-
flußauf seinen Geräuschpegel und
auf seine Abnutzung.
Diese Gebrauchsanweisung
enthält eine Reihe von Anweisun-
gen für einen ökologisch verantwor-
lichen und gleichzeitig wirtschaftli-
chen Fahrstil.
Bitte beachten Sie alle Abschnitte
dieser Gebrauchsanweisung, die mit
dem Symbol ❀versehen sind.
Wir rechnen auf Sie.
Schonen die
die Umwelt!

6

Datos personales:
Données Personelles:
Dati personali:
Personal details:
Persönliche Angaben:
Nombre / Nom / Nome: / Name / Name
...................................................................
Dirección / Adresse / Indirizzo
Address / Adresse
...................................................................
Teléfono / Téléphone / Telefono
Tel. / Telefon
...................................................................
Compañía de seguros
Compagnie d'Assurances
Compagnia assicuratrice
Insurance Company:
Versicherungsgesellschaft
...................................................................
Póliza de seguros N.º
Police d'assurance n.º
Polizza di assicurazione nº:
Insurance Policy Nº
Versicherungspolice Nr.
...................................................................
Representante DERBI más cercano
Représentant DERBI le plus proche:
Concessionario DERBI piùvicino:
Nearest DERBI Agent:
Nächste DERBI-Vertretung:
Nombre / Nom / Nome: / Name / Name
...................................................................
Dirección / Adresse / Indirizzo
Address / Adresse
...................................................................
Teléfono / Téléphone / Telefono
Tel. / Telefon
...................................................................
Jefe de Taller / Chef d'Atelier
Capo Officina Meccanica
Workshop Supervisor
Werkmeister
...................................................................
Teléfono / Téléphone / Telefono
Tel. / Telefon
...................................................................
Datos del Ciclomotor:
Données du cyclomoteur:
Dati del ciclomotore:
Details of your moped:
Angaben zum Mokick:
Designación de modelo
Désignation du modèle
Denominazione del modello
Model Name
Modellbezeichnung
...................................................................
Número de chasis
Numéro du châssis
Numero di telaio
Frame Number
Fahrgestellnummer
...................................................................
Número de motor
Numéro du moteur
Numero del motor
Engine Number
Motornummer
...................................................................
7

8
Modo de orientarse en este libro de
instrucciones:
El sumario estádividido en cinco
capítulos como indica la tabla de mate-
rias adyacente. Dichos capítulos se
localizan mediante los cuadros de color
negro.
En la primera página de cada capítu-
lo hay una introducción y un índice
detallado del capítulo.
Los títulos que encabezan cada
página sirven para localizar determina-
do texto, hojeando rápidamente el libro.
En el índice de la página 116 figura
la página en que se encuentra la infor-
mación que se precisa.
Debido a su criterio de constante mejora en sus
productos, DERBI - NACIONAL MOTOR, S.A.
Sociedad Unipersonal se reserva el derecho de
introducir las modificaciones que crea oportunas,
sin previo aviso.
Comment utiliser ce manuel d’ins-
tructions:
Le sommaire est diviséen cinq cha-
pitres comme indique la table des matiè-
res ci-jointe. Ces chapitres se localisent
au moyen des carrés noirs.
Sur la première page de chaque cha-
pitre il y a une introduction et un index
détaillédu chapitre.
Les titres de chaque page servent à
localiser un texte déterminé, en feuille-
tant rapidement le manuel.
L’index de la page 116 donne l’infor-
mation dont vous avez besoin et la page
oùelle se trouve.
Etant donnéle critère d’amélioration constante de
ses produits, DERBI / NACIONAL MOTOR, S.A.
Sociedad Unipersonal se réserve le droit
d’introduire les modifications qu’il jugerait
opportunes sans préavis.
Come orientarsi in questo libro di
istruzioni:
Il sommario èsuddiviso in cinque
capitoli come indica la tavola di materie
adiacente.
I sopraddetti capitoli si localizzano
mediante i quadri color nero.
Nella prima pagina di ogni capitolo
c’è una introduzione ed un indice detta-
gliato del capitolo.
I titoli che intestano ogni pagina ser-
vono per localizzare un testo determina-
to, sfogliando rapidamente il libretto.
Nell’indice di pagina 116 appare la
pagina dove c’è l’informazione di cui si
ha bisogno.
A causa del suo criterio di miglioramento costante
dei propri prodotti, DERBI - NACIONAL MOTOR,
S.A. Sociedad Unipersonal mantiene il diritto di
introdurre le modifiche che consideri necessarie,
senza avviso previo.
9
How to use this instruction manual:
The summary is divided into five
chapters, as indicated in the adjoining
table of contents. These chapters are
located by means of the black panels.
On the first page of each chapter
there is an introduction and a detailed
index of the chapter.
The titles heading each page serve
to locate a certain text by leafing quickly
through the book.
In the index on page 116 you will find
the page number of the information you
need.
Due to its criterion of constant improvement of its
products, DERBI - NACIONAL MOTOR, S.A.
Sociedad Unipersonal reserves the right to
introduce any modifications it considers suitable,
without prior notice.
Zur Benutzung des vorliegenden
Bedienungshandbuches:
Wie aus dem unten angeführten
Inhaltsverzeichnis hervorgeht, besteht
die Zusammenfassung aus fünf
Kapiteln. Das Auffinden der jeweiligen
Kapitel erfolgt mit Hilfe der schwarzen
Farbfelder.
Die erste Seite eines jeden Kapitels
enthält eine Einleitung und ein
ausführliches Inhaltsverzeichnis.
Die Überschriften auf jeder Seite
dienen dem Auffinden eines bestimmten
Textes, indem man das Buch schnell
durchblättert.
Dem Inhaltsverzeichnis auf Seite 116
ist die Seite mit der gewünschten
Information zu entnehmen.
Im Hinblick auf die ständige Verbesserung ihrer
Produkte behält sich DERBI - NACIONAL MOTOR,
S.A. Sociedad Unipersonal das Recht vor, ohne
vorherige Ankündigung die als zweckmäßig
erachteten Änderungen einzuführen.
Mandos
Commandes
Comandi
Controls
Bedienungselemente
Equipo y accesorios
Équipement et accessoires
Dotazione ed accessori
Equipment and Accessories
Ausstattung und Zubehör
Arranque, conducción y rodaje
Démarrage, conduite et rodage
Avviamento, guida e rodaggio
Starting, Riding and running-in
Anlassen, Fahren und Einfahren
Mantenimiento
Entretien
Manutenzione
Maintenance
Wartung
Especificaciones
Spécifications
Specificazioni
Specifications
Technische Daten
13
25
29
43
97

Número motor, bastidor - Llaves
Numero moteur, châssis - Clés
10
Emplazamiento del número de motor.
El número de motor estágrabado en la
parte trasera del cárter izquierdo
Emplazamiento del número del chasis.
El número del chasis estágrabado en
el tubo lateral derecho del chasis en su
parte trasera inferior a la altura del
travesaño.
Llaves
Con el scooter se entregan dos llaves
para la cerradura de contacto. Guarde la
llave de repuesto en un lugar seguro.
Atención
Para llamar la atención del lector sobre
puntos importantes se utilizan las siguien-
tes indicaciones: "observación", "precau-
ción" y "aviso"
O
BSERVACION
:
Las observaciones dan consejos comple-
mentarios o explican el texto
¡Precaución!
Con este encabezamiento se advierte que
las maniobras en cuestión pueden ocasio-
nar deterioros en el vehículo o desgaste
prematuro.
¡Aviso! 00
Los avisos advierten que la maniobra es
peligrosa y que podría causar lesiones.
Situation du numéro du moteur
Le numéro de moteur est inscrit sur la
partie arrière du carter gauche.
Situation du numéro du châssis
Le numéro du châssis est inscrit sur le
tube latéral droit du châssis sur sa partie
arrière inférieure àla hauteur de la
traverse du châssis.
Les clés
Deux clés de contact sont remises àla
livraison du scooter.
Attention!
L’attention du lecteur sur des points
importants sera sollicitée par les
indications suivantes: “observation”,
“précaution”et “avis”.
O
BSERVATION
:
Les observations fournissent des conseils
complémentaires ou expliquent le texte
Précaution!
C’est un avertissement indiquant que les
manoeuvres en question peuvent
endommager le véhicule ou provoquer
son usure prématurée.
Avis! 00
Avertissement qu’une manoeuvre est
dangereuse et qu’elle peut causer des
lésions.

Numero motore, telaio - Chiavi •Engine, chassis number - Keys
Motornumber, Fahrgestellnumber - Schlüssel
11
Localizzazione del numero del
motore.
Il numero del motore èinciso nella parte
posteriore del carter sinistro.
Localizzazione del numero del
telaio.
Il numero del telaio èinciso nel tubo late-
rale destro del telaio nella sua parte pos-
teriore inferiore, all’altezza della traversa.
Chiavi
Con lo scooter si consegnano due chiavi
per la serratura d’accensione.
Tenere la chiave di scorta in un luogo
sicuro.
Attenzione !
Per richiamare l'attenzione sui punti
importanti si usano i seguenti termini:
“osservazione”, “attenzione”e “avviso”.
O
SSERVAZIONE
:
Le osservazioni danno consigli comple-
mentari o spiegano il testo.
Attenzione!
Con questa intestazione si avverte che
le manovre in questione possono provo-
care danni nel veicolo o logoramento pre-
maturo.
Avviso! 00
Gli avvisi avvertono che la manovra è
pericolosa e che potrebbe produrre lesio-
ni.
Location of the engine number
The engine number is stamped on the
rear end of the left hand crankcase half.
Location of the frame number
The frame number is stamped on the
underneath at the rear of the front side
frame tube, at the level of the cross tube.
Keys
Two keys to fit the ignition lock are sup-
plied with the scooter. Keep the spare key
in a safe place.
Important Note
To draw the reader’s attention to impor-
tant points we use the following terms:
“Note”, “Caution”, and “Warning”
N
OTE
:
Notes give additional advice or further
explanation of the text
Caution!
This heading is to used to warn you that
carrying out the manoeuvres in question
may damage the vehicle or cause it to
deteriorate more quickly.
Warning! 00
Warnings are used to draw your atten-
tion to dangerous manoeuvres which may
cause you personal injury.
Motorkennzahl
Die Motorkennzahl befindet sich an der
Hinterseite der linken Gehäusehälfte.
Fahrgestellnummer
Die Fahrgestellnummer befindet sich
am rechten Seitenrohr des Fahrgestells
(hinten unten), auf der Höhe des
Querträgers.
Schlüssel
Mit dem Scooter werden zwei Schlüssel
übergeben für das Zündschloss.
Bewahren Sie den Ersatzschlüssel an
einer sicheren Stelle auf.
Achtung
Um den Leser auf wichtige Punkte
aufmerksam zu machen, werden die
folgenden Begriffe verwendet:
“Anmerkung”, “Vorsicht”und “Warnung”.
A
NMERKUNG
:
Die Anmerkungen geben zusätzliche
Hinweise oder erklären den Text.
Vorsicht!
Hierunter wird darauf aufmerksam
gemacht, daßdie betreffenden Handgriffe
oder Manöver Schäden am Fahrzeug
oder frühzeitigen Verschleißzur Folge
haben können.
Warnung! 00
Die Warnungen machen darauf
aufmerksam, daßdas betreffende
Manöver gefährlich ist und Verletzungen
verursachen kann.

12
Instrumentos y mandos •Instruments et commandes •Strumenti e comandi
Instruments and controls •Instrumente und Bedienungselemente
1.- Tablier
2.- Mando freno
delantero
3.- Mando de gas
4.- Pulsador arranque
5.- Cerradura contacto
6.- Mando freno trasero
7.- Conmutador
intermitentes
8.- Pulsador claxon
9.- Conmutador luces
10.- Mando aire
carburador
1.- Tableau de bord
2.- Commande de frein
avant
3.- Commande du gaz
4.- Bouton de
démarrage
5.- Serrure de contact
6.- Commande frein
arrière
7.- Commutateur des
clignotants
8.- Bouton poussoir du
Klaxon
9.- Interrupteur
lumières
10.- Commande
carburateur
1.- Cruscotto
2.- Comando freno
anteriore
3.- Comando
dell’acceleratore
4.- Pulsante
d’avviamento
5.- Serratura
d’accensione
6.- Comando freno
posteriore
7.- Commutatore
indicatori direzione
8.- Pulsante avvisatore
acustico
9.- Commutatore luci
10.- Comando aria
carburatore
1.- Instrument panel
2.- Front brake lever
3.- Throttle twist grip
4.- Electric starter
button
5.- Ignition lock
6.- Rear brake lever
7.- Turn indicator
switch
8.- Horn button
9.- Headlight dip switch
10.- Carburettor choke
lever
1.- Intrumententafel
2.- Bremshebel
Vorderbremse
3.- Gasregler
4.- Anlasserknopf
5.- Zündschloß
6.- Bremshebel
Hinterbremse
7.- Blinklichtschalter
8.- Hupe
9.- Scheinwerfer-
schalter
10.- Choke
6 9 1
7 8
10
45
3 2

13
Mandos
Commandes
Comandi
Controls
Bedienungselemente
Tablier
Tableau de bord
Cruscotto
Instrument panel
Instrumententafel
...................................14
Pulsador de arranque
Bouton de démarrage
Pulsante d’avviamento
Electric starter button
Anlasserknopf
.........................................16
Conmutador intermitentes
Commutateur clignotants
Commutatotre indicatori direzione
Turn indicator switch
Blinklichtschalter
....................................16
Pulsador claxon
Bouton poussoir Klaxon
Pulsante avvisatore acustico
Horn button
Hupe
........................................................16
Conmutador luces
Commutateur lumières
Commutatore luci
Headlight dip switch
Scheinwerferschalter
.............................16
Mando freno delantero
Commande frein avant
Comando freno anteriore
Front brake lever
Vorderbremshebel
.................................18
Mando freno trasero
Commande frein arrière
Comando freno posteriore
Rear brake lever
Hinterbremshebel
..................................18
Mando gas
Commande gaz
Comando dell’acceleratore
Throttle twist grip
Gasregler
................................................18
Cerradura de contacto
Serrure de contact
Serratura di accesione
Ignition lock
Zündschloß
.............................................20
Palanca de arranque
Levier de démarrage
Leva d’avviamento
Kick start pedal
Kick-Starterhebel
...................................22
Mando aire carburador
Commande air carburateur
Comando aria carburatore
Carburettor mixture control (choke)
Choke
......................................................22
Portabolsas
Porte-bagages
Portaborse
Bag carrier
Hängevorriehtung für Taschen
............24
Este capítulo contiene una
descripción detallada de todos
los instrumentos y mandos de
especial interés para el
usuario.
Ce chapitre contient une
description détaillée de tous
les instruments et des
commandes particulièrement
intéressantes pour l’utilisateur.
This chapter contains a
detailed description of all the
instruments and controls of
special interest for the user.
Questo capitolo contiene una
minuta descrizione di tutti gli
strumenti e comandi
d’interesse speciale per
l’utente.
Dieses Kapitel enthält eine
ausführliche Beschreibung
aller Instrumente und
Bedienungselemente, die für
den Anwender von Bedeutung
sind.
Indice del capítulo
Index du chapitre
Indice delcapitolo
Index of the chapter
Inhaltsverzeichnis des Kapitels
Tablier
Tableau de bord
14
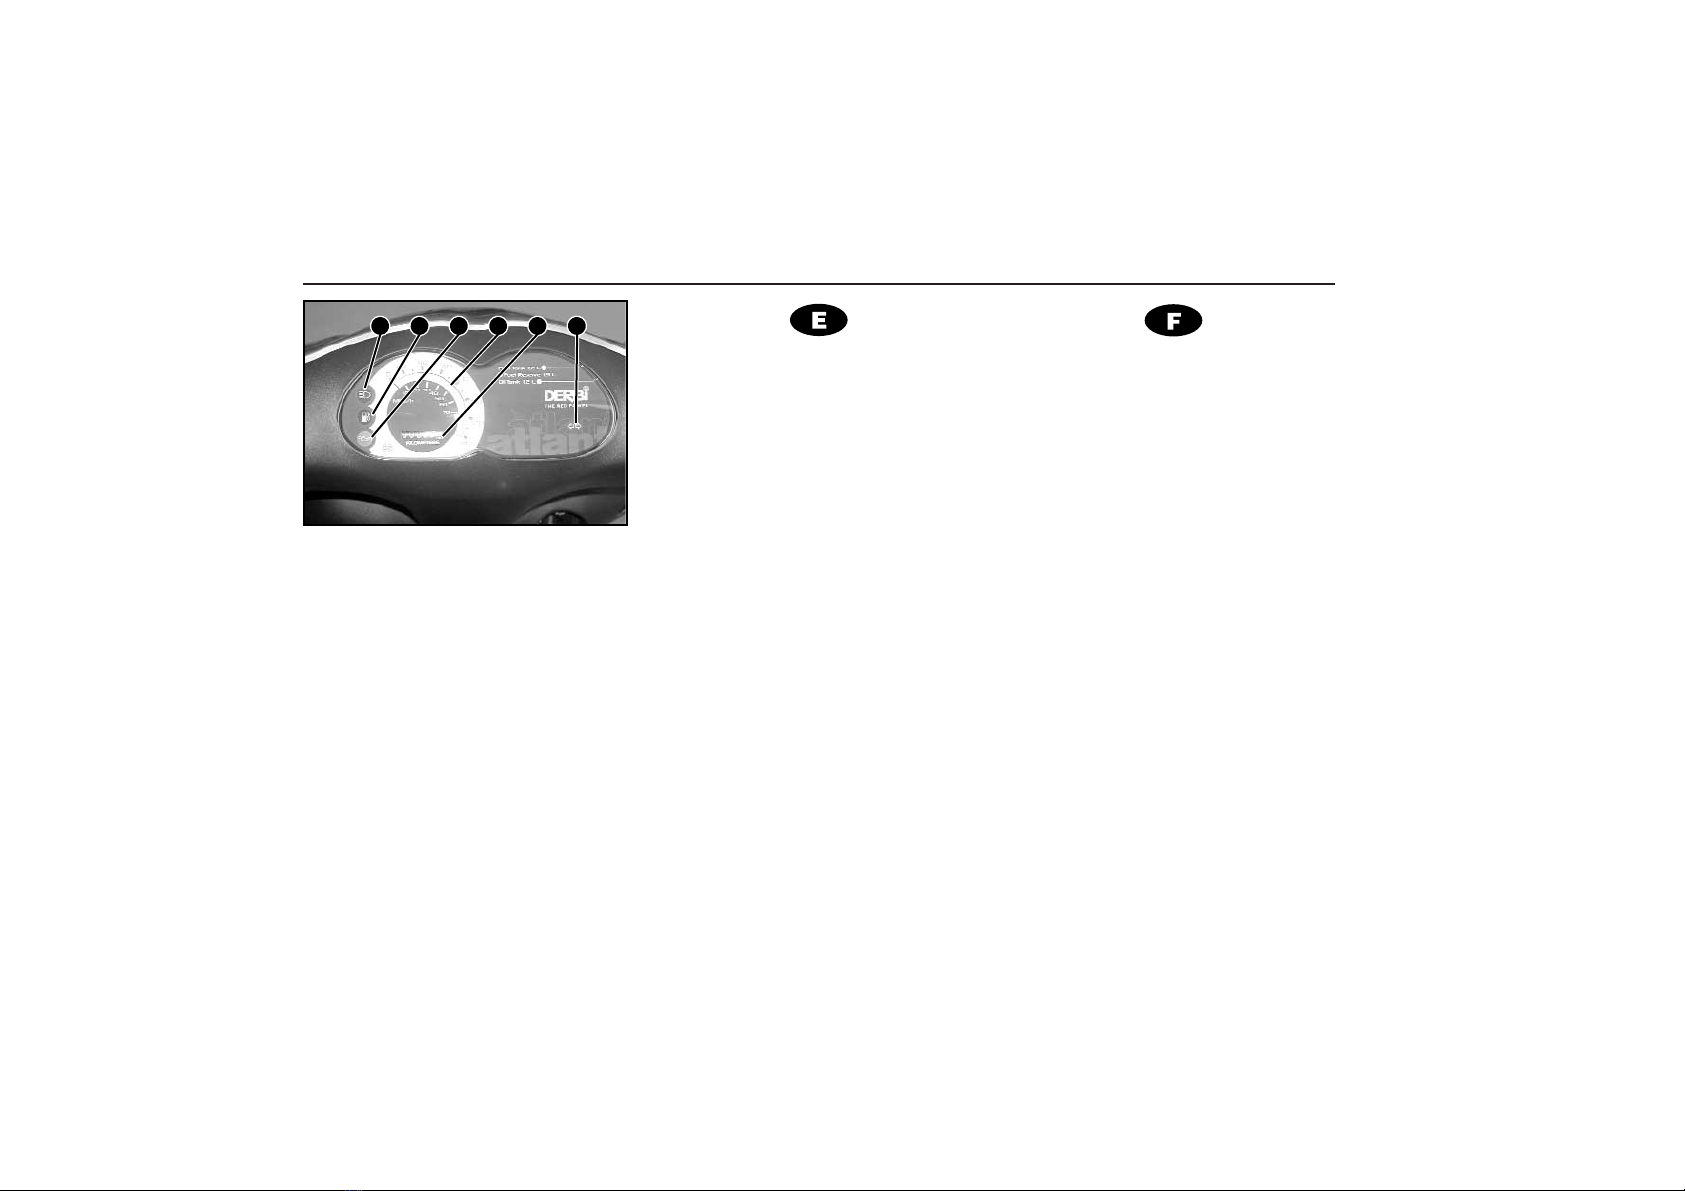
(1) Velocímetro. El velocímetro indica
la velocidad de marcha en kilóme-
tros por hora.
(2) Cuentakilómetros. Totalidad de
kilómetros recorridos. La cifra del
extremo derecho indica el número
de hectómetros.
)
3) Indicador de intermitentes.
-
(4) Indicador de luz intensiva.
&
(5) Indicador reserva gasolina.
Cuando se enciende la luz de
advertencia, la reserva de combustible
es de 1,9 litros.
'
(6) Indicador reserva de aceite.
Cuando se enciende la luz de adver-
tencia, la reserva de aceite es de 0,200
litros.
(1) Vélocimètre. Le vélocimètre
indique la vitesse en kilomètre
par heure.
(2) Compte-kilomètres. Totalise les
kilomètres parcourus. Le chiffre de
droite indique le nombre d’hec-
tomètres.
)
(3) Témoin clignotants.
-
(4) Témoin lumière de phare.
&
(5) Indicateur de réserve d’essence.
Lorsque la lumière s’allume, la réserve
d’essence est de 1,9 litres.
'
(6) Indicateur réserve d’huile. Lors-
que la lampe témoin s’allume, la réser-
ve d’huile est de 0,200 litres.
4 5 6 1 2 3

Cruscotto •Instrument Panel
Armaturenbrett
15
(1) Tachimetro. Il tachimetro indica la
velocitàdella moto in chilometri
all’ora.
(2) Contachilometri. Totalitàdi chilo-
metri percorsi. La cifra nell’estremo
destro indica il numero di ettometri.
)
(3) Spia indicatori direzione.
-
(4) Indicatore luce abbagliante.
&
(5) Spia riserva benzina. Qualora si
accende la luce di avvertenza, la
riserva di carburante corrisponde a
litri 1,9.
'
(6) Spia riserva olio. Qualora si accen-
de la luce di avvertenza, la riserva
d'olio corrisponde a litri 0,200.
(1) Speedometer
The speedometer indicates the
speed of the vehicle in kilometres
per hour
(2) Odometer
The total number of kilometres run.
The digit on the extreme right indi-
cates tenths of a kilometre.
)
(3) Direction indicator warning light
-
(4) High beam warning light
&
(5) Fuel reserve warning light
When the fuel reserve pilot light
comes on, there is a fuel reserve
remaining of 1.9 litres
'
(6) Oil reserve warning light
When the oil pilot light comes on,
there is a reserve of 0.200 litres
(1) Geschwindigkeitsmesser. Der
Geschwindigkeitsmesser gibt die
Fahrtgeschwindigkeit in
Stundenkilometern an.
(2) Kilometerzähler
Gesamtzahl der zurückgelegten
Kilometer. Die Stelle am rechten
Ende gibt die Hektometer an.
)
(3) Blinklichtanzeige
-
(4) Fernlichtanzeige
&
(5) Benzinreserveanzeige
Wenn das Warnlicht aufleuchtet,
beträgt die Reserve 1,9 Liter.
'
(6) Ölreserveanzeige
Wenn das Warnlicht aufleuchtet,
beträgt die Reserve 0,200 Liter.
Pulsador arranque. Conmutador intermitentes luces y pulsador claxon
Poussoir de démarrage. Commutateur clignotants lumières et poussoir klaxon
16
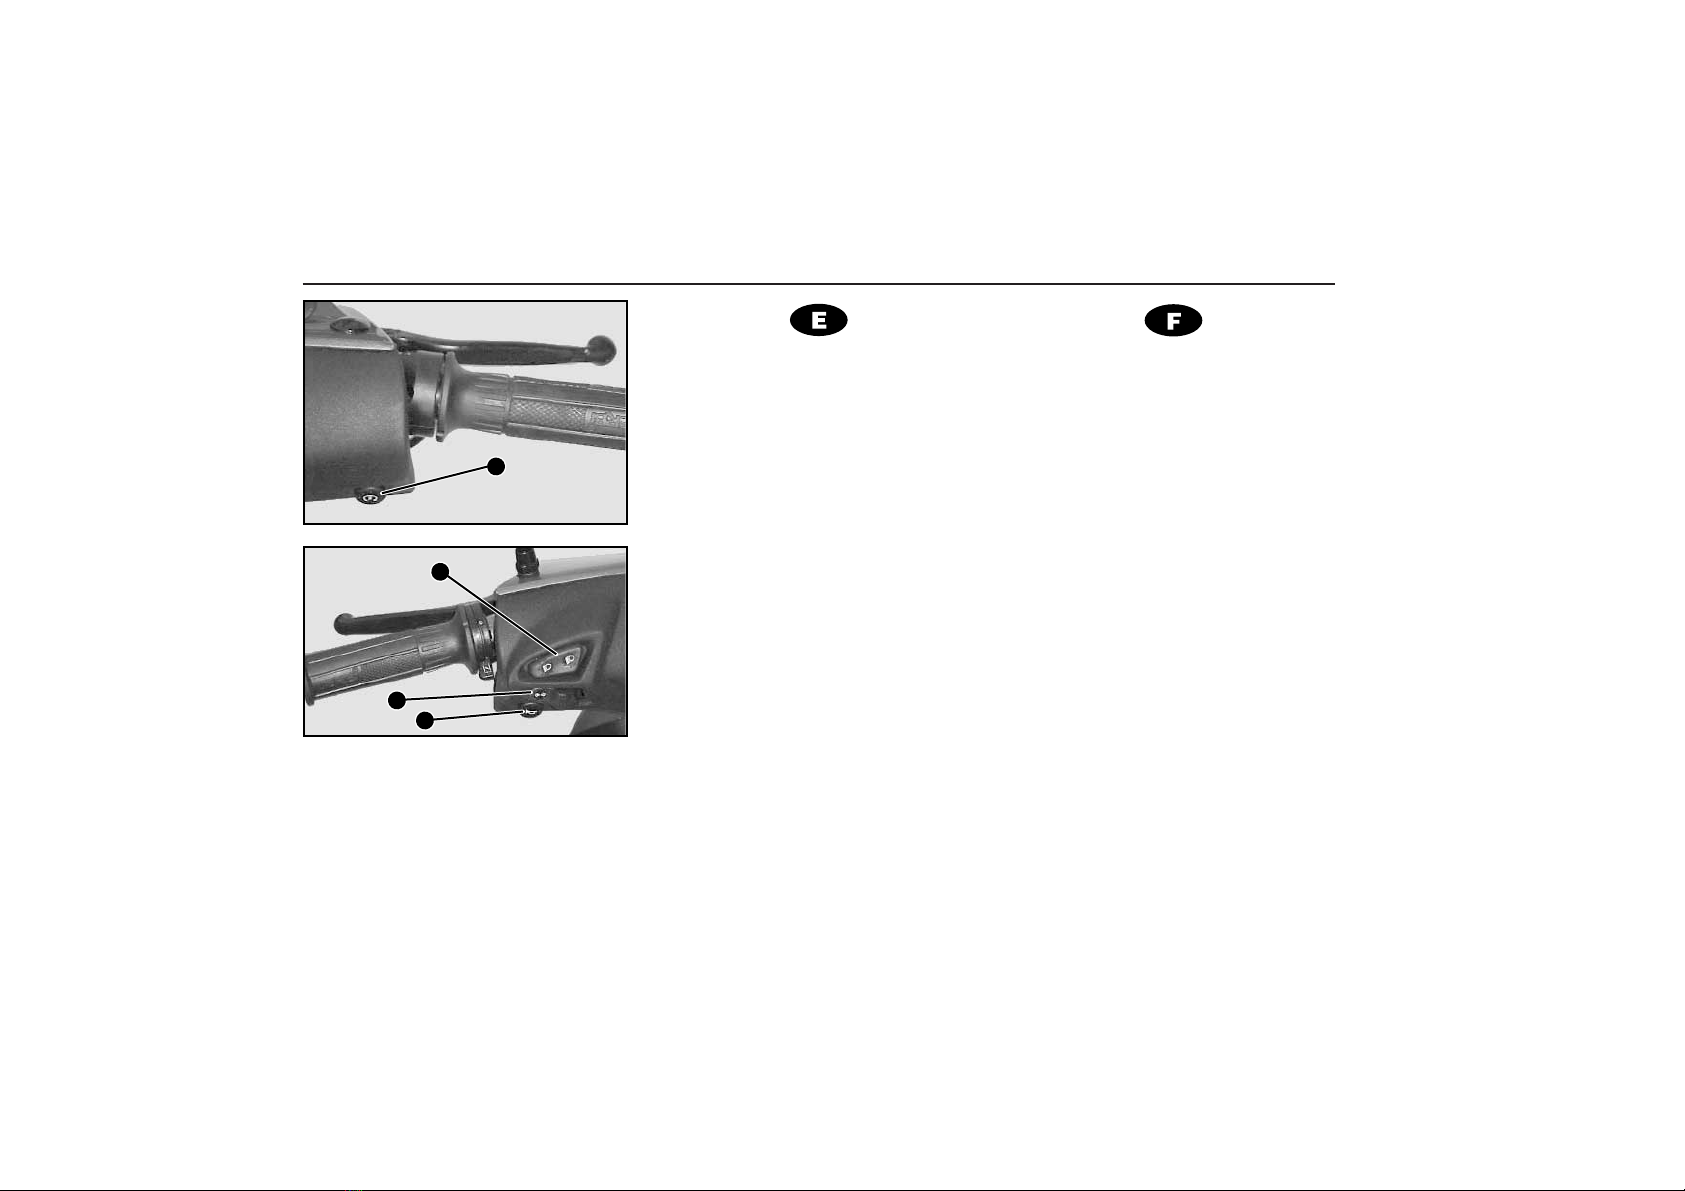
Pulsador arranque
Situado en el lado derecho del mani-
llar (2). Pulsarlo en forma continuada
hasta que el motor se ponga en mar-
cha. Ver las instrucciones de puesta en
marcha en el apartado de arranque,
página 30.
Pulsador claxon %
El pulsador claxon estásituado en el
lado izquierdo del manillar (1)
Conmutador intermitentes )
Situado en el lado izquierdo del
manillar (2)
Centro - Intermitentes apagados
Derecha - Intermitentes lado
derecho encendidos
Izquierda - Intermitentes lado
izquierdo encendidos
El mando intermitentes después de
ser accionado a la derecha o izquier-
da, automáticamente vuelve a su
posición inicial. Para apagar los
intermitentes, apretar el mando hacia
abajo.
Conmutador luces
Situado en el lado izquierdo del
manillar (3).
-- Luz intensiva.
. - Luz de cruce.
Poussoir de démarrage
Placéàdroite du guidon (2). Mainte-
nir appuyéjusqu’à ce que le moteur
démarre. Lire les instructions de déma-
rrage au paragraphe “démarrage”, page
30.
Bouton klaxon %
Le bouton poussoir klaxon est situé
du côtégauche du guidon (1).
Commande des clignotants )
Située du côtégauche du guidon (2)
Centre - clignotants éteints
Droite - clignotants côtédroit
allumés
Gauche - clignotants côtégauche
allumés
La commande des clignotants, après
avoir étéactionnée àdroite ou àgau-
che, revient automatiquement àsa posi-
tion initiale. Pour éteindre les cligno-
tants presser la commande vers le bas.
Commutateur lumières
Situédu côtégauche du guidon (3)
-- Phare route
. - Phare code
2
3
2
1
Pulsante d'avviamento. Commutatore indicatori direzione, luci e pulsante avvisatore acustico
Starter button. Indicator switch, dip switch, horn button •Anlasserknopf Scheinwerferschalter, Blinklichter und Hupe
17
Pulsante d'avviamento
Situato sul lato destro del manubrio (2).
Premerlo in modo continuo finchéil
motore si avvia. Vedi istruzioni
dell’avviamento nella sezione di accen-
sione, pagina 30.
Pulsante avvisatore acustico %
Il pulsante avvisatore acustico è
situato sul lato sinistro del manubrio (1).
Commutatore indicatori
direzione )
Situato sul lato sinistro del manubrio
(2).
Centro - Indicatori direzione spenti
Destra - Indicatori lato destro accesi
Sinistra - Indicatori lato sinistro accesi
Il comando indicatori direzione, dopo
essersi azionato a destra o a sinistra,
ritorna alla sua posizione di partenza.
Per spegnere gli indicatori di direzione,
premere il pulsante in giù.
Commutatore luci
Situato sul lato sinistro del manubrio (3)
-- luce abbagliante
.- luce anabbagliante
Starter button
Located on the right hand side of the
handlebar (2). Press the button without
releasing until the engine starts. See
the starting instructions in the section
on Starting, on page 30.
Horn Button %
The horn button is located on the left
hand side of the handlebar (1).
Indicator switch )
Located on the left hand side of the
handlebar (2)
Centre - indicators off
Right - indicators flashing on the
right hand side
Left - indicators flashing on the
left hand side
The indicator switch returns automati-
cally to the centre position after being
moved either to the left or to the right.
To turn the indicators off, push the indi-
cator switch downwards.
Dip Switch
Located on the left hand side of the
handlebar (3).
-- High beam
.. Dipped beam
Anlasserknopf
An der rechten Seite des Lenkers (2).
Den Knopf gedrückt halten, bis sich der
Motor in Gang setzt. Siehe auch die
Anweisungen zum Starten im Kapitel
‘Starten und Fahren’, S. 30.
Hupknopf %
Der Hupknopf befindet sich am linken
Lenkerende (1)
Blinklichtschalter )
Am linken Lenkerende (2)
Mitte - Blinklichter aus
Rechts - Blinklichter rechts ein
Links - Blinklichter links ein
Nachdem der Blinklichtschalter nach
rechts oder nach links betätigt worden
ist, kehrt er automatisch in seine
Ausgangsstellung zurück. Um die
Blinklichter auszuschalten, den Knopf
nach unten drücken.
Scheinwerferschalter
Am linken Lenkerende (3)
- - Oben, Fernlicht
.- Unten, Abblendlicht

Mando freno delantero, trasero y gas
Commande freins avant, arrière et gaz
18
Mando freno delantero
Situado en el lado derecho del mani-
llar (1). Poner especial atención en su
uso procurando siempre evitar el blo-
queo de la rueda.
Mando freno trasero
Situado en el lado izquierdo del mani-
llar (3). Debe usarse preferentemente
cuando se desee reducir o detener
totalmente la velocidad del vehículo.
Combinar la utilización del freno tra-
sero con el delantero según necesida-
des, de esta forma obtendrán frenadas
más eficaces.
Mando de gas
Situado en el lado derecho del mani-
llar (2). Con la rotación hacia adentro
de la empuñadura se obtiene la apertu-
ra de la válvula del carburador.
Commande frein avant
Située du côtédroit du guidon (1). Ne
pas utiliser brusquement pour éviter le
blocage de la roue.
Commande du gaz
Située du côtédroit du guidon (2). En
tournant la poignée vers l’intérieur on
obtient l’ouverture du clapet du carbura-
teur.
Commande frein arrière
Situédu côtégauche du guidon (3).
Utiliser de préférence lorsqu’on veut
réduire ou arrêter totalement la vitesse
du véhicule.
Combiner l’utilisation du frein arrière
et avant selon les besoins pour aug-
menter l’efficacitédu freinage.
1
2
3

Comando freno anteriore, posteriore ed acceleratore •Front brake lever, rear brake lever, and throttle twist grip
Vorderbremshebel, Hinterbremshebel und Gasregler
19
Comando freno anteriore
Situato sul lato destro del manubrio
(1). Avere speciale cura nell’uso e cer-
care di evitare sempre il bloccaggio
della ruota.
Comando dell’acceleratore
Situato sul lato destro del manubrio
(2). Quando si gira verso l’interno la
manopola si provoca l’apertura della
valvola del carburatore.
Comando freno posteriore
Situato sul lato sinistro del manubrio
(3). Deve usarsi preferibilmente quando
si desideri ridurre o fermare completa-
mente la velocitàdel veicolo.
Bisogna combinare l’uso del freno
posteriore con quello anteriore, a
seconda delle necessità: in questo
modo si otterranno delle frenate piùeffi-
caci.
Front brake lever
Located on the right hand side of the
handlebar (1). Be particularly careful to
avoid locking the wheel when operating
the brake lever.
Rear brake lever
Located on the left hand side of the
handlebar (3). It should be used for pre-
ference when reducing the speed of the
scooter or when coming to a complete
stop.
Combine the use of the front and rear
brakes as conditions demand, and in
this way you will obtain a more efficient
braking action.
Throttle twist grip
Located on the right hand side of the
handlebar (2). By rotating the twist grip
towards you the carburettor valve is
opened.
Vorderbremshebel
An der rechten Seite des Lenkers (1).
Vorsicht beim Bremsen mit der
Vorderbremse. Vermeiden Sie stets ein
Blockieren des Rades.
Gasregler
An der rechten Seite des Lenkers (2).
Durch Drehen des Griffs nach innen
öffnet sich der Gasschieber.
Hinterbremshebel
An der linken Seite des Lenkers (3).
Geben Sie dieser Bremse den Vorzug,
wenn Sie das Fahrzeug abbremsen
oder ganz zum Stehen bringen wollen.
Kombinieren Sie die Wirkung der
Hinterbremse mit der der Vorderbremse
je nach den Erfordernissen. Sie erzielen
so eine bessere Bremswirkung.

Cerradura de contacto
Serrure de contact
20
Cerradura de contacto
Posición de la llave
En esta posición, el circuito de
encendido se cierra y es posible
arrancar el motor. La llave no
podráextraerse de la cerradura
de contacto en esta posición.
#Motor parado y sin blocaje.
$(bloqueo)
Para bloquear la dirección, gire
el manillar completamente hacia
la izquierda. Presione hacia
abajo la llave y después gírela
hasta la posición $ y extráigala.
Para desbloquear, presione la
llave hacia abajo y gírela hacia
la derecha.
OBSERVACION:
Antes de girar la llave hasta la posi-
ción $ (bloqueo), ponga el scooter enci-
ma del caballete. No intente nunca
mover el scooter cuando la dirección
estébloqueada, ya que podría perder el
equilibrio.
Serrure de contact
Position de la clé:
Sur cette position, le circuit
d’allumage se ferme et le
moteur peut démarrer. La cléne
pourra pas être enlevée de la
serrure de contact sur cette
position.
#Moteur arrêtéet débloqué
$(blocage)
Pour bloquer la direction, faire
tourner tout àfait le guidon vers
la gauche. Pressez la clévers le
bas et ensuite faites-la tourner
jusqu’à la position $ et ôtez-la
ensuite.
Pour la débloquer pressez la clé
vers le bas et faites-la tourner
vers la droite.
OBSERVATION
Avant de faire tourner la cléjusqu’à la
position $(blocage), placer la scooter
sur son chevalet. Ne jamais tenter de
faire bouger la scooter si la direction est
bloquée car il pourrait perdre l’équilibre.
This manual suits for next models
1
Table of contents
Other Derbi Scooter manuals

Derbi
Derbi Variant Sport User manual

Derbi
Derbi Variant Sport User manual

Derbi
Derbi GP1 2004 User manual

Derbi
Derbi BOULEVARD 125 User manual

Derbi
Derbi Rambla 250 User manual

Derbi
Derbi GP1 125 E3 User manual

Derbi
Derbi ATLANTIS 50 2004 User manual

Derbi
Derbi GP1 OPEN User manual

Derbi
Derbi GP1 125-250 c.c. Instruction manual

Derbi
Derbi BOULEVARD 50 2T Instruction manual


