Derby cycle Pedelec Groove 2.0 User manual

Original User Manual | Version 1 | 01.07.2014
Pedelec Groove 2.0
English
Item no. 1973K0015013

Inhalt
Introduction 3
1 Safety 4
1.1 General 4
1.2 Statutory requirements 4
1.2.1 Requirements for the rider 4
1.3 Battery 5
1.4 Charger 6
1.5 Motor 7
1.6 Adjustments/maintenance/repair 7
1.7 Transportation of the Pedelec 7
1.7.1 The Pedelec and your car 7
1.7.2 The Pedelec on trains 7
1.7.3 The Pedelec on aeroplanes 8
1.8 Cleaning 8
1.8.1 Battery 8
1.8.2 Motor 8
1.8.3 Display 8
1.8.4 Control unit 8
1.8.5 Charger 9
1.9 Riding with luggage 9
1.9.1 Panniers 9
1.9.2 Trailers 9
2 Warranty regulations 10
2.1 Warranty periods 10
2.2 Warranty conditions 10
2.2.1 Conditions 10
2.2.2 Exclusions 10
2.2.3 Wear parts 10
2.2.4 Intended use 10
3 Components of the Pedelec 11
4 First steps 12
4.1 Checking the tightening torques 12
4.2 Fitting the pedals 12
4.3 Adjusting the saddle height 12
4.3.1 Clamping bolt 12
4.3.2 Quick-release device 12
5 Quick start 13
6 Battery 14
6.1 Charging the battery 14
6.1.1 Removing the battery 14
6.1.2 Charging the battery 15
6.1.3 Installing the battery 16
6.2 Battery information system 16
6.2.1 Checking the charge state 16
6.3 Battery management 16
6.4 Warranty and service life 16
6.5 Storage 17
6.6 Shipping 17
6.7 Disposal 17
7 Charger 18
8 Display and control unit 18
8.1 Switching on and o 19
8.1.1 Switching on 19
8.1.2 Switching o 19
8.2 Assist mode 19
8.3 Pushing assistance 19
8.4 VEL (speed),
ODO (total kilometres)
and DST (trip distance) 20
8.4.1 Resetting the trip distance (DST) 20
8.5 Adjusting the back-lighting 20
8.6 Battery charge indicator 20
9 The motor 20
9.1 Operation 20
9.2 Range 21
9.3 Riding your Pedelec eciently 21
10 Troubleshooting 22
10.1 Code indication on the display 22
11 Removing and tting the ont wheel 23
12 Technical data 23
Original User Manual | Groove 2.0 3
Introduction
Thank you for choosing the Pedelec Groove 2.0. This Pe-
delec is equipped with an innovative electric drive that
assists you when you are cycling. This will make your trip
much more enjoyable if you are riding up hills, carrying
loads or riding into the wind.
The purpose of this User Manual is to help you get the
most out of your Pedelec Groove 2.0 and use it correctly.
Structure of the User Manual
You will nd information on how to use your Pedelec in
Chapter 1 „Safety“Safety”.
You will nd a brief introduction in
Chapter 5 „Quick
start““Quick start”.
The most important components of your Pedelec are de-
scribed in detail in the following chapters.
You will nd the technical data for your Pedelec Groove
2.0 in
Chapter 12 „Technical data“.
The information in this User Manual specically refers to
your Pedelec Groove 2.0. For general information, on the
bike technology, for example, refer to the “Original User
Manual | General” (CD).
CD with important information
On the enclosed CD, you will nd versions of the “Original
User Manual | Pedelec Groove 2.0” in various languages. In
addition, the CD also contains the “Original User Manual |
General” with general information on bike technology.
You can download the latest version of the User Manual
om the Internet. Manuals for the individual bike compo-
nents are also found there.
You can run the CD using any commercially available PC or
laptop. Proceed as follows:
METHOD A:
1. Insert the CD.
2. Double-click on the le shelexec.exe using the le
mouse button.
3. Select the desired language.
4. Select “Open User Manual om CD” or “Check for new
version of User Manual online”.
METHOD B:
1. Insert the CD.
2. Using the mouse, right-click once on: “Open folder to
display les.”
3. Double-click on “Start” using the le mouse button.
4. Select the desired language.
5. Select “Open User Manual om CD” or “Check for new
version of User Manual online”.
Printable version of the "Original User Manual | General"
To call up the les, you need the Adobe Reader program. It
has been included on the CD or can be downloaded ee of
charge om www.adobe.com.
If you would like a printed copy of the “Original User Man-
ual | General”, you can have it sent to you ee of charge by
requesting it om the following address:
Derby Cycle GmbH / Raleigh Univega GmbH
Siemensstrasse 1–3
49661 Cloppenburg, Germany
+ 49 (4471) 966-0
Even if you can't wait to go for a ride, you should
read through the “Original User Manual | Pedelec
Groove 2.0” and the “Original User Manual | Gen-
eral” (CD) carelly before using your Pedelec for
the rst time.
The manufacturer accepts no liability for damage
resulting om the failure to adhere to this manual.
Use your Pedelec only as intended. Otherwise,
there is a risk of technical failure, which can lead
to unforeseeable accidents! Improper use may
void the warranty and guarantee.
Pass on the manual to anyone who uses, maintains
or repairs this Pedelec.

4 Original User Manual | Groove 2.0
1 Safety
Read all the safety information. Failure to observe the
instructions can cause electric shock, re and/or serious
injury. The User Manual contains the following symbols
that denote dangers or important information.
WARNING
regarding possible physical injury, increased
risk of falls or other injuries.
IMPORTANT ADDITIONAL INFORMATION
or special information on using the Pedelec.
NOTE
regarding possible damage to property or the
environment.
1.1 General
If you have reason to suspect a safety problem
with your Pedelec, do not ride it, and make sure
nobody else can use it until you have it checked by
a specialist cycle shop. Safe use is not possible if
electrical components or the battery show signs of
damage.
Never ride with no hands! This poses an acute risk
of falling.
Take the battery out before beginning work on the
Pedelec.
Observe the maximum permitted gross weight
of your Pedelec, as this could otherwise lead to
breakage or failure of safety-relevant components
Chapter 12 „Technical data“.
If you wish to make any adjustments to the ride
characteristics of your Pedelec, please consult
your specialist cycle shop.
1.2 Statutory requirements
The Pedelec, like all other bikes, must comply with
the national regulations for road safety. Please
observe the relevant explanations and general
information provided in the “Original User Manual
| General” (CD).
These statutory requirements apply for a Pedelec:
•The motor is designed only to provide pedal-
ling assistance, i.e. it can only “assist” the rider
when he/she turns the pedals.
•The average motor output must not exceed
250 W.
•As the speed increases, the rate at which the
motor output reduces must also increase more
intensely.
•The motor must switch o once the bike reaches
a speed of 25 km/h.
1.2.1 Requirements for the rider
•You do not legally have to wear a helmet. Howev-
er, in the interest of your own safety, you should
never ride without a suitable helmet.
•You do not legally have to have a driving licence.
•You do not legally have to have insurance.
•No age restriction applies for a Pedelec.
•The regulations governing the use of cycle paths
are the same as for normal bikes.
These regulations apply to you wherever you are
in the European Union. It is possible that dierent
regulations exist in other countries, also inside
Original User Manual | Groove 2.0 5
the EU in individual cases. Before using your Pe-
delec abroad, nd out about the applicable legis-
lation in the relevant country.
1.3 Battery
The battery contains chemical substances, which
could cause dangerous reactions if the safety in-
formation given here is not adhered to.
Avoid contact with liquid leaking om a damaged
battery. In case of contact, rinse o the liquid with
water. In case of eye contact, consult a doctor
aer rinsing.
Never attempt to repair your battery. Batteries
must not be dismantled, opened or crushed. The
improper opening or damaging of the battery
poses the risk of serious injury. Opening the bat-
tery voids the warranty claim. If your battery is
damaged, contact your specialist cycle shop for
advice.
Batteries must not be exposed to heat (e.g. radia-
tor) or naked ames. External heat can cause the
battery to explode. In addition, high temperatures
shorten battery life. When charging, always ensure
there is adequate ventilation.
A battery must not be short-circuited. It is danger-
ous to store batteries in a box or drawer where
they can short-circuit one another or can be short-
circuited by other conductive materials (paper
clips, coins, keys, nails, screws). A short circuit
between the battery contacts can cause burns or
re. Short-circuit damage caused in this way voids
all guarantee claims.
Batteries must not be exposed to mechanical
shocks. Even if a battery shows no visible signs
of damage aer falling or being knocked, it may
be damaged. For this reason, even batteries that
seem ne must be taken to a specialist dealer for
inspection. Damaged batteries must neither be
charged nor used for another application.
Keep the battery away om children.
Use the battery solely for your Pedelec.
Ideally, take the battery out of your Pedelec when
not in use. There is a risk of injury through acci-
dentally operating the battery switch.
Batteries not designed for the Pedelec must not
be used. The Pedelec operates using low voltage
(36volts). Never attempt to operate the Pedelec
using power om a source other than a genuine
Pedelec battery. The designations of approved
batteries are listed in
Chapter 12 „Technical
data“.
Never transport damaged batteries. The safety of
damaged batteries cannot be guaranteed.
Lithium reacts very strongly upon direct contact
with water. Never put the battery into water. Cau-
tion is therefore also required in the case of dam-
aged batteries which have become wet, as they
may catch re.
In case of re, water can be used to extinguish any
ames in the vicinity, but never the battery itself.
Powder re extinguishers for metal res (Class D)
are better suited to this task. If the battery can be
safely moved outdoors, the re can also be suo-
cated using sand.

6 Original User Manual | Groove 2.0
1.4 Charger
Children must be supervised. This will ensure that
children do not play with the charger.
Children and people who, as a result of their
physical, sensory or mental capacities, or their
lack of experience or knowledge, are not capable
of using the charger safely, must not make use of
this charger without the supervision or instruction
of a responsible person. Otherwise there is a risk
of incorrect use and of injury.
Only charge batteries that are approved for your
Pedelec. The battery voltage must match the
charger's battery charging voltage. Otherwise
there is a risk of re or explosion.
The charger may only be used to charge the bat-
tery supplied. Use of the charger for other pur-
poses is not permitted. Any kind of manipulation
of the charger is forbidden.
The mains voltage must correspond to the voltage
given on the type plate of the charger. The supply
voltage of the charger is given on the type plate on
the back of the device.
The charger is only intended for use indoors. The
battery may only be charged in a dry, non-am-
mable environment. During the charging process,
the battery and charger must be placed on a at,
non-ammable surface. Battery and charger must
not be covered. There must be no highly combus-
tible materials in the immediate vicinity. This also
applies when charging the battery on the Pedelec.
In this case, you must place the Pedelec so as to
prevent any re om spreading quickly (exercise
caution with carpeted oors!).
Only use indoors. Keep the charger away om rain
or water. If water gets into a charger, there is a
risk of electric shock. If water has nevertheless
got into the charger, disconnect it om the mains
immediately, and have it checked by a qualied
workshop.
The battery may heat up during charging. A maxi-
mum temperature of 45°C may be reached. If the
battery becomes any hotter than this, stop the
charging process immediately. Such a battery may
no longer be used, and you must have it inspected
by the dealer.
A battery that displays a fault must not be charged
any more.
The battery must not be le unattended while
charging.
Damaged batteries must not be charged (risk of
explosion!).
Do not attempt to modi or take apart the charger.
Have repairs carried out only by specialists.
A charger with a damaged mains plug or mains ca-
ble must not be connected to the mains and must
be replaced by a specialist. The same applies for
extension cables that are not in perfect condition.
Do not charge batteries for an extended period if
they will not be used.
If you detect smoke or an unusual smell, immedi-
ately unplug charger at the wall socket and discon-
nect the battery om the charger.
No chargers other than those specically intended
for use with the battery may be used. The use of a
dierent charger may cause malnctions, short-
ened service life, re or explosion.
Do not use damaged batteries or chargers (plug,
housing, cable).
Do not replace the mains cable. This poses the risk
of re and explosion.
Keep the charger clean. Dirt poses the danger of
electric shock.

Original User Manual | Groove 2.0 7
1.6 Adjustments/maintenance/repair
Take the battery out before beginning work (e.g.
assembly, servicing, etc.) on the Pedelec. There is
a risk of injury through accidentally operating the
battery switch.
When carrying out adjustments and maintenance
or when cleaning, avoid crushing cables or damag-
ing them with sharp edges.
Please have all installation and adjustment work
carried out by your specialist cycle shop. In case
you have to fasten something in place or change
something yourself, you will nd an exhaustive list
at the end of the “Original User Manual | General”
(CD) detailing the tightening torques which must
always be adhered to.
When replacing the handlebar, ensure that the
weights are also changed.
1.7 Transportation of the Pedelec
Remove the battery before transporting the Pe-
delec. There is a risk of injury through accidentally
operating the battery switch. A suitable storage
container can be obtained om your specialist
cycle shop.
1.7.1 The Pedelec and your car
If you transport your Pedelec on a bike rack, ensure that it
is designed for the higher weight of a Pedelec. To reduce
the load on the rack, and for protection against the weath-
er, the battery must be transported inside the car.
1.7.2 The Pedelec on trains
In Germany, you can take your Pedelec with you on trains
which are marked with the bike symbol. On German Inter-
city (IC) and EuroCity (EC) trains, you must book a place
Condensation may form on the charger if the
temperature changes suddenly om cold to hot.
In case of condensation, wait approximately one
hour before connecting the charger to the mains,
until it has warmed up to the temperature of the
room. Ideally, avoid such situations by storing the
charger in the place where it is operated.
Only charge the battery at ambient temperatures
of between 0°C and +45°C. You can maximise a
battery's service life, however, by charging it at
an ambient temperature of between +10°C and
+30°C.
1.5 Motor
If children are present, keep a close eye on them,
especially if there is a possibility they could insert
objects into the motor through apertures in the
housing. This poses the danger of fatal electric
shock.
Bear in mind that the motor can heat up on long
ascents. Be carel not to touch it with your hands,
feet or legs. You could burn yourself.
Live parts may be exposed when you open covers
or remove parts. Connection points may also be
live. Maintenance or repairs on the motor when it
is open must only be carried out by a professional
bike workshop.

8 Original User Manual | Groove 2.0
for your bike in advance. As a rule, you may not take bikes
with you on German Intercity Express (ICE) trains.
1.7.3 The Pedelec on aeroplanes
Your Pedelec is generally subject to the policies of the
respective airline concerning bikes. Batteries are subject
to dangerous goods legislation. Therefore, they must not
be carried on passenger planes – neither in the cargo
hold, nor the cabin. Please contact the relevant airline for
detailed information.
1.8 Cleaning
Remove the battery before you clean your Pedelec.
Do not use benzine, thinner, acetone or similar
agents in the cleaning procedures under any cir-
cumstances. Non-neutral cleaning agents can strip
the paint and cause discolouration, deformation,
scratches or defects. Also avoid using abrasive or
harsh cleaners.
Only use household cleaners and disinfectants
(isopropyl alcohol) or water. You can obtain suit-
able cleaning products and additional information
om your specialist cycle shop. We recommend
you clean your Pedelec with a damp cloth, a
sponge or a brush.
1.8.1 Battery
Make sure that water does not enter the battery
when cleaning. Although the electrical compo-
nents are sealed, it is not advisable to clean your
bike with a hose or high-pressure cleaner, as it
could cause damage. When wiping down the bat-
tery, be carel not to touch and connect the con-
tacts on the underside. This could cause a short
circuit and the battery to switch o. If the battery
connections are dirty, clean them with a clean, dry
cloth.
1.8.2 Motor
Dirt should be removed om the motor of your Pedelec
regularly, ideally using a dry brush or a damp (not wet)
cloth. Do not use running water such as a hose pipe or
even a high-pressure cleaner.
The ingress of water can damage the motor, so ensure that
no uids or moisture enter the motor at any time during
cleaning.
Do not clean the motor when it is warm, e.g. immediately
aer a trip. Wait until it has cooled down. Otherwise, the
motor may be damaged.
If you remove the motor, e.g. for cleaning purposes, never
hold or carry it by the cables, as there is a risk that they
will break.
If you remove the motor om the ame of your Pedelec,
check the plug om the motor and battery cable socket for
dirt. If necessary, clean carelly with a dry cloth before
reconnecting.
1.8.3 Display
The housing of the display must only be cleaned with a
clean, damp (not wet) cloth.
1.8.4 Control unit
The control unit can be cleaned with a clean, damp (not
wet) cloth if necessary.

Original User Manual | Groove 2.0 9
1.8.5 Charger
Always unplug the charger om the wall socket
before cleaning to avoid a short-circuit and physi-
cal injury.
Make sure that water does not enter the charger when
cleaning.
1.9 Riding with luggage
Child seats must not be used with the Pedelec
Groove 2.0.
The carrier is only approved for a maximum of 15 kg!
1.9.1 Panniers
We recommend that you do not transport luggage
on the carrier, but in panniers at the side. Distrib-
ute the luggage evenly between the two panniers.
Put heavier items at the bottom, and lighter ones
at the top. This will make your ride safer.
1.9.2 Trailers
You may use a trailer with your Pedelec Groove 2.0.
Only use trailers that meet the requirements of the
road trac licensing regulations in your country
(the Road Trac Licensing Regulations (StVZO) in
Germany for example). Non-approved trailers can
cause accidents.
Trailers adversely aect the handling. Adapt your
handling accordingly. Otherwise the bike trailer
may tip up or detach and cause an accident.
Practise starting o, braking, cornering and riding
on hills with an unladen trailer.
Bear in mind that the gross weight of the bike also
includes the trailer.
A bike trailer may increase the braking distance
considerably. Failure to observe these points
could result in an accident.

10 Original User Manual | Groove 2.0
2.2.3 Wear parts
The following are considered wear parts under the statu-
tory warranty:
•Battery
•Tyres
•Brake linings
•Rims in connection with rim brakes
•Sliding bearings / bearings
•Hydraulic oils / lubricants
•Chains and toothed belts
•Chain wheels, sprockets, bottom brackets and
jockey wheels
•Paint nishes
•Handlebar tape / handle grips
•Lamps in the lighting equipment
•Motor
•Gear-shi / brake cables
The Groove 2.0 ont wheel motor subjects the
wear parts to greater stress than occurs on a bike
with no drive.
2.2.4 Intended use
Due to their design and components, Pedelecs are in-
tended for use on public roads and paved paths. They can
also be used on gentle o-road terrain such as country
lanes. Neither the manufacturer nor the dealer is liable for
any use above or beyond this or for a failure to observe
the safety-related instructions in the User Manual and any
resulting damage. This applies in particular to the use
of these bikes o-road, when overloaded and aer any
defects have been improperly removed. Intended use also
includes complying with the manufacturer's conditions for
use, service and maintenance specied in the User Manu-
al. Fluctuations in use and battery performance as well as
an age-related reduction in capacity are typical and tech-
nically unavoidable, and as such do not constitute a fault.
2 Warranty regulations
2.1 Warranty periods
The statutory warranty valid at the time of delivery ap-
plies to all models.
2.2 Warranty conditions
2.2.1 Conditions
A defect is present under the following conditions:
•Manufacturing, material or information error.
•The cause of the change in the product is not wear
or ageing arising naturally or as a result of its nc-
tions.
•The damage was not caused by use of the Pedelec
for other than the intended purpose.
2.2.2 Exclusions
The warranty is excluded in the following cases:
•In the event of damage caused by improper use or
force majeure.
•For all parts subject to nction-related wear and
tear or ageing to a normal, expected extent, unless
this is the result of a defect in the manufacturing
process or material
•In the case of damage caused by incorrect or
insucient care and unprofessional repairs, con-
versions or replacement of components on the
Pedelec.
•In the case of accident damage or damage caused
by other external factors, providing this is not at-
tributable to incorrect information or a product
error.
•In the case of repairs carried out with used parts or
damage that occurs as a consequence of this.
•In the case of damage resulting om competitive
use of the product.
•In the presence of special equipment, accessories
or non-standard equipment; in particular in the
presence of technical modications.
•If the servicing intervals are not observed.
•Fluctuations in use and battery performance as
well as an age-related reduction in capacity are
typical and technically unavoidable, and as such do
not constitute a fault.


12 Original User Manual | Groove 2.0
4 First steps
4.1 Checking the tightening torques
Check that all screws and important components are fas-
tened securely and correctly. You will nd a table with im-
portant screw connections and the prescribed tightening
torques in
Chapter 12 „Technical data“ of the “Original
User Manual | General” (CD).
4.2 Fitting the pedals
It may be that the pedals for your Pedelec have yet to be
tted on delivery:
The right pedal (marked with an “R”) is screwed clockwise
into the right crank arm. The le pedal (marked with an
“L”) is screwed anticlockwise into the le crank arm. Both
pedals are screwed in tightly in the direction of the ont
wheel using a size15 open-ended spanner or a suitable
Allen key. The tightening torque is 40Nm.
If the pedals are not screwed in straight, the
thread in the crank arm may be severely damaged.
This could lead to serious accidents and injuries.
4.3 Adjusting the saddle height
4.3.1 Clamping bolt
If a torque is specied (in Nm) on the seatpost clamp,
tighten the clamping bolt to this torque. If no tightening
torque is specied, tighten an M6 bolt (dia. 6mm) and an
M5 bolt (dia. 5mm) to 5.5Nm.
4.3.2 Quick-release device
For opening, the quick-release lever must be folded back
through 180° – you will see the lettering “OPEN”. For clos-
ing, fold the quick-release lever back in through 180° –
you will see the lettering “CLOSE”.
Opening the quick-release lever
OPEN
Closing the quick-release lever
CLOSE
As a rule of thumb, you can be condent that the
quick-release device is suciently secure if the
lever can only be closed by applying rm pressure
with the heel of your hand. You will feel increasing
resistance om the lever, beginning when it is at
approx. 90°. If the seatpost is not clamped rmly
or securely enough, tighten the clamping nut or
turn the screw clockwise by another half a turn
respectively while the quick-release lever is open.
Close the quick-release lever and check that the
saddle is securely fastened once more.
Check that all quick-release levers are fastened
correctly and securely before every journey and
every time you return to your bike having le it
unattended for a short time.
With regard to the saddle height, there is a simple
test procedure: Whilst sitting on the saddle, the
heel of your lly-stretched leg should just reach
the pedal in its lowest position. When the ball of
your foot is in the same position, your leg should
be bent slightly.
Original User Manual | Groove 2.0 13
5 Quick start
Charge the battery completely before riding for
the rst time. As required by transport law, the
battery leaves the factory with an approximately
30% charge. Charge temperature: 0°C to 45°C.
You can also remove the battery om your Pedelec
and charge it elsewhere. For more information,
refer to
Chapter 6 „Battery“y”.
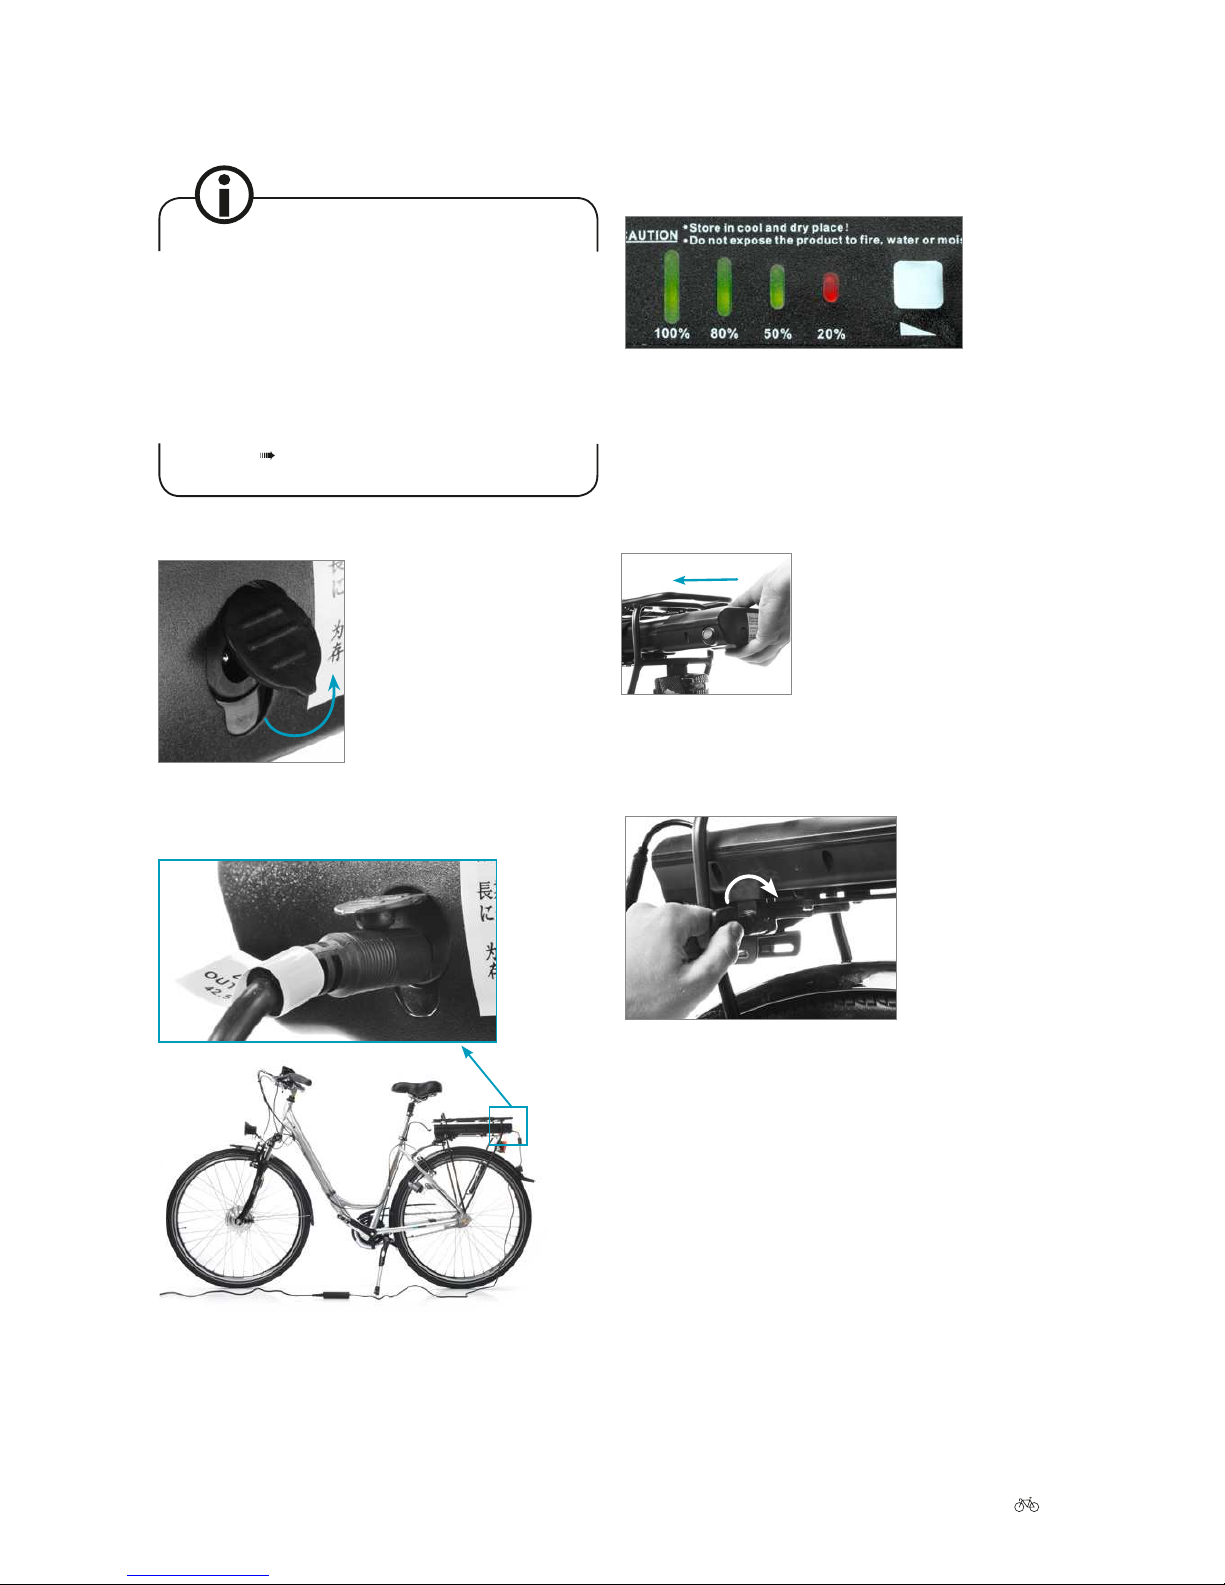
1. Open the cover of the charging socket.
Opening the cover
2. Connect the plug of the charger to the battery.
Charging the battery
3. Plug the charger in at the wall socket.
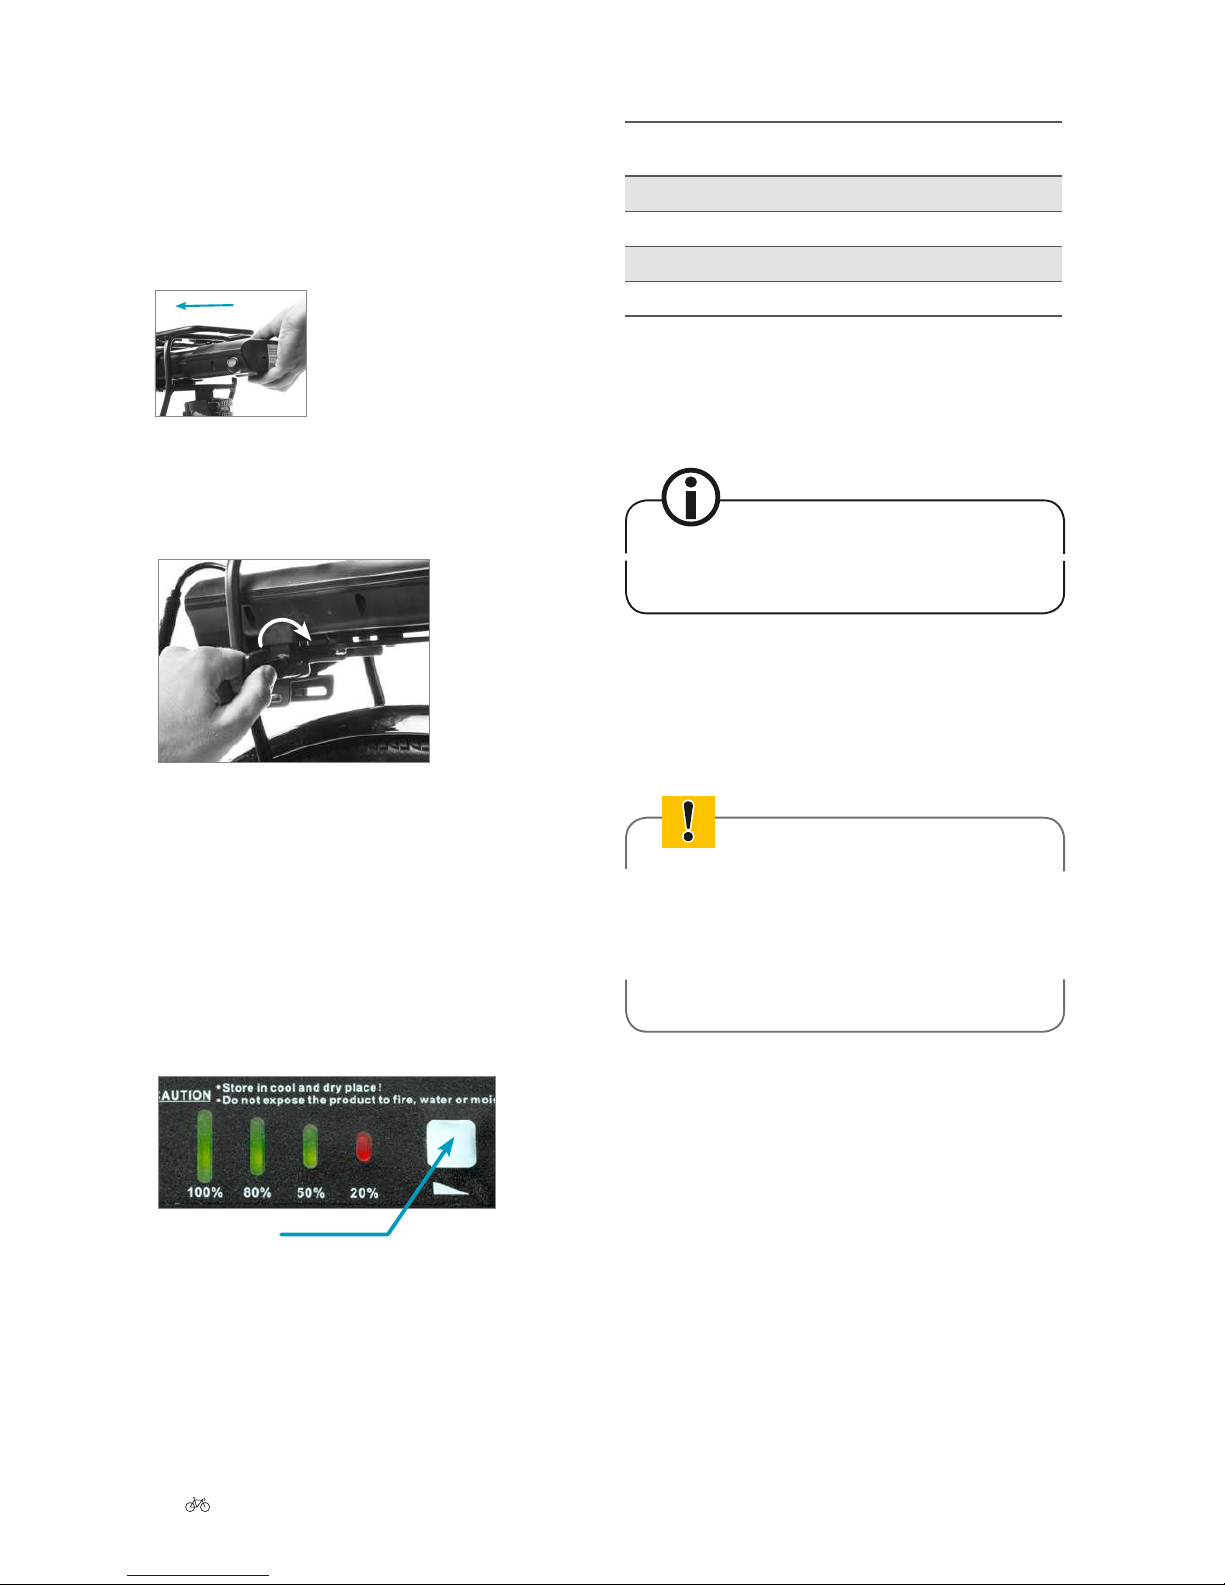
4. Press the battery button. The battery is lly charged
when all the green LEDs on the battery are lit. Pull the
plug of the charger out of the charging socket, close
the cover and unplug the charger at the wall socket.
Battery information system
5. If you removed the battery for charging, replace it in
the battery holder.
Installing the battery
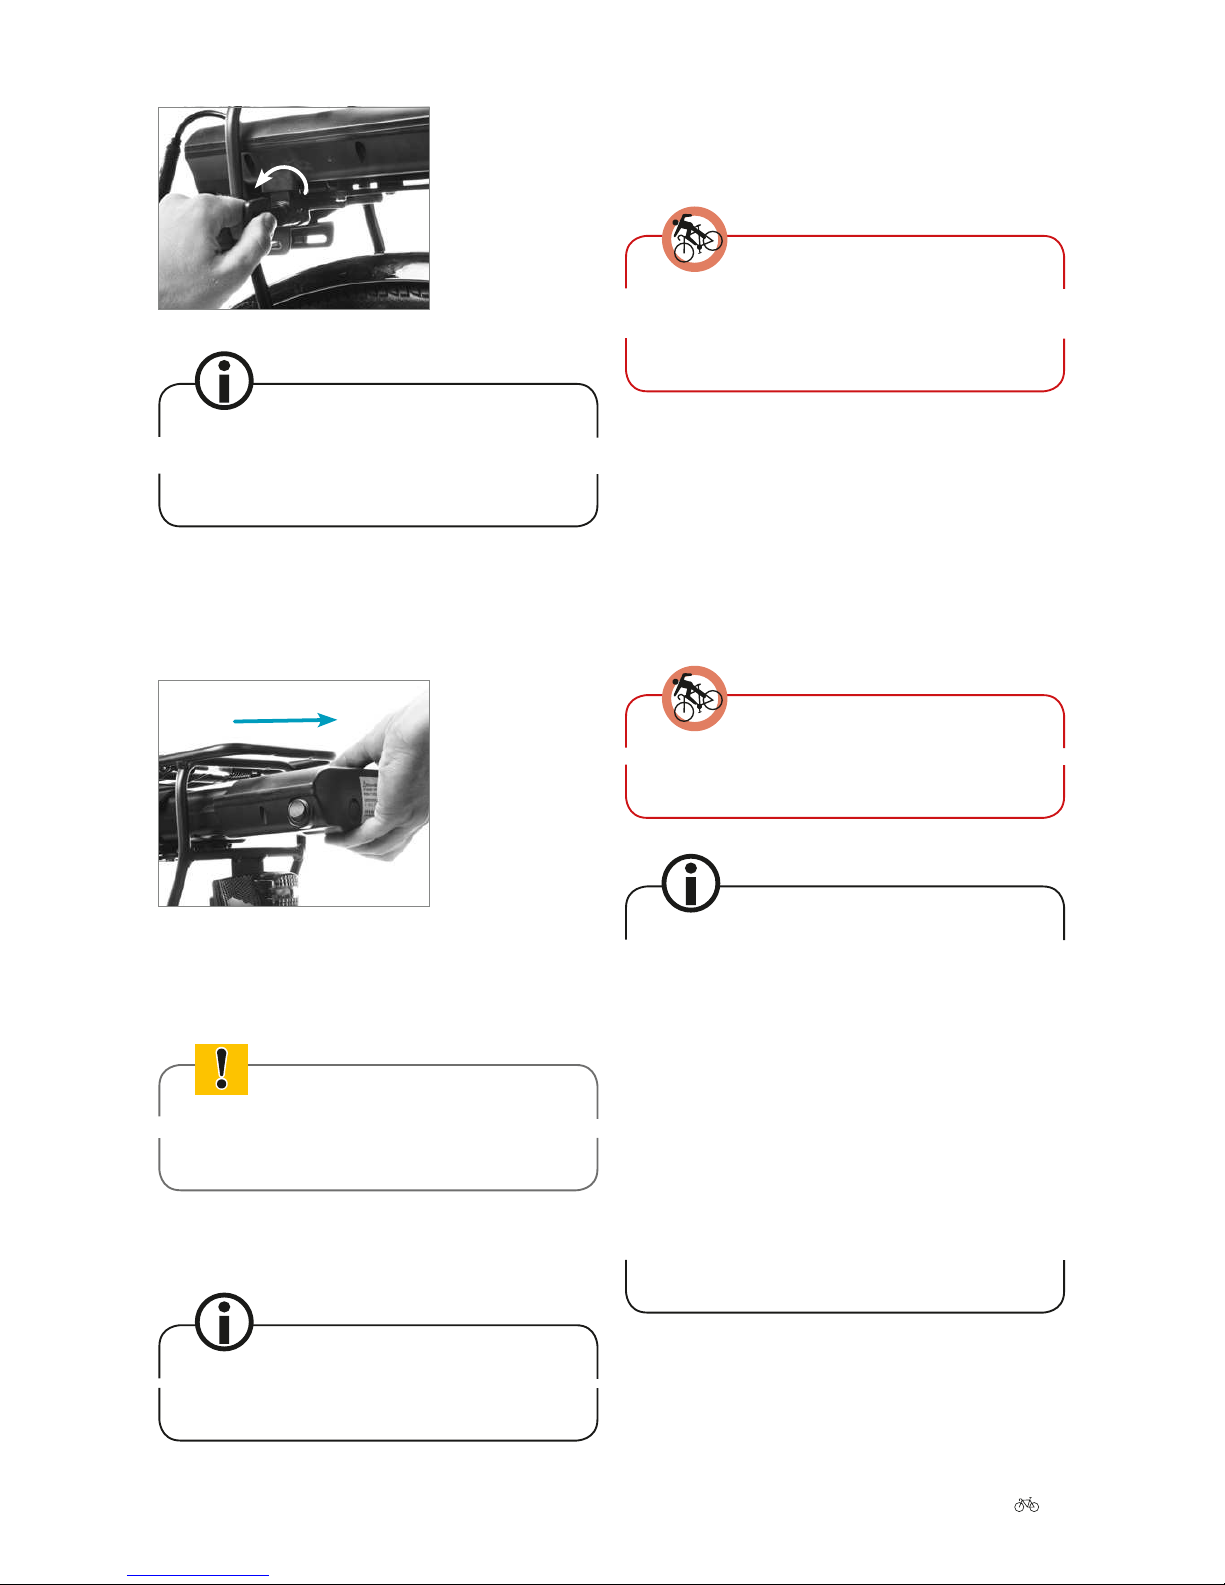
6. Now turn the key clockwise and remove it. The battery
is now locked in place.
Locking the battery
7. Make sure that the battery is securely positioned and
that the key is no longer in the lock.
The battery must be switched off before it is pushed into
the battery housing.
14 Original User Manual | Groove 2.0
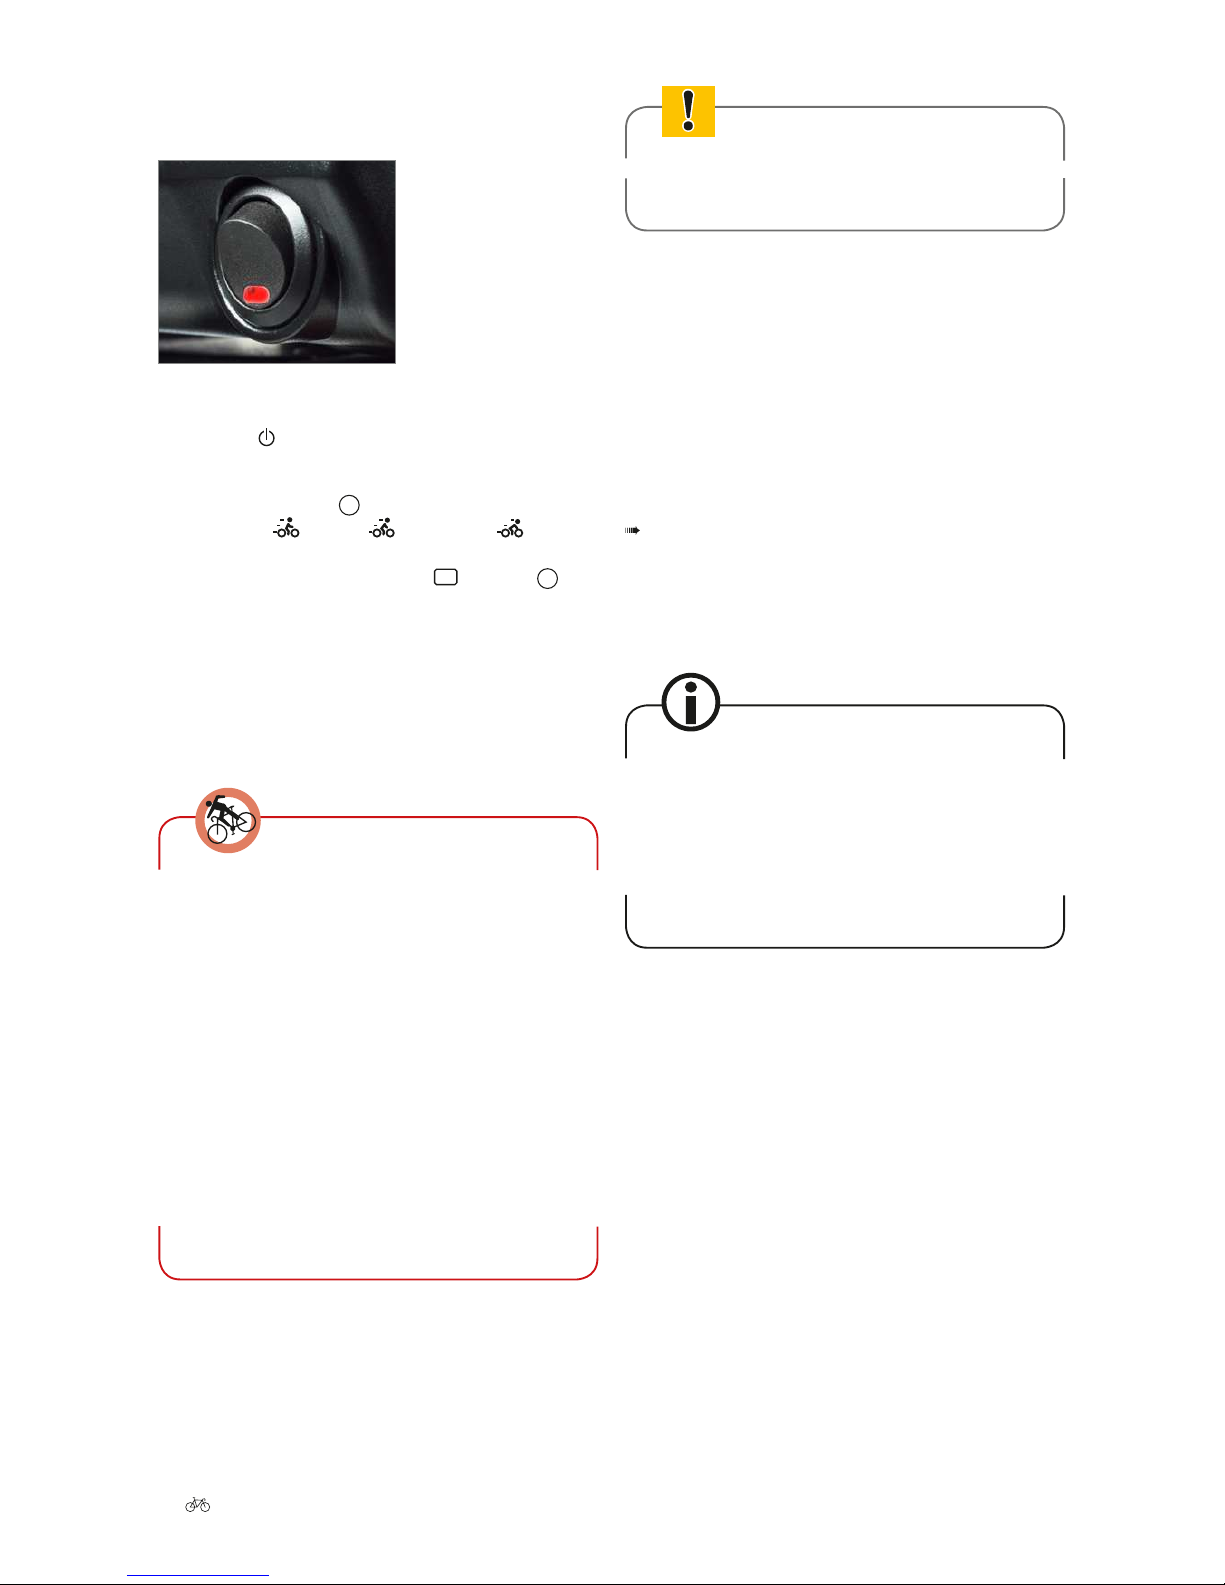
8. Press the battery switch. The red LED inside it lights
up.
Battery switch
9. Press the button to switch the system on.
10. The most recently selected power-assist mode will be
indicated. Press the MODE button to select the level of
assistance: (slight), (medium) or (strong).
Pressing once changes the level of assistance by one
level. A box marks the selection: Press the MODE
button if you want to ride without assistance. The box
disappears.
11. You can now ride o just as you would if you were
riding a normal bike. The assistance om the motor
begins as soon as the cranks have completed about a
quarter of rotation.
Apply the brake before putting your foot on the
pedal.
You have assistance om the very rst moment.
The assistance begins gradually. Practice start-
ing up in a safe location before venturing into the
road trac.
Never ride with no hands! This poses an acute risk
of falling!
We recommend that you do not transport luggage
on the carrier, but in panniers at the side. Distrib-
ute the luggage evenly between the two panniers.
Put heavier items at the bottom, and lighter ones
at the top. This will make your ride safer.
The carrier is only approved for a maximum of 15
kg!
6 Battery
Your battery is a lithium-ion battery, the ideal type for
this application. One of the main benets is its low weight
combined with a high capacity.
6.1 Charging the battery
You can charge the battery whilst it is on the Pedelec
Chapter 5 „Quick start“.
Alternatively, you can take the battery out of its holder
and charge it in a separate location. This is recommended
if it is cold outside, in order to charge the battery in a
warmer room.
Condensation may form on the charger if the
temperature changes suddenly om cold to hot.
In case of condensation, wait approximately one
hour before connecting the charger to the mains,
until it has warmed up to the temperature of the
room. Ideally, avoid such situations by storing the
charger in the place where it is operated.
The battery can be charged at temperatures between 0°C
and 45°C. However, you can maximise a battery's service
life by charging it at an ambient temperature of between
+10°C and +30°C.
6.1.1 Removing the battery
1. Grip the battery by the handle, insert the key into
the lock and turn it anticlockwise. The battery is now
unlocked.
Original User Manual | Groove 2.0 15
Unlocking the battery
Your Pedelec is supplied with two battery keys.
Keep one key in a safe place, and get a copy made
of the key if necessary.
2. Grip the battery with one hand and pull it backwards
out of the Pedelec. Hold the battery tight to avoid
dropping it. Place the battery down on a suitable sur-
face, which should be dry, at and non-ammable.
Removing the battery
3. You should now remove the key and keep it in a safe
place to prevent it om breaking o or being lost.
Please note, the battery is heavy. Hold on to it
tightly!
6.1.2 Charging the battery
Before charging the battery, read the information
on the charger carelly.
1. Take the charger provided out of its packaging and
plug it in at the wall socket (230–240V). The LED in
the charger now lights up green continuously.
To charge the battery safely, the charger must be
placed on a suitable surface, which should be dry
and non-ammable.
2. Connect the plug of the charger to the battery.
3. Charging begins. The charger's LED lights up red. You
can check the level to which the battery is charged by
pressing the battery button. As soon as the LED on the
charger lights up green, the battery is lly charged.
4. Unplug the charger at the wall socket once charging is
complete.
Damaged batteries must not be charged, and r-
ther use is not permitted.
There is no memory eect. You can therefore top
up your battery again aer every trip. Then you
are always ready for the o.
Ideally you should charge the battery at a tem-
perature of between +10°C and +30°C. It takes
longer to charge the battery at low temperatures,
while the battery will not charge up at tempera-
tures higher than +45°C. If the battery becomes
any hotter than this, stop the charging process
immediately. Ideally, you should charge and store
the battery inside your house or in a warm garage
when the outside temperature is low. In this case,
you should only t the battery onto your bike just
before using it.
16 Original User Manual | Groove 2.0
6.1.3 Installing the battery
1. Put the battery back in the battery holder.
Installing the battery
2. Now turn the key clockwise and remove it. The battery
is now locked in place.
Locking the battery
3. Make sure the battery is rmly in place.
6.2 Battery information system
There is a battery information system with four LEDs and a
battery button on the top of the battery. The LEDs light up
as soon as you press the battery key. The charge state and
capacity of the battery is indicated by the number of LEDs
that light up and the way in which they light up.
Battery button
6.2.1 Checking the charge state
Press the battery button briey. The LEDs light up and
display the current battery charge state.
DISPLAY BATTERY CHARGE
STATE
••••4 LEDs light up – %
•••3 LEDs light up – %
••2 LEDs light up – %
•1 LED lights up – %*
*
If the battery is empty, it will work again briey follow-
ing a short period of rejuvenation and will then switch
back o. It must now be charged.
Check the battery charge level before every trip to
make sure it is sucient for the planned journey.
6.3 Battery management
The battery management monitors the temperature of
your battery and warns you of incorrect use.
If an external short-circuit has been caused at the
contacts or the charging socket, please consult
your specialist cycle shop.
Never leave the battery unattended during charg-
ing. Disconnect the charger aer use.
6.4 Warranty and service life
Batteries are wear parts. Wear parts come with a two-year
warranty.
If a fault occurs during this period, your specialist cycle
shop will replace the battery. Normal ageing and battery
wear do not constitute a fault.
The service life of the battery depends on dierent factors.
The most important wear-relevant factors are:
The battery must be switched off
before it is pushed into the battery
housing.

Original User Manual | Groove 2.0 17
•The number of charges
Aer 1,100 charging cycles, your battery will still
have 60% of its initial capacity, providing it has
been well looked aer. This means 6.6 Ah in an 11
Ah battery and 7.2 Ah in a 15.5 Ah battery. A charg-
ing cycle is dened as the sum of the individual
charges until the battery has been charged to ll
capacity once.
For example: You charge the battery with 5 Ah on
the rst day, 2 Ah on the second day and 4 Ah on
the third day; the sum is 11 Ah. The battery has
thereby completed one charge cycle.
According to the technical denition, the battery is
exhausted when less than 60% of the initial capac-
ity is available. If you can still ride the distances
you require with the remaining battery capacity,
you can of course continue using it. If the capacity
is no longer sucient, you can take your battery to
a specialist cycle shop, which will dispose of your
battery and sell you a new one.
•The age of the battery
A battery also ages during storage.
This means that even if you do not use your bat-
tery, its capacity reduces. You can expect the bat-
tery to age by approximately 3 to 5% each year.
Ensure that the battery does not become too hot.
The rate at which the battery ages increases signi-
cantly at temperatures above 40°C. Direct sunlight
can heat the battery considerably. Be sure not to
leave the battery in a hot car, and always stand
your Pedelec in the shade during breaks in cycle
trips. If you cannot prevent exposure to heat, do
not charge the battery until it has cooled down.
A lly charged battery ages at an even greater rate
than a partially charged one at high temperatures.
•If you always ride with maximum motor output,
your motor will always require a stronger cur-
rent. Stronger currents cause the battery to age
more quickly.
•You can also extend the service life of the bat-
tery by using the assistance selectively. Use a
low assist level when riding. With lower dis-
charge currents, you conserve your battery.
Make sure that the battery is lly charged before
you ride your bike for the rst time or if you have
not used it for a while.
The range of the battery is less in winter due to
the lower temperatures. Only move the battery
(om the warm room where you store it) and t it
on your Pedelec just before you set o. This will
help to prevent the eect of the low temperature
on the range of the battery.
6.5 Storage
If you do not need your battery for a while, store it at a tem-
perature of +18–+23°C at 50–70% of its ll charge capacity.
If you don't use the battery for a relatively long period, we
recommend that it is recharged every three to six months.
6.6 Shipping
Never send your battery by post or courier! A bat-
tery is a hazardous article which can overheat and
catch re in certain conditions.
The preparation and shipping of a battery may only be
carried out by trained personnel.
If you would like to return your battery for repair or re-
placement, please always arrange this via your specialist
cycle shop. Specialist cycle shops can have the battery
picked up ee of charge and in compliance with danger-
ous goods legislation.
6.7 Disposal
Batteries must not be disposed of with domestic waste.
Consumers are legally bound to dispose of used or damaged
batteries at the locations designated for the purpose (bat-
tery collection point or specialist cycle shop). The disposal
of batteries is clearly regulated in each country's laws.


Original User Manual | Groove 2.0 19
NO SYMBOL FUNCTION BUTTON PUSH
11 SET
a) Switch the
ont and rear
light on/o
b) Change the
indication (VEL,
ODO, or DST)
c) (in the Set-
tings menu)
a) 2 seconds
b) 1 second
c) 1 second
12 MODE a) Change mode
b) (in the Set-
tings menu)
a) 1 second
b) 1 second
13 Switch the sys-
tem on/o
2 seconds
12 + 13 MODE +Clear the DST
(trip distance)
2 seconds
11 + 12 MODE +
SET
Change the
back-lighting of
the display
3 seconds
8.1 Switching on and o
8.1.1 Switching on
1. Switch the battery on.
Battery switch
2. Hold the button down for two seconds.
8.1.2 Switching o
1. Hold the button down for two seconds.
2. Switch the battery o.
8.2 Assist mode
MODE ASSISTANCE RECOMMENDATION
Assistance up to at
most 25 km/h
Use for small climbs
(bridges etc.).
Assistance up to at
most 20 km/h
Assistance up to at
most 15 km/h
For a high range
Press MODE briey to change the assistance. The dierent
modes change in the following sequence: , , . A
box marks the selection: You can ride without assis-You can ride without assis-
tance when no box is displayed.
The most recently selected mode is displayed
when you switch back on again.
8.3 Pushing assistance
The pushing assistance helps you to push the bike. That is
particularly helpl when you are on a steep hill that you
cannot manage by pedalling. Proceed as follows to use the
pushing assistance:
1. Get o the bike.
2. Push your bike.
3. Press MODE . Pushing assistance mode starts aer three
seconds. The is now positioned at the symbol.
Hold the button down until you no longer need the
pushing assistance.
Only use the pushing assistance when you are
pushing the bike. You must not use the pushing
assistance when you are riding! This can cause the
motor to "stutter", i.e. to keep starting and
stopping.

20 Original User Manual | Groove 2.0
8.4 VEL (speed),
ODO (total kilometres)
and DST (trip distance)
When you switch the Groove 2.0 on, the display automati-
cally shows VEL (the current speed). Hold SET
down for a
second to change the display over to ODO (total kilome-
tres). Hold SETdown again for 1 second, in order to change
over to DST (trip distance). When you press SETbriey
again, you return once more to VEL (the current speed).
The selected mode has a black line under it: The dis-The dis-
play of the values changes, according to what mode you
are in.
8.4.1 Resetting the trip distance (DST)
Stop when you want to change the settings. Lack
of attention in trac can lead to accidents.
Select DST (trip distance) with SET.Press MODE + for two
seconds in order to reset the DST (trip distance) to 0 km.
ODO (total kilometres) cannot be reset. On reach-
ing 99999 KM, the Groove 2.0 system returns
automatically to 0 KM.
8.5 Adjusting the back-lighting
1. Switch the battery on.
2. Press the button. The back-lighting of the display
can only be adjusted when switched on.
3. Hold SET
+MODE down simultaneously for three seconds.
The abbreviation "bl" appears on the display, along
with the current brightness value (1, 2 or 3).
1 Little light
2 Medium light
3 Maximum brightness
4. Use SETand MODE to choose the value you want.
5. When you have made your decision, hold the button
down for three seconds.
8.6 Battery charge indicator
The battery charge indicator shows how much charge is
available in the form of a stylised battery. The lower the
charge state of the battery, the fewer black segments can
be seen.
9 The motor
9.1 Operation
If you switch on the assistance and start pedalling, the
motor starts up once the cranks have completed about one
quarter of a revolution.
The level of thrust delivered by the motor depends on:
•which level of assistance you have selected.
At the highest assistance level (Power) the motor
helps you with the maximum power (250 watts), and
up to the maximum permitted speed of 25 km/h. How-
ever it does then use the most energy. If you ride at
the Sport assist level, the motor produces slightly less
power (150 watts). If you have selected Economic,
you receive the least amount of assistance (70 watts),
but have the battery’s maximum range at your dispos-
al. Each assistance mode supports you up to dierent
switch-o speeds. This nction lets you adjust to the
speed of other riders (e.g. in a group).
Table of contents
Other Derby cycle Scooter manuals


