Triumph Mobility Trizer User manual
1. This scooter should be used by one person at a time. At no time can the maximum weight
capacity of 100 kgs / 220 lbs be exceeded.
2. Please wear a proper shoes while using this T IZE scooter.
3. Always use appropriate protection equipment (helmet, knee and elbow pads) when using scooter.
4. Keep both hands on the handlebars when riding the T IZE scooter.
5. Never ride near traffic, or on wet or uneven surfaces.
6. Avoid sharp bumps , drains , grates , and sudden surfaces changes.
Scooter may suddenly stop and also avoid surfaces with water , sand , gravel and other debris.
Wet weather impairs traction , braking and visibility.
7. Do not ride at night without lights and reflective clothing.
8. Brake will get hot from continous use . Do not touch brake pad after braking.
9. Avoid excessive speed associated with downhill rides.
10. Children should always be under adult supervision . This scooter is NOT suitable for children
below FIVE (5) years of age. Always check your child’s T IZE scooter before use.
11. Assembly and set up the T IZE should only be performed by an adult.
12. Watch out for pedestrians when riding.
13. Make sure your finger are clear of the folding or pinch point, whenever the product is fold or
unfolded.
14. eplace worn or broken parts immediately.
15. Check and secure all fasteners before every ride and make sure Quick elease Lever was locked
securely before riding. Please refer to the Assembly Instruction in page 3.
16. MAXIMUM WEIGHT CAPACITY : 100kgs / 220lbs .
17. This product complies with European Scooter safety standard EN 14619.
1
IMPORTANT SAFETY NOTICE / INDEX 1 1
5 MAINTENANCE 5
6 6
INDEX
PAGETITLENO
2PART LIST2
ACCESSORIES / SPARE PARTS
3 ASSEMBLY INSTRUCTION 3
4 RIDING INSTRUCTION 4
Important Safety Notice & Caution
WARNING

Parts List
1. Handgrip 7. Cable clip 13. Front Fork
2. Handlebar 8. Upright Tube 14. Quick Release Lever
3. Stem cap 9. Right Foot Deck 15. Hex key
4. Brake handle 10. Left Foot Deck 16. Velcro strap
5. Brake cable 11. PU Caster 17.Product manual
6. Stem post 12. Rear Fork
2
PARTS LIST
Remove TRIZER
scooter from carton
and lay flat on the floor
Remove velcro
strap
Lift up the
Handlebar, and
expand the Right
& Left Foot Tube.
While keeping both
foot tubes open with
your leg , lock the
folding hinge with
Quick Release clamp.
Metal plate must on the
outside. Quick release
clamp must be tight,
and close.
(clamp must be tight
against the vertical tube)
Using Hex key
provided, remove
the top stem cap
screw.
Assemble the handle bar to top of stem post ,
and re-install stem cap screws. Ensure that
handle bar is centered , and brake handle is
on right hand side.
To adjust the brake
loosen or tighten
the adjustment
screw located at
the brake pad or
at the brake handle.
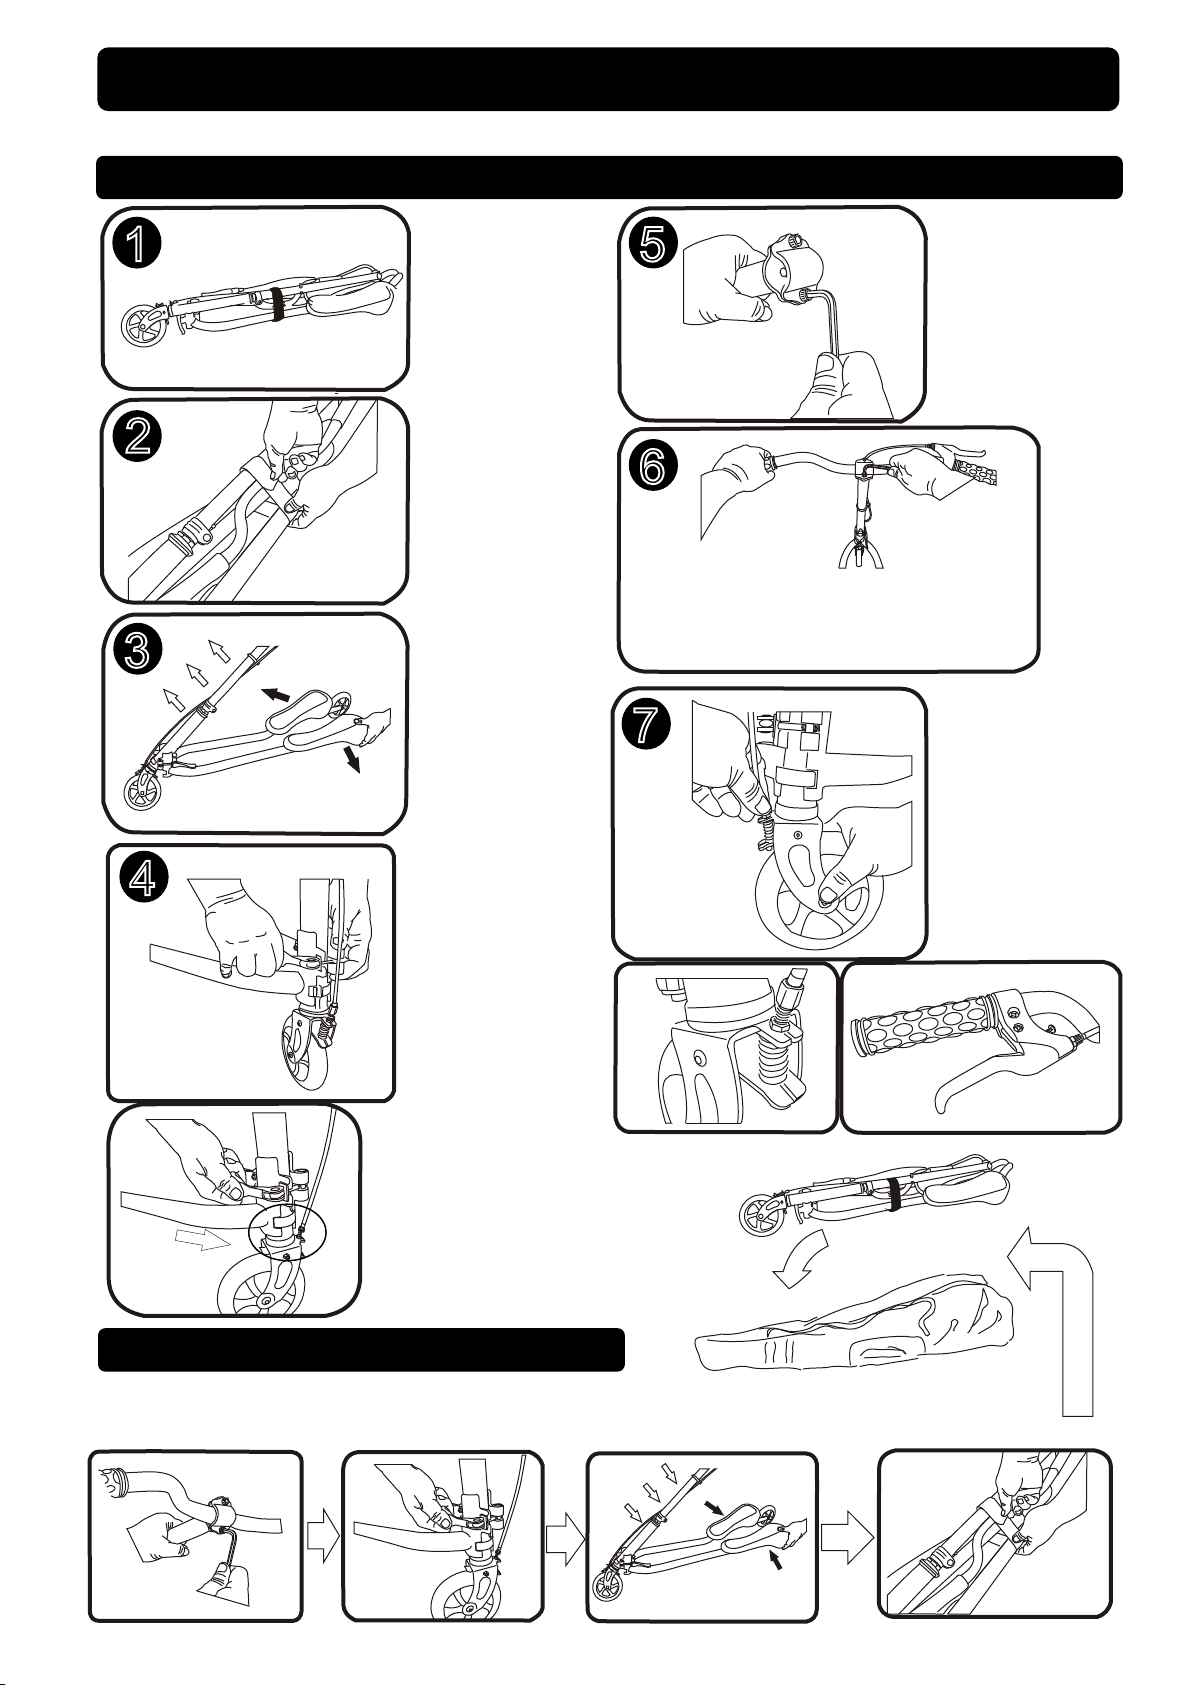
Assembly Instruction
Please read and understand the Assembly instruction to avoid any difficulties during using this product.
UNFOLDING
FOLDING & STORAGE
To fold the TRIZER scooter follow step 6 to step 1. Put TRIZER
Scooter into the optional carry bag (Sold separately), and you
can easily store or transport it.
3
3
4
5
26
1
7

Remove TRIZER
scooter from carton
and lay flat on the floor
Remove velcro
strap
Lift up the
Handlebar, and
expand the Right
& Left Foot Tube.
While keeping both
foot tubes open with
your leg ,
Turn clockwise 3 or 4
times to lock quick
release
Metal plate must on the
outside. Quick release
clamp must be tight,
and close.
(clamp must be tight
against the vertical tube)
Using Hex key
provided, remove
the top stem cap
screw.
Assemble the handle bar to top of stem post ,
and re-install stem cap screws. Ensure that
handle bar is centered , and brake handle is
on right hand side.
To adjust the brake
loosen or tighten
the adjustment
screw located at
the brake pad or
at the brake handle.
Assembly Instruction
Please read and understand the Assembly instruction to avoid any difficulties during using this product.
UNFOLDING
FOLDING & STORAGE
To fold the TRIZER scooter follow step 6 to step 1. Put TRIZER
Scooter into the optional carry bag (Sold separately), and you
can easily store or transport it.
3
4
5
6
2
7
1
8
3Check Quick
Release Lever
always at the back
to avoid broken when
lift up the handle
(This part not covered
warranty)
Please watch assembly instruction at.................. for more detail.
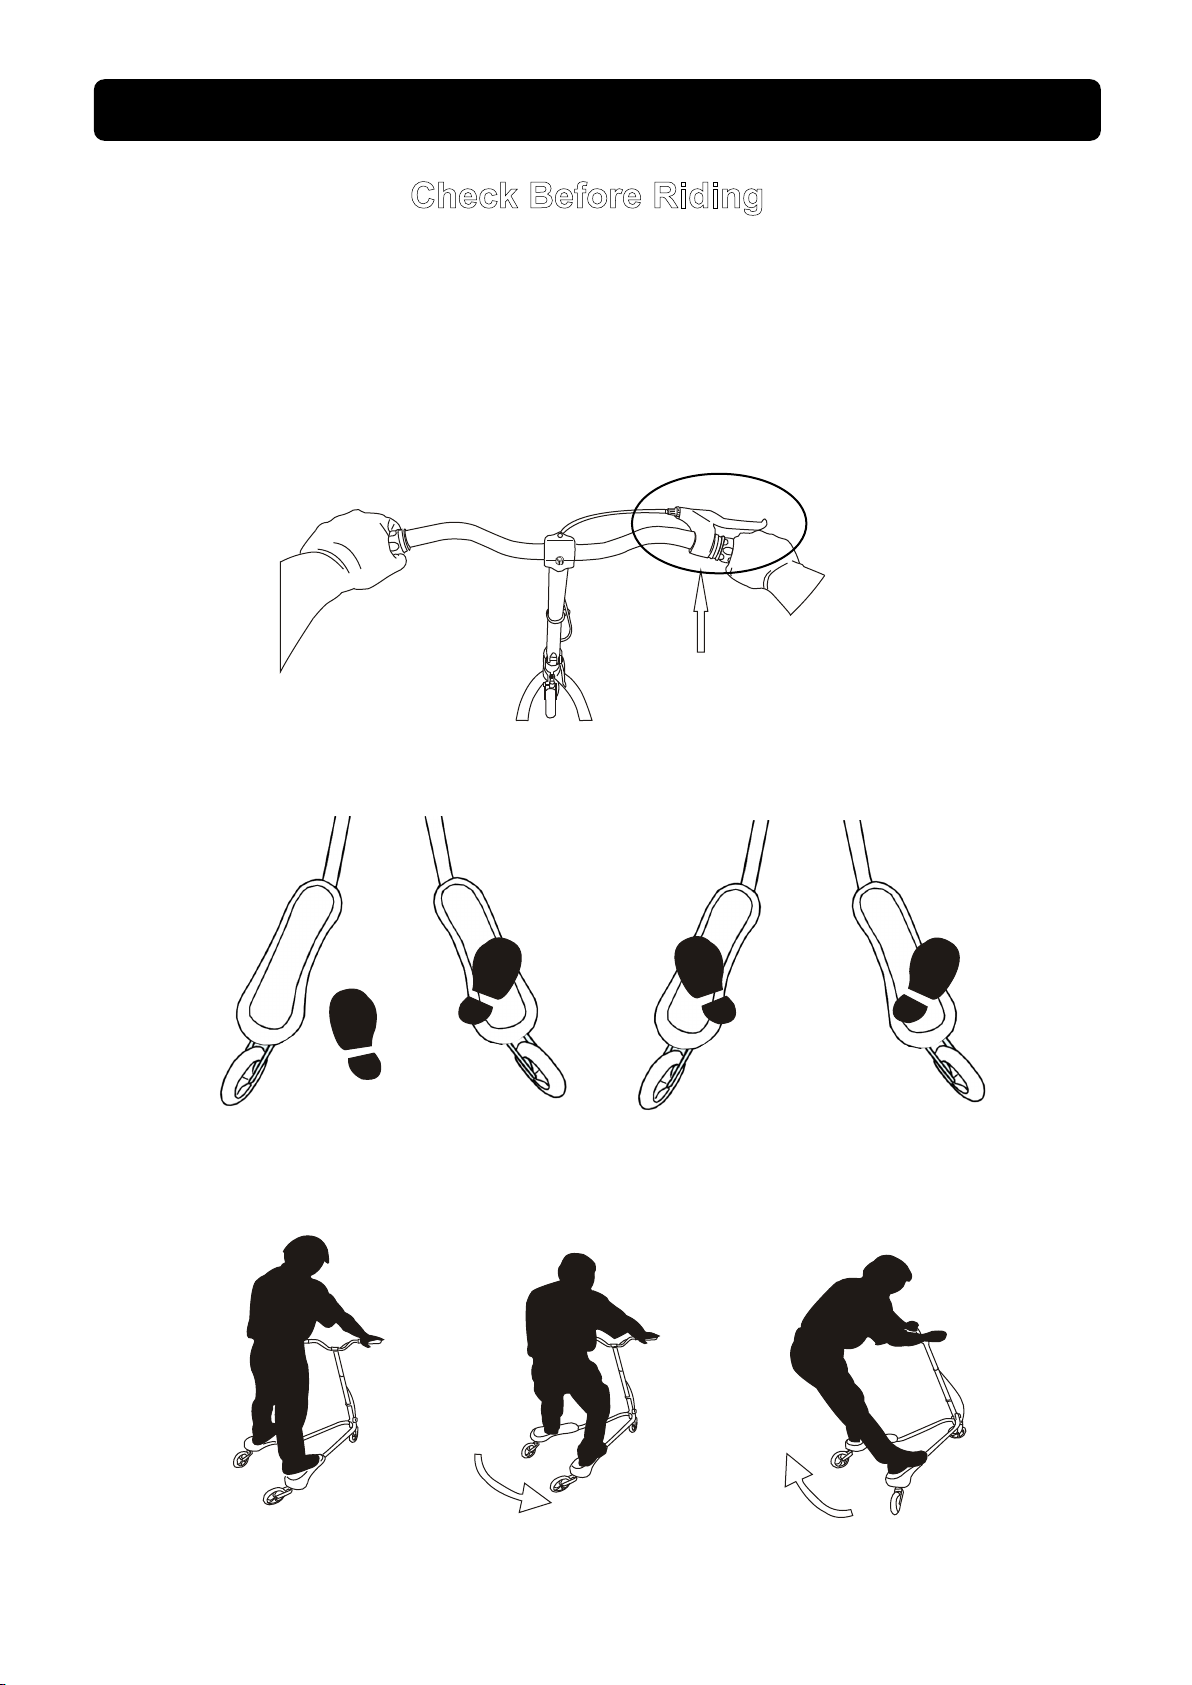
Riding Instruction
Check Before Riding
1. Check brake. Do not ride if brake does not function properly.
(see maintenance section for adjustment instructions)
2. Quick release clamp must be tight.
3. Check wheels to ensure they roll smoothly.
4. Ensure the stem cap screws are tight , and the handle bar is centred & secure.
make sure the brake
lever is at right side
Use both hands to hold the handlebar tightly and make sure TRIZER scooter
in stable position with the rear wheel leaning out from foot deck.
Start with right leg to step on the right Deck and then follow by the left leg.
Step on the TRIZER
and hold the handles
tightly
Twist your body to the
RIGHT
Twist your body to the
LEFT
4
1. Always make sure your TRIZER scooter is in good condition before using it. Check the brake cable ,
Casters Quick Release Lever for wear. Ensure all fasteners are tight before using.
2. Replace casters when worn. Contact your dealer for replacement casters.
3. Check the condition of bearings on the two rear fork. Clean any dirt , mud or debris that may prevent
the forks from rotating. If necessary add a lubricant (light oil) to the bearings after cleaning
to ensure the smooth operation of the bearings.
4. Clean your TRIZER frequently using soap water, and add a lubricant to moving parts for better
performance.
5. Always ensure the hand brake is engaging the front wheel. The brake should allow your trizer
to slow down or stop when the user is in motion. If the brake is not performing as it should see
below (Pt. 7 8) on how to adjust the brake before riding your Trizer Scooter.
6. Keep the brake handle brake pad free from dust dirt.
7. If the brake is not engaging with the front wheel to allow for safe stopping while in motion,
please check the brake cable and make adjustment before continuing use of your Trizer.
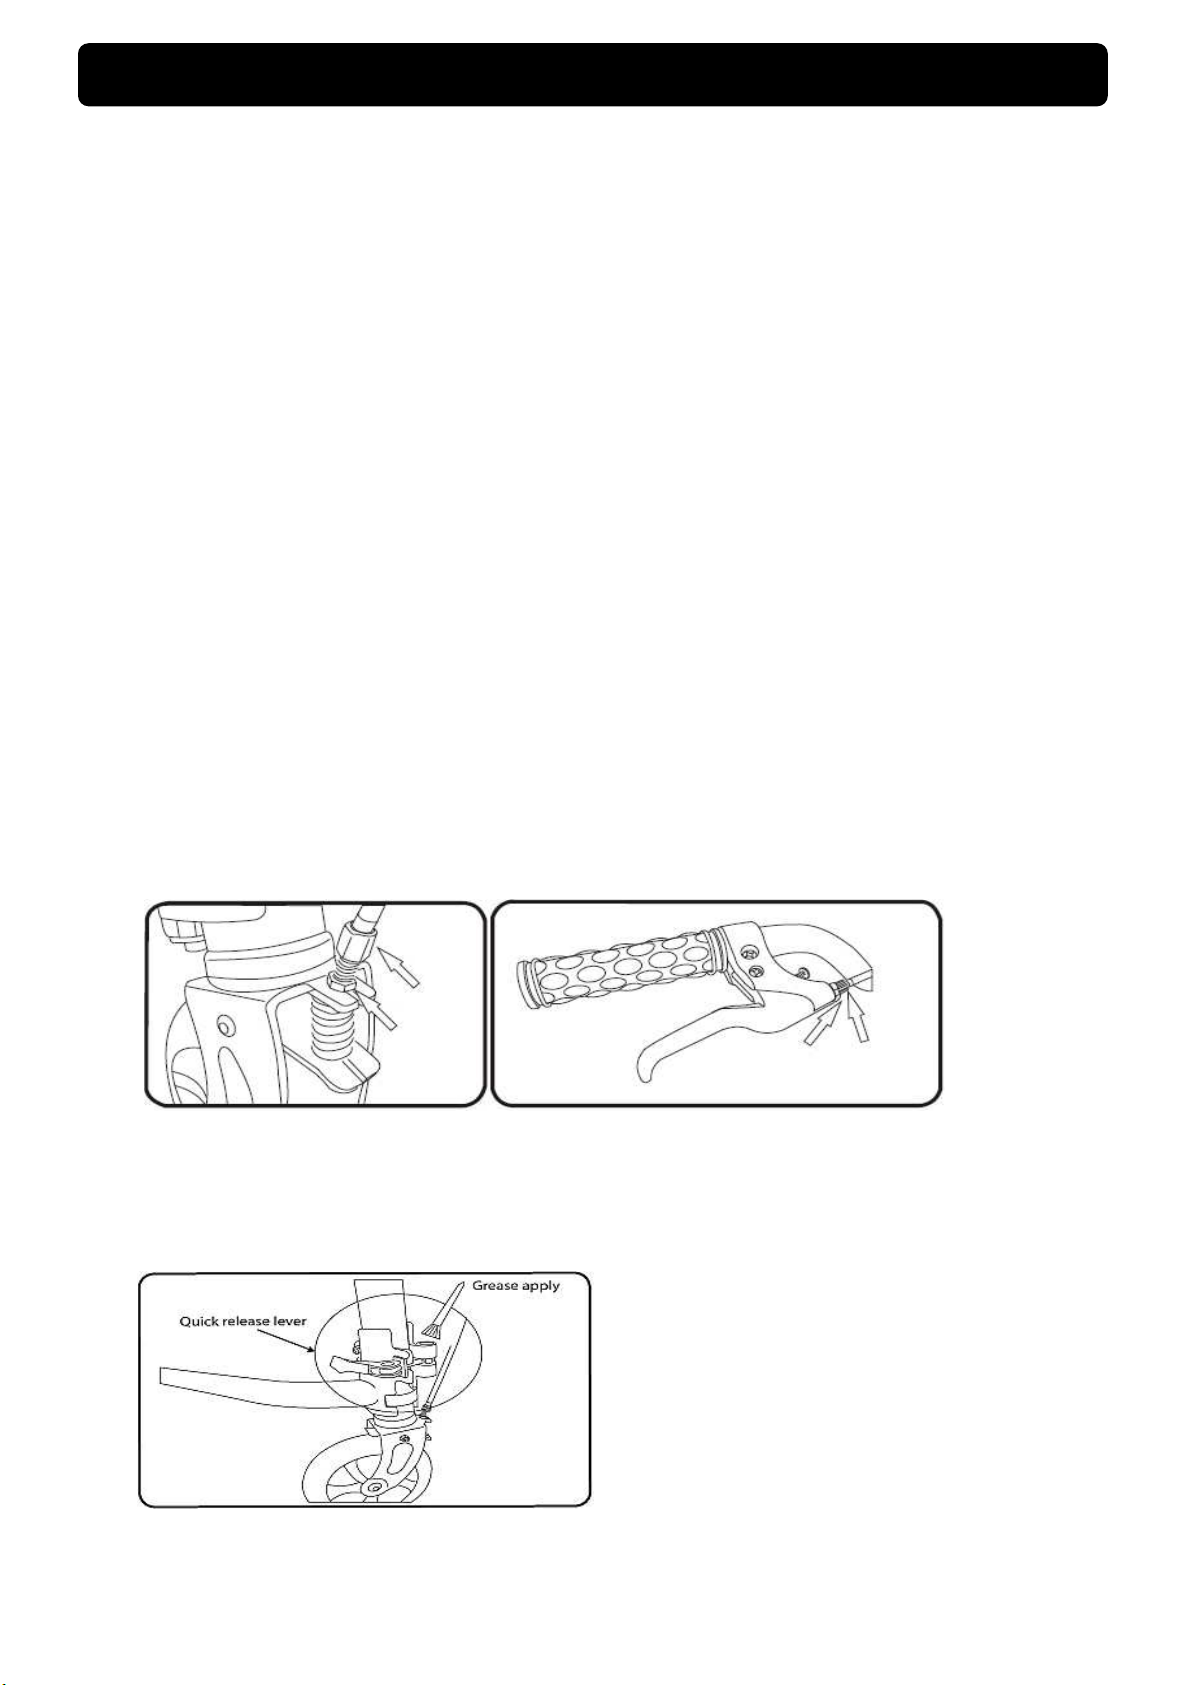
8. The brake can be adjusted by turning the adjusting screw at either the brake handle or the
brake pad. To tighten the brake , turn the adjusting screw clockwise. Lock the adjusting screw
in place , by tightening the lock nut against the brake handle (or fork).
Only tighten the cable as much as required to make the brake function correctly. Do not
over tighten.
9. The self-locking nuts and other self-locking elements might lose their effectiveness, so please
always make sure all components are assembled and secured sturdily before each use.
10. Apply grease to Quick Release Lever to ensure it function smoothly.
11. Do not Modify or remove some of the TRIZER component. Use only the Original part recommended
by manufacturer.
5
MAINTENANCE
Locking Nut Adjusting
Screw
Locking
Nut
Adjusting
Screw

TRIZER ACCESSORIES / SPARE PARTS (Sold separately)
No Item Item code Image Item Detail
Handgrip
(Black) TZ-HG02
1Qty: 2pcs / set
Deck (Black) TZ-D02
Footplate : 2pcs
Pan Head Screw :
#10 x 19mm : 8pcs
Scooter wheel /
caster
TZ-W01
Wheel ø145 x 30mm : 1pc
Bearing 608zz : 2pcs
Wheel Bush:
Od10.7 x Id8.2 x 16.1mm : 1pc
Brake Cable
Adult
Brake Cable
Junior
TZ-BC01
TZ-BC02
TZ-B01Trizer Bag
Qty: 1pc / set
Qty: 1pc / set
Qty: 1pc / set
6
2
3
4
5
6

Rev 2013
Manufactured by :
TROLLI MASTER SDN. BHD. (209382-P)
Lot 525 , Mukim Telok Panglima Garang , 42500 Daerah Kuala Langat ,
Selangor Darul Ehsan , Malaysia .
Tel : (603) 3191 4077 / 3191 2837 Fax : (603) 3191 2152 / 3191 3022
Email : tm@trollimaster.com.my Website : www.trollimaster.com
Table of contents


